Spottedlaurel
-
Posts
1,980 -
Joined
-
Last visited
Content Type
Profiles
Forums
Events
Gallery
Everything posted by Spottedlaurel
-
A great start there, look forward to seeing it progress. I enjoyed building one of these last year, it went together really nicely.
-
Some brave work going on here - there won't be much left of the original shell! I have a later Fujimi release. Even keeping it fairly standard it's not one I'm rushing to build, I remember it looking like it would need a bit of work. When I was young I thought the 1:1s were FWD, I think it was that long front overhang.
-
No suggestions from me Steve, I just look forward to seeing your progress on it - I know it's going to look great!
-
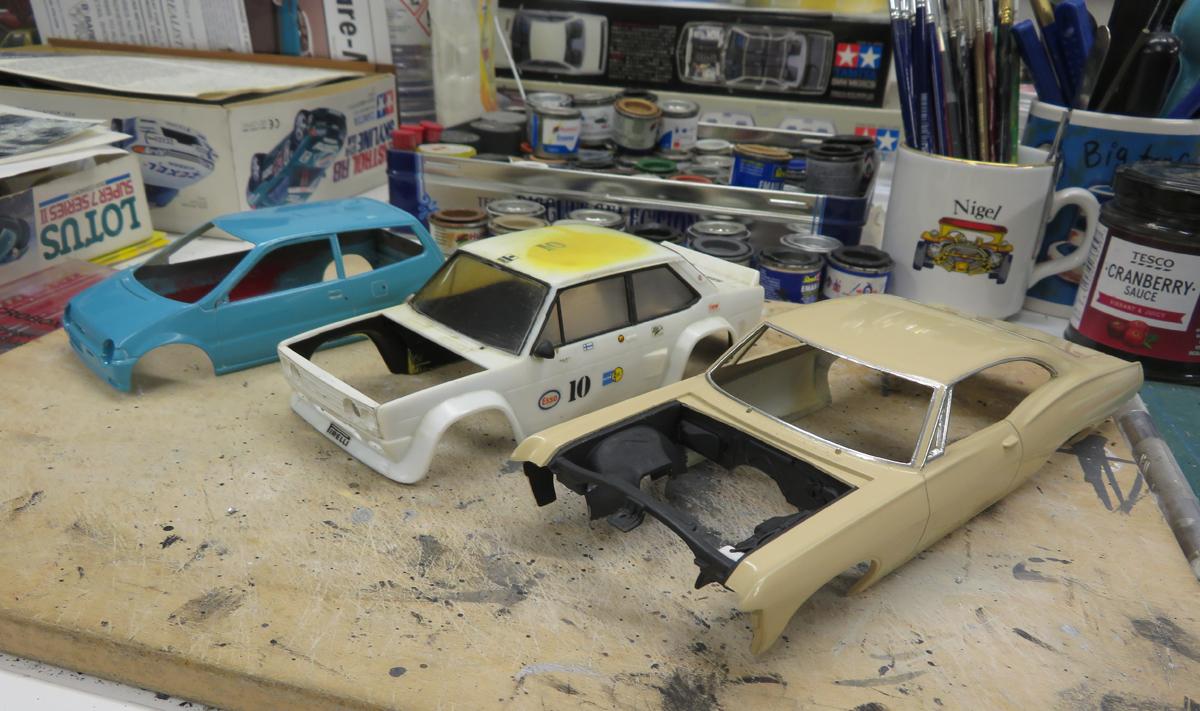
Great progress, that's going to look a very impressive set-up once completed. I found time to make more progress on some of mine last night: Three quarters of the Impala's window trims now have BMF. After wet sanding and Micromesh on the Fiat's front and rear glass over the weekend, I attacked it with coarse, medium and fine polishing compounds by Zero Paints. First time I've ever done that on clear parts, amazing to see it finally come clear again. I'll replace the sides with clear sheet, but that one is now a viable restoration project and I've got the colour and wheel choice already in mind for it. Would have been easier if I hadn't randomly squirted it with some yellow paint at some point in the past..... While I had the olishing compound I thought I'd have another go at the Honda. Just about managed to do all three stages without going through the paint, and it is now improved.

-
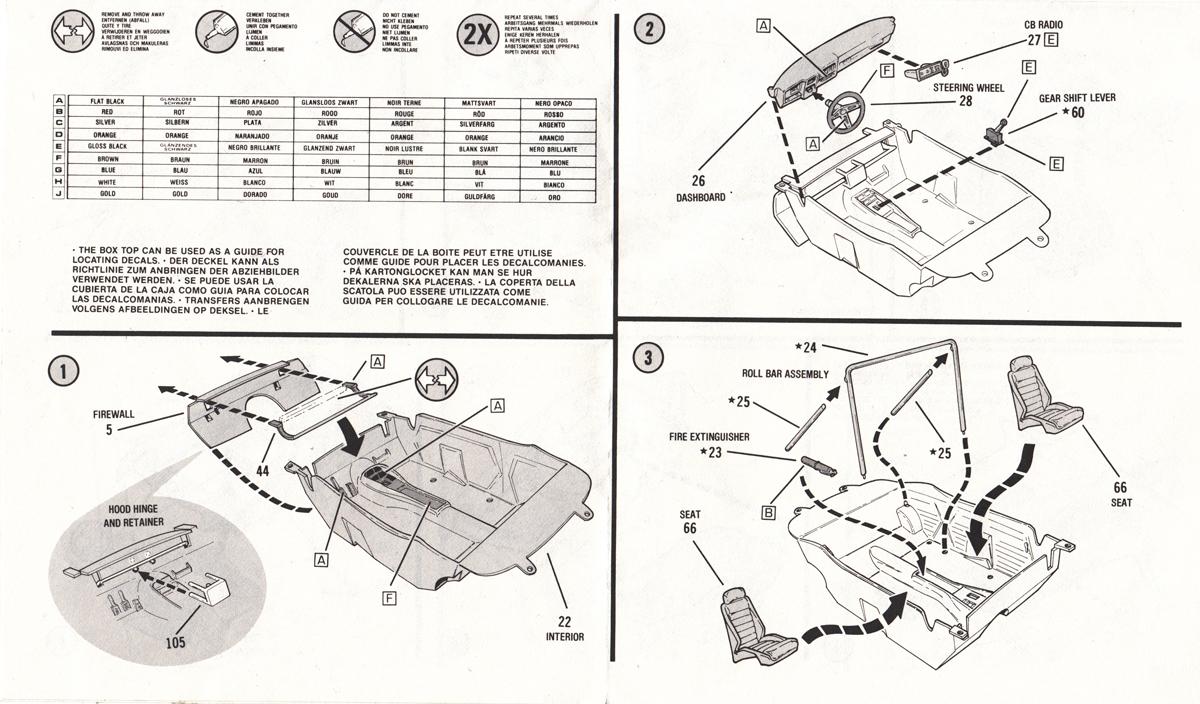
I've had that one pretty much since it first came out here in the '90s. Very useful source of reference to me in pre-internet days, and still used now as my wifi signal doesn't extend out to the shed where I do most of my building.
-
1970-72 Toyota Celica 1600 GT by Hasegawa
Spottedlaurel replied to Spottedlaurel's topic in WIP: Model Cars
Same here, most of them became cheap, rusty cars by the 1980s. Thanks John. I've also been thinking about reinforcing that broken piece, a piece of metal might be a better soloution than the flat plastic I'd ben considering. Thank you Tom. If you're able to choose between Hasegawa and Aoshima versions, and you want to build a nice road car, then the former is definitely the way to go. I'm keeping my Aoshima version for something more modified, as it's a little cruder (but still pretty decent). The Hasegawa kit also has the option of LHD dashboard and wipers. Since these photos I've done a trial-fit of the glass, interior and floorpan into the bodyshell and it seems to go together quite happily. My larger-than-standard rear tyres are continuing to necessitate more clearance and trimming, but that's a self-inflicted problem. -
Eight hours?! That's how I used to do them when I was young, but they never looked this good.......
-
Nice work, looks really good and pleasing to see something a little bit different. I've got the Heller version to do someday, would look good alongside their Renault 4 as a reminder of previous French holidays.
-
That is truly fantastic Steve, you should be very proud of it. It looks so 'right', very plausible.
-
Well done for your patience on that task! The finished result will look good in there. I can see why the other person sought your help, it's not something I'd have wanted to do........ Car as a whole is coming on very nicely.
-
51 studebaker 3 window coupe conversion
Spottedlaurel replied to damodelguy az's topic in WIP: Model Cars
Wow, that's coming together nicely with your work on the roof and all the donor parts from various sources. -
1970-72 Toyota Celica 1600 GT by Hasegawa
Spottedlaurel replied to Spottedlaurel's topic in WIP: Model Cars
Thanks Chaz. Good to hear from a former owner and that you have fond memories of it. I don't know about in the USA but 1:1 examples are worth quite a bit here now. -
Looks good so far. I'd love to get hold of one of these, but they always fetch more than I can justify.
-
1970-72 Toyota Celica 1600 GT by Hasegawa
Spottedlaurel replied to Spottedlaurel's topic in WIP: Model Cars
I thought I was making good progress on this one until a little incident this morning...... 1:24 Hasegawa Toyota Celica 1600GT kit by Spottedlaurel, on Flickr Started getting the interior together. Old brochures I have show it to have been a sea of black vinyl and some 'wood' trim, with perhaps a bit of nylon cloth within the seats. 1:24 Hasegawa Toyota Celica 1600 GT kit by Spottedlaurel, on Flickr 1:24 Hasegawa Toyota Celica 1600 GT kit by Spottedlaurel, on Flickr Got the basecoat of Citroen Mediterranean Blue down. Earlier this week I managed to get some automotive acrylic clearcoat onto it (same Halfords range as the base and primer), that flattened out nicely and I polished it this morning with Micromesh and resin polish. At this point I was very happy, it's probably one of the best paintjobs I've done. What do they say about "Pride before a fall"?........ 1:24 Hasegawa Toyota Celica 1600 GT kit by Spottedlaurel, on Flickr I was attaching the floorpan to the bodyshell, usually quite a straightforward procedure on Japanese kits, when somehow half of the front valance (rocker?) broke off and the slender panel above it snapped. Kind of frustrating..... The panel below the grille and headlights has since been glued together, and is hidden by the bumper anyway. I'm going to leave the broken section of valance off until final assembly - if I try and put it together now I suspect I might snap it off again. I can only be thankful that the break didn't go through to anywhere more visible. It's a clean break so a discreet bit of glue and reinforcement behind it should do the job. 1:24 Hasegawa Toyota Celica 1600 GT kit by Spottedlaurel, on Flickr First job was to cut out the rear inner arches, as the wider accessory set rear tyres wouldn't fit in there. 1:24 Hasegawa Toyota Celica 1600 GT kit by Spottedlaurel, on Flickr Next was to narrow the track, achieved by shortening the axle and taking material off the back of the wheels. 1:24 Hasegawa Toyota Celica 1600 GT kit by Spottedlaurel, on Flickr This is where I'd got to by the end of the afternoon, with the interior progressing and most of the suspension/floorpan mod's done to get it sitting how I'd like it to. I had to notch the the end of the tunnel, and since then I've had to cut a hole in the floor for the top of the diff. This was the finished result: 1:24 Hasegawa Toyota Celica 1600 GT kit by Spottedlaurel, on Flickr 1:24 Hasegawa Toyota Celica 1600 GT kit by Spottedlaurel, on Flickr Leaving aside the little issue with the front end I'm happy with how this is progressing. The colour works well on the Celica's attractive shape and the ride height is just where I want it, not crazy low and with the wheels sitting nicely in the arches. Other than fabricating some basic new rear inner arches and making good the holes it's just a straightforward curbside assembly job from now. There are some sharply moulded trim pieces to detail and BMF to apply around the windows. Edit: Looks like I could do with an anti-static brush........ -
Foolhardy, or even stupid, might be a better description than brave..... Very simple but looks decent. It'll sit nicely alongside the Honda City and Suzuki Alto I've already got on the shelf. After a wet sanding I gave it a few more spattery coats of the Coral Green. After a couple of days of drying out in a warm cupboard it flattened out remarkably well and I gave it the Micromesh treatment this morning: 1:24 Tamiya Honda Today kit by Spottedlaurel, on Flickr 1:24 Tamiya Honda Today kit by Spottedlaurel, on Flickr Still debating whether to give it some clear, might just live with it - it's just meant to be a fun build to look good on the shelf. Tried it on the 13" Watanabe-style wheels that came with the Hasegawa Sunny Truck I built last year, they should suit it well painted dark bronze/gunmetal.
-
Looks very sharp Luke. It's a great kit that one, I enjoyed building one last year in the same colour as my 1:1 1200 2-door. Bought another one recently to do a different way, it's the early model like yours.
-
This is my preference. For several reasons: 1. It makes the different texture and finish of the BMF be more apparent. 2. Possible risk of damage to the foil when sanding/polishing if it was applied before clear. 3. Until I get the clearcoat down and it's been polished I'm never confident in the quality of my paintwork. I'd have to apply a load of foil, then clear it and find there was a issue that meant it needed to all be redone. For clear I use either Tamiya TS-13 (if it's over one of their aerosol paints) or an automotive acrylic, everything can-applied. A few light coats (I don't count, maybe 3-4?) then a heavier coat to finish off, but obviously not so thick as to get runs. I rarely have a good shine by that stage, I rely on letting it dry out for a few days somewhere warm, then Micromesh sheets 3600 down to 12000 finished with an automotive resin polish. I used to apply a cutting compound between the Micomesh and final polish stages, but on several occasions I found I'd gone through the topcoat and I get decent results without it now. Take it slowly, build up with thin coats and experiment on scrap pieces or plastic spoons to find a technique that works for you.
-
A simple clean-up was definitely the right way to go on that one.
-
This is what I did with mine: Monogram 1:24 1957 Chevrolet Bel Air 'High Roller' by Spottedlaurel, on Flickr Monogram 1:24 1957 Chevrolet Bel Air 'High Roller' by Spottedlaurel, on Flickr Monogram 1:24 1957 Chevrolet Bel Air 'High Roller' by Spottedlaurel, on Flickr
-
KA Models Mazda K360
Spottedlaurel replied to GeeBee's topic in WIP: Model Trucks: Pickups, Vans, SUVs, Light Commercial
What a charming little thing, I look forward to seeing it progress with your clean, considered build approach. -
A Pair of Revell 1970 Pontiac Trans Am's.
Spottedlaurel replied to Dragonhawk1066's topic in Model Cars
They both look great. Do you have a favourite? What was the biggest issue with doing both at once, perhaps the repetitiveness of the tasks? I can imagine doing two lots of brightwork, wheel detailing etc might make it feel a bit of a slog. Like most of us I imagine, I usually have several kits on the go at the same time, but generally at different stages so if I get fed up or challenged by one aspect of a build I can jump onto something simpler on another one. -
That looks great Gareth, nice work. The two-tone colour combinations inside and and out look spot-on.
-
Camaro, as I built in about 1985: I don't know about the LUV, but I'd imagine the Chevelle would be similar - basically a pretty much standard kit on this high-lift 4wd running gear. I had no great issue swapping mine onto a '57 Chevy.
-
That looks great Tom, nice one. That chrome strip running into the window trim does look tricky, well done for getting it to look so sharp.
-
Very nice, a great memory of your family car. Regrettably none of ours were as cool as that.