Search the Community
Showing results for tags 'Chevy'.
-
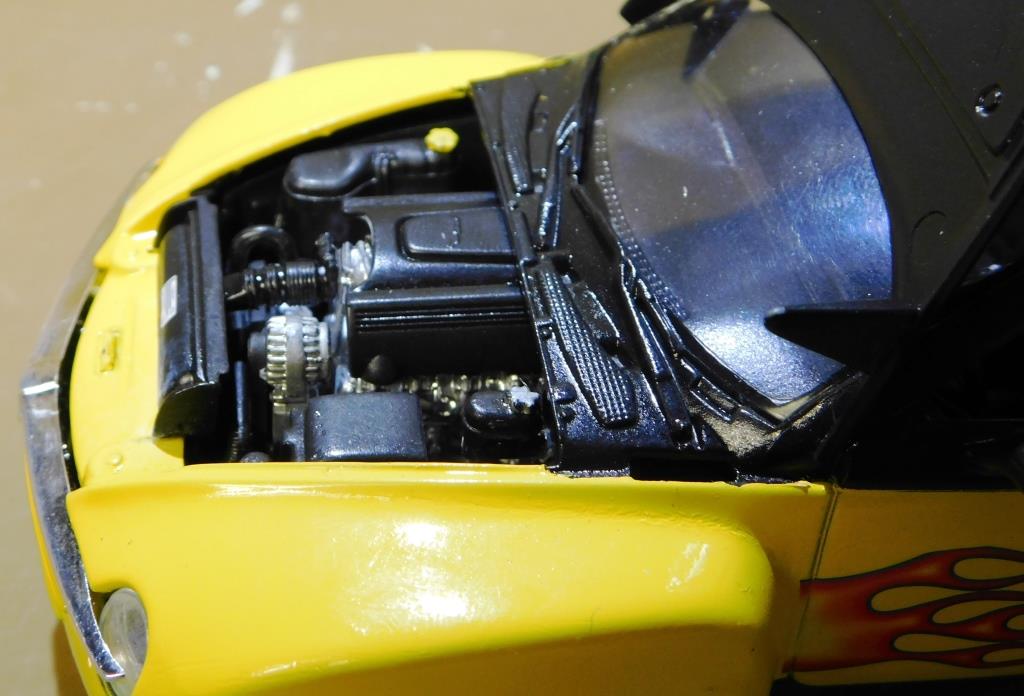
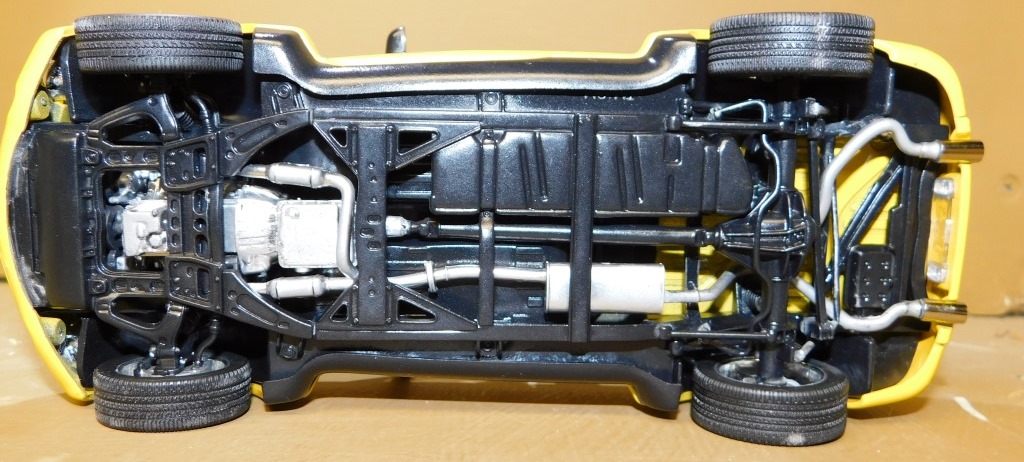
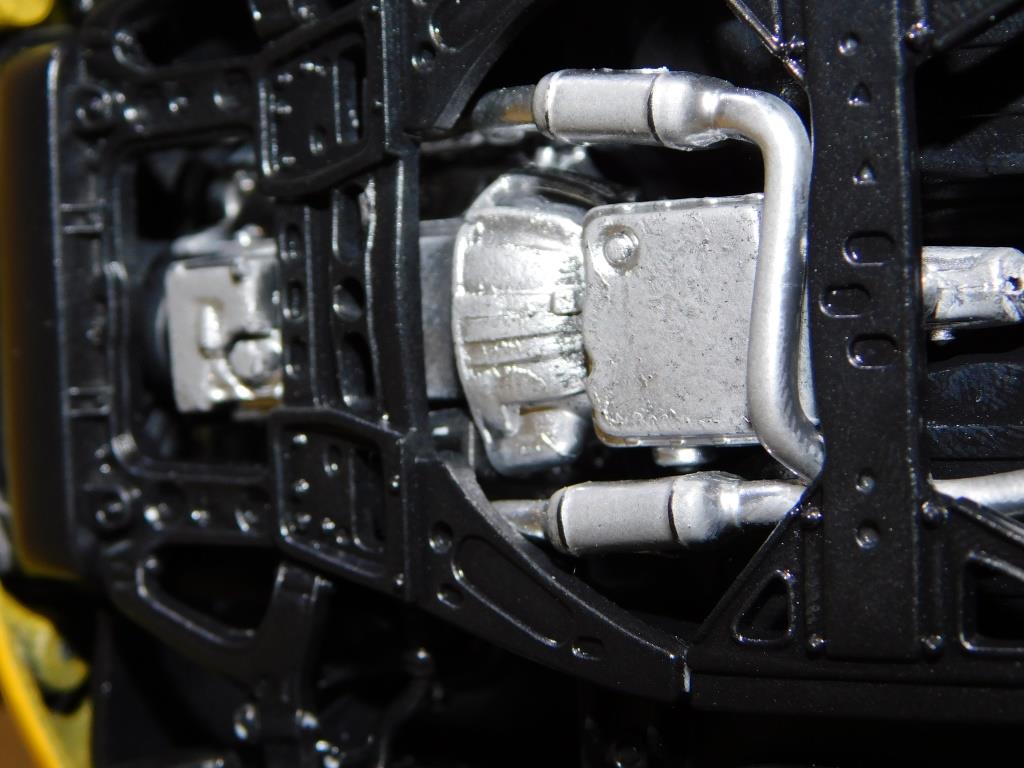
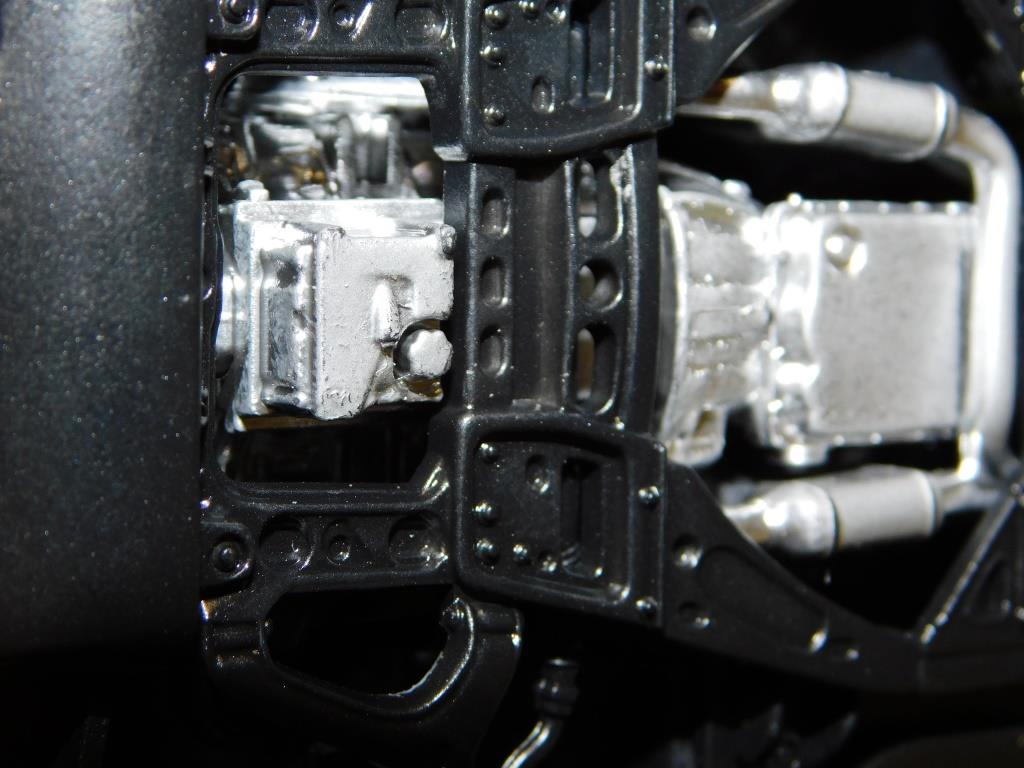
 Happy Saint Patrick's Day, friends! I stopped at Hobby Lobby after work and picked up this brand new Round 2/AMT 2017 Camaro SS "Fifty" edition. I haven't seen a review for this kit, so I decided to take some photos and let you know what I think about it! Please leave some feedback and share your thoughts on this kit. I've only been back into building for the last couple of years, so please correct me if I'm wrong, but I believe this is the first completely "new" kit from any of the Round 2 brands. I've been looking forward to this one and I'm not even the biggest fan of Camaros. The body is molded in what looks like the factory correct color "Nightfall Gray Metallic", credit to RandyB. for identifying that color. The shrinkwrap sticker on the box said this kit was molded in black, so I was surprised to see the body molded in this color. You're going to need to paint it as the plastic is very swirly. The body on this kit feels very flimsy and thin. You can see the actual print through the roof when held to the light and you can also so how thin the plastic is near the door handles. Very disappointed in that! There are a couple mold lines to look out for on the front clip and over the rear wheel well. Note: This is looking from the top of the car and down. The area near the door handles look almost like a non-fill issue. The piece count is very nice for this kit. The parts are molded in black, metallic gray, silver, clear, chrome and transparent red. I'll go into a more detailed look at these trees down below. As like the body, all of the large pieces in this kit feel brittle and flimsy at the same time. I really hope that only my kit is like this and it's not an issue across the board. That would be a real bummer. The frame, chassis and floor pans are all one solid piece. This may be similar to the snap version of this kit, but I'm not sure. If you look, you'll see the driveshaft is even molded in. The rear seat detail will disappear under a coat or two of paint. Very poorly molded or mastered. The wheels look pretty cool for this car. I wish that the bow tie was a lot more visible, instead of the blob it looks like. The clear parts in this kit however, are some of the best I've ever seen! Lots of detail and thought went into these pieces. I love the tail lights and the defrost lines in the rear window. The black window trim is a great touch and gives you one less problem when detailing the kit! The tires look good and they're directional. They are not branded, however. I hope that Round 2 doesn't go the same way Revell-Monogram has gone. The last photo is of the decals. Like all of the other Round 2 releases, these are very brilliantly printed. If you've stuck around through my ramblings this long, I thank you for your time. I'm not sure that I'll ever get around to building this kit. I've got so many other projects started or that I want to start and I don't see this one knocking any of those out anytime soon. It's a nice kit and looks very accurate, but it has flaws that shouldn't exist on a newly tooled kit that was made 3 months ago. If you have one, let me know how yours is! Until next time!
 -
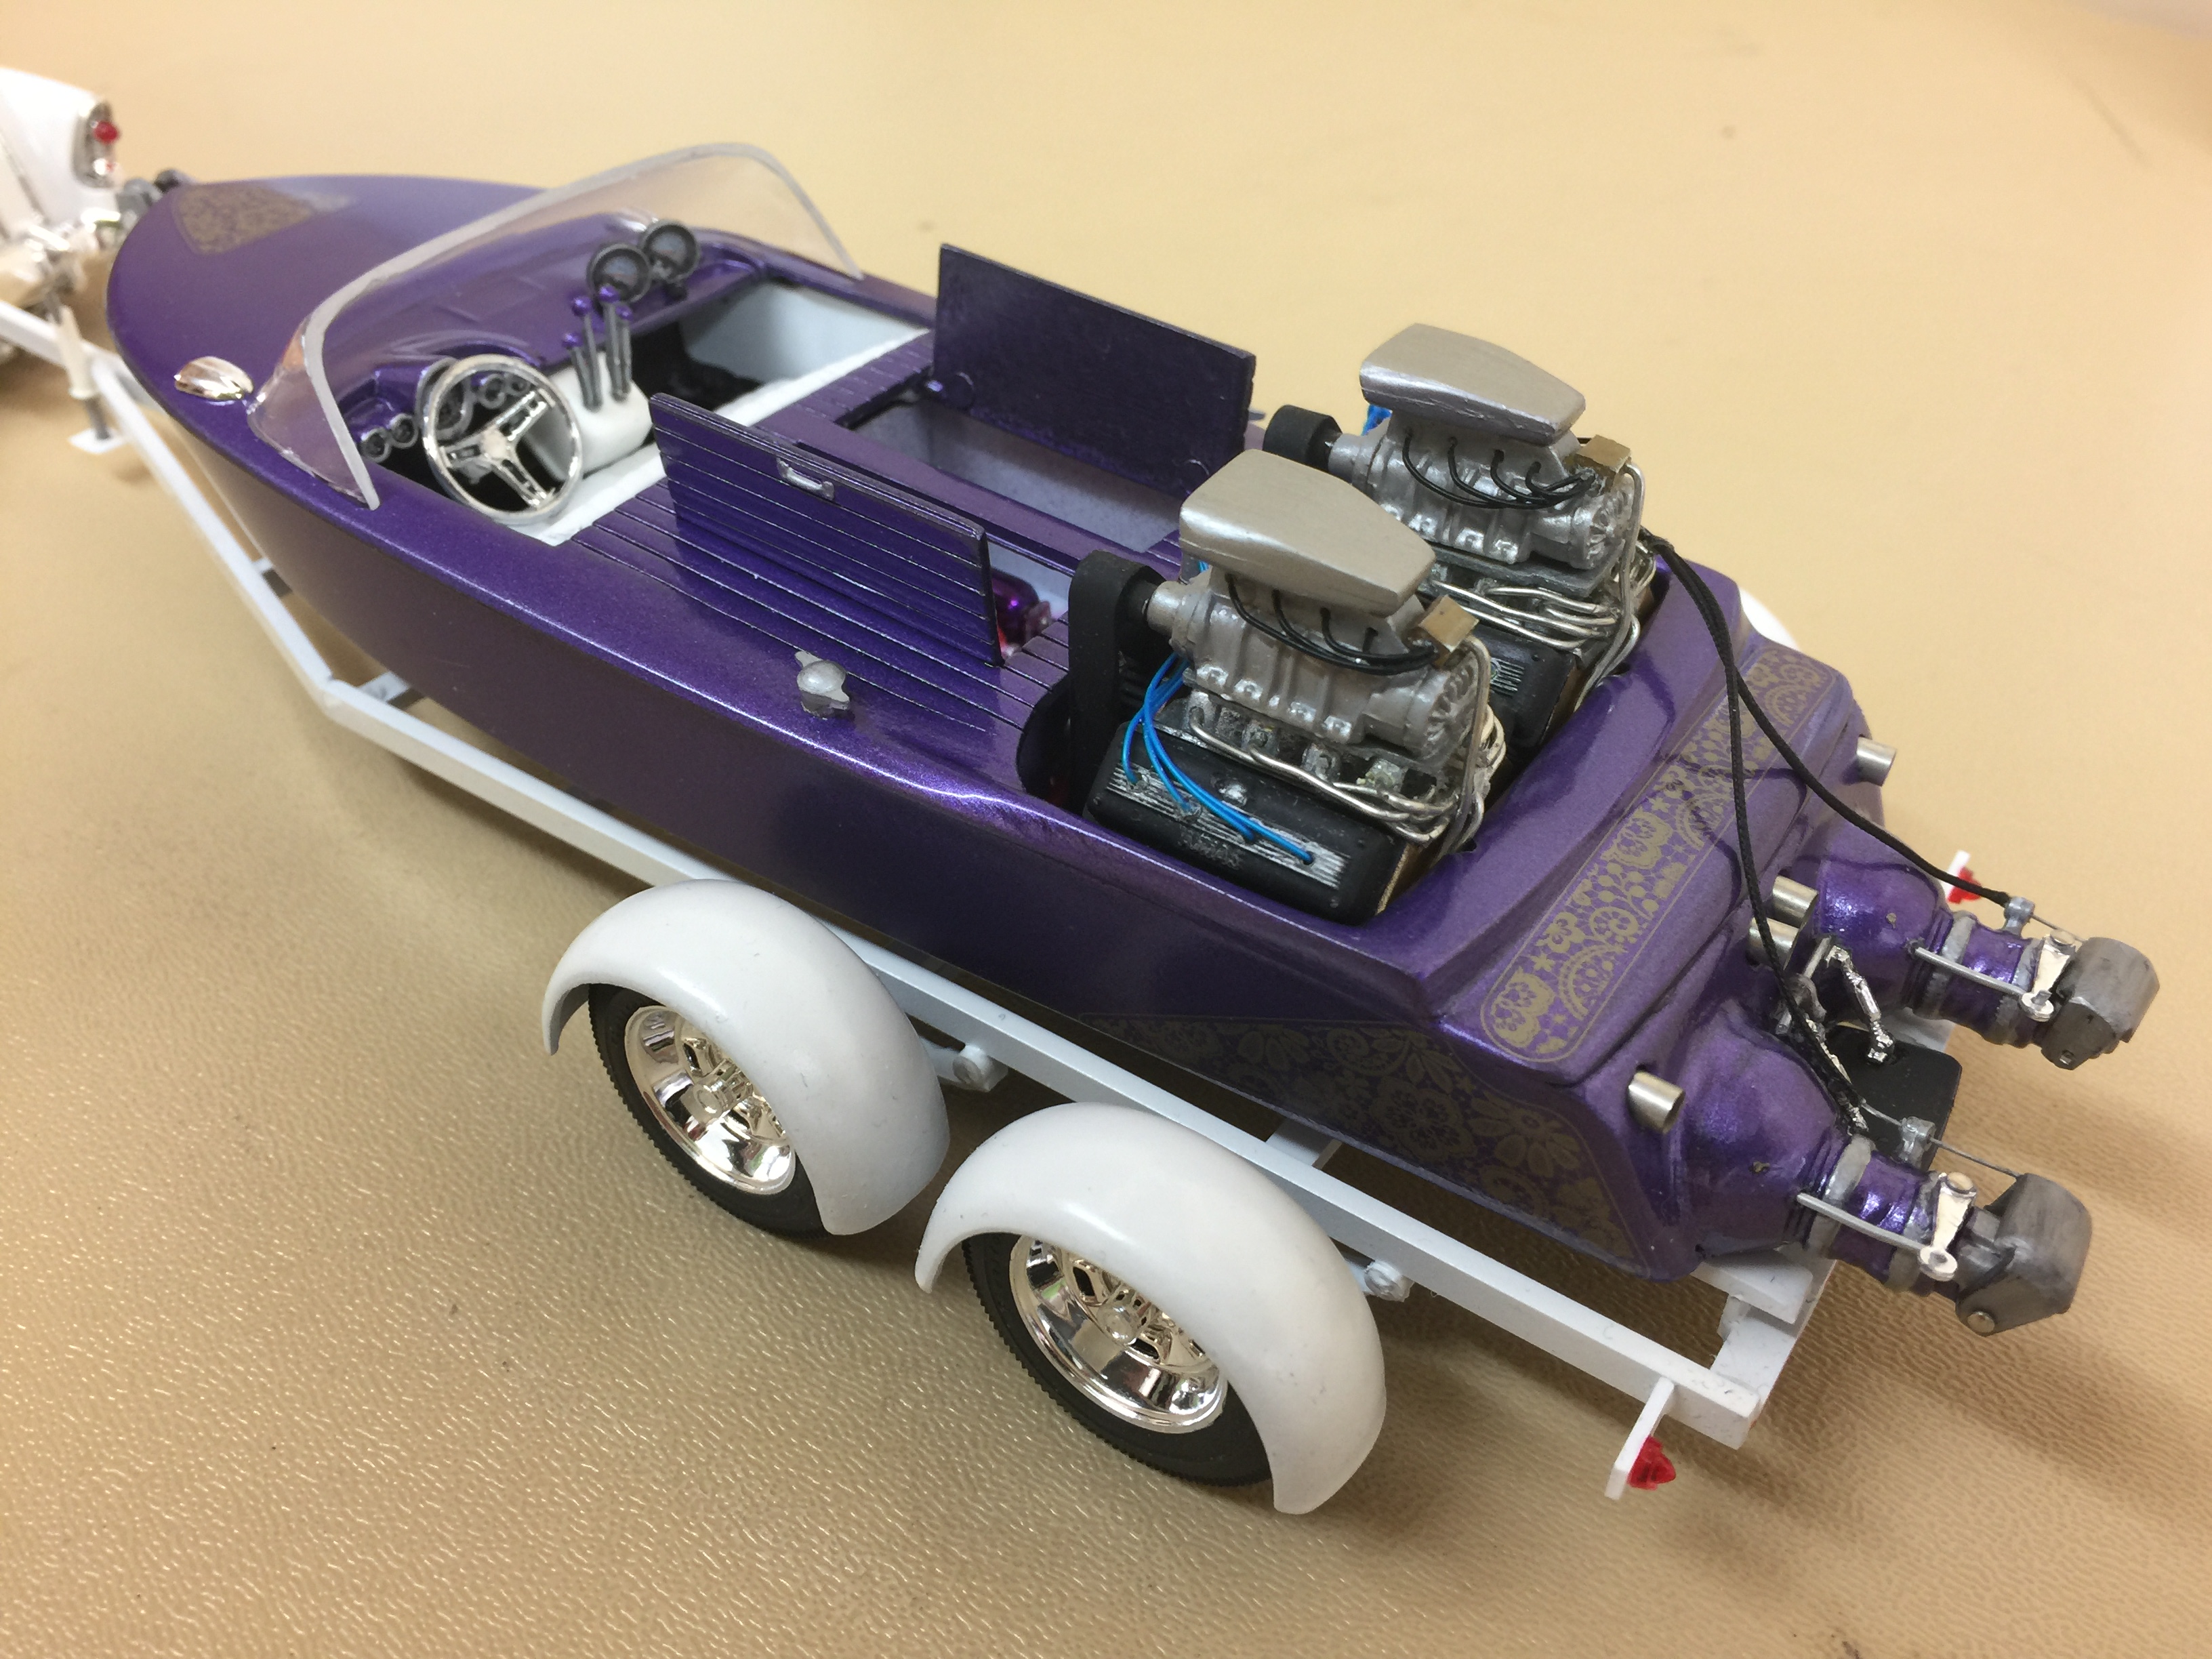
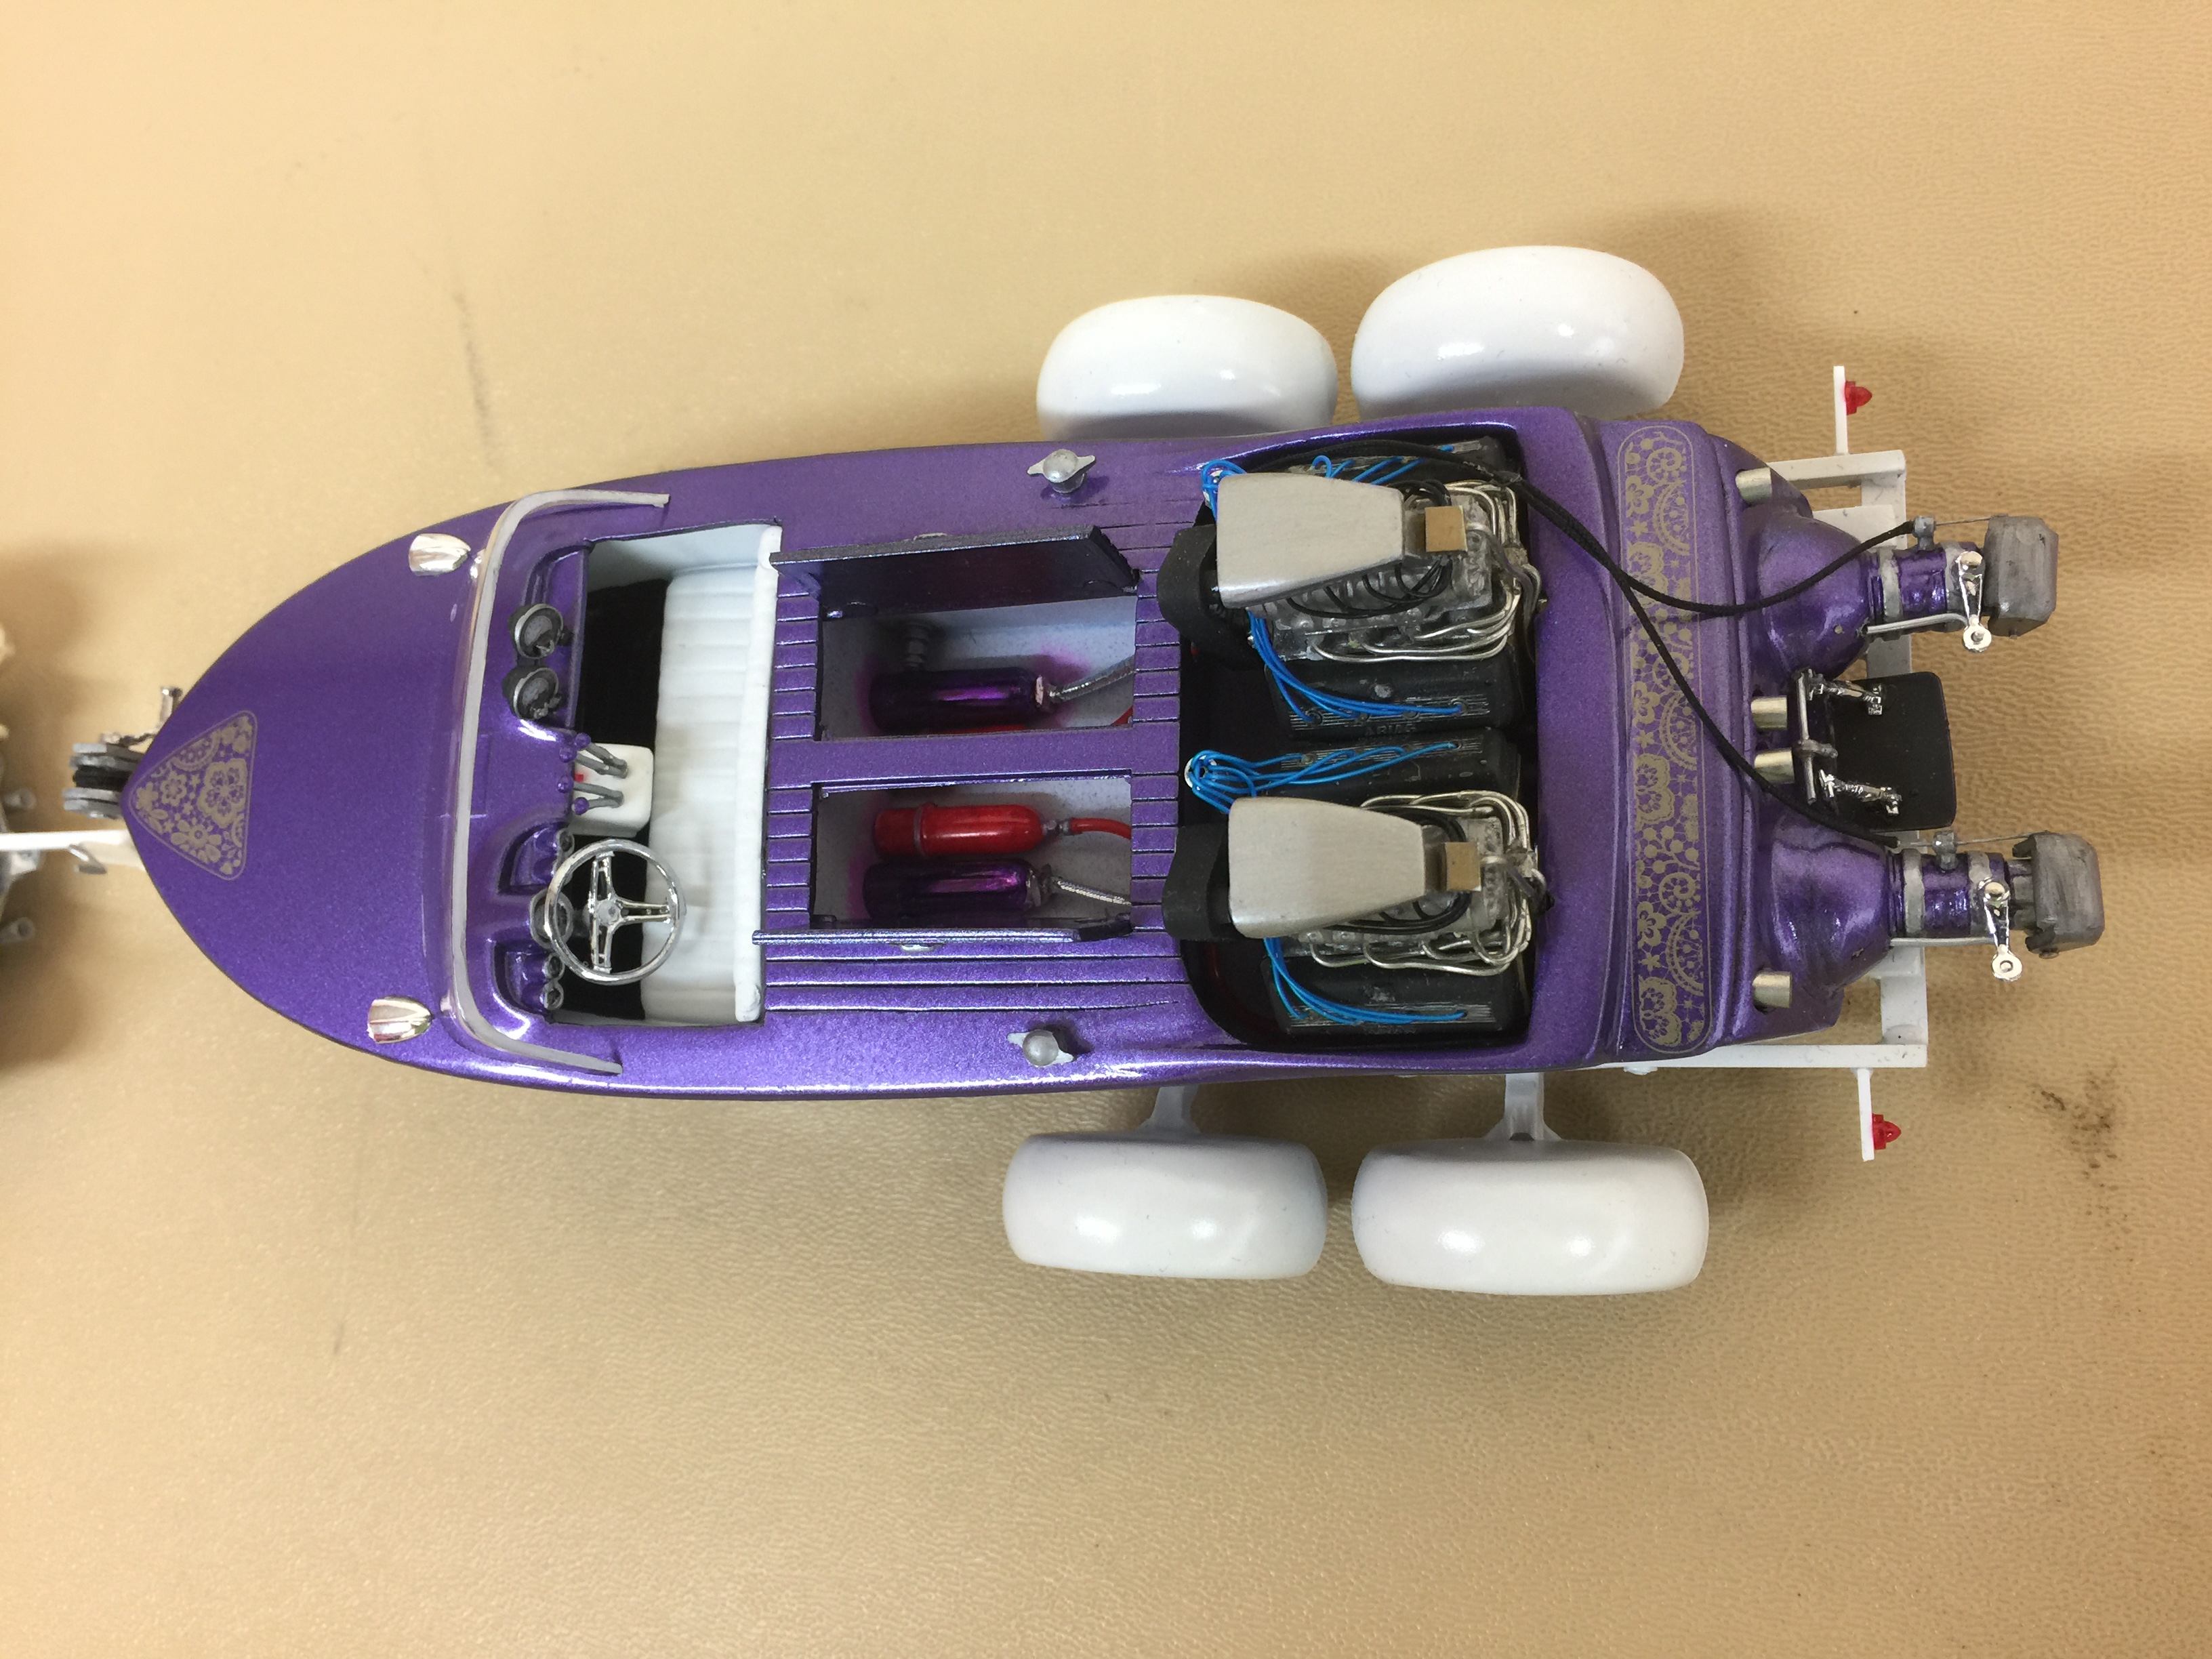
 well as of today this little hot rod ensemble is done!!!!!!! I need to put a hook on the cable to hold the boat on the trailer but otherwise it's done!!!! 56 build thread the boat build thread Here they are.......
-
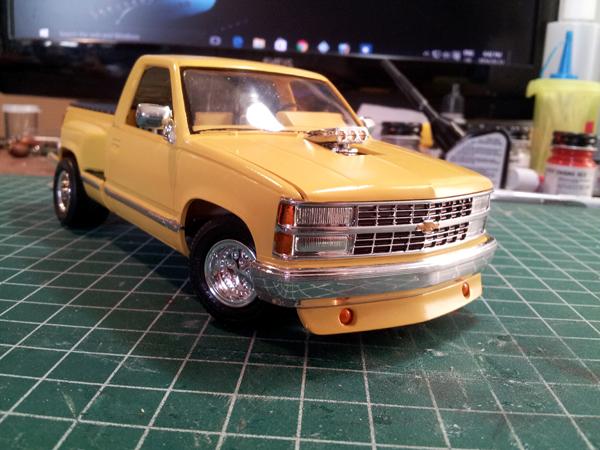
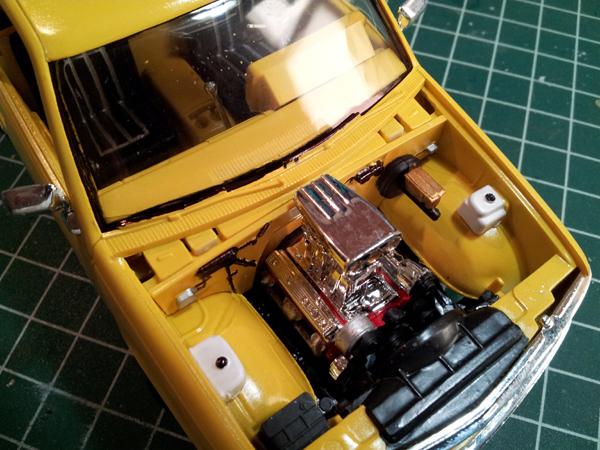
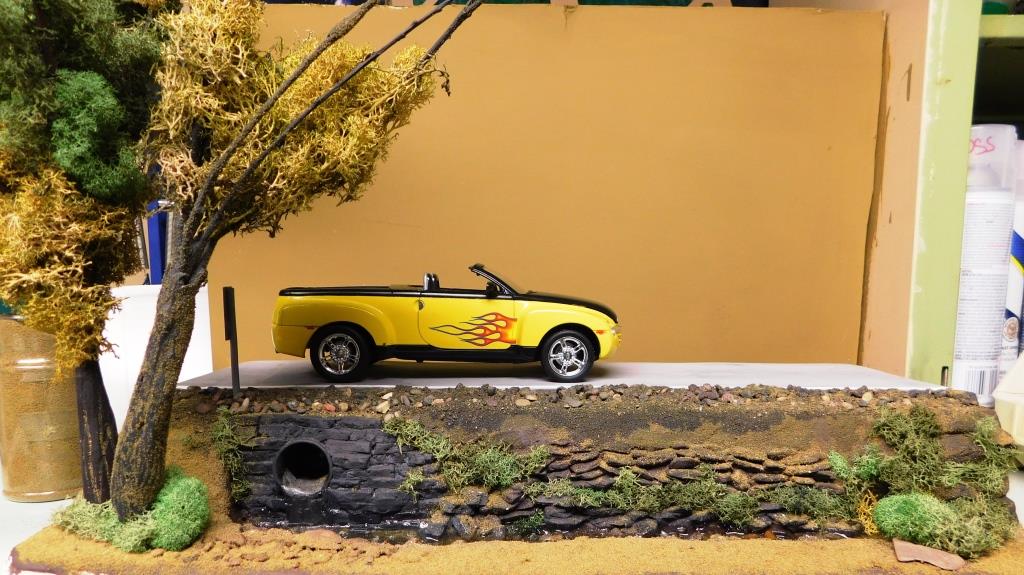
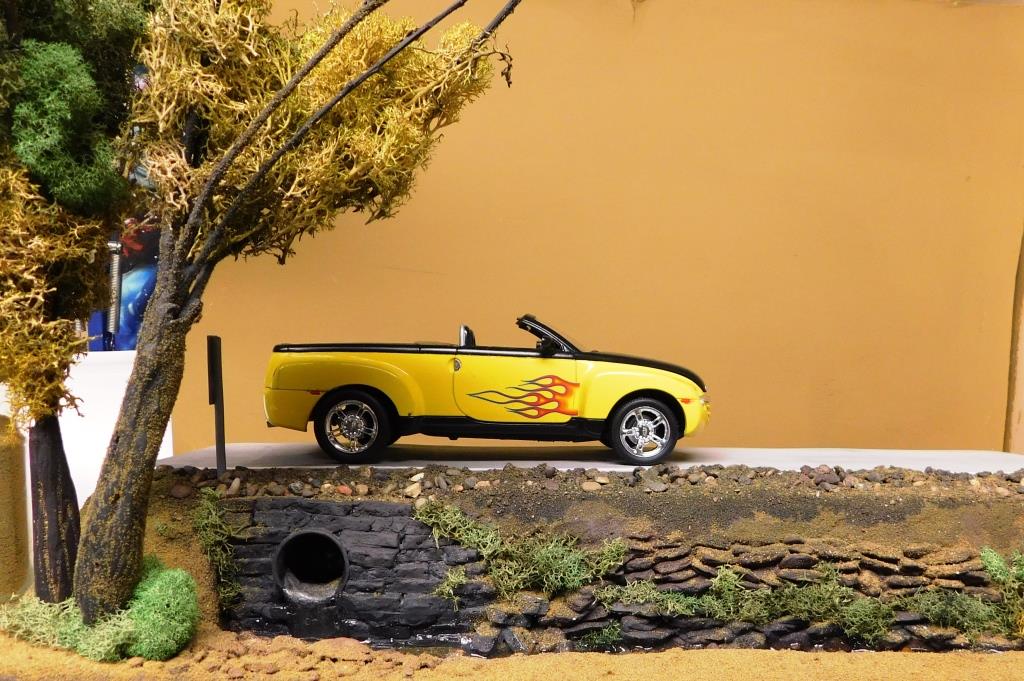
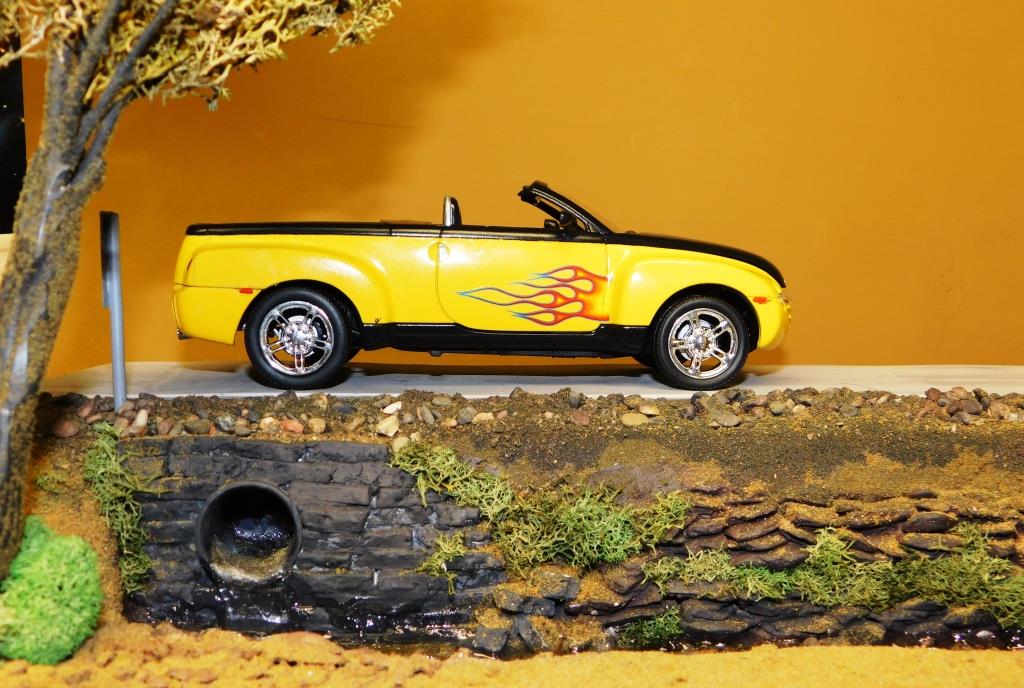
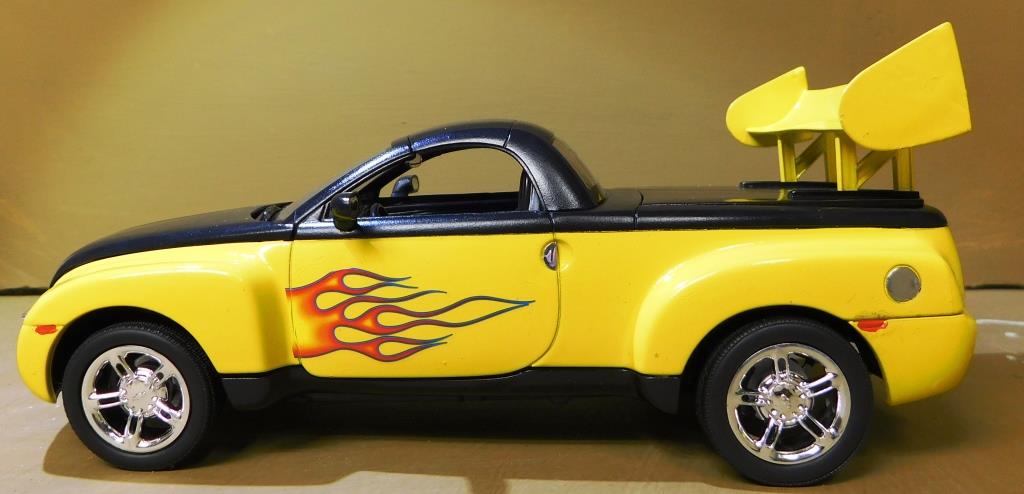
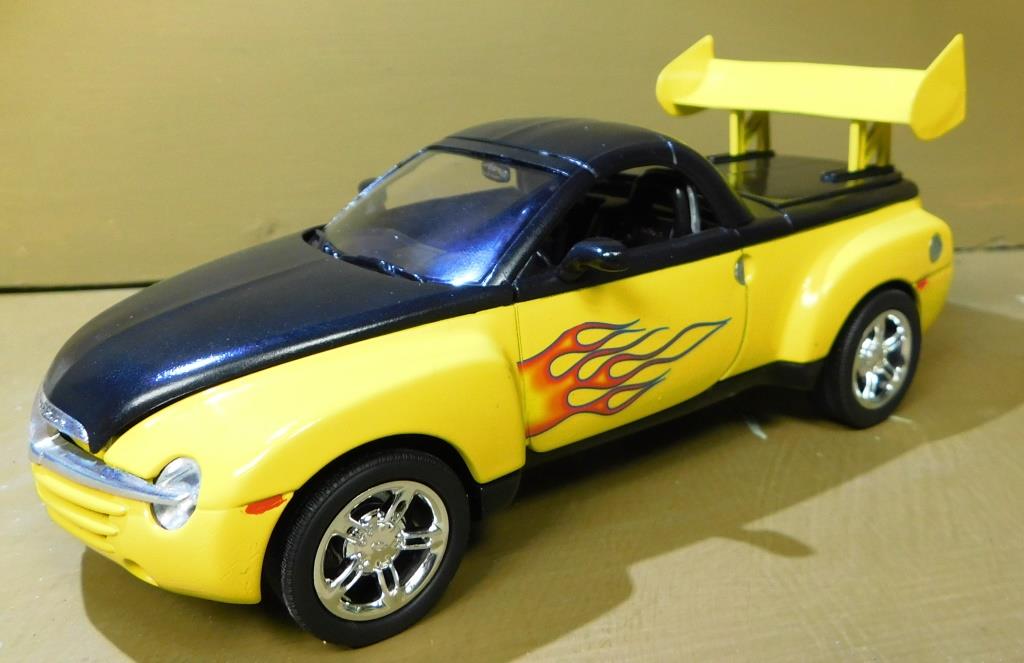
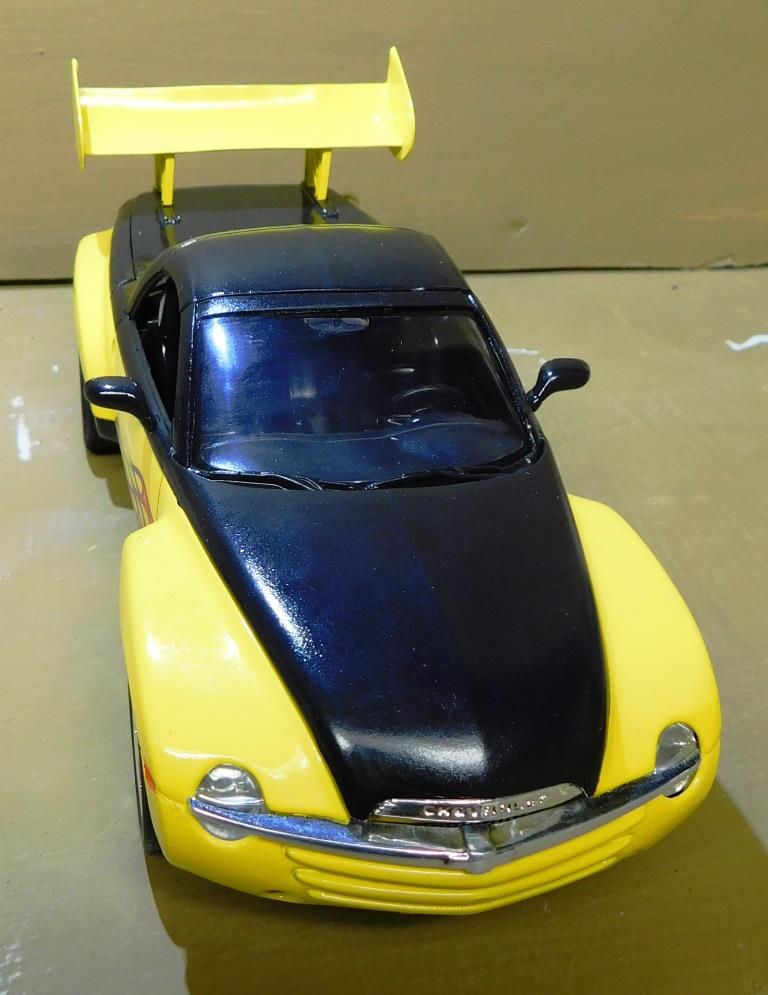
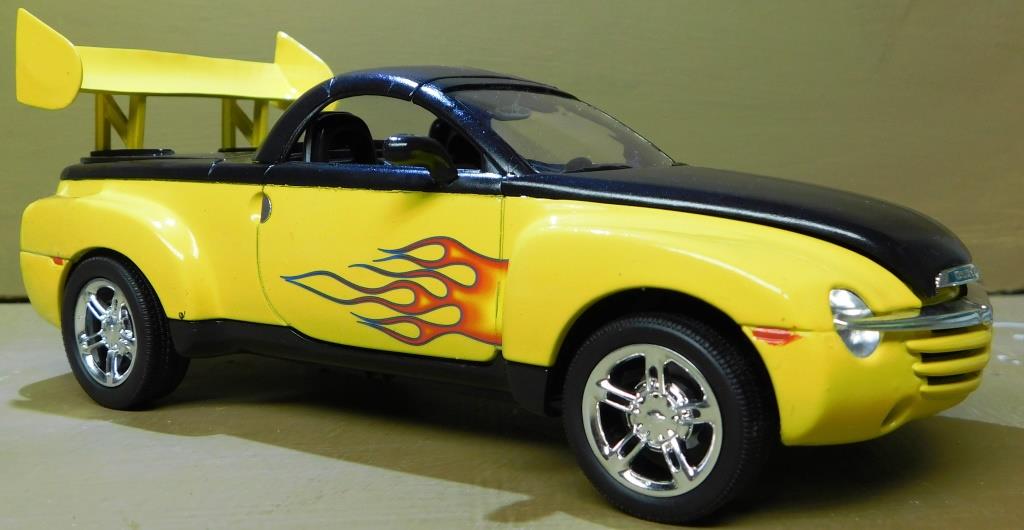
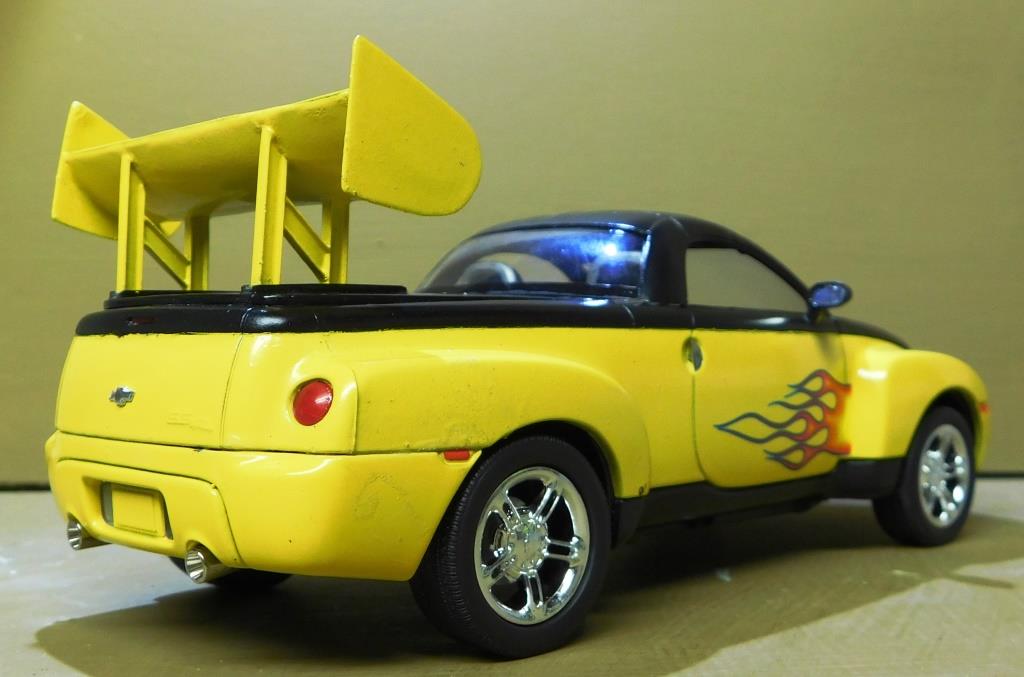
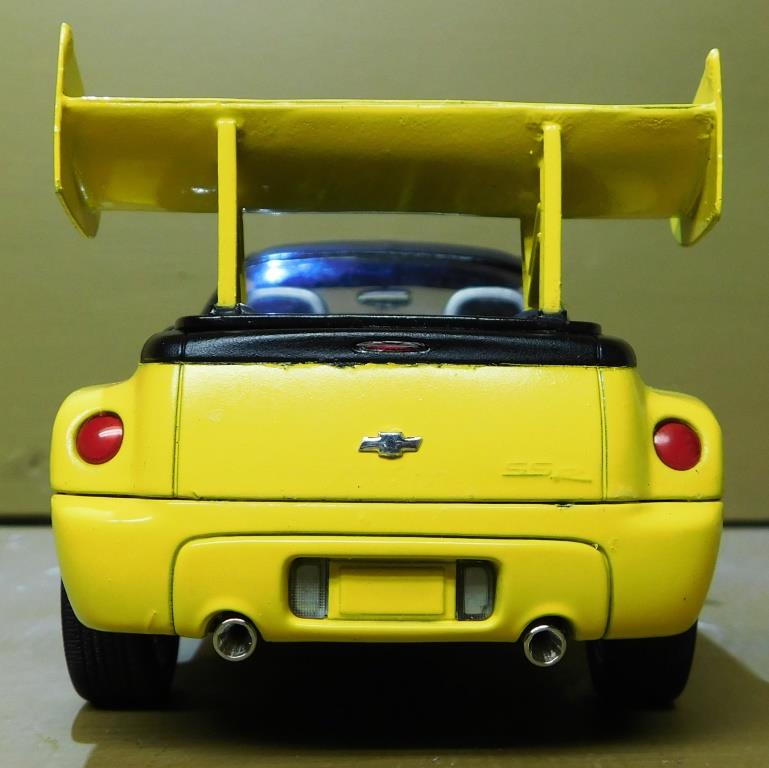
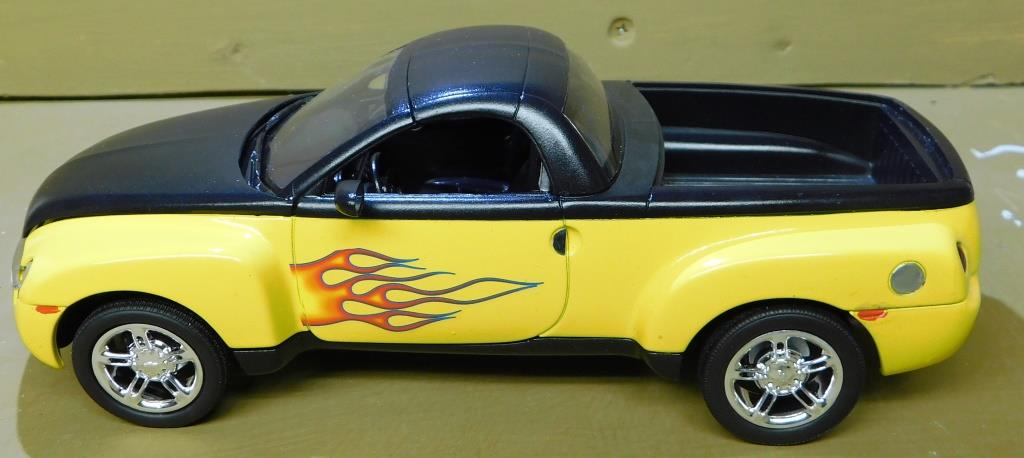
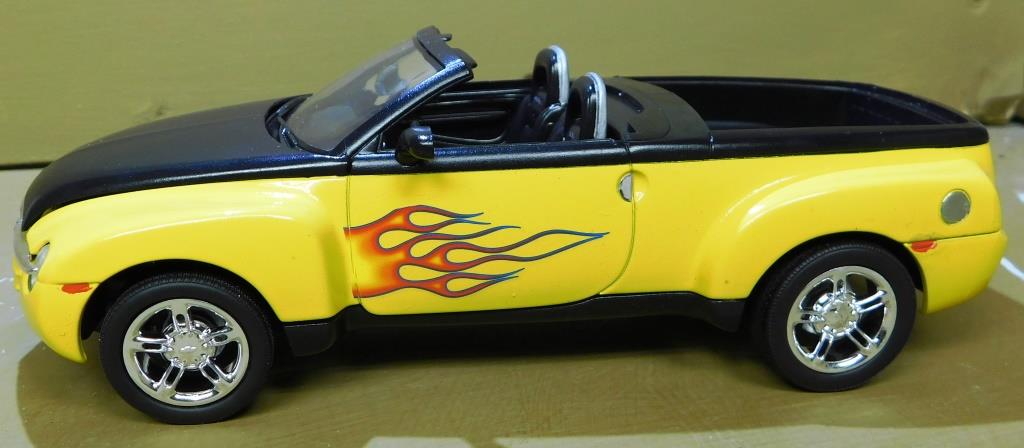
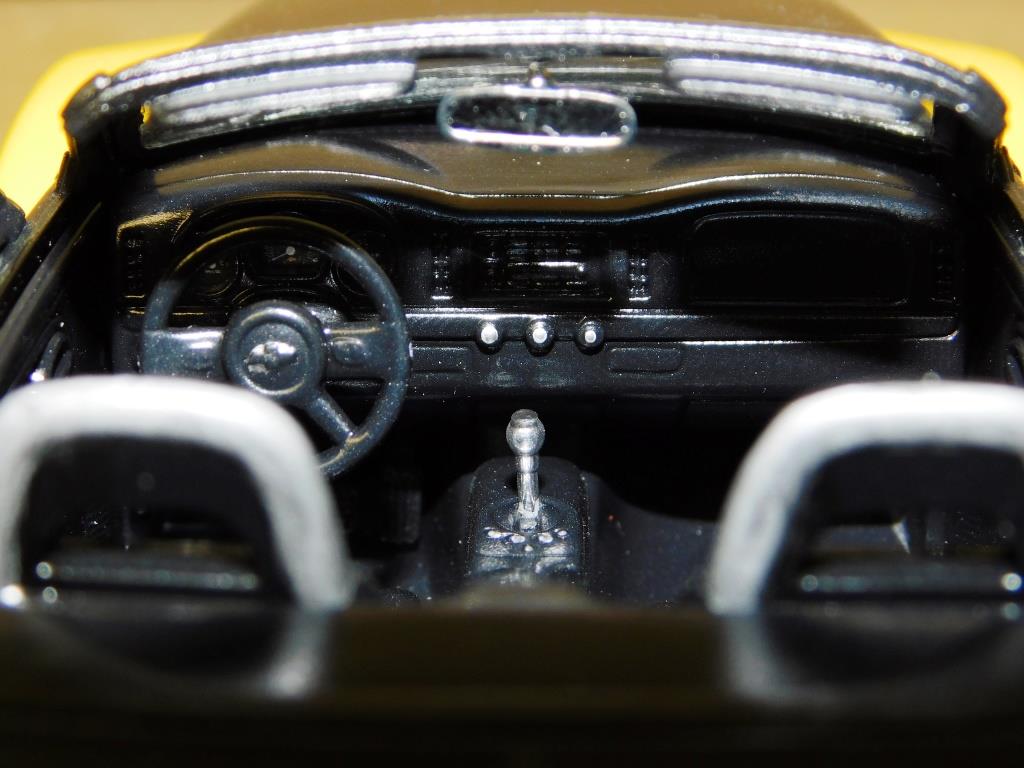
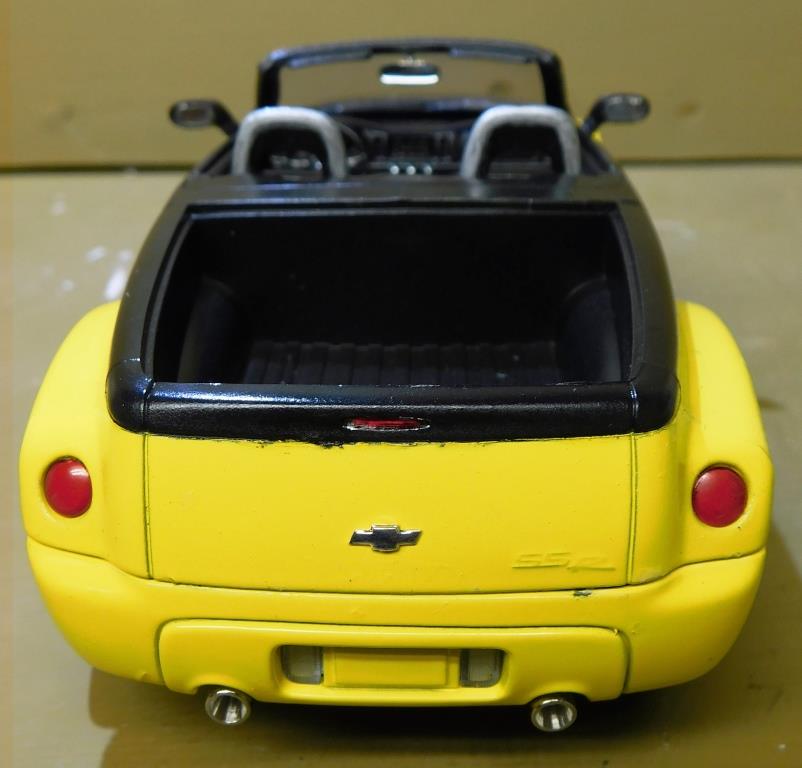
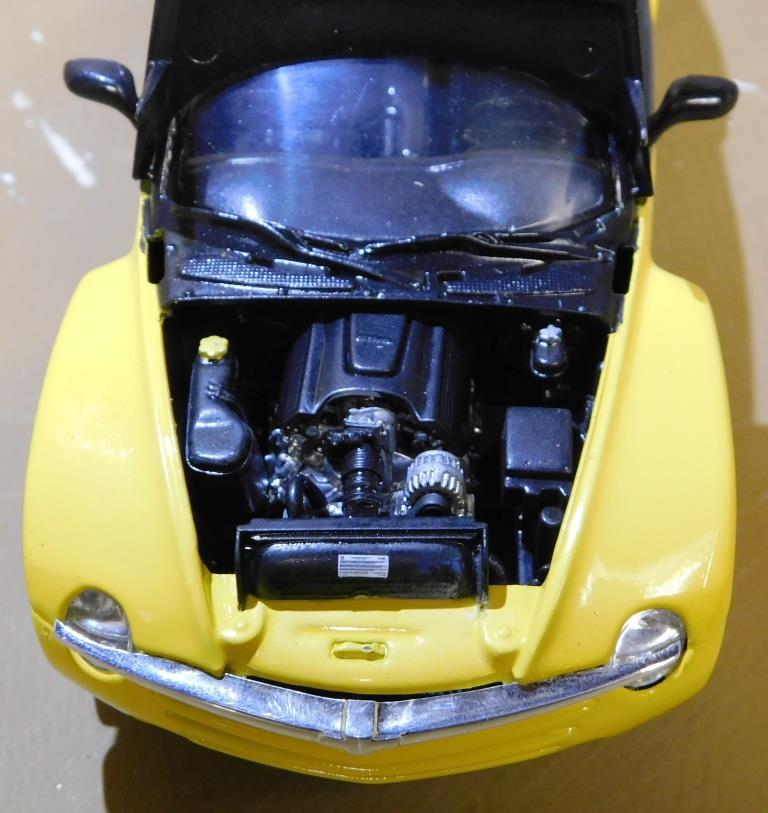
Found this kit at my local Olies store for cheap. I picked it up a while back and put it on the shelf. I spent some time thinking about how could I make it better. I painted it two-toned and took some flame decals I had laying around and put on the sides. My son suggested that maybe I put a GT Wing on the back. So I got started with the most ridicules wing I have ever seen. I did some research and scaled the measurements down, but it still seems a bit large, maybe next time I'll make it a bit smaller. Overall the kit went together nicely with the exception of the glue bomb on the back bumper, because it was warped slightly. The wing is 100% custom from sheets of styrene and small I-beams. I chromed the entire engine. I had recently made a new diorama and decided to take some pictures of the SSR on it. Out for a Sunday drive with the top down and the wing at home.
-
 This here is a model my Dad had been tinkering with every now and then for the past few years. His hands hurt a little to much to enjoy building and he's very busy with work and life type stuff so he offered to me last week to either part out or scrap all together. Naturally I'm doing neither, instead I'm going to tear it down and re-build/restore it for him as a late Father's Day present. Going in a Overhaulin' style with it, he knows it's happening but won't really get to see it until it's finished. I'll be taking a few idea's he's thrown around for his 1:1 Suburban and add few of my own in as well. The end result will be something along the lines of a Overhaulin'/ Fast & Furious/ resto-mod type'ish (lots of "ish" in there) custom truck. Some of the idea's are as follows. The one big thing he'd like to see is the bare metal finish that's becoming quite popular. Got a plan that proved to be very promising. But I'm open to hearing ideas too, backup plans are always good to have. It's going bumper less. Among some of the ideas he's tossed around for his 1:1 removing the bumpers has been something he mentions often so I'll be applying that to this build. Changing the tail light set up in the back. Not going with the usual Corvette treatment, instead I'll go with a tail light design he's very found of and that's the '67 GTO's quad light. Big horsepower, naturally. Swapping the Standard 283 small block with the 396 big block out of the '67 Pro-street Chevelle. Tossing a supercharger on it to for good measure. Custom grill and a few other ideas that I'm still working out. I was initially hoping to have it done before Father's Day but 7 days in and I'm still doing body work. There's a ton more to be done after that and as nice as it would be I'm not going to rush it, I want to do it right and to the very best of my ability. Picture time. Starting point: Believe it or not that color is that $1.29 bottle paint in Wal-Marts craft section, brushed on even. That stuff's not half bad. Rims will also be getting stripped due to the paint and scratches on them. After stripping. Removed the grill mounts to make room for the custom grill. Removed the gas cap and side trim for a smooth body. Will also be bodying in the door handles as the handles themselves are missing. Lower plate for the back with the GTO style lights. And after the first round of body work, starting on the second round. Thanks for looking, more to come.
 -
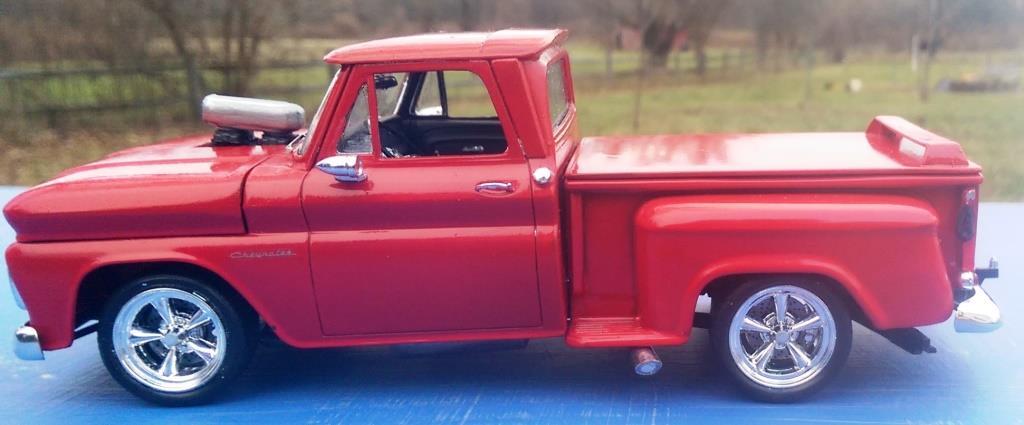
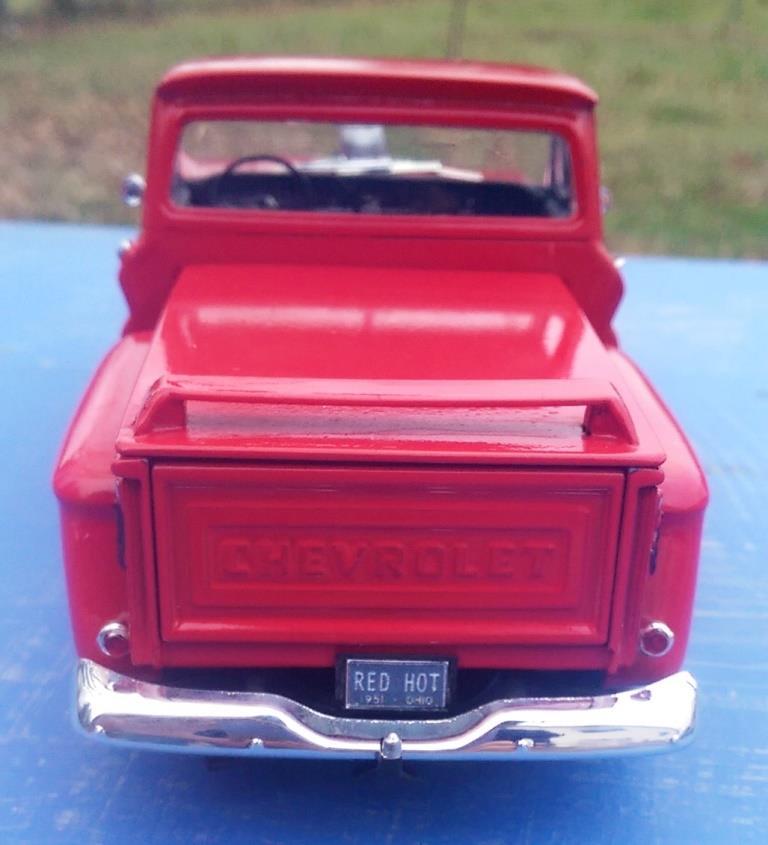
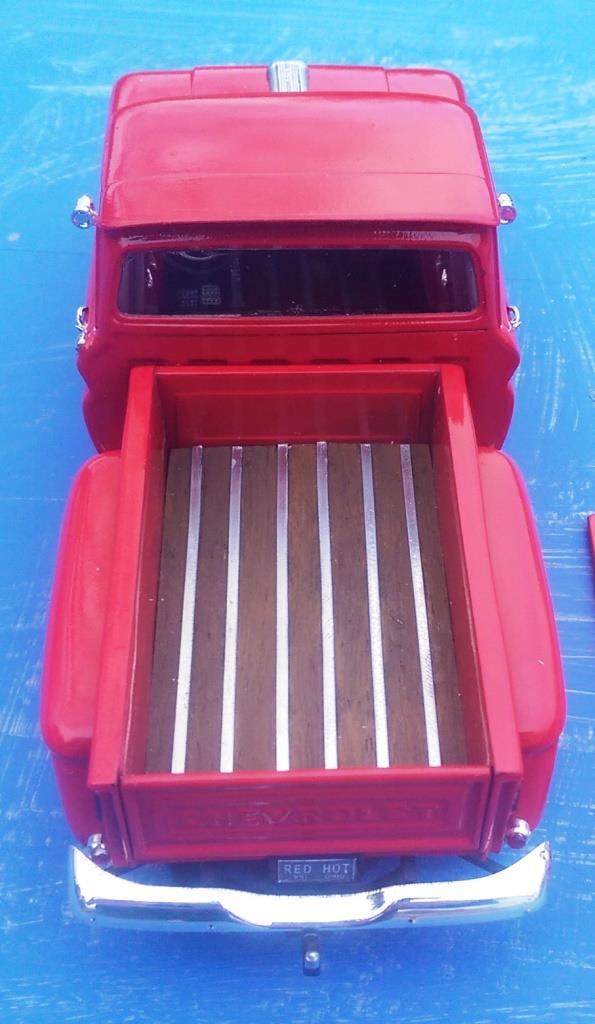
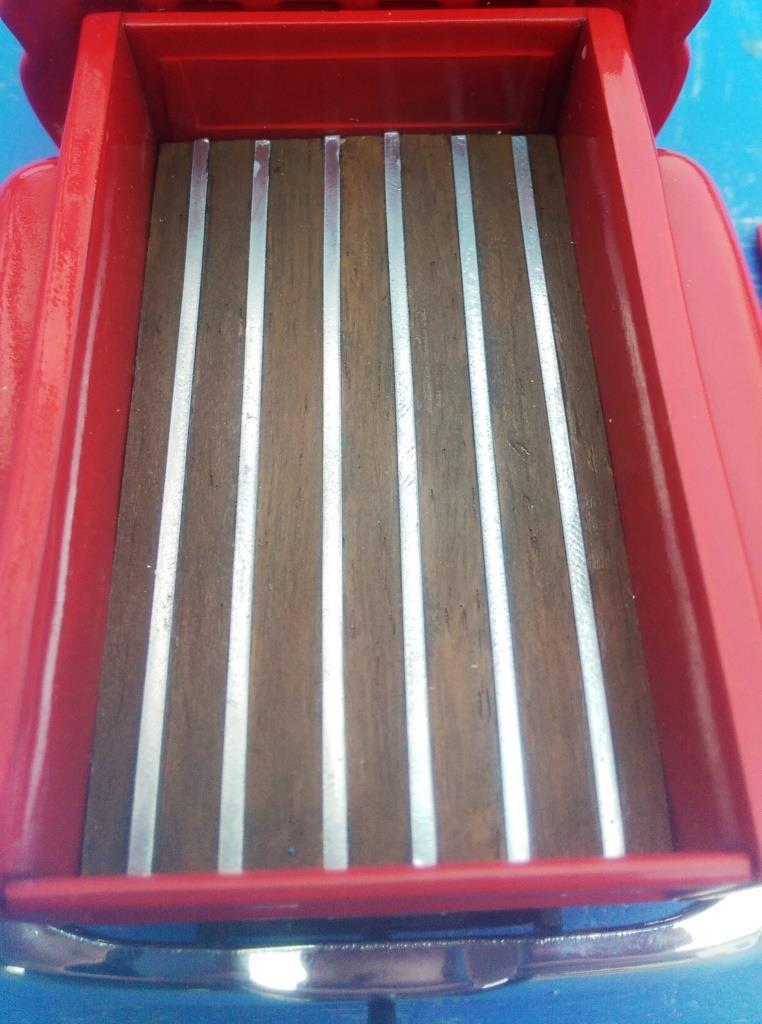
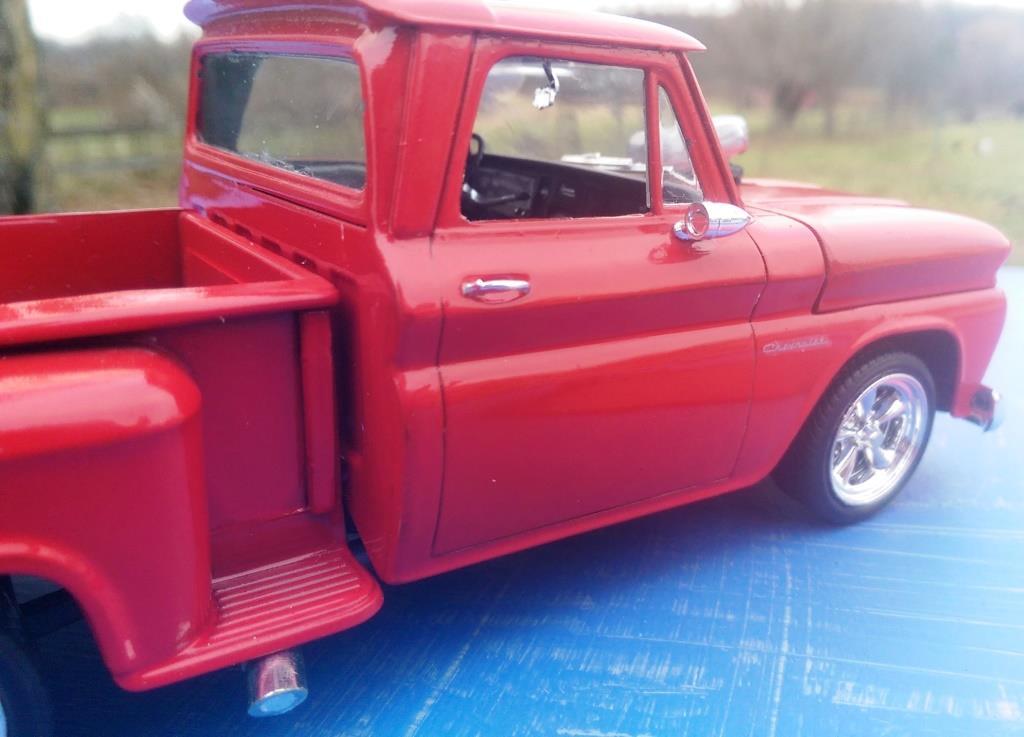
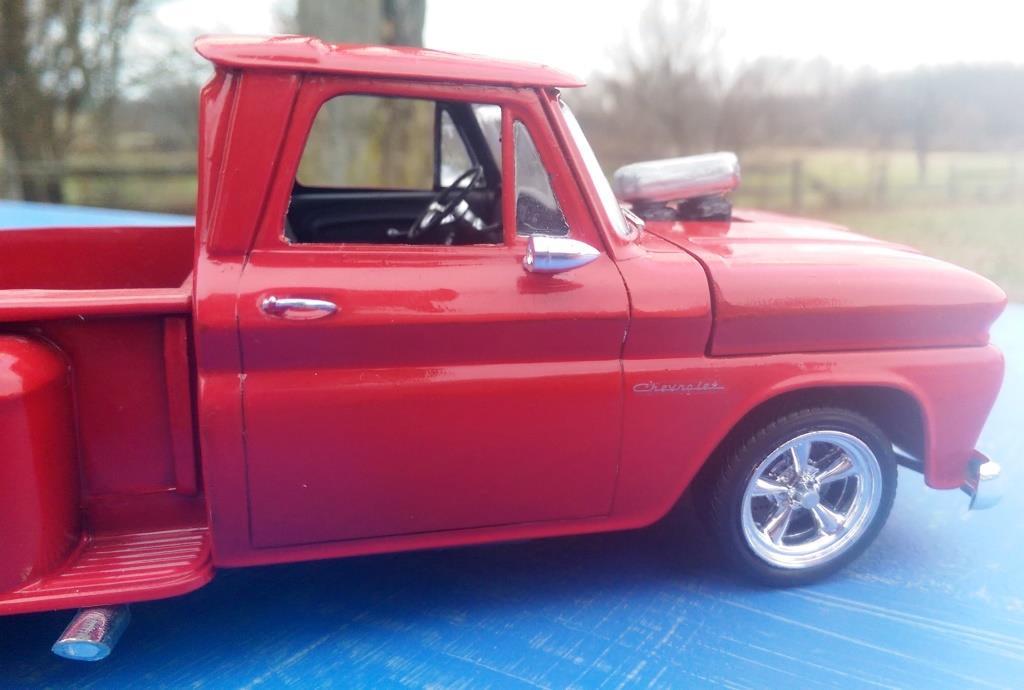
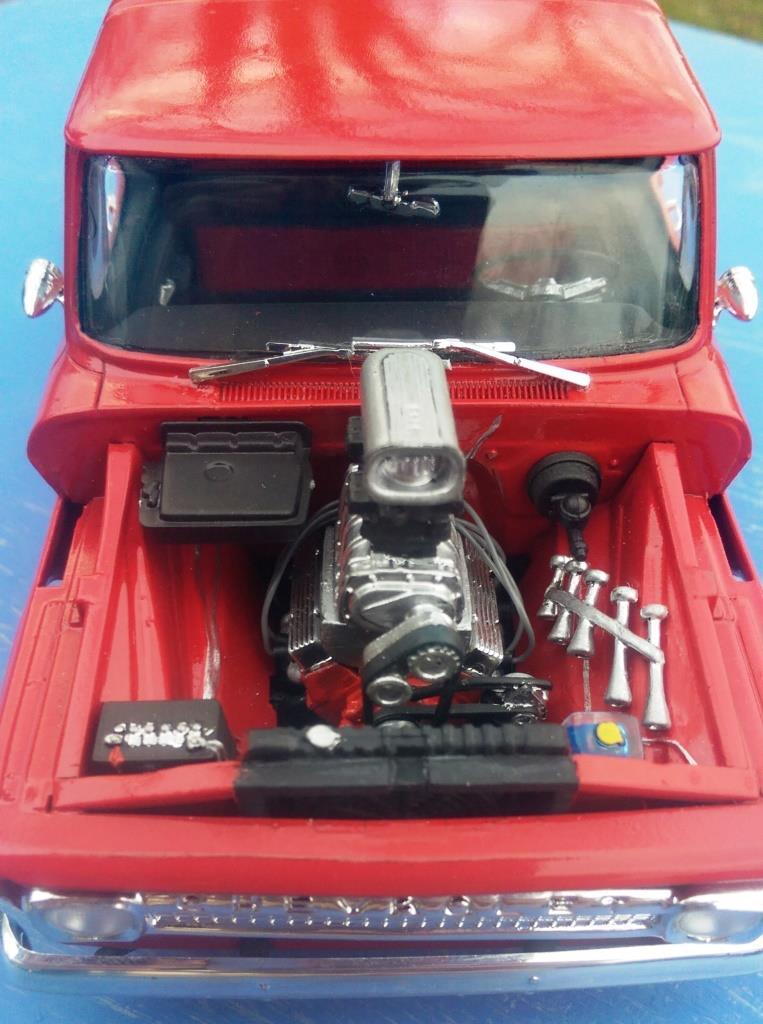
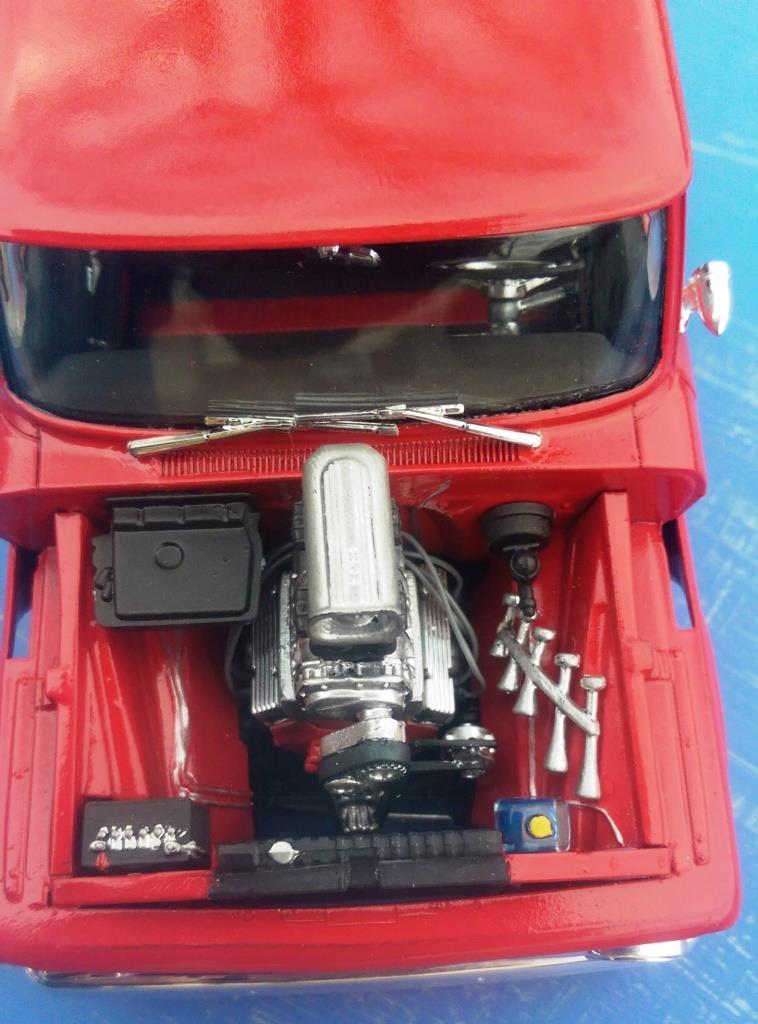
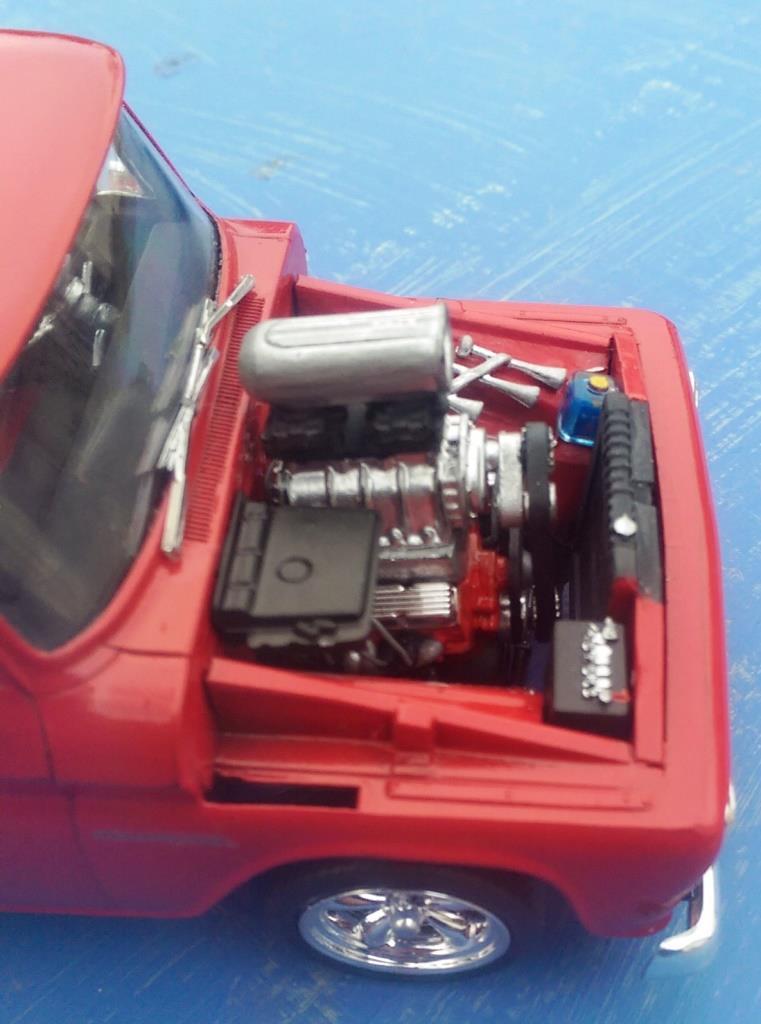
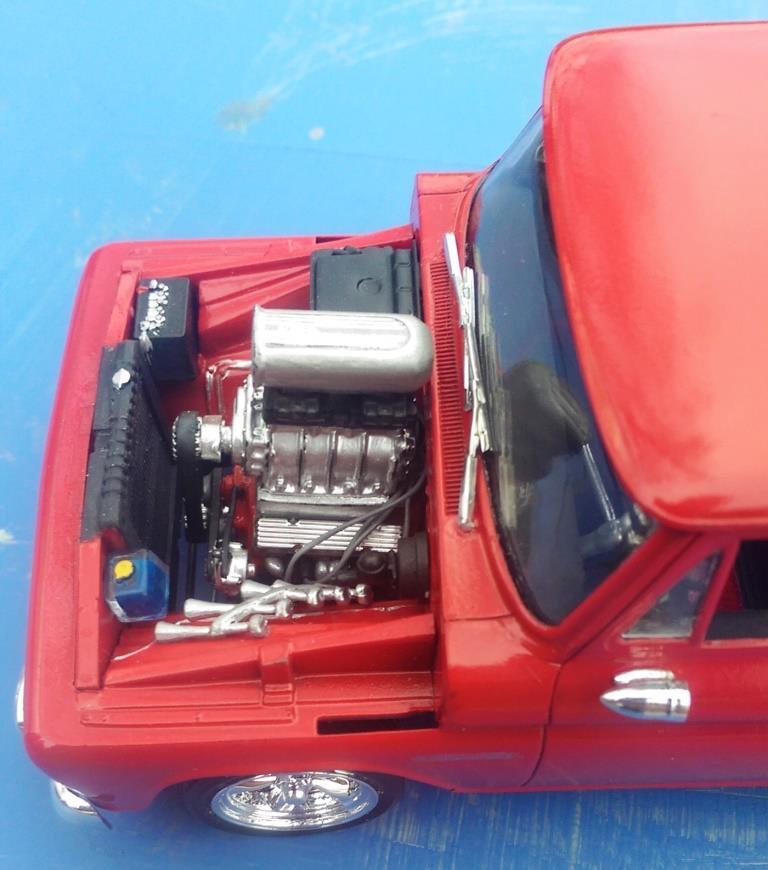
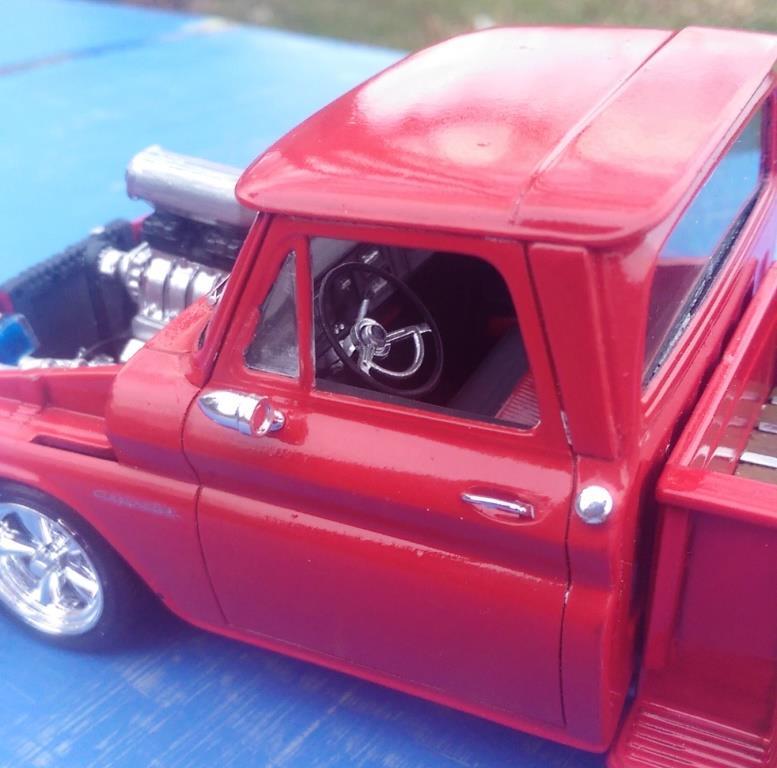
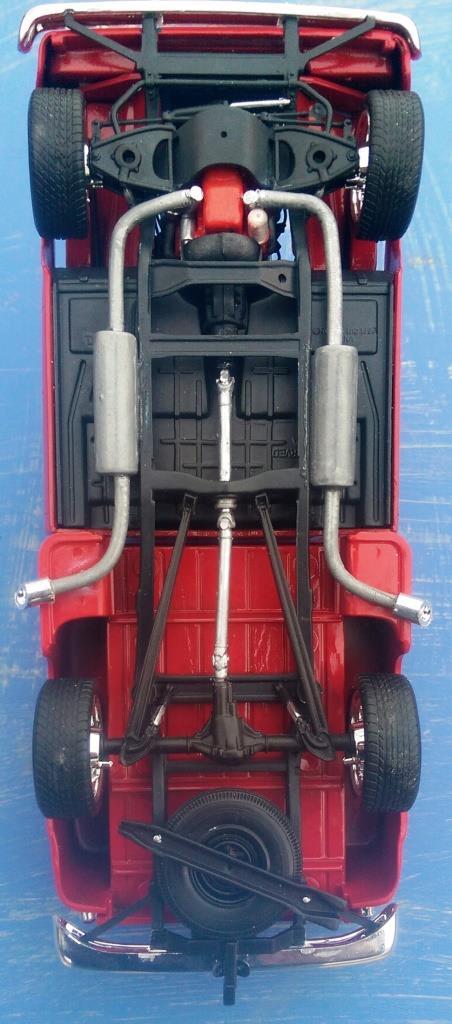
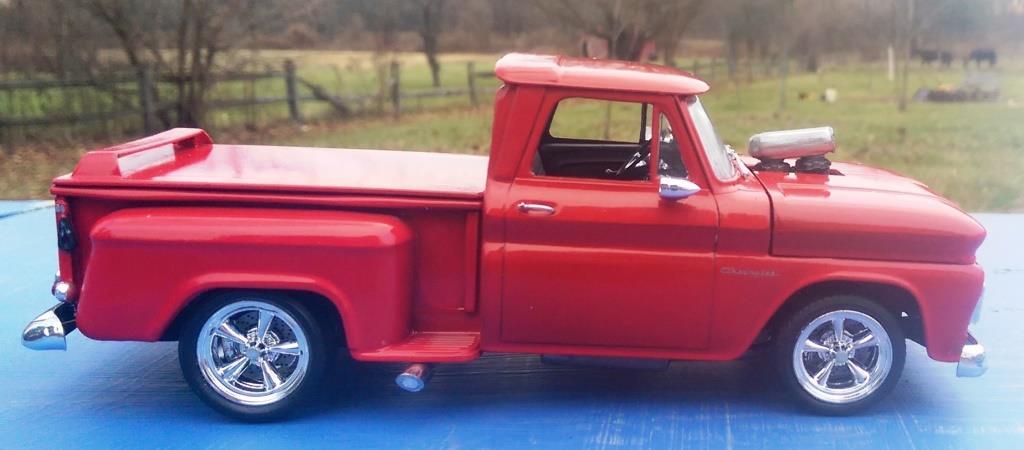
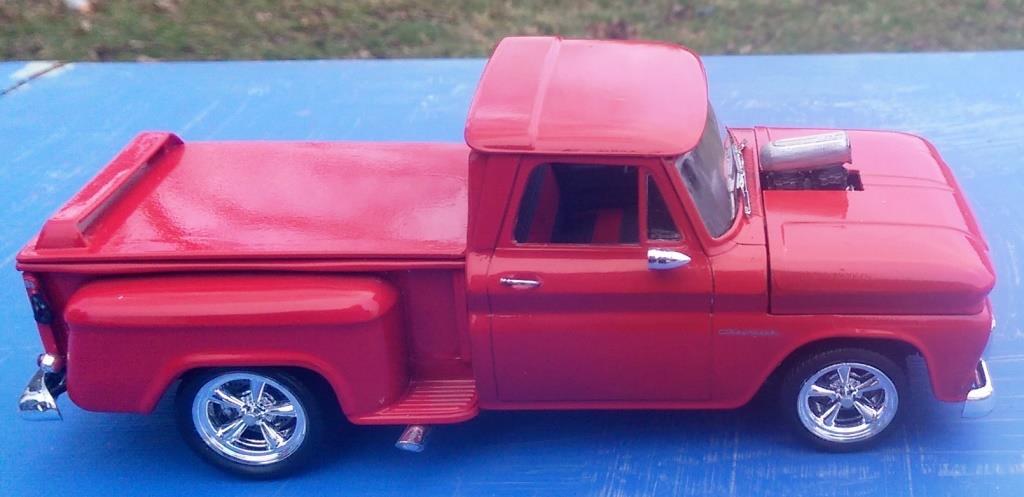
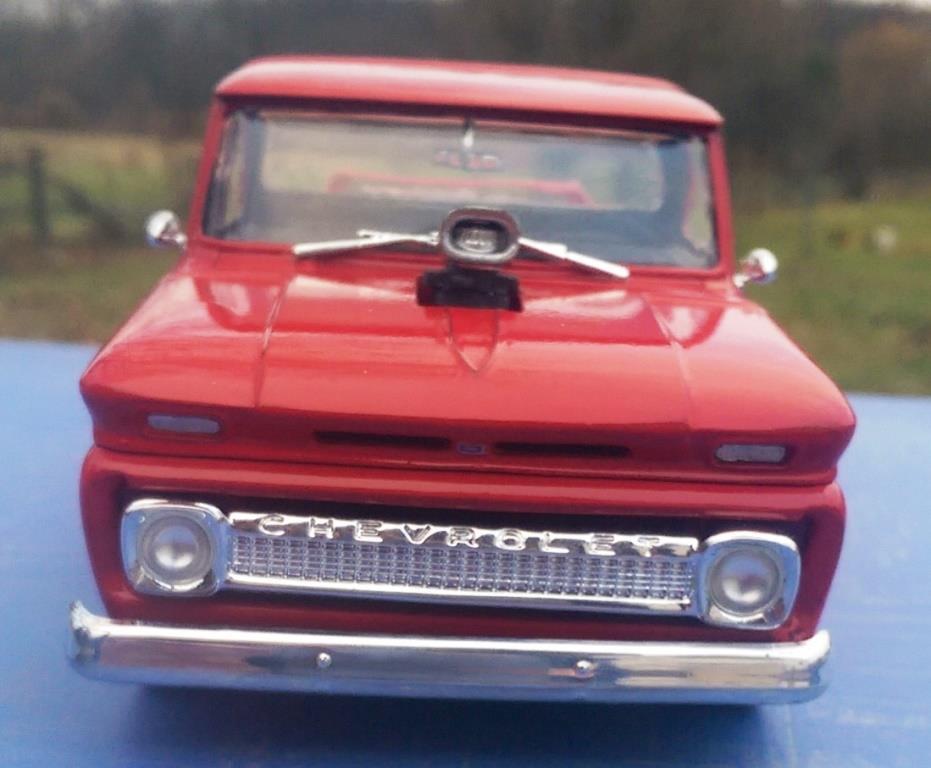
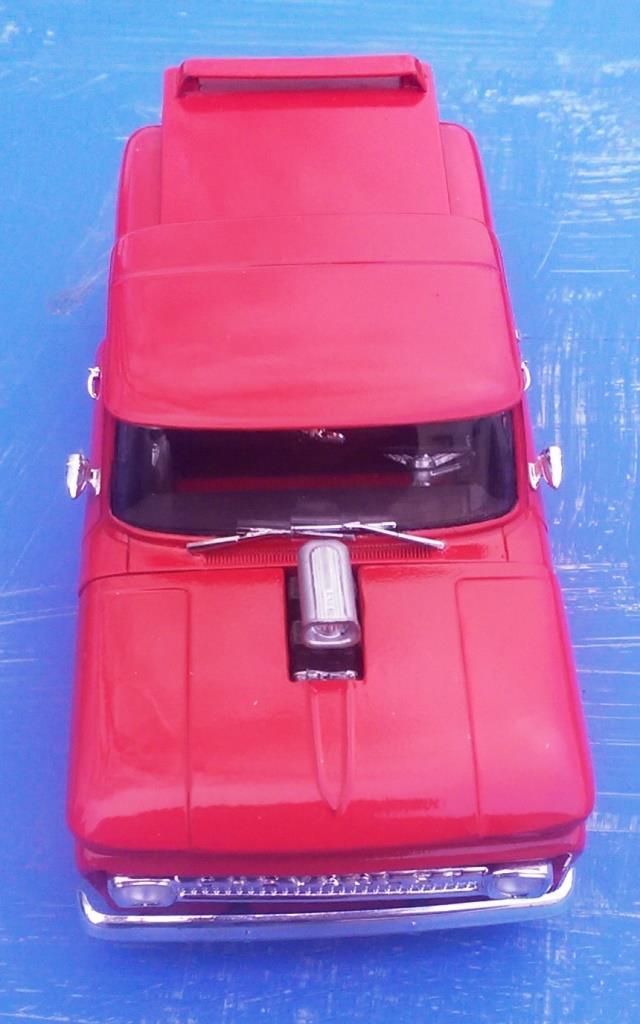
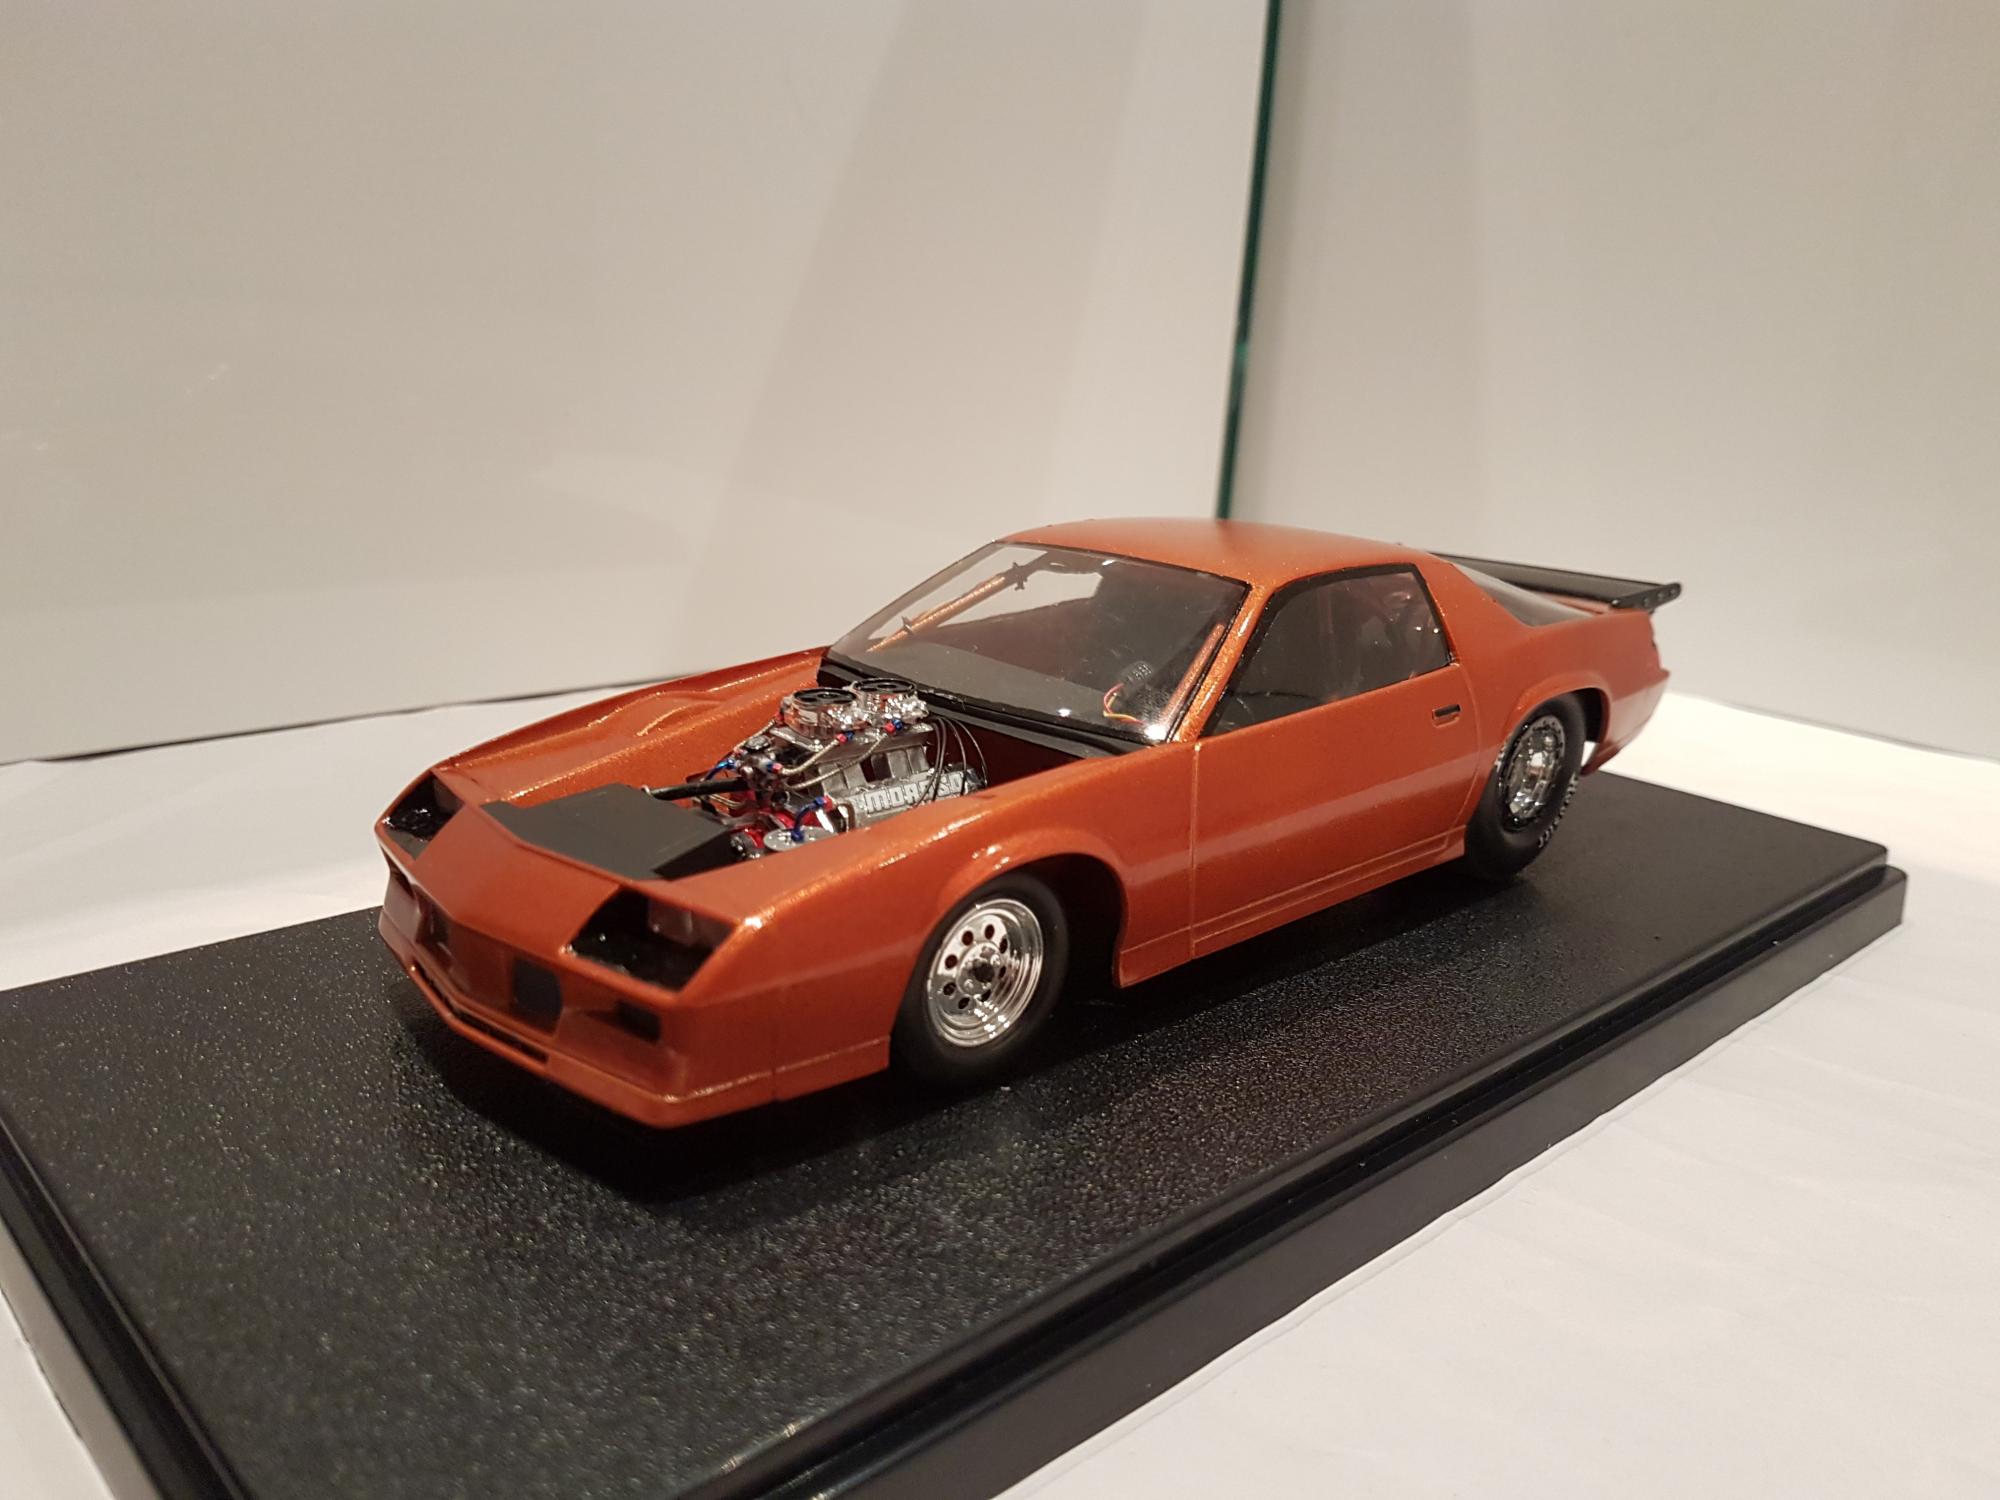
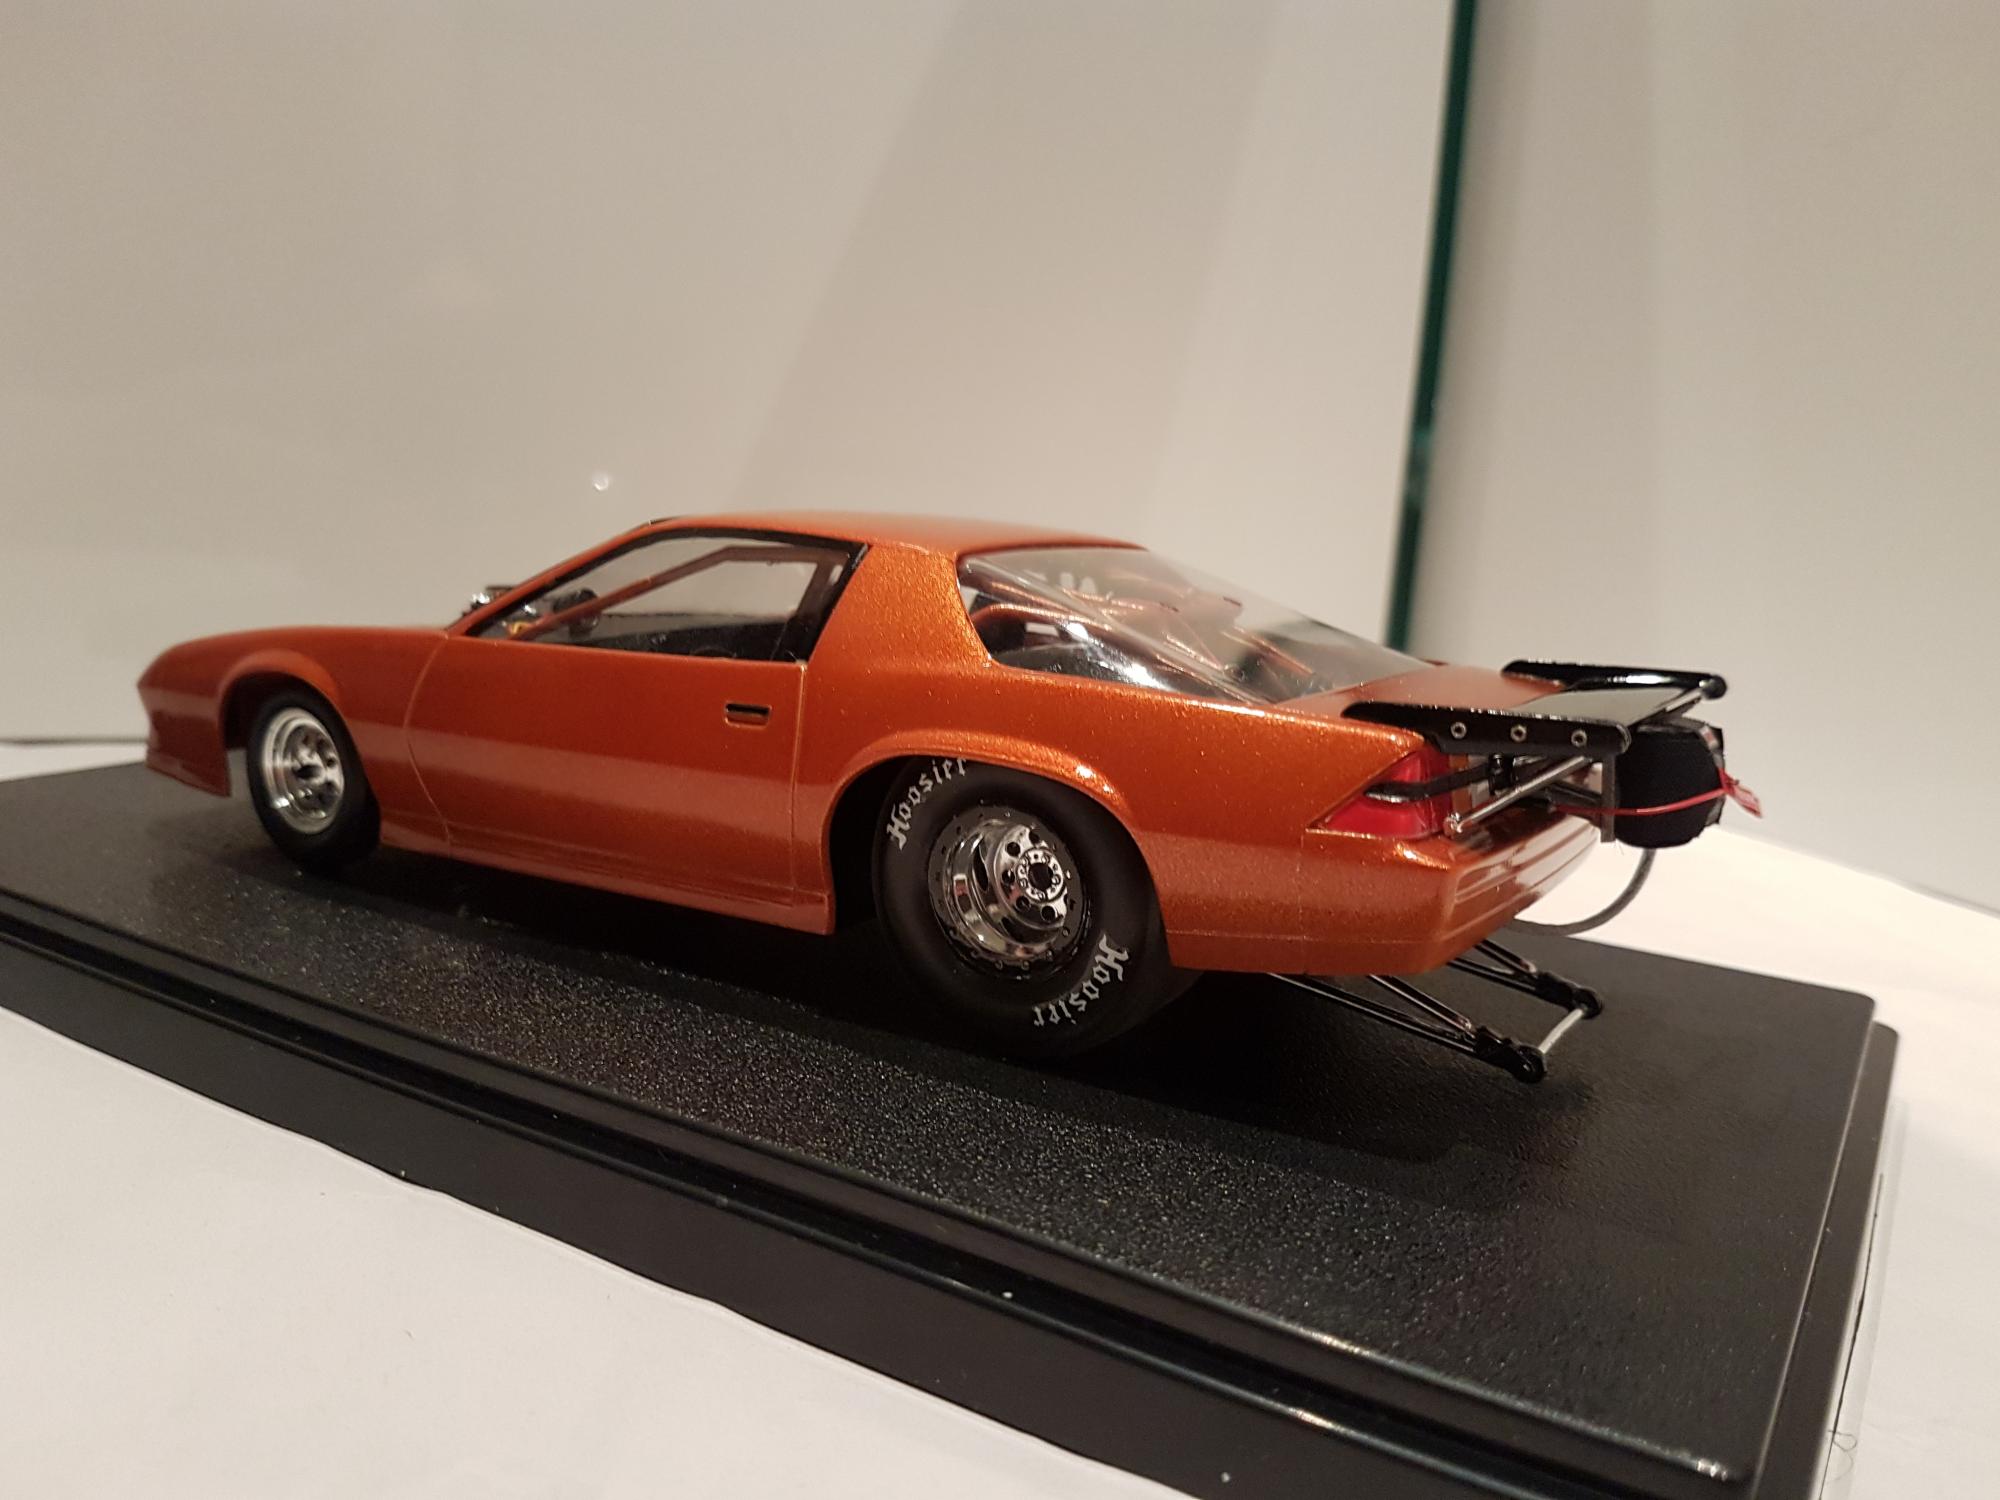
 This truck was supposed to be a quick build, something to tow the trailer with my 68 Mustang Drag (Link) on it. I quickly purchased the Revell '65 Chevy Stepside Pickup 2 'n 1 to take the place of an AMT 1953 Ford Pickup Street Machine that I simply failed at when building. I was going to make the custom version of the truck straight out of the box and paint it with the same rattle can red as what I painted the trailer it is going to be towing. However if you look at the pictures you will soon discover that I got a bit carried away with some customizing of my own. I went through my parts box and managed to find the stuff to put a supercharger and such on top of the engine. As you notice I also found am air horn...so I put it in the extra space in the engine compartment. I then looked over and saw a piece of styrene laying on the desk and decided that a truck like this needed a fiberglass tonneau cover over the bed. I made a custom spoiler for the cover also. I could not leave the bed alone and had to put some wood and strips of styrene painted chrome. The mirrors are from the 68 Mustang (who needs mirrors on a drag car anyway??). (the truck is straight, the board it is on is not) The last thing I did to finish the custom job on this truck was to put a custom exhaust on the bottom. I used some solder to make the pipes and added to round styrene for the mufflers. Once again I stole something from the 68 Mustang, the exhaust tips finish it out, don't you think? Thanks for looking
-
 Started this kit a week ago after a long time off from building. It started life as the revell gmc plow truck but, thats far from what it will end up as. I added the molding/ trim to the sides and tailgate sections, also added a drip rail, body dropped the bed floor so it can lay as low as possible. Should be a fun replica to build just need to find a set of wheels from a 72 Chevy truck kit like the stock hubcaps...
-
So i got some stuff from a good buddy of mine and he passed me on this what looks like a PROMO kit but i'm not too sure cause i've searched on ebay and can't seem to find one close enough promo wise to it. Can anyone help me out here and let me know what this actually is? It's a really nice clean car, well kept.
-
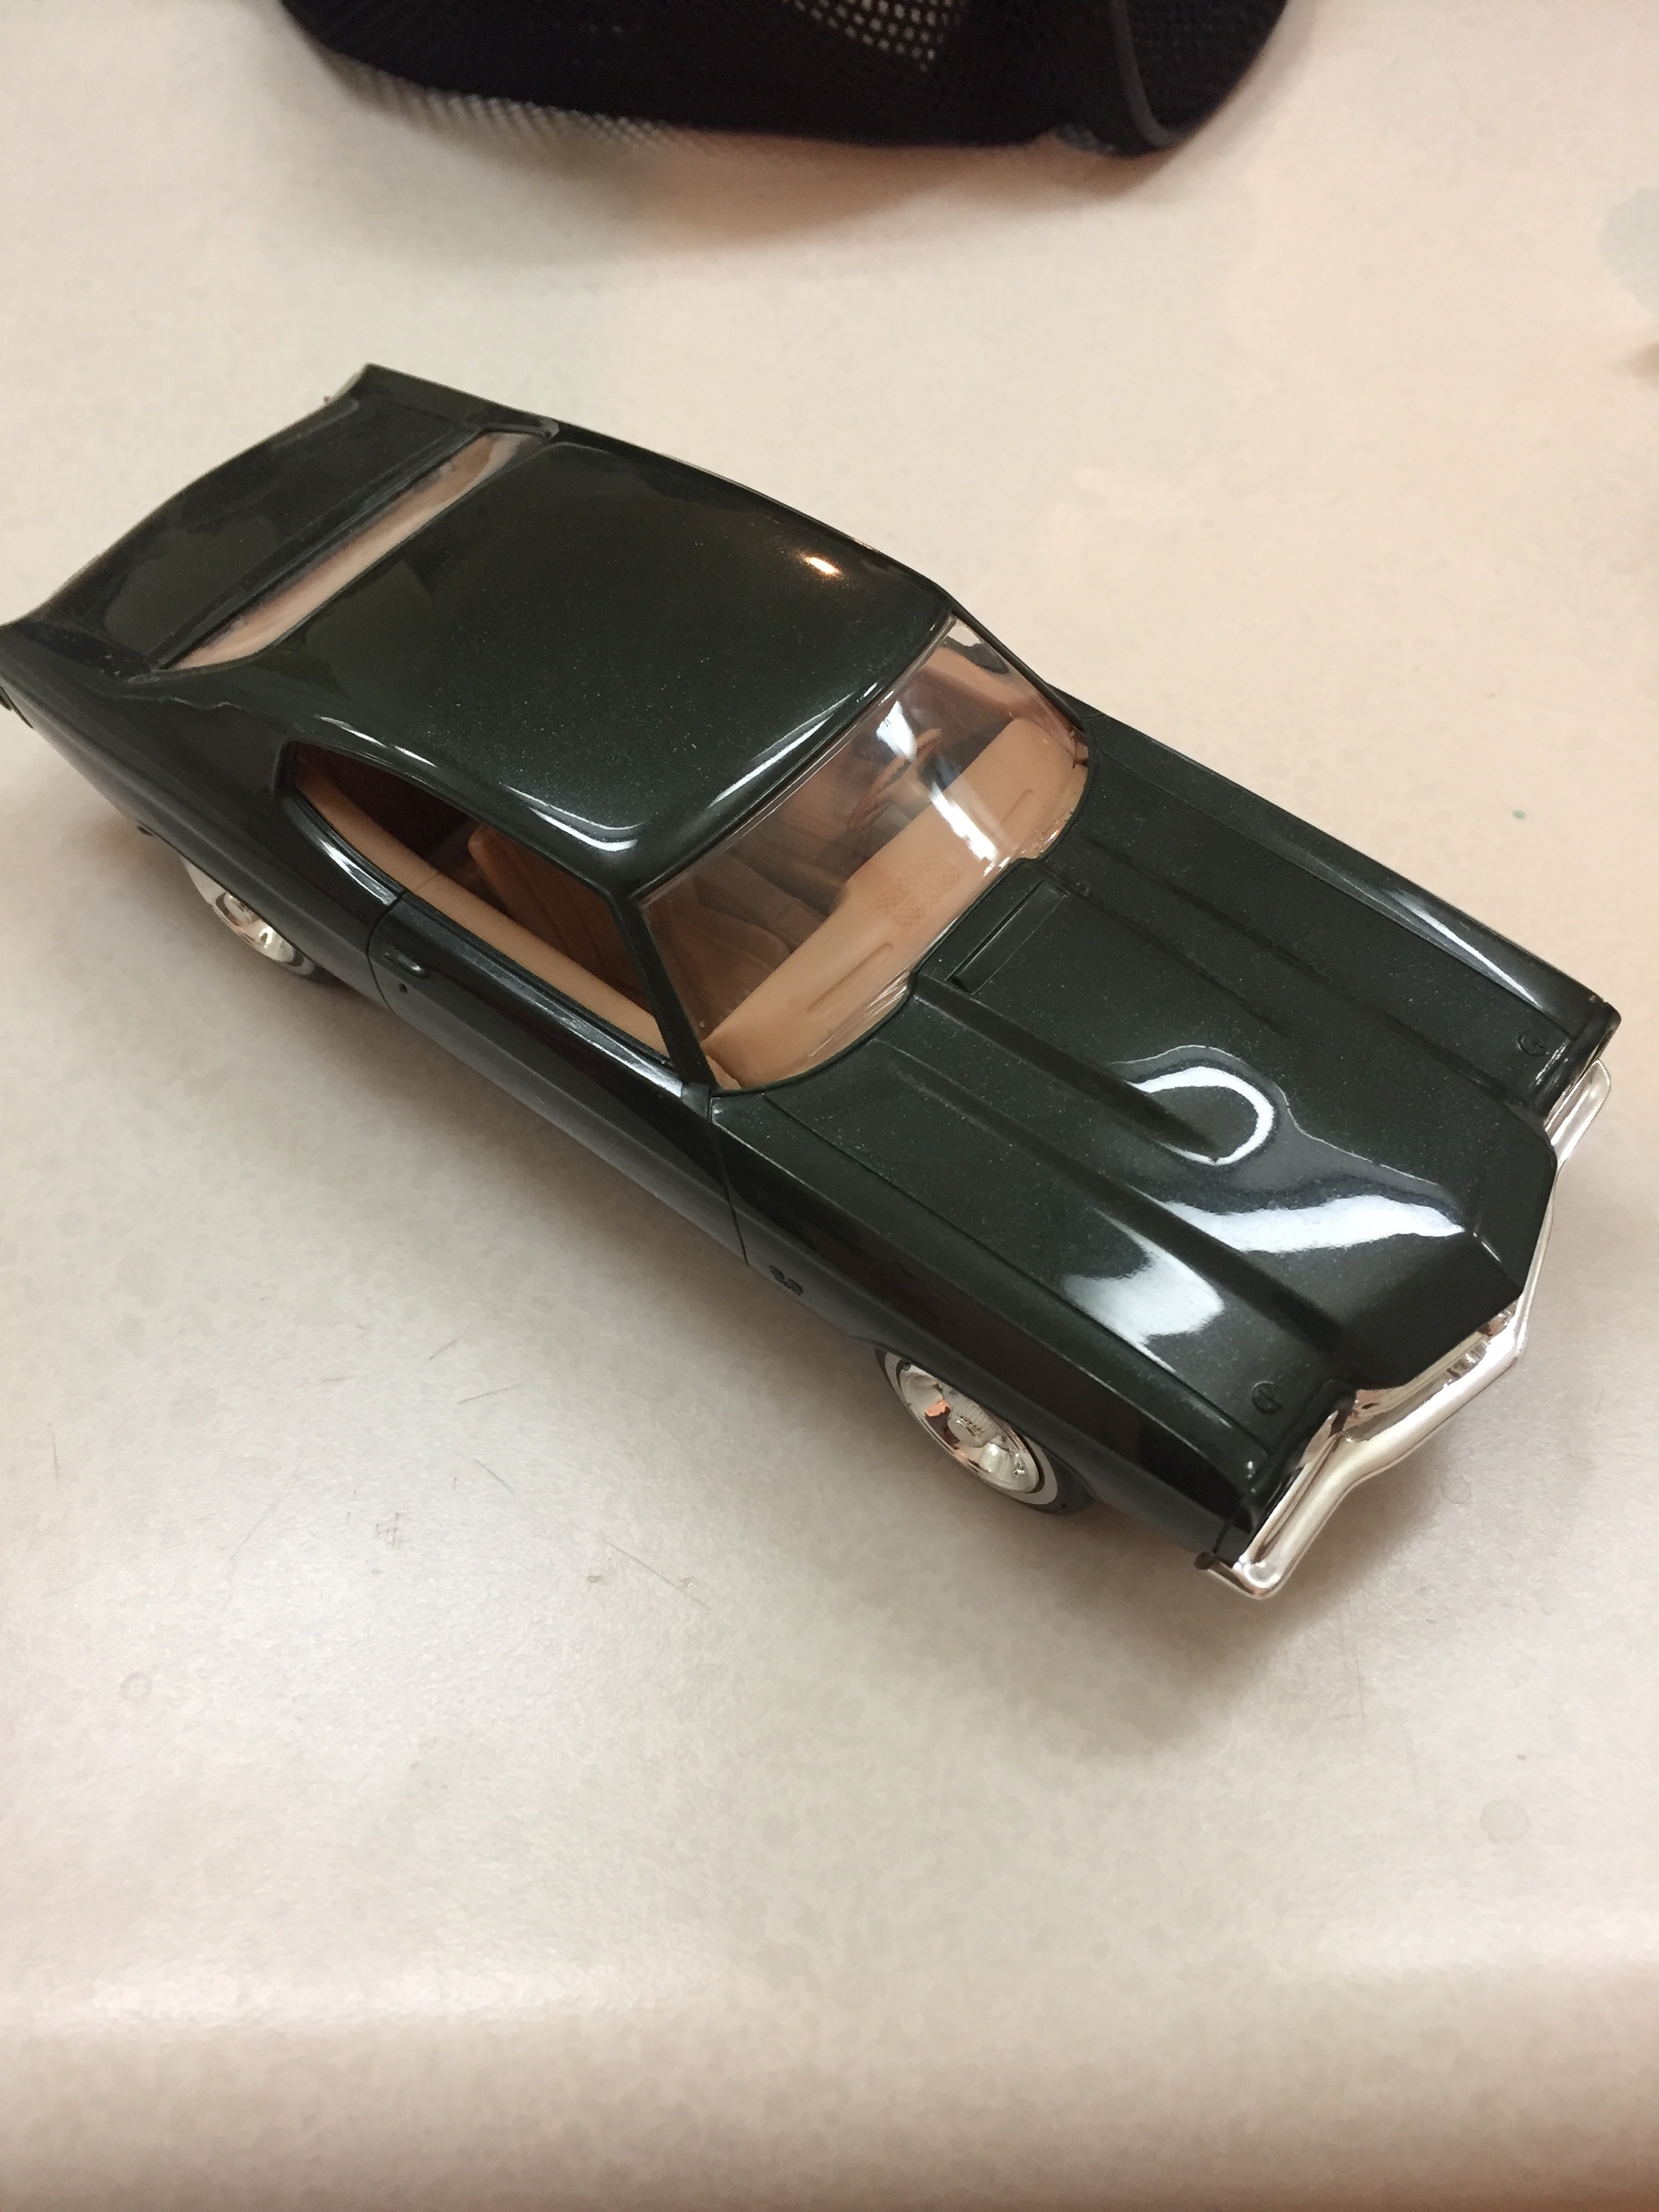
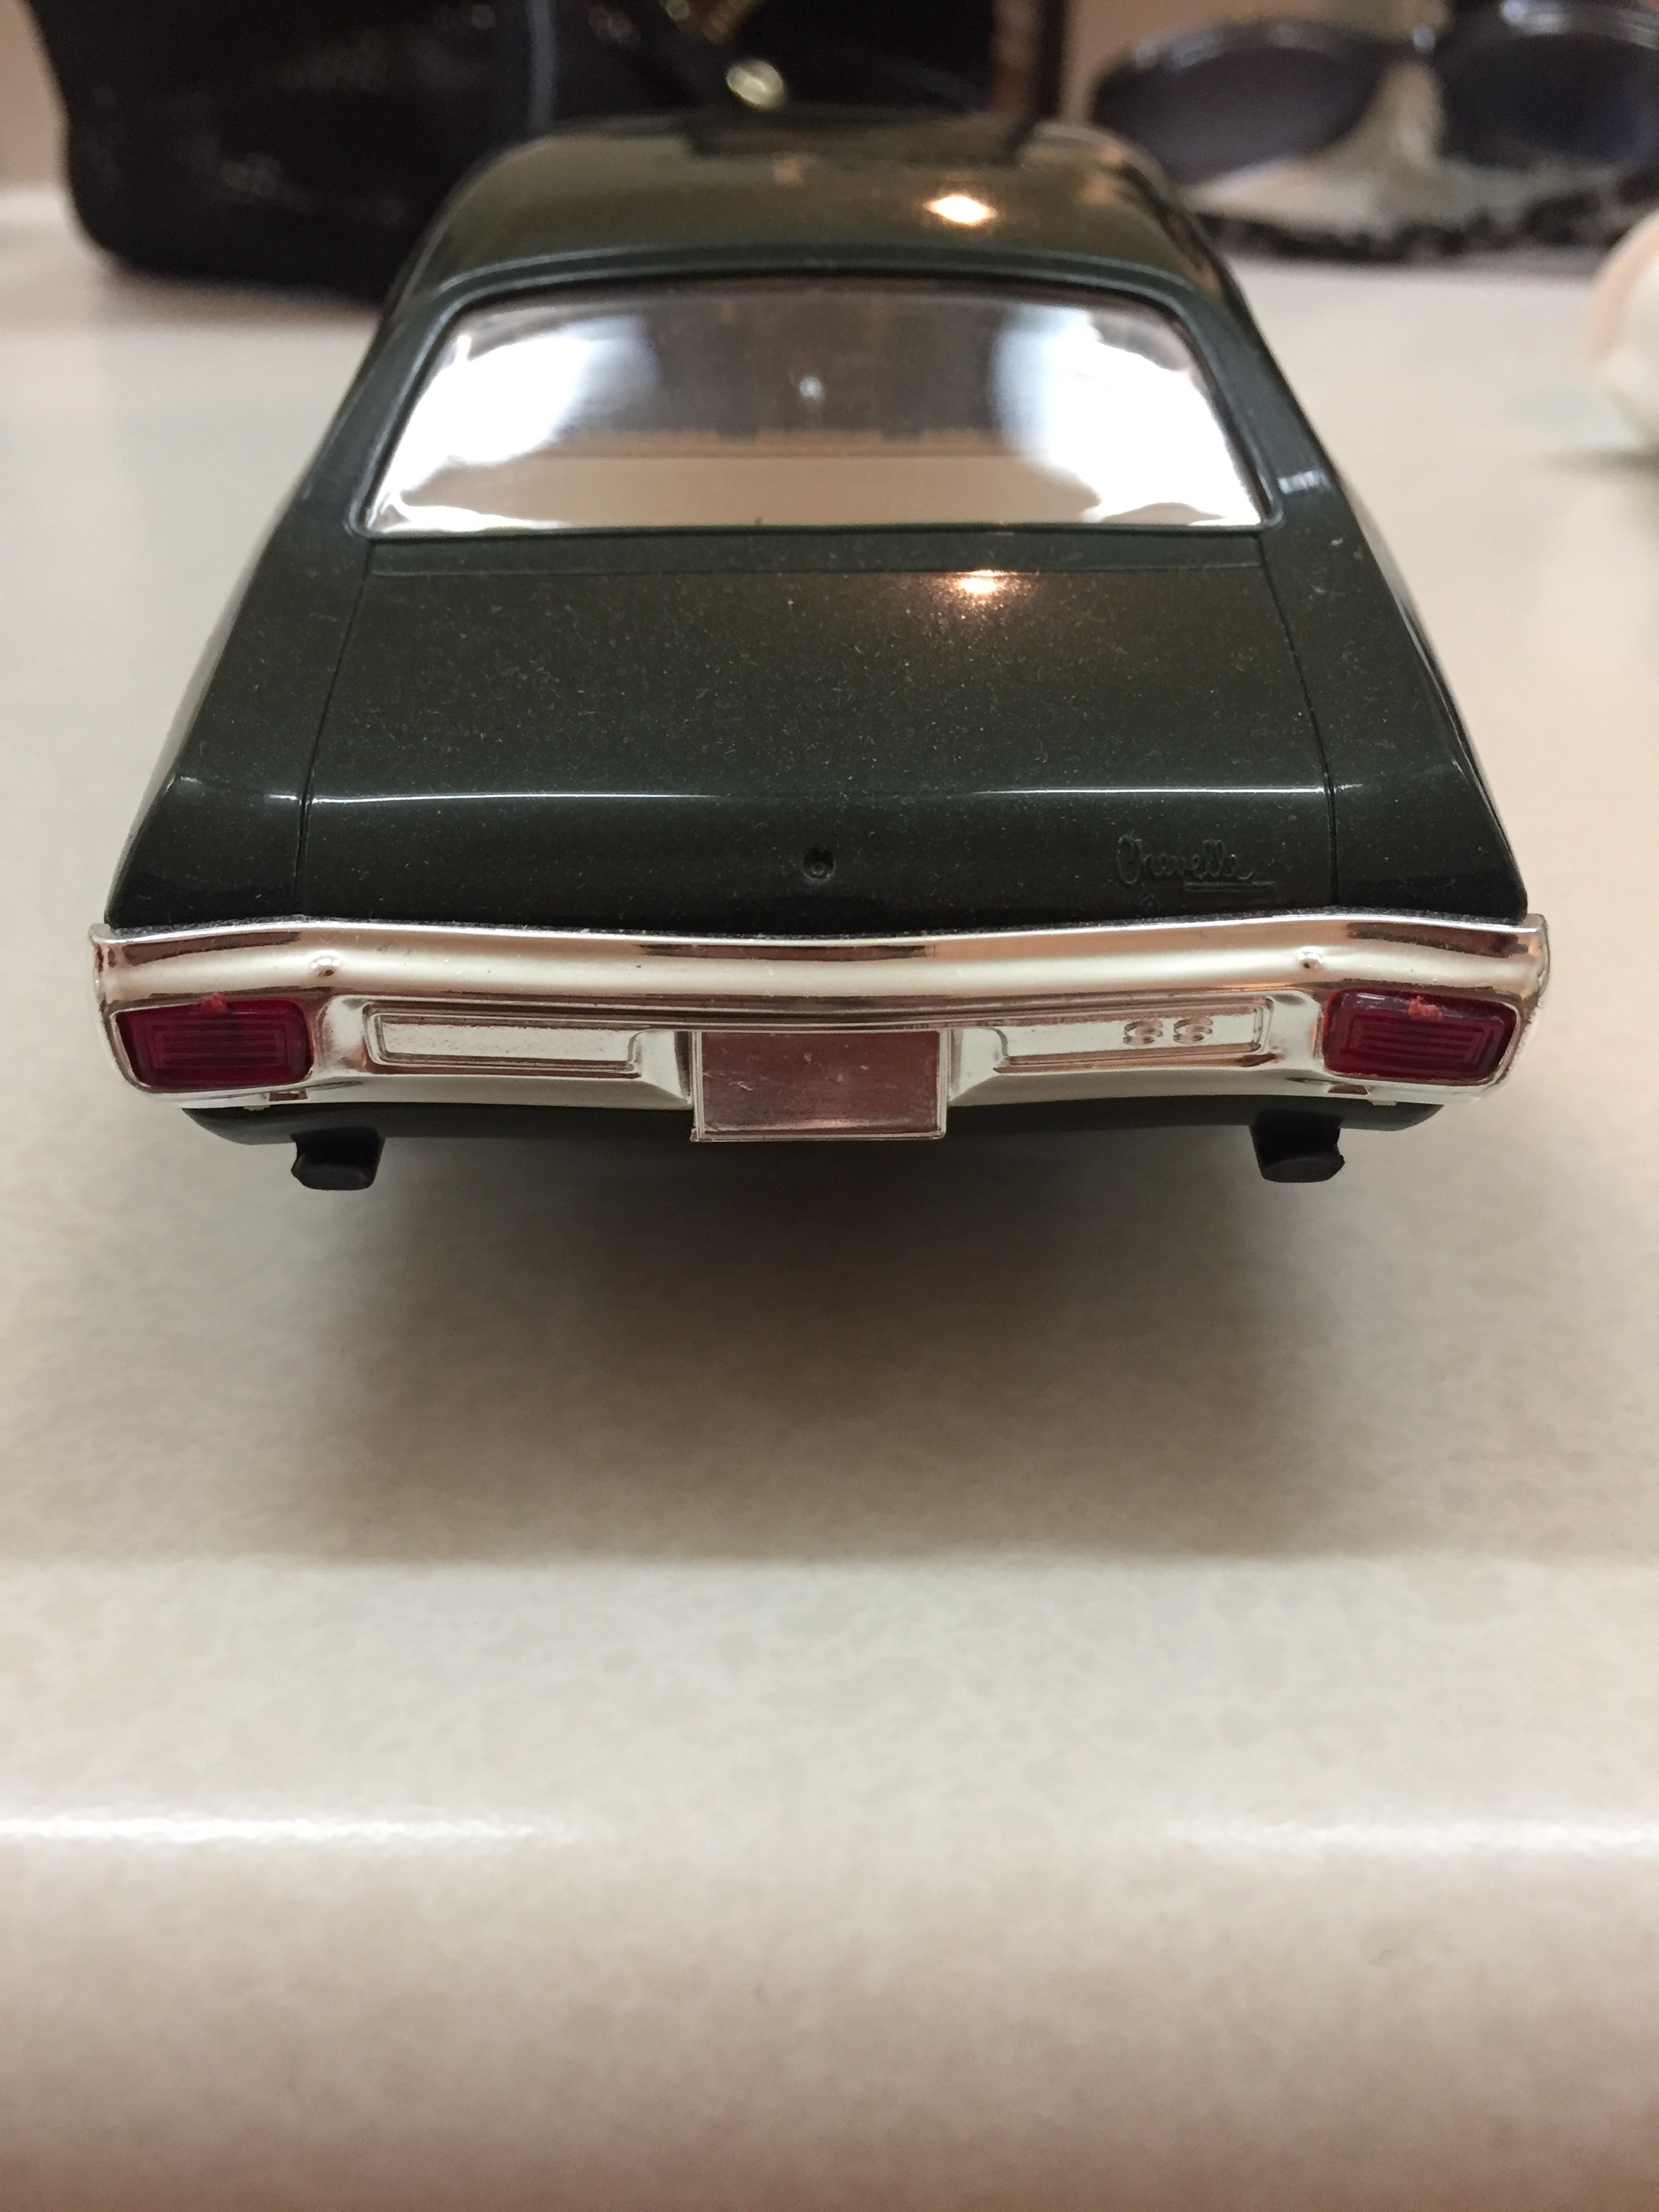
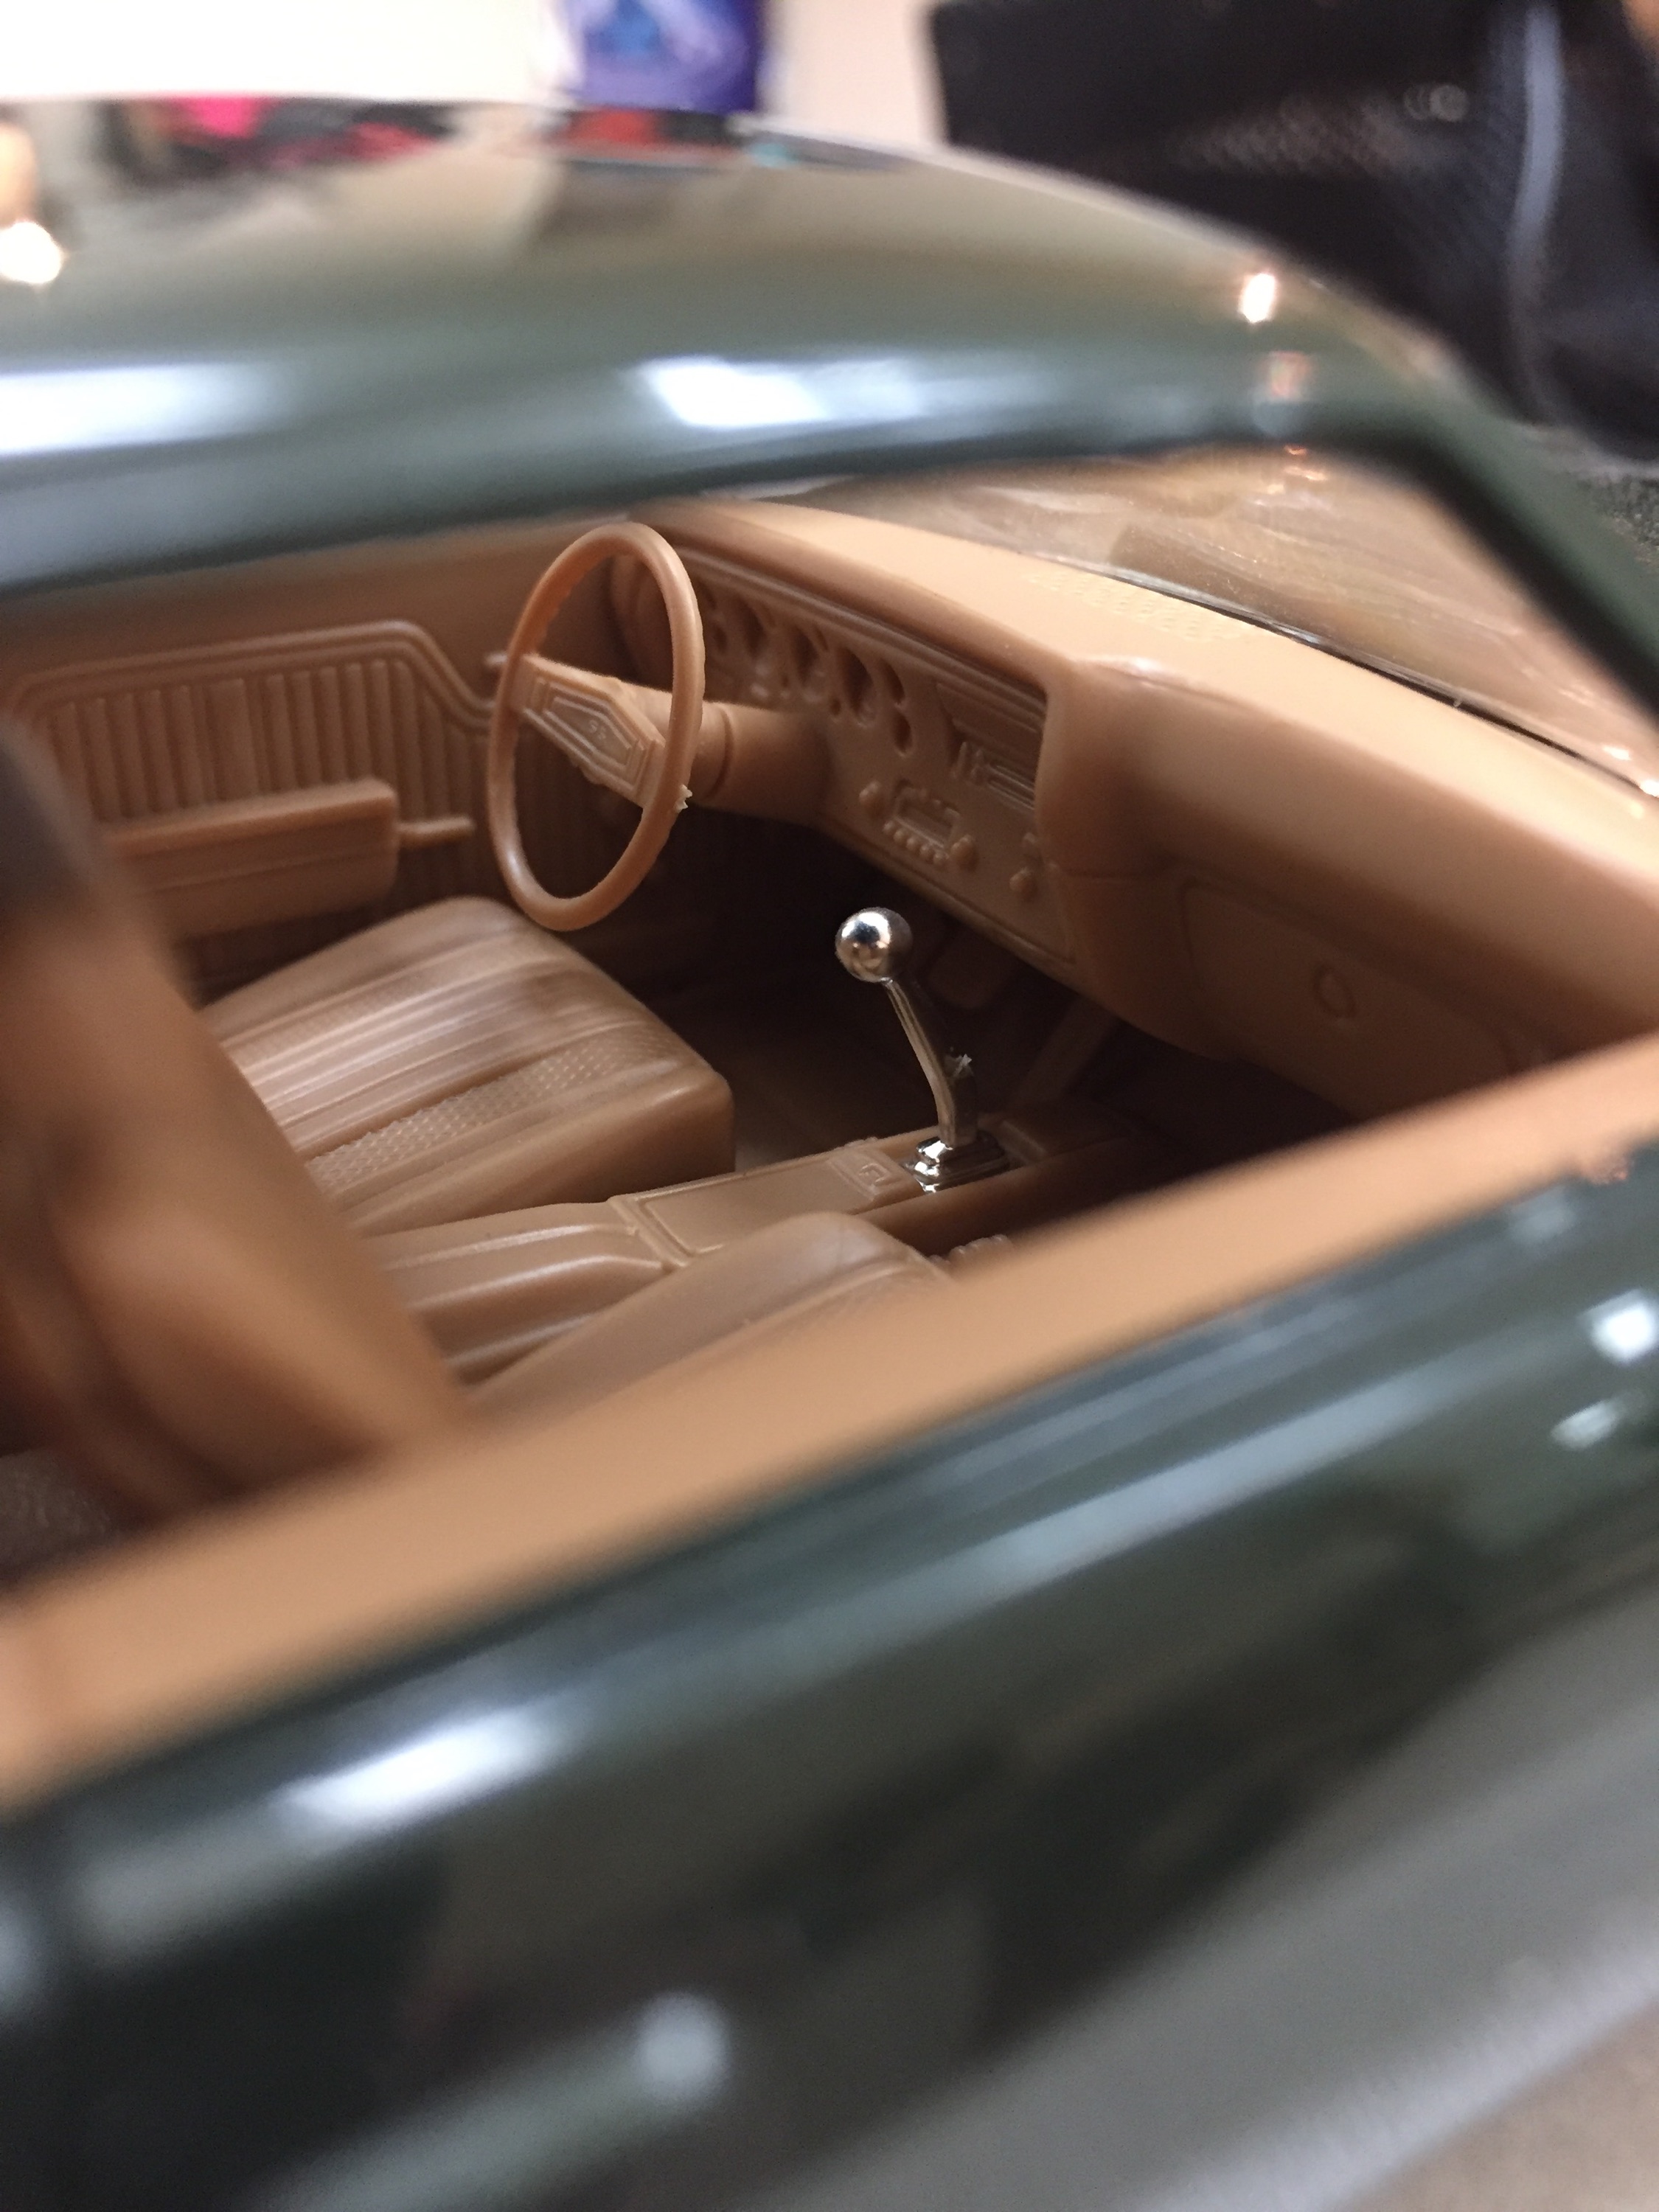
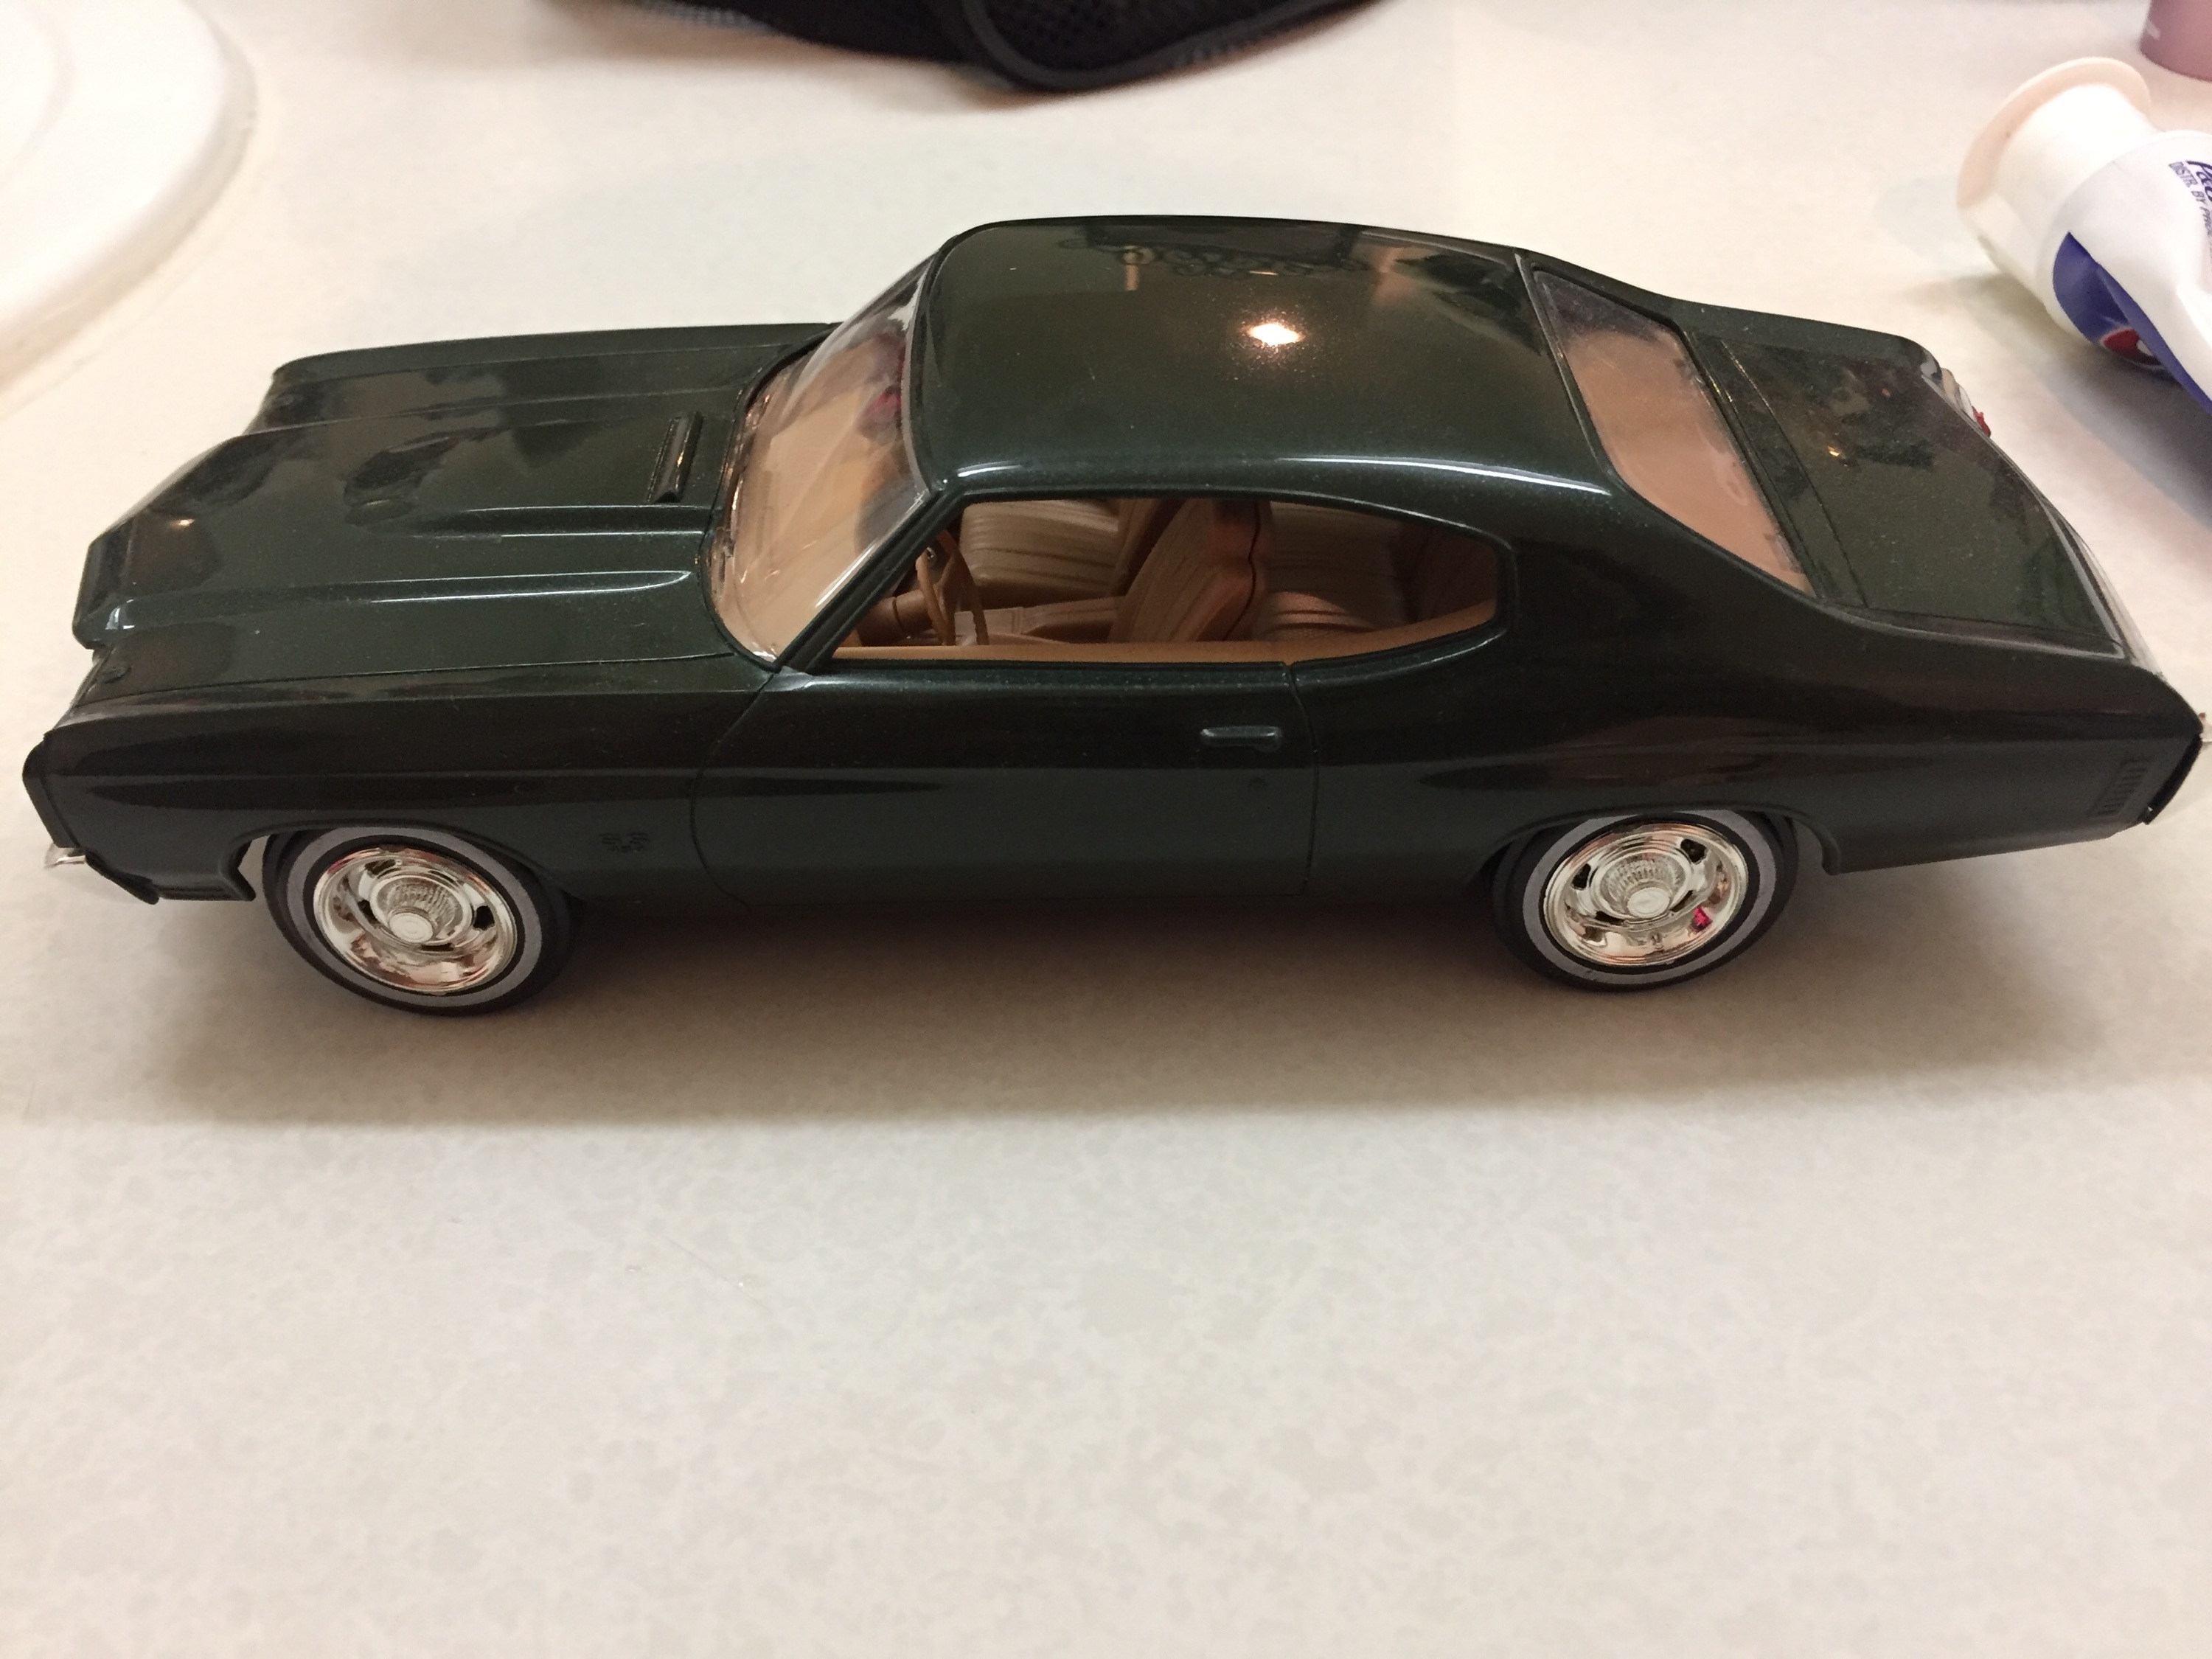
About 2 years ago I was made aware that one of my model customer (work at a hobby store) had become sick and was not able to make it back home. His wish was I would take all his kits and find home for the ones I would not use. After a few months of sorting and putting all the parts back in the right boxes (he started about 30 kits started and miss-matched parts) I started to work on a few, when I popped the the top on this box and saw what he had started (chassis with the tubbed rear end from the First release of the Revell 67 Chevelle pro street) I was pretty excited. So after sitting and thinking for a bit I mounted to diff and had to re-do the rear end housing to make it wider to fill the wheel wells properly. After that I changed the rims to ones on it now (couldn't stand the centerline chevy emblem ones) I hot another road block some of the chrome was missing. For those who don'y know what i was starting with here is what the kit box art is this was after the first night of playing and mounting the new rims. Made a tail gate filler panel so after thinking of what i was going to do to fill the missing chrome void i did this for the front bumper and added some screen for a grilles so for the box i tried to fill it best i can, keep in mind the tubs are on the chassis (black part) and the rest is part of the box So for the rear I carried on the lines from the bumper and tail lights, should look not bad. Not a lot of filler was required due to me cutting out the mold lines and filling it with styrene and then sanding it all to shape. For a motor I wanted something big and had killer look to it, but not too unbelievable for scale effect. I purchased a Ross Gibson Alley rat 502 tpi motor a few years ago and tossed it in the goody box so I couldn't thing of a better home for it. More to come after I get some more bench time in.
-
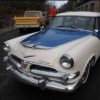
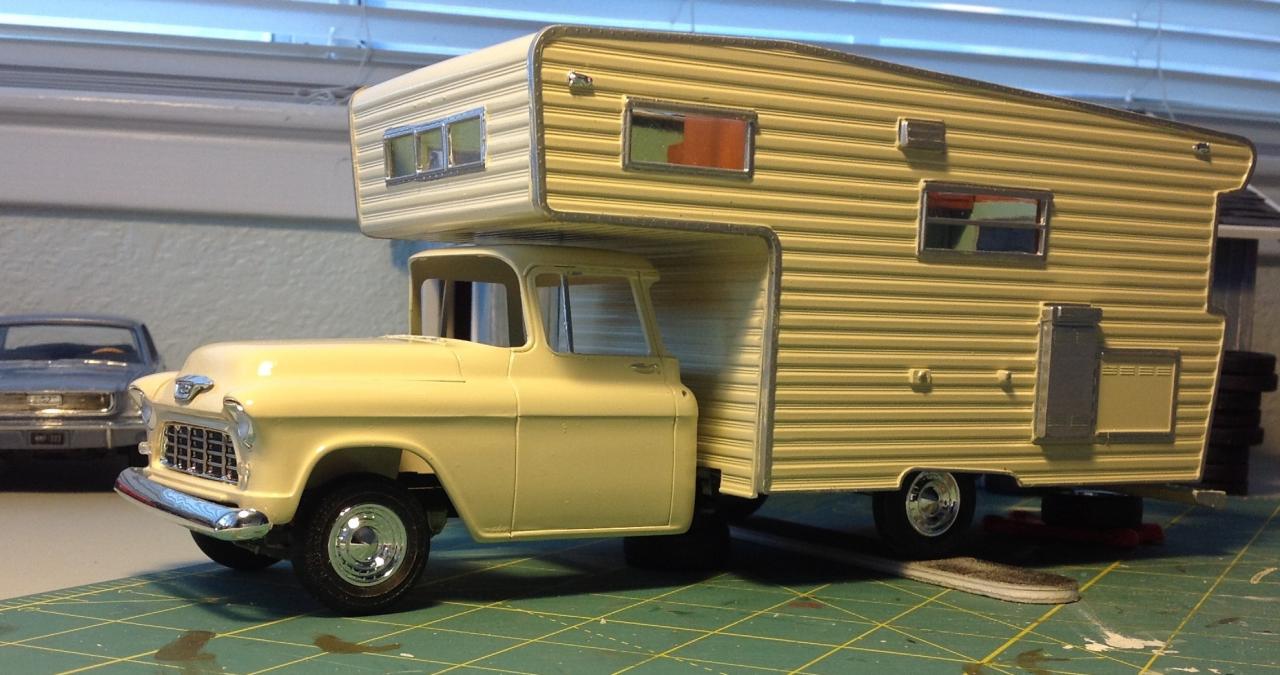
 This is a mock-up of my Open Road Camper, with a 1955 Chevy Cameo in front of it. The original release of the camper kit came with a truck. I believe it was a 1967 Chevy. But the AMT re-release did not come with a truck. It was a 'stand alone' camper. I wanted to connect it to a truck, but found it hard to find a match. As you can see here on the photo, the suspension of the camper is too low. I placed the camper on a sanding stick to verify the difference in hight. I think I need to take the wheels off under the camper and elevate the suspension a bit.
-
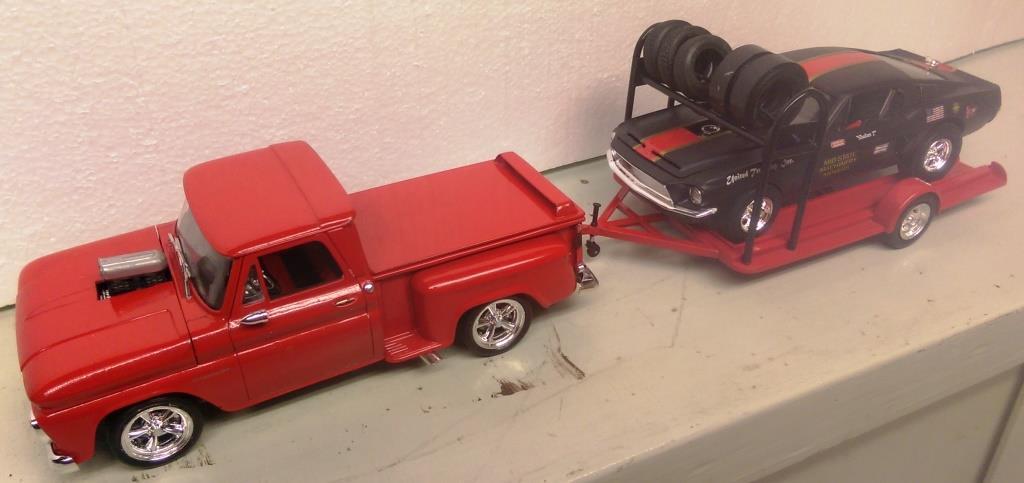
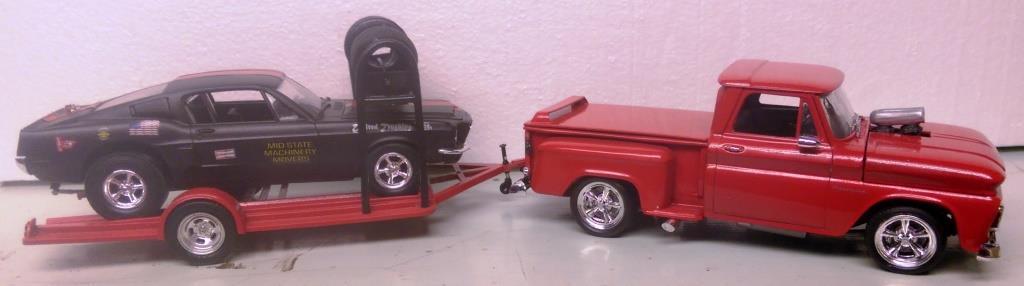
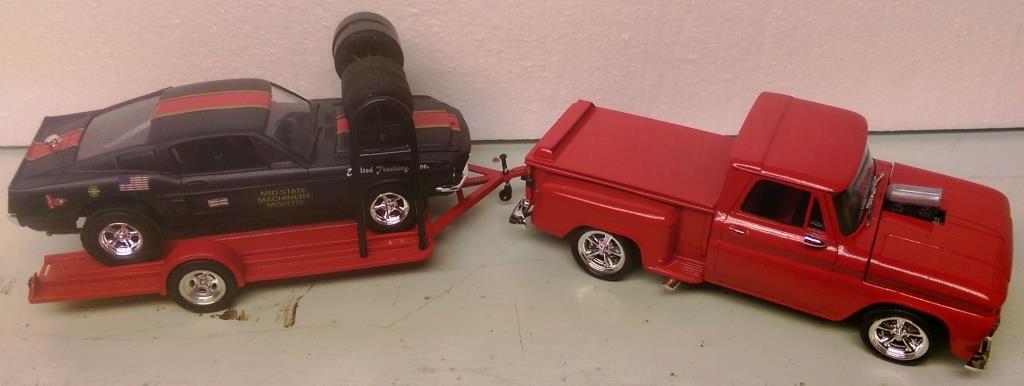
I finally finished my 1965 Chevy Stepside, trailer and 1968 Mustang Drag. I got the trailer from a junk yard I got off ebay. Put some nice rims on the trailer and added the scratch buit tire rack on the front. Thank you for looking Original '68 Mustang Drag thread - Link Original '65 Chevy Stepside thread - Link
-
Had a few issues with fit and still have to do a few touch ups, but it came out great.
-
Hey all! I'm still pretty new to the model scene but have loved so far what I've seen on this forum. There's a lot of amazing talent around here and it's definitely inspiring. This is my first finished model while being a member on this forum. I always want to improve on my model building so constructive criticism is always welcome. Thanks for looking!
-
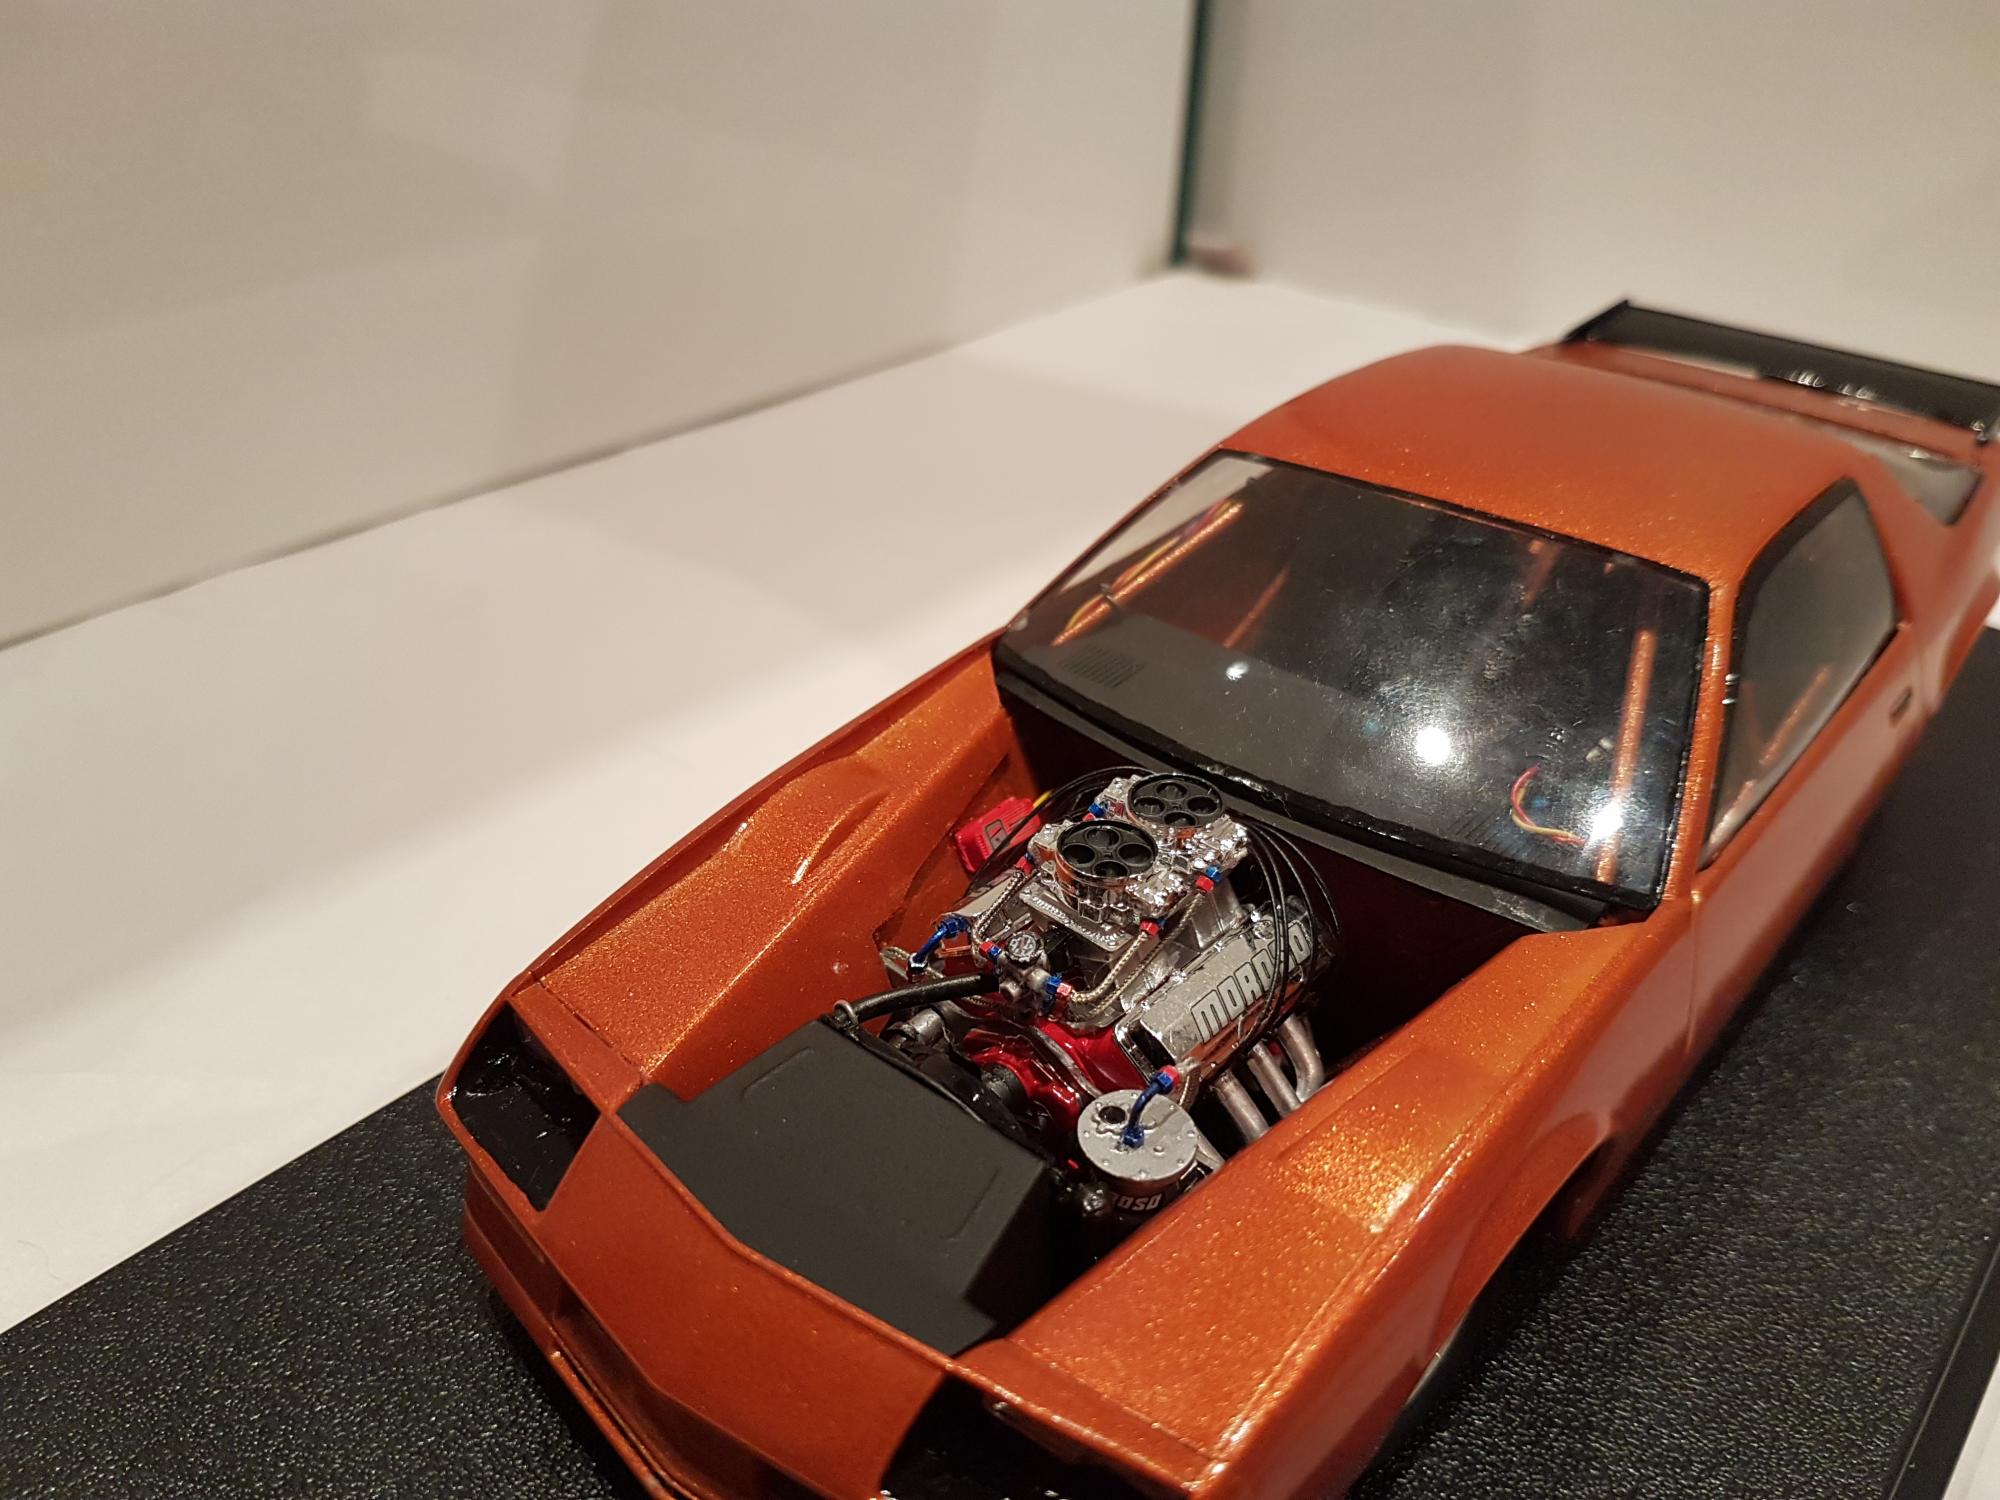
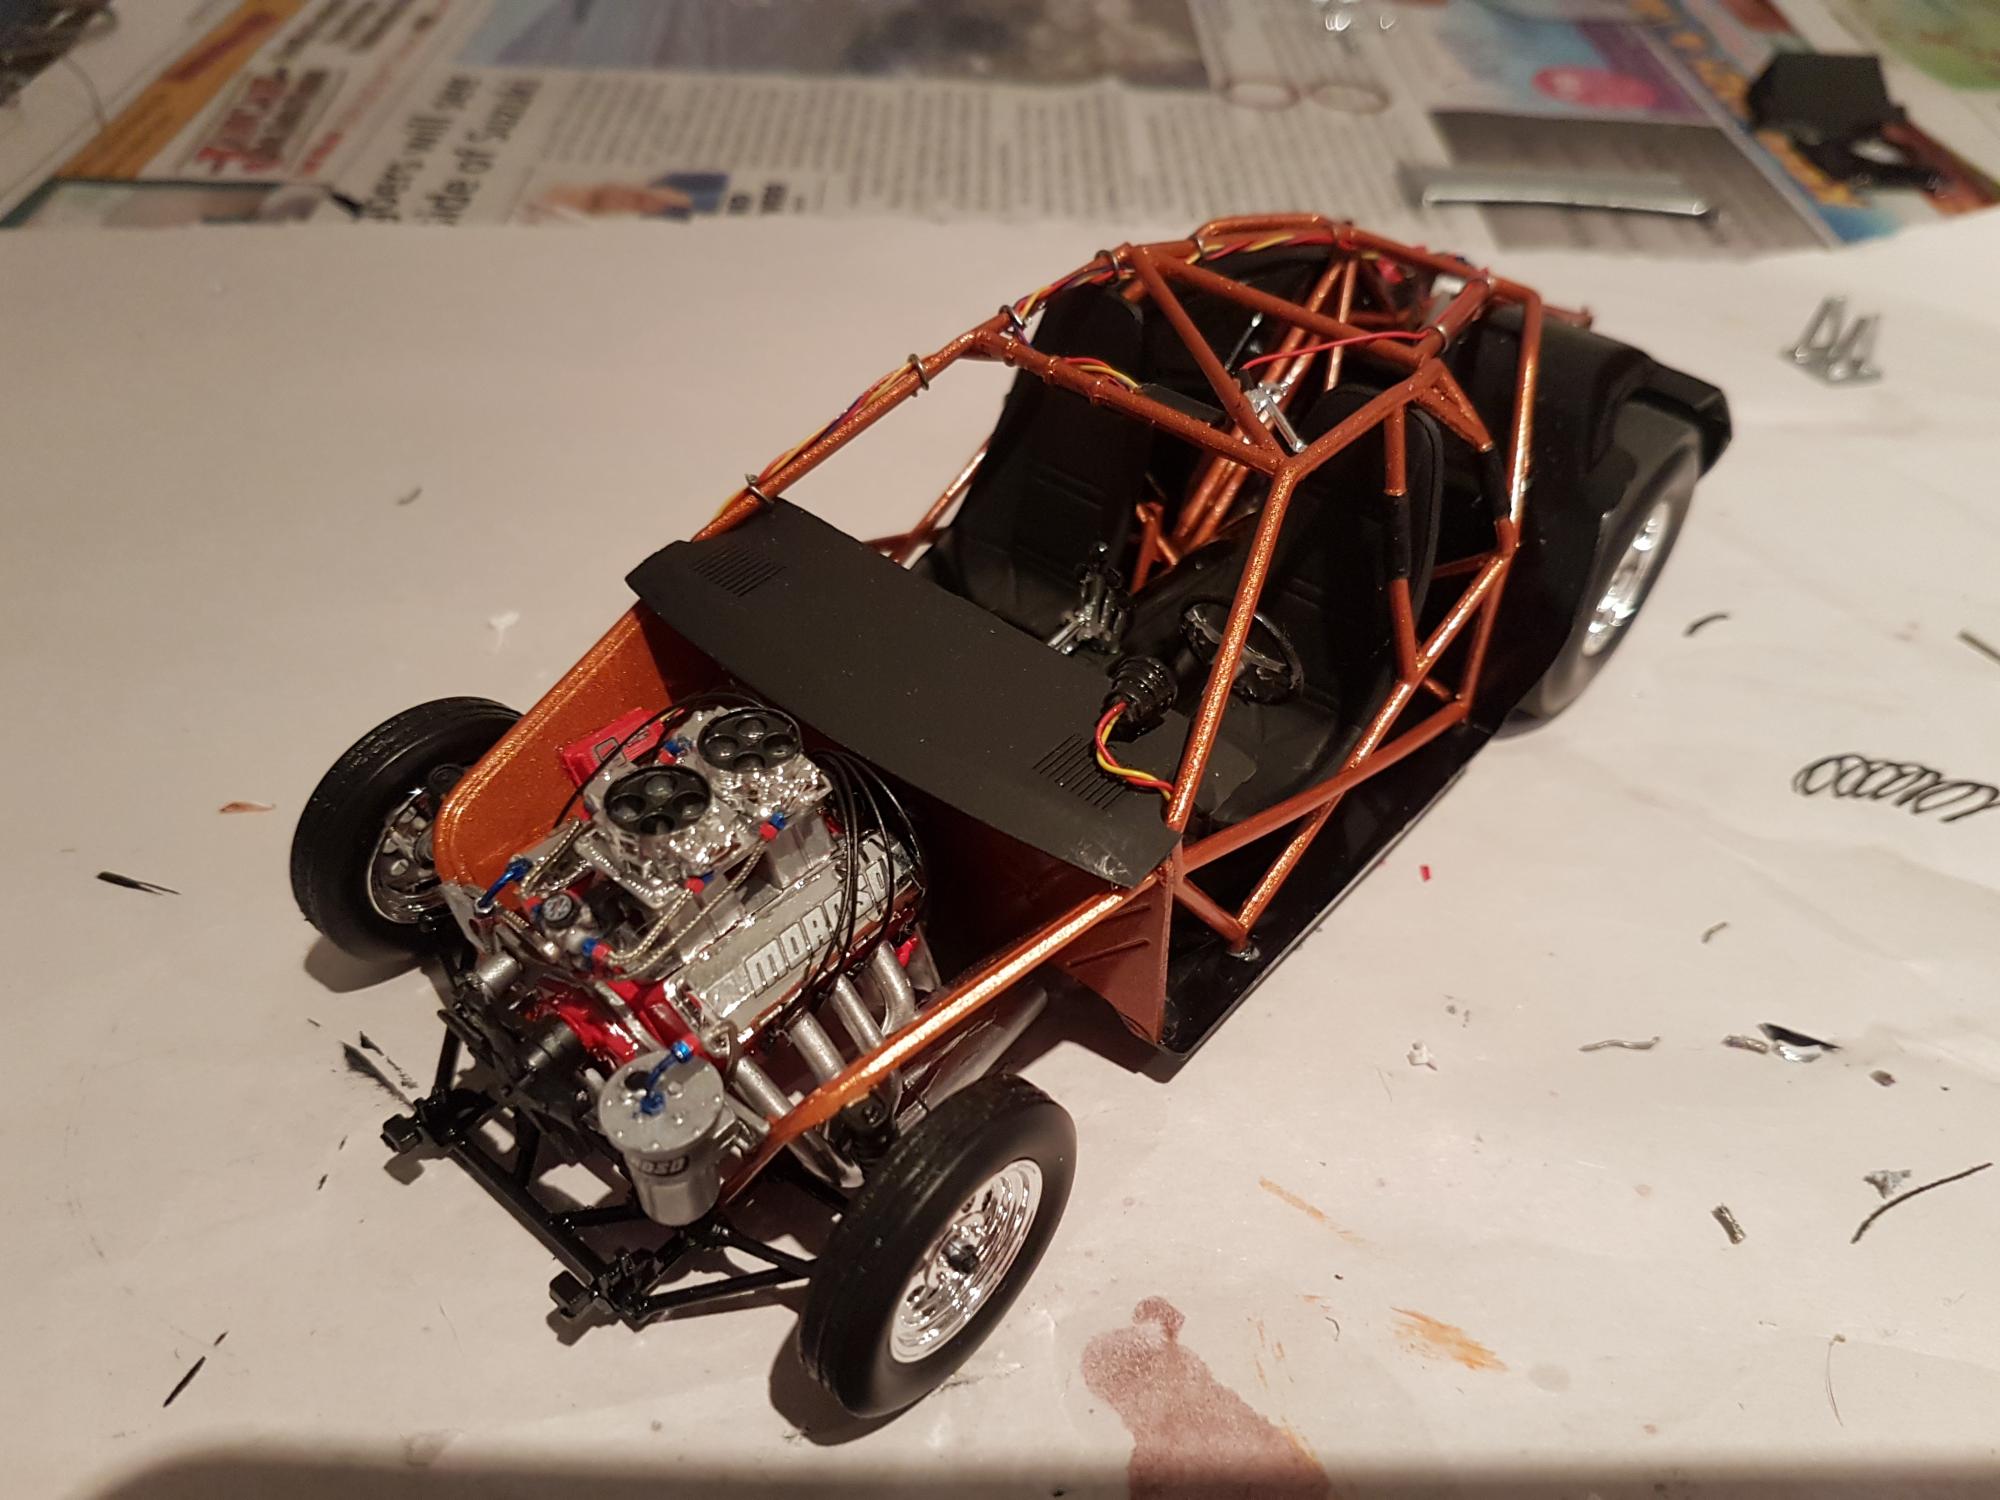
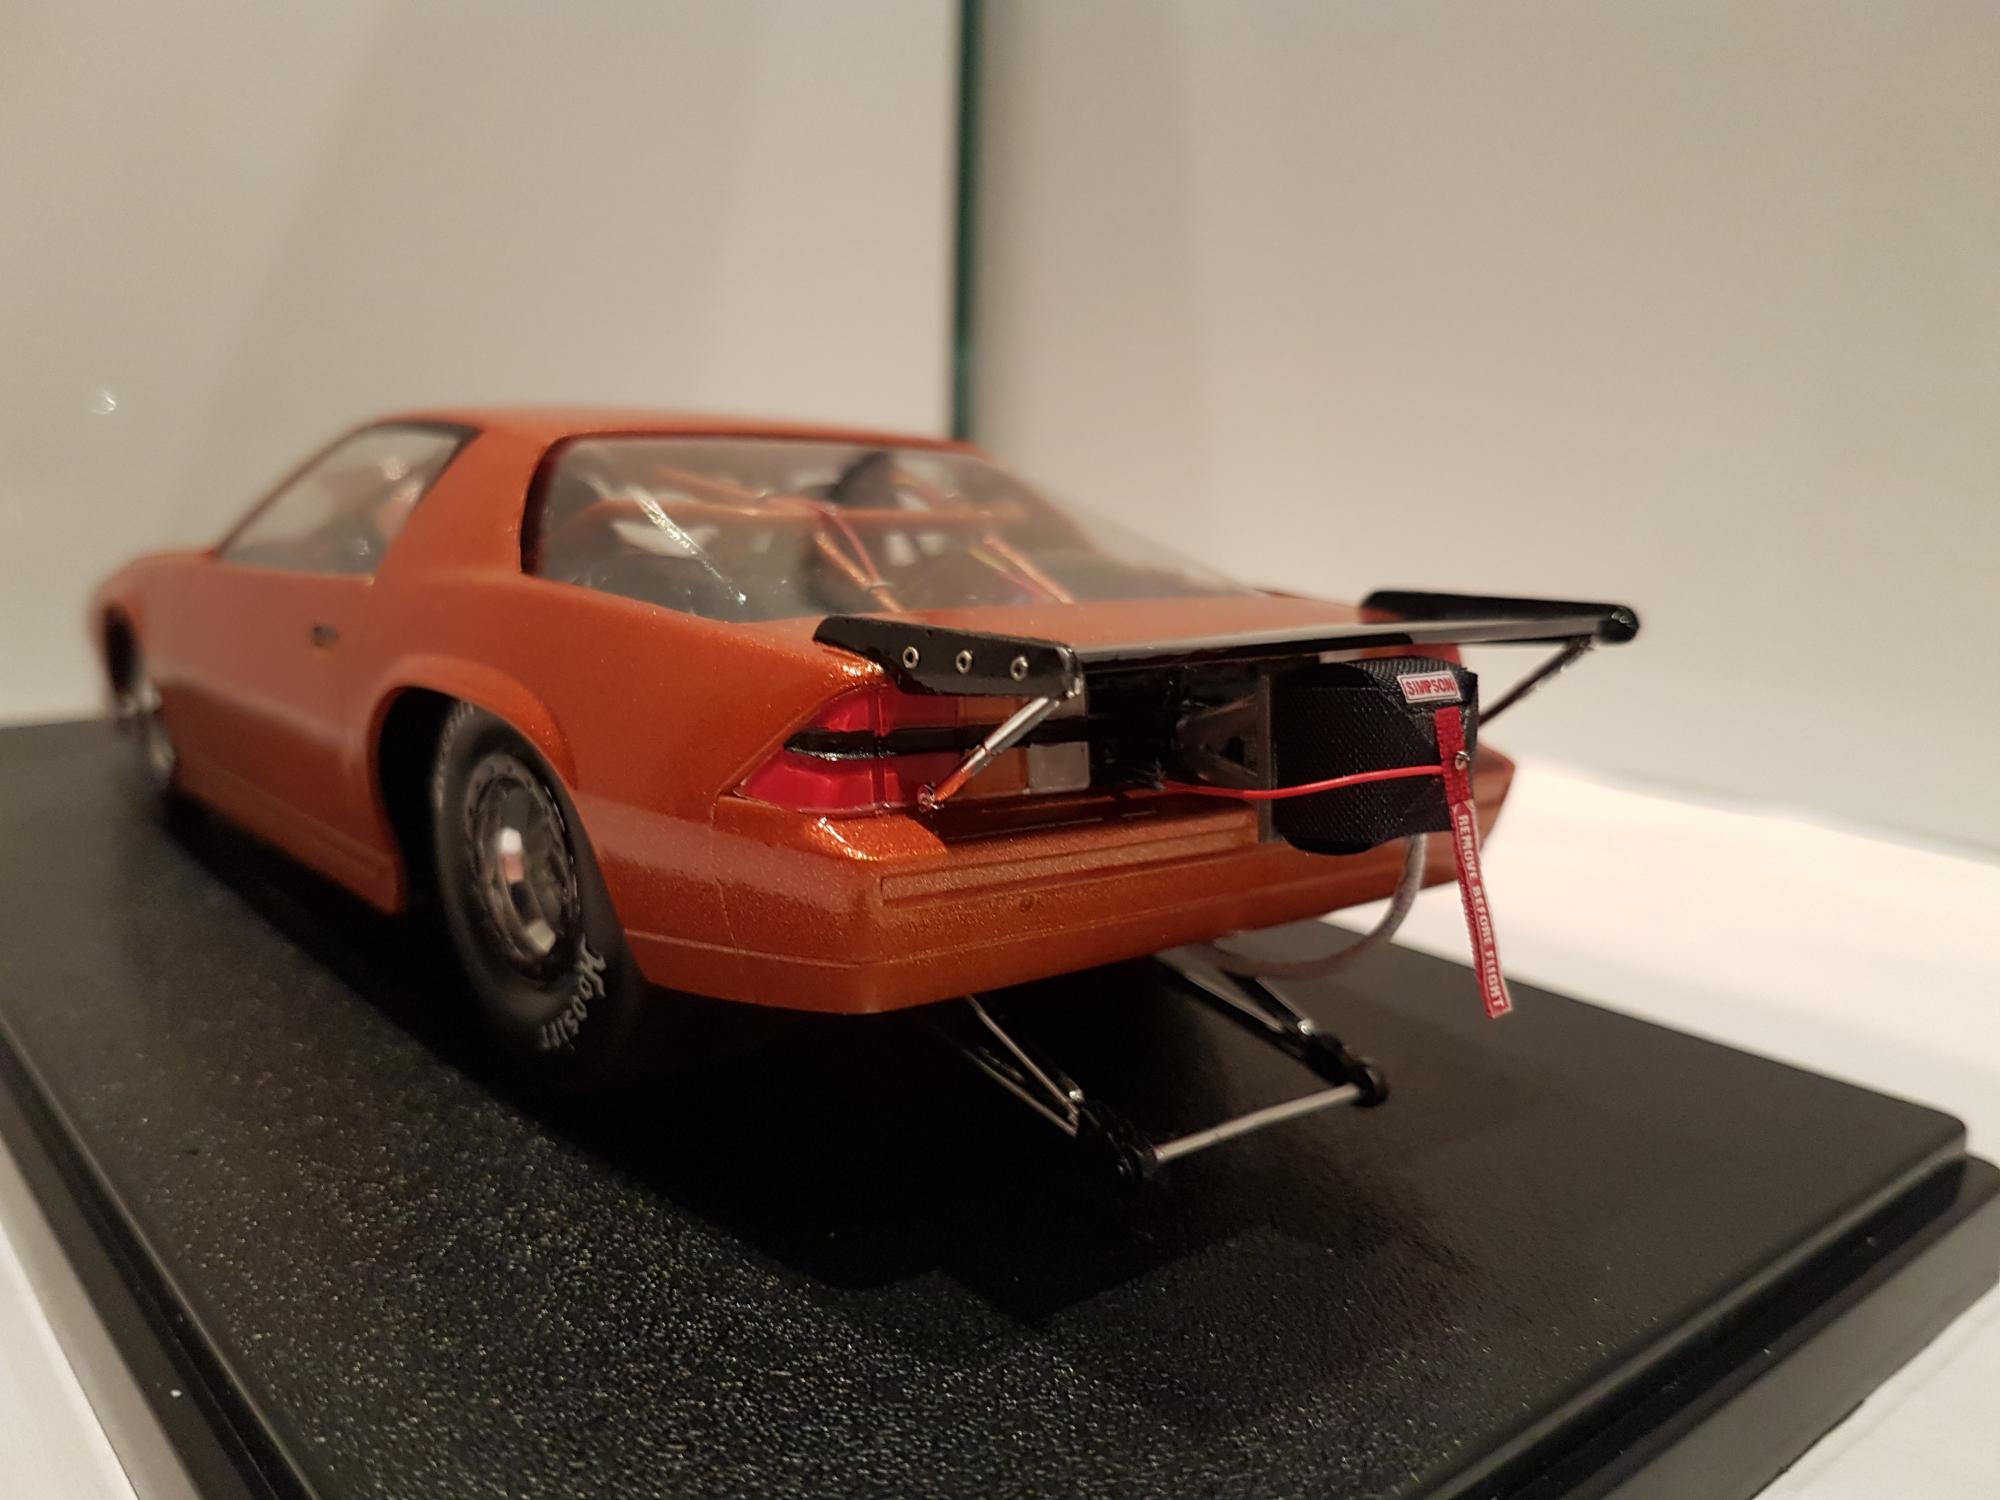
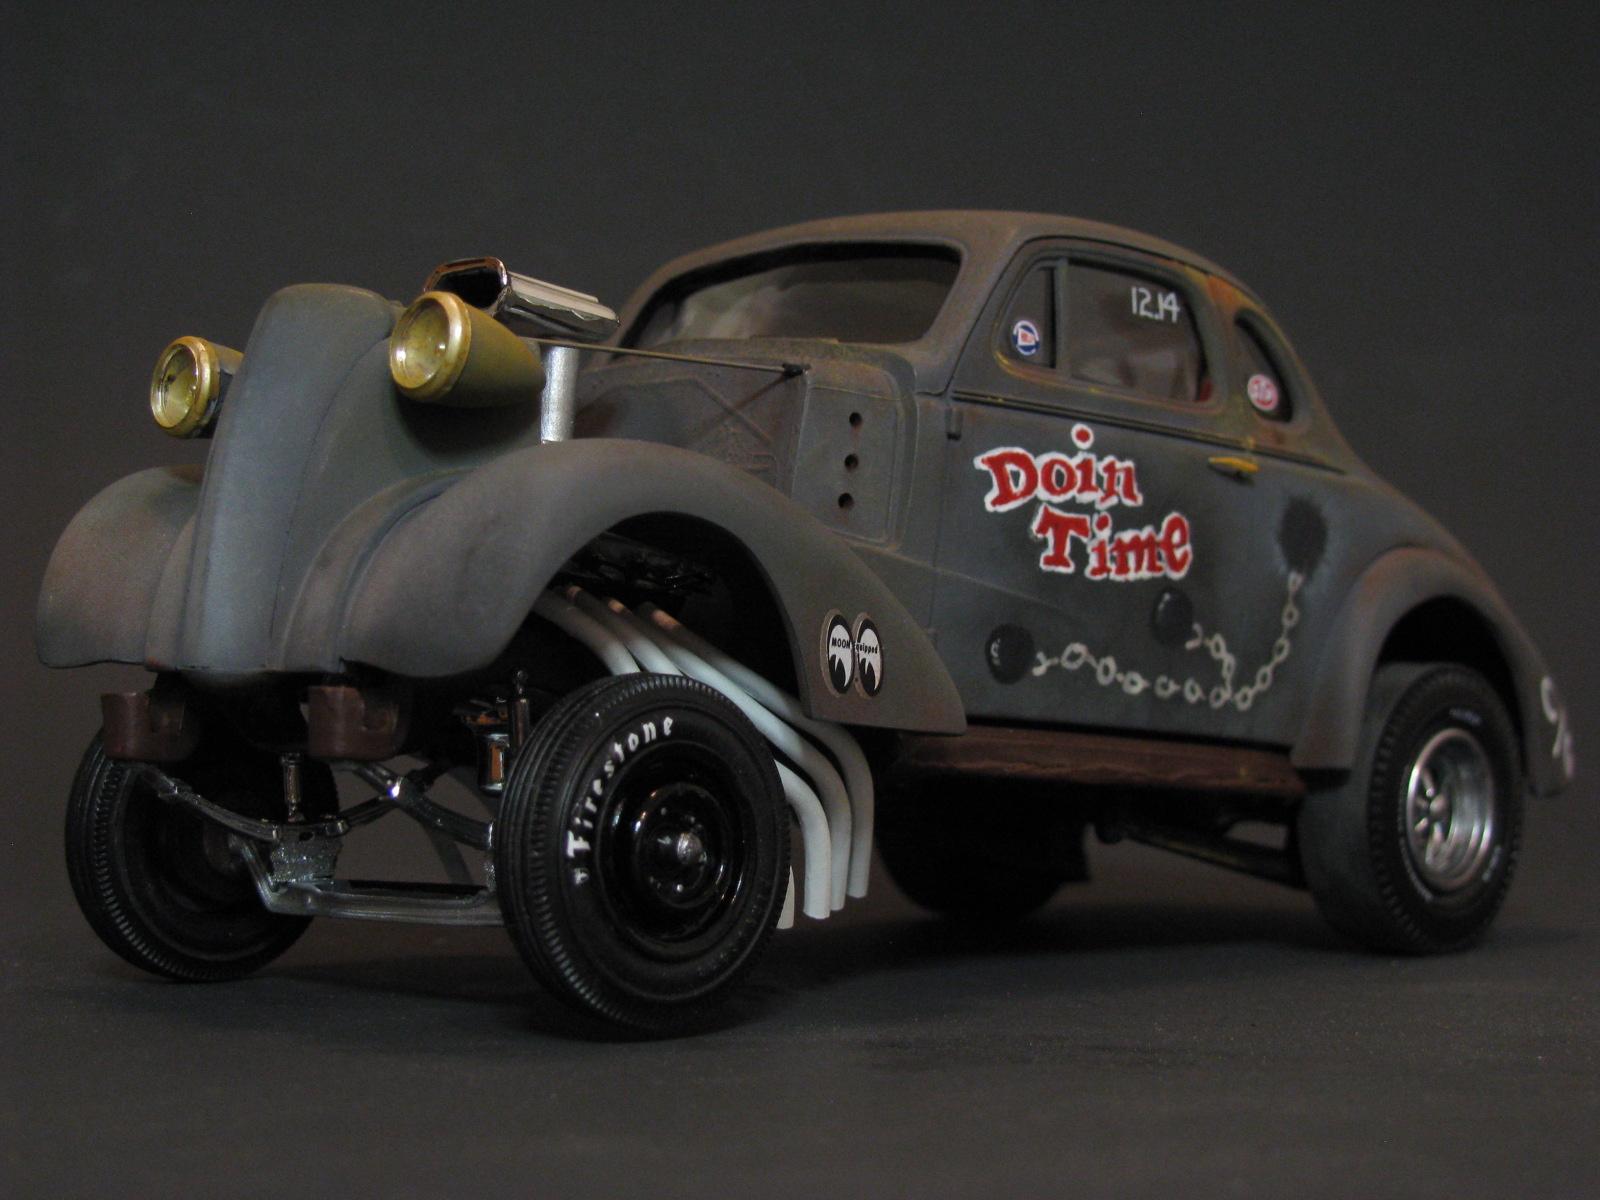
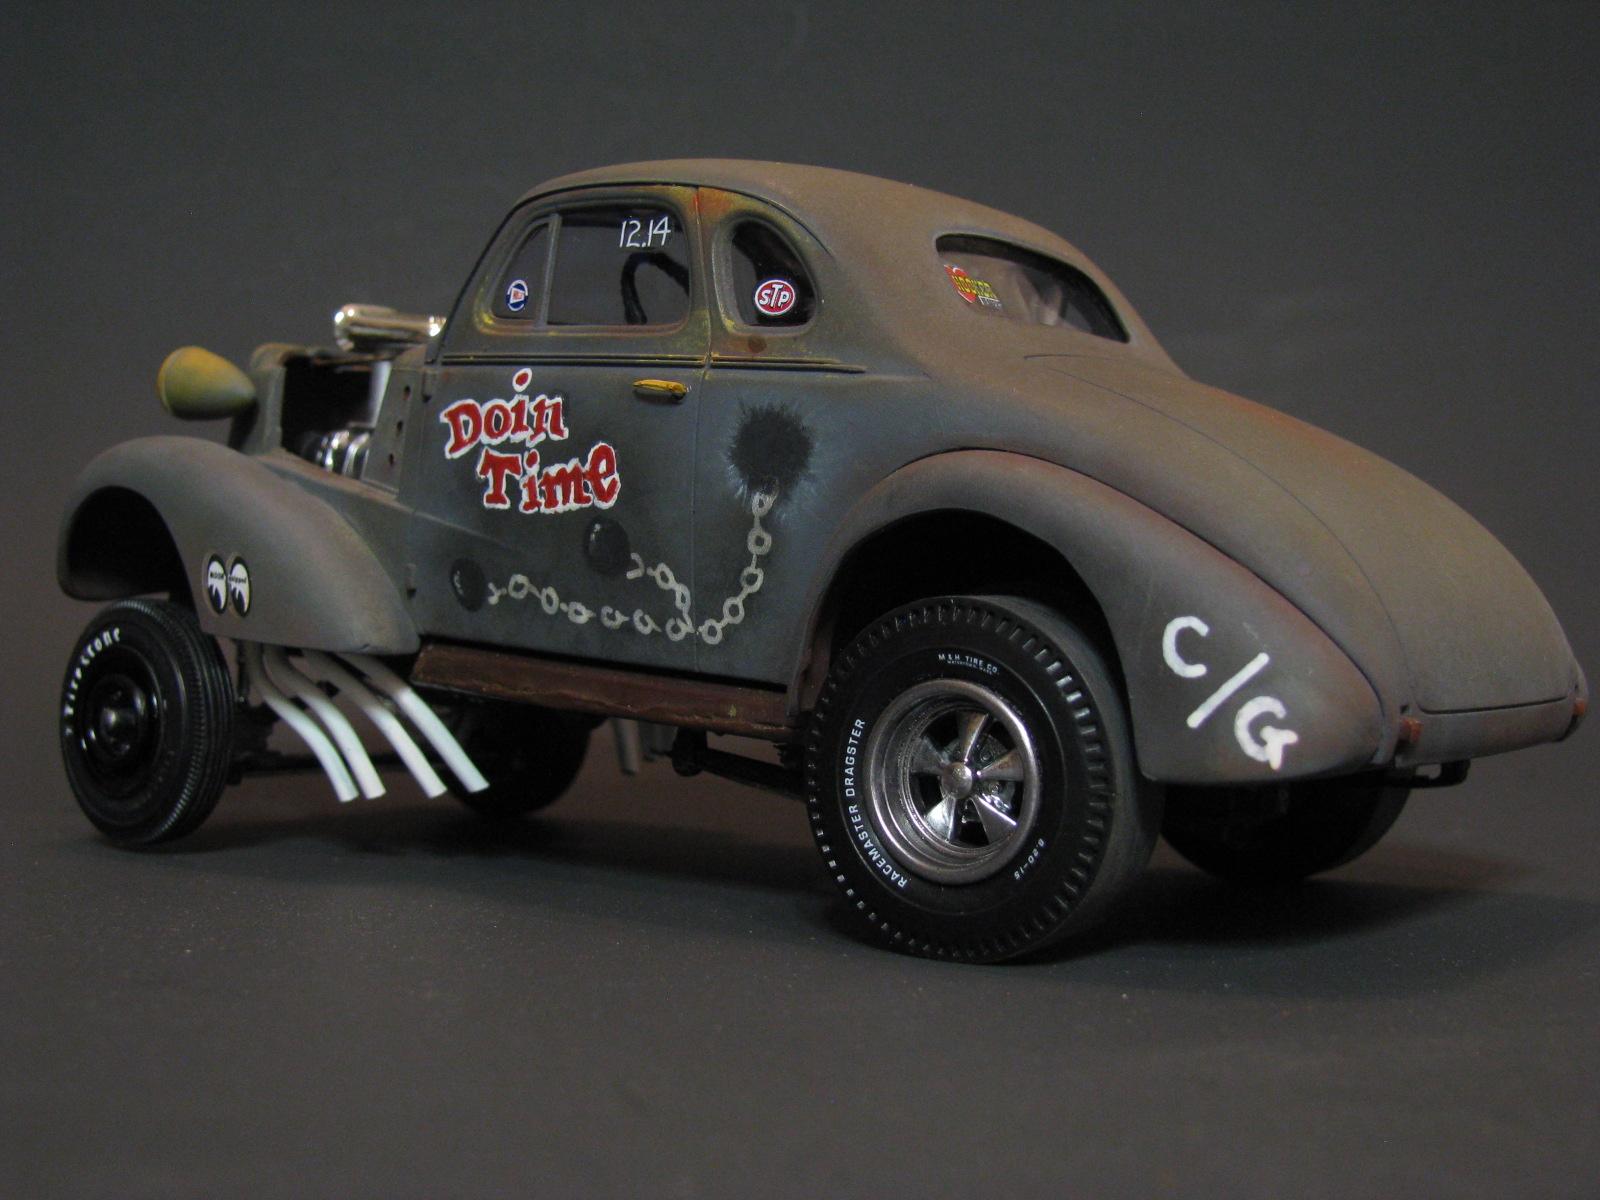
This was my first time to try hand-painting letters and artwork directly on the body of a model car, which turns out, is a whole lot harder than drawing on a piece of paper laying flat on the table, but it was a fun experiment! I’m gonna be trying more of this on more projects soon! This is my tribute to those crazy fellas from the 50’s and 60’s who lived to drag race with whatever they could get their hands on….probably built in their Dad’s garage…the big blown souped-up motor was the most important thing. Winning on Saturday night was all they could think about all week long. And maybe safety wasn’t exactly first on their mind--just winning with the craziest fastest car out there! This is the excellent 1/25 AMT ’37 Chevy kit that comes with the option to build one of three ways, and I chose to build a mad gasser in honor of those drag racing pioneers. The body was primed with Krylon Gray Ultra-Flat primer and allowed to dry outside for about an hour while I took my oil pastel sticks and scraped 5 colors into powder with an Xacto on a piece of wax paper…Orange Rust, Yellow, Light Blue and Brown. I used cotton swabs to mix those powder colors together a bit, and then rubbed the body down to appear severely weathered, like it was finally rescued from the junkyard. I sprayed Testor’s Dullcote over the body to protect all that weathering work, and to prep for the task of hand-painting the lettering and ball-and-chain artwork -- the lettering was done with acrylic paint markers, and the ball & chain was done with the edge corners of the pastel sticks that I made the powders from earlier. Then a second coat of the dulcote to protect the artwork. The chassis was painted Krylon Red Oxide and set aside. I added a few of my own touches to the beastly 427 powerplant -- like the MOROSO valve covers, some CRAZY PIPES from a Miss Deal funny car kit, velocity stacks made from Evergreen Styrene tube, a parts-box blower, and I made the fuel pump tubing from some clear plastic bead string stuff I found at Michael’s that I painted with Tamiya Clear Yellow acrylic to appear full of gasoline - then hooked up to the kit-supplied fuel pump. The rear tires are the most excellent pad-printed M&H dragmaster piecrust slicks from AMT parts pack--the Cragars are lightly coated with Tamiya Light Gunmetal to bring the kit chrome shine down a bit. Seatbelts were made from masking tape painted the same Light Gunmetal, and P/E buckle hardware was added. Finally, I used Tamiya Weathermaster Orange rust to give the door handles and headlight bezels that neglected look like it was just dug out from years in the junkyard. I also increased the ride height in front and rear from kit specs by adding cut / stacked & painted pieces of balsa wood blocks. This was a BLAST to build! Thank you AMT.
-
Came out great. Not a bad kit.
-
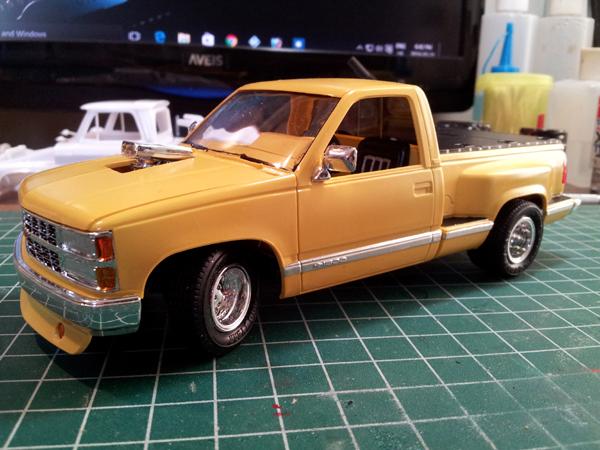
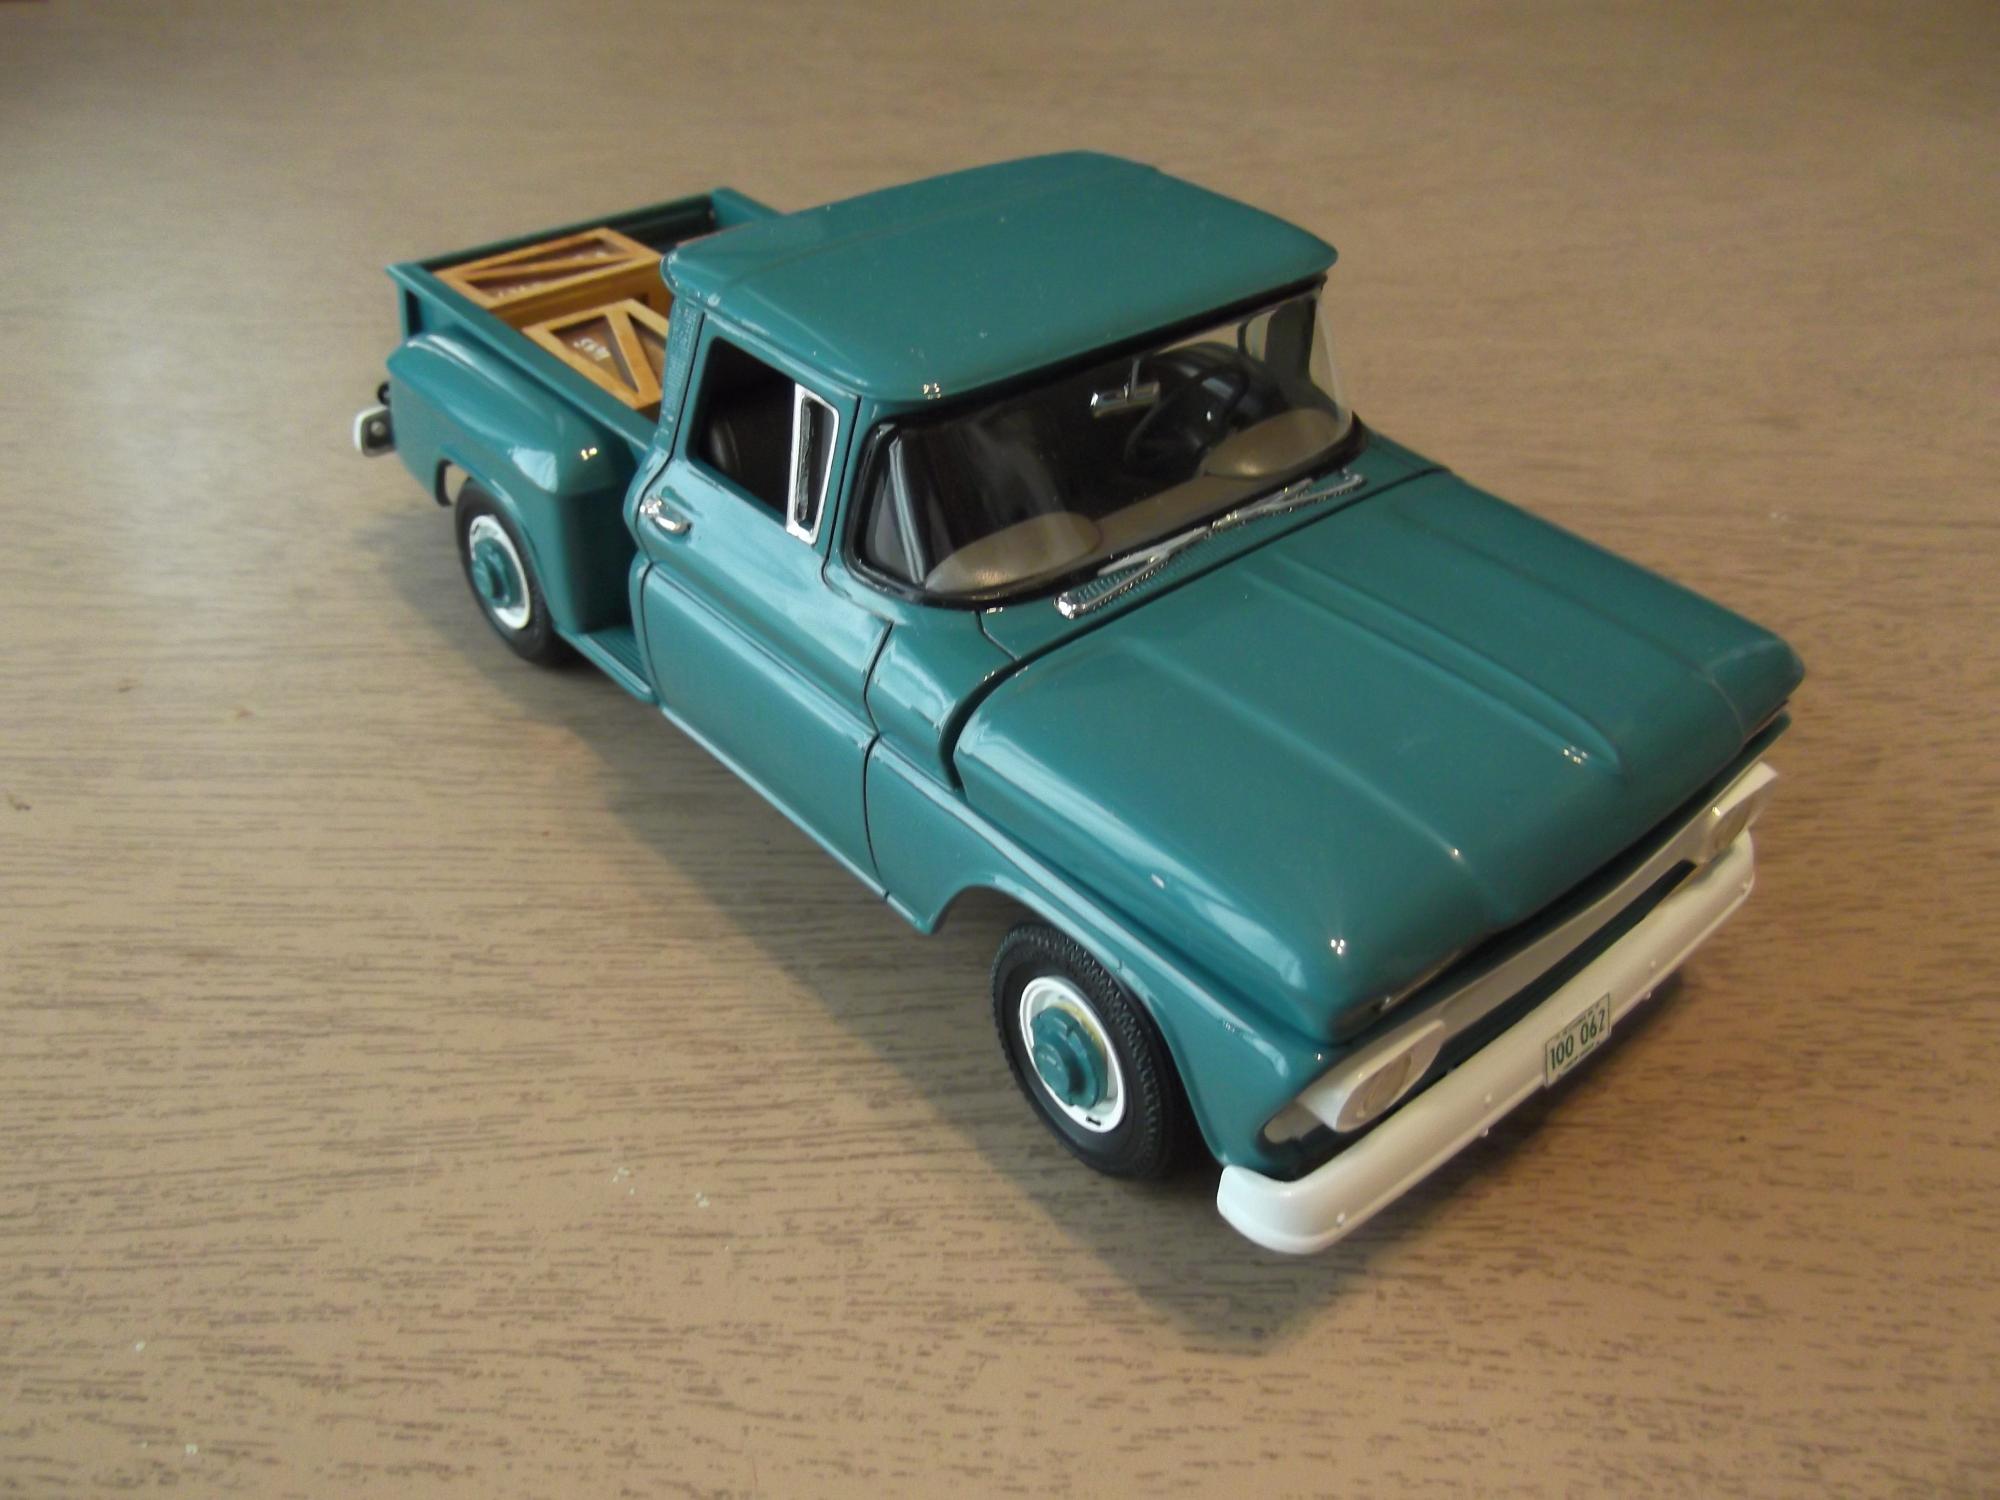
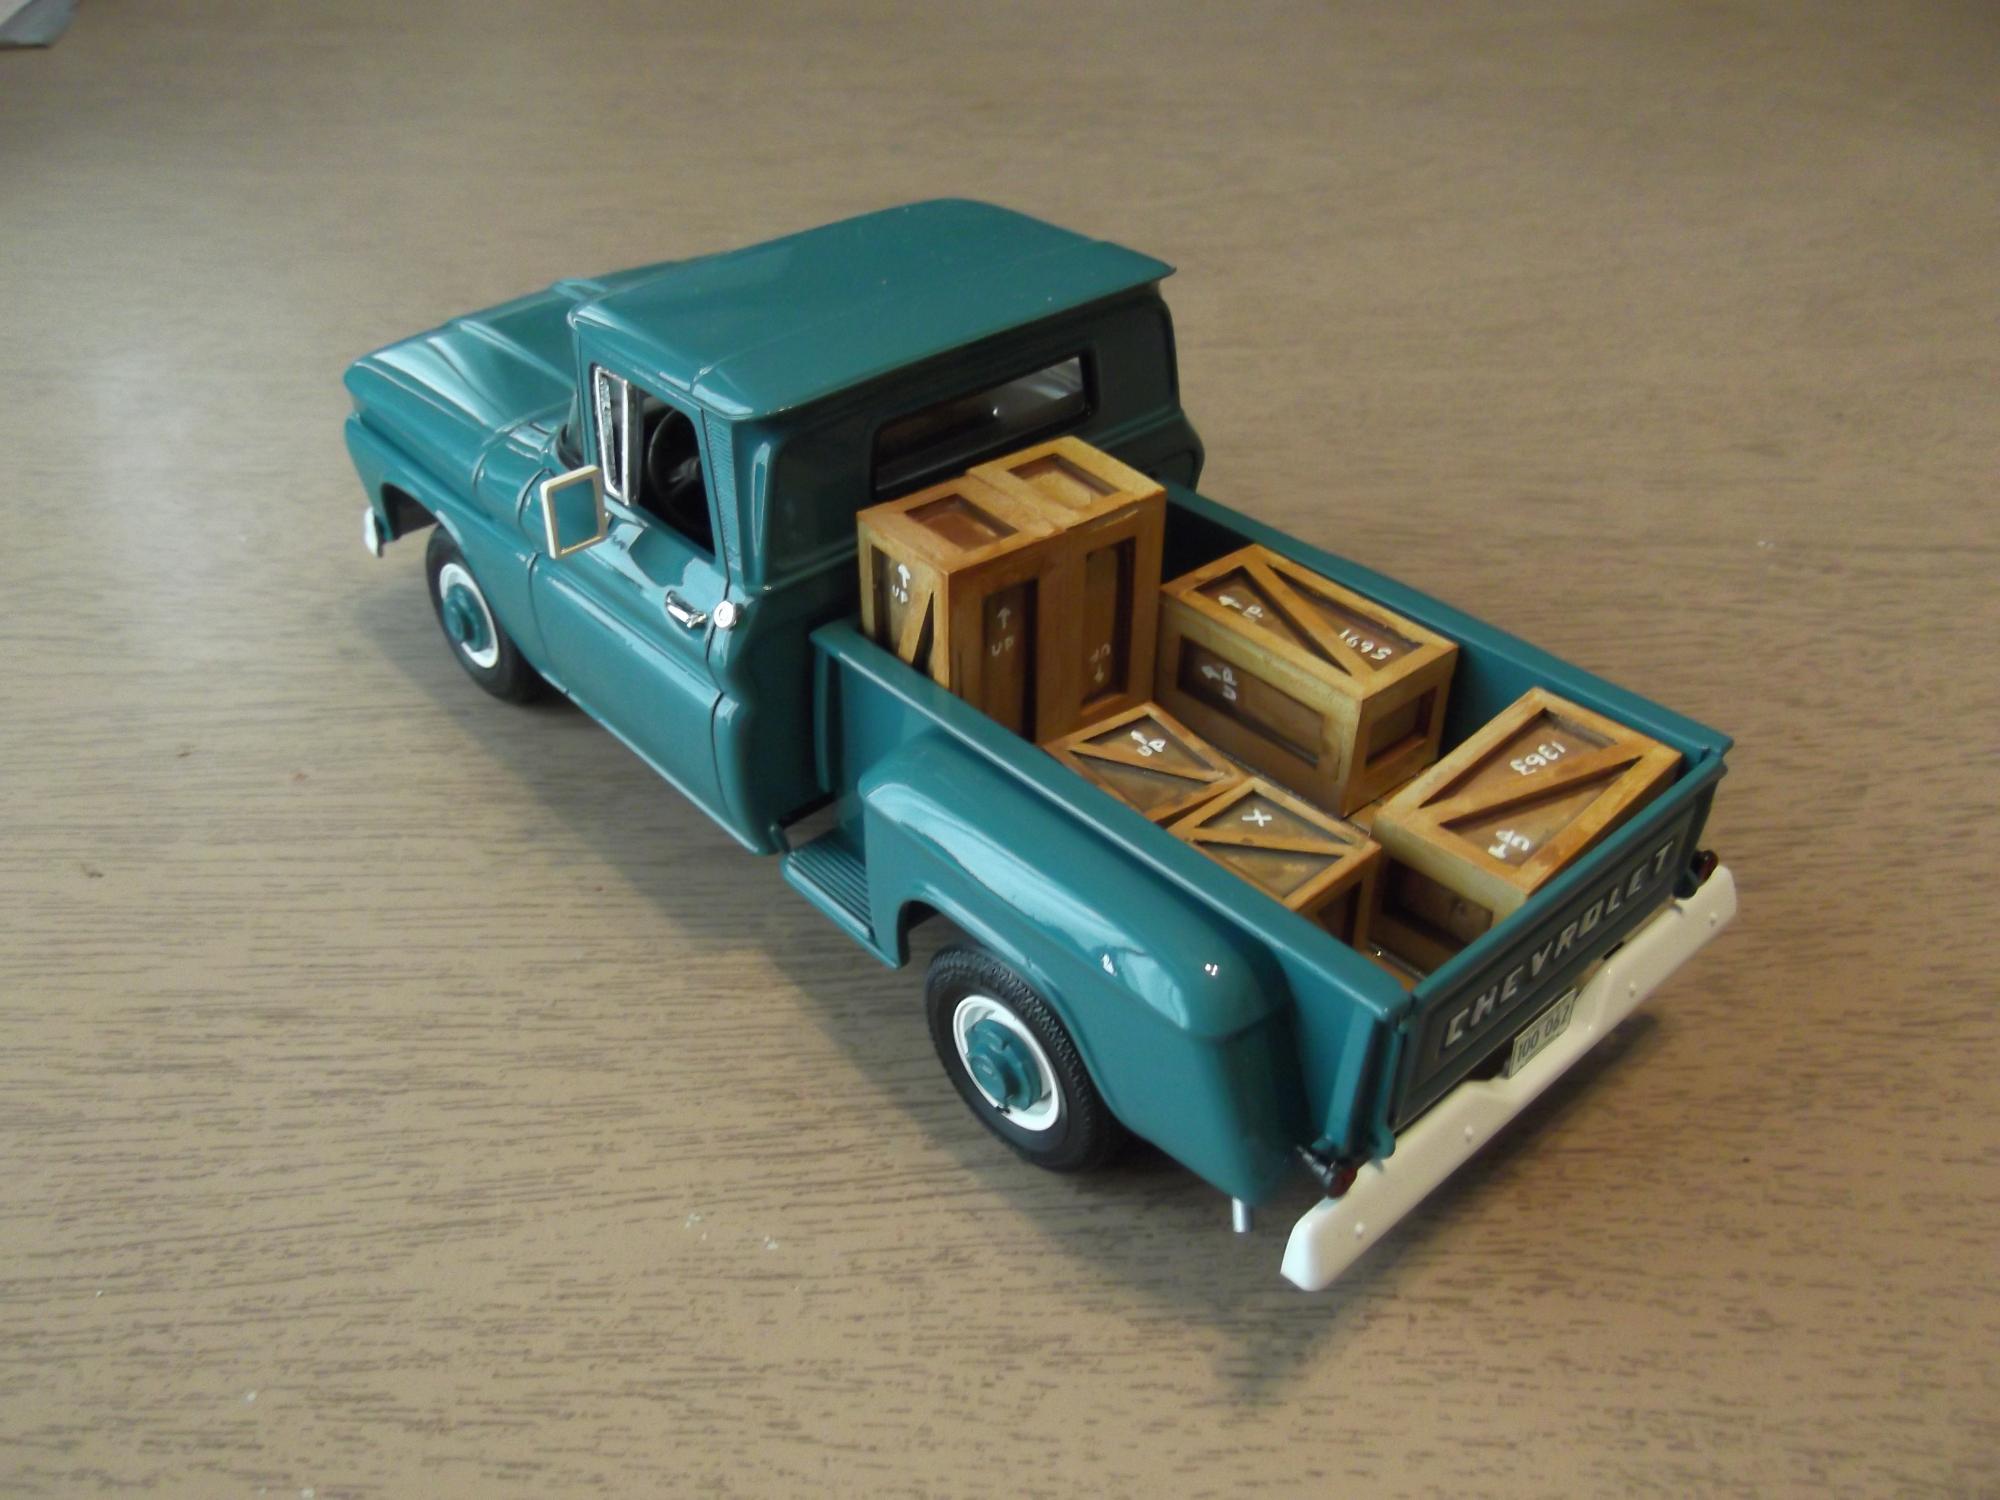
Used the (newer) AMT '60 Chevy pickup as a base, The stepside bed is from Revell's '65/6 Chevy stepside, while the hood, grill, and hubcaps are from an original '62 Chevy glue bomb. The crates are scratchbuilt/molded/cast...... Enjoy!
-
-
....just wondered if the Revel Model King BAD NOOZE 53/54 Chevy gasser issued in 2006,,,,,then reissued again in 2013 have any differences in kit mold quality, chrome, basically anything........I ask because I may buy the lastest one, but seem to recall checking out a 2006 issue a few years ago and not thinking the overall quality of the kit was very nice, being quite rough generally...... any thoughts here from our members would be welcomed....thanks, the Ace...
-
This is the excellent AMT kit of the 66 Nova that can be built up one of three ways.... as Grumpy's Toy drag car, or a street custom, or just factory stock. I chose the street custom route and modified the engine slightly by using a P/E air cleaner from Parts by Parks. I also wired it up and added fuel and electrical lines. The paint is rattle-can Tamiya Metallic Red over a base coat of Silver Leaf. The interior is Tamiya Semi-Gloss Black, the carpet is flocking from Detail Master. The fantastic tires are pad printed tires from the AMT 68 Camaro kit (which came w/ 2 sets of tires!). I'd love to have one of these bad boys in real life!
-
Not bad for a kit that was incomplete when I bought it. Wish it had emblem decals, but it came out great.
-
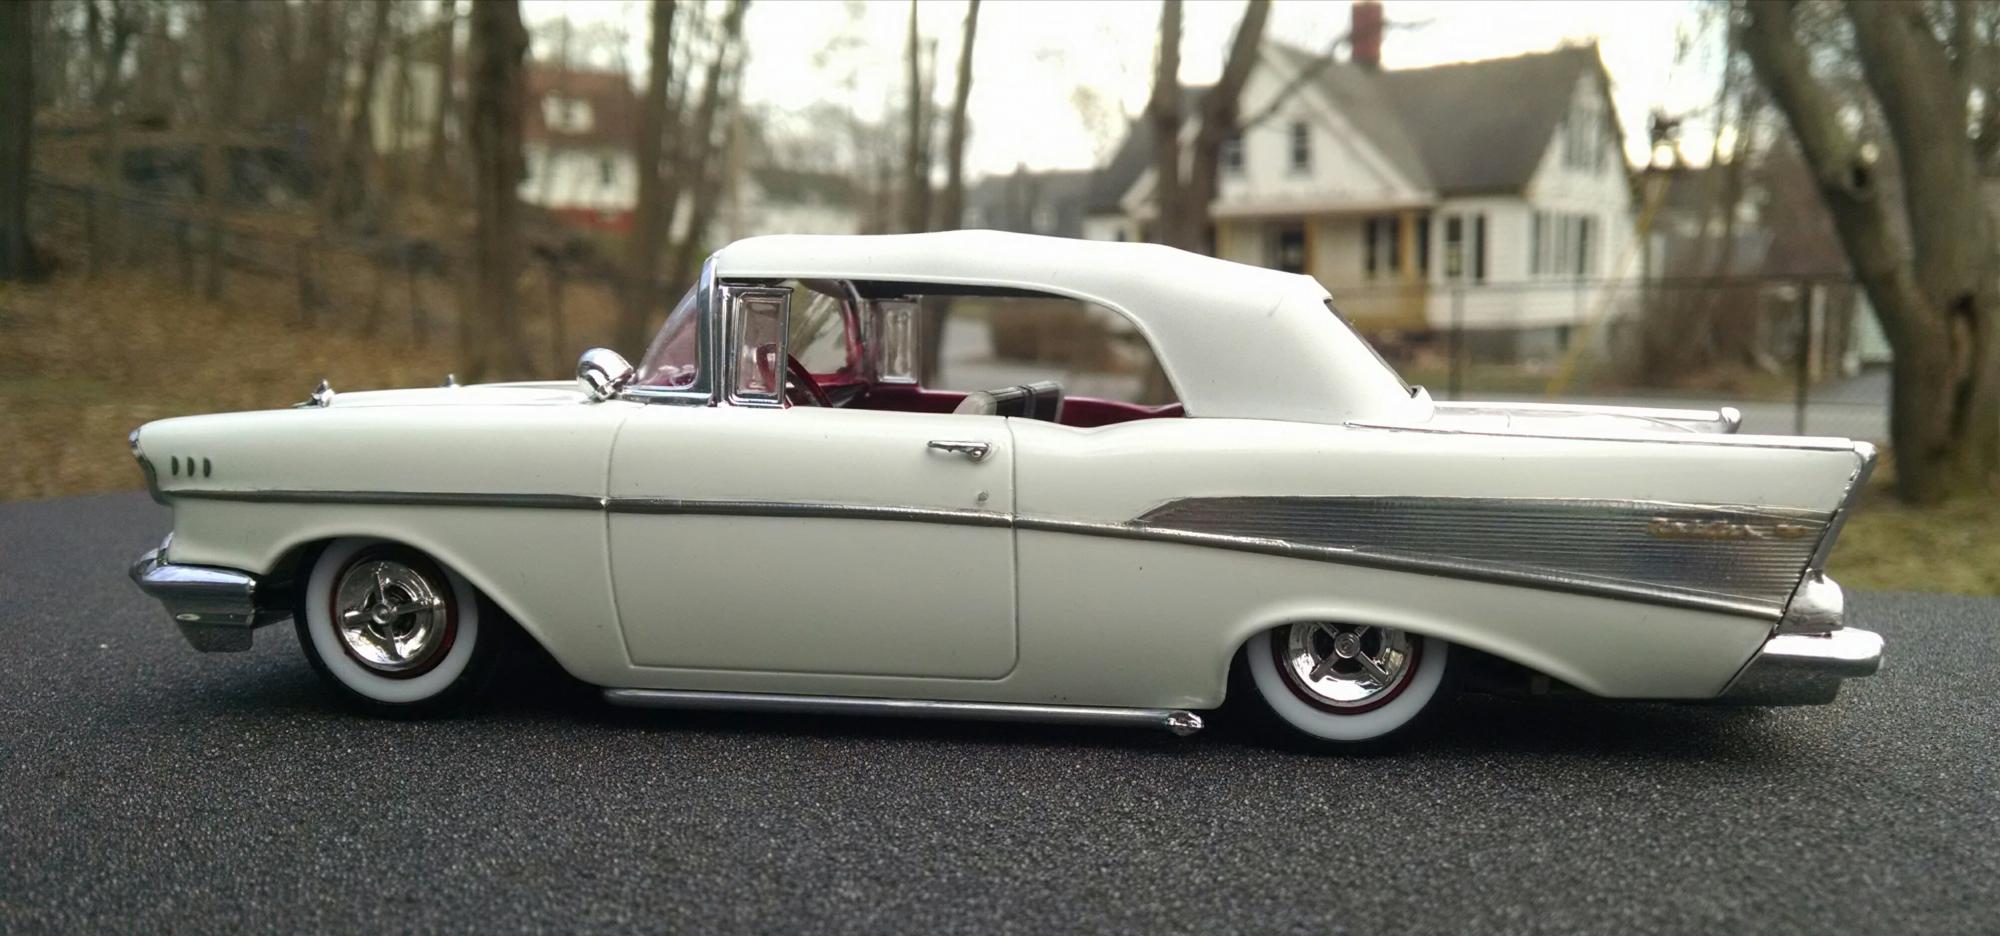
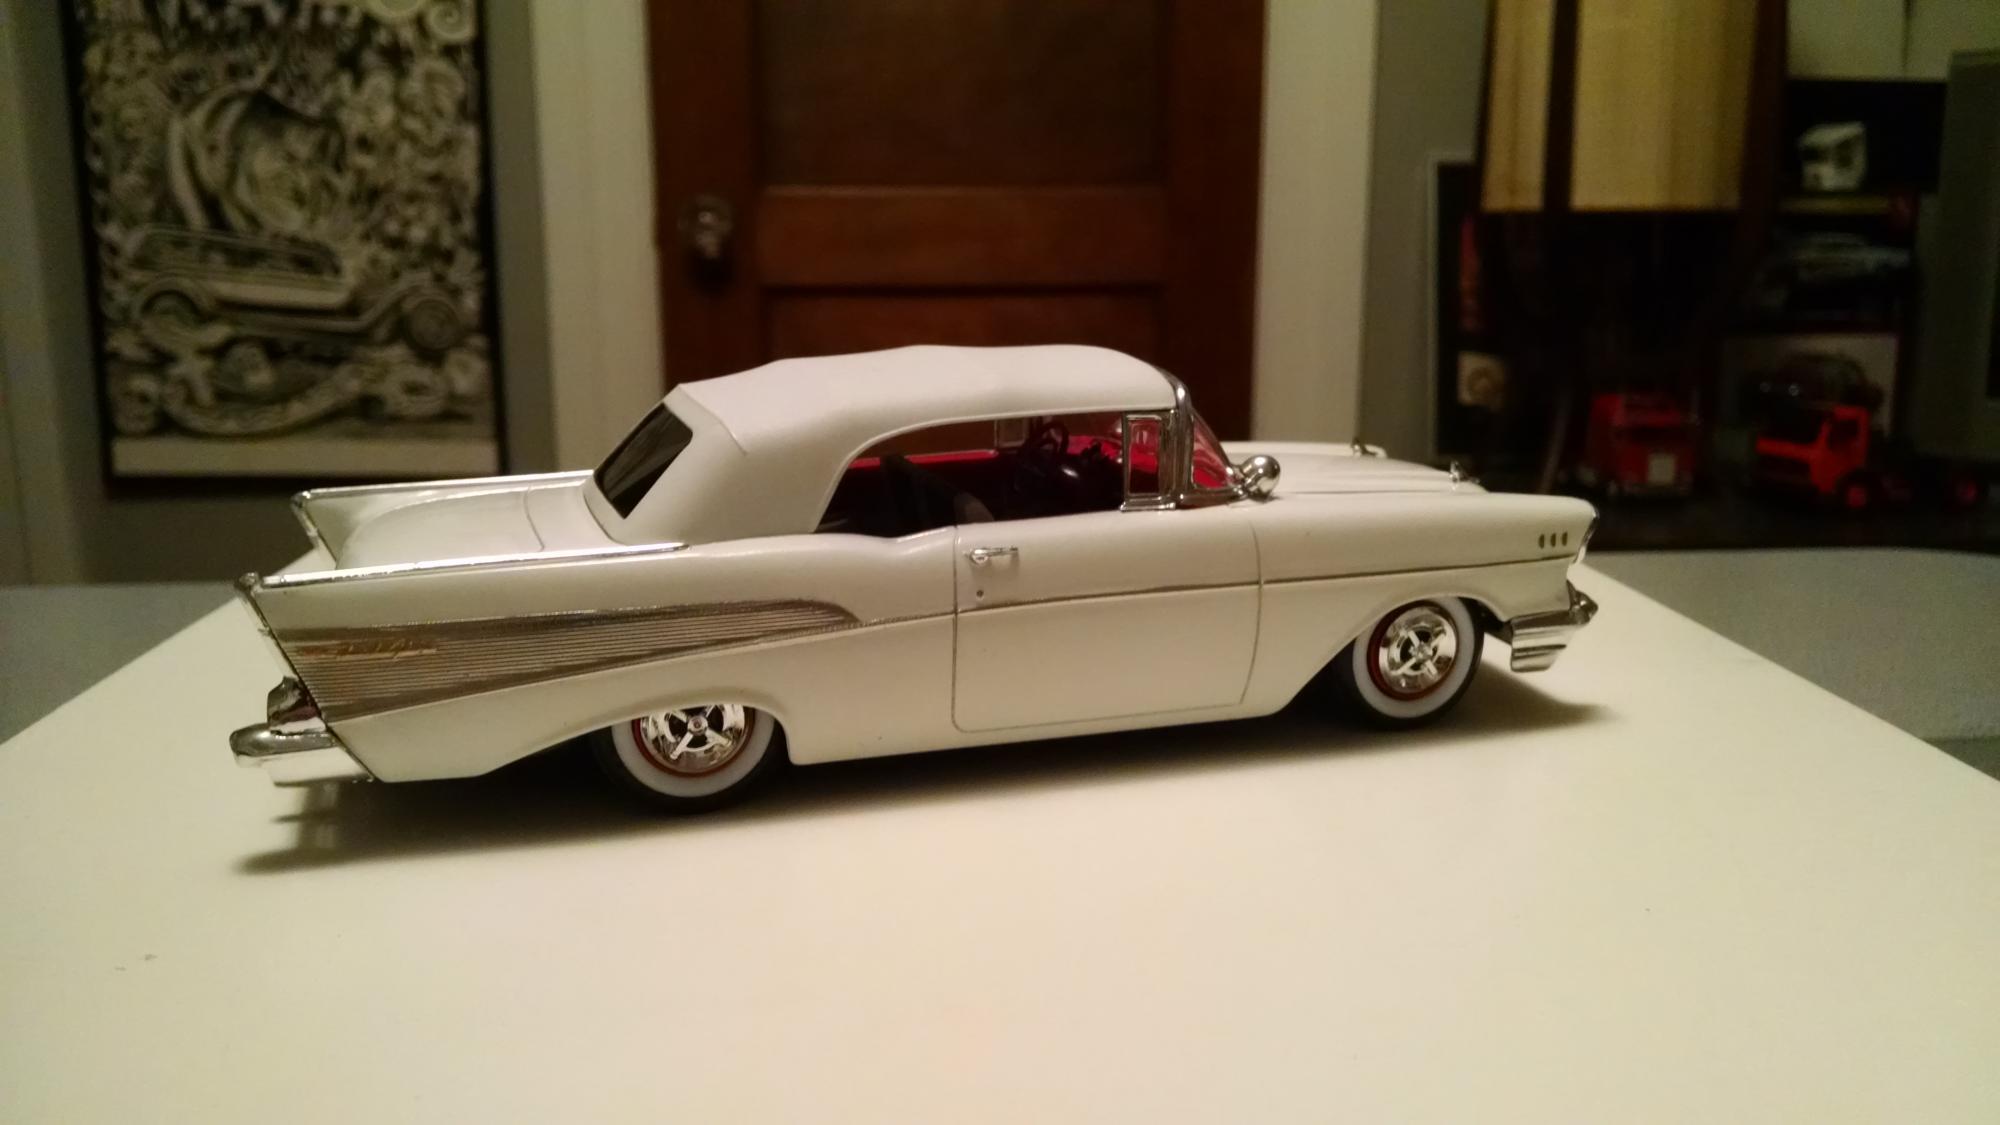
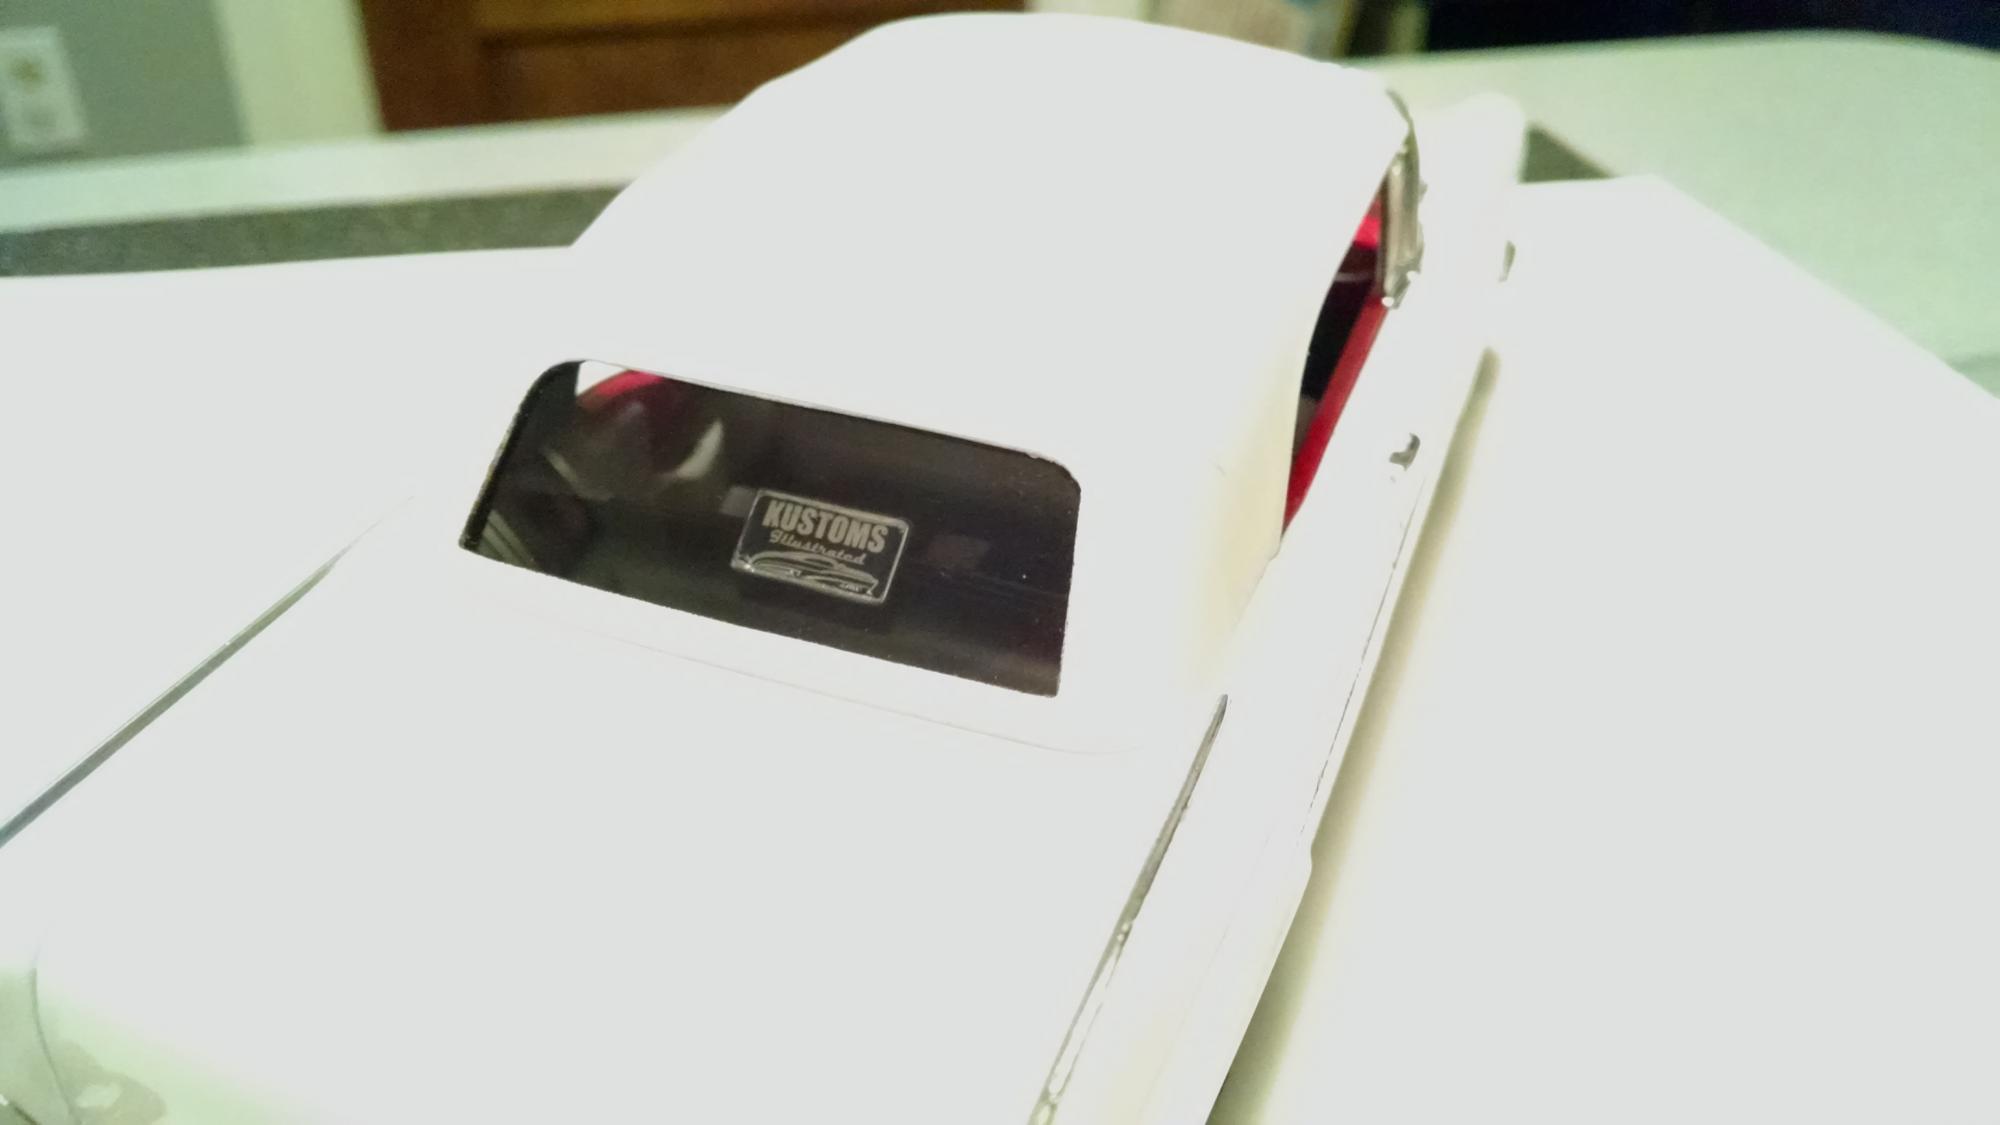
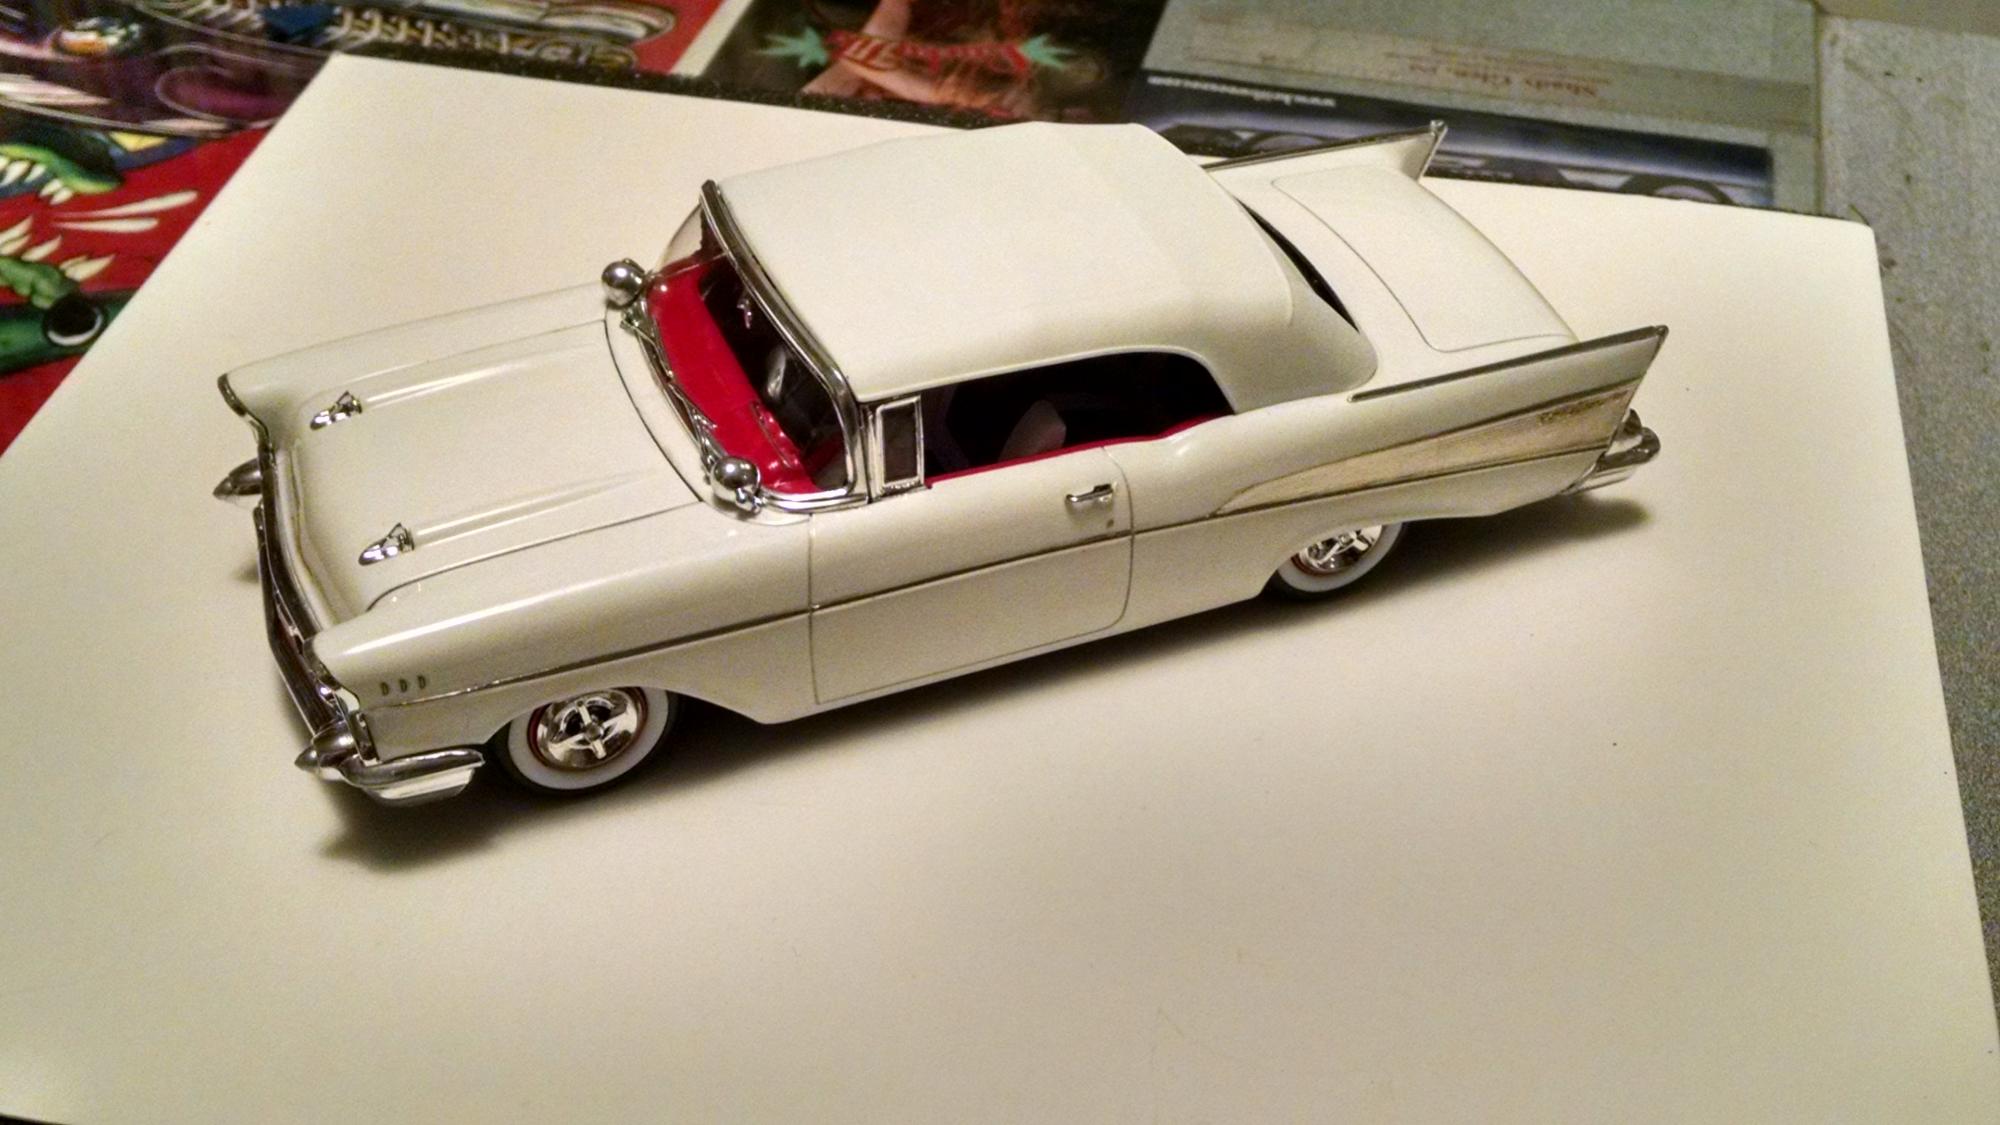
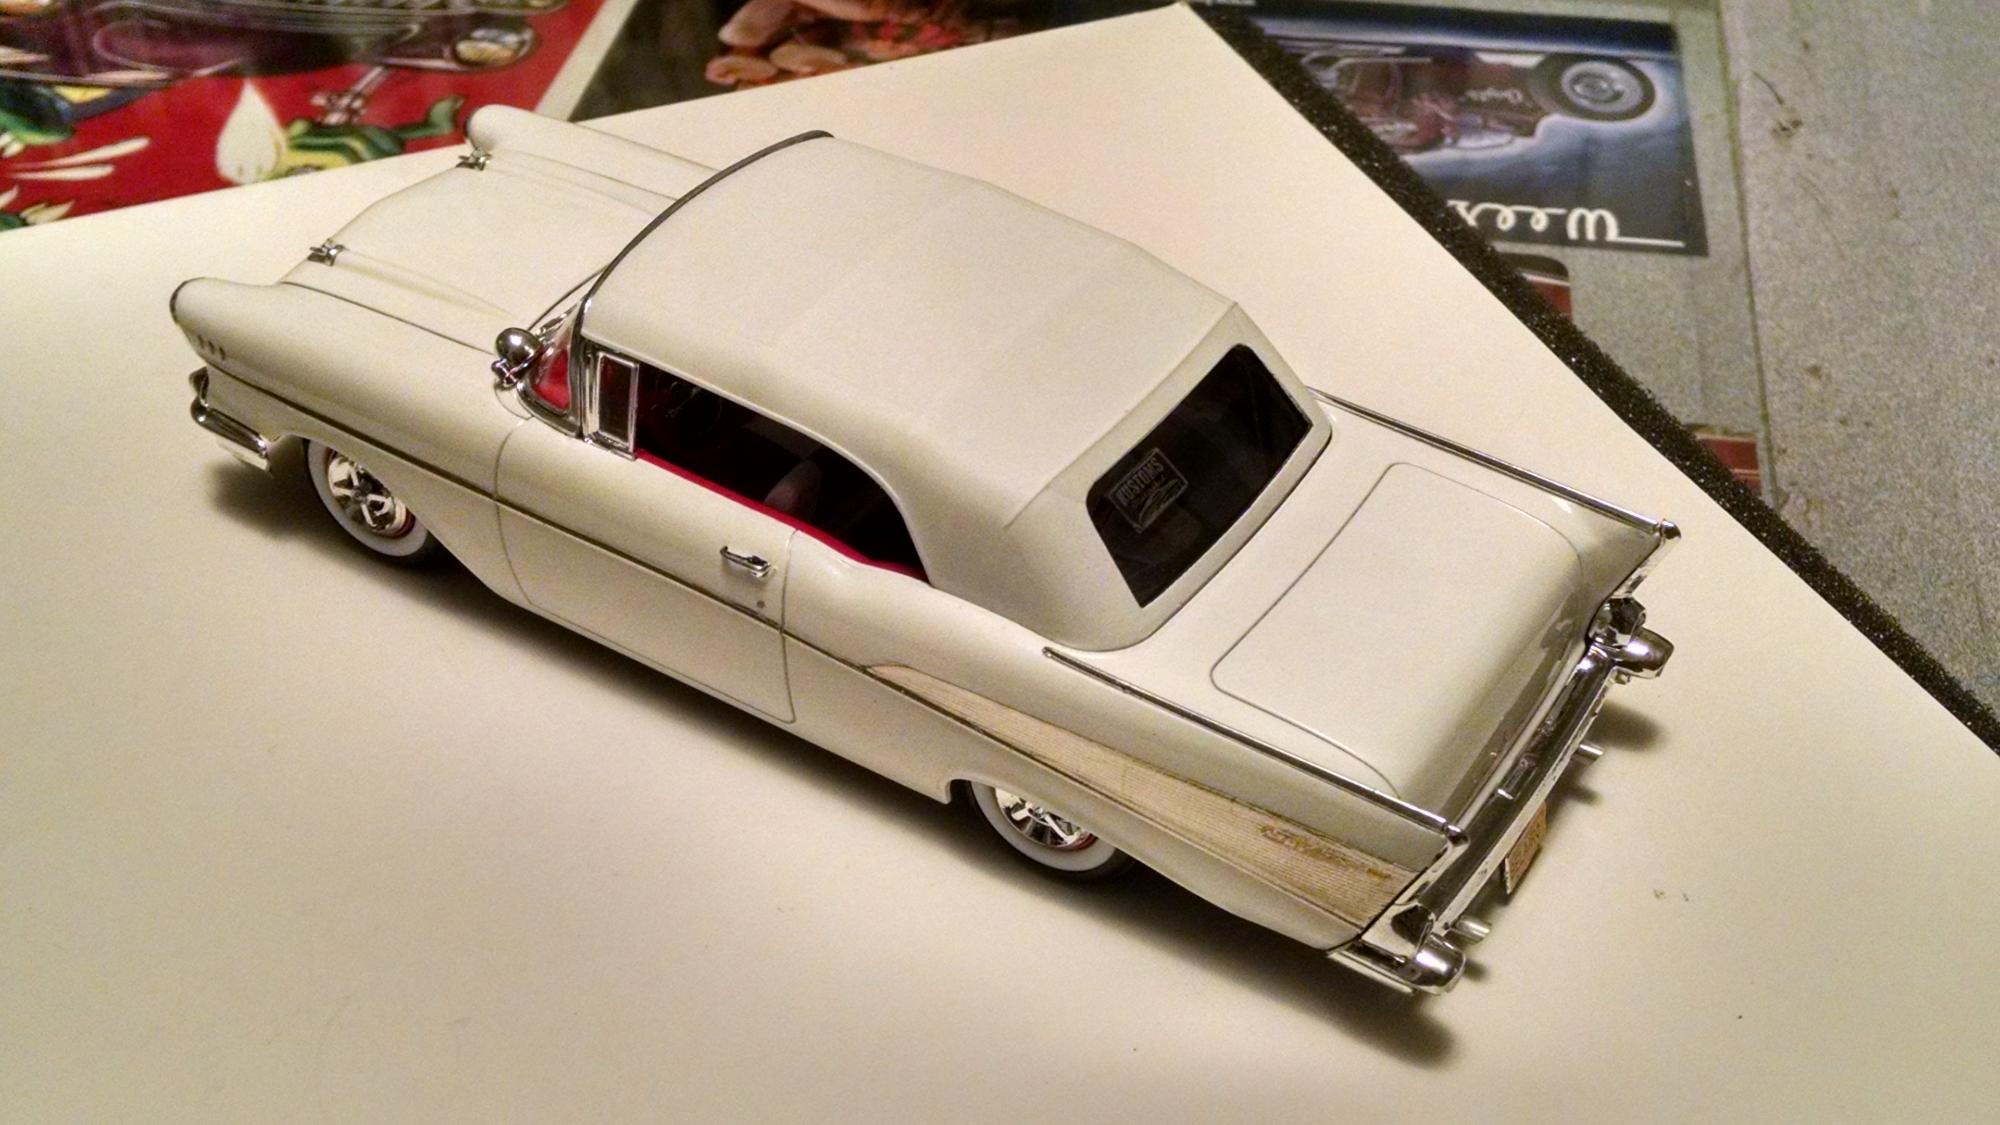
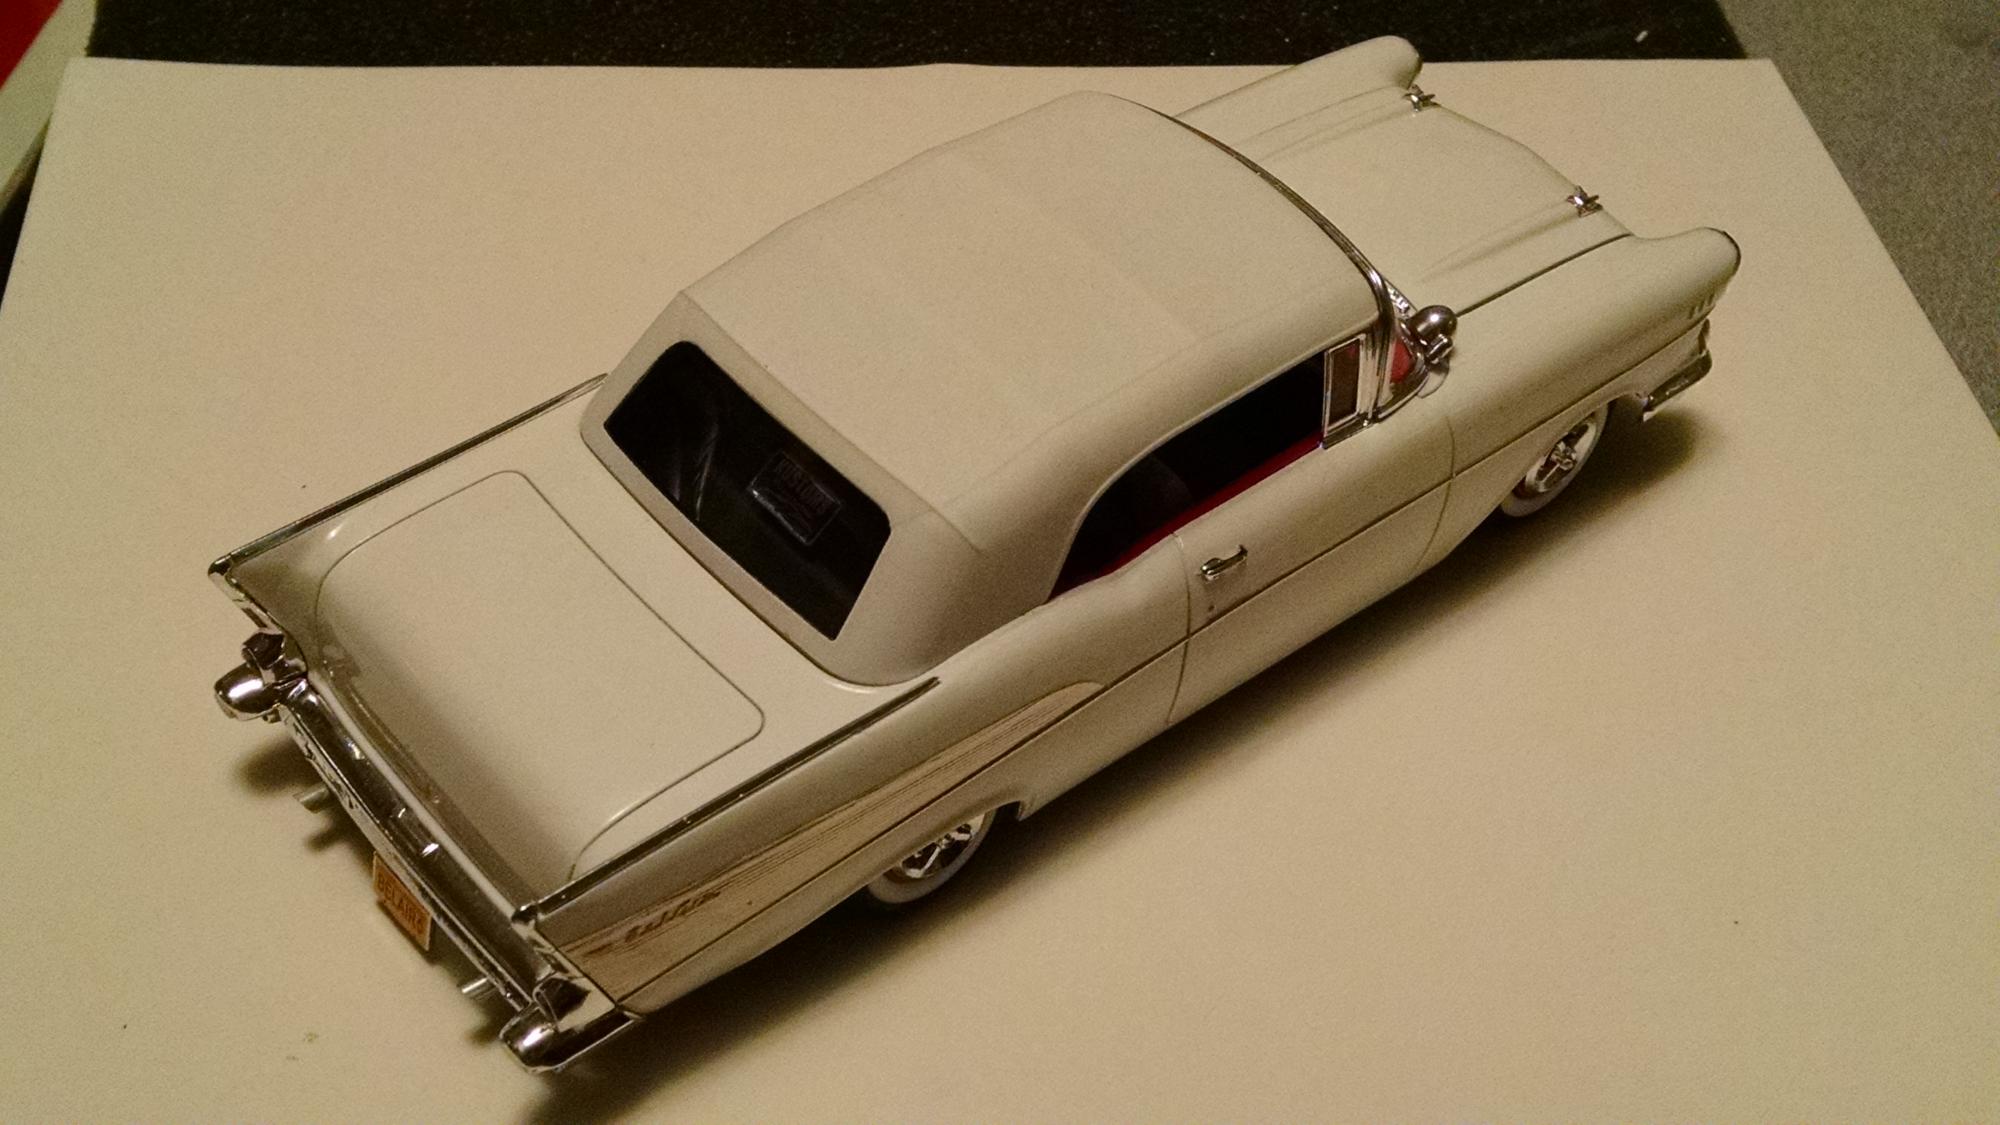
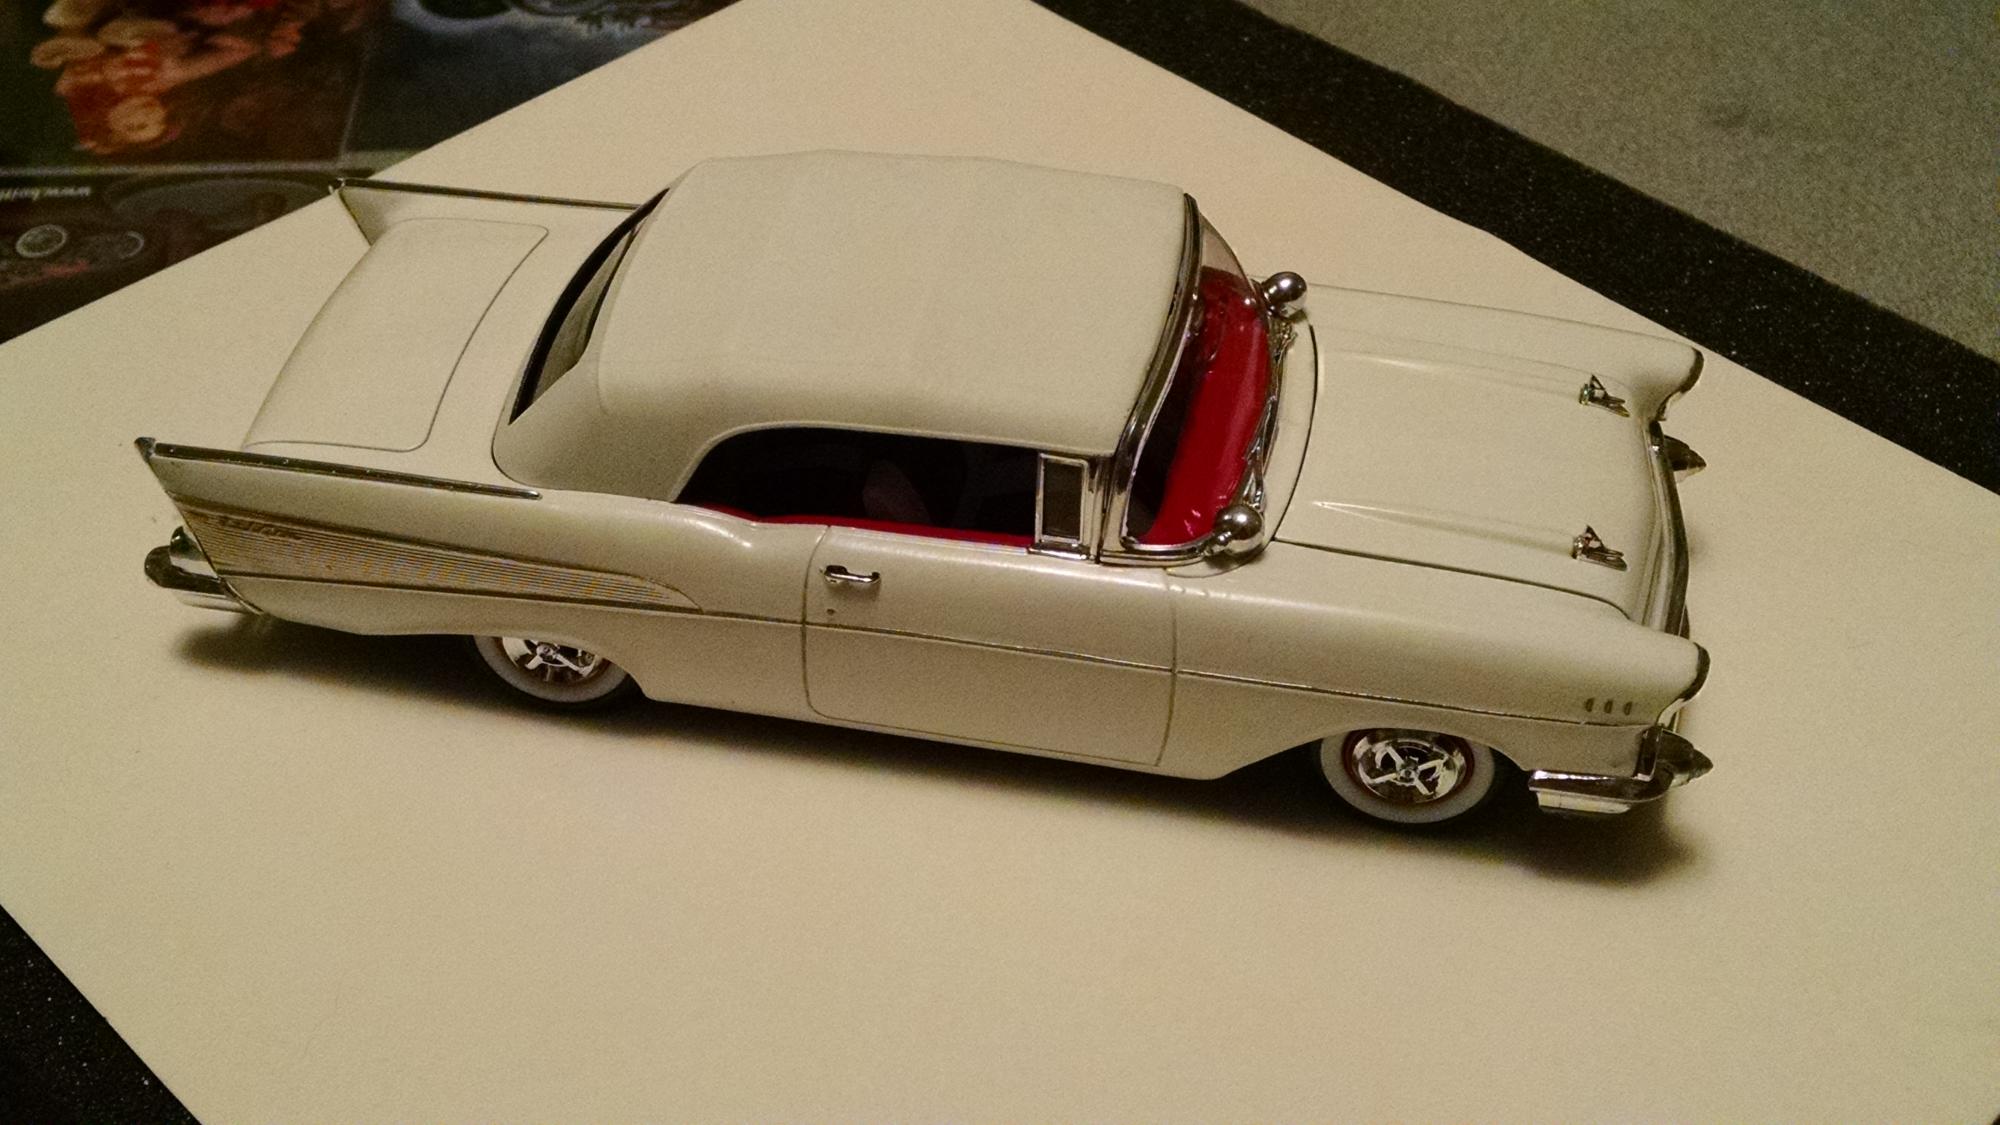
Just finished this last night. I call it "Mack The Knife". Based on Revell's '57 Chevy Ragtop and inspired by a real one I had seen at Lead East a couple of years ago. Very fun kit to build. It is Tamiya White with red black and white interior. The top is krylons flat white. the caps are from Modelhaus and the spots are parts box finds.
-
Nice kit they need to make more like these
-
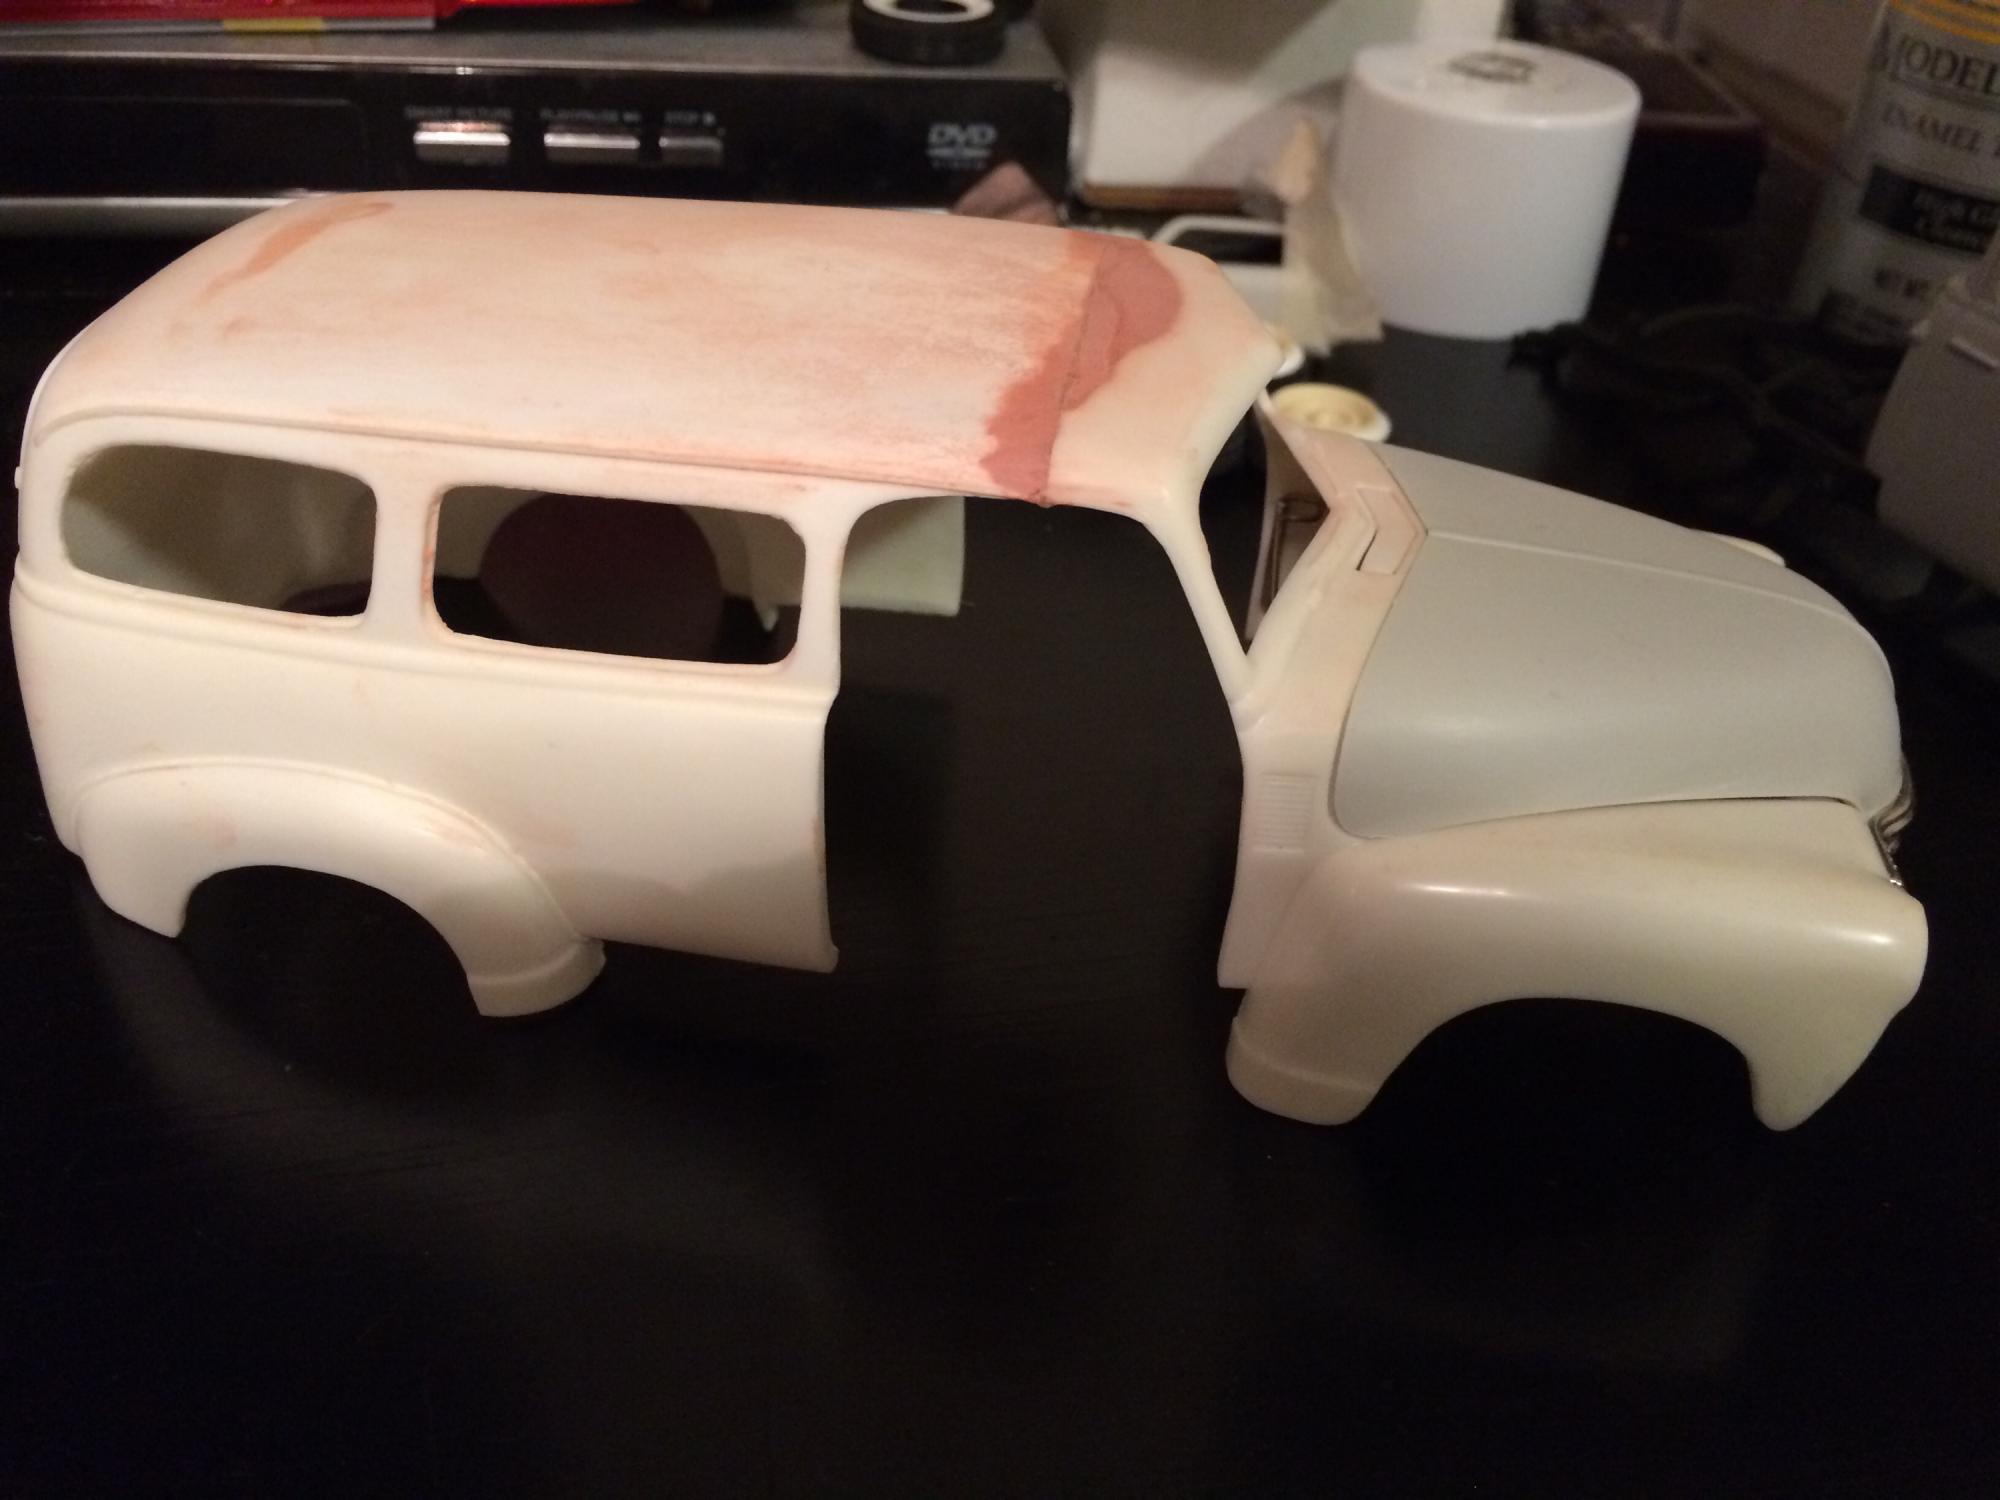
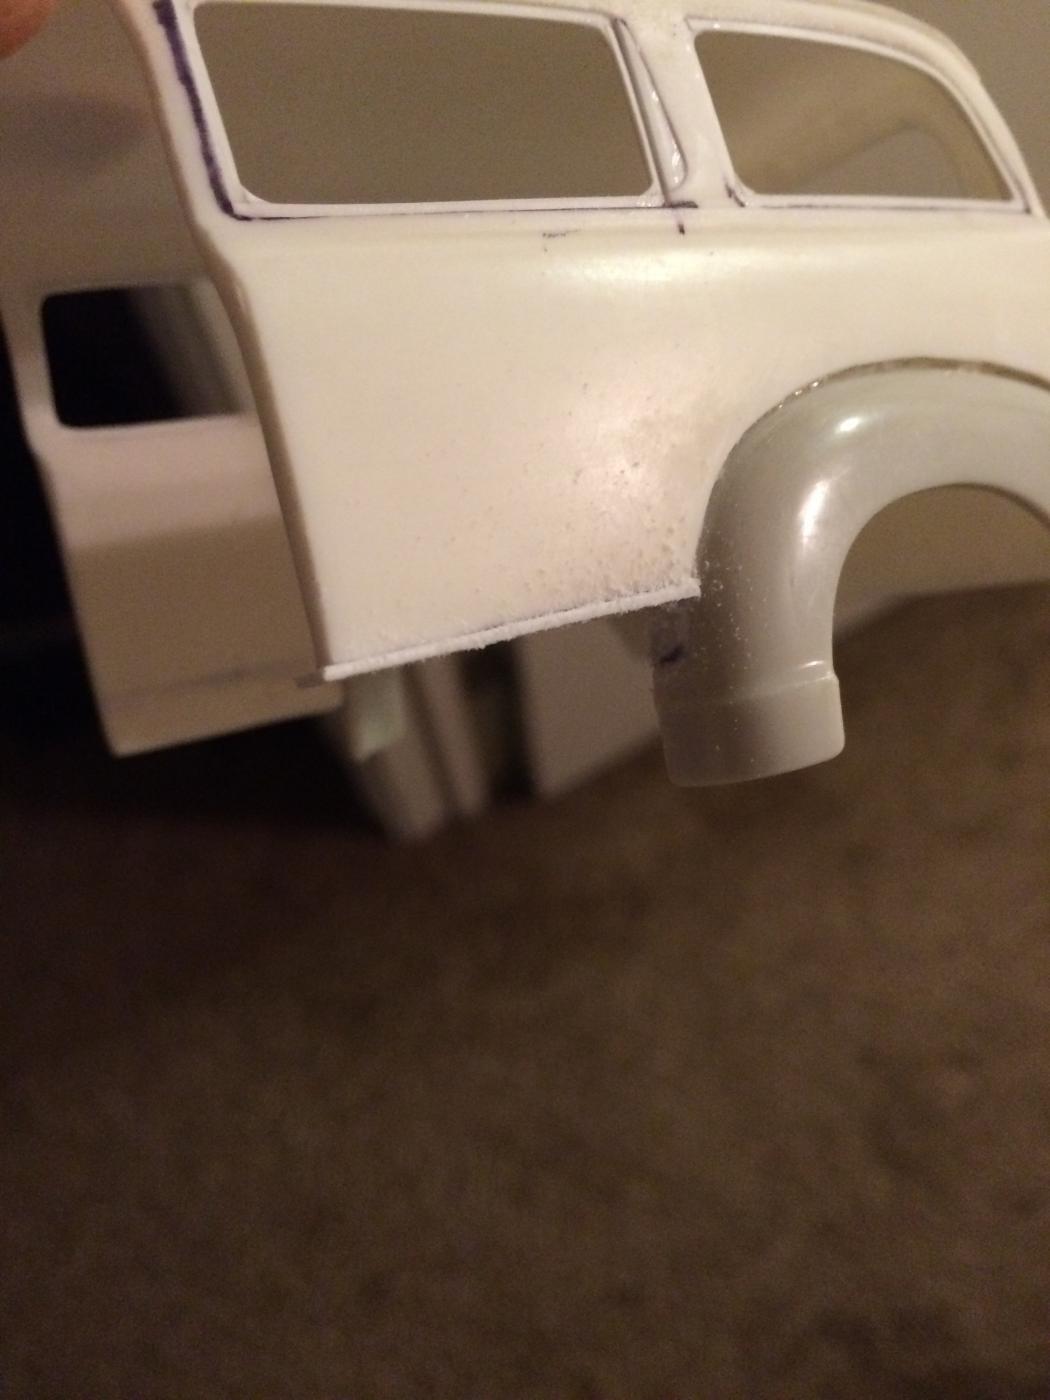
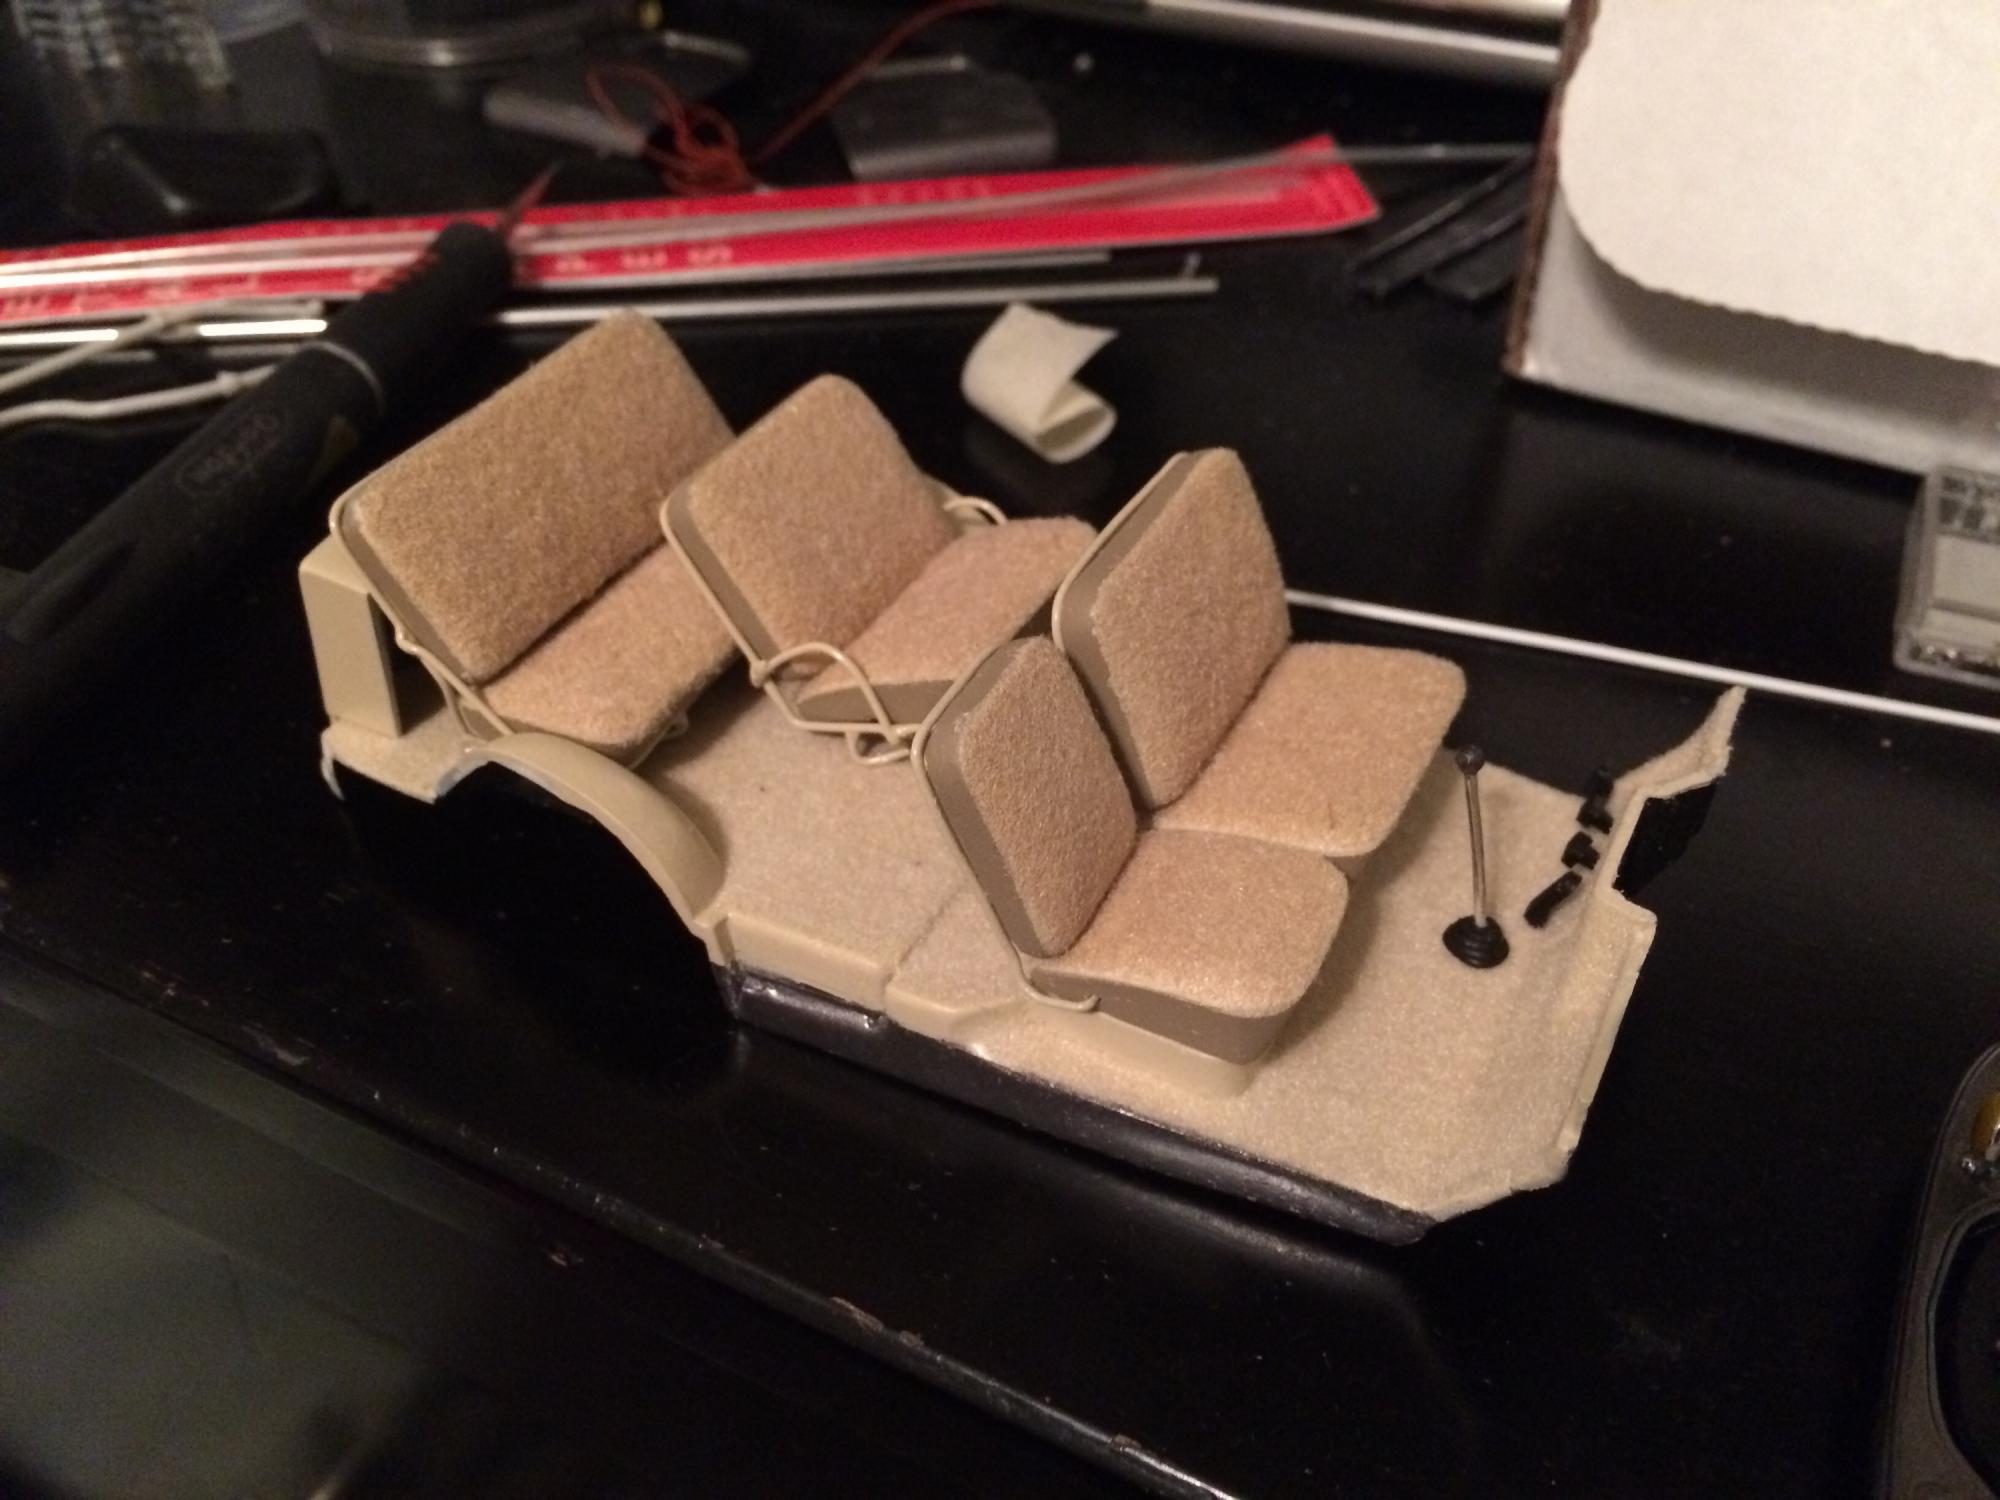
 Hers is my 1950 chevy suburban that i just finished in time for the NNL WEST at Santa Clara. This started out as a 50 chevy resin kit, but i modified it with the amt 50 chevy truck cab for a better fitment of the hood and doors. The original piece needed alot of work in correcting the window frames, and adding new rear fenders. Also had to ad some styrene to the sides of the lower panel areas to be able to flow evenly with the lower section of the doors. I made the clam shell style rear door instead of the barn door style it came with, scratch built the following: rear single brake light attached to the tailgate, front visor, traffic view finder, compass, rear splash pan, all seats, seat frames, inner rear door panels, and couple other small items. There is a real working speaker system built in played by an ipod shuffle and yes it does still have full suspension. Well enough about it lol, and enjoy the pics
-
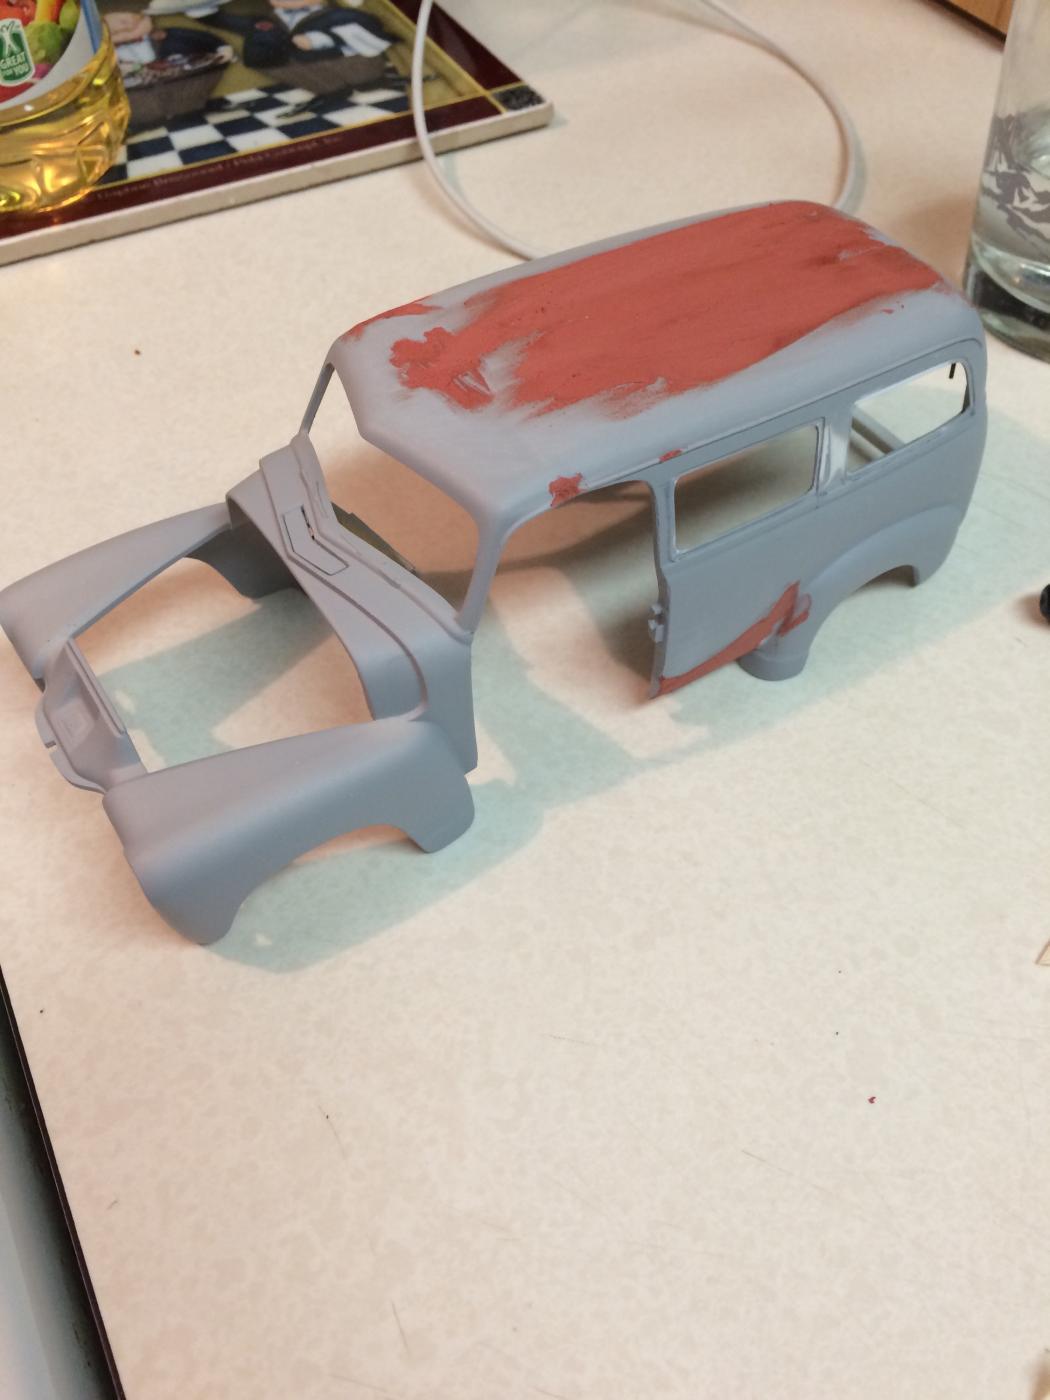
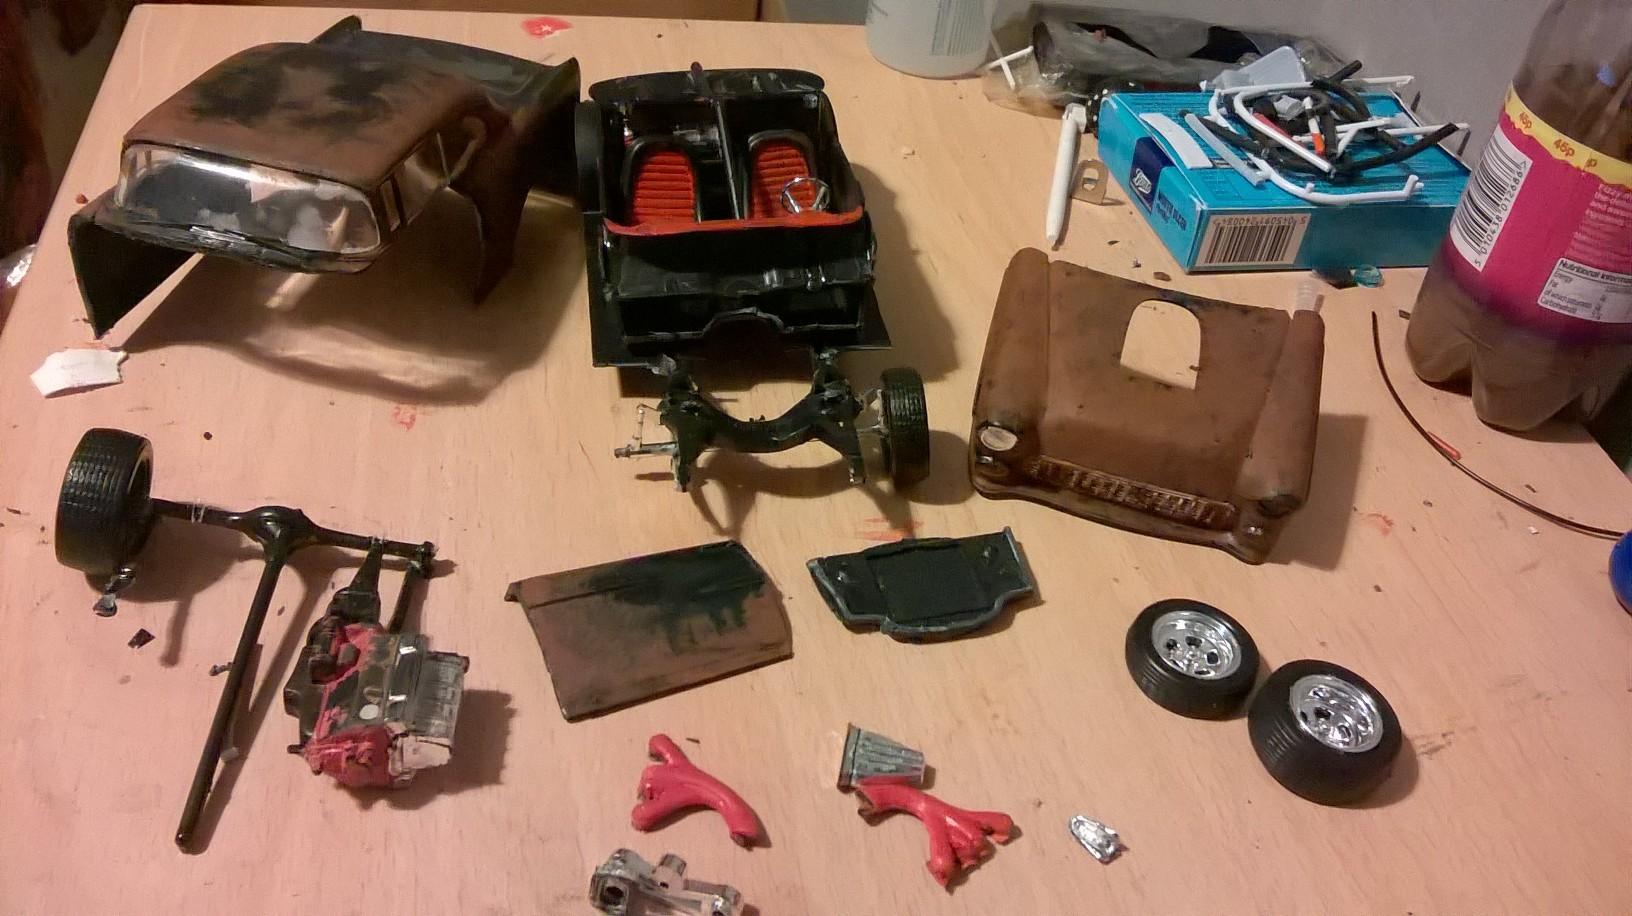
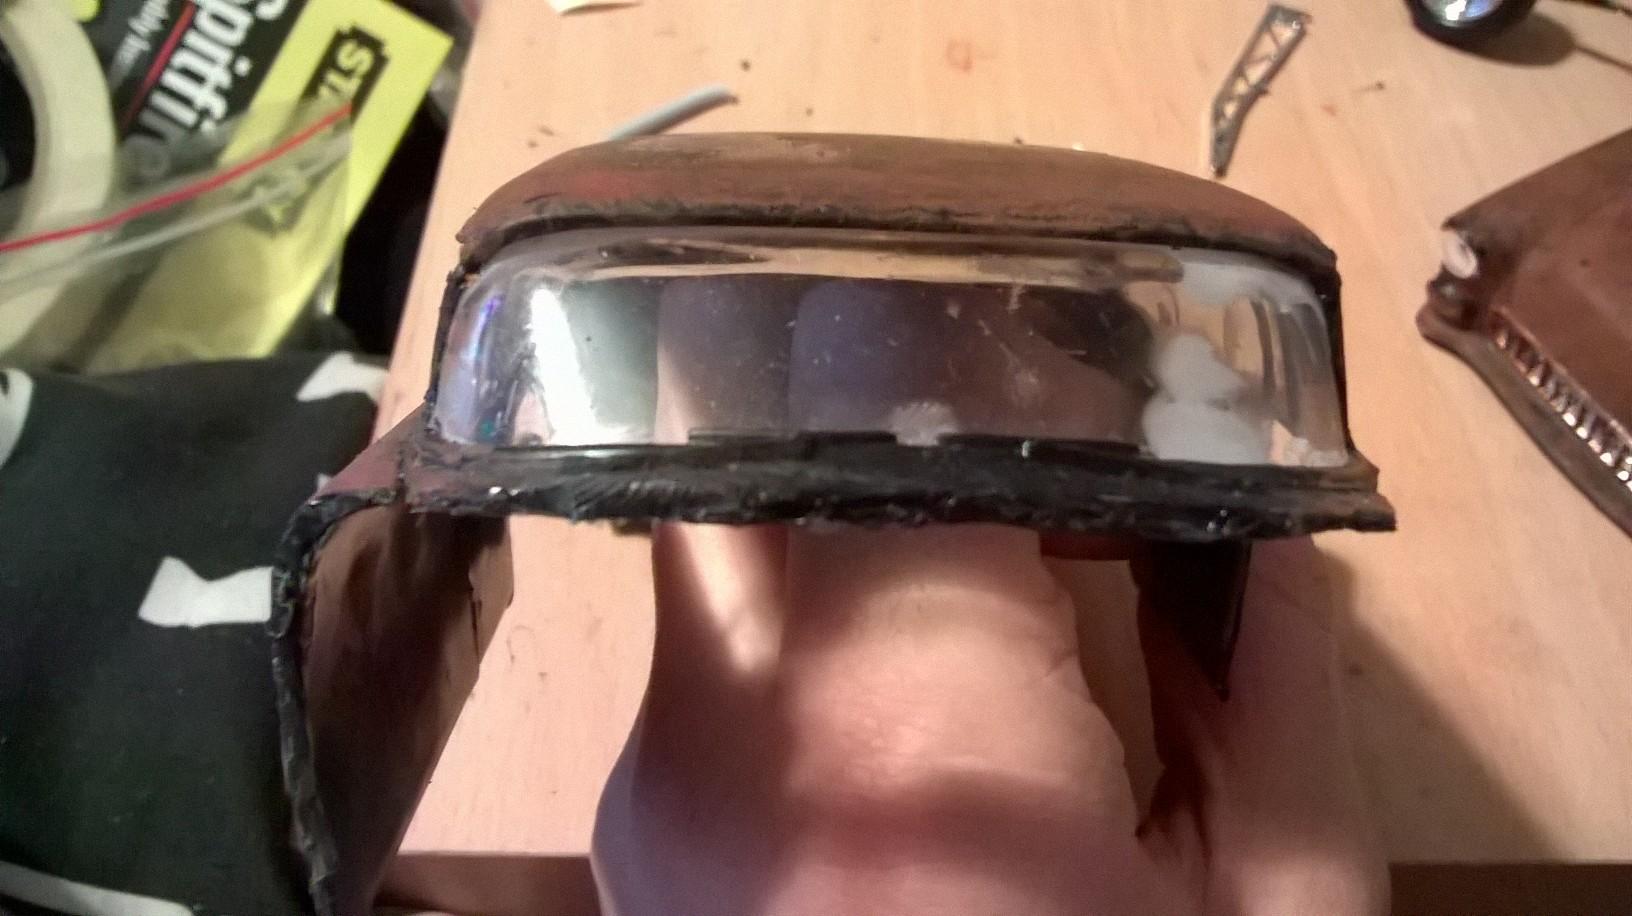
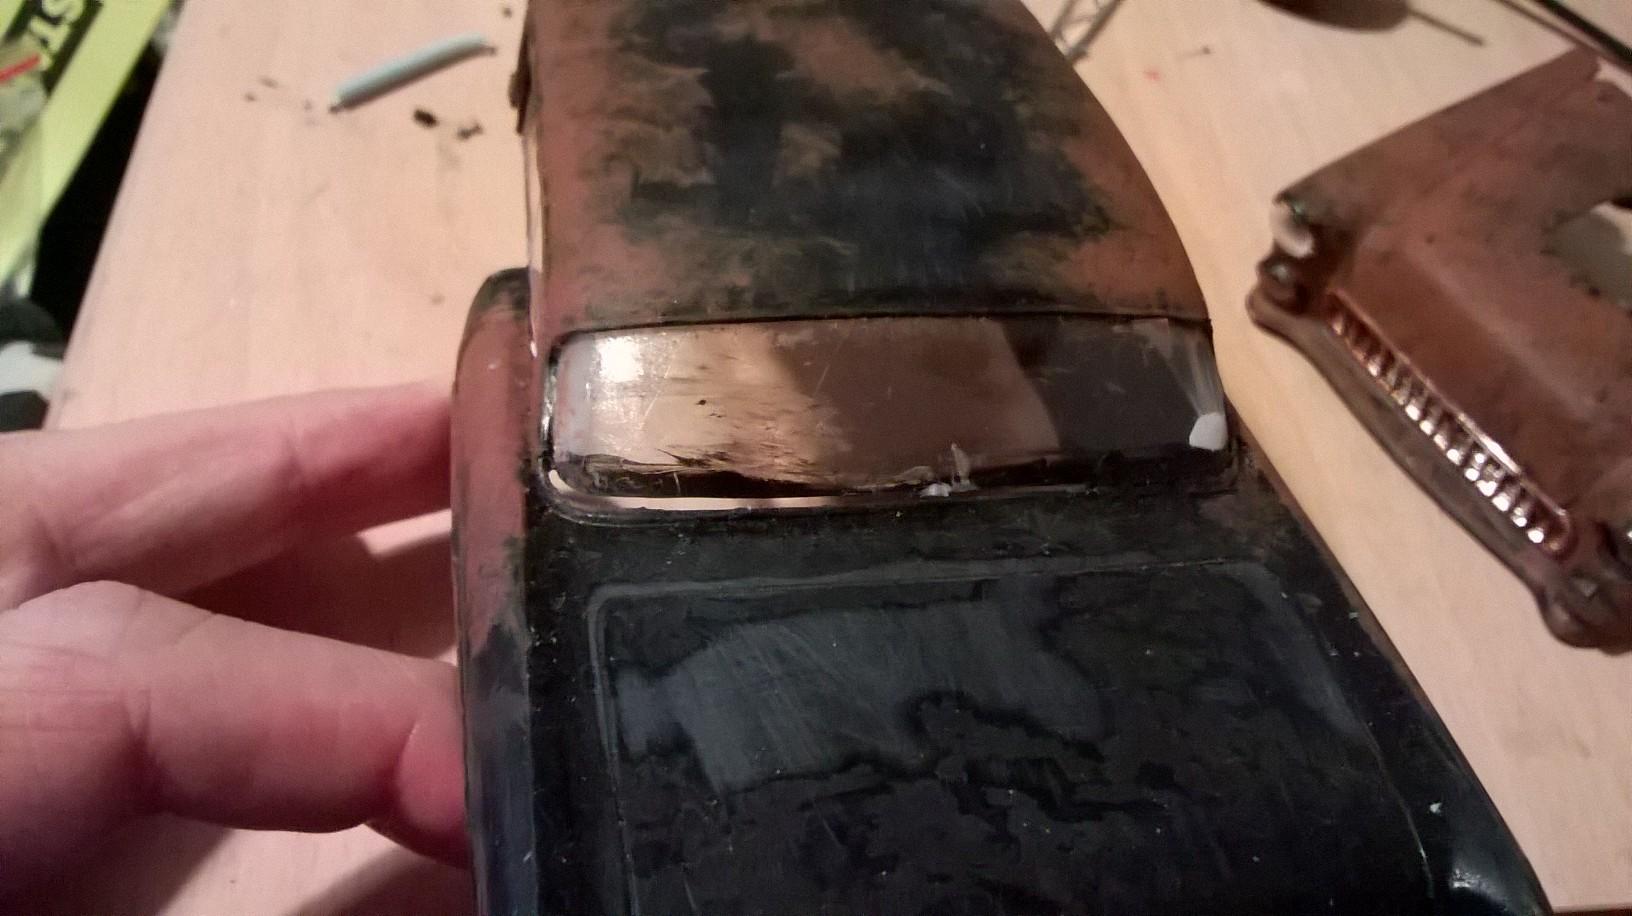
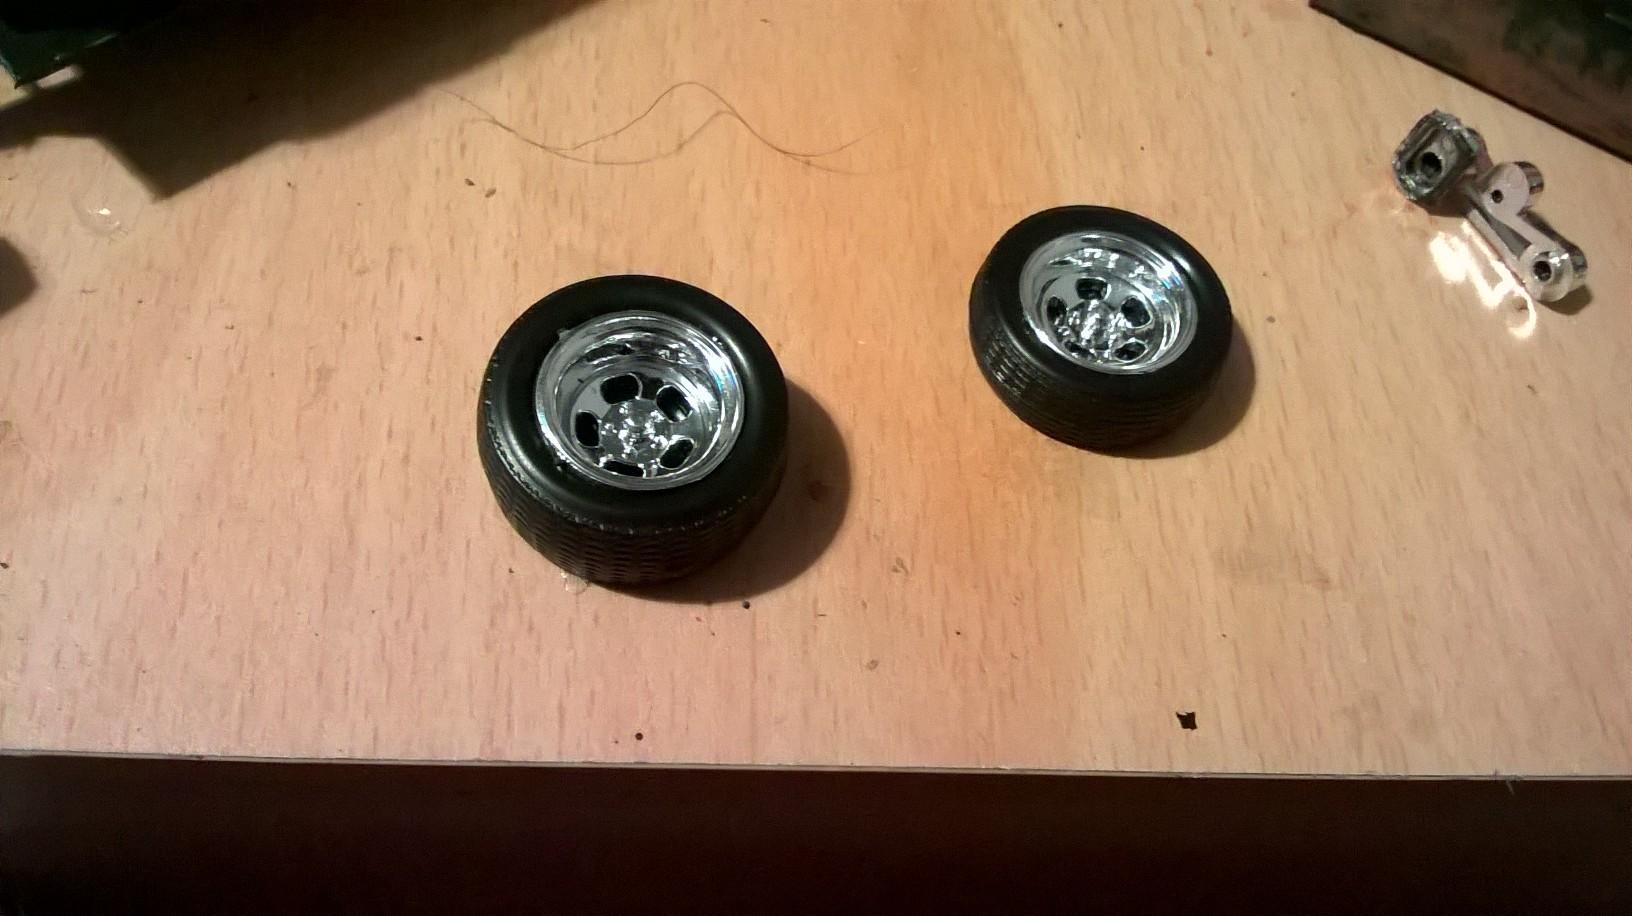
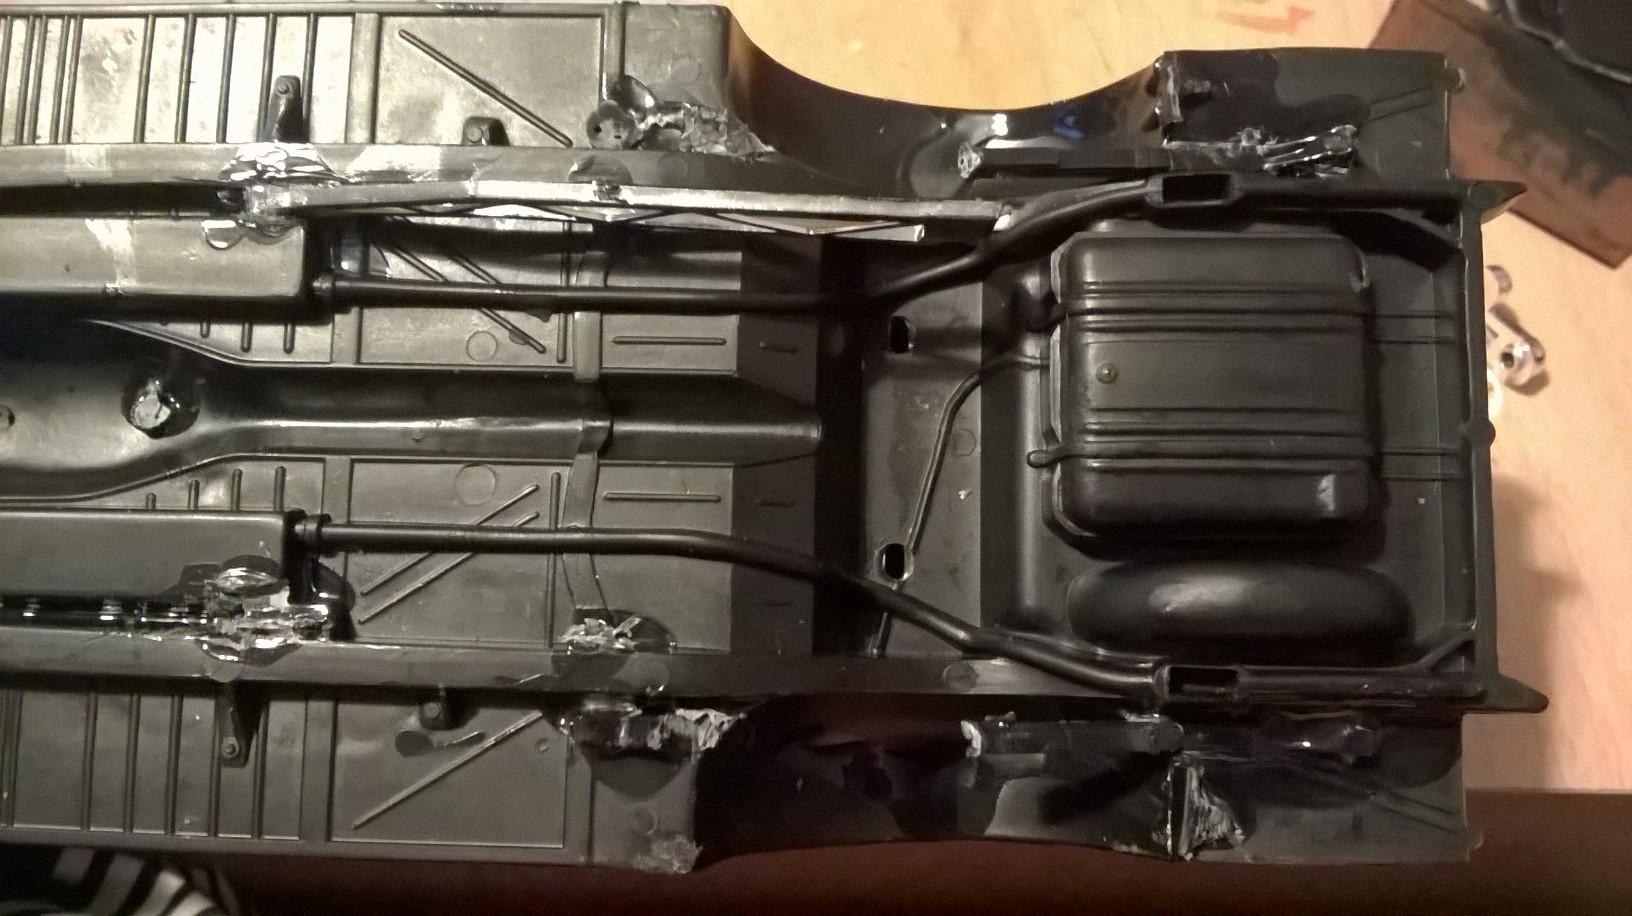
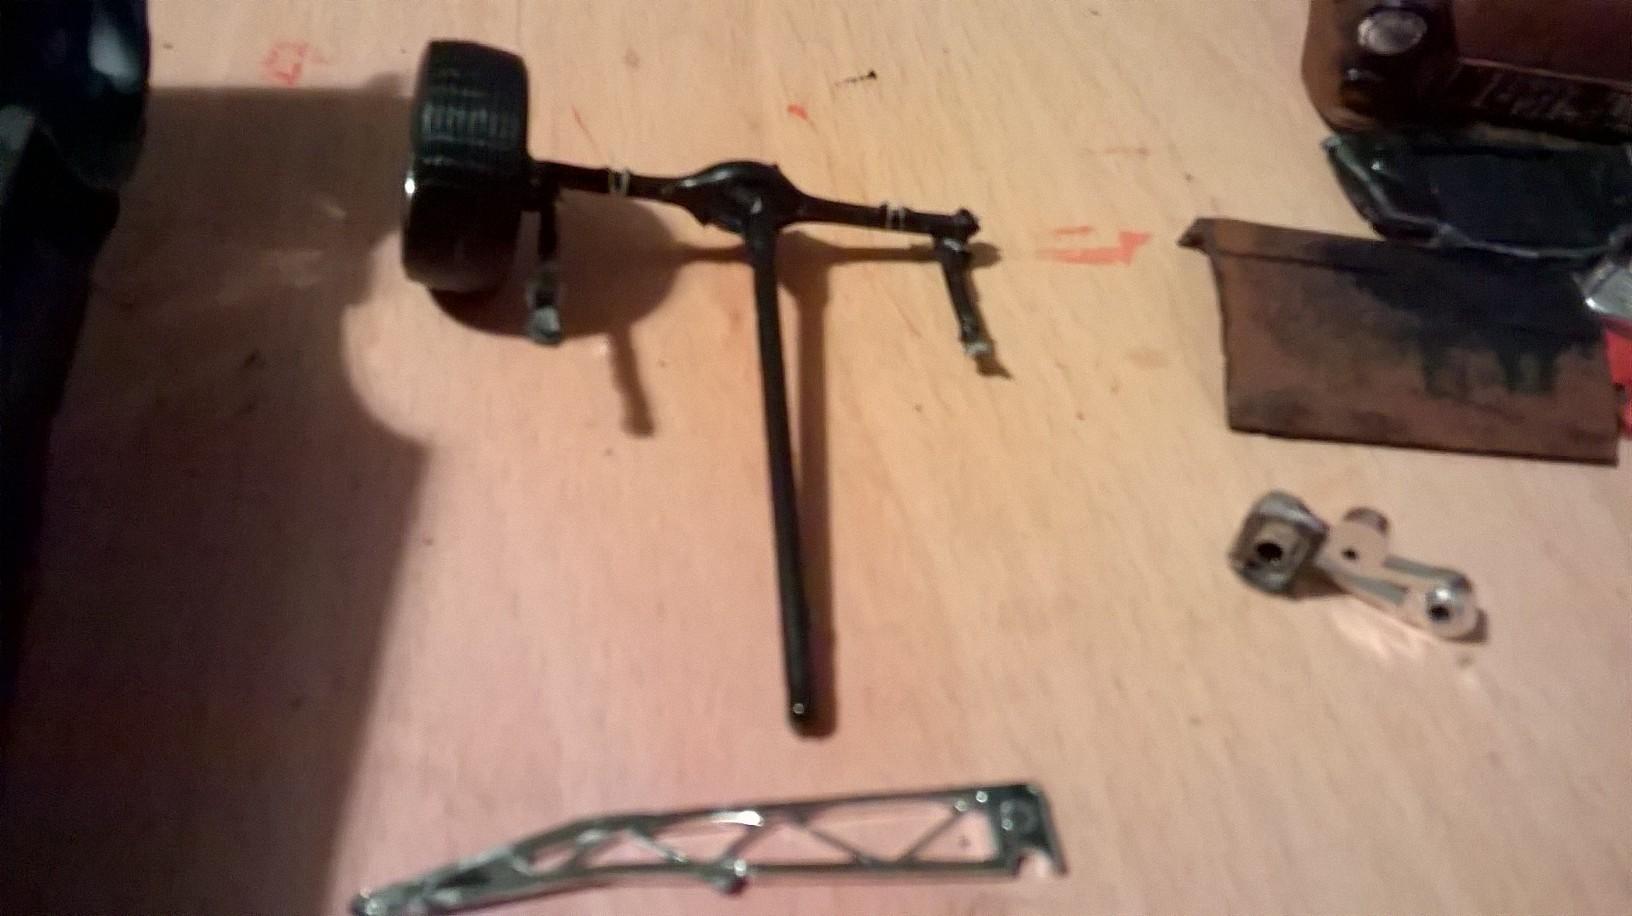
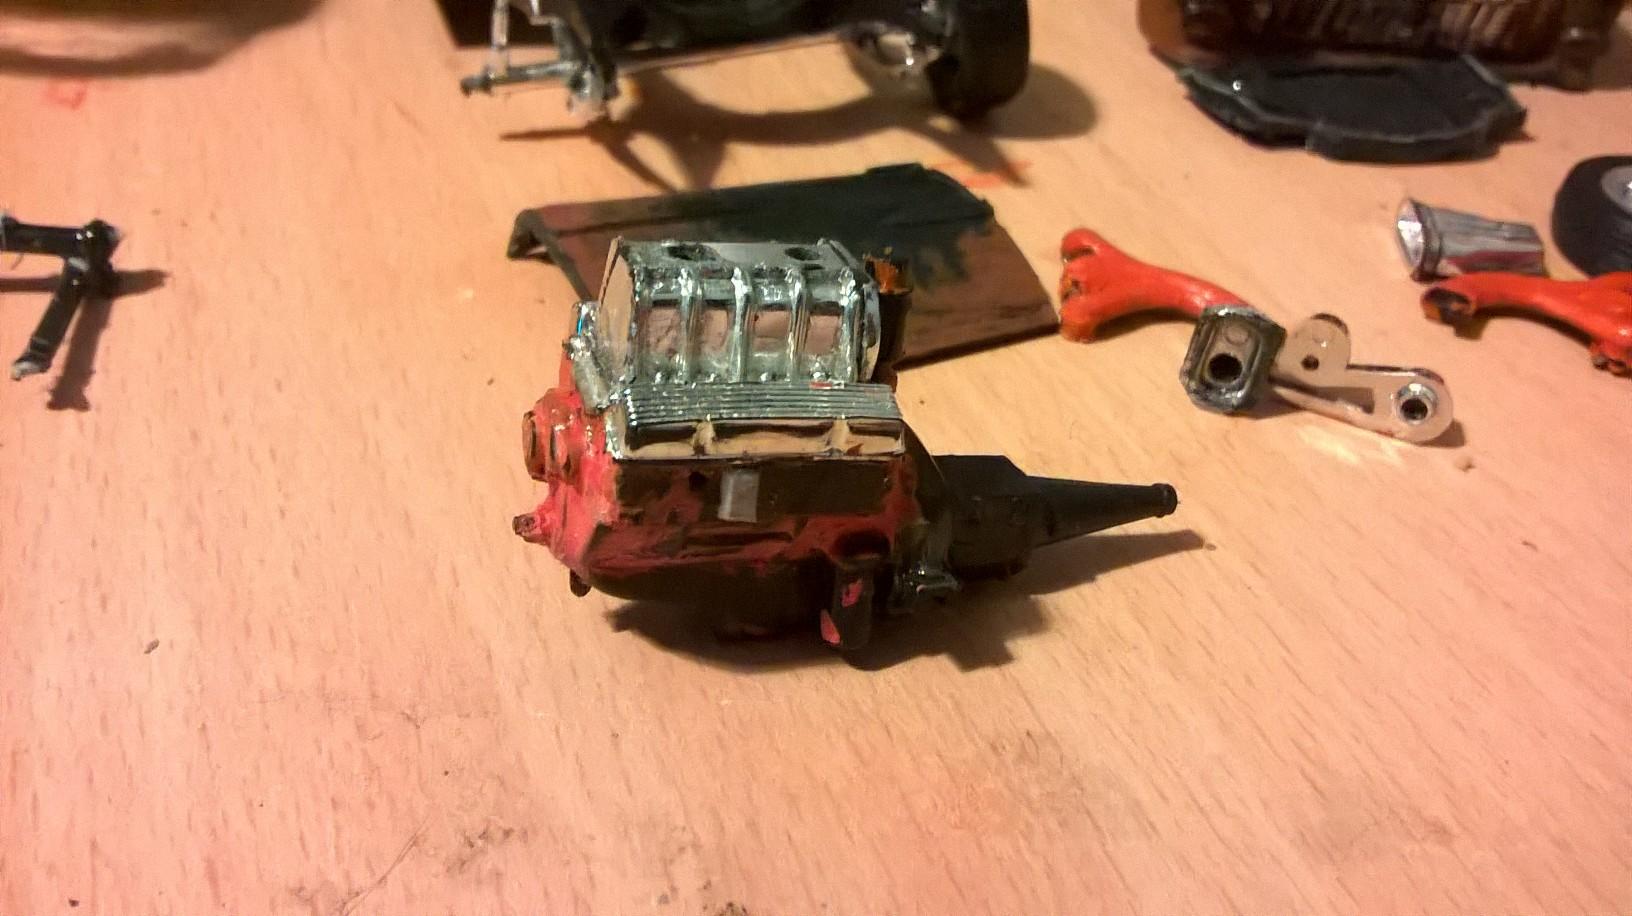
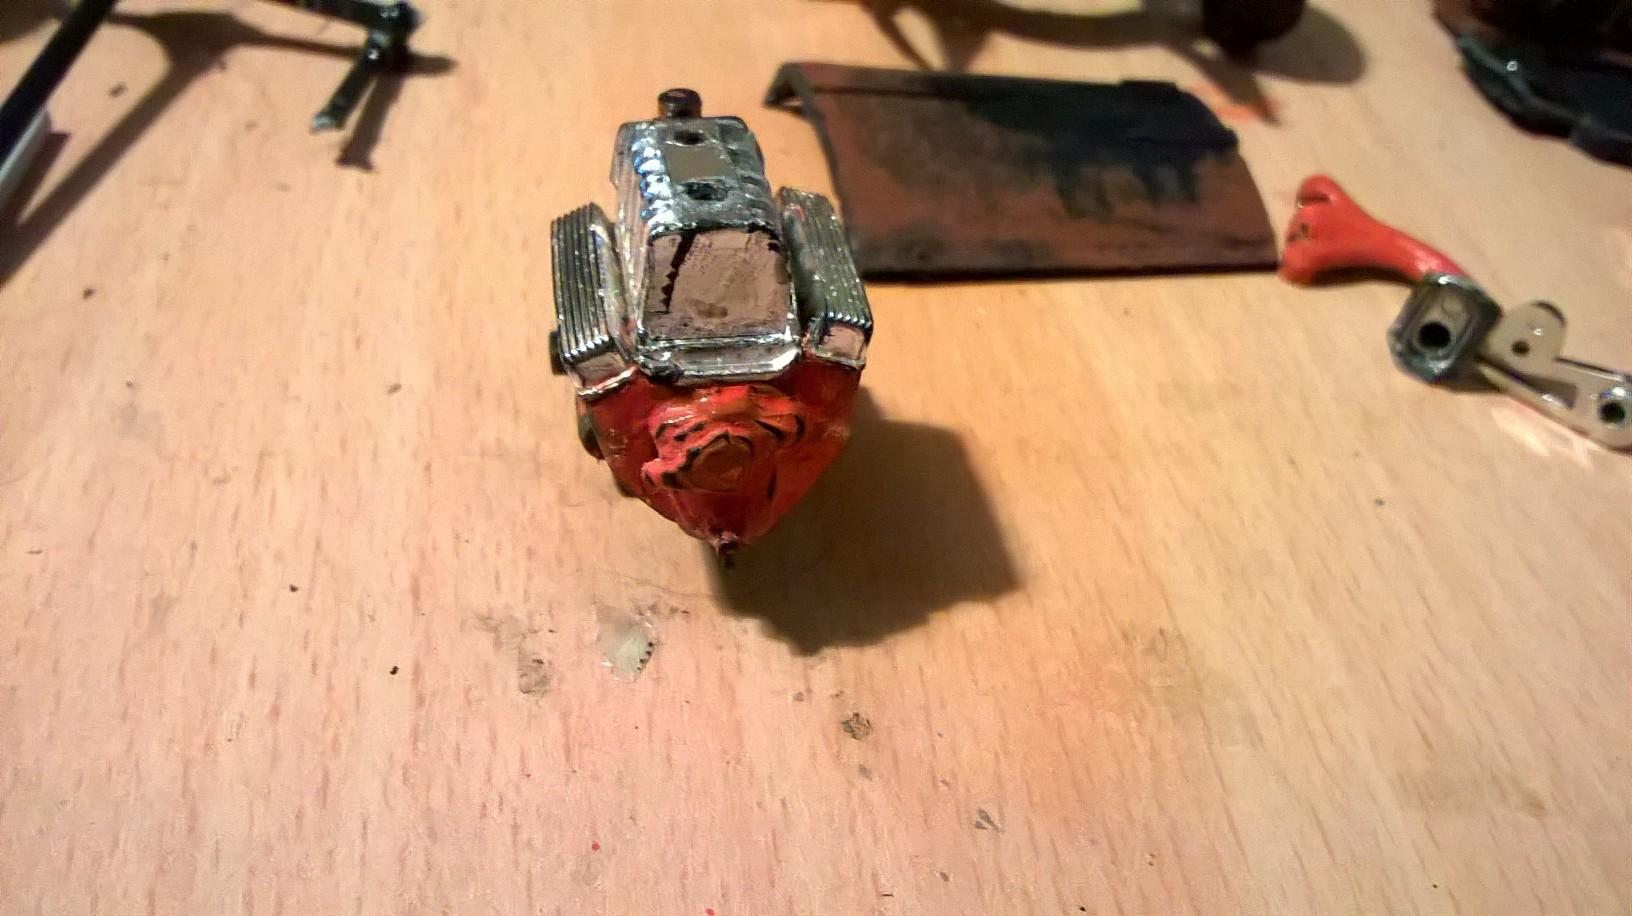
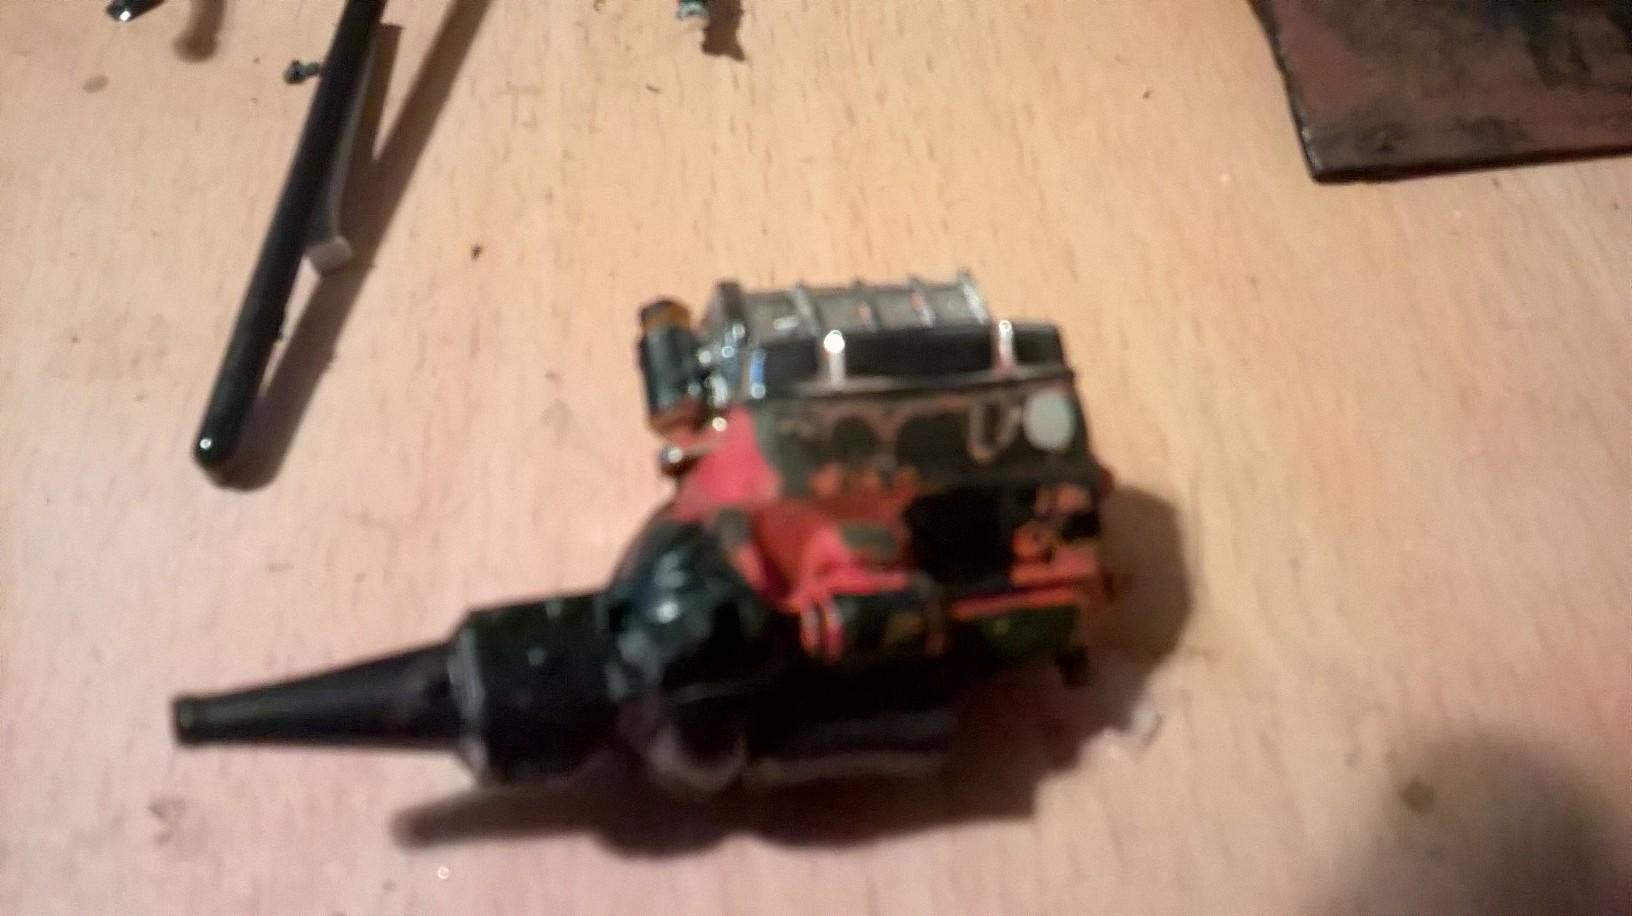
Just before i start this, i, like my cousin am a rookie at modeling, i have only built a few but i couldnt pass up the opportunity to try to get this model looking reasonable, i love chevy gassers and so will try to fix this with what limited knowledge i have. So this weekend my little cousin gave me this model of his, it was fairly complete but its the first model he ever made and its in such a state. Below are all the parts i got with it, he tried to make some rusty 2 lane black top style chevy, but it really hasnt turned out well. (the pictures arent great, the rust is darker than that and doesnt look too bad, for some reason the camera has made the pictures a lot lighter than they should be.) Im not really sure where to start on the car tbh, there was some big holes on the engine which i managed to fill with some scraps of plastic i had and im in the process of getting the paint off. I think i will have to re-make the rear leaf springs as they have split in the middle and are covered in glue and one of the wheels has snapped of the rear axle so i dunno what to do about that. i also dont know what to do about the firewall that he, for some reason, cut out and the terribly cut out door. There is also a lot of glue on the front and rear window and im not sure how to get it off. Thanks for reading, updates to come.
-
This is my first build in almost 30 years. I'm actually building a kit that I bought back in the 80's (better late than never, right?). I built it once back then and I remember it being a total pain because of ill-fitting parts. This one hasn't been that bad, though. This is also my first time airbrushing and using BMF....Please be gentle. lol. Anyway, here is the progress that I've made so far. Please excuse the photography.
-
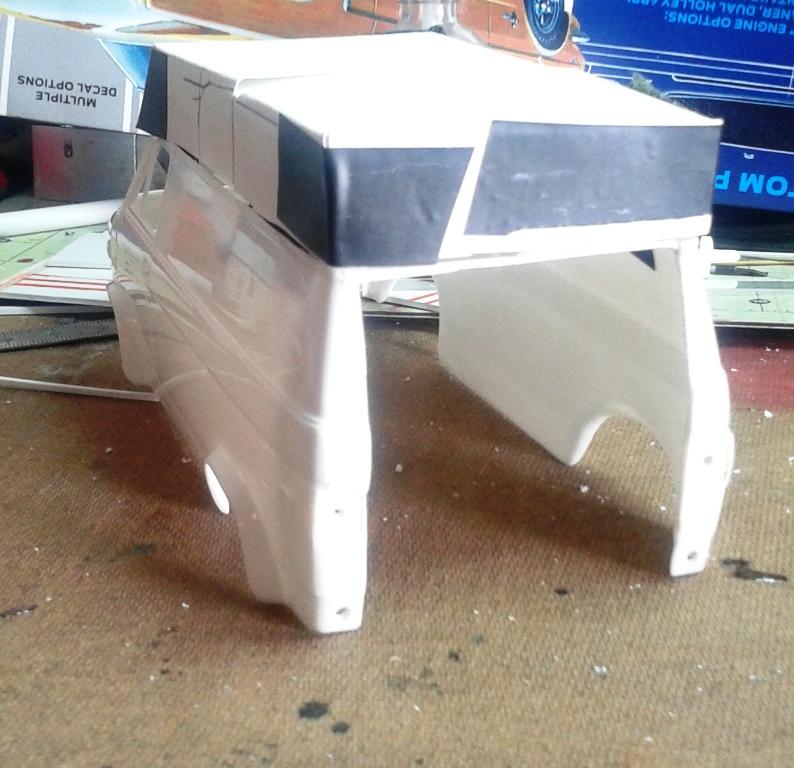
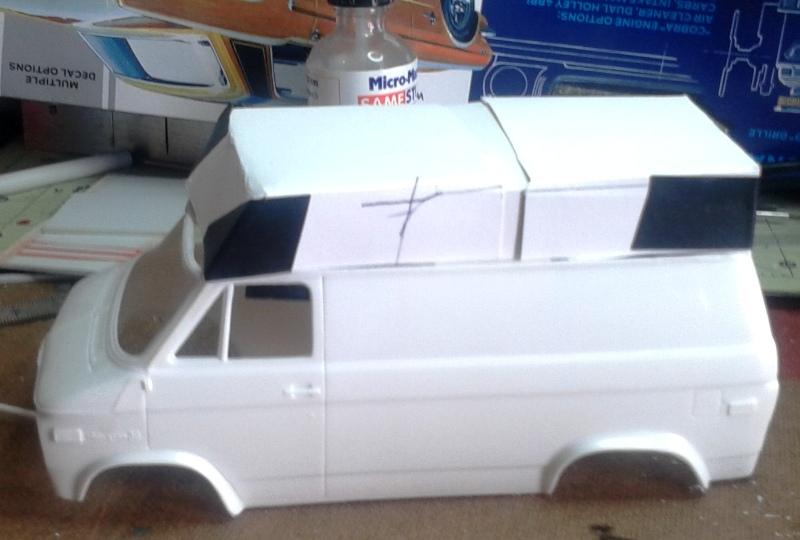
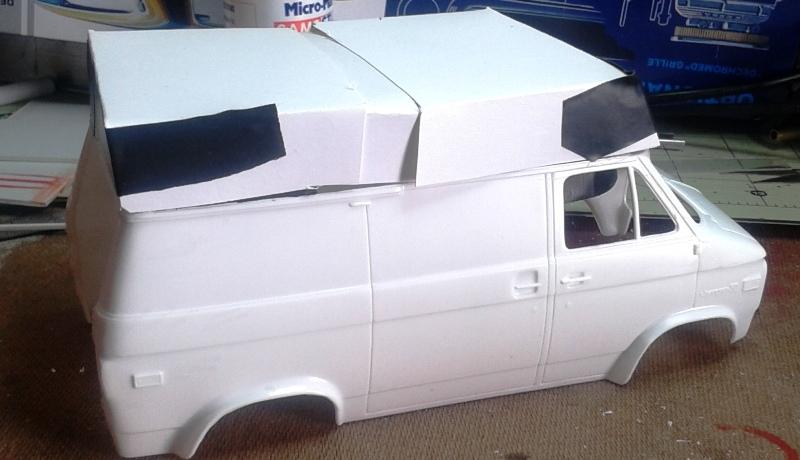
My current build is the 1977 Chevy Van, that I am going to build into a camper. I have removed the roof to add a 24 inch extension and cut the back doors open. My intention is to add a cabinet with Microwave, Refrigerator, and sink; a table and chairs, bench seat/fold down bed, as well as storage overhead of the van cab. Carpet will be grey felt and the walls will have simulated paneling. The raised roof with simulate the fiberglass cap that was relatively common for conversion vans back then. I plan to paint the van white and use the blue decals that came with the kit to decorate the outside. Jeff


.jpg.7cd706354e0f409f78d2c96e6a274f60.jpg)