1959scudetto
-
Posts
3,319 -
Joined
-
Last visited
Content Type
Profiles
Forums
Events
Gallery
Everything posted by 1959scudetto
-
 Last pit stop in this part of the forum - all details finally applied (including door handles from steel wire) - final part will be the application of race numbers and sponsor decals. Next time in the Under Glass section !
-
Here is a link to jimperlinx (le mans decals) on ebay: https://www.ebay.de/itm/124763932572?_skw=ferrari+250+gto+1964&itmmeta=01JC4DKB95G65RY6S1E4DCYK94&hash=item1d0c82879c%3Ag%3ALj4AAOSwPhpmPxcS&var=425767140646 Gary has ordered a few times from them, so did I -no problem.
-
x 2 - looks very good !
-
Your excellent dioramas are always a pleasure to look at, Charles - so many small details to discover. (Unusual subject, though)
-
A very fine tribute to Fangio, Matt - and of course another fine model for your Roy Cross tribute series. Your upgrades and alterations make this kit look very convincing. I really do hope that your series will continue.
-
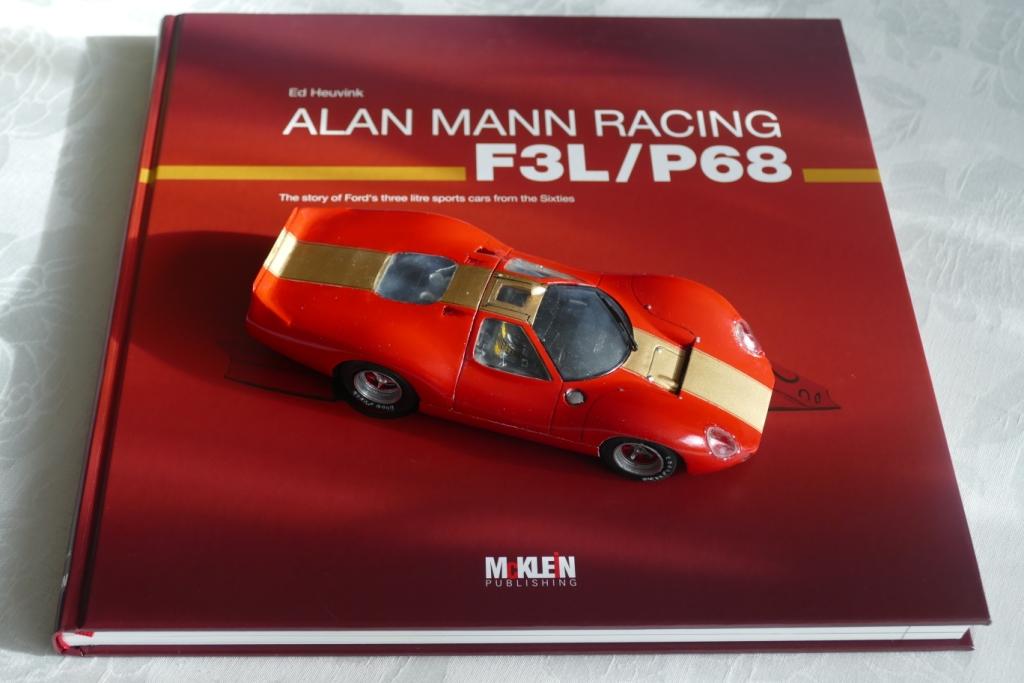
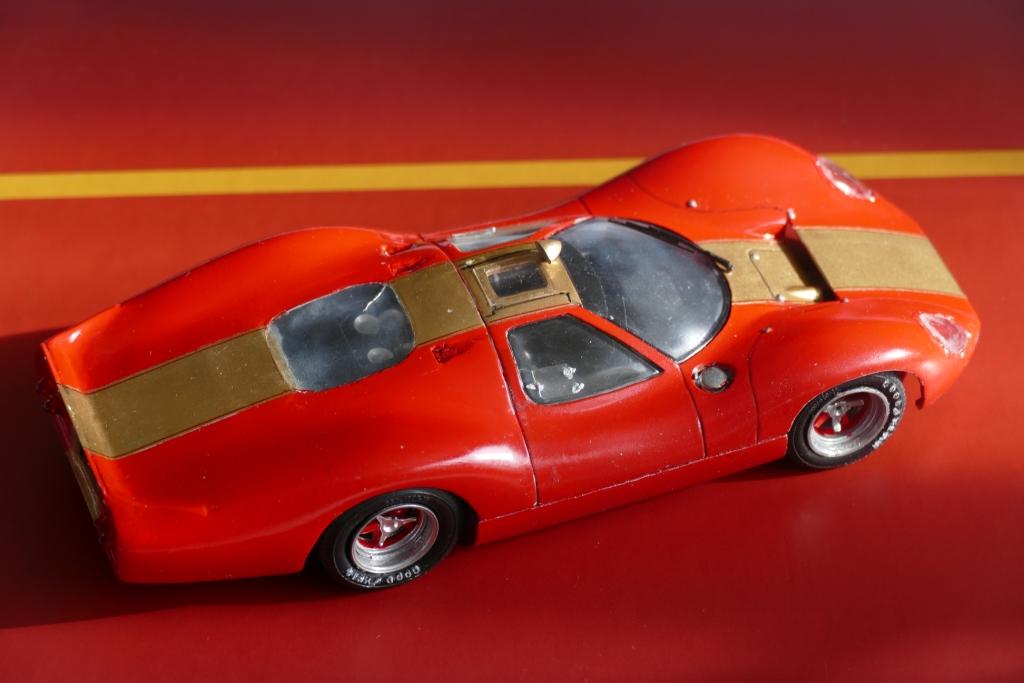
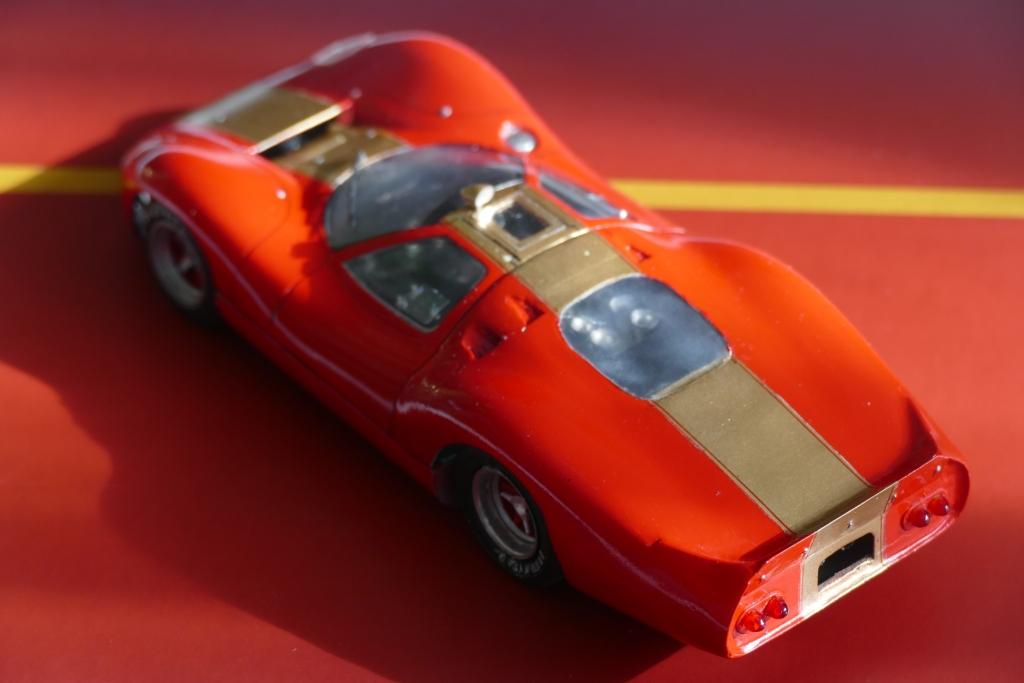
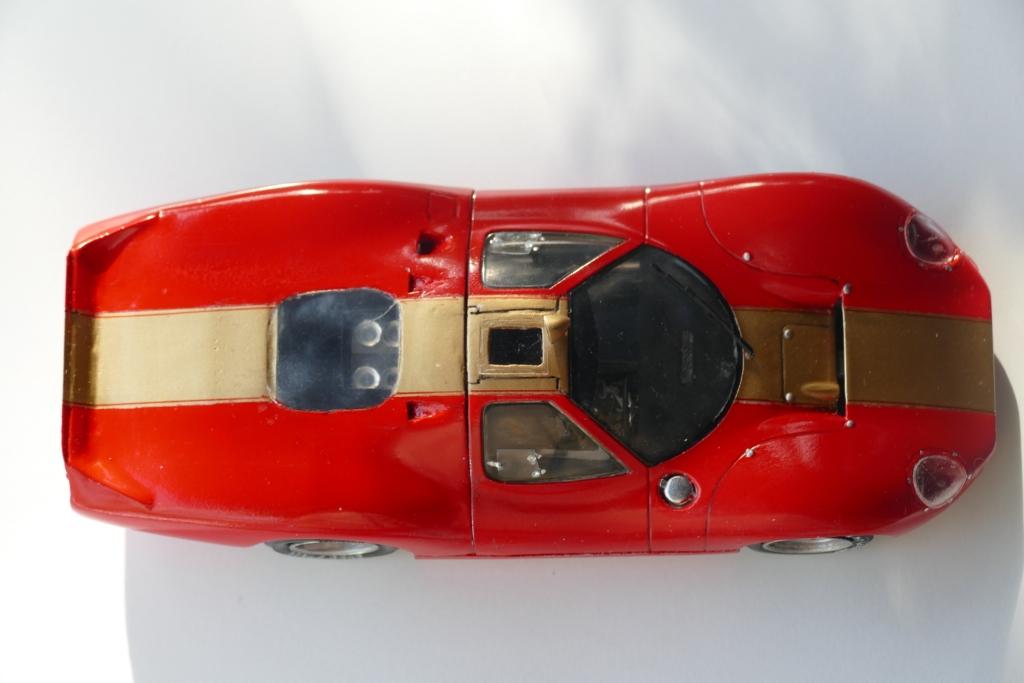
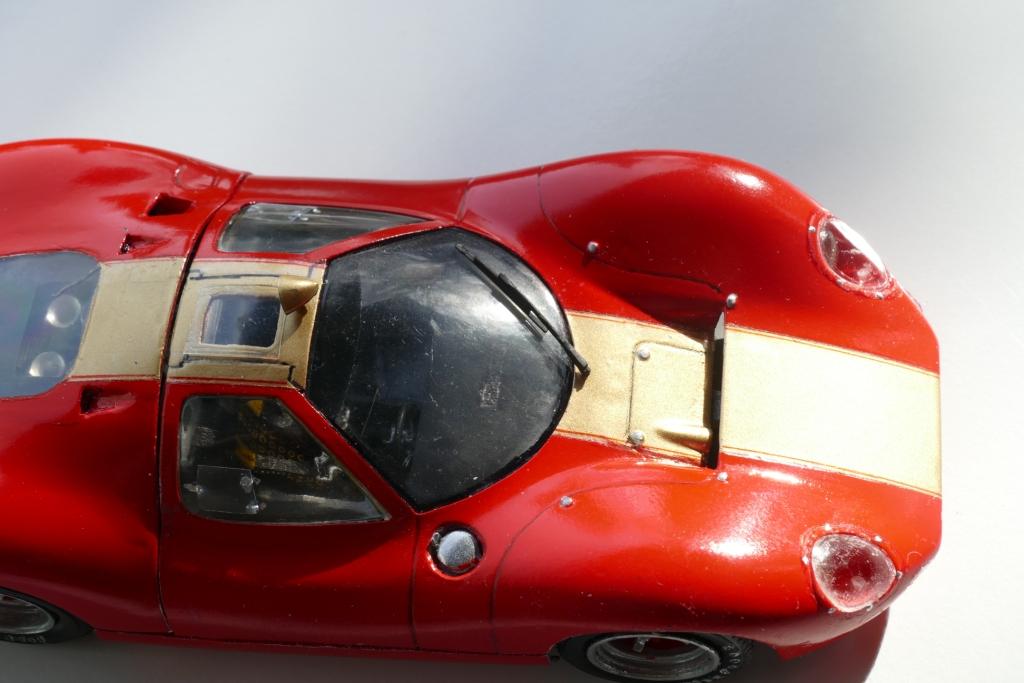
Got one of the now ultra-rare "British Sponsors" decal sheet from the (obviously) defunct DMC decals: A French slotcar seller had still 2 left in stock. Now I can finally complete my Ford P68:
- 39,234 replies
-
- 4
-

-
- johan
- glue bombs
- (and 1 more)
-
Please carry on - this will be nothing than mindblowing !
-
That is a misunderstanding from your side, Mark. Of course you will see this in the Under Glass section - but it is not yet finished (missing decals arrived today).
-
Batmobile
1959scudetto replied to Pierre Rivard's topic in WIP: Other Racing: Road Racing, Land Speed Racers
Paint and decals came out great, Pierre - and these fantastic wheels are the icing on the cake. -
Who doesn't love a mock-up? Let's see yours!
1959scudetto replied to Belairconvertable's topic in WIP: Model Cars
Thanks Mark - it is in the WIP section as of now. -
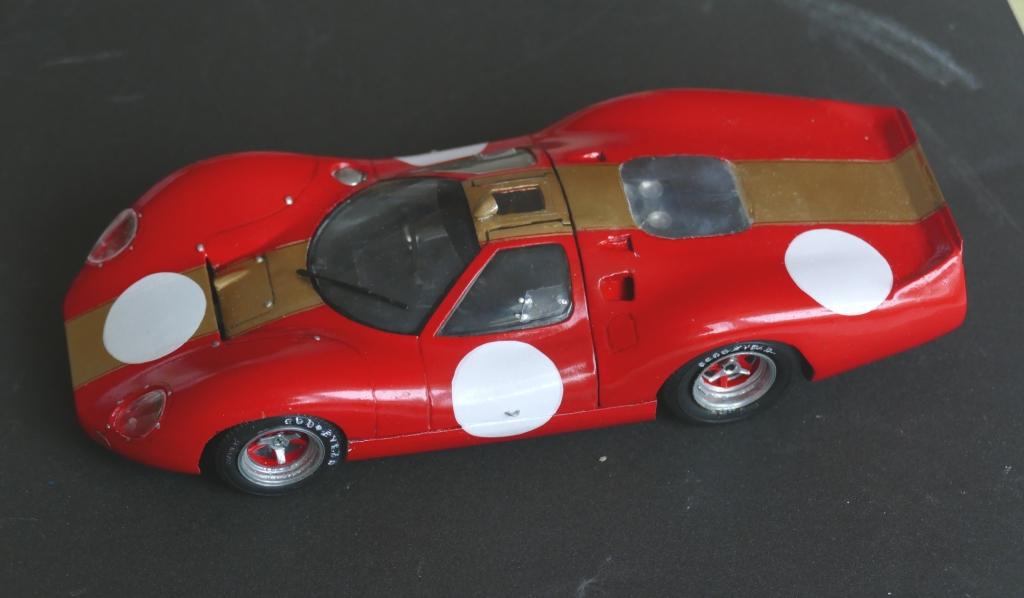
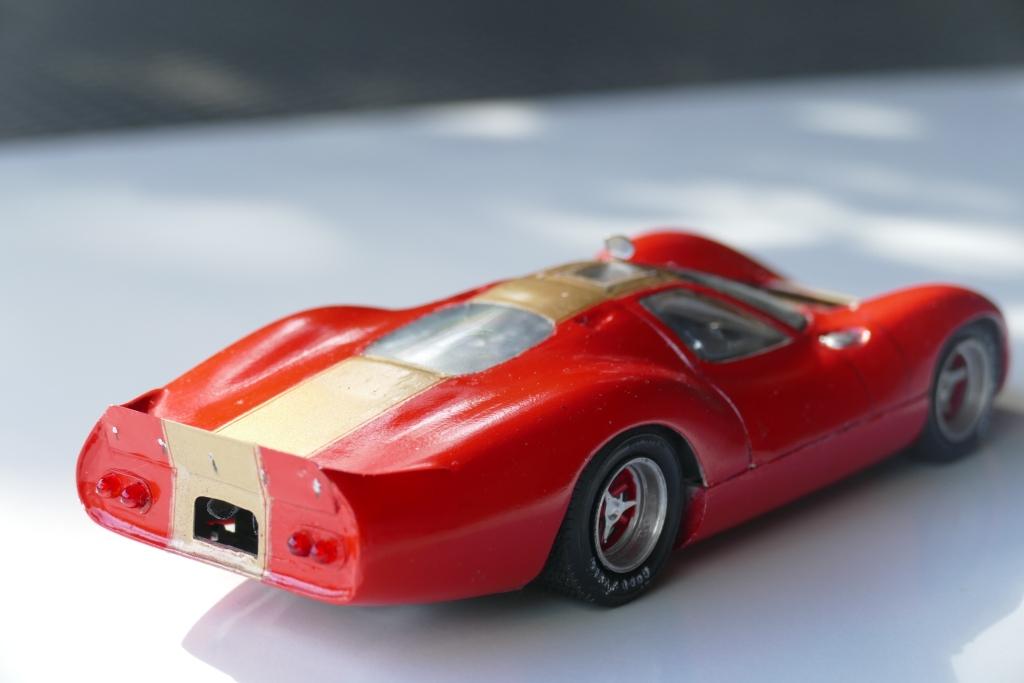
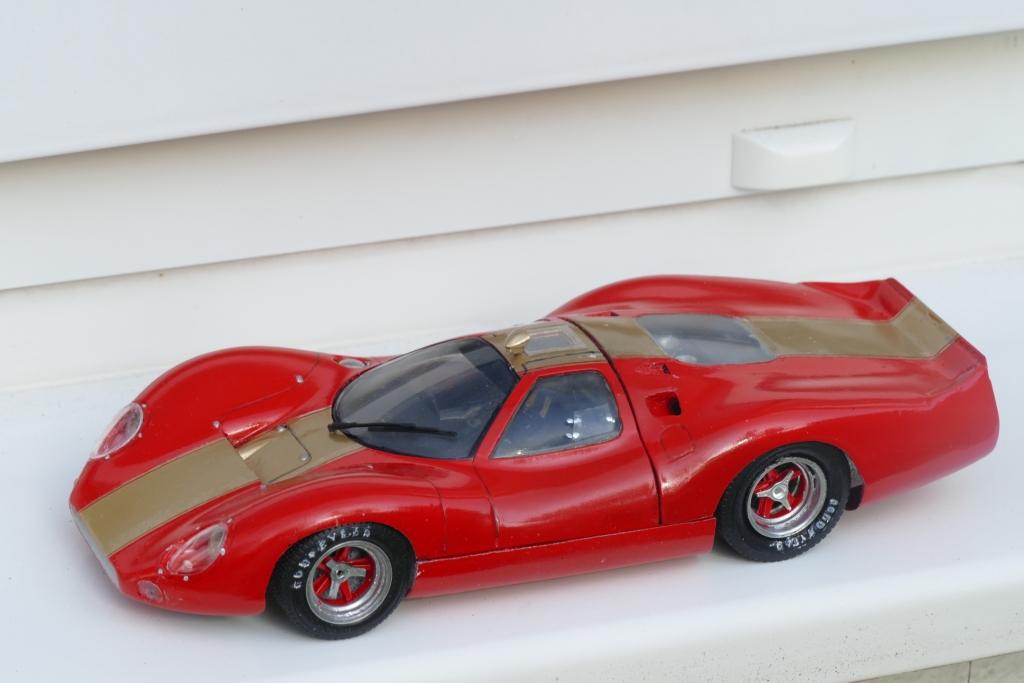
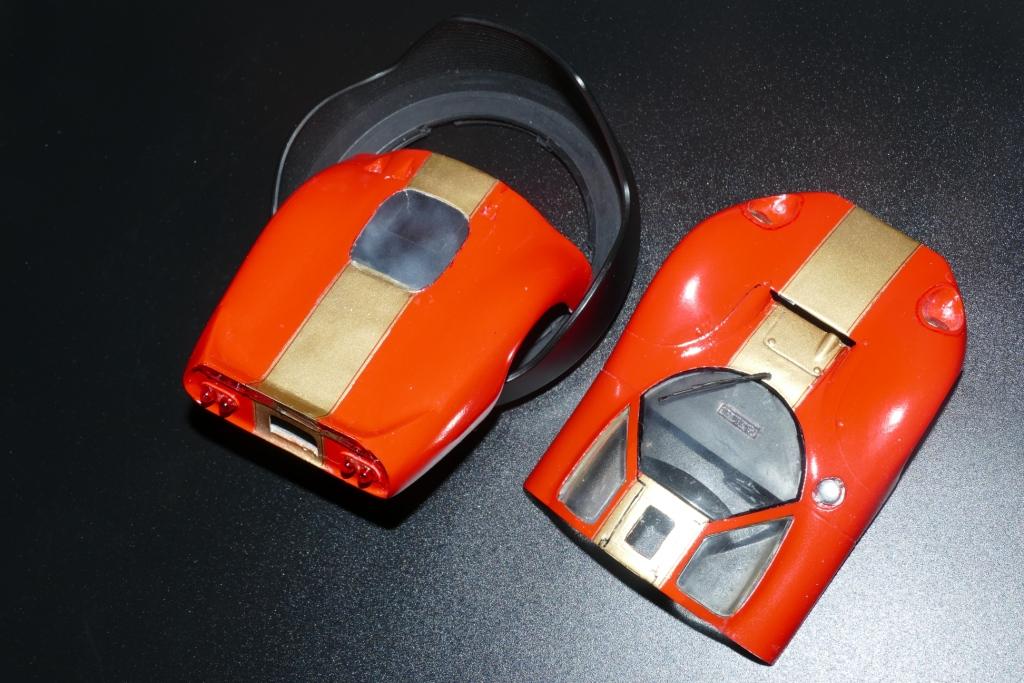
Yesterday evening I have all missing details finally included: side window hatches cut from blister packages, headlight covers were donated from a 250 GTO (Italeri), roof-mounted rear view mirror from Scale Productions (polished metal), rear wheel spinners from a Fujimi Gulf GT40, touch-ups with Humbrol silver and matte white enamels (tire lettering): Now waiting for the (correct) decals... then a few small touch-ups where necessary, and next time it will be in the "Under glass" section.
-
Who doesn't love a mock-up? Let's see yours!
1959scudetto replied to Belairconvertable's topic in WIP: Model Cars
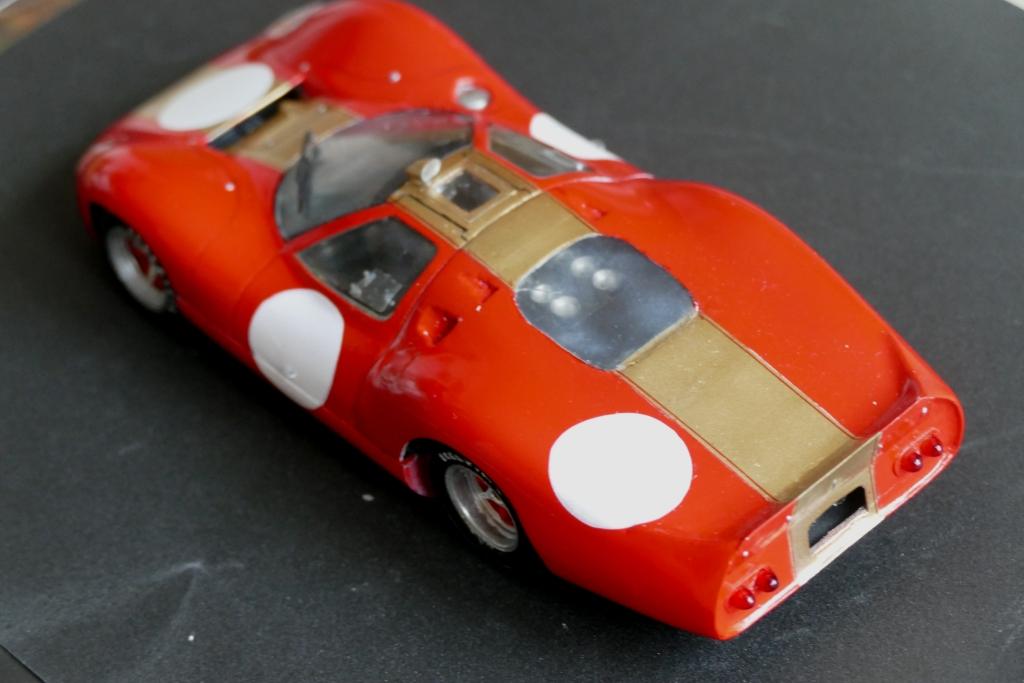
Mock-ups are quite essential: for self-motivation and for checking ride-height of a vehicle to achieve the stance you want to get, especially when kit-bashing or modifying/reworking old builts like this '68 Ford 3 L prototype:
-
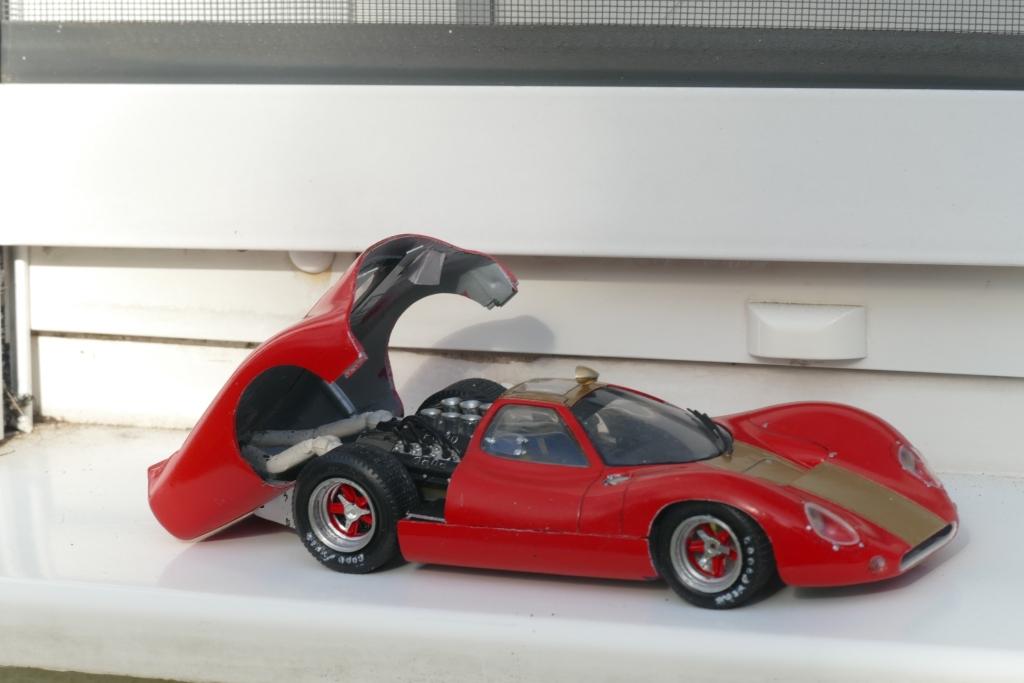
As you may know, the real F3L/P68 did not finish any of the races it attended. Well, mine is at least crawling towards the finish line (still a few details have to be added - I'm still awaiting some decals I have ordered from France): wiper from the spares box, polished metal fuel cap from Scale Production, headlights from CTM: rear lights are amt truck roof lights, painted over with orange and red (outside) and dark red (inside) clear enamels. Roof opening has been closed with clear plastic. Engine cover (black) and dashboard have been added and an inside rear view mirror. Next update will follow soon...
-
Ferraris that won 24 Hours of Le Mans
1959scudetto replied to Gramps46's topic in Other Racing: Road Racing, Salt Flat Racers
Very nice collection, Gary - thanks for showing them all together ! Great model of the 1949 LM winner: from drawing to wood-carving to the final modelcar - absolutely marvellous! -
Smokey and The Bandit, my way!
1959scudetto replied to TruckerAL's topic in Model Trucks: Big Rigs and Heavy Equipment
Fantastic build, Alex ! -
Very sharp-looking Ferrari !
-
1/12 Ferrari 641/2 (F50)
1959scudetto replied to Rich Chernosky's topic in Other Racing: Road Racing, Salt Flat Racers
Exquisite model, Rich - with lots of additonal details (I followed your WIP) - its business end looks so real with the body panel removed, you can almost hear the screaming of the V12 ! -
Tamiya 1/12 Ferrari 641/2
1959scudetto replied to Rich Chernosky's topic in WIP: Other Racing: Road Racing, Land Speed Racers
Absolutely exceptional model, Rich - can't wait to see it in the under glass section. -
That's a bunch of nostalgia, Matt - and marvellous reproductions !
-
Those wheels are superb, Ken - the kit-supplied low-profile tires simply look wrong. Primrose yellow is a good choice as analternative to the ever-present red and green (as is Opalescent Silver Blue).
-
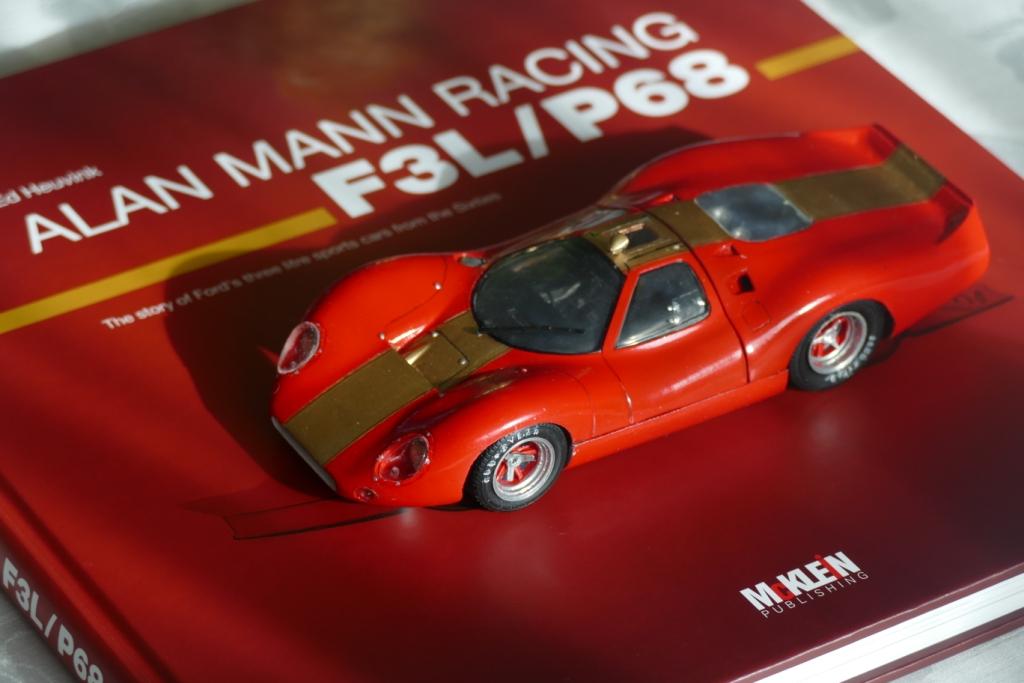
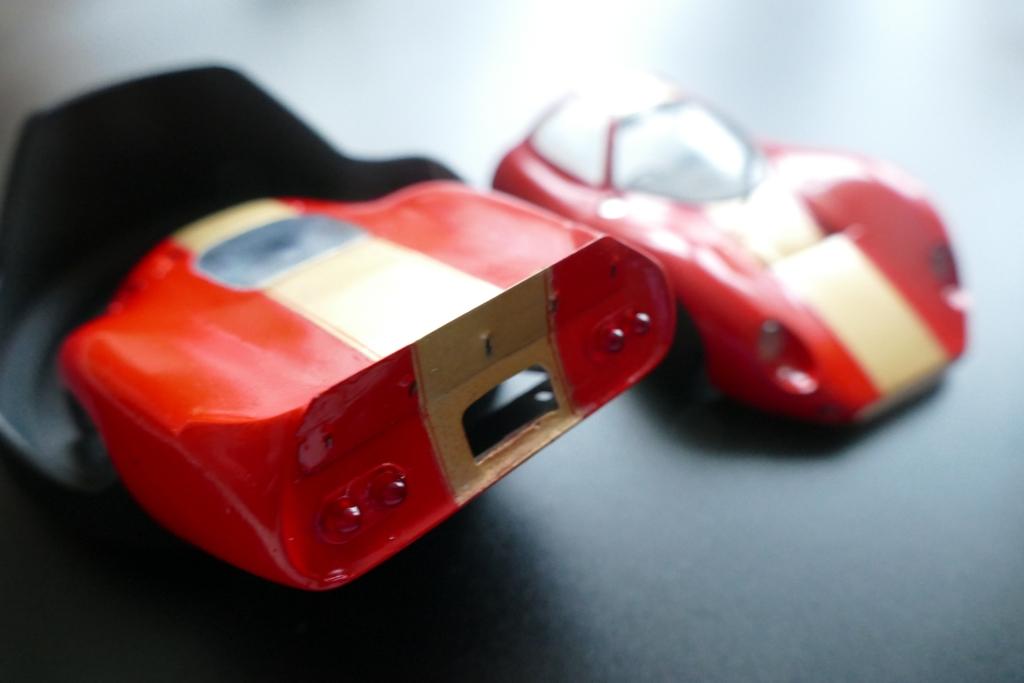
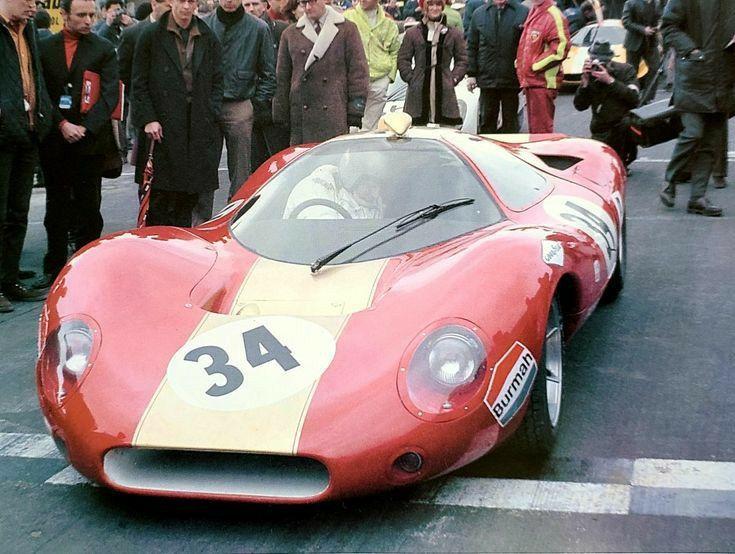
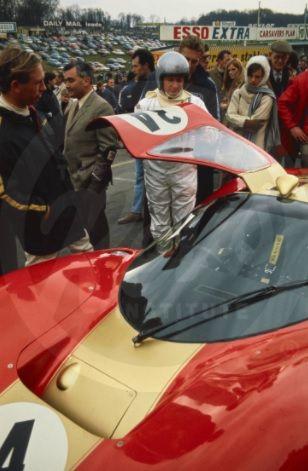
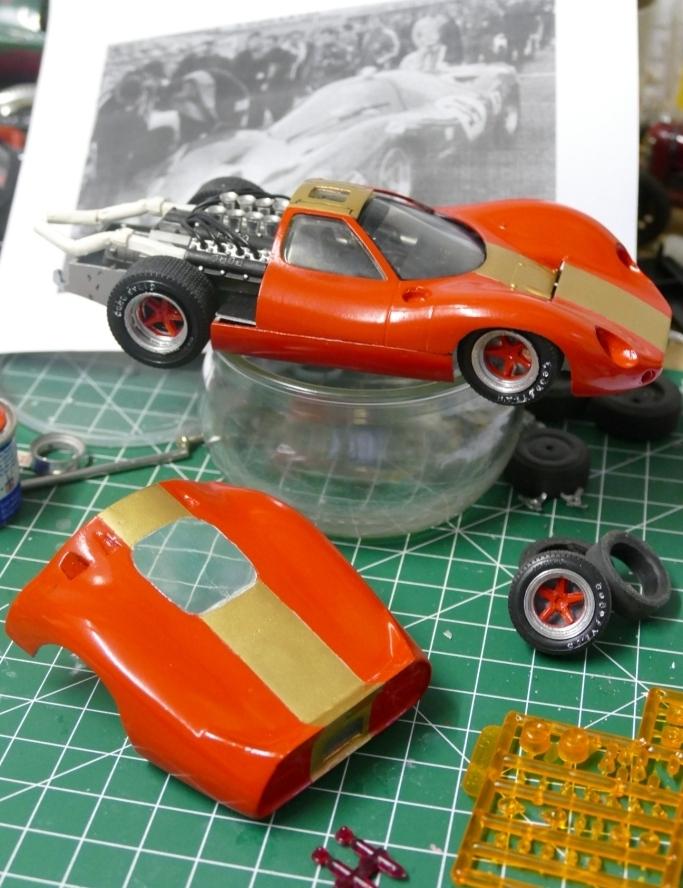
Looking at the golden stripes, suddenly I wanted to try adding the red pinstriping to them - see the original (on the starting line at Brands Hatch): I had the idea of drawing some thin lines with a very fine red (waterproof) ink-marker onto an old sheet of clear decal paper and then trying to place these stripes on the body of the car. It certainly is not in scale, but I think it looks quite acceptable.
-
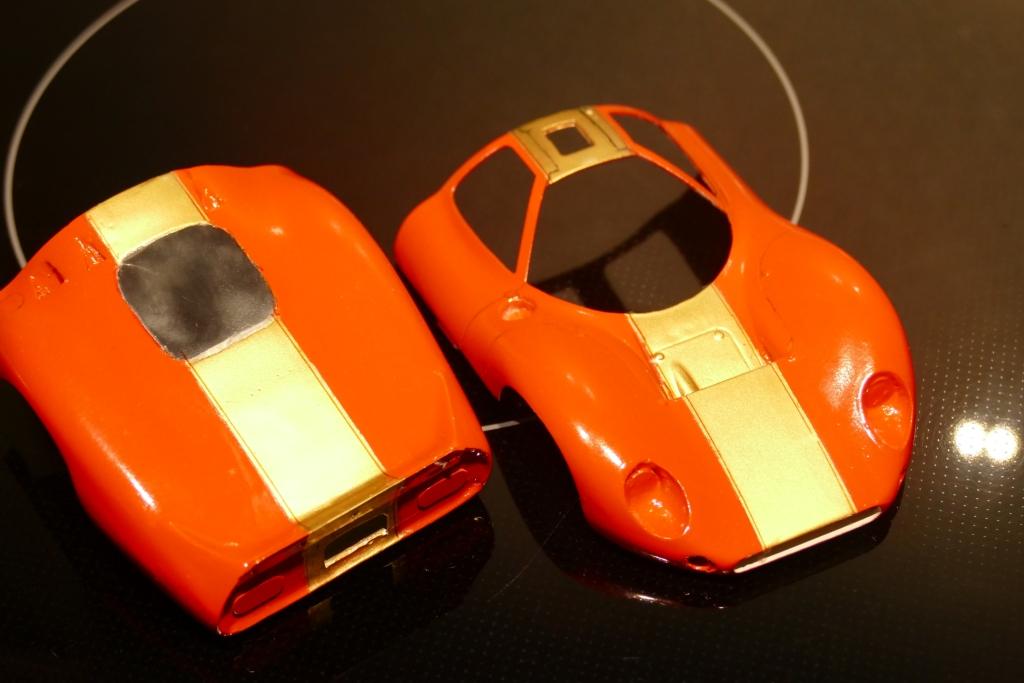
After several setbacks (masking tape peeled off paint) and mishaps painting has been finished (surprisingly the rear window masking could be cautiously removed) the body is ready for decaling and adding the final details (wipers, mirrors, lights etc.) - here is a quick mock-up: Paint has some small imperfections, but I can live with that. A bit of polishing may be needed, but I have to be careful especially with the rear window (It has a crack and is a bit milky/cloudy, very thin and blended into the body with putty). As this is supposed to be a racing and not a show car, I will let it be like that.
-
Very clean and crisp-looking resin kit - excellent quality I would say. The real challenge will be without doubt the application of these decals, which cover the entire body.
-
Autoquiz #619 - Finshed
1959scudetto replied to carsntrucks4you's topic in Real or Model? / Auto ID Quiz
PM sent... -
Excellent GTA, Lin - one of my favorite cars ever ! Just watched your WIP video - fantastic work: your photos let the model look like the 1:1 car.