Straightliner59
-
Posts
5,814 -
Joined
-
Last visited
Content Type
Profiles
Forums
Events
Gallery
Everything posted by Straightliner59
-

64 Dodge D100 Pickup Pro Street
Straightliner59 replied to AmericanMuscleFan's topic in WIP: Drag Racing Models
Awesome, Francis! If/when I ever get back to work on my Chevelle, you have laid a path for me to follow, for my hinges. Excellent work, my friend! -
Monogram 1926 Mack
Straightliner59 replied to Straightliner59's topic in WIP: Model Trucks: Big Rigs and Heavy Equipment
Thank you, kind sir! I'm working at it! ? Thanks, Charles. That's all good advice, and I will heed it. I would rather you suggest adding weathering, than letting me know I did too much. I appreciate it! -
Monogram 1926 Mack
Straightliner59 replied to Straightliner59's topic in WIP: Model Trucks: Big Rigs and Heavy Equipment
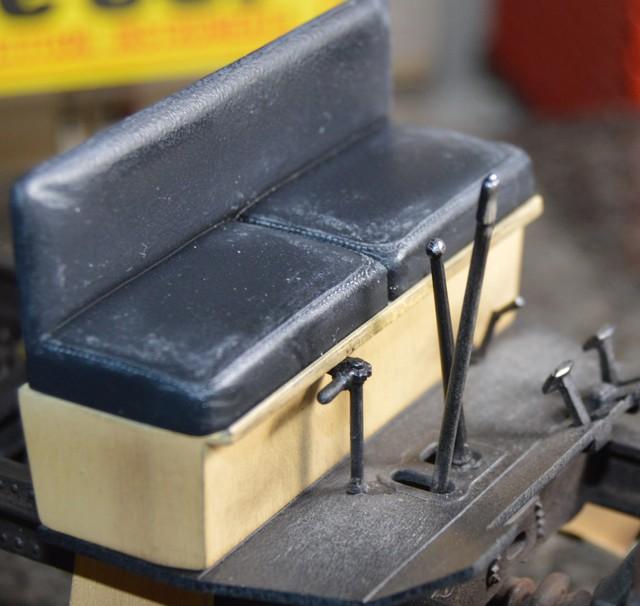
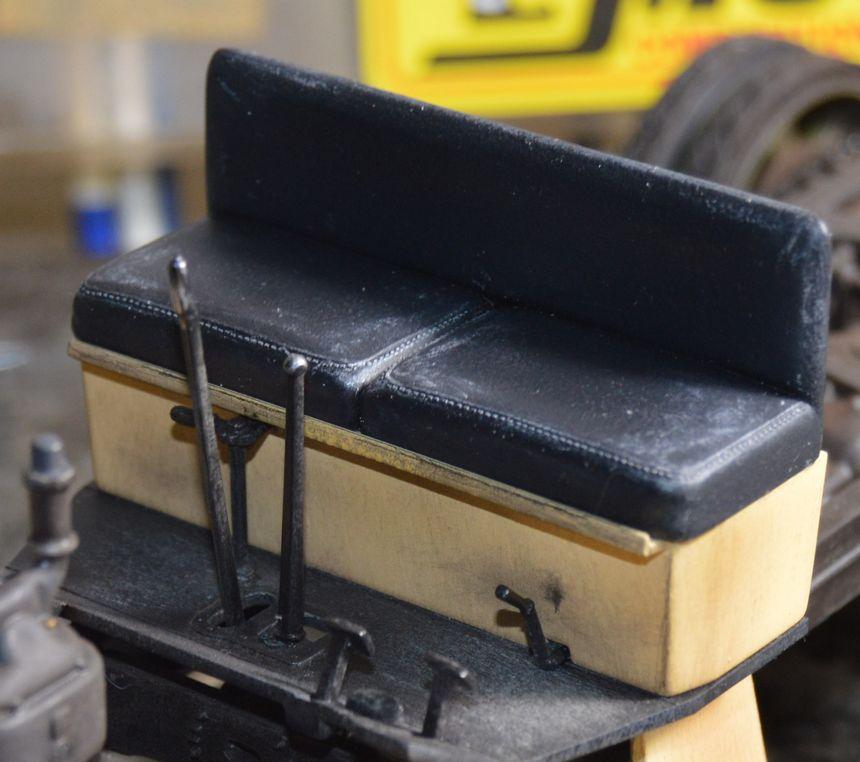
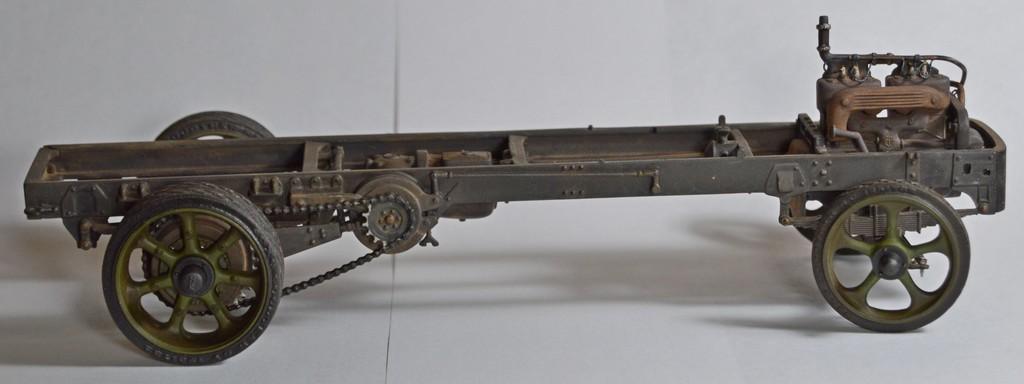
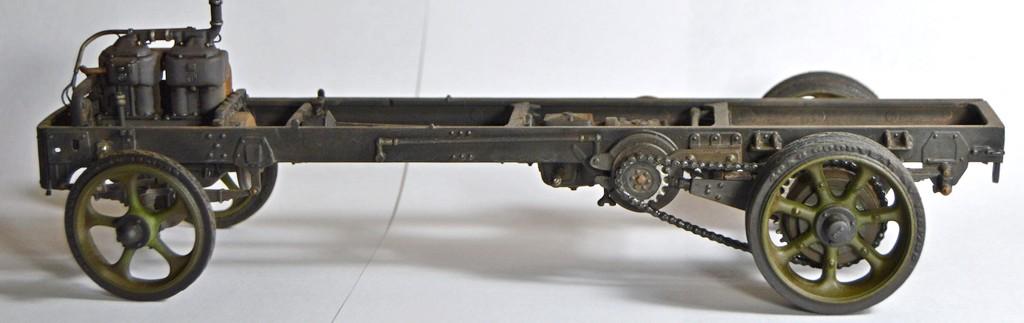
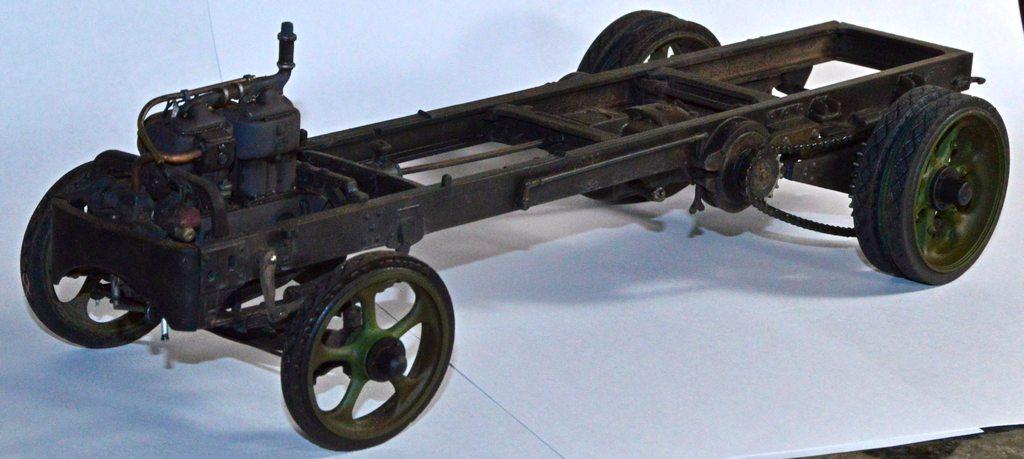
I got the fenders, cab floor, details and seats installed. I used some old, pretty dry oil pastels to do the weathered ares of the seat. The rest of the weathering is pastels, as I have been using. Critiques, questions and comments are always welcome! Thanks for looking!
-
Monogram 1926 Mack
Straightliner59 replied to Straightliner59's topic in WIP: Model Trucks: Big Rigs and Heavy Equipment
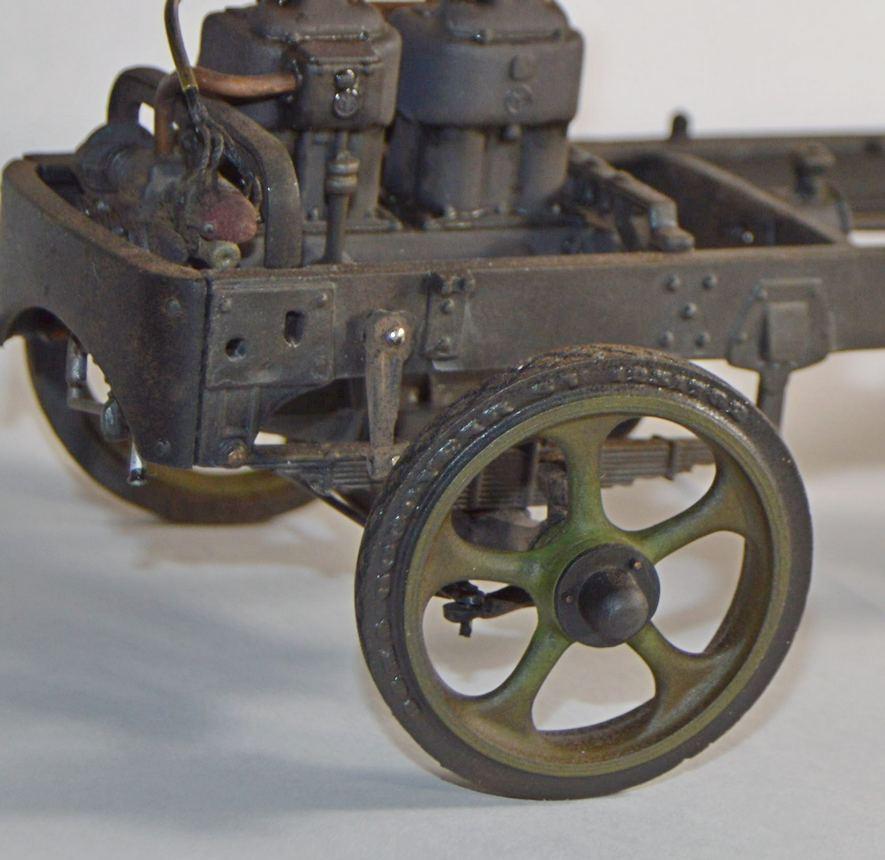
Hi, Hans. I used heavy duty (button and carpet) thread for the plug wires. The tube is 3/64" brass from Special Shapes. To begin, I thinned both ends of the tube and bent it to shape. Next, using very fine brass wire (.008"), I folded the wire over, creating a loop I then fed through the tube from the (engine's) rear. This was done before mounting the tube, just for clarity's sake. Then, I fed two lengths of thread through the loop of wire--don't spare the thread! It's cheap! roughly center the threads through the wire loop. Now, use the wire loop to pull the thread into/through the tube. Continue pulling until you can remove the wire from the thread. Now, simply pull the thread back into the tube--if enough length is left inside the tube, it won't even need to be cemented, as friction will hold it in place. Trim the loose ends, leaving enough to reach your magneto/distributor. For the spark plug ends of the wires, I simply drilled holes in the appropriate locations, and inserted short lengths of thread. Thanks for asking, and for your kind comment! Thanks, Brian! You're welcome, Roy. I hope they're helpful! -
Hahaha! A man after my own heart!
-
Monogram 1926 Mack
Straightliner59 replied to Straightliner59's topic in WIP: Model Trucks: Big Rigs and Heavy Equipment
Thank you, Dan! I got the paint straightened out on the fenders and seat base, so I can begin weathering them, pretty soon! -
Testor's is No More
Straightliner59 replied to DoctorLarry's topic in Model Building Questions and Answers
When I worked in a hobby distributorship, back in the late '80s, RPM owned Testors. At that time, Pactra was a Plast-i-cote brand. At some point, during that time, RPM bought Plast-i-cote, as well. Soon after, as I recall, Pactra began to go away. -
Monogram 1926 Mack
Straightliner59 replied to Straightliner59's topic in WIP: Model Trucks: Big Rigs and Heavy Equipment
Thanks, Carl! I appreciate it! -
Nostalgic 70 Johan Challenger Funny-Car trip
Straightliner59 replied to Claude Thibodeau's topic in Drag Racing
Indeed, it is! I'll find one of the Challengers, at a reasonable price, one of these days--or, maybe find stupid money, to buy one! ? -
Monogram 1926 Mack
Straightliner59 replied to Straightliner59's topic in WIP: Model Trucks: Big Rigs and Heavy Equipment
Thanks, Danno. Hoping to get back to it, this weekend. I had a small issue with the paint, I need to address. -
Monogram 1926 Mack
Straightliner59 replied to Straightliner59's topic in WIP: Model Trucks: Big Rigs and Heavy Equipment
Thank you, very much, David! -
Monogram 1926 Mack
Straightliner59 replied to Straightliner59's topic in WIP: Model Trucks: Big Rigs and Heavy Equipment
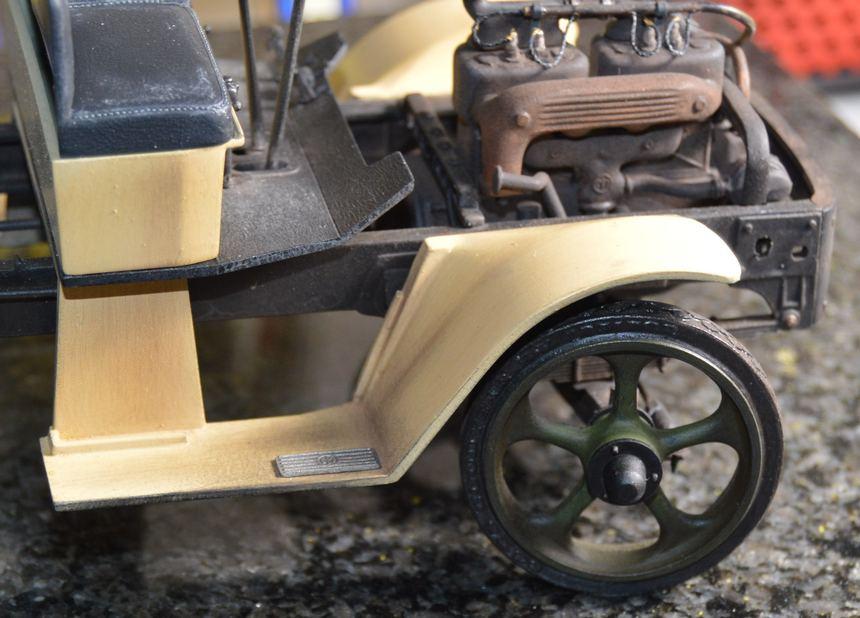
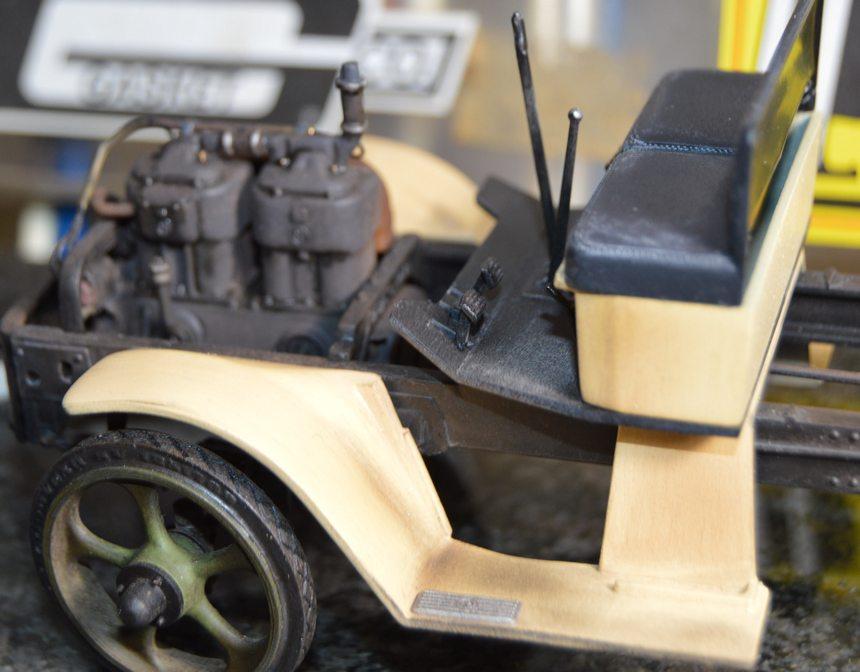
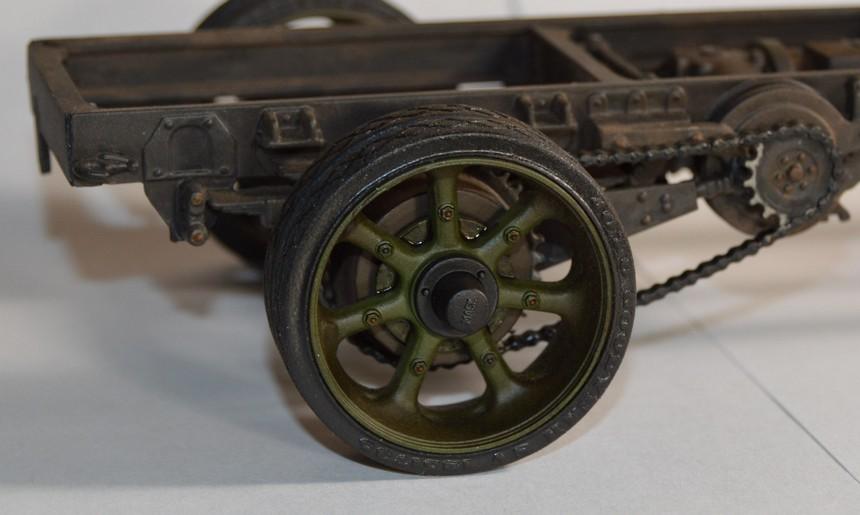
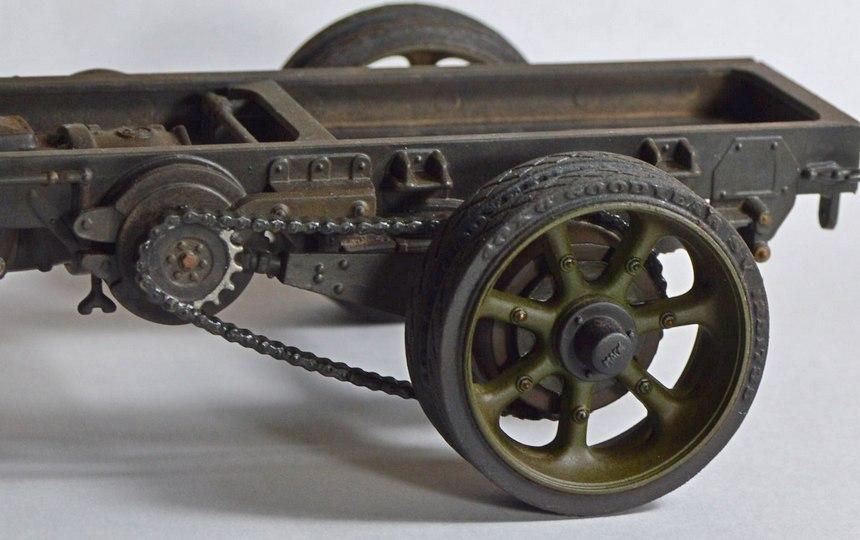
Thanks, Ken. Thanks, Larry. I'm figuring out this weathering, as I go(I hope!). I appreciate that, Roy. I'm inspired by the positive comments from everyone! My basic technique has been to clean up, assemble, paint, and detail paint a given assembly. Then, I flow thinned black paint into the corners, crevices, etc. Next, I use a stiff brush to apply a mixture of pastels, overall. I work in sections, and blow off the pastel dust, and shoot Dullcote on the assembly. I will add more pastels, if needed. After that, I touch some of the nuts/bolts with either Testors flat brown, or a mechanical pencil, just to add some variety, and visual interest. I run the mechanical pencil along some of the edges, to simulate wear (note the edges of the hubs), and I also used it here and there, on the wheels, to simulate scratches. When I did the wheels with the pastels, I applied it more heavily along the rim, since centrifugal force pushes all the dirt outward, which eventually causes discoloration, due to microscopic particles impregnating the paint--at least I surmise that's how it happens! ? Thank you, very much, Philippe! I am happy when people enjoy my work. Or, are inspired by it. Glad you like it, sir! I truly appreciate that, Charles! Sounds like I am accomplishing the look I'd hoped for. -
Louvers. Possible solution?
Straightliner59 replied to Straightliner59's topic in Tips, Tricks, and Tutorials
Thank you, sir! If you were to punch them in metal, then fair them into the hood that should work. I'm probably crazy enough to try making the hood from metal! ? Make a man some louvers, and he will have louvers for a model... ? I could see them being something that would sell, but, it's not a time commitment I am willing to make. I really want to keep the time I spend modeling, my own. I'm planning to buy some different sized chisels, however, so that I can punch different sizes. -
D'oh!
-
Nostalgic 70 Johan Challenger Funny-Car trip
Straightliner59 replied to Claude Thibodeau's topic in Drag Racing
Excellent work, Claude! I have one of the Pintos, but, would like to acquire one of the Challengers, as well. I had several of them, at one time. Anyway, beautiful job, sir! -
Very cool! I love this kit. I have built two, and have a third started, that may be next on my list of "finishers". Nice work, sir!
-
1/24 Revell/Monogram Pro Stock chassis & 1/25 bodies?
Straightliner59 replied to crowe-t's topic in WIP: Drag Racing Models
Hahahaha! Probably. And, I am sure he's being told it's his own fault! -
I may have some photos of one that Roger Lee and Rich Ruggiero built years ago. Roger built the chassis, so, no question it is correct! It will probably be tomorrow night, before I have a chance to look.
-
Dodge (Color me Gone) Promod
Straightliner59 replied to Tortuga Kustomz's topic in WIP: Drag Racing Models
I wouldn't even worry about the dinged paint on the four-link brackets. They move those things, all the time! -
Old timer returning here...
Straightliner59 replied to Cruzn1320's topic in Welcome! Introduce Yourself
Never heard of him! ? -
Monogram 1926 Mack
Straightliner59 replied to Straightliner59's topic in WIP: Model Trucks: Big Rigs and Heavy Equipment
Thank you very much, my friend! I've been driving straight trucks for about forty years, so, I just drew on memory for the dusty/rusty effect. I don't want to overdo it, just present a daily-driven truck, much like I would likely have driven in that era--which is even much earlier than I started doing it!? Magic lessons?! This is my first go, at this! I'm not even qualified to give regular lessons!? Seriously, though, as everyone does, I studied photos of similarly used trucks to see how they aged, and approached the application of colours as if I was doing a painting. I try to apply it in a way that I can apply more, if need be, but not so much as to feel I need to remove some. -
Old school shop advice: Get a piece of beeswax from a fabric/sewing shop. It's excellent lubricant for the blade.
-
Cooper barn find
Straightliner59 replied to absmiami's topic in WIP: Other Racing: Road Racing, Land Speed Racers
Fabulous work, sir! Excellent use of texture and color; Beautiful detail work. It's been a pleasure to follow this project! -
Monogram 1926 Mack
Straightliner59 replied to Straightliner59's topic in WIP: Model Trucks: Big Rigs and Heavy Equipment
I got the wheels done, but ran out of Dullcote so will need to shoot another coat of that on them, once I have the paint. I went ahead and mounted them. I think they'll work. As always, questions, critiques and comments are welcome! Thanks for looking.
-
Need my first scribing tool
Straightliner59 replied to Venom's topic in Model Building Questions and Answers
I think the real lesson in this thread is that one can never have too many tools! Variants may perform certain aspects of a task more, or less, effectively. There's a lot of fun in experimentation.