peteski
-
Posts
9,226 -
Joined
-
Last visited
Content Type
Profiles
Forums
Events
Gallery
Everything posted by peteski
-
I was just having some fun. I'm glad you're back online. Hopefully the hack did not cause much damage.
-
Nope - didn't work.
-
So you are telling me that I can call, in the middle of my contract period, and haggle about the price? I thought all those documents I signed (um, at the best price they could give me) when I signed up for the service stated that the the price was valid for the duration of the contract. Crazy!
-
Do you have Xfinity Triple Play? That is what I have (since I needed all 3 services). I sighed a 2 year contract for the price I'm paying.
-

Extra Parts, Boxes, Instructions, Etc.
peteski replied to bluestringer's topic in Model Building Questions and Answers
I had a good chuckle that after a year in the hobby you are running out of space for the kit leftovers. Some of us have been in the hobby for over half a century, and we find ways to squirrel away most of the leftovers, and the hundreds or (sometimes thousands of un-built kits). If you stay in the hobby for another few years, you will have to find a new, larger place to live. I'm curious of how many kits have you built in that year? But seriously, it is good to keep leftover parts and failed builds. Plastic storage containers are available in lots of handy sizes. You could store them in those. Instructions and boxes? Those could be folded flat, not to take up to much space. Or dispose of them. Those are recyclable (paper and cardboard). Or if you don't recycle, trash them or burn them. You could also scan the instructions (and even box art), and keep the scans on your computer while disposing of the paper. If you feel charitable, assuming they don't already have them, you could send the scans to the instructions hosting site mentioned in this thread: -
What did you see on the road today?
peteski replied to Harry P.'s topic in General Automotive Talk (Trucks and Cars)
You guys know what "fanny" means in British slang, right? It would be, ahem, "kitty wagon" to us Yanks. -
I also often drill (in plastic) by holding the shank in my fingers. That gives me very good control of the precision drilling process. The 1/8" shank makes this possible. I've done this with the drill bit as small as #85. You do need steady hands (propping them on the workbench helps).
-
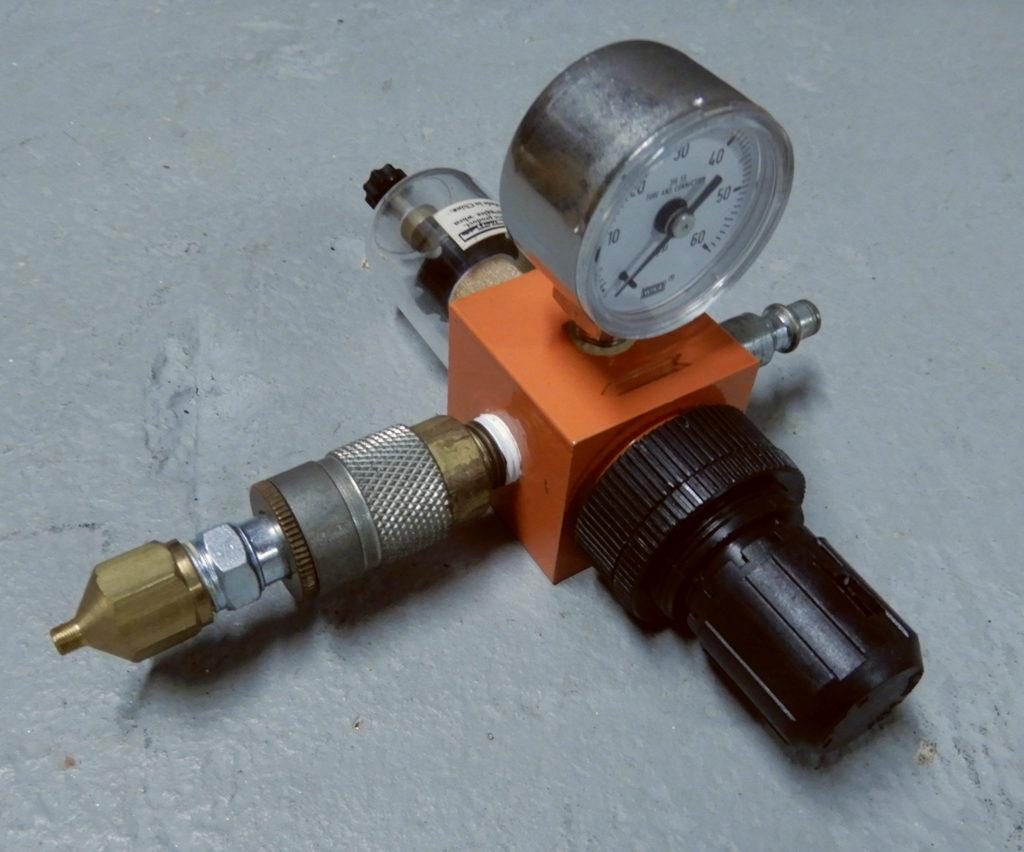
Well, it is a HF compressor/regulator designed for construction work (air-tools, not for precision airbrushing). The regulator is probably cheaply designed and made, using low cost components. Zippy could buy and install a secondary, better quality regulator. Just crank the compressor's regulator to 50 ir 75 psi, then use the 2nd regulator for the airbrush pressure adjustment. I actually do that myself on my setup. I have secondary regulator/moisture-trap which I attach to the output of the compressor's regulator. I bought it at HF too. LOL.

-
That makes perfect sense.
-
What happens to the pressure reading once you stop pressing the trigger? Does it show few psi higher than while you are spraying? Or is the pressure reading steady regardless of whether the air is flowing through the regulator or not?
-
Just a warning not to use the Minwax urethane that comes in paint cans (not sprays). It is slightly amber to begin, but it gets *MUCH* darker after few years. I ruined white model by using that stuff as a clear coat. If the stuff in spray cans is the same I would stay away.
-
I've been using vector based Corel Draw program for the last 20 years. Since it is vector-based, here is no pixalation at all. Yes, there is a learning curve, but once you get used to is, you will never go back to using bitmap-based graphic editors for making your decals. I use an older version, so it was rather inexpensive, but there is also similar freeware program called Inkscape. I highly recommend it. Corel suite of programs also has a powerful bitmap editor called Photo-Paint, which I also use when I deal with bitmaps. If you want to stay with bitmap editors, there is a powerful freeware program called Gimp. Much more advanced than MS Paint.
-
All the pressure regulators will show static pressure few psi higher than when the air starts flowing (ie. when I depress the airbrush trigger or use the regulated air for some other purpose). Granted, my regulators are not expensive high-precision units, but I believe that all the regulators will have static pressure slightly higher than when the air is moving through them.
-
This doesn't work with Comcast (my provider). To get the best price I had to sign onto a 2 year contract. The service level can't be changed without serious penalties. I could have chosen no contract for all my services, but that would have cost a lot more money. They basically have me by the cahones. They have it all figured out.
-
Ah, if moist when deposited, they have a nice crunchy coating - just like Nutty Buddies.
-
Very impressive model!
-
You can kiss testors goodbye!
peteski replied to Dpate's topic in Model Building Questions and Answers
Funny how this thread has morphed from discussion about a hobby paint line. -
In my area, there are 2 providers of CATV/Internet (and land-line phone): Verizon (FiOS) and Comcast (Xfinity). There are no other choices that I know of. It is sort of a monopoly because they both have similar prices. Yes, I'm prety sure you could choose to only get the Internet portion of their offering, but it is not cheap. Of course the "package deals" and contracts seem to give a price break (which it really isn't). I've seen ads for a satellite-based ISP, but I'm not sure what the quality of the connection would be. There is a new Internet-only company installing cable in some areas of New Hampshire with TV ads promising great deals with "no-bull", but they are only available in selected areas and I'm sure those great deals will disappear once they get well established. Plus I live in Mass.
-
One reason I don't like dogs licking me (especially my face, or even worse: lips)!
-
I'm glad you had good time. Did you meet Gregg?
-
I seem to recall you posting some pedestrian bridge collapse story few years back. Is this the same bridge, or another bridge?
-
Bill's illustrations reminded me a bit of the movie "Brainstorm".
-
As I understood it, Tom was mentioning that something ate the poop dog deposited on the deck. One of my GF's dogs used to like eating "poopsicles".
-
If they just leave the bags, that makes no sense at all (for the reasons you mentioned. I live on an inlet street leading to couple of loops. About 1 mile in total distance. There are several people daily walking the loops with their dogs. Some (especially with larger dogs that leave larger "gifts" behind) pick up and bag their dogs output, tie it, then leave at the side of the road. On the way back they pick up their bag and take it with them. I ask why they do that and they told me that they just don't feel like carrying the warm bag of steaming poo all the way around the loop, to be picked up when they return.
-
Spray Booth Filter Replacement
peteski replied to Zippi's topic in Model Building Questions and Answers
Why not get one of the better quality furnace filters and cut it down to size that fits the spray booth? Or even a cheap filter, but that will not catch as many particles as a better filter. There are lots and lots of options.