peteski
-
Posts
9,226 -
Joined
-
Last visited
Content Type
Profiles
Forums
Events
Gallery
Everything posted by peteski
-
 Car logos are often not done it standard typefaces (fronts). They are usually created by the in-house designers.
 -
I always use acetone or lacquer thinner (with and without acetone). Always do it right after painting session. Funny,m I just posted the same info for the same question in another thread, just few days ago. Weird! Don't people look for answer anymore before posting questions? Also, all the seals which come in contact with paint (in my old trusty Badger 200) are made of Teflon (not rubber). I would imagine the same would be true in more expensive airbrushes. The only rubber seal there is in the air valve. No paint ever gets there.
-
Yellow is not the color often seen on these cars, but I like it! Nice model and photography. I'm also curious if you had the mismatched width between the cowl and the bonnet? If yes, how did you take care of it? Bill, if you mean the windscreen problem, I hope that you post your solution on the forum.
-
Hmmm. That doesn't give me "warm and fuzzies". BMF "Ultra" foil was always crappy - too stiff to work with. Oh well, I have decent stash of the "good stuff". At the frequency I currently build new model's I should be all set for life.
-
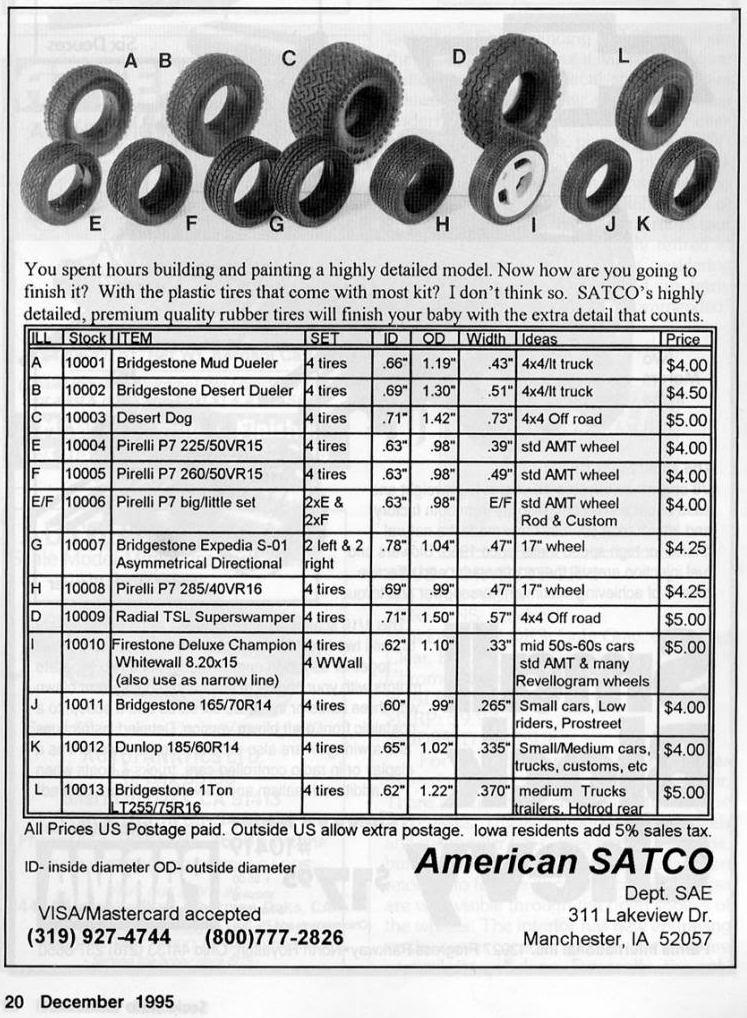
You sure have some interesting designs Scott. One thing about that rim is that you gave it cross section similar to what the 1:1 rims look like. For model cars the standard kit's rim OD is either flat (with or without small lips), or it has a center ridge if the kit tire has a groove on the inside. As I see it, flat surface would be more universal. I suppose one could install a model tire on this rim, but it would be more secure if the rim's OD was flat. As for the ID diameter of tires, here are some dimensions of American SATCO rubber tires (many of which were used in Japanese made kits).

-
So you want to add the moisture trap immediately next to the vacuum pot?
-
I bought (when new) and built that black '80 Trans Am. I was in my early 20s at that time. I remember installing light bulbs in the headlight buckets. It looked really good! I recall that the plastic body was so shiny that I didn't even paint it. Unfortunately I did not take it with me when I moved in 1992. It ended up in trash. I wish I still had it. As for large scale, Pocher was making 1:8 scale multimedia kits even before Revell. I built the 1935 Mercedes 500K roadster (which I still have). There were also other 1:8 scale kits made by other model companies back in the '70s. Not many, but they are out there.
-
I have also experienced that. Good thing is that the forum now shows which used was confused by your intelligible posts, so you can ask them why they're confused (either in the open or via a PM).
-
MEK is much more dangerous to human health than alcohols or acetone. It is also banned in some states.
-
Yes, those dental files/reamers are very handy for modeling. I'm a "frequent flier" at my endodontist's office and she lets me have several of those files during each visit.
-
Any paint that is designed for fabrics is likely to remain flexible. It will not dry hard. Not something I would use on a model car.
-
Airbrush Cleaning-Ultrasonic Cleaner
peteski replied to 69NovaYenko's topic in Model Building Questions and Answers
Well Mike, that is just not something I would do to the nozzle. Besides, I never had paint clogging the tip enough that it would require reaming. I will repeat what I said few more times: I flush the airbrush immediately after every paint session. No paint remains in the passages. It is all clean. However I only shoot "stinky" paints through my airbrush. But even with water-based acrylics, I would think that if you flush the airbrush right after a painting session, you should be able to prevent any paint clots. -
Exactly! . . . just one more thing . . .
-
Thanks guys. This one did not look familiar to me. I don't recall seeing one at the car shows I attended. It still has a "European flavor" to me.
-
That photo is from Micro-Mark's website. They probably still sell that tool. I bought it years ago. Totally useless for what I need. The rubber bulb (actually it feels like vinyl) it way too stiff. You have to squeeze it fairly hard (thus the precision control is gone). You also have no feel as to when the vacuum will be released for the part to be freed up. It might work better if I replaced the bulb with a thin flexible silicone hose, and put the end of the house in my mouth so I could generate and control the vacuum with my mouth. I now prefer the tools that have sticky end (like shown here), but I make my own using a toothpick and some adhesive from "adhesive only" roll I found in a surplus store. This stuff is sort of like the "snot" adhesive found on junk mail envelopes.
-
Doug, just going by the photos (since I can't see the model in-person), this looked like the best representation of hail strikes. But I think you'll be just as happy modeling vehicles that were spared from a hail storm, and are pristine, smooth and shiny.
-
Advice for 1st time airbrush user
peteski replied to Kevinch's topic in Model Building Questions and Answers
Nothing beats hands-on experience. Grab the airbrush and spray away (at some unimportant objects like discarded model car body, plastic soda bottle, or plastic spoons). Then, when you feel more comfortable, start spraying the parts of a kit you will actually build. -
Sand and polish?! Another strike! I don't sand or polish out my paint jobs -- way too much work.Drudgery! I rather spend my hobby time on other things. As I see it, my paint jobs are good enough without all that sanding, polishing, and rubbing. I guess we use different painting techniques. If I had to all that sanding and polishing, the hobby would become a chore (not a pleasant fun activity).
-
Airbrush Cleaning-Ultrasonic Cleaner
peteski replied to 69NovaYenko's topic in Model Building Questions and Answers
I would NEVER, NEVER, NEVER, NEVER insert any hard objects into the very delicate brass tip!!!! Microbrush - yes. Reamer - NOOOOOOOO!! Besides, since I flush the airbrush with lacquer thinner after every paint job (right after painting, not few hours or days later), the tip of my airbrush (Badger model 200) doesn't clog. Plus, the needle itself (when closed) fits tightly into the nozzle and shouldn't allow paint to accumulate. I am still cringing about what you mentioned! -
You coat (seal) the ink jet printed decal so the inks won't run when immersed in water (not to thicken up the decal film).
-
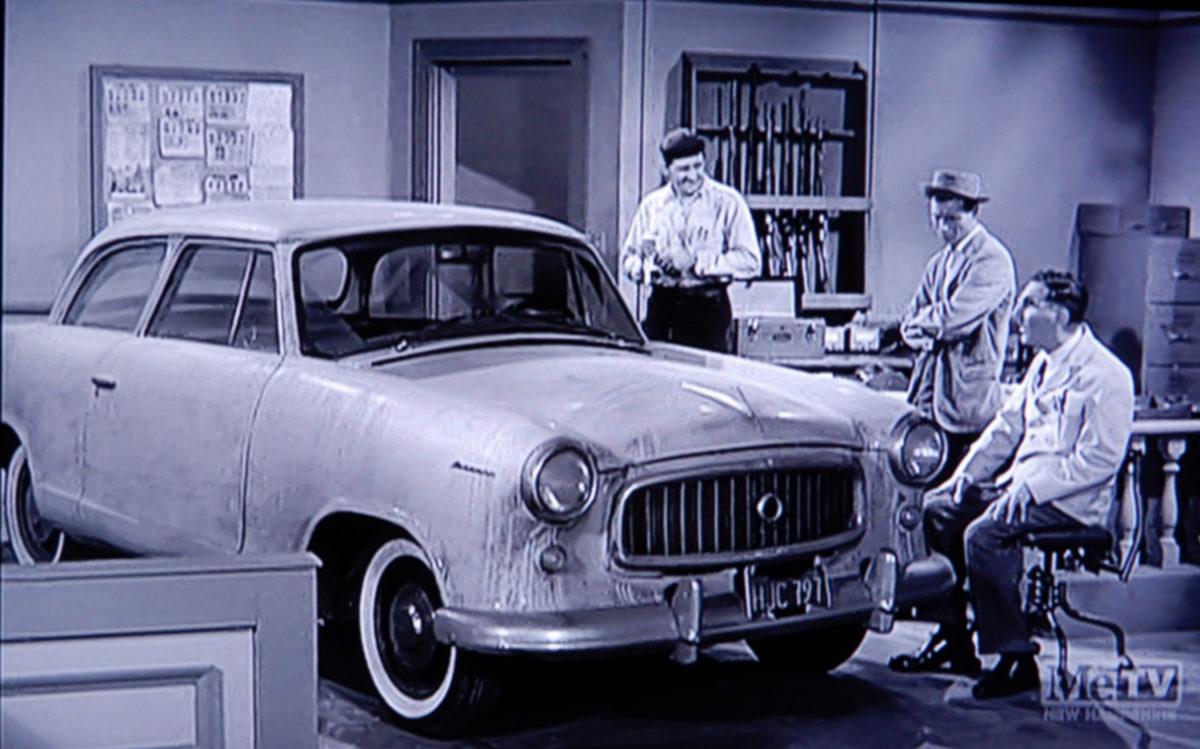
I was watching an old episode of the Andy Griffith Show and Goober (the local mechanic) has has taken apart a car he was working on and assembled it inside the police station. That is a strange looking car. It looks sort of European. Does anybody know what brand/model car that is?
-
No, and either way I don't want my model to look like it has been dipped in honey. That is about the thickness of clear coat which would be needed to hide the thicker decal film. When I do use clear, I strive for thin clear coat. I know, it is a trade-off.
-
Sure, but the Tamiya decal's thick film still shows up on the model surface, and it is difficult to hide with gloss coats. I have noticed that Tamiya has used Cartograf decals in some of their automotive and aircraft releases.
-
Good news. Looks like Randy worked through the Easter Sunday to make his customers happy!
-
How to fix sealed new yellowed IMEX decals?
peteski replied to Dpate's topic in Model Building Questions and Answers
I have bleached yellowed clear film on old Revell Can-Do wrecker decal set by placing them in a plastic bag and hanging them in a window to get exposed to sunlight. That was years ago. I don't remember how long it took, but I think it was couple of weeks (in the summer, northeast USA). The yellow didn't totally clear up, but it enough to make the decal usable. Of course I can't guarantee that it will work for you.