SfanGoch
-
Posts
5,248 -
Joined
-
Last visited
Content Type
Profiles
Forums
Events
Gallery
Everything posted by SfanGoch
-

Die-cast body work?
SfanGoch replied to Pat Minarick's topic in Model Building Questions and Answers
Lab Metal is an aluminum filled repair putty which I highly recommend. It's much better than J-B Weld It has an 81 Hardness Rating on the Shore D Scale, which makes it very tough. Bill can verify this..
-
Wire Wheels--One More Way To Make Them
SfanGoch replied to Straightliner59's topic in Tips, Tricks, and Tutorials
Nice! Pretty straightforward and easy to follow directions.This method could be used for other than dragster wheels, too. -
ACK! Like I said before, use a scriber to loosen it, followed with a stainless PE saw; then, it won't break. No medical degree from Grenada required to perform this surgical procedure.
-
Wile E. Coyote v. Acme Company
-
Evergreen strip is indispensable. If the RUSTALL doesn't work out, check out the rust pigments and other neat weathering stuff from Vantage Modeling Solutions Then, there's SDW Rust pigments from True Earth. These are water soluble; so, it'll be a cinch to remove them when necessary. Us treadhead modelers like to stay on top oif important things like weathering an AFV.
-
Use a scriber.
-
The only kind of PC which concerns me is the one I'm using.
-
-
Donor roof for AMT Rambler Snap kit
SfanGoch replied to STYRENE-SURFER's topic in Model Building Questions and Answers
Boy, are you in luck. I reduced that image to scale with the Dodge body and did a quick comparison. Just so happens that the Lindberg Dodge, unlike the real car, has a slight kink/crease that also starts to slope downward at the same location. Also, the angle of the C Pillar is a dead on match. Lowering the height of the rear window 2mm by adding some styrene inside the top of the window frame, and a little bit of block sanding to increase the slope, will convert it very easily. Say what you want about the documented inaccuracies of the overall shape and proportions of the Lindberg offering; but, in this circumstance, they're just what you needed. -
If it was a van sold in NYS, or other areas with snowy winters, it would've been black from the anti-corrosion undercoating sprayed to protect against road salts.
-
Donor roof for AMT Rambler Snap kit
SfanGoch replied to STYRENE-SURFER's topic in Model Building Questions and Answers
You're still ending up with incorrectly shaped C Pillars. The Lindberg Dodge bodies can be had from Model Car Mountain for under six bucks and the roof requires a heck of a lot less work to make it look like the one in the photo. -
Stripping chrome & flat black issues. Need advice
SfanGoch replied to DPNM's topic in Model Building Questions and Answers
I already mentioned the Testors ELO. Brush it on the parts (no need to soak the parts) and use a Q-Tip or old toothbrush to scrub the mess. When the paint has loosened and can be easily scrubbed, rinse under warm to moderately hot water, using Comet, Ajax or similar cleaners, and scrub with the toothbrush. The flat black paint will be gone and the parts squeaky clean. -
Donor roof for AMT Rambler Snap kit
SfanGoch replied to STYRENE-SURFER's topic in Model Building Questions and Answers
Interesting. Seems like everybody sees something different. I don't see any similarities. Neither the '63 Tempest '63 Impala 2dr HT nor the '62 Impala 2 or 4dr HTs are good starting points because the C Pillars are too narrow, meaning increasing the width will be necessary; and, there is the beveled edge along the rear of the pillar which needs to be removed if Kurt wants to model the roof as in the photo he posted: The C Pillars on this are flat, slab-sided, with to beveled rear edge. The C Pillar of the '58 T-Bird HT roof is a lot wider than the pillar in Kurt's pic. This, too, needs to be addressed by performing surgery. The Lindberg Dodge roof, as I pointed out, shares most, if not all, of the characteristics he's looking for. BTW, you guys must have an odd sense of humor or a large pile of disposable income to even suggest using an AMT '63 Tempest as a donor. It must be nice to be able to hack up a kit that goes for almost 200 bucks just to use the roof on a 15-20 dollar snap kit and not think twice about it.
-
Donor roof for AMT Rambler Snap kit
SfanGoch replied to STYRENE-SURFER's topic in Model Building Questions and Answers
I'm looking at a Lindberg '64 Dodge 330 body and the roof from this looks like a better starting point.
-
Stripping chrome & flat black issues. Need advice
SfanGoch replied to DPNM's topic in Model Building Questions and Answers
True; but, ammonia does have a pretty strong aroma compared to chlorine bleach. -
Ruler, right angle suggestions
SfanGoch replied to aurfalien's topic in Model Building Questions and Answers
Get a machinist's square. -
Stripping chrome & flat black issues. Need advice
SfanGoch replied to DPNM's topic in Model Building Questions and Answers
Testors ELO Paint & Decal Remover gets rid of that undercoat in around twenty minutes. Plain chlorine bleach will also dissolve chrome plating in a few minutes. -
Add a clamshell lid on the back and you have a HUMMV clone.
-
TESTORS SPRAY PAINTS
SfanGoch replied to shoopdog's topic in General Automotive Talk (Trucks and Cars)
No breaking news here. Rustoleum is a subsidiary of RPM International Inc., which also owns Testors. RPM International Inc. -
I use Bondo Fiberglass Resin. You know that it's pretty forgiving when mixing small quantities like 1 oz. (I use those 30ml cough medicine dose cups). Just add 10 drops of liquid hardener and you have approximately 5 minutes work time before it gels, which is more than ample to fill in FUBARed panel lines and such.
-
Try fiberglass resin with microbeads mix. Fill in the gekakt lines and it'll be ready in about two hours max. Better than CA.
-
White primer provides a lighter base color which affects the intensity/hue of colors. Likewise, black, red or gray primers will cause colors to appear darker.
-
Believe it, or not, he's a dentist. Paul has been well known in the military modeling community for what seems like decades. Here's his website which I had bookmarked: http://paulbudzik.com/
-
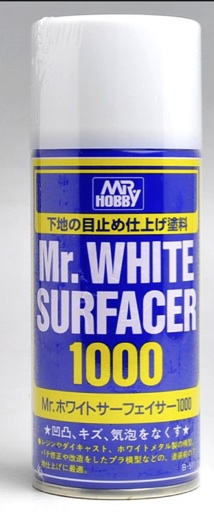
Use GSI Creos' Mr. Surfacer White 1000 Spray. It's 100% opaque and prevents any bleed-through from colored styrene, especially red. I use it, and Mr. Surfacer Gray 1000 Spray on Johan kits molded in that color leaching red styrene we've all grown to love to hate over the years. This is a lacquer and will not craze, or otherwise damage, the plastic. You can even skip spraying additional white paint over it because of its opacity. Once dry, it can be polished to a high gloss. You can get a large (170ml) can from SCALEHobbyist for $8.29.
-
To each, his own. I have the UMM SCR-01/02/03 set and they suit my requirements. I also use the Hauler set I posted above. UMM also makes an ultra-thin scriber which is only .15mm thick, matching the blade kerf of their universal razor saws.