jaymcminn
-
Posts
1,757 -
Joined
-
Last visited
Content Type
Profiles
Forums
Events
Gallery
Everything posted by jaymcminn
-

Airbrush paints for interior and chassis
jaymcminn replied to tengel78's topic in Model Building Questions and Answers
Not to throw another variable at you, but the Iwata Revolution Hp-CR is another fantastic choice. The price generally comes in around $90-100, so it splits the difference between the Eclipse and the Paasche H. With a .5mm tip, it sprays lacquers and acrylics beautifully. It goes from a 1/16 to 1" spray pattern and is dead simple to use and maintain (at least by dual-action standards). The quality is up to Iwata's high standards as well. Dual-action 'brushes take some getting used to, but you'll have to learn anyway if you eventually upgrade to the Eclipse from the Paasche. With the Revolution, you'll never really need to upgrade! (Note: you might be tempted by the Iwata Neo brushes... DON'T. The price point seems nice, but they're cheap Chinese junk. There's a big difference!) As far as paint goes, Tamiya acrylics, thinned with their thinner or 70% isopropyl alcohol, work great. I really like the Testors Model Master acrylics too. Their "Aircraft Interior Black" is my go-to when I'm looking for a dead-flat greyish black. Tamiya acrylics do tend to have a little more sheen than you might want for some applications, but you can add some of their flat base to knock that down. I haven't used enamels in many years since I got comfortable using acrylics. Good luck! -
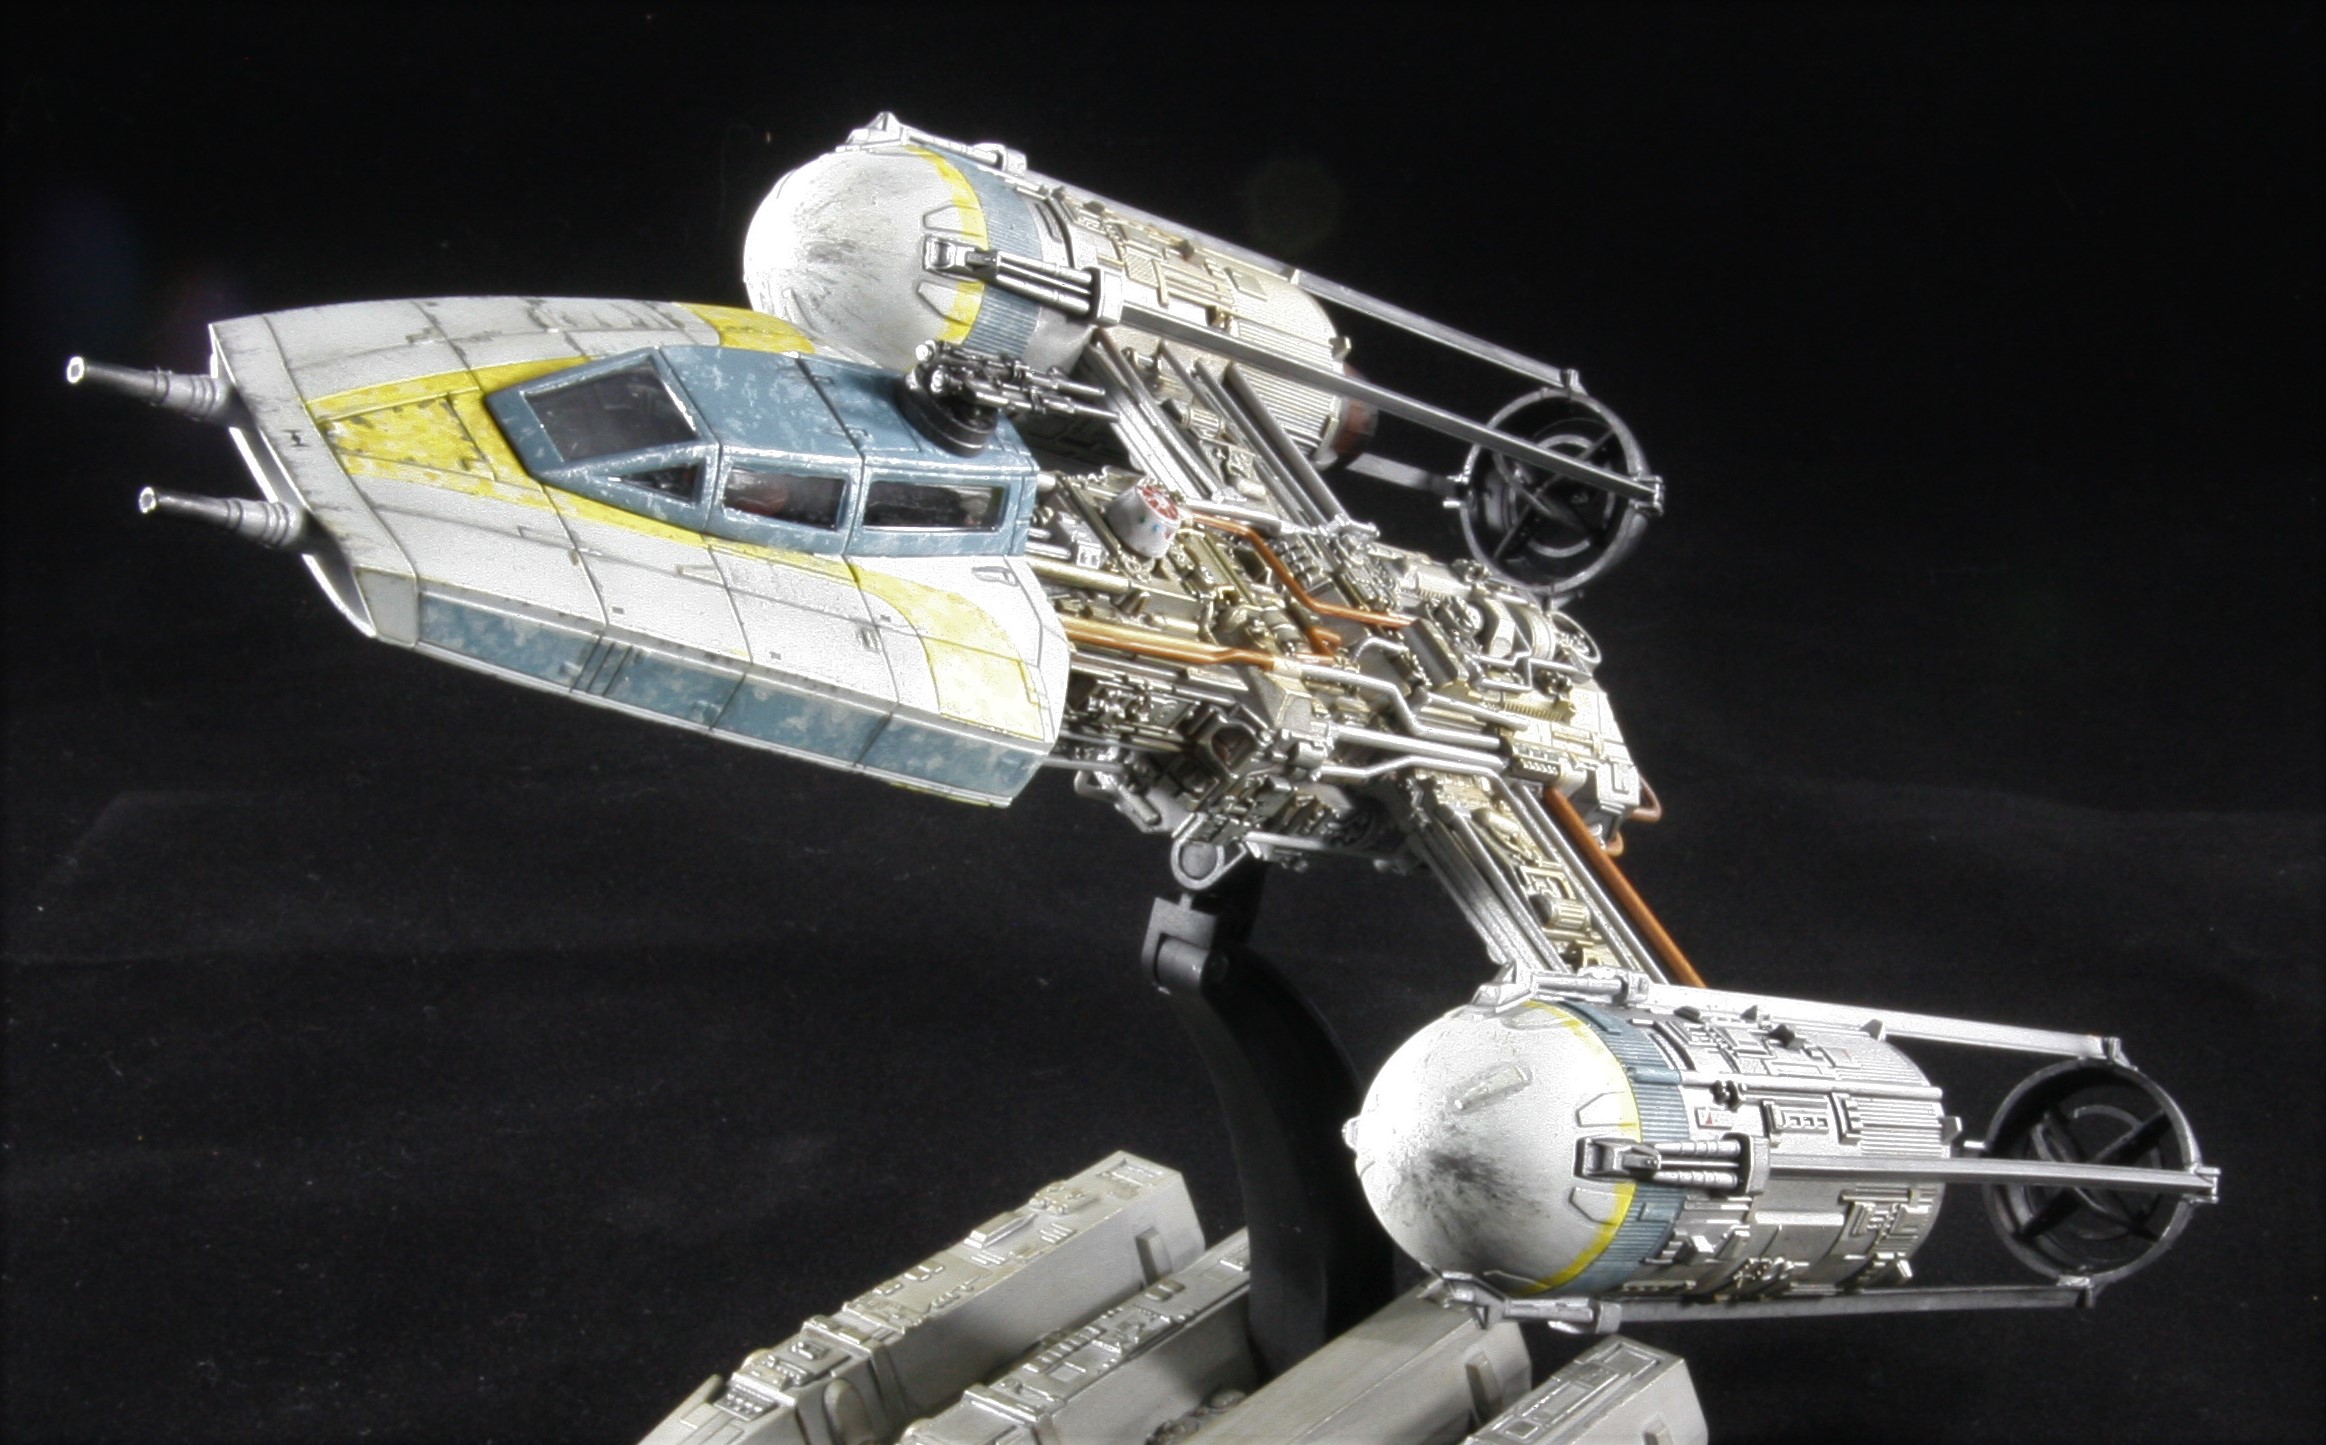
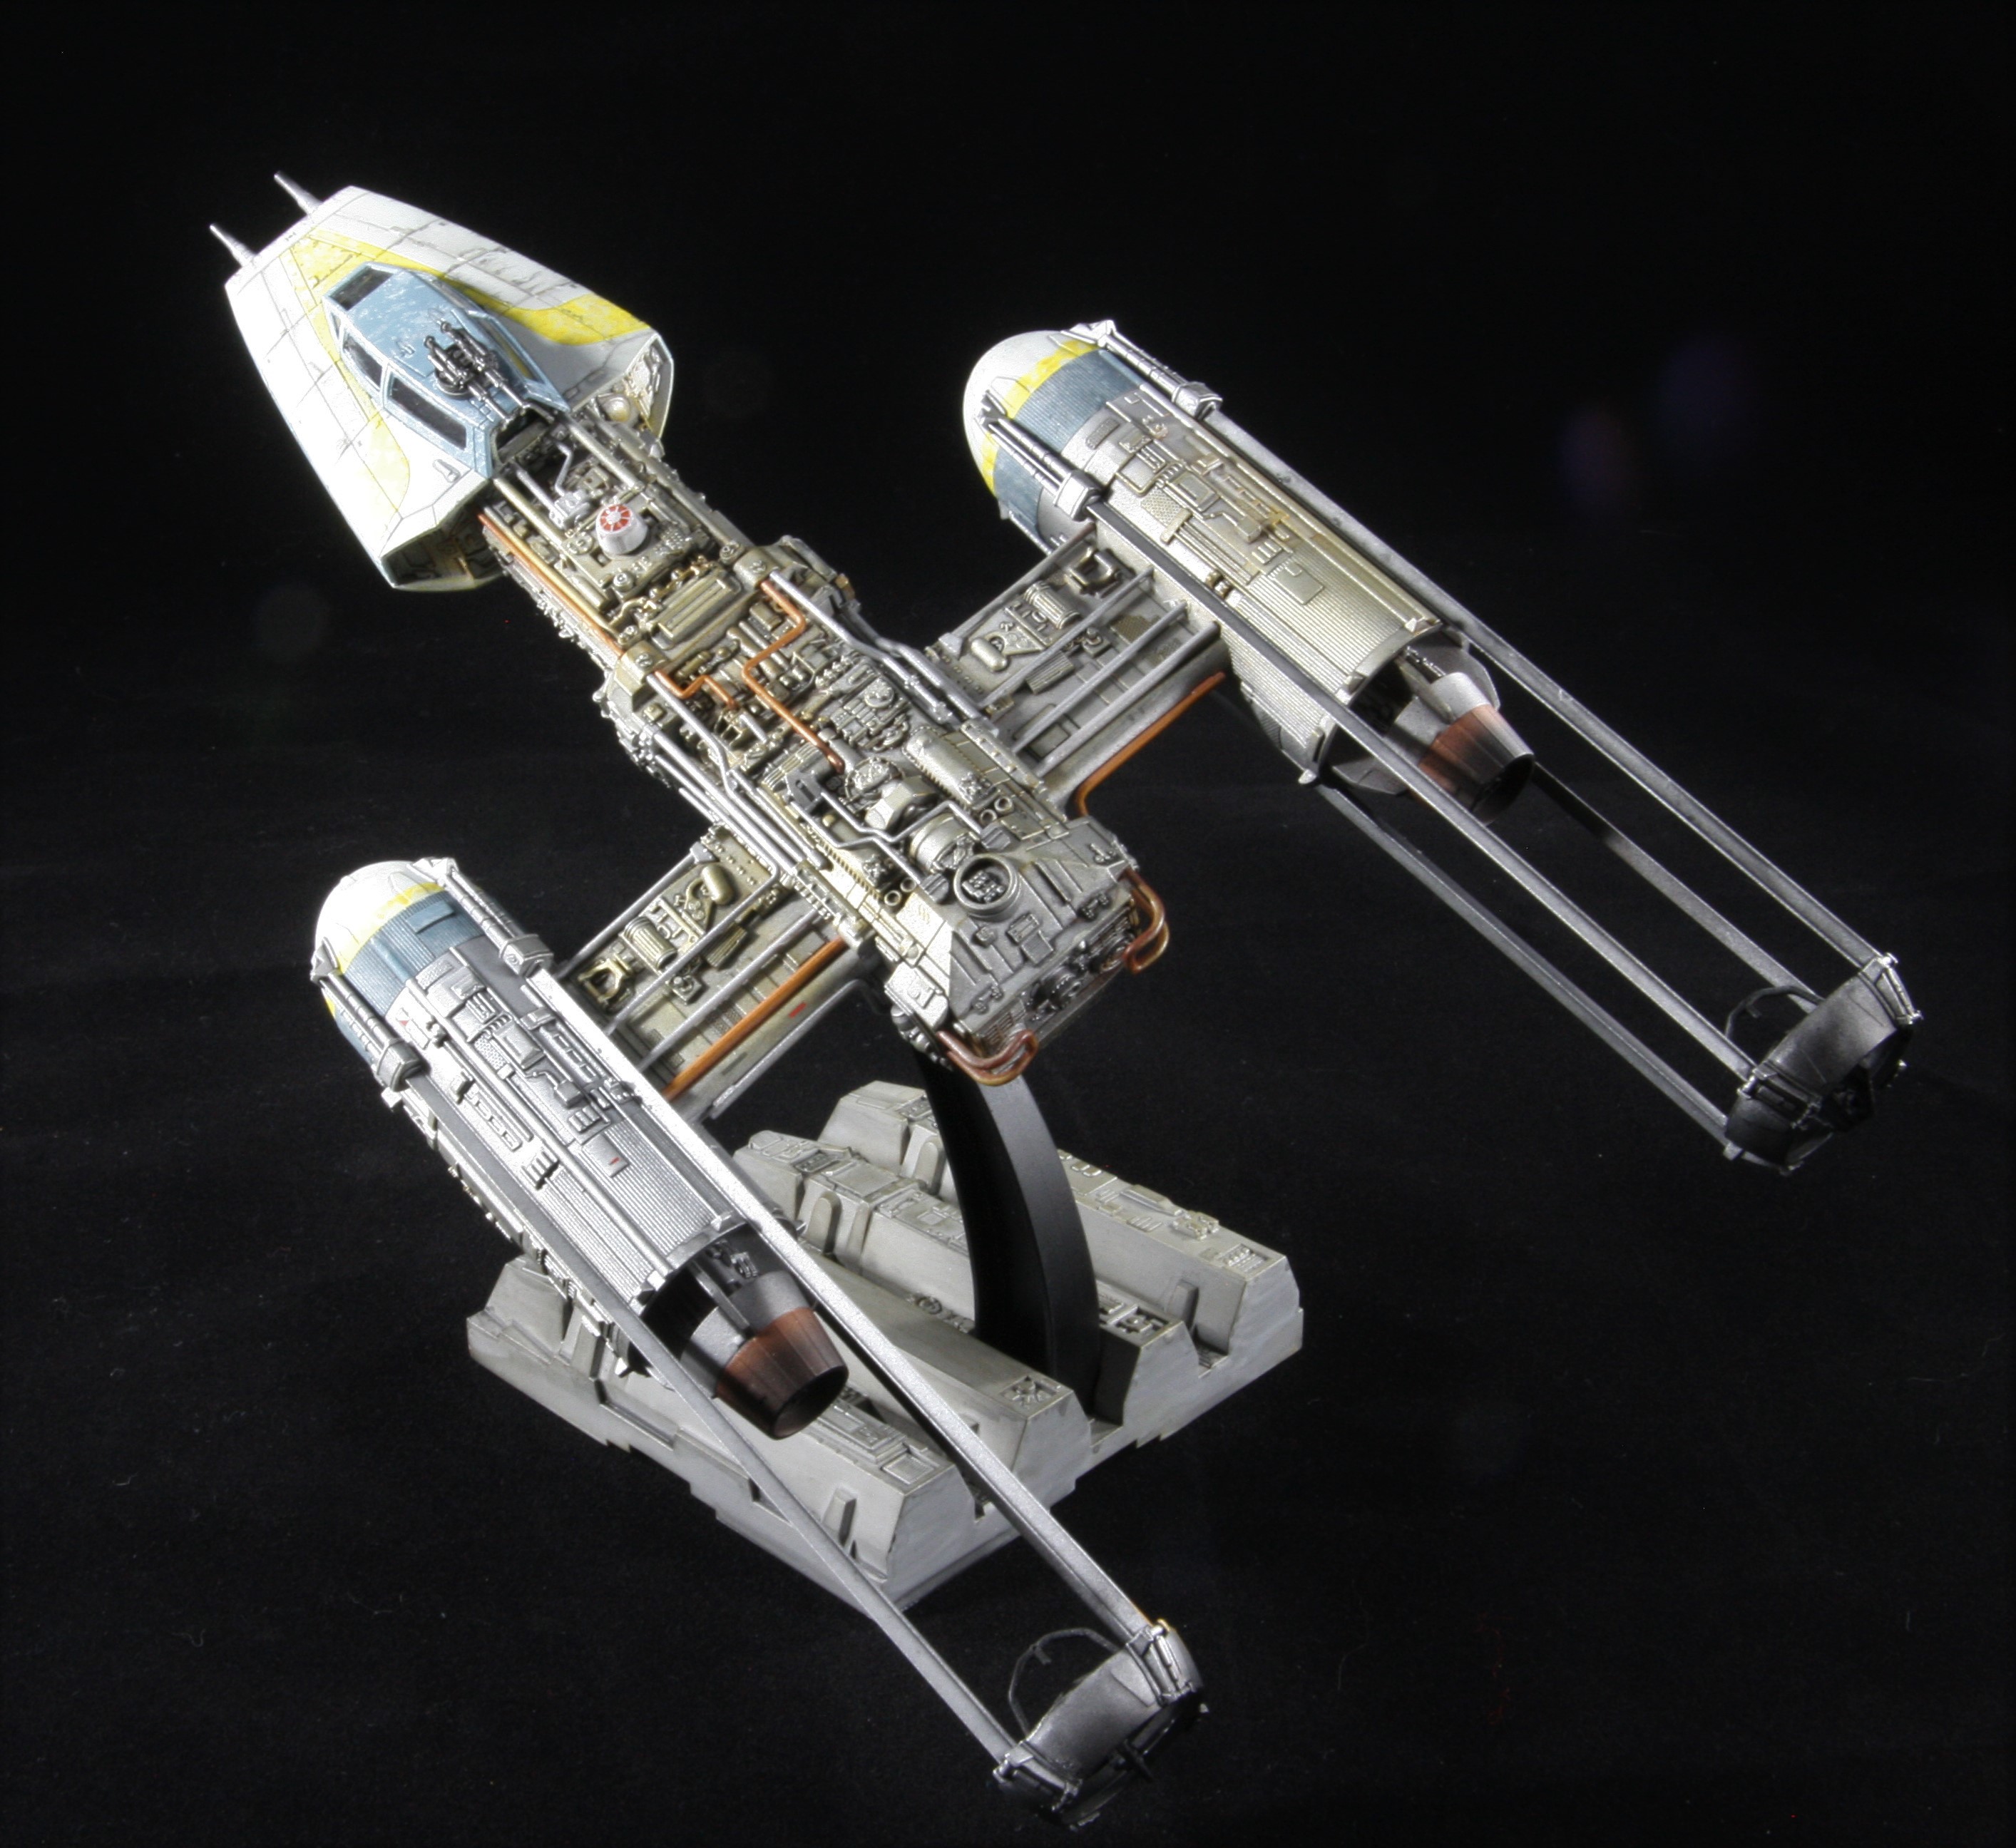
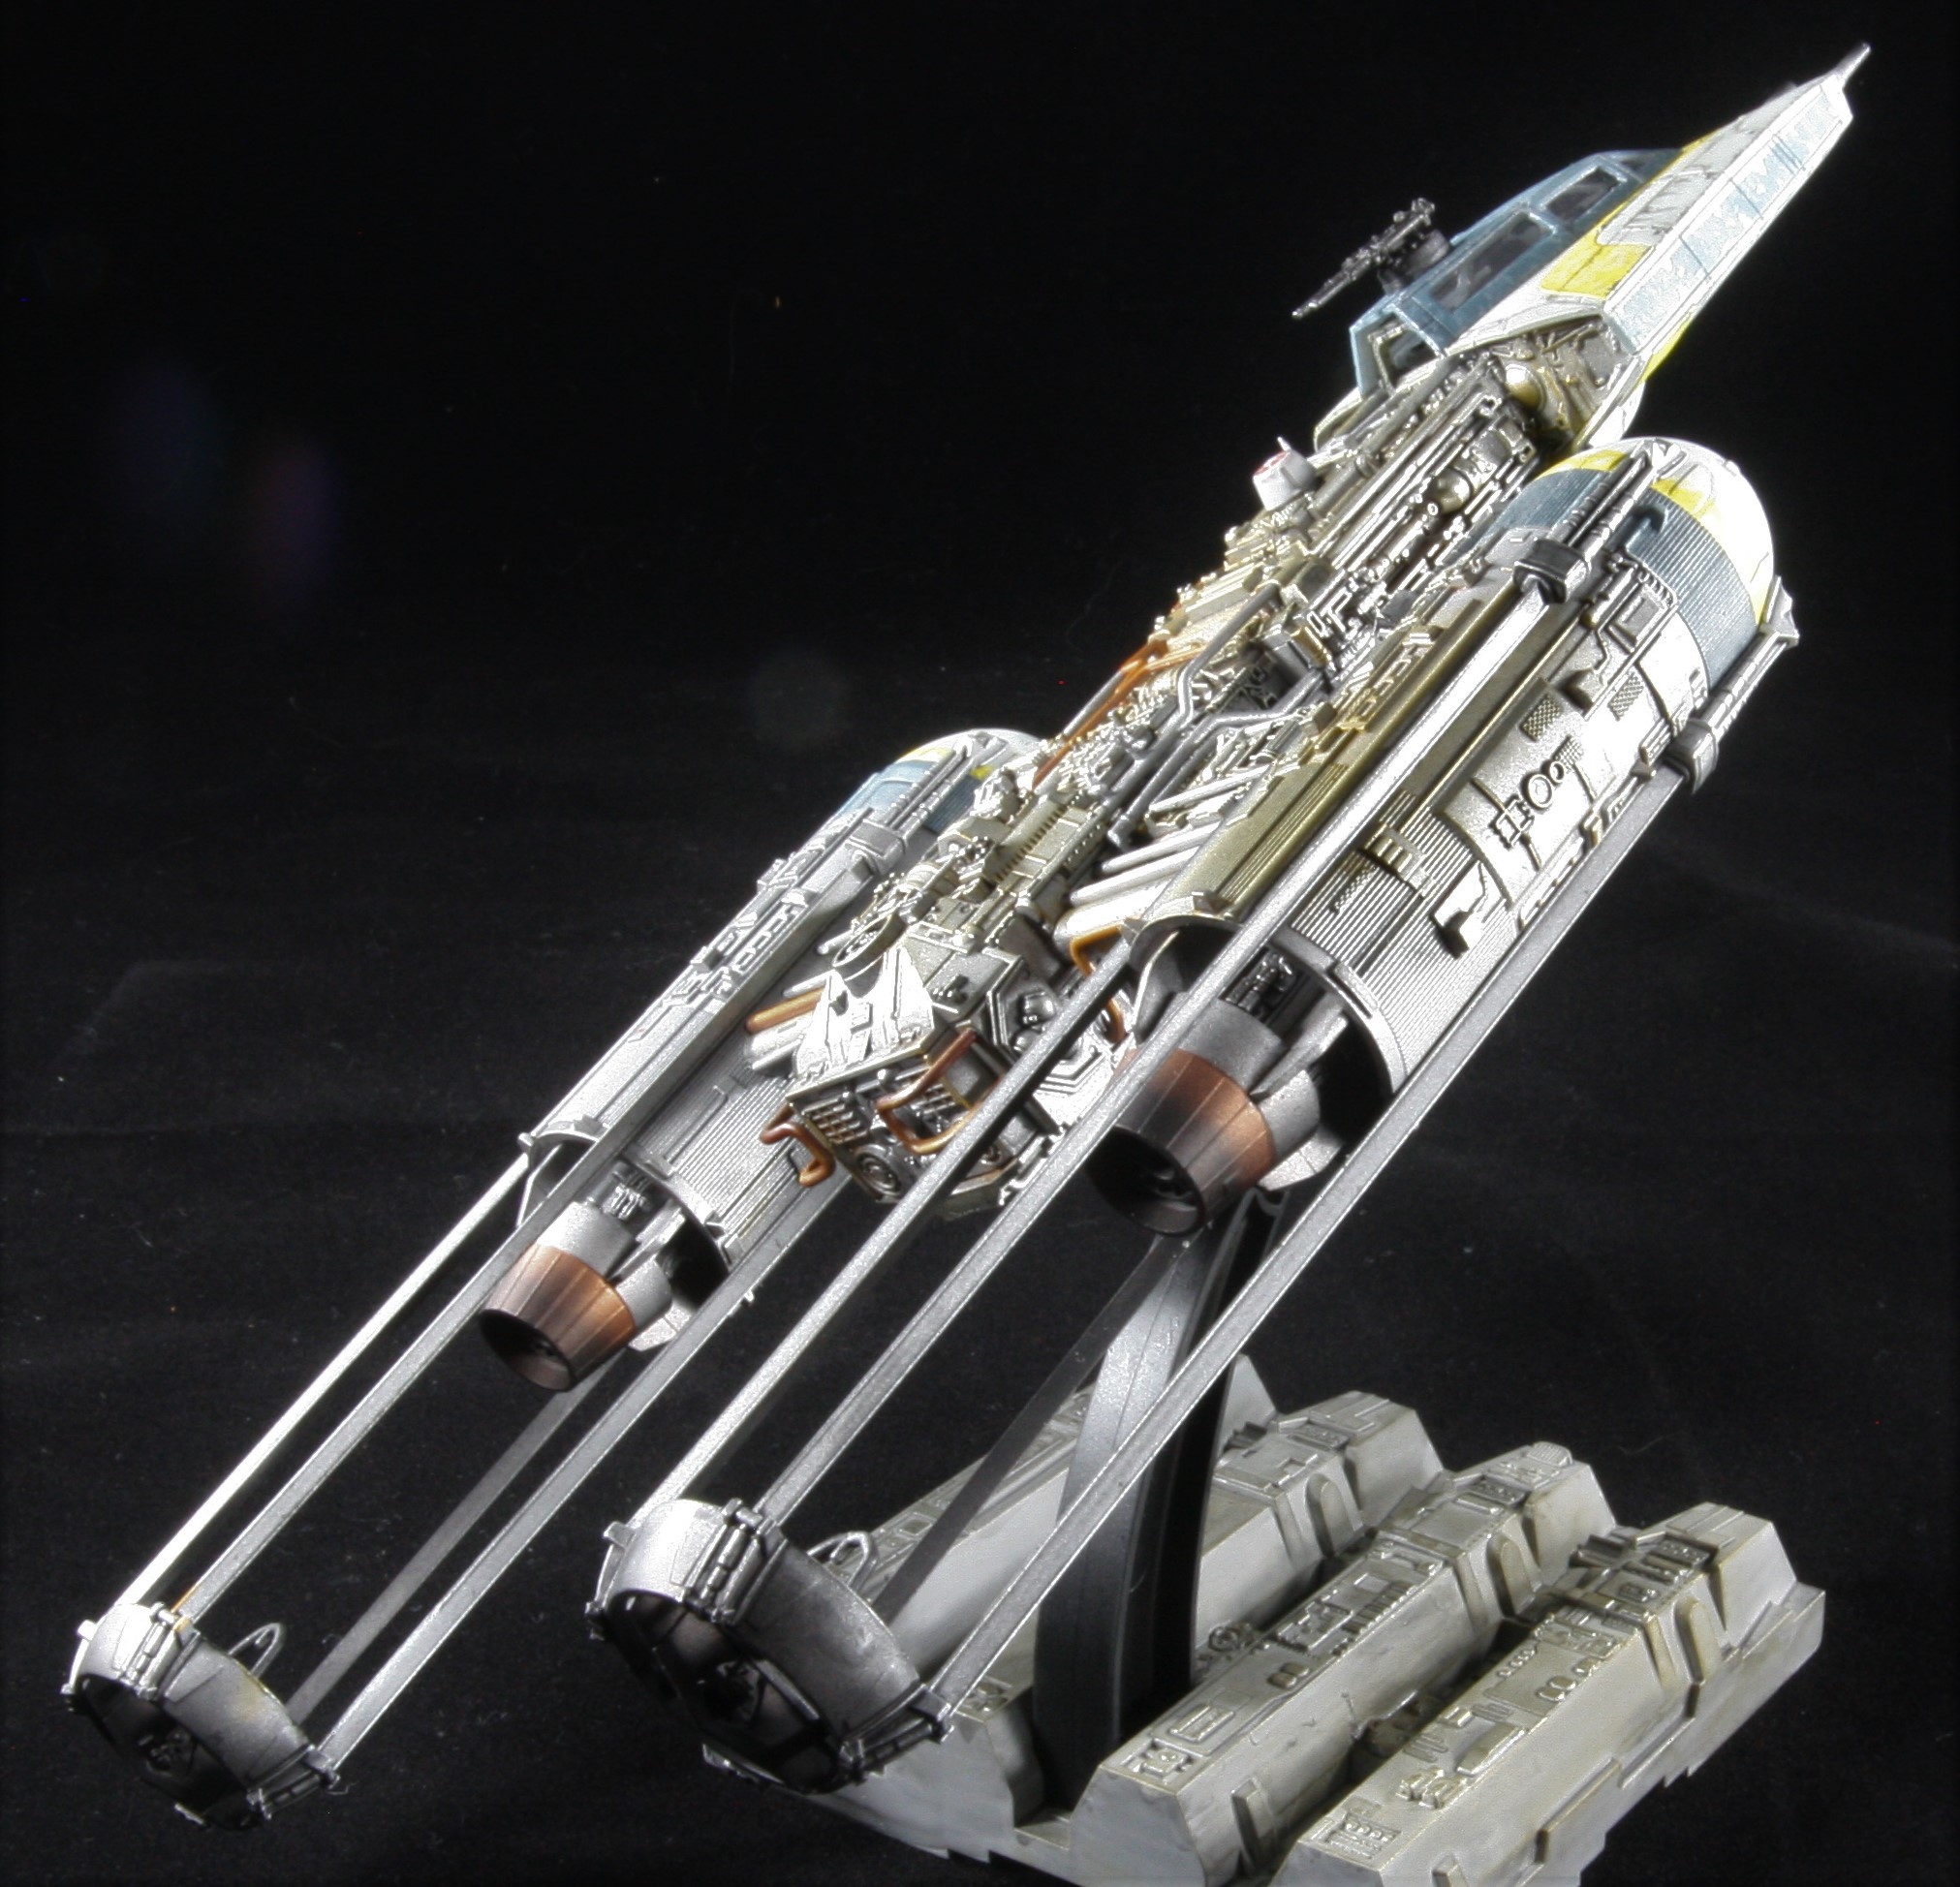
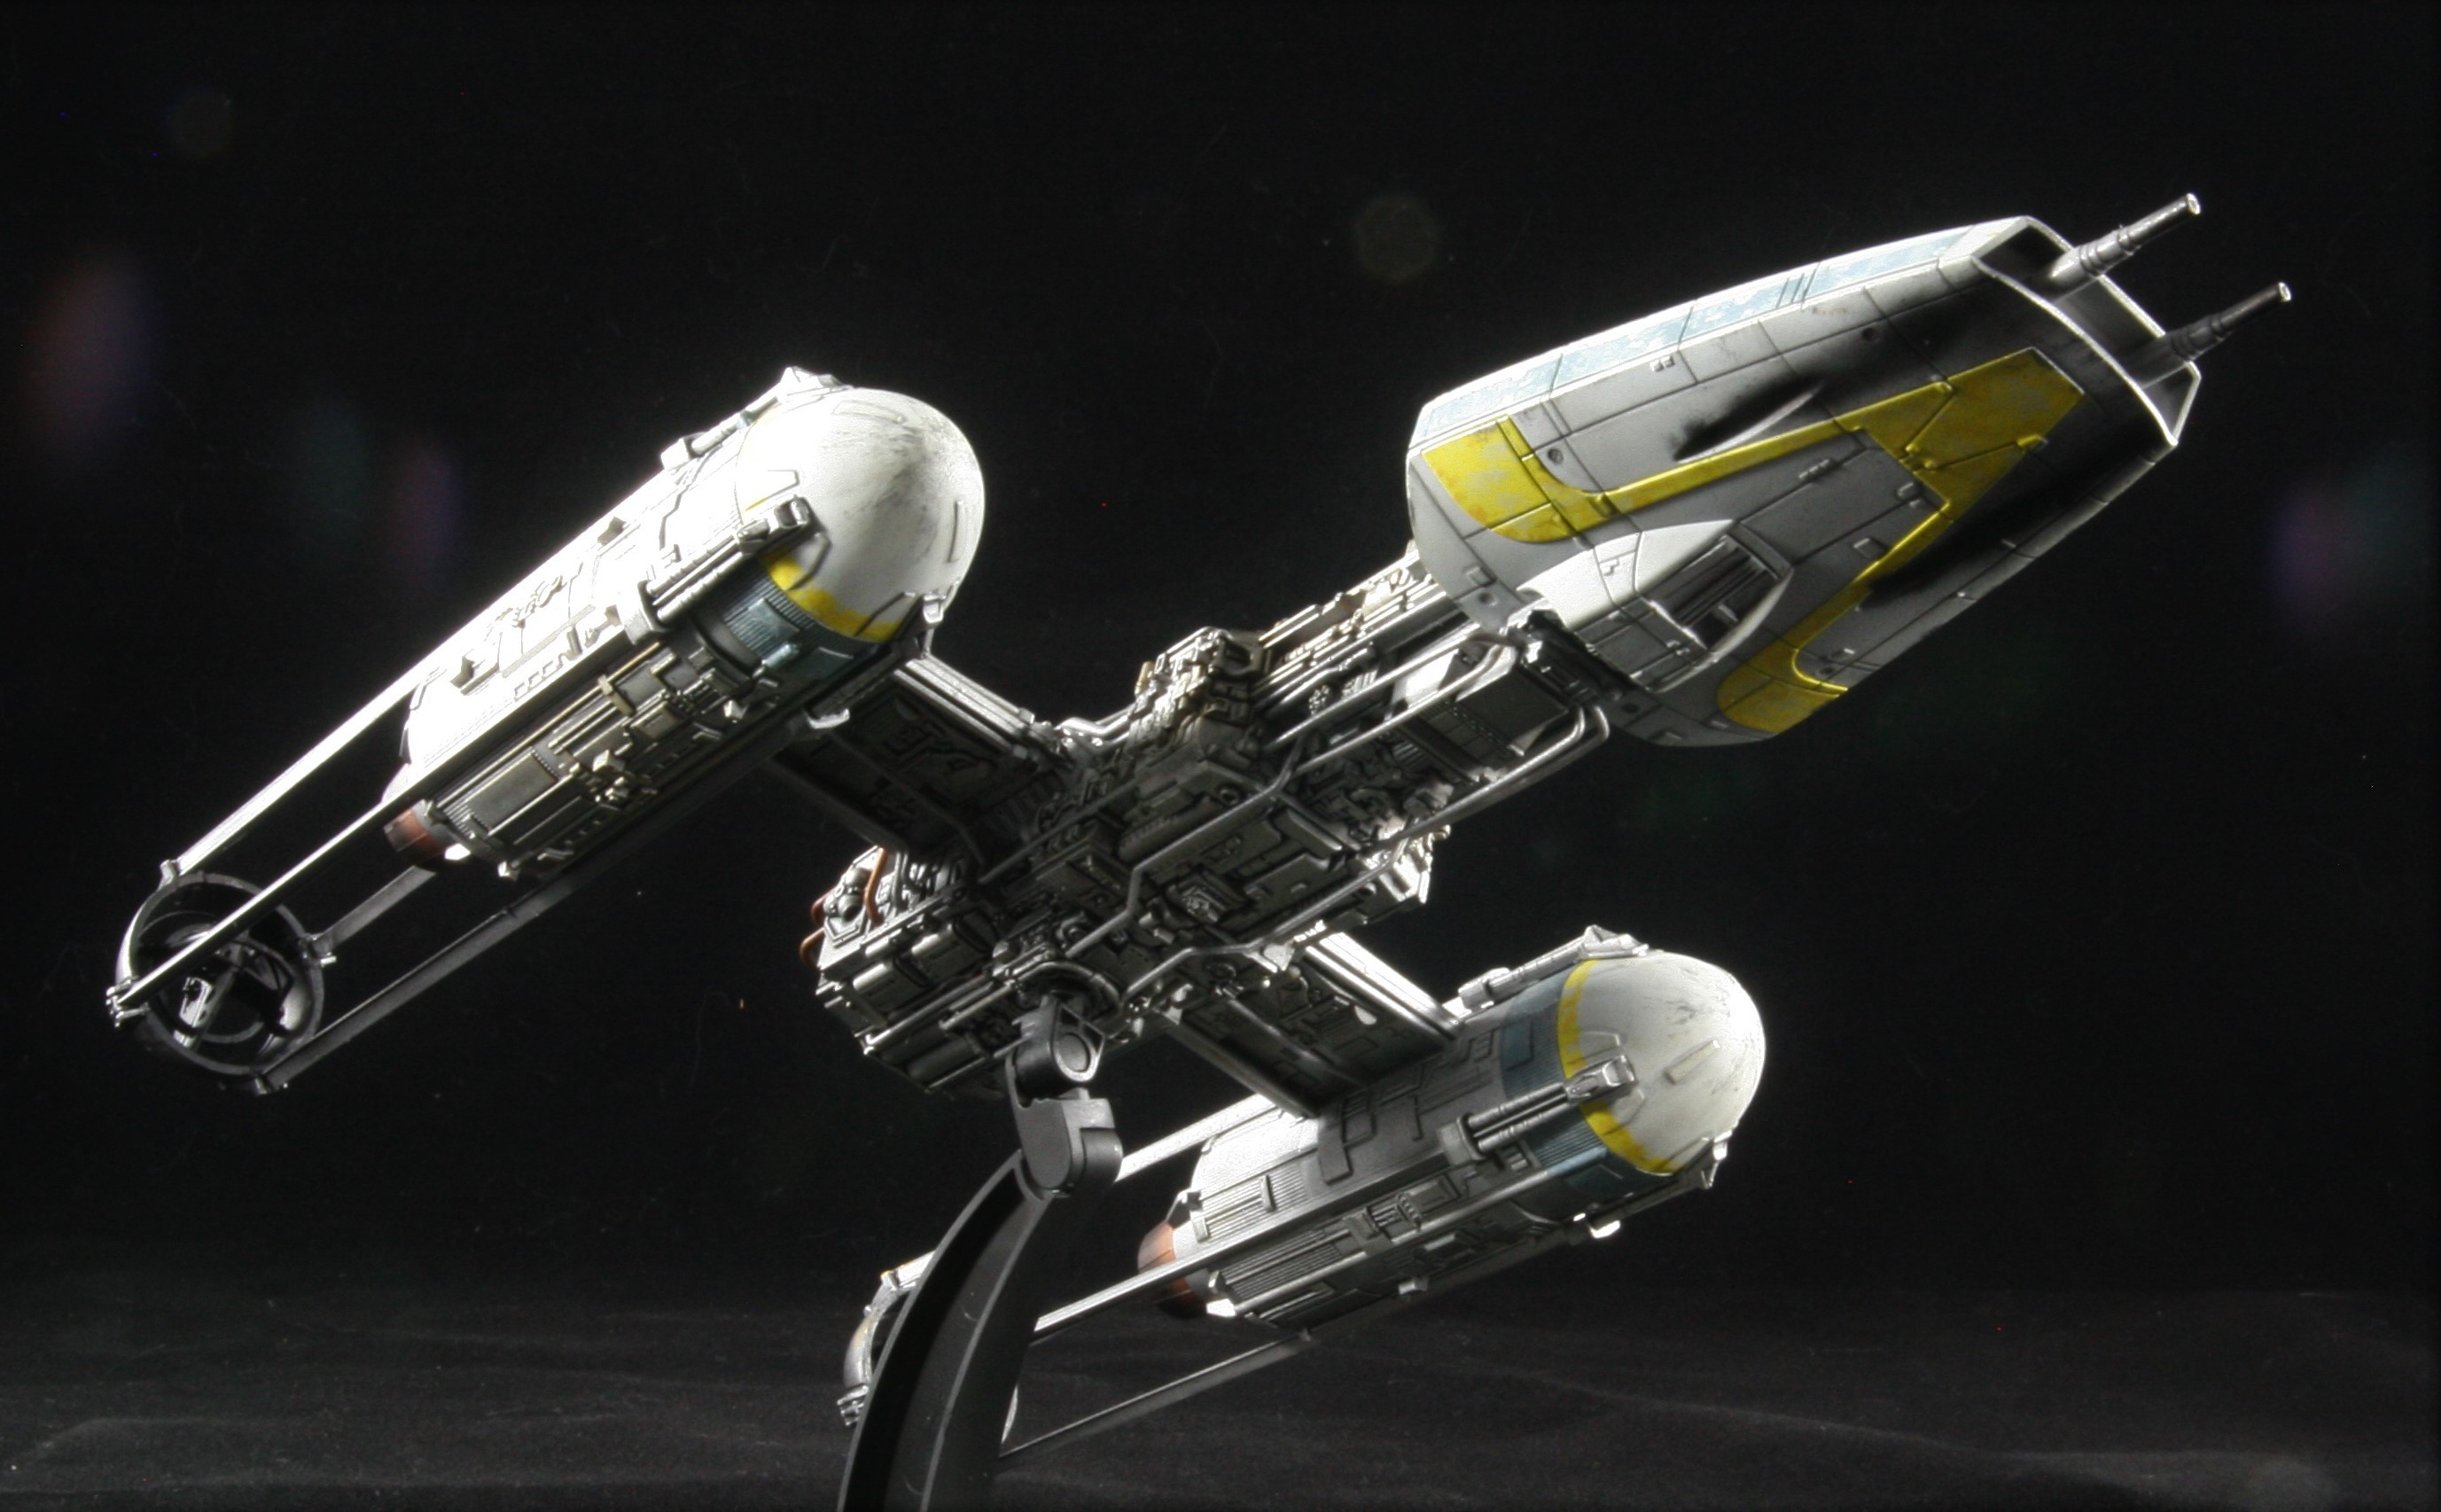
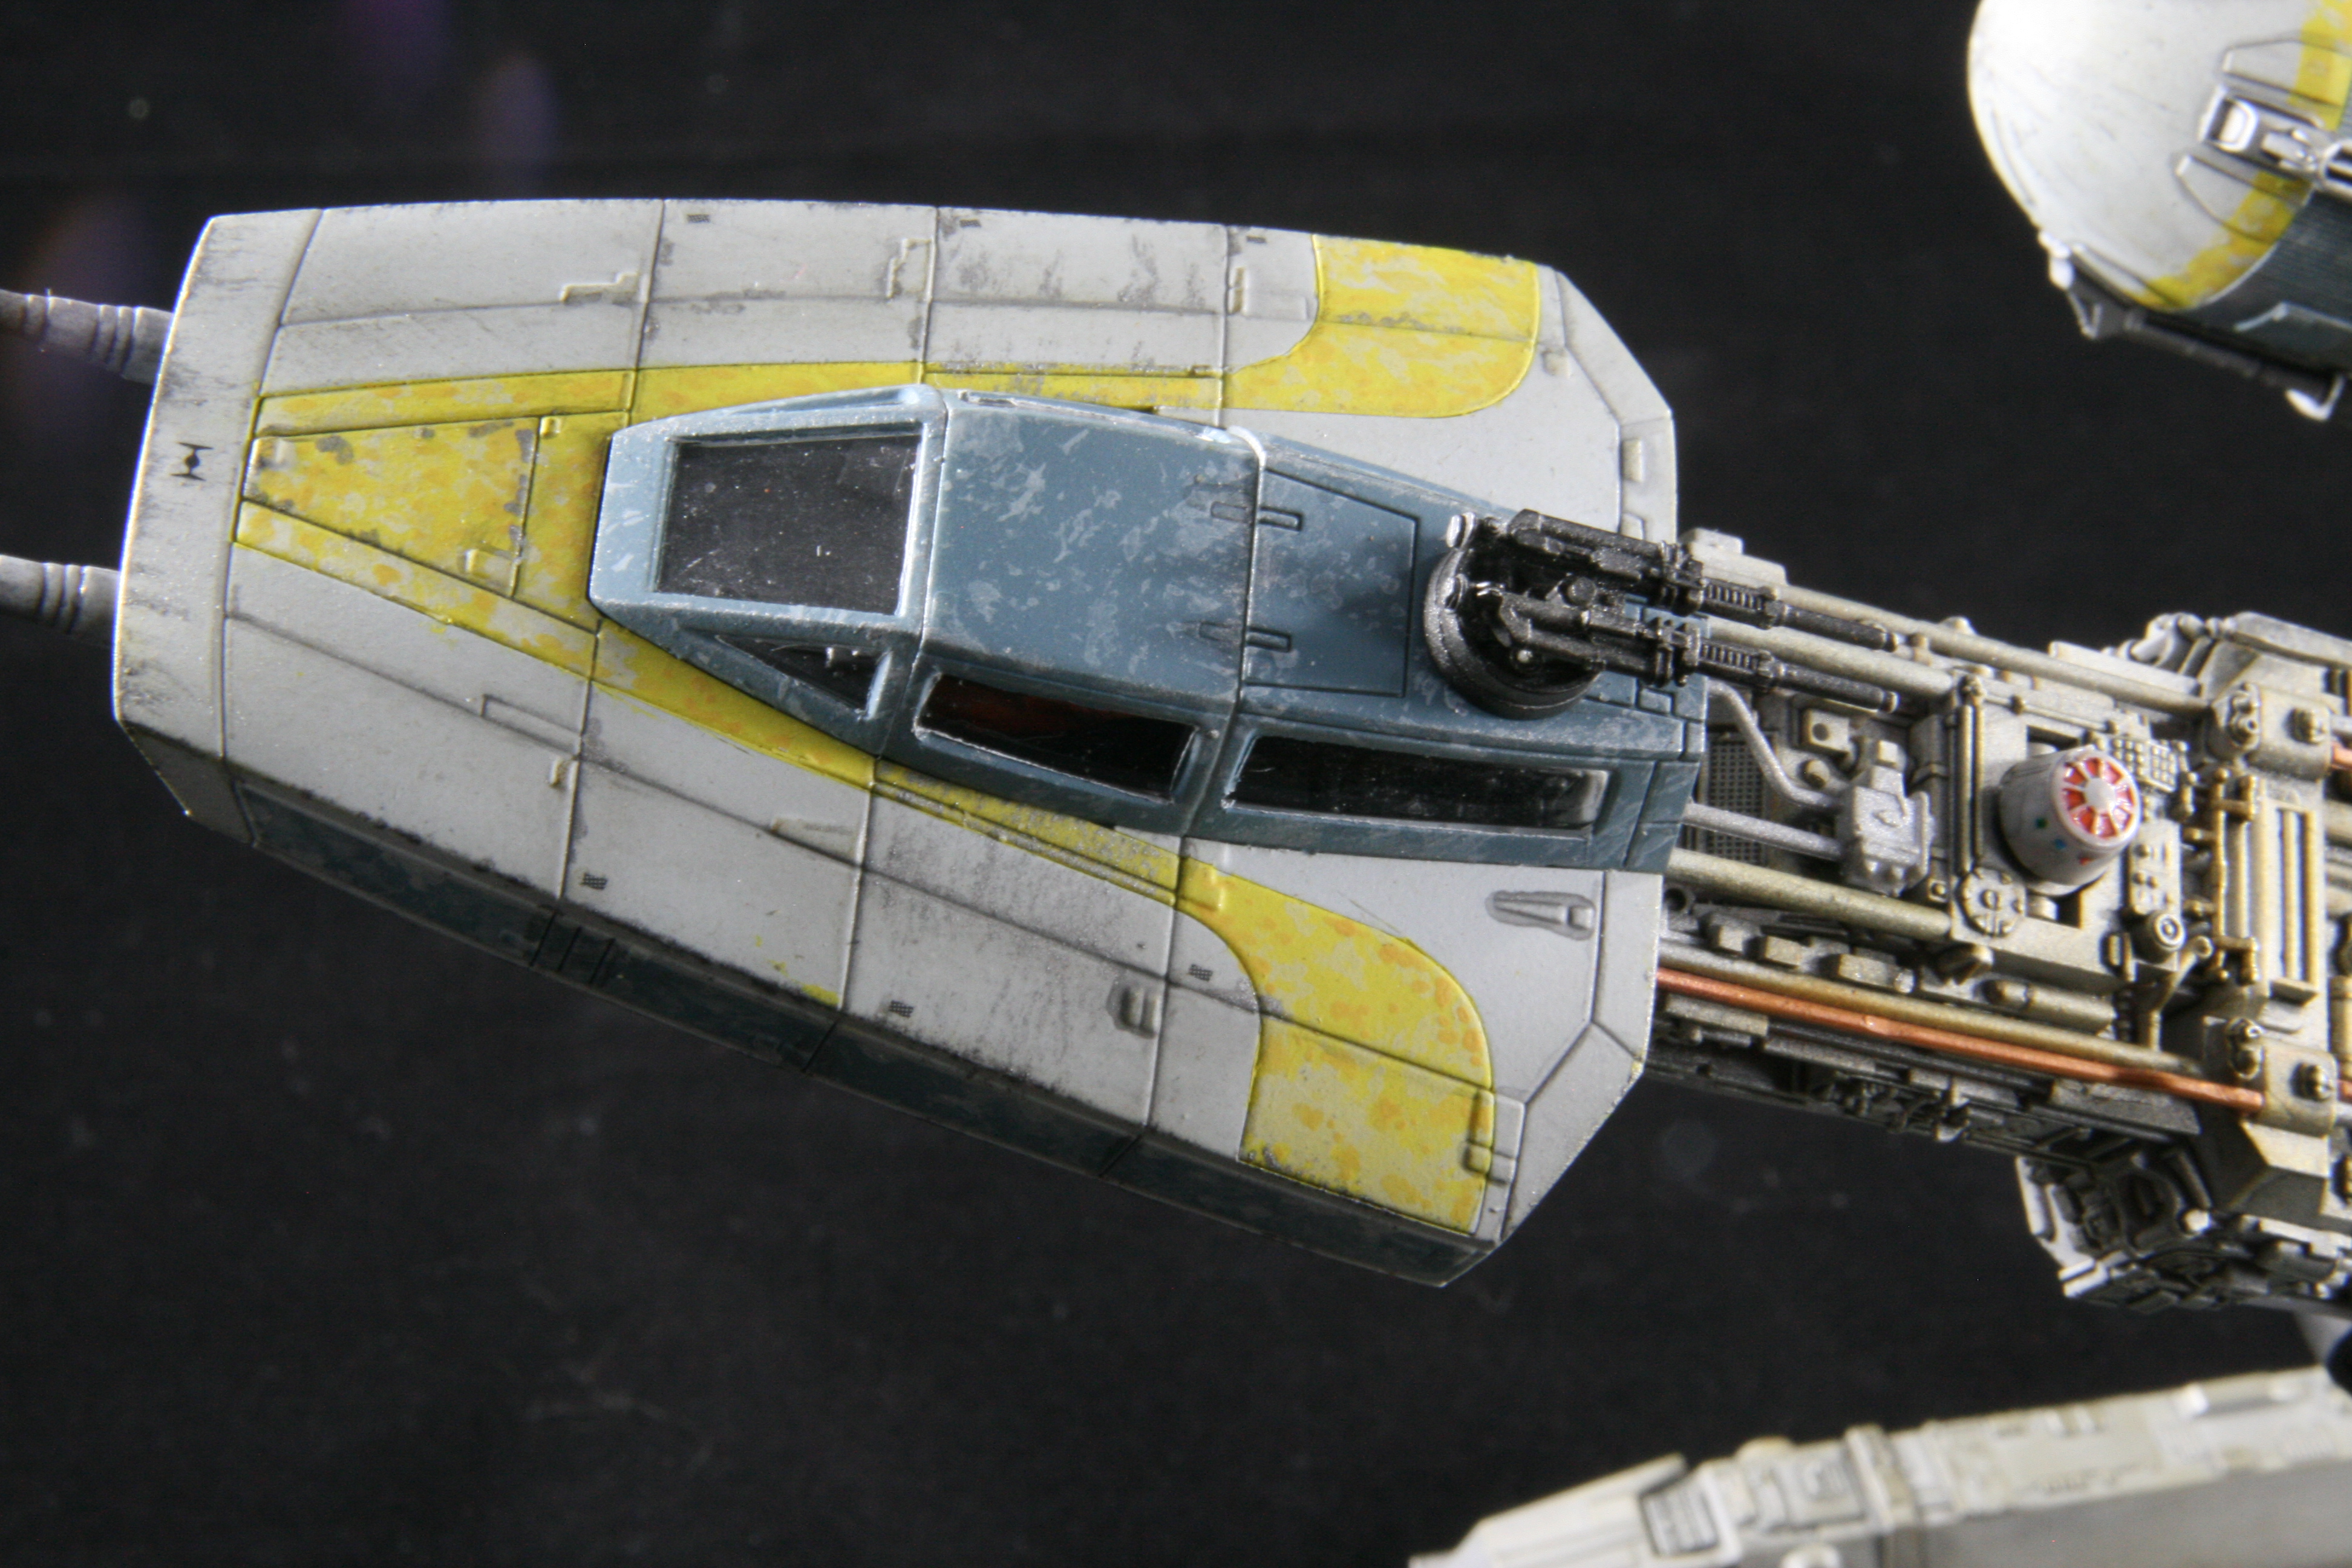
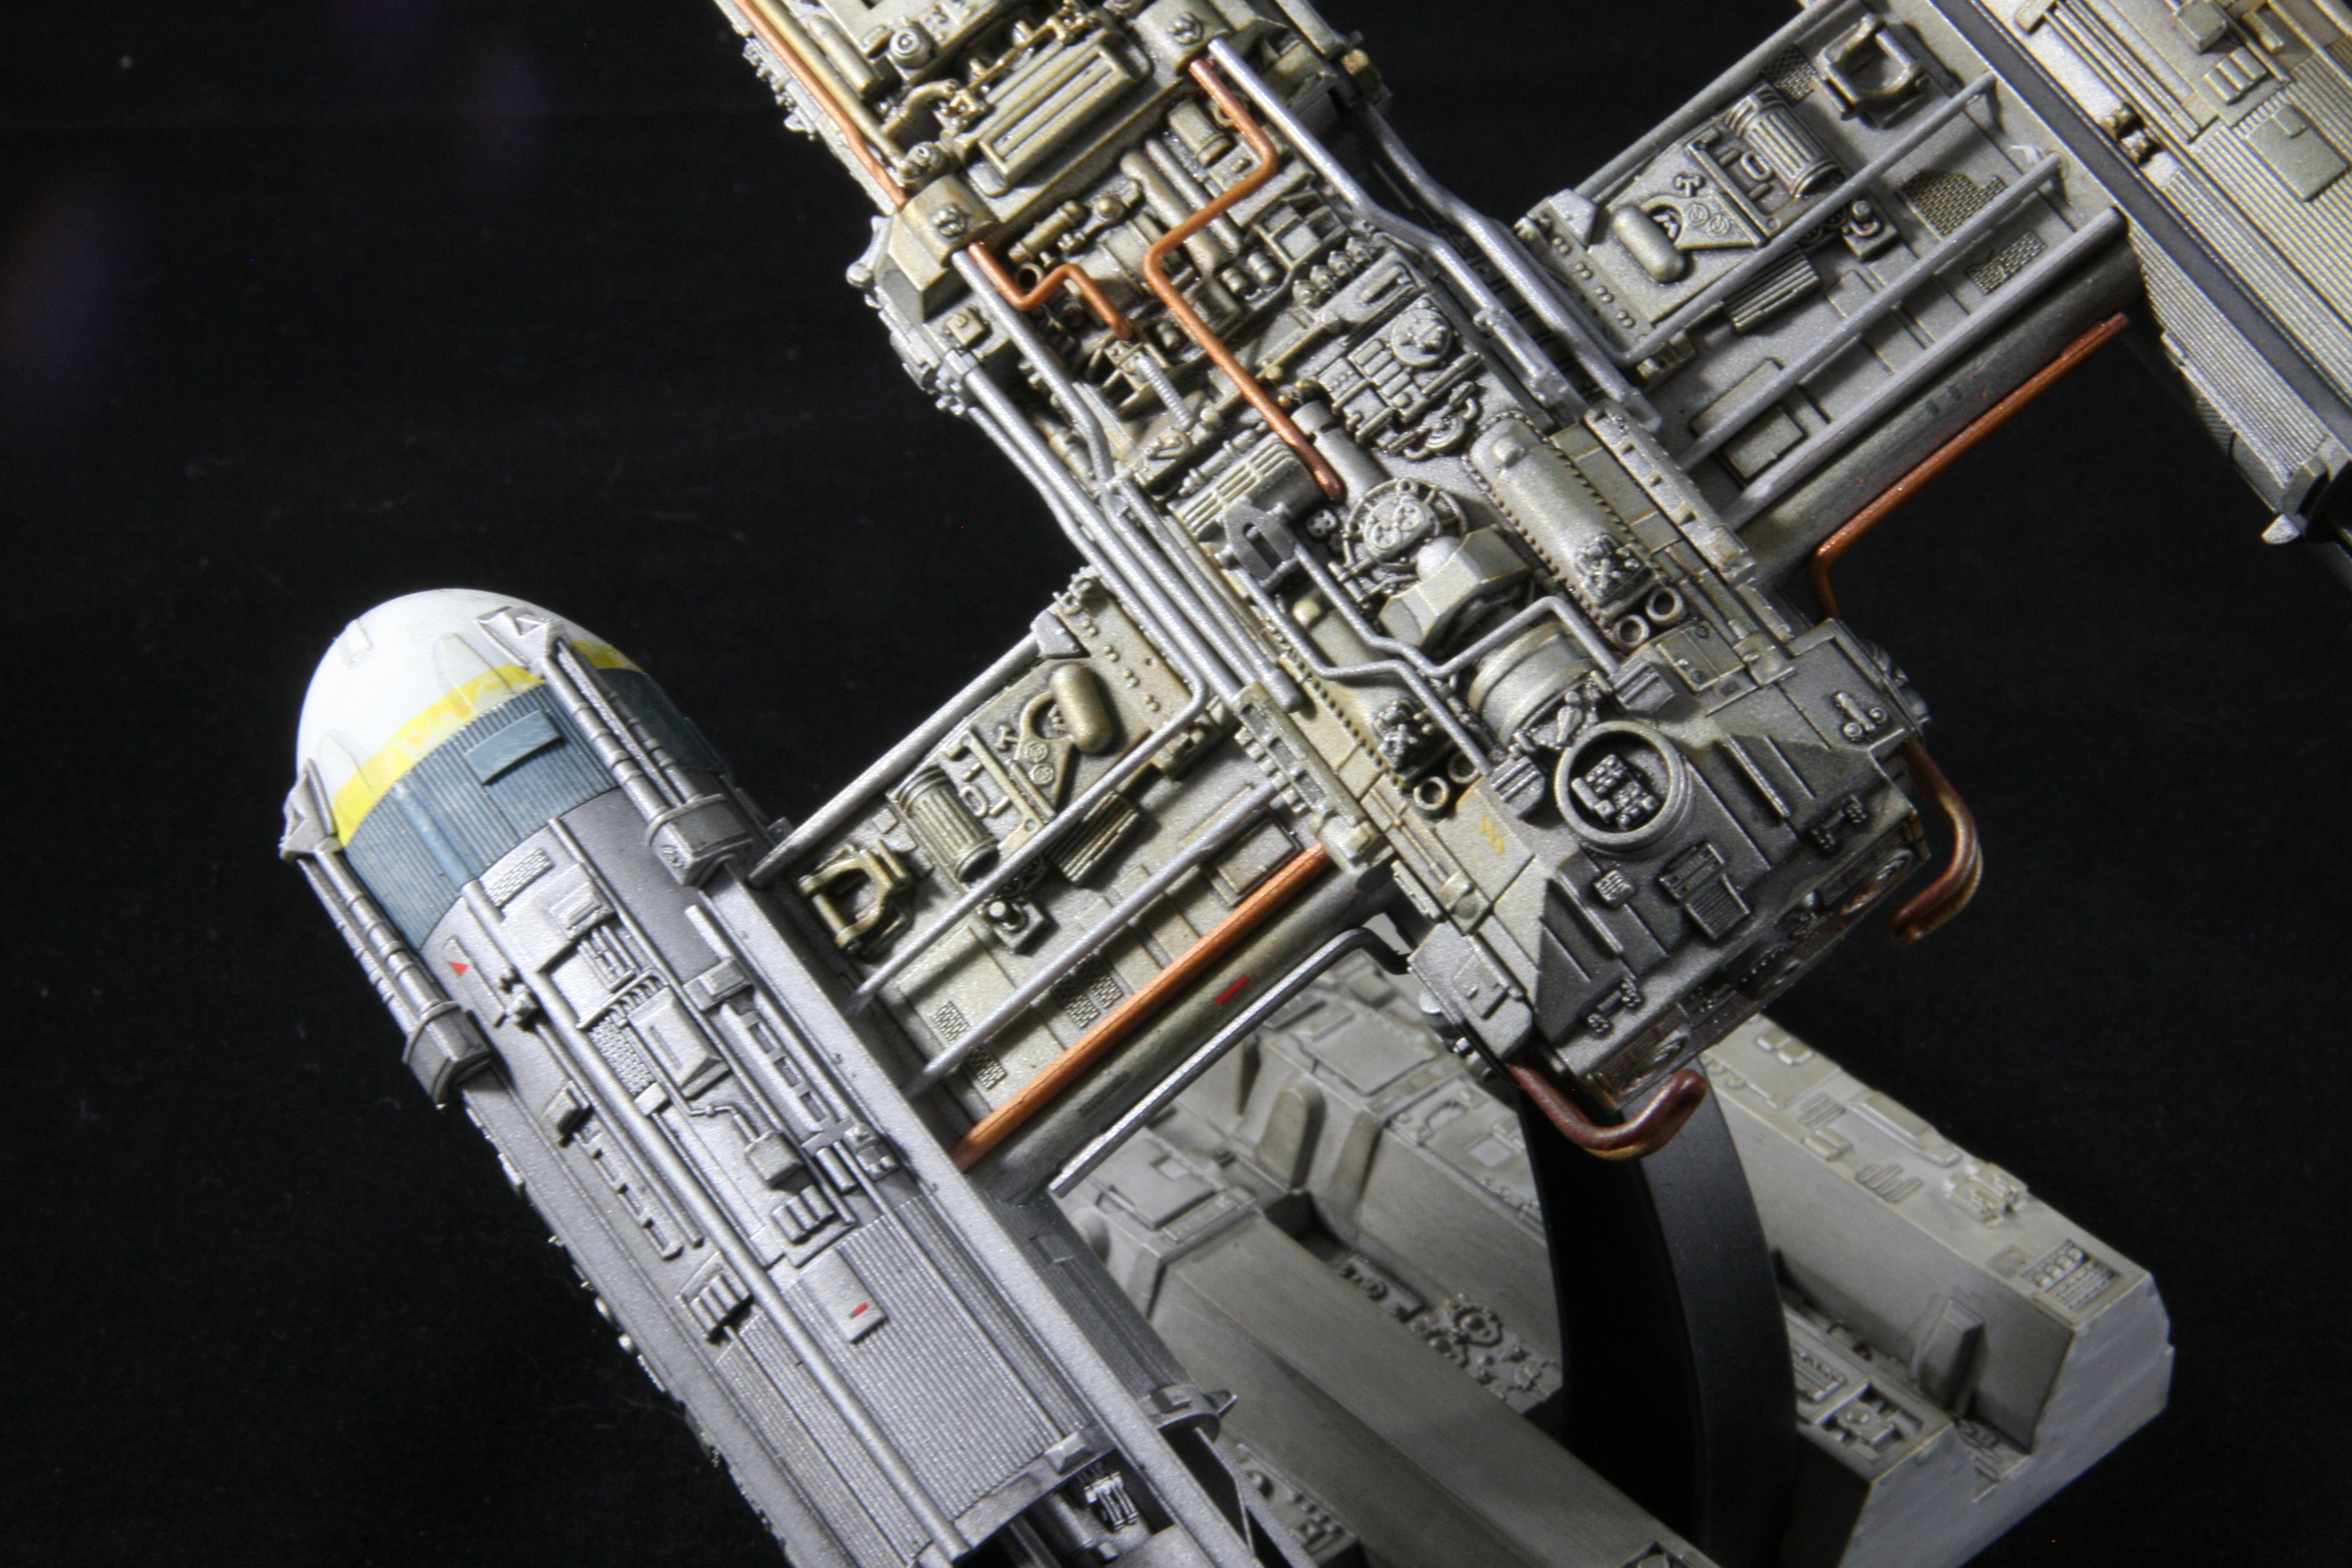
As a break from building shiny things, I decided to take on the Bandai Y-Wing kit I picked up at a local comic book store a few months ago. The detail on this kit is astounding as is the engineering... it's a snap-fit kit that has the smallest panel gaps and best parts fit of ANY model I've ever seen. Bandai uses a nifty technology that allows them to mold several colors onto one tree, so the kit can look pretty good for a relatively inexperienced modeler right out of the box. The Y is pretty complicated as all the "plumbing" of the movie model is done as separate parts, which adds a level of depth to the model that it would never have if this stuff was molded in place. The fiddly fit of these pieces is further complicated by the extremely tight tolerances... a few layers of paint really make a difference in how everything fits! Paint is custom mixes of Tamiya colors over Tamiya grey primer. I did the panel lines, wash on the mechanical bits and streaking with Testors Model Master oil wash. Finally I used Tamiya Weathering Master pastels to bring out highlights. Enjoy!

-
Volksfliegen? Fliegenwagen? Whatever you call it, it's very cool, as are your previous jet rods!
-
Hobbico - BANKRUPT!
jaymcminn replied to niteowl7710's topic in General Automotive Talk (Trucks and Cars)
Oof. Not good. I would be very surprised if Revell-Monogram went completely away, but any money for new tools and releases is going to be tough to come by for a while. In addition, distribution of many products is going to be adversely affected, especially since a lot of local hobby shops use Hobbico as a one-stop source for all of the brands listed. This might hurt them too... if I can't get Tamiya paint at my LHS, I'll have to order it online as opposed to giving them my money. Less income for them, more aggravation for me. There could be a real ripple effect here, especially with the R/C stuff, where hobby shops make most of their money. 2018 is not off to a good start. -
Harder and Steenbeck Infinity Airbrush 2 in 1 Set
jaymcminn replied to Samuel S's topic in Tips, Tricks, and Tutorials
I'd be leery about this brush for hobby work. As Aurf said, it's really more of a fine art brush. The .15 tip is too narrow for the viscosity that the paint we use needs to be at to cover properly... it's more suitable for inks than any hobby paints. The .4mm tip should work for hobby paint, though. Why this particular brush? It's nice, but the Iwata Revolution is an extremely nice brush for half the price with the added benefit of easy availability of replacement parts. I know that the tendency is to want to go with a high-end brush, but an airbrush designed specifically for our hobby is probably a better choice. -
Yawn.
-
Are Heller kits good?
jaymcminn replied to vancouver71's topic in Model Building Questions and Answers
Agree that the Heller kits are generally pretty weird... one of their favorite tricks is to mold the windows and interior side panels as one piece so you have to paint clear interior parts! They often represent subjects you can't otherwise acquire, though. That Revell 2CV, however, is no reboxed Heller kit. It's a really nice representation of a very late-production car tooled a few years ago by Revell Germany and is seriously nice. The decal sheet includes the "Charleston" markings and is very comprehensive overall. Wish I had more info on the Heller kit, but it looks like it might be a step above their old 70s tools. I'd still hold out for the Tamiya or Revell kits, though. Good luck! -
Question about dust control
jaymcminn replied to Samuel S's topic in Model Building Questions and Answers
I just picked up a Tamiya anti-static dusting brush. It seems to work pretty well for finished models, but I haven't gotten to see if it reduces the tendency for dust to stick to plastic during the painting process yet. Maybe it'll help keep the dreaded cat hairs out of my paint! -
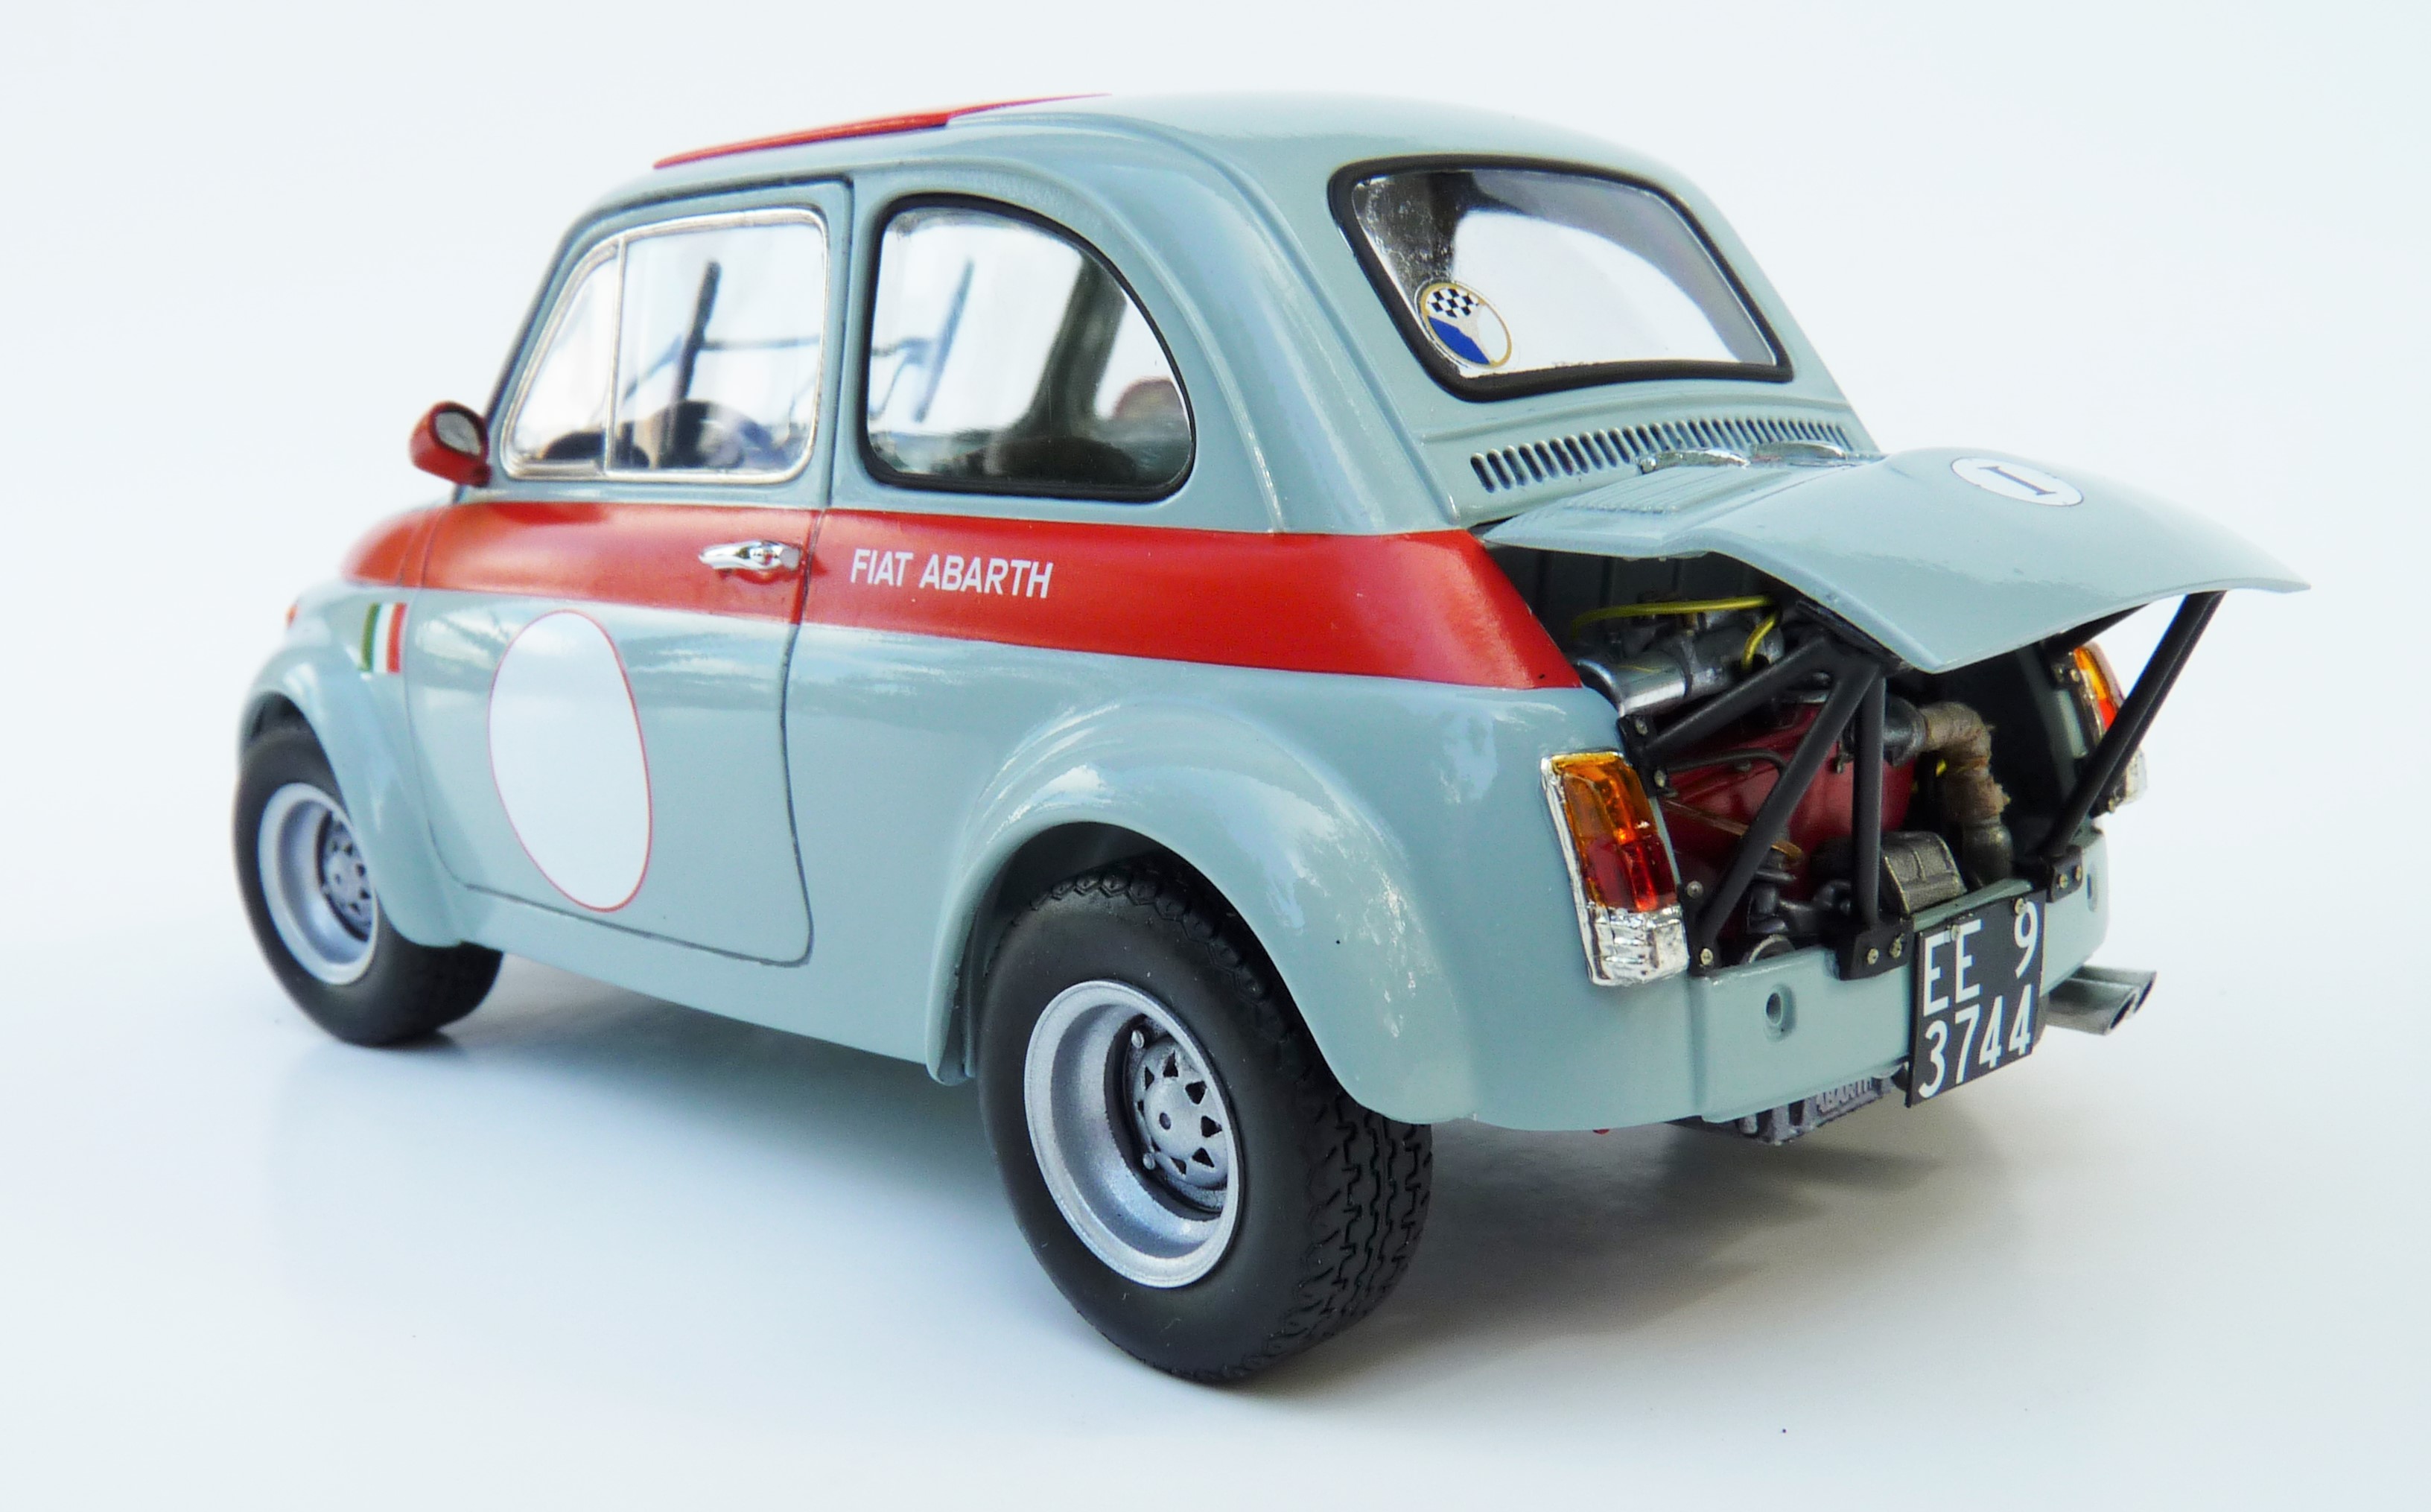
Thanks everybody! I had fun with all of these and I wanted to get some pics up after Photobucket's little stunt this year. That is the kit top. It also includes a 1/2 tonneau cover, folded top cover, and side curtains for the up-top. Thanks Matt! Everybody loves the Esprit, which was easily the biggest pain of all of these to get looking right. It took a lot of work to get the box-stock nose-high 4x4 stance down where it belongs. I really love the Abarth too... it has a lot of character and pretty much just fell together. We definitely have similar choices in subject matter... a lot of the cars you've already built I have in my stash!
-
I'm cool with the 1/16 scale 356, but why would the cabriolet be a glue kit while the coupe is an "easy click"?
-
Wow. Beautiful models all, but that 911 is just perfect. Are those the USCP Outlaw wheels on that?
-
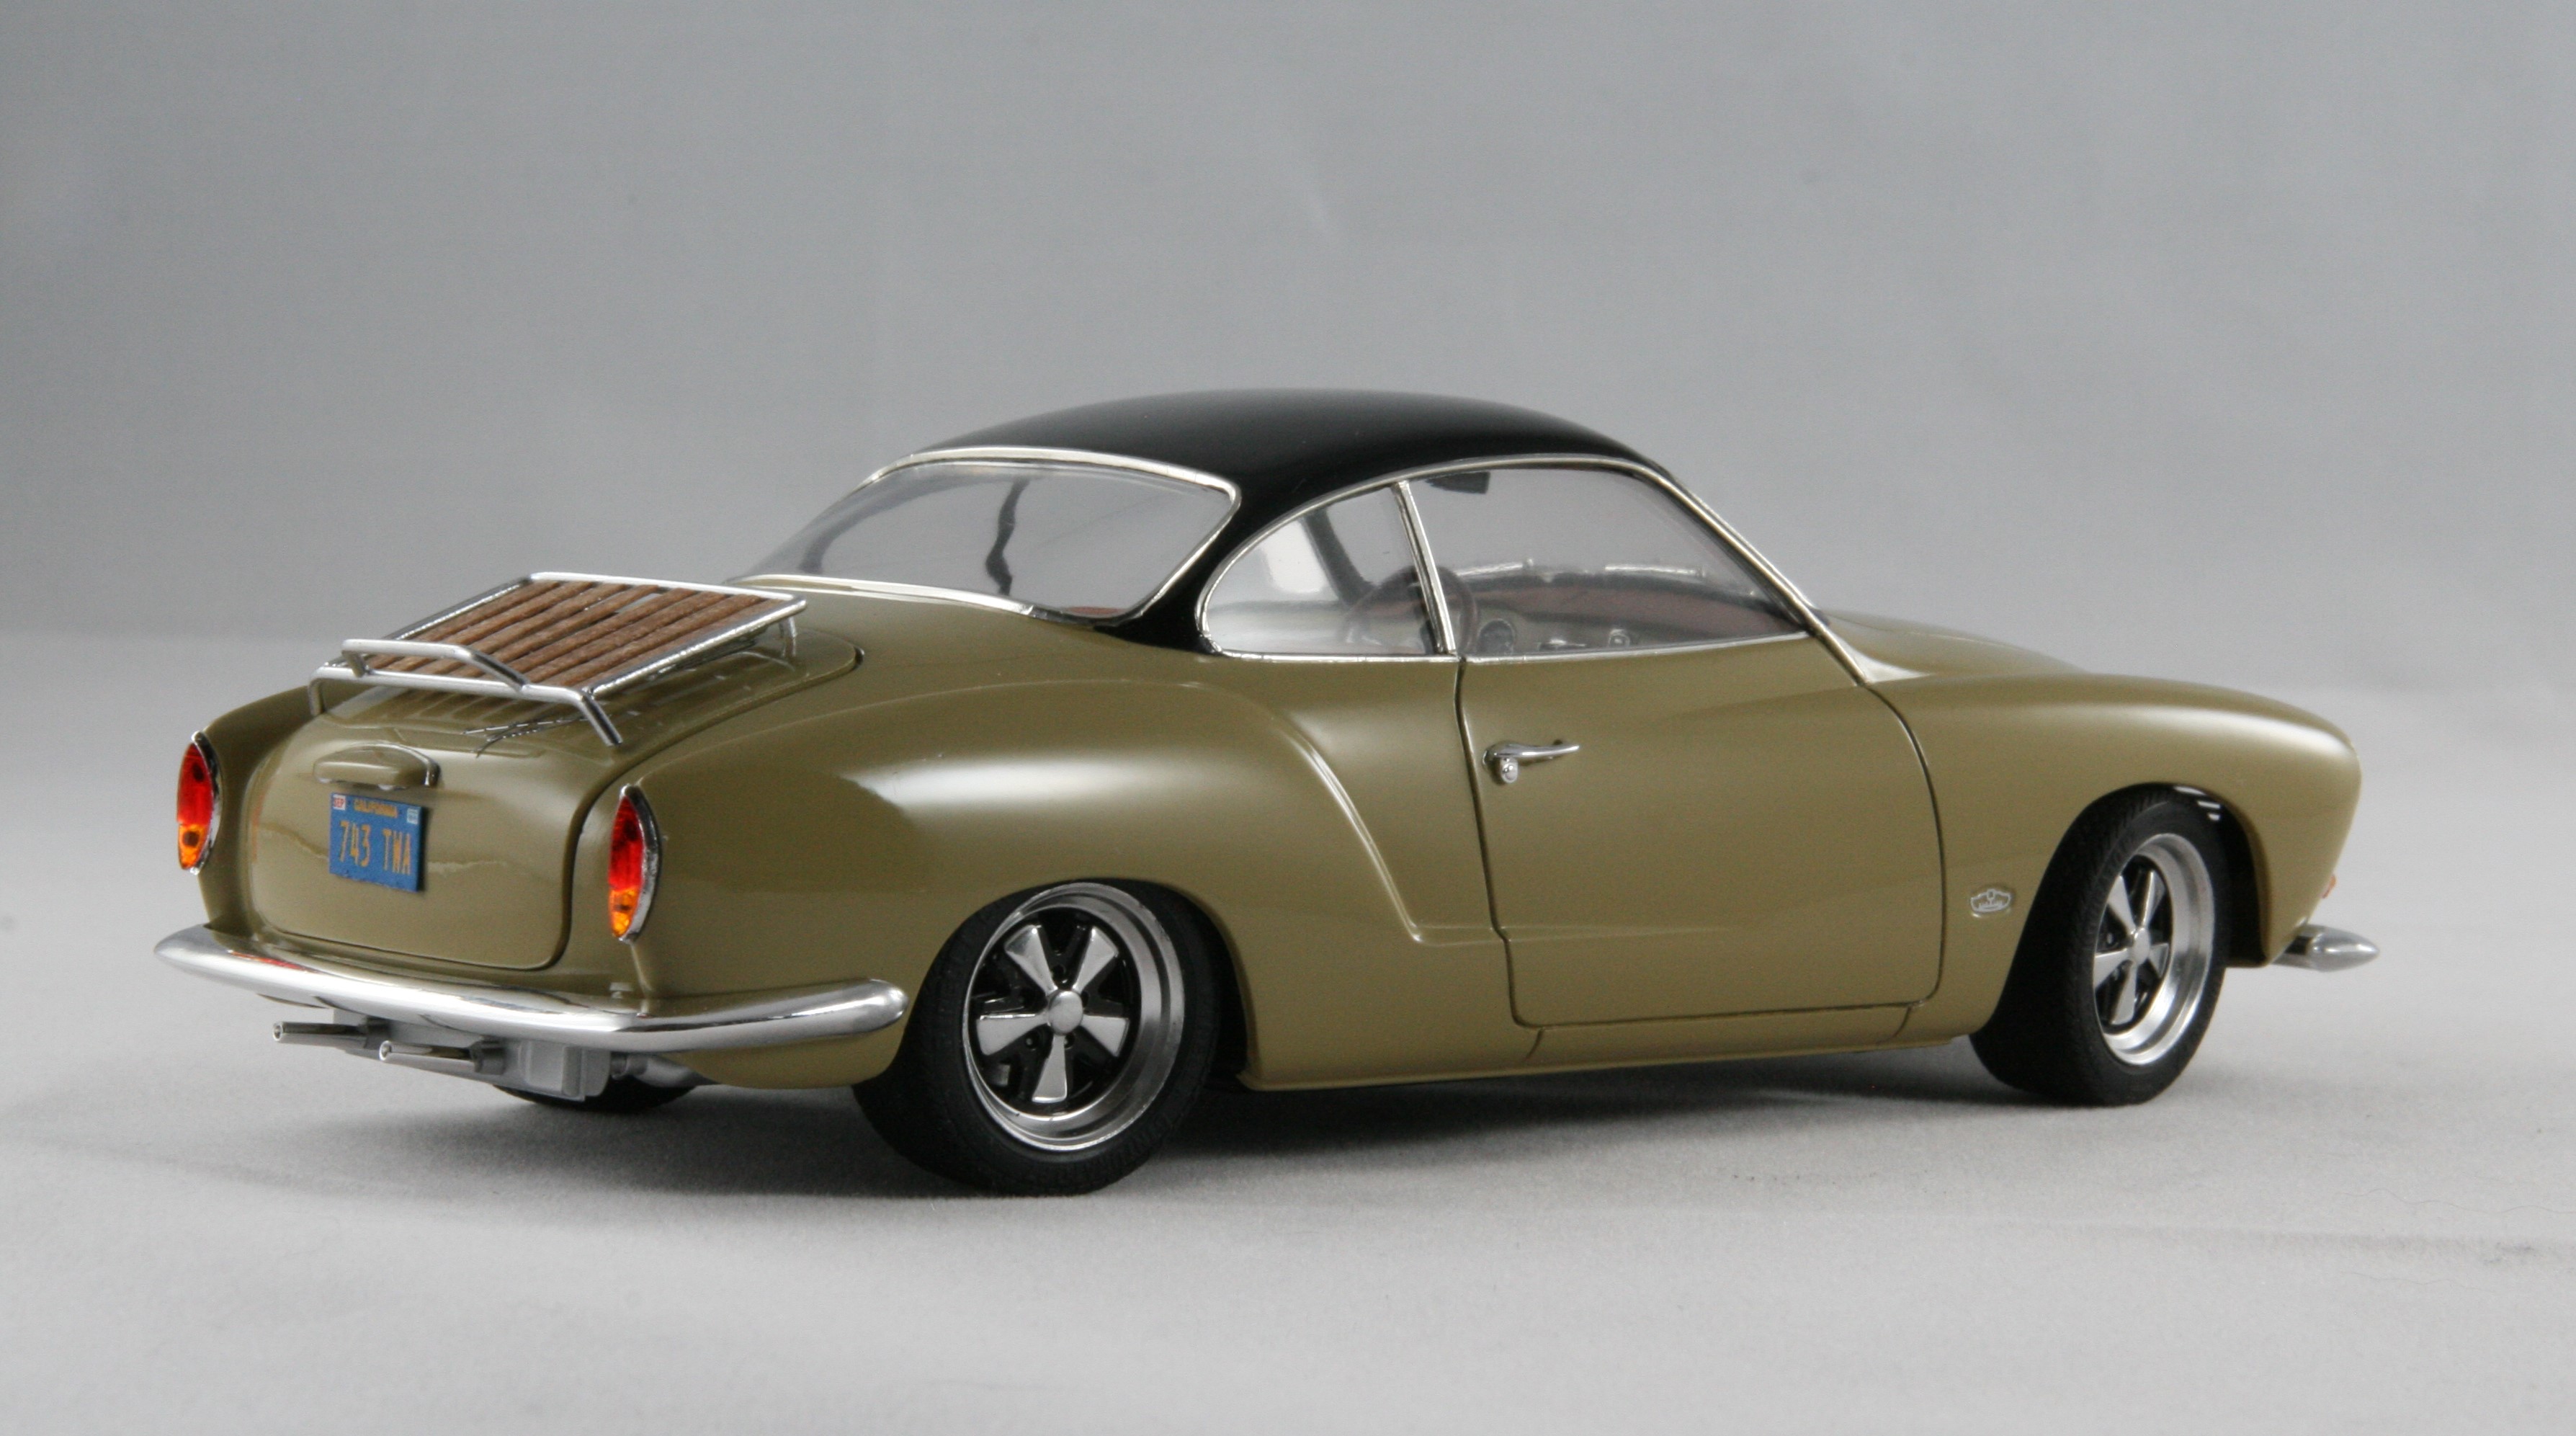
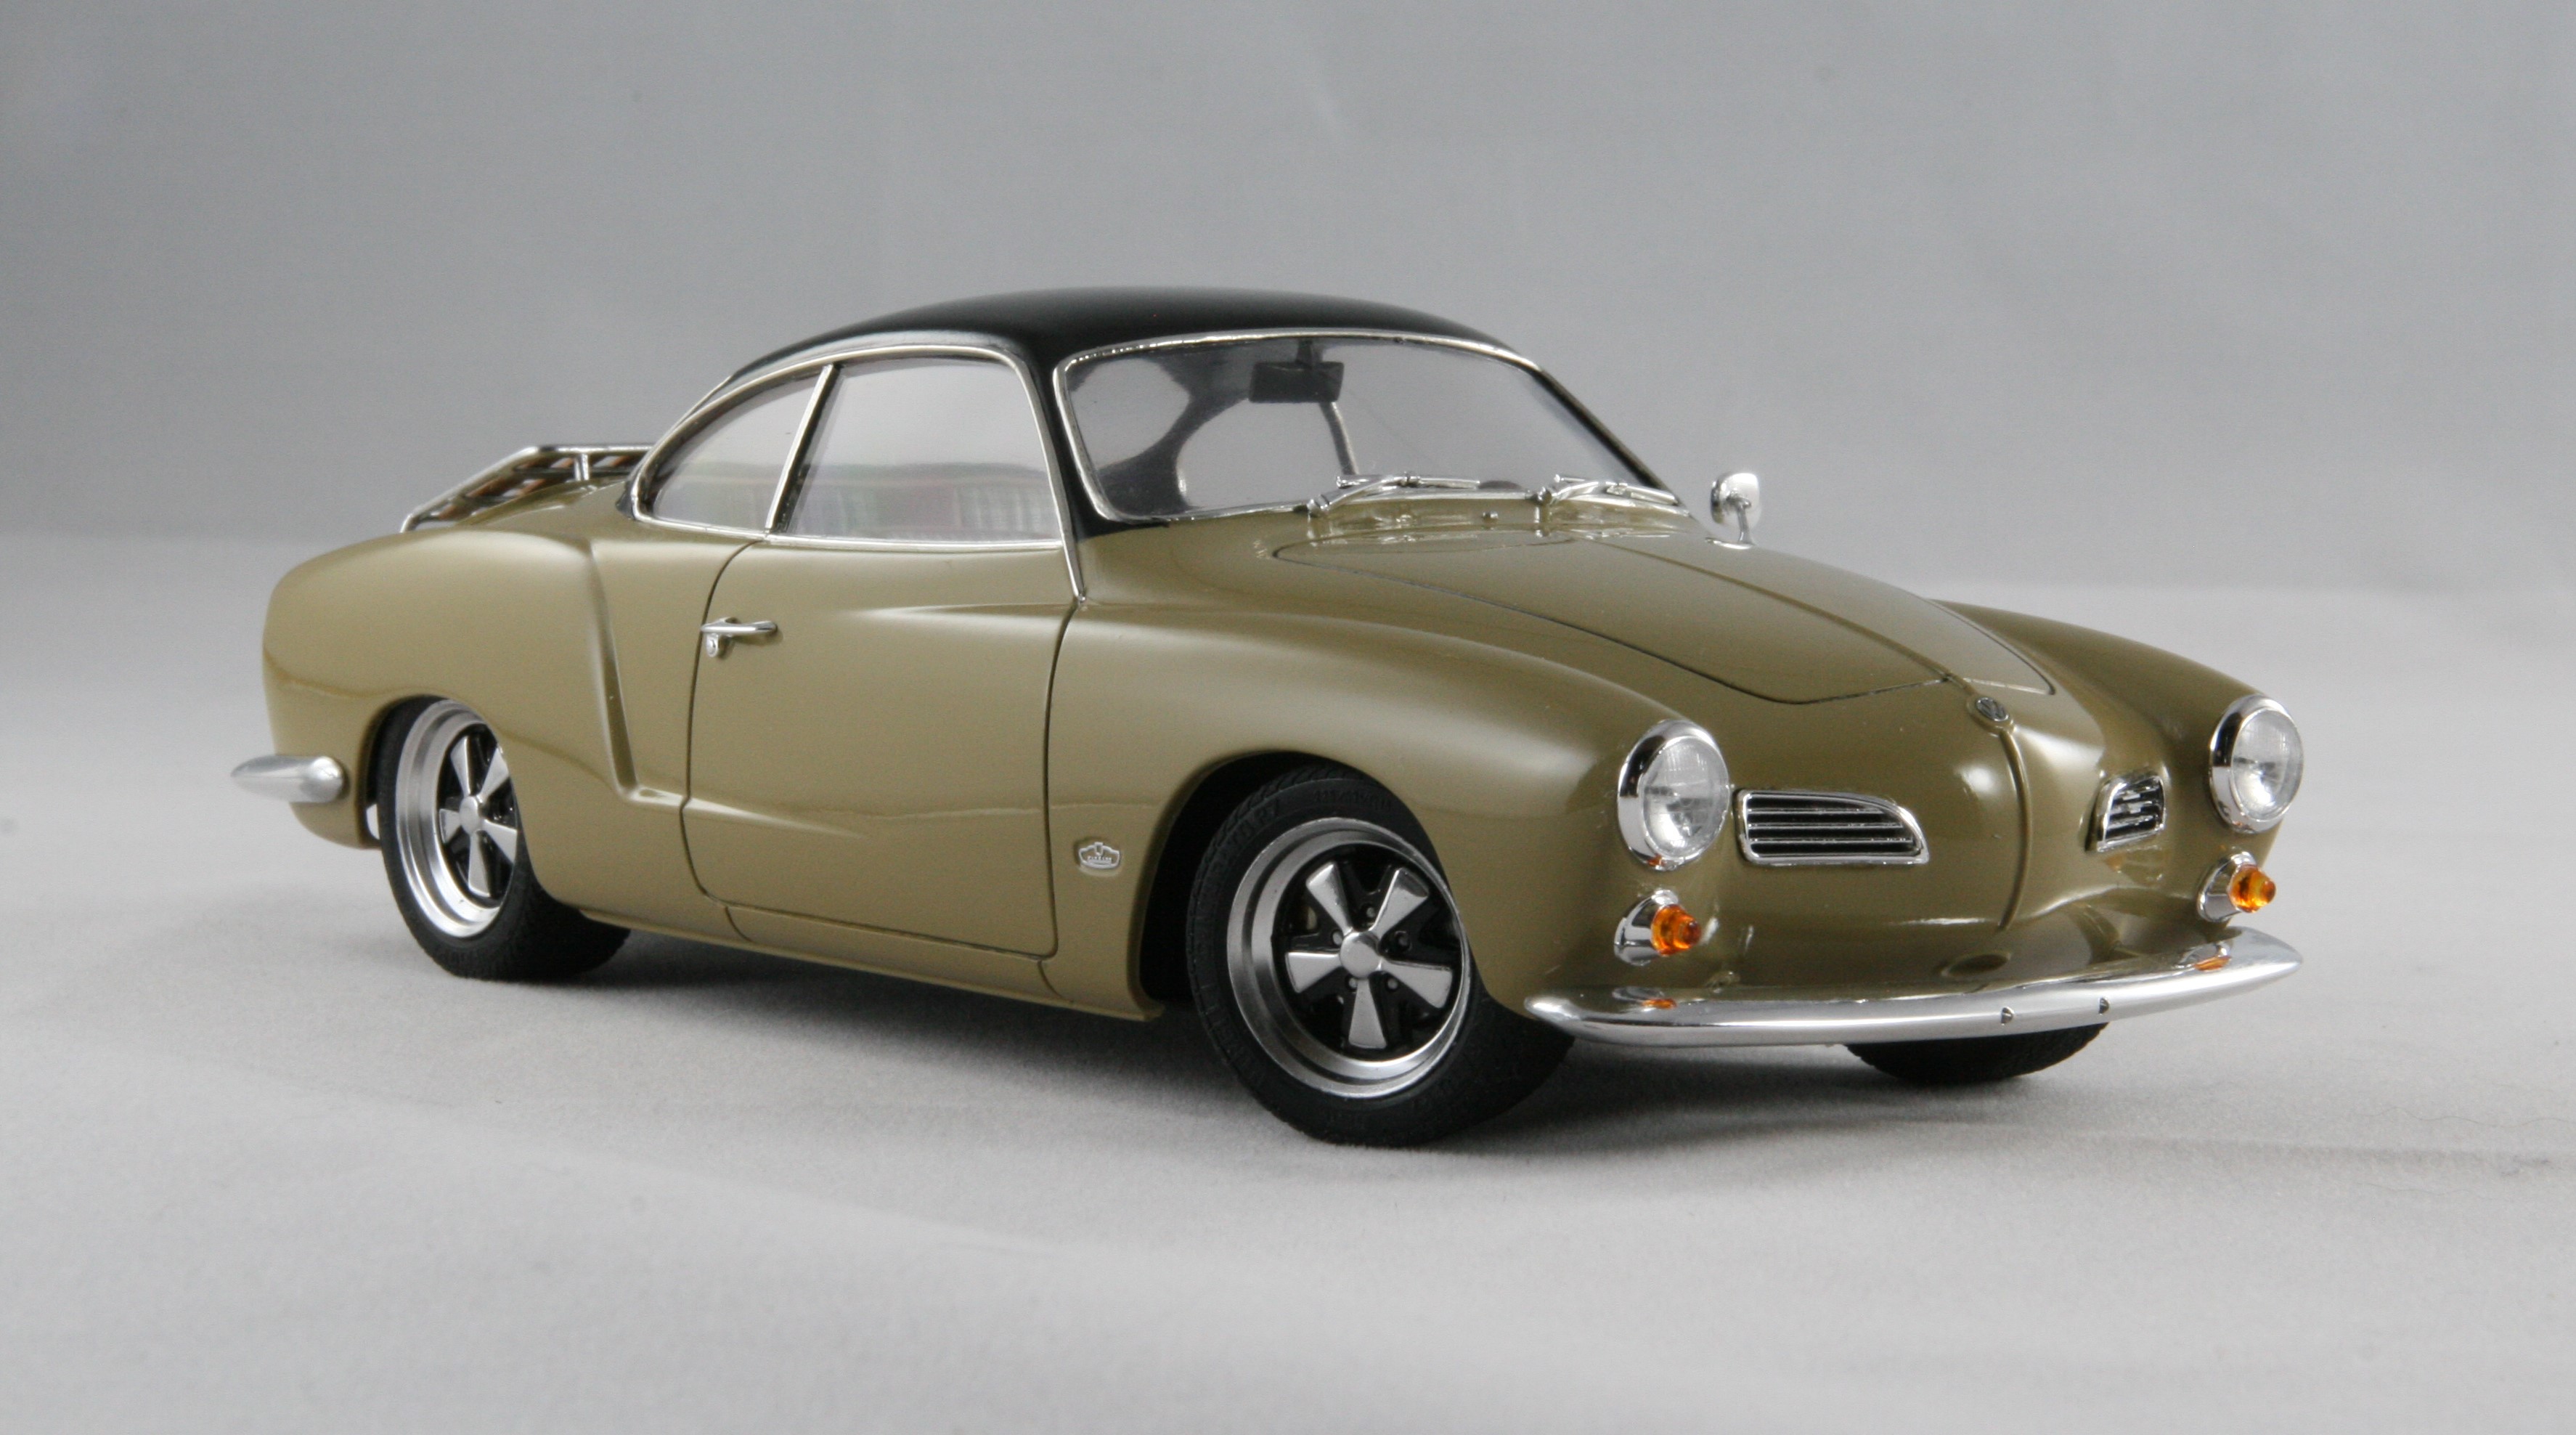
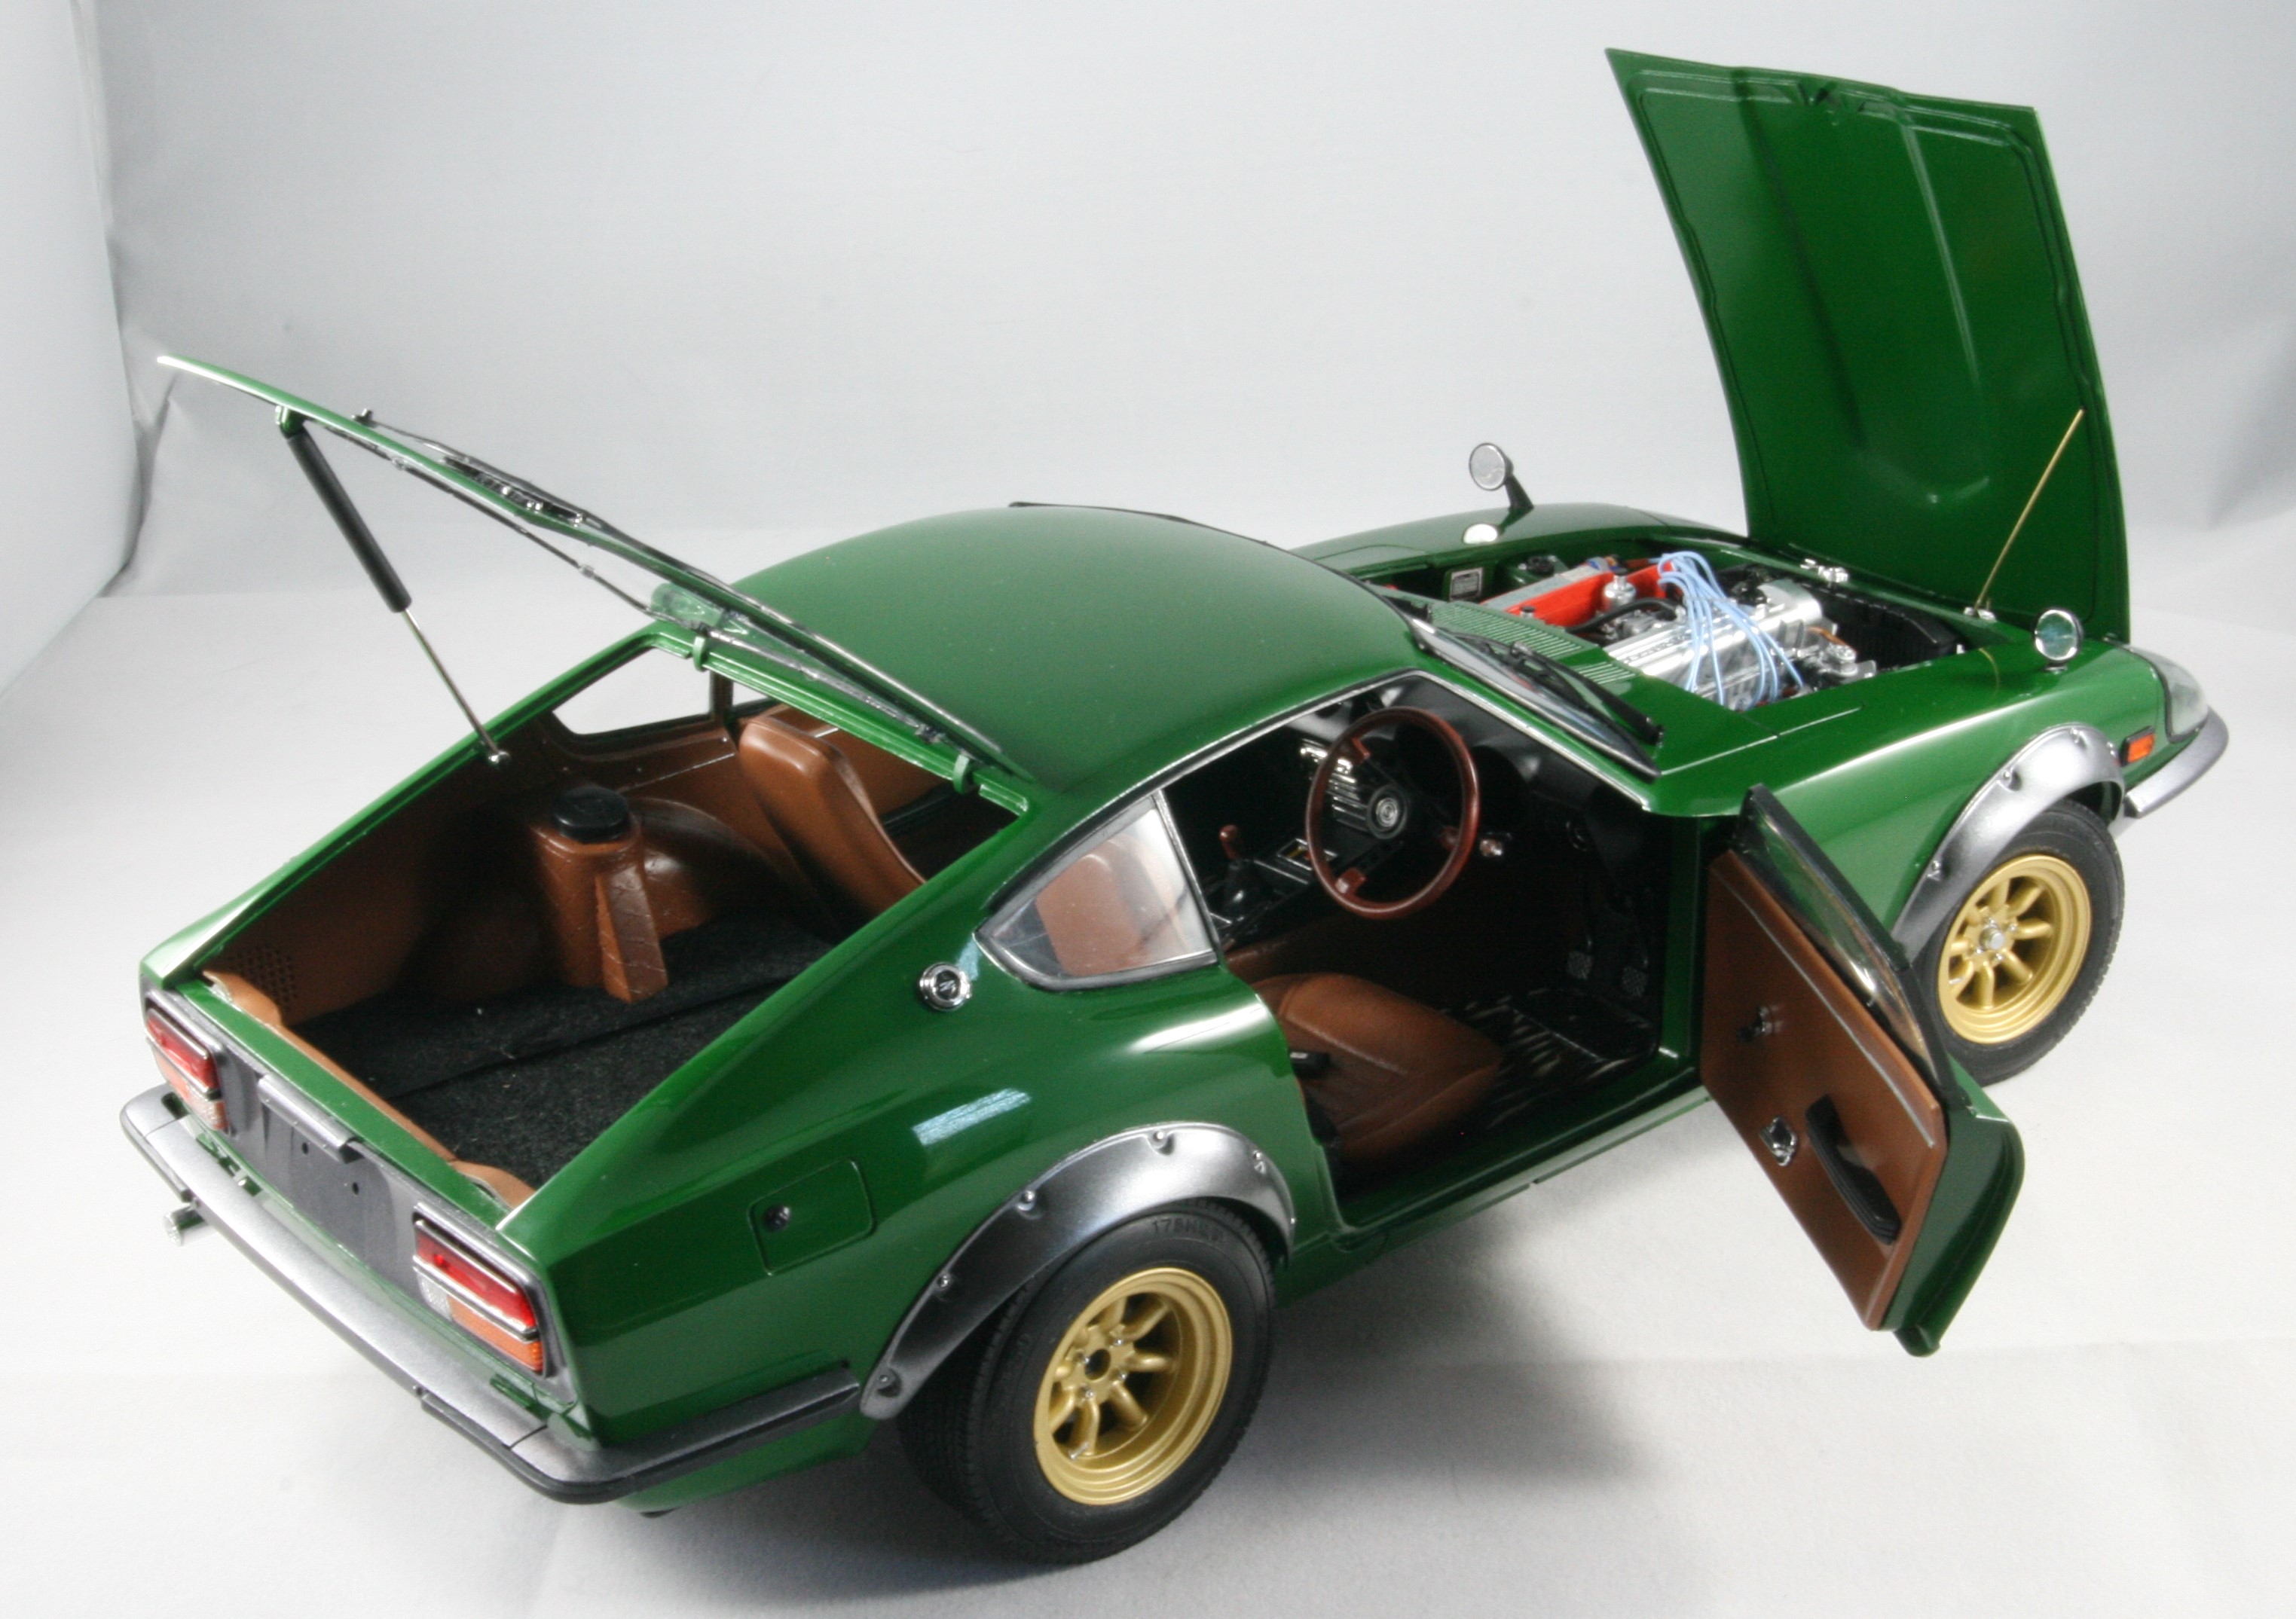
2017 was a pretty productive year... I had been in a bit of a slump but decided this year to start thinning out the stash a little and to get some great projects out of my head and into my display case. Fujimi Enthusiast 356 Speedster... my first use of Molotow Chrome Tamiya Mercedes 300SL Gullwing... Scale Motorsport plaid upholstery decals, HRM Rudge wheels Tamiya Karmann Ghia... scratchbuilt luggage rack, Fuchs wheels from a Fujimi 911 kit, Weber carb setup Tamiya Fiat 695 Esse Esse- custom Weber setup, wrapped headers, scratchbuilt engine cover braces Monogram Lotus Esprit 300- box stock Tamiya Ferrari F50- Hobby Design PE kit Revell Mercedes SLS AMG... Hobby Design PE kit And the latest... Tamiya 1/12 scale Datsun Fairlady 240ZG... build thread in Big Boyz Not too shabby!
-
Favorite Movie 2017, which one for you?
jaymcminn replied to 10thumbs's topic in The Off-Topic Lounge
Thor: Ragnarok. Enormously fun from the first scene to the last post-credits scene. Taika Waititi took the sense of humor he showed in "What We Do in the Shadows" and made it work on a much grander scale. Dunkirk was excellent as well... Christopher Nolan took a step back from big, bloated sci-fi to deliver a lean, mean war movie that kept the viewer on edge. It shows that this was a real passion project for him. -
Magic, this stuff. Given that it mostly gets used for small detail parts and windows, I'd guess that 40% of any given model (based on the number of parts) I build is held together with MKK. I use it for mockups, windows, gluing parts to toothpicks for painting... you name it. It gets used for small lenses like instruments and turn signals too.
-
Nice single-action brush. Works really well with pearls, metallics and candies. Make sure to agitate your bottle as you spray to keep the solids from settling to the bottom. It works best for exactly what you're planning on using it for. Good luck!
-
1/12 Tamiya Datsun Fairlady 240ZG... Under Glass!
jaymcminn replied to jaymcminn's topic in WIP: Model Cars
THanks Henry! The battery had the connectors molded in... I drilled holes into the top of the battery at a 45 degree angle to the connector to attach the leads. The carpeting was done three ways... the black carpet in the passenger compartment was flocked, the cargo compartment cover is an adhesive-backed felt fabric cut to size, and the mats were embroidery cord twisted together and coated with white glue. -
That's a great idea, Bob. The only thing I am less than thrilled with on my current setup is the lack of reflections in the photos... i'm going to give this a shot!
-
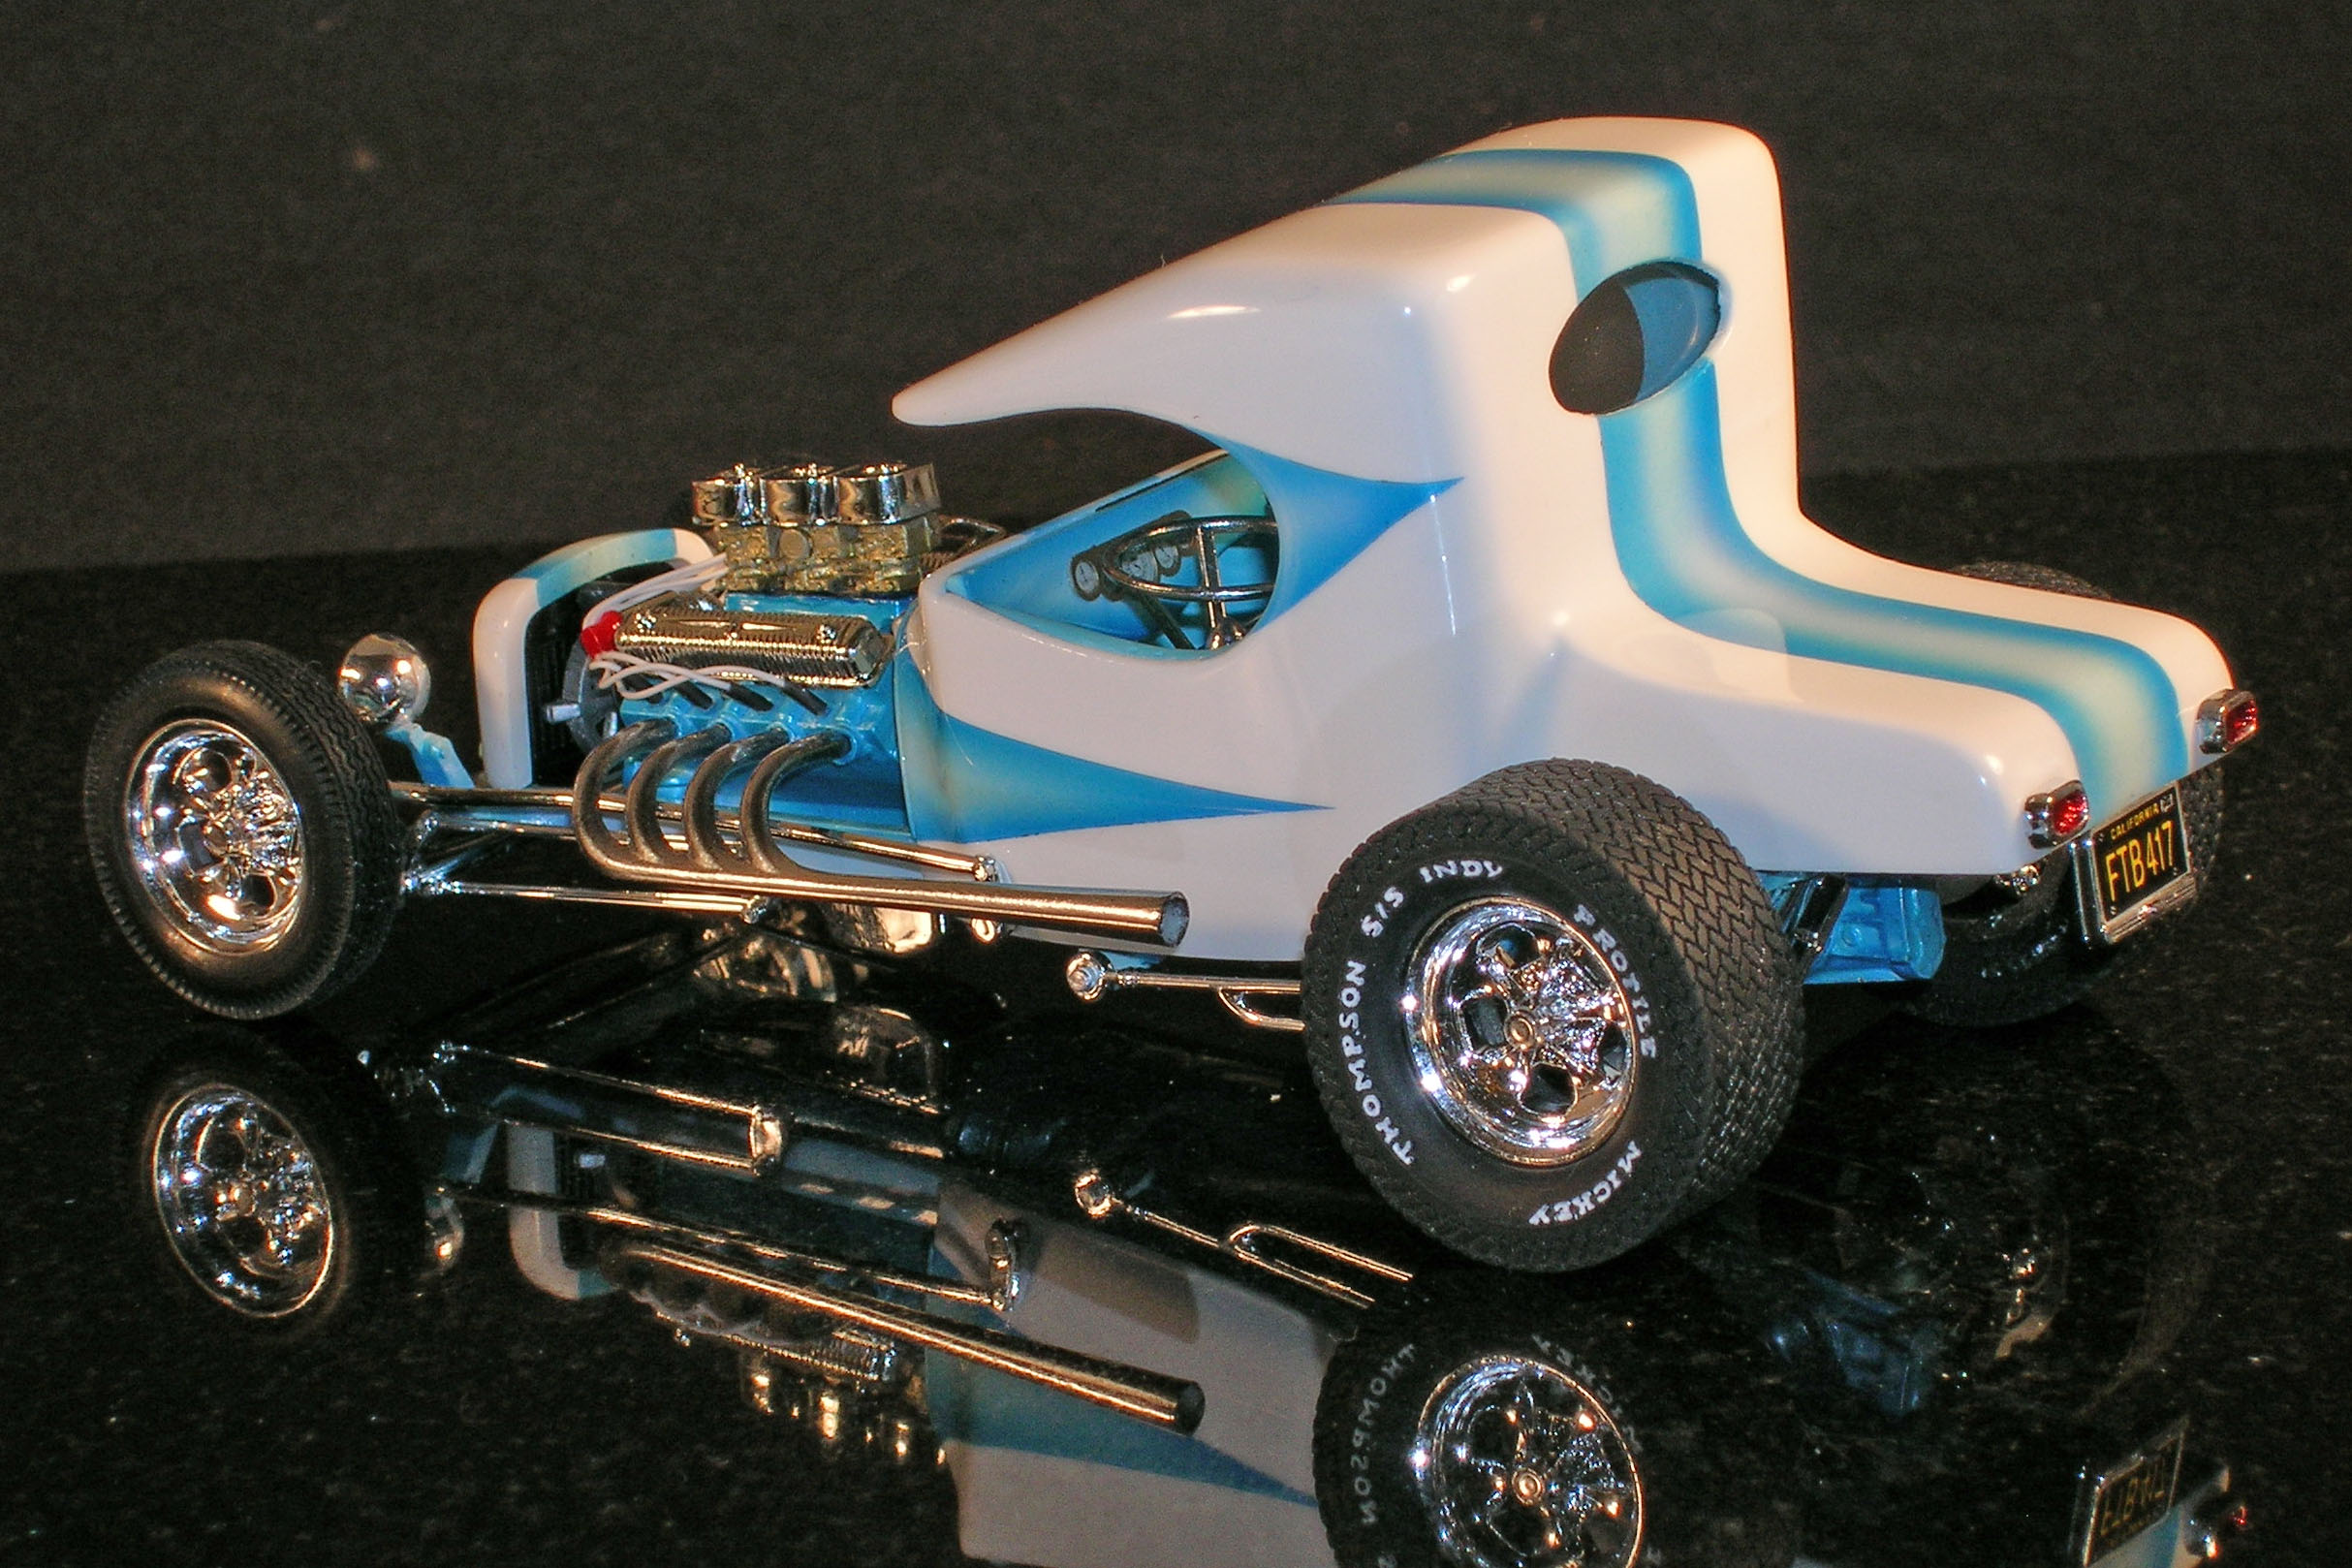
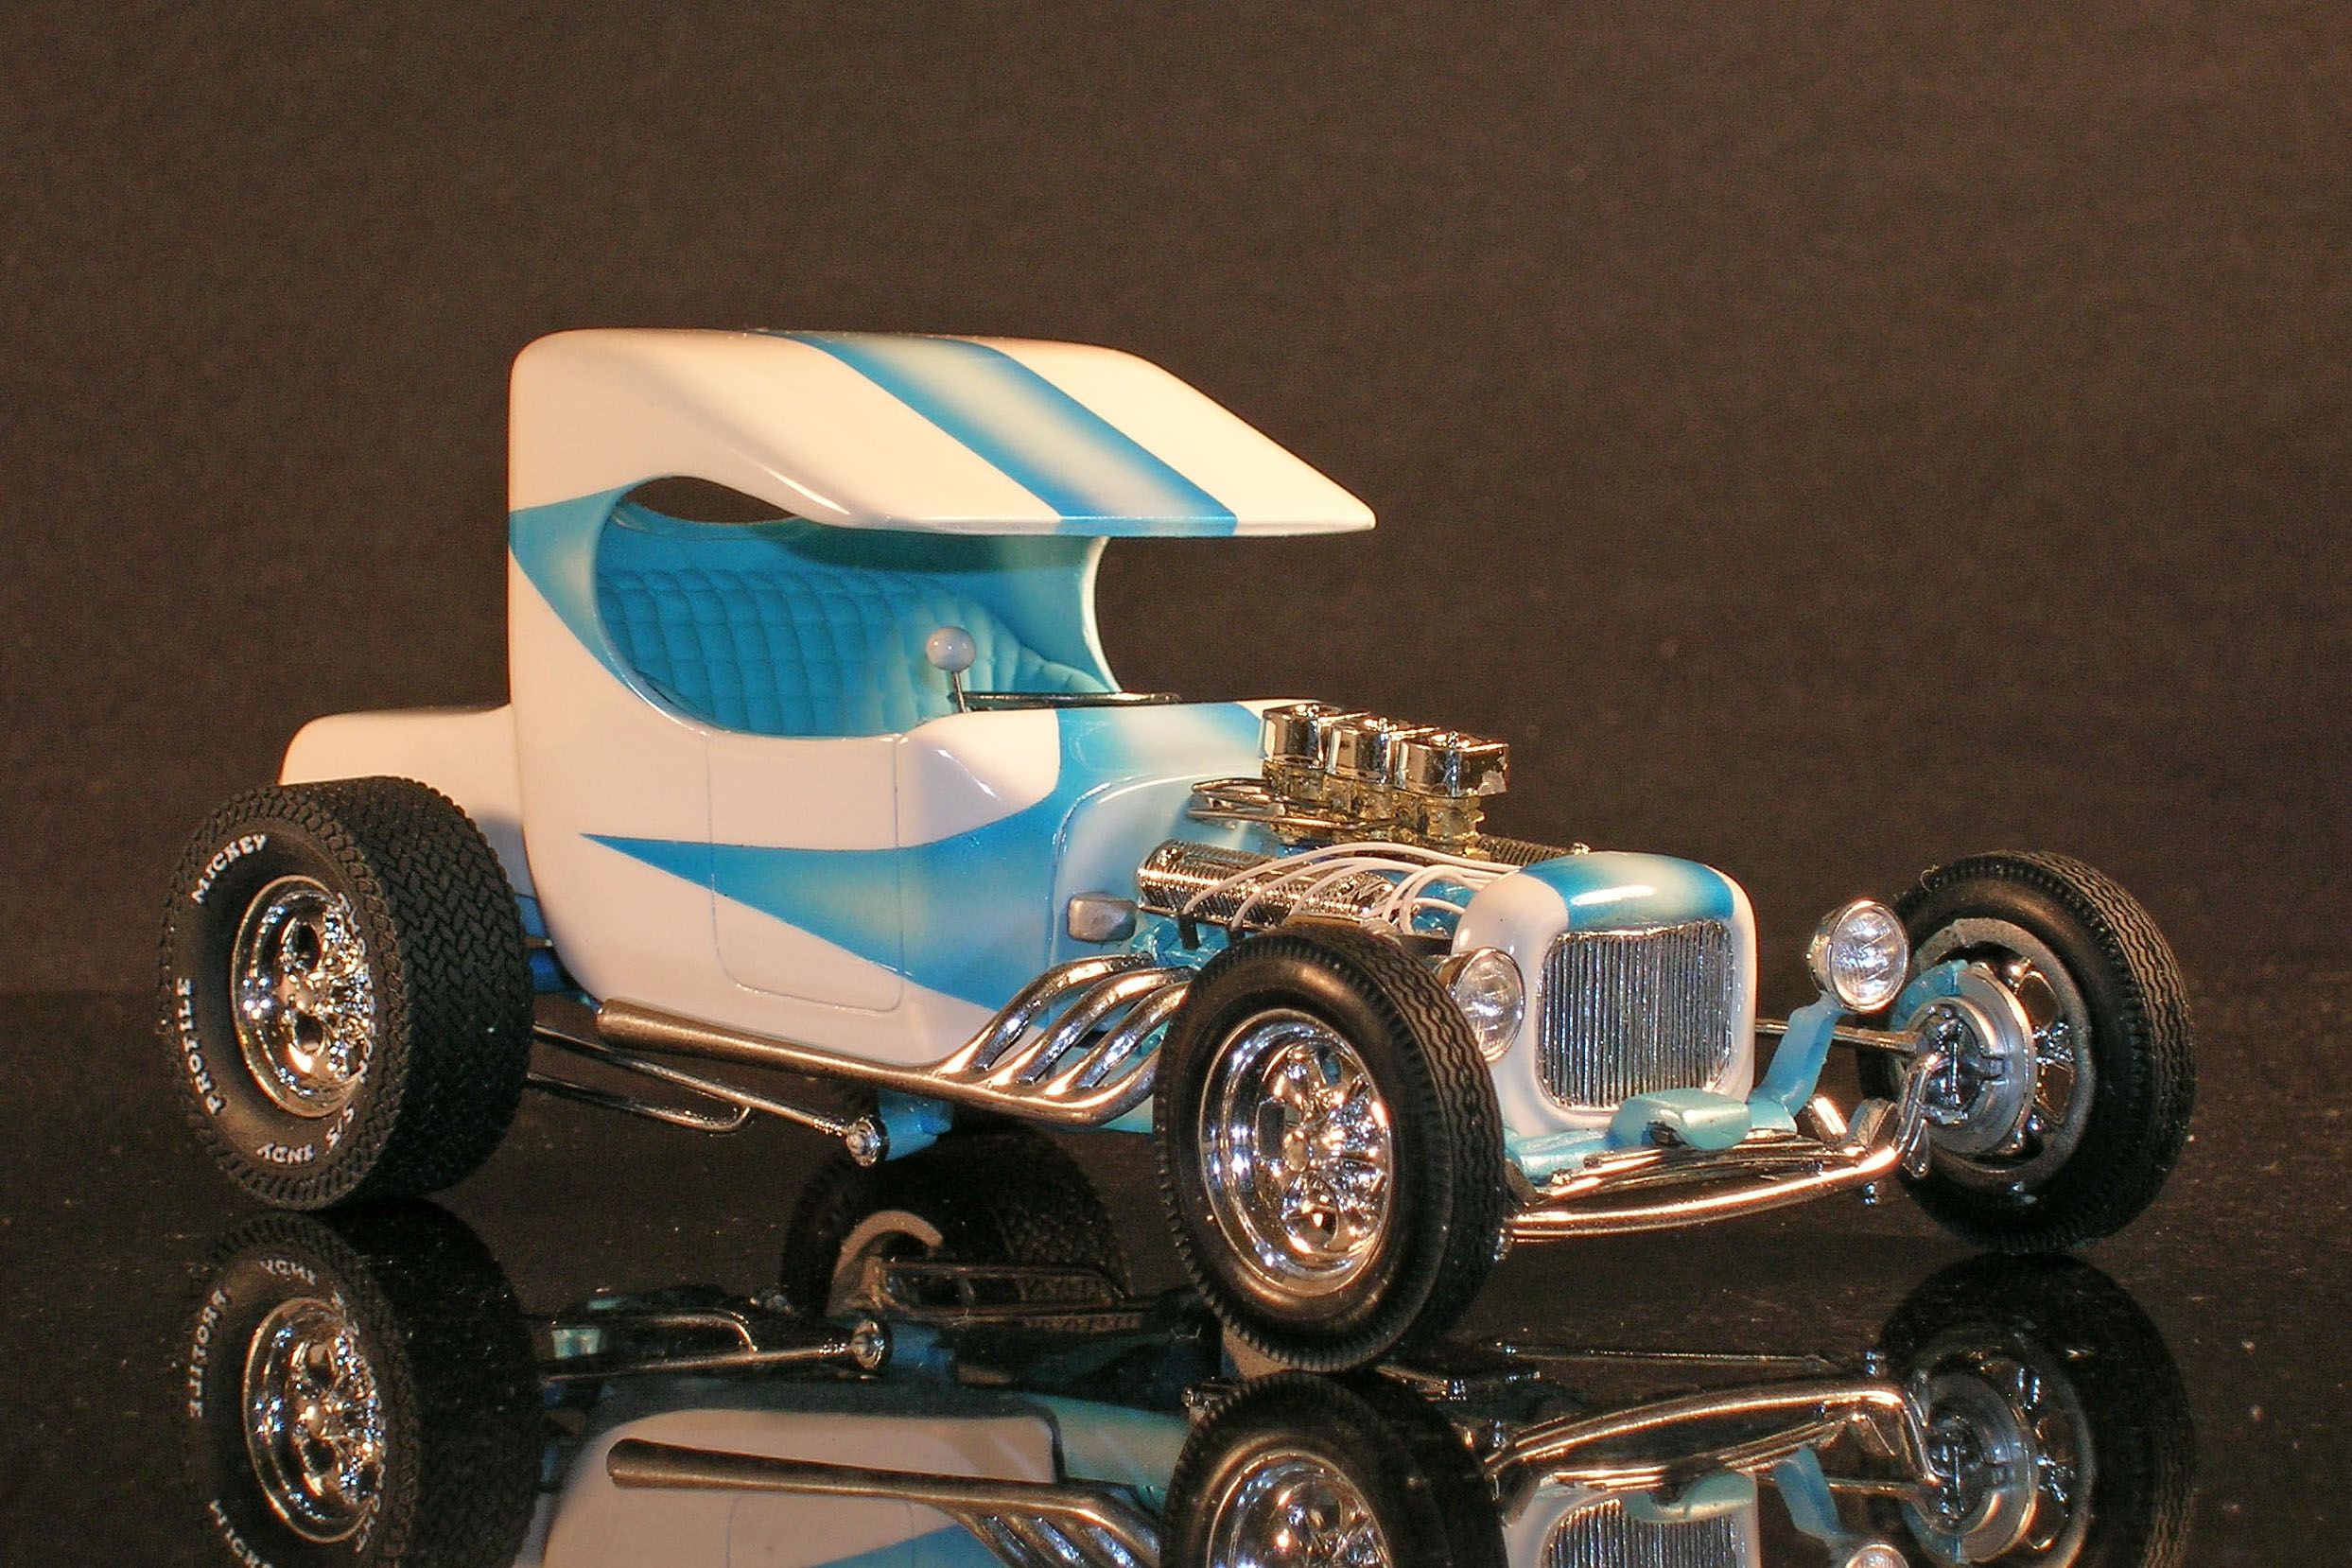
I built this one using mostly AMT '25 Ford parts several years ago. I molded the top to the body and gave it a custom c-cab look. I was going for a late '60s vibe.
-
I'm a big fan of using a flat file to sharpen up the edges of trim... it's part of my body prep on practically every kit I build. Make sure your file has the cutting surface on the flat surface only and not the edges to keep from gouging your bodywork. Go slow and constantly check your progress. Finish with a fine sanding stick or 800 grit sandpaper. This method provides nice sharp lines to foil against and also reduces the sometimes-too-thick look of kit trim. As always, practice on something you don't care about before tackling something rare or valuable!
-
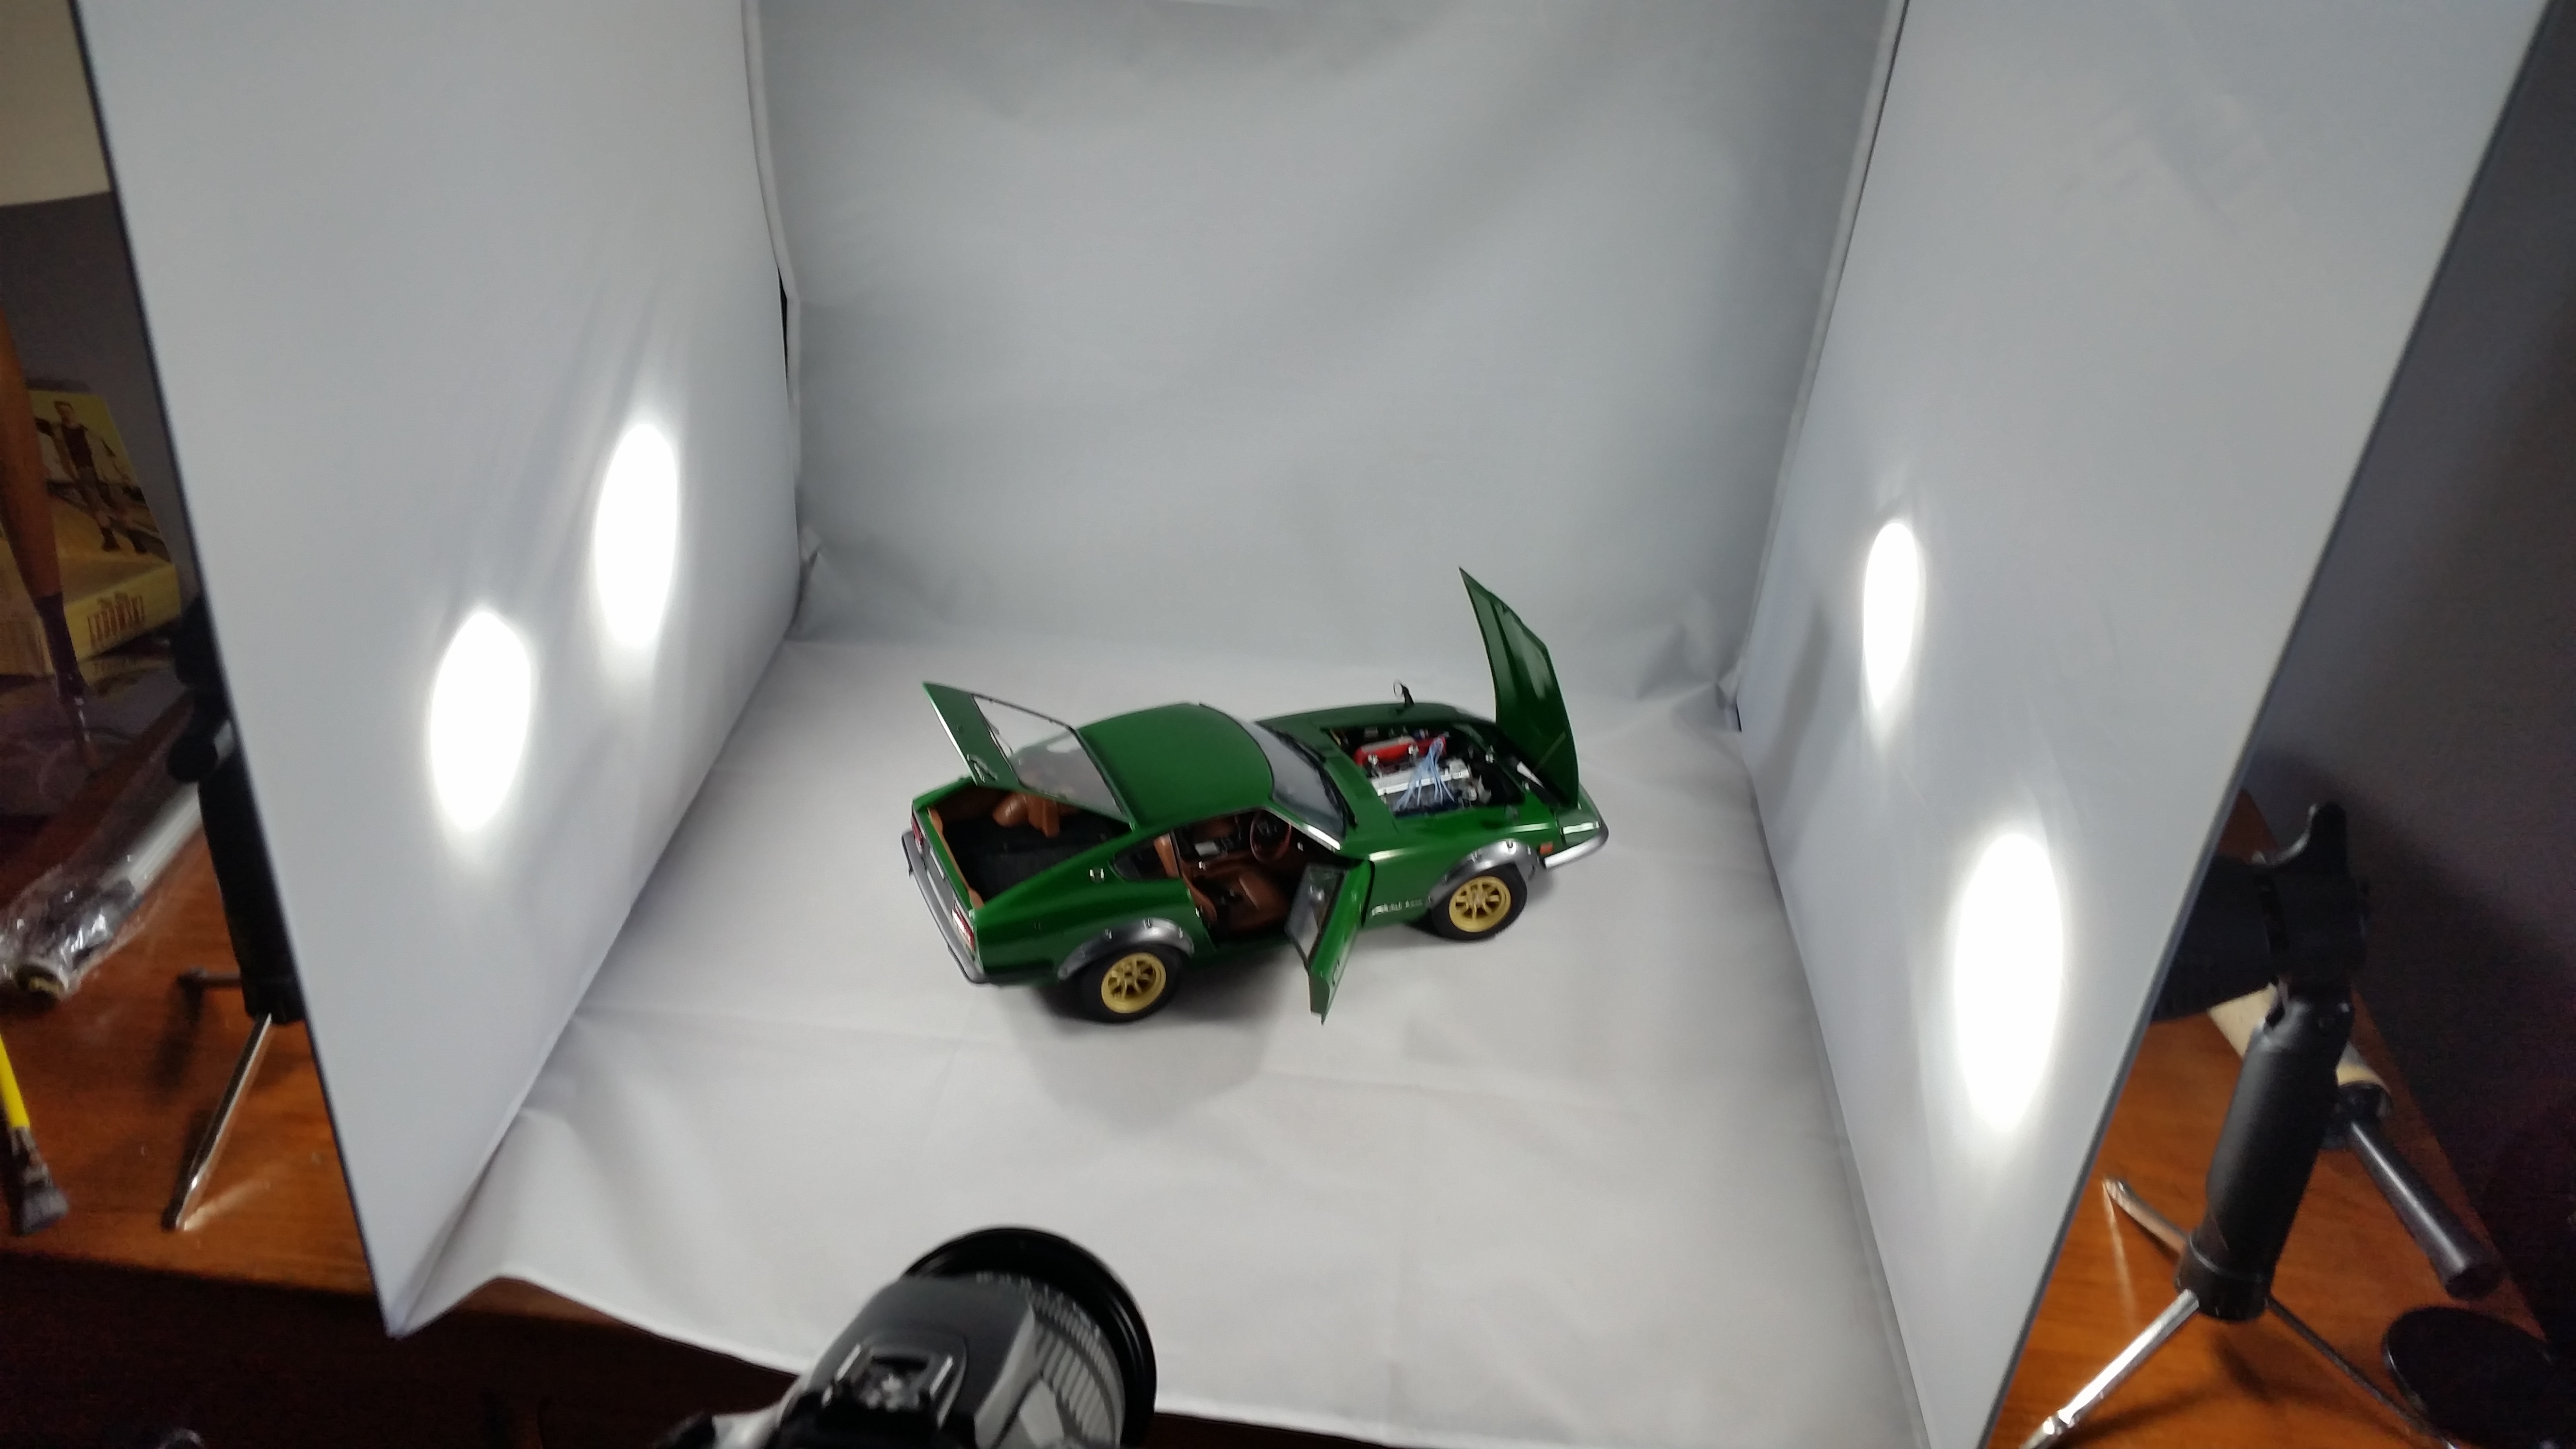
Thanks Bernard! I like a good black background shot... they're a lot more dramatic than plain white. I like to include both when I post up pics to break up the monotony. The kit's fabric background sweeps are indeed flocked and are very low reflectivity... I didn't have to mess with the backgrounds in these shots at all other than cropping. One of the things I like about the 24" setup is that you'll rarely see the sides of the enclosure when shooting a 1/24 model. Even 1/12 scale models like the Z fit well enough.
-
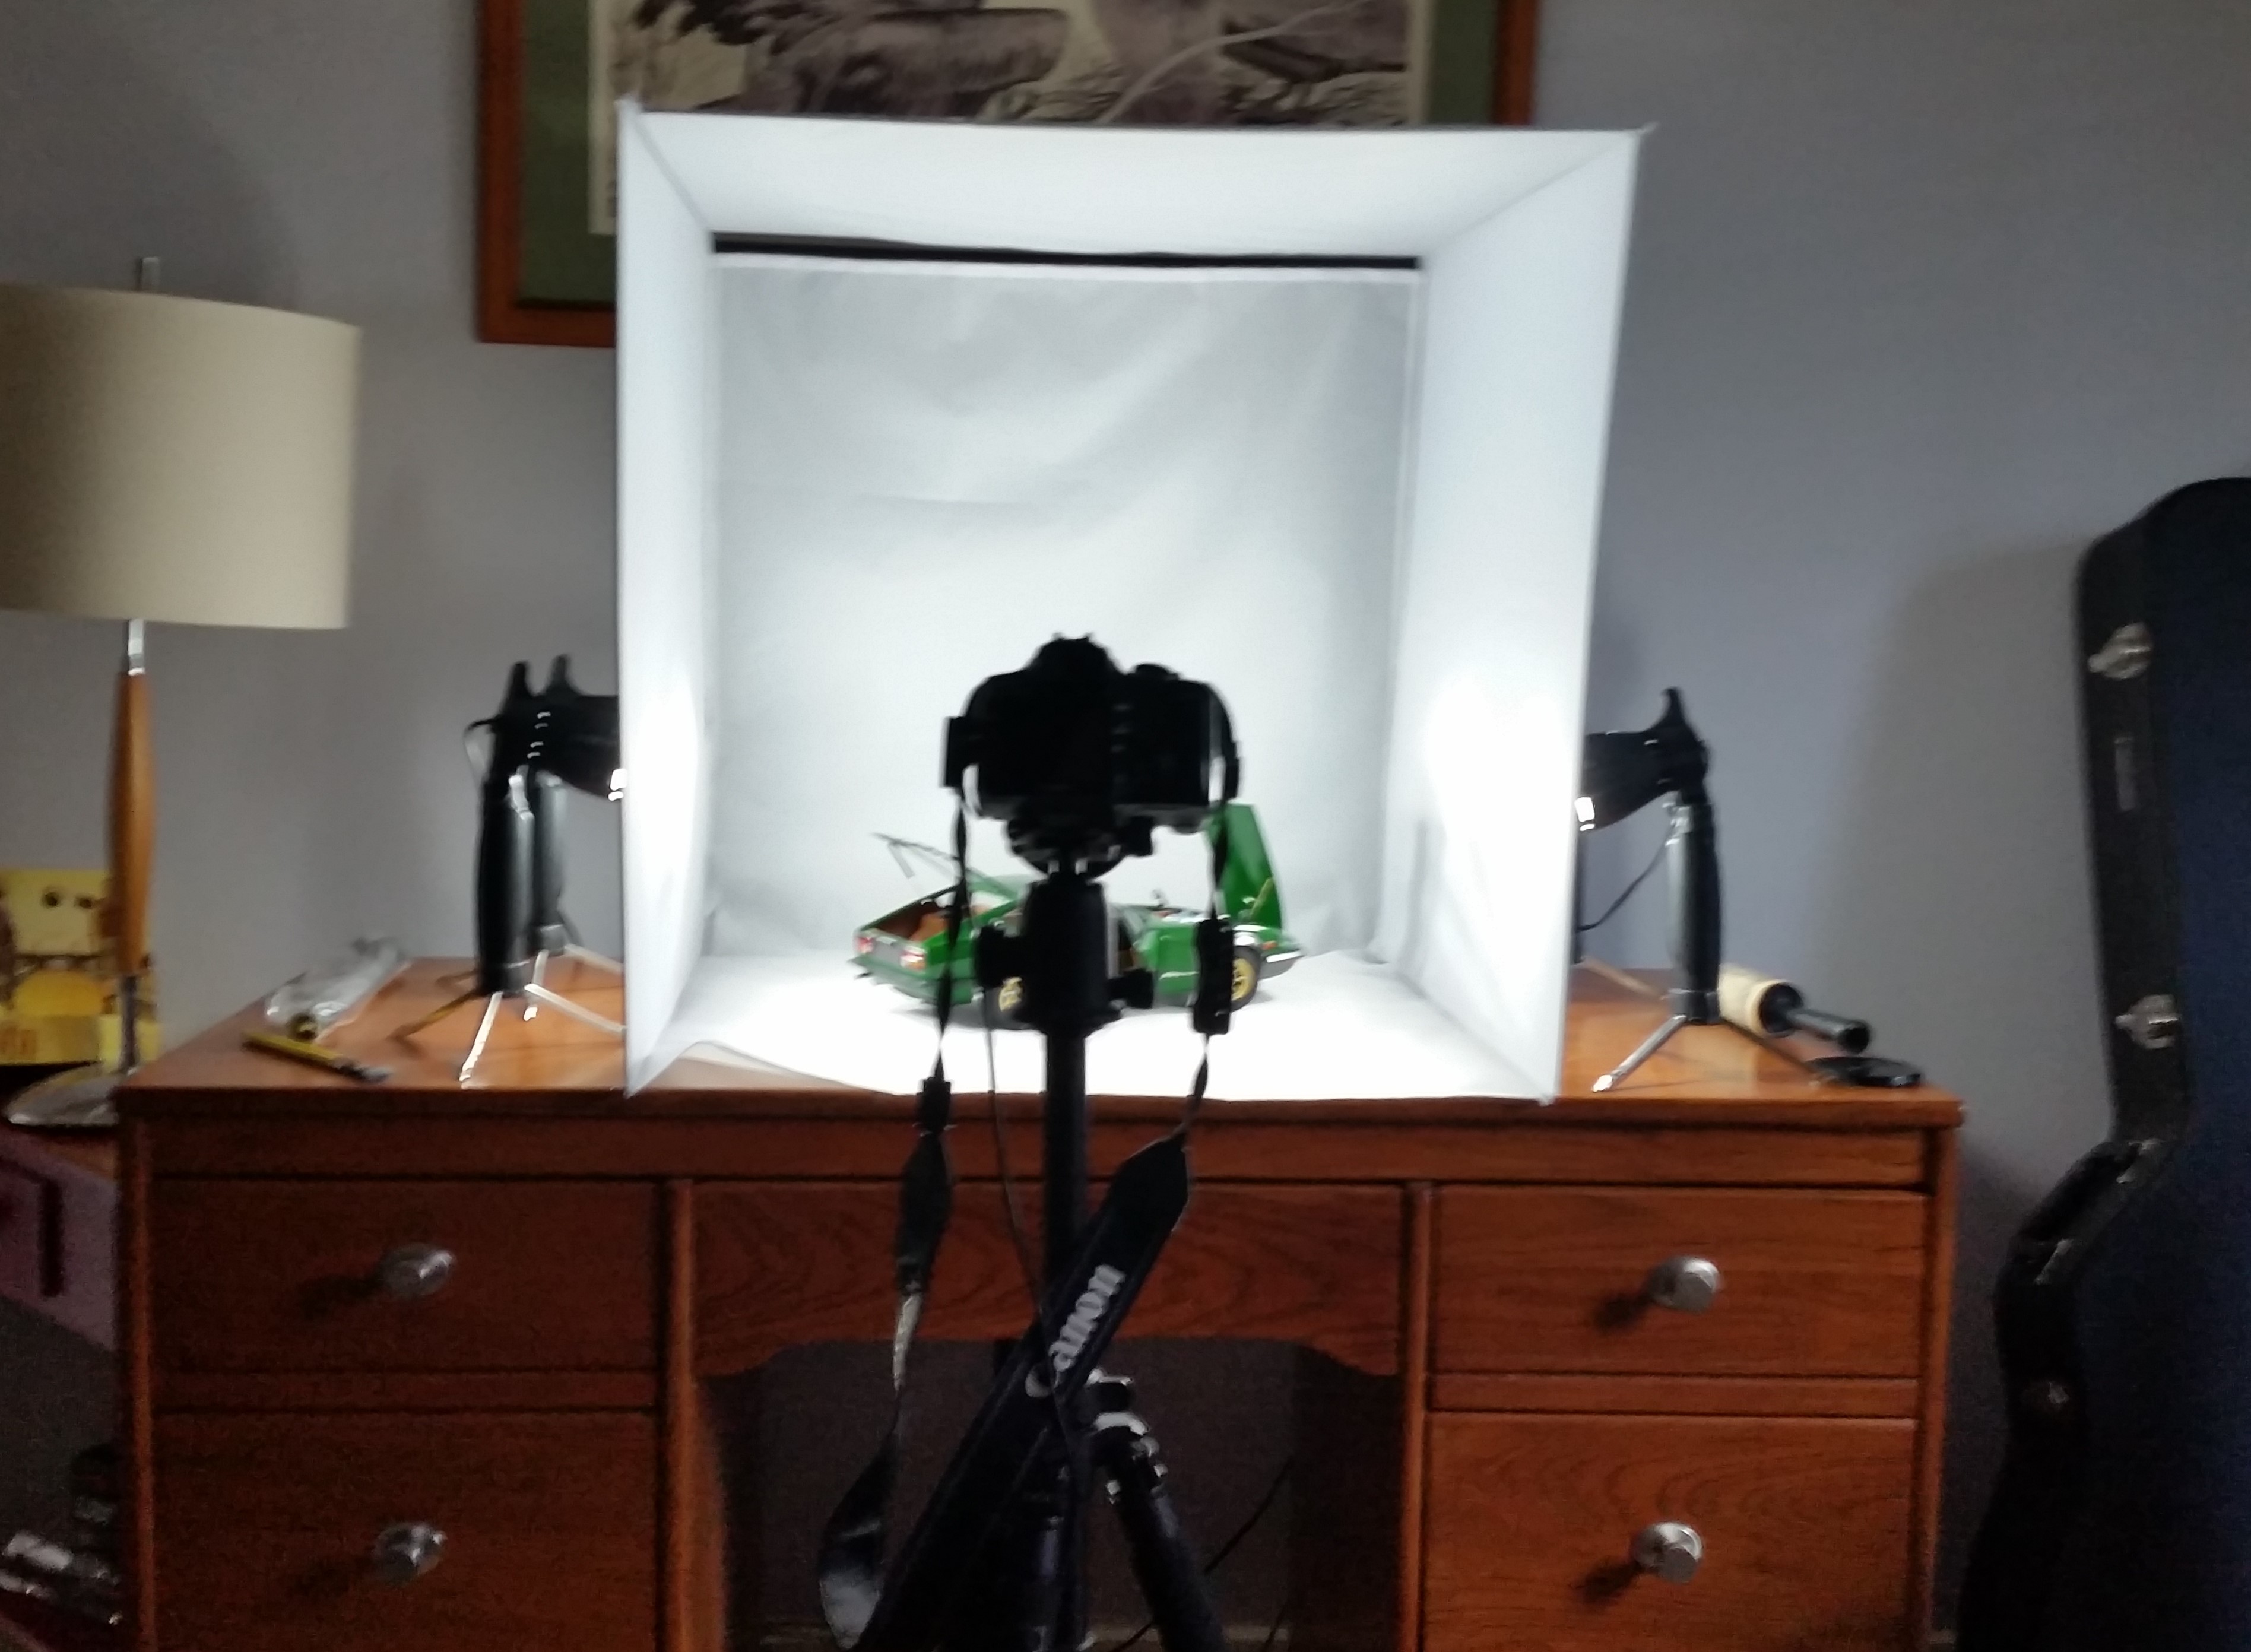
Thanks Jim! I'm actually going to rig up a clamp light holder for overhead lighting. The lighting could definitely be brighter... I have to shoot with a fairly slow shutter which leads to more "graininess" than I'd like.
-
You have to play with the light positioning a lot depending on exactly how you want your subject lit. The distance of the lights from the sides affects both the intensity and harshness of the lighting. Digital photography is your friend... keep playing until you get some shots that work! Here are some shots from the "under glass" shoot of my 1/12 scale Datsun 240ZG.
-
https://www.amazon.com/gp/product/B01N5O9D0Z/ref=oh_aui_detailpage_o07_s00?ie=UTF8&psc=1 Unfortunately, it looks to be out of stock right now. Hopefully they get more in... the smaller ones look nice, but the extra size comes in handy!
-
Great story, and an incredibly well-built model. It's always impressive when something with the amount of scratchbuilding that you put into this looks as clean as this does. Breathtaking!
-
Great job so far. I built this kit a few years back and absolutely love it!