Tommy124
-
Posts
1,648 -
Joined
-
Last visited
Content Type
Profiles
Forums
Events
Gallery
Everything posted by Tommy124
-
Same here!
-
 I figured it was about time to get me some Jo-Han kits. It was my 50th birthday some days ago, but some presents you'll just have to give to yourself. The Javelin is an opened but complete and non-built kit which I managed to get on eBay Germany. The Superbird is mint and boxed with foil, that one came from the States...
-
Nothing short of a beauty! Very, very well done!
-
OK Dann, now show us the BUILT one! Joking aside, this looks very real! From my own experience I know that it's not so easy to make them small trolley wheels look good. What did you use for them? Styrene rods cut in slices?
-
Always nice to see a Fujimi Enthusiast Model finished. You did well on this, congrats! But you should show the V12 too!
-
Looks great and that color scheme is a welcome change!
-
Beautiful result, as are your other 32'ers!
-
How Do You Fit Warped Hood
Tommy124 replied to 69NovaYenko's topic in Model Building Questions and Answers
I agree, maybe a food dehydrator could be of some use for warming up the plastic in this case. With it's possibility to create a continous and controllable temperature window, I gather this will be more effective than hot water, hairdryer etc. -
How to remove pin marks
Tommy124 replied to Scott Vinton's topic in Model Building Questions and Answers
Always wondered what non- rattle can surface primer was for... Thanks for the tip, I will try this one out. Filling the concave pin marks with regular putty, followed by sanding is such a tedious process imho. -
'71 Plymouth Satellite - restoration WIP images added!
Tommy124 replied to Tommy124's topic in Model Cars
Thanks, David. Guess that's the stuff that heroic restorations are made of? Stripping those old enamels can give you real a hard time. I remember that I simply couldn't strip off the interior paint when I did the resto on my old Maserati Boomerang build, no matter what chemicals I used. I painted some Revell enamels with no primer when I built it around 1990, so the paint had some real long time to eat into the plastic. Fortunately, this is the exception and most paints strip off real fine with the stuff I am using. Thanks to you too, Mr. B..., uh, Gene! -
Great model! I wasn't sure about the "bumper pinholes" first but they are correct!
-
Absolutely agree, great product. I used that primer for covering a body molded in BLACK with no problems:
-
'71 Plymouth Satellite - restoration WIP images added!
Tommy124 replied to Tommy124's topic in Model Cars
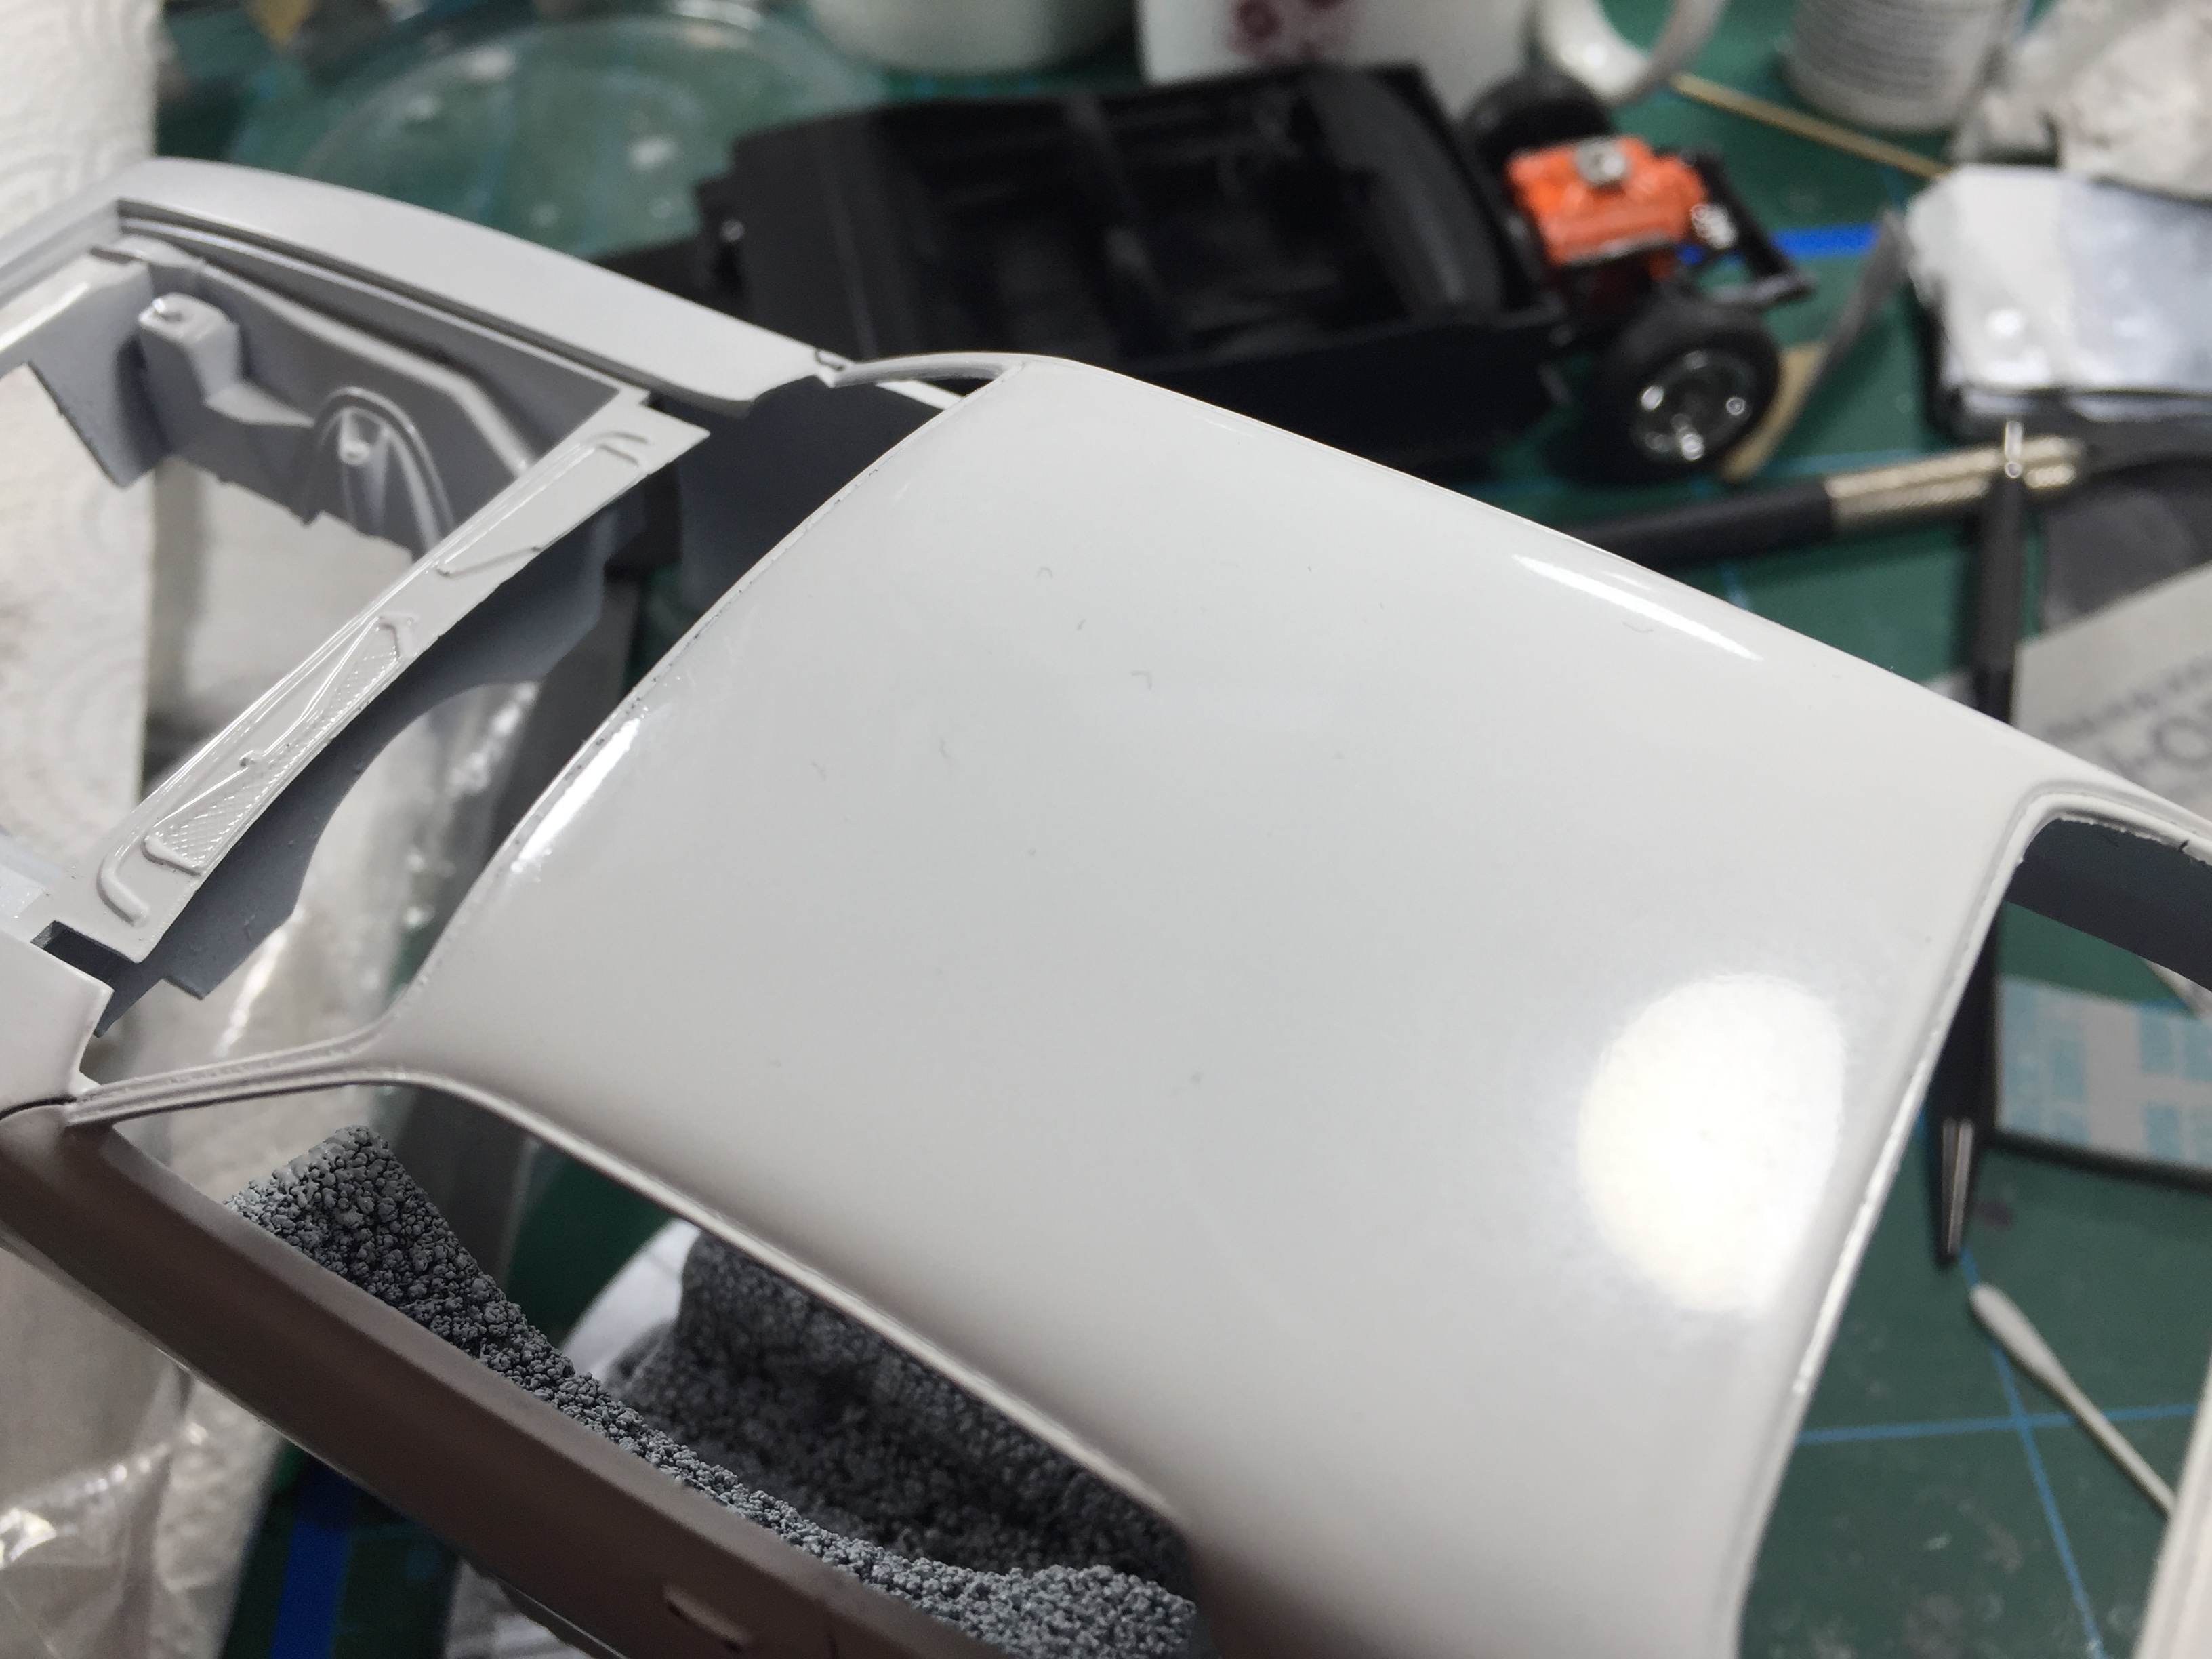
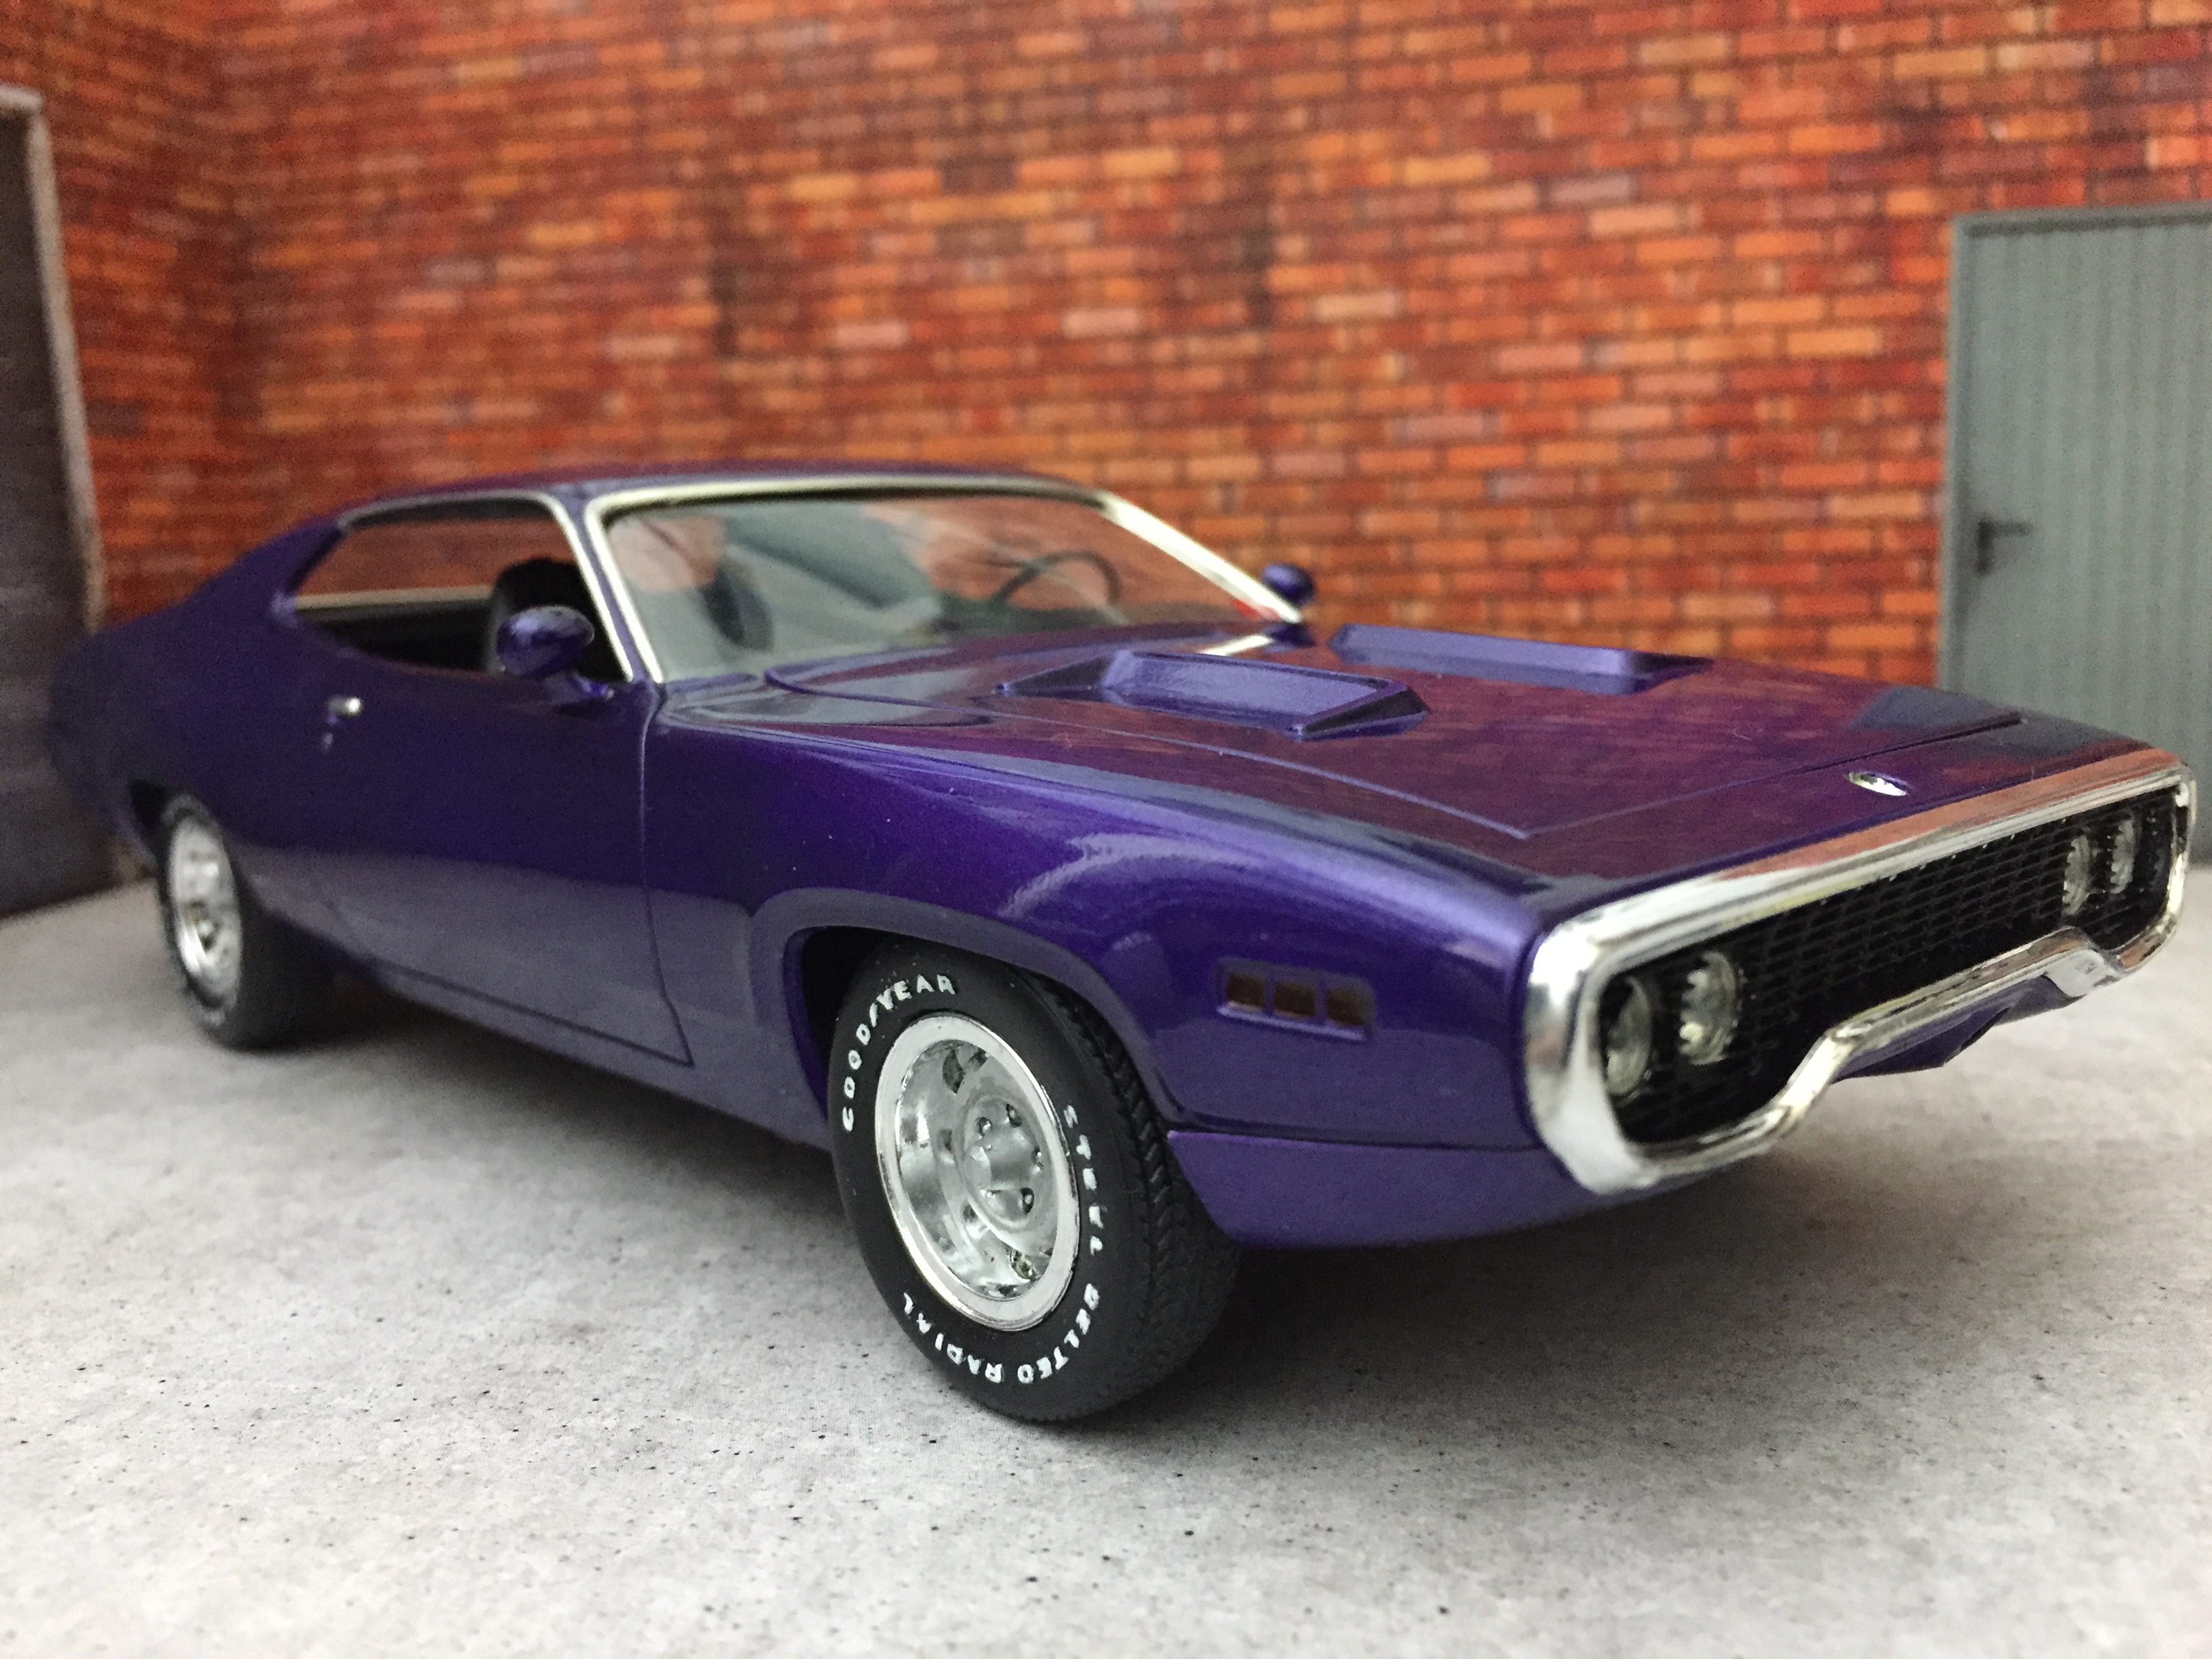
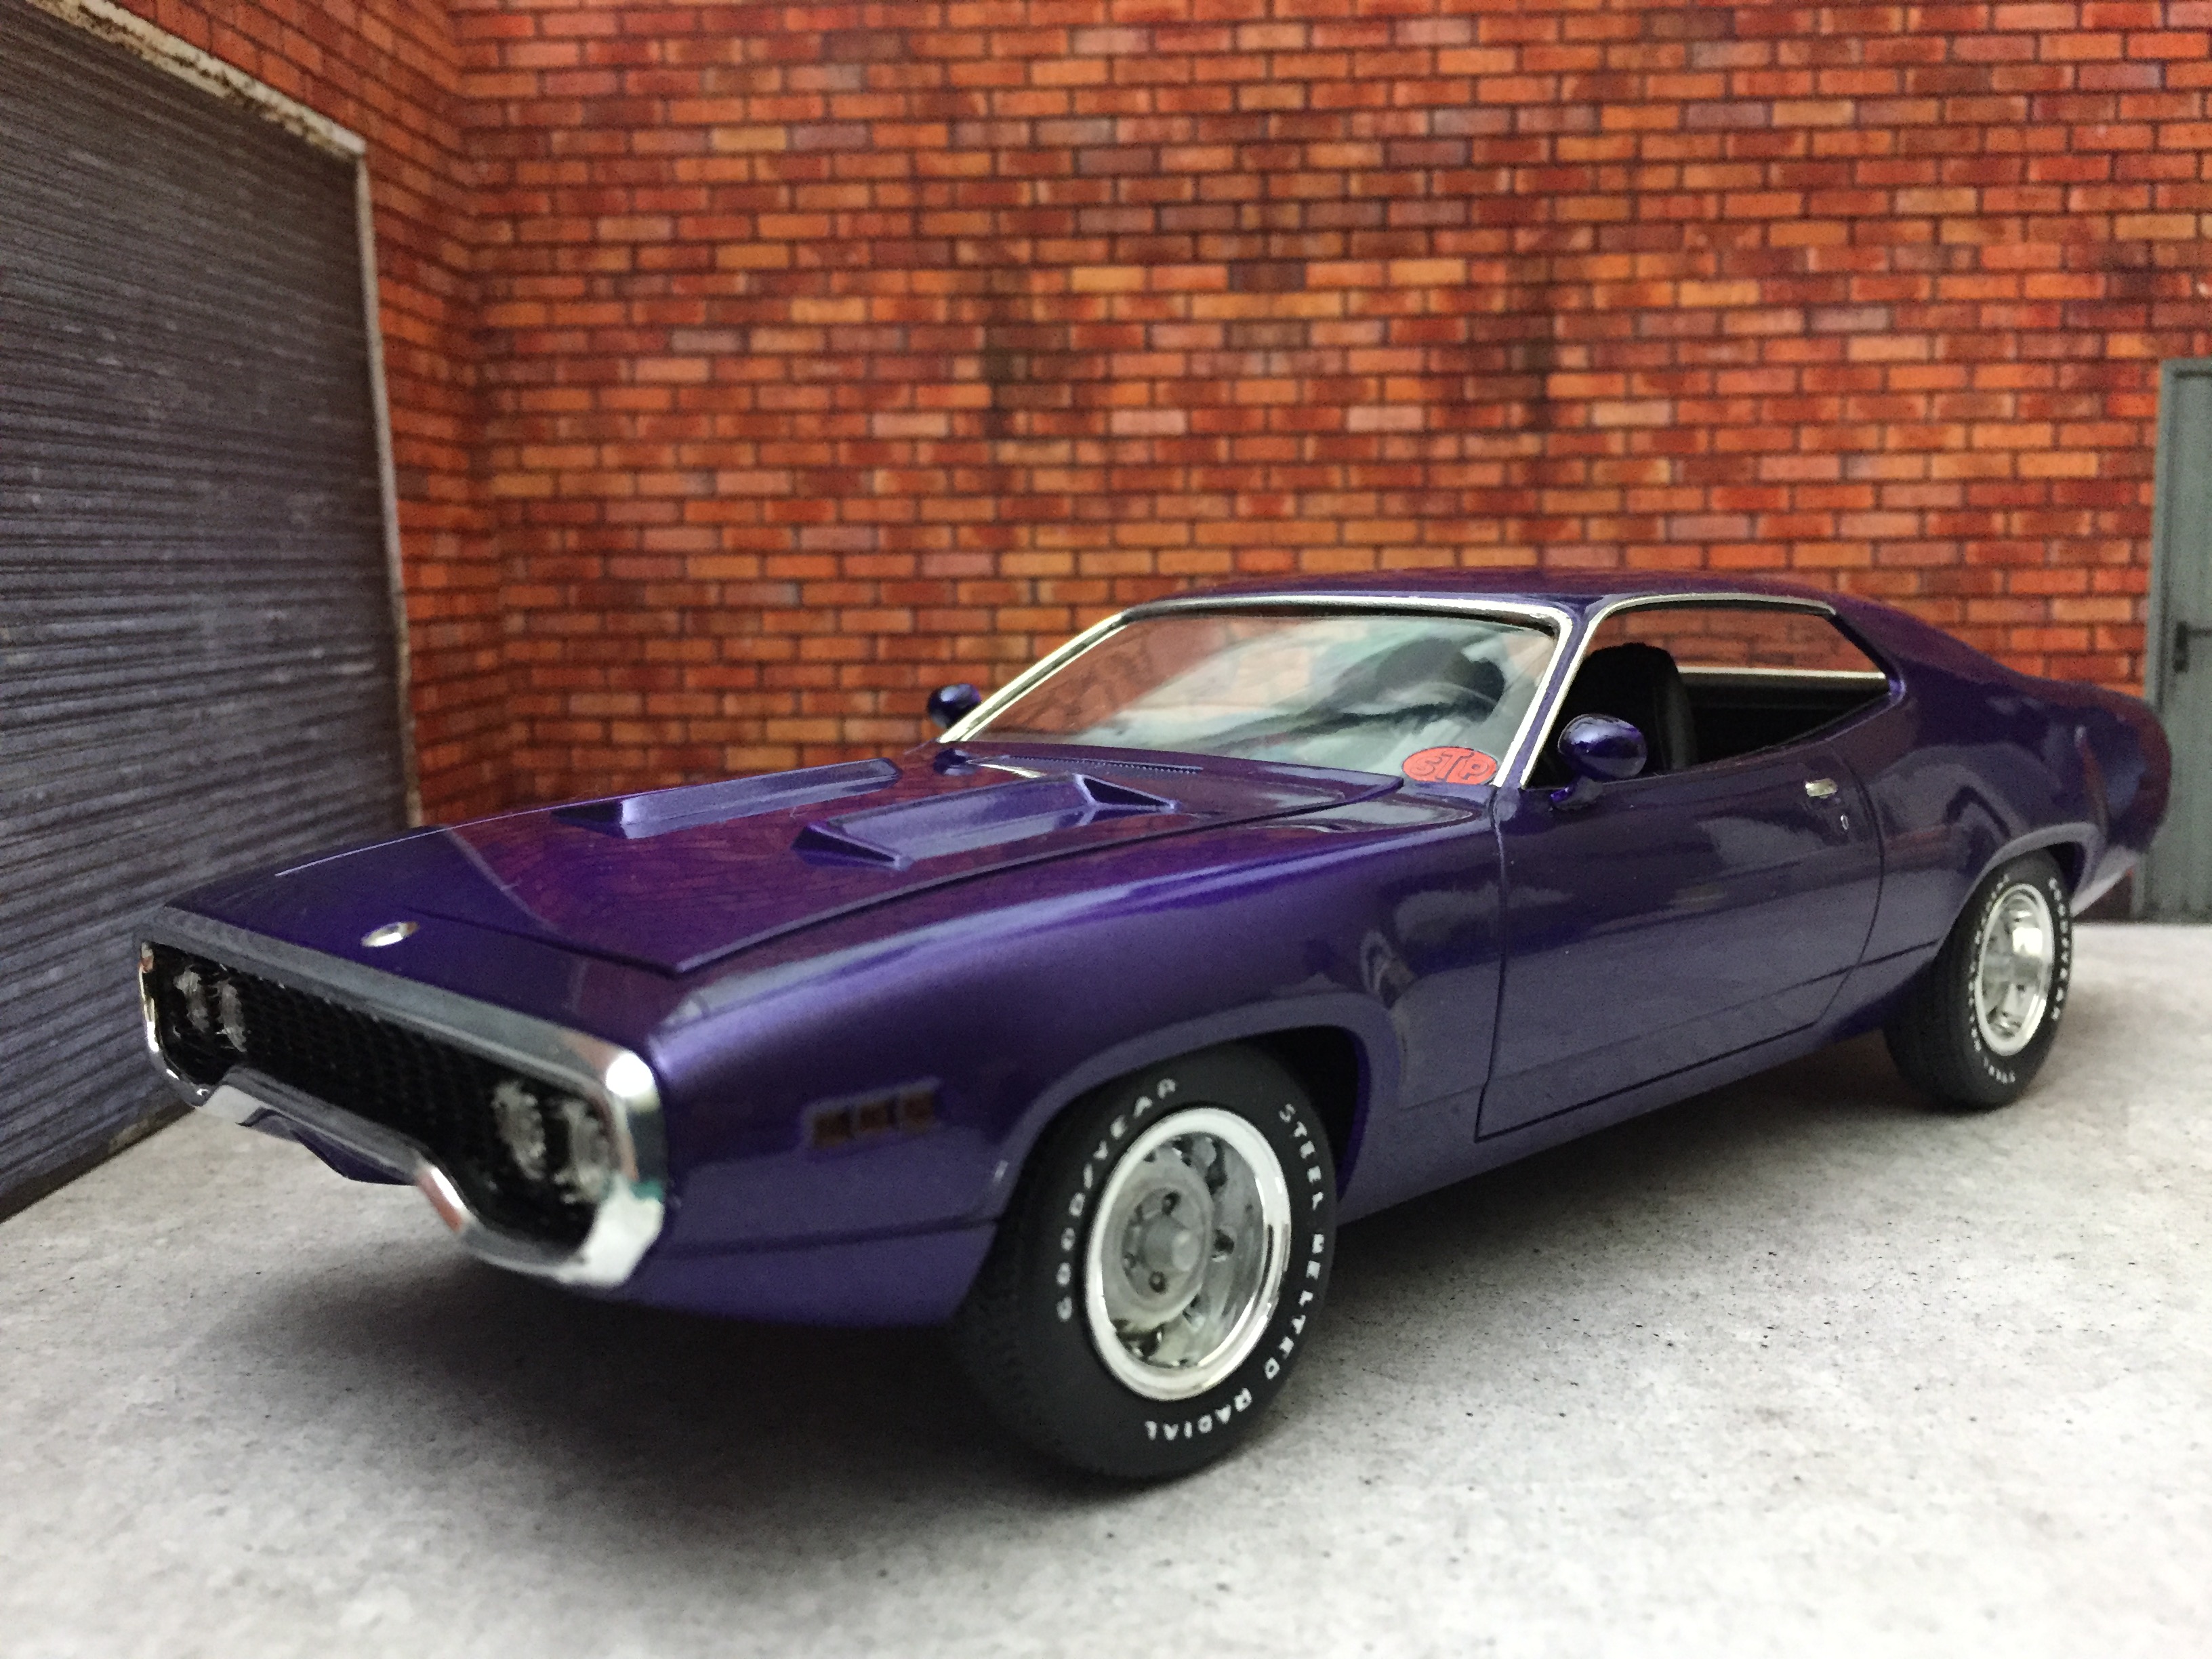
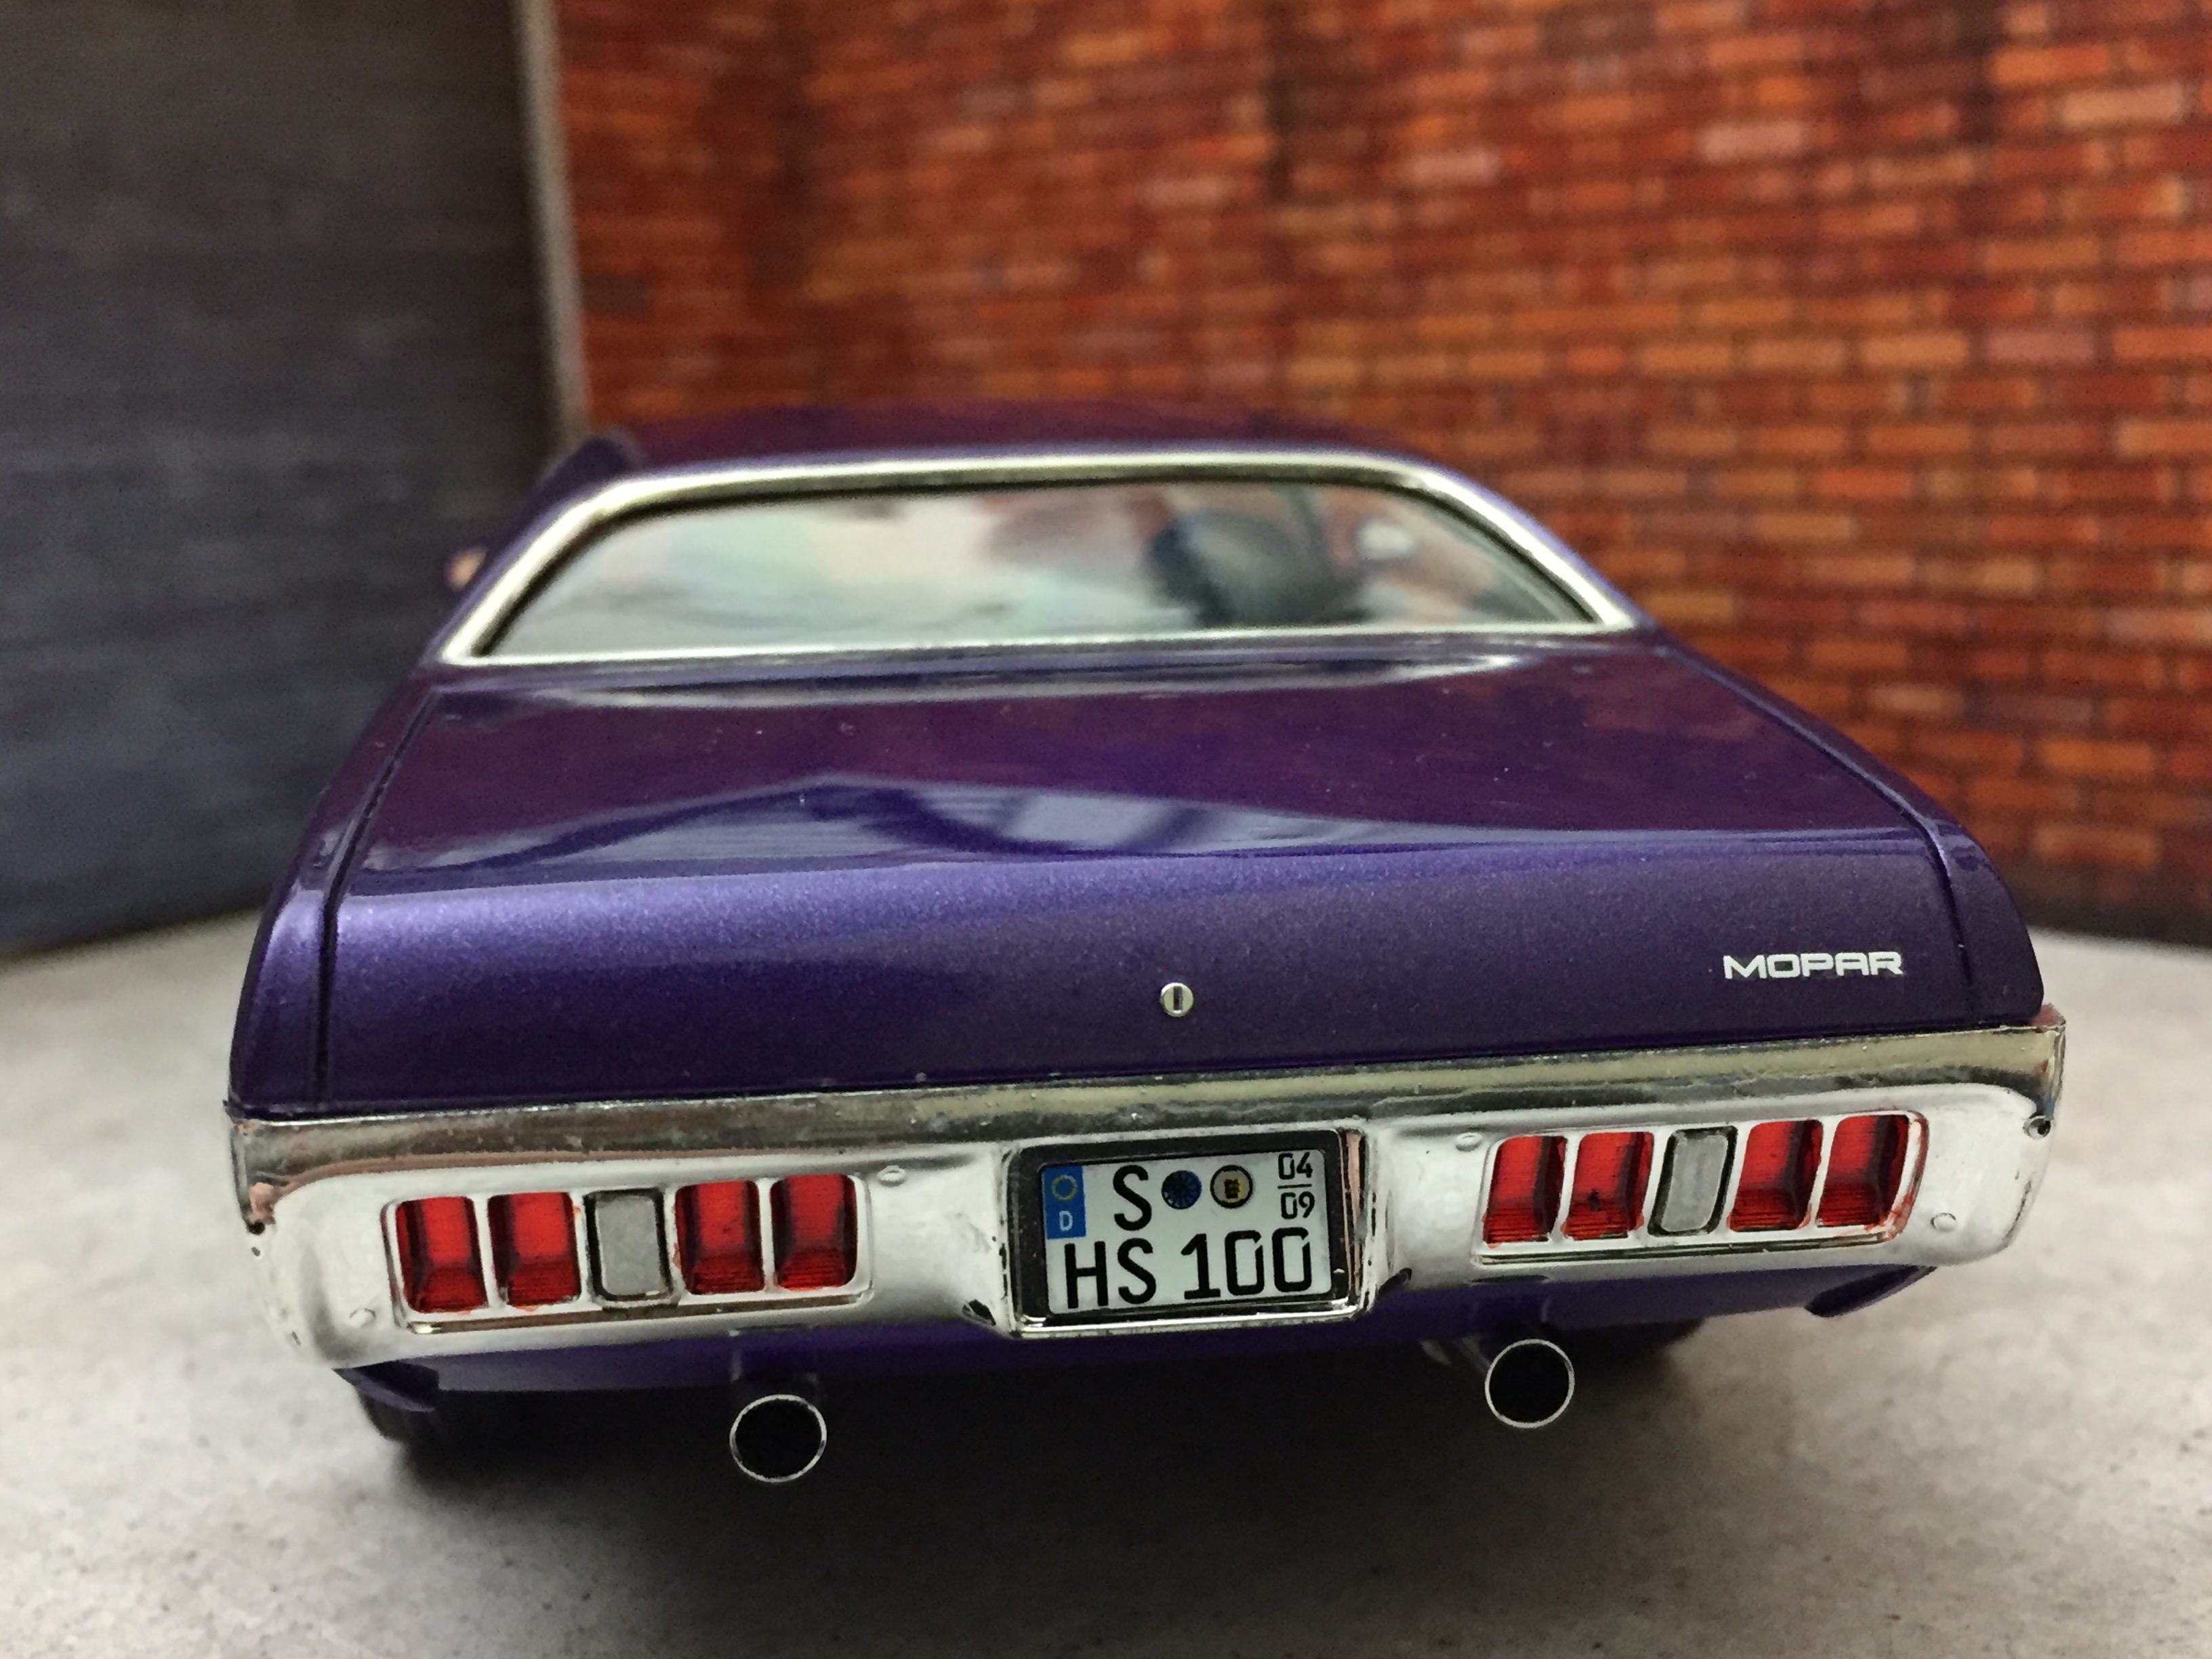
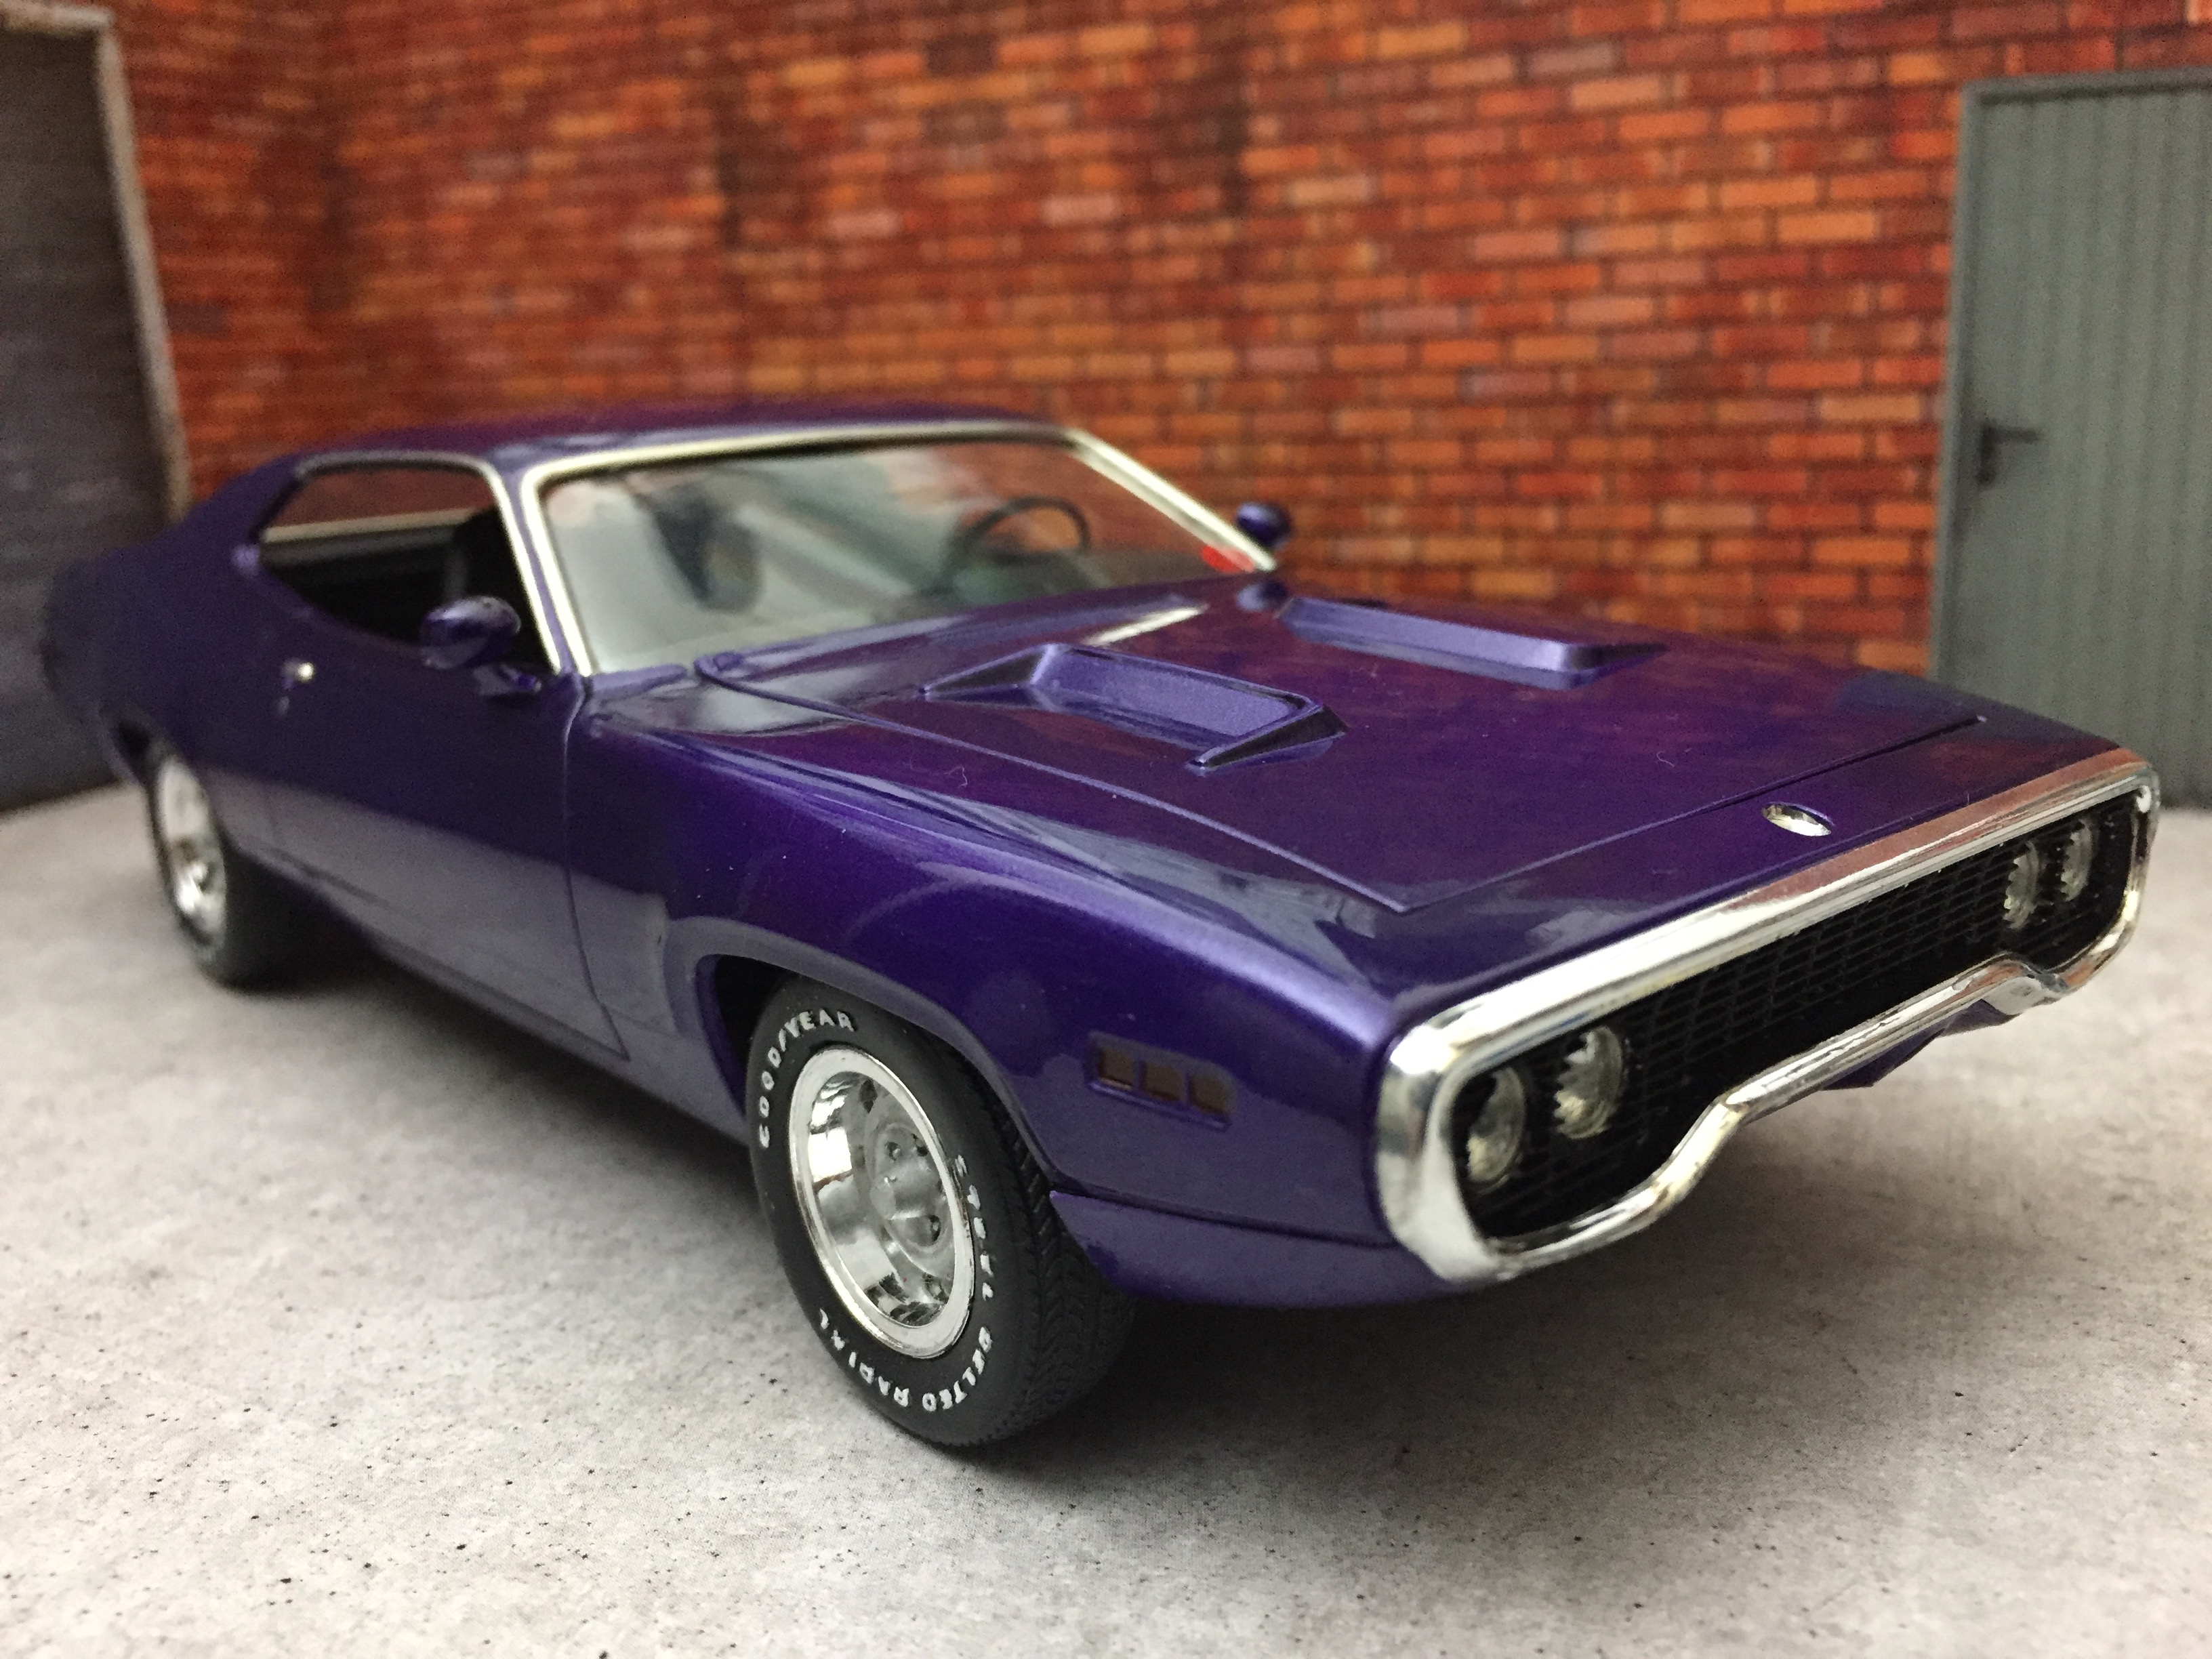
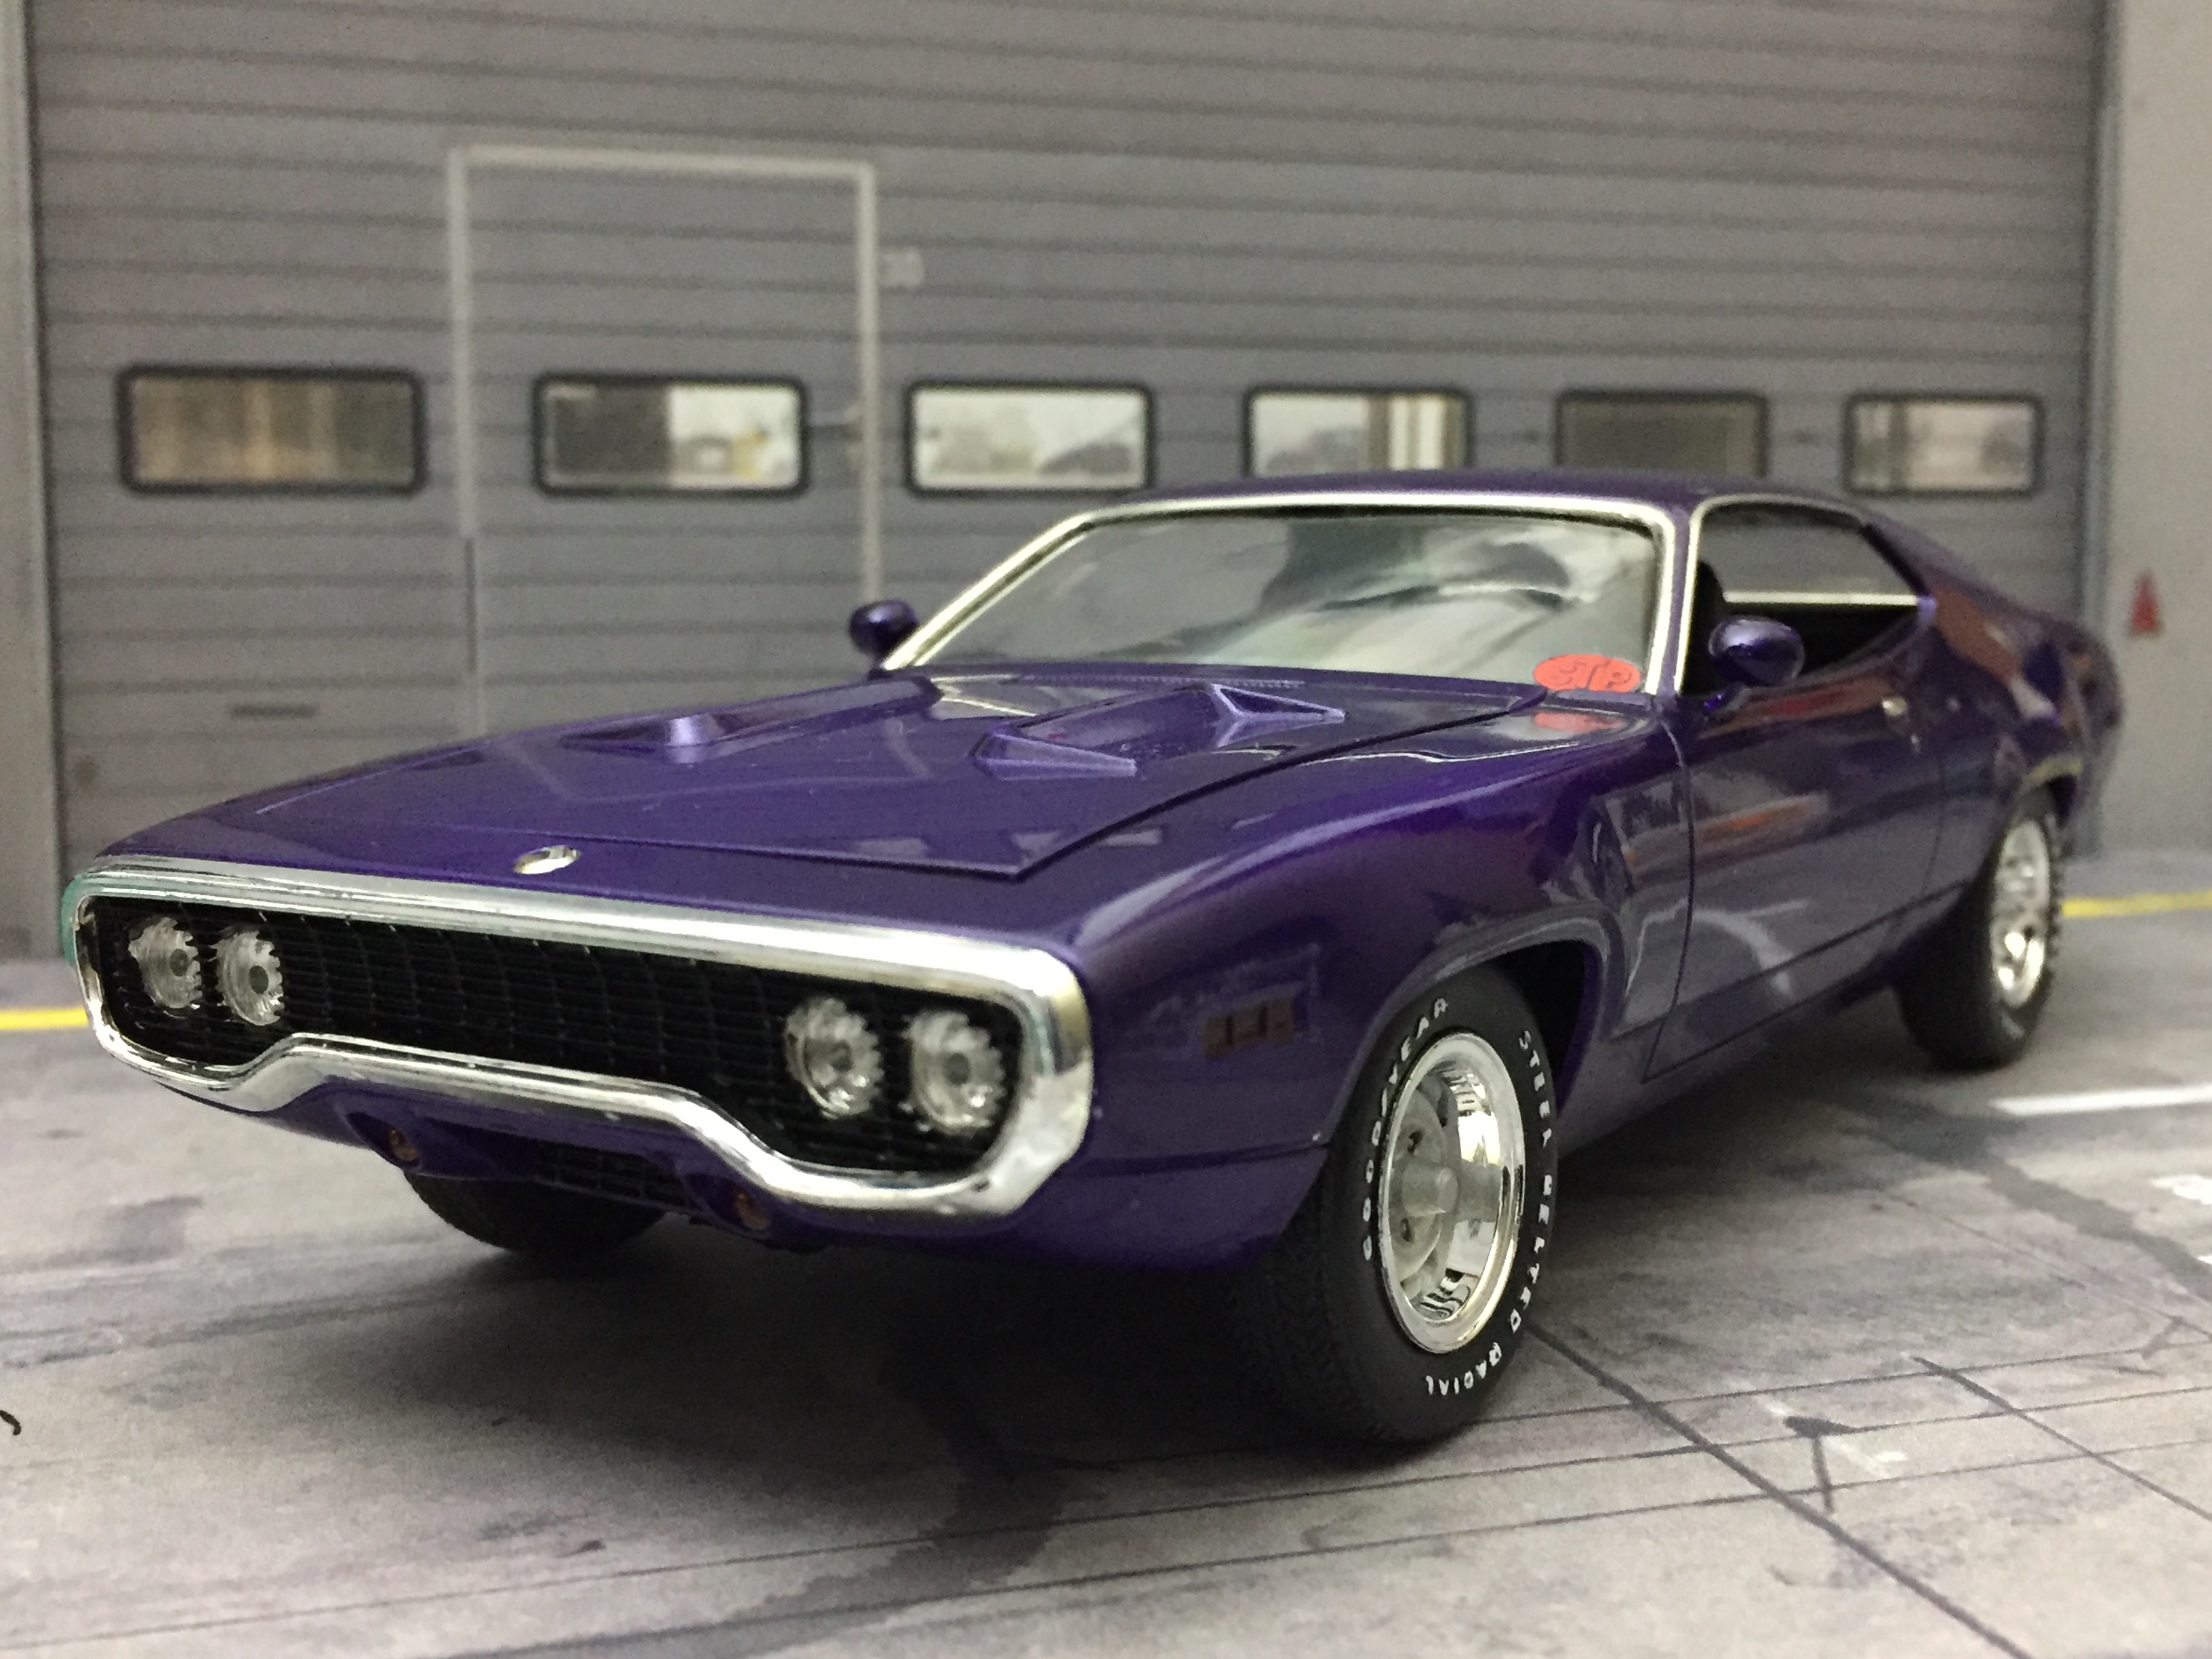
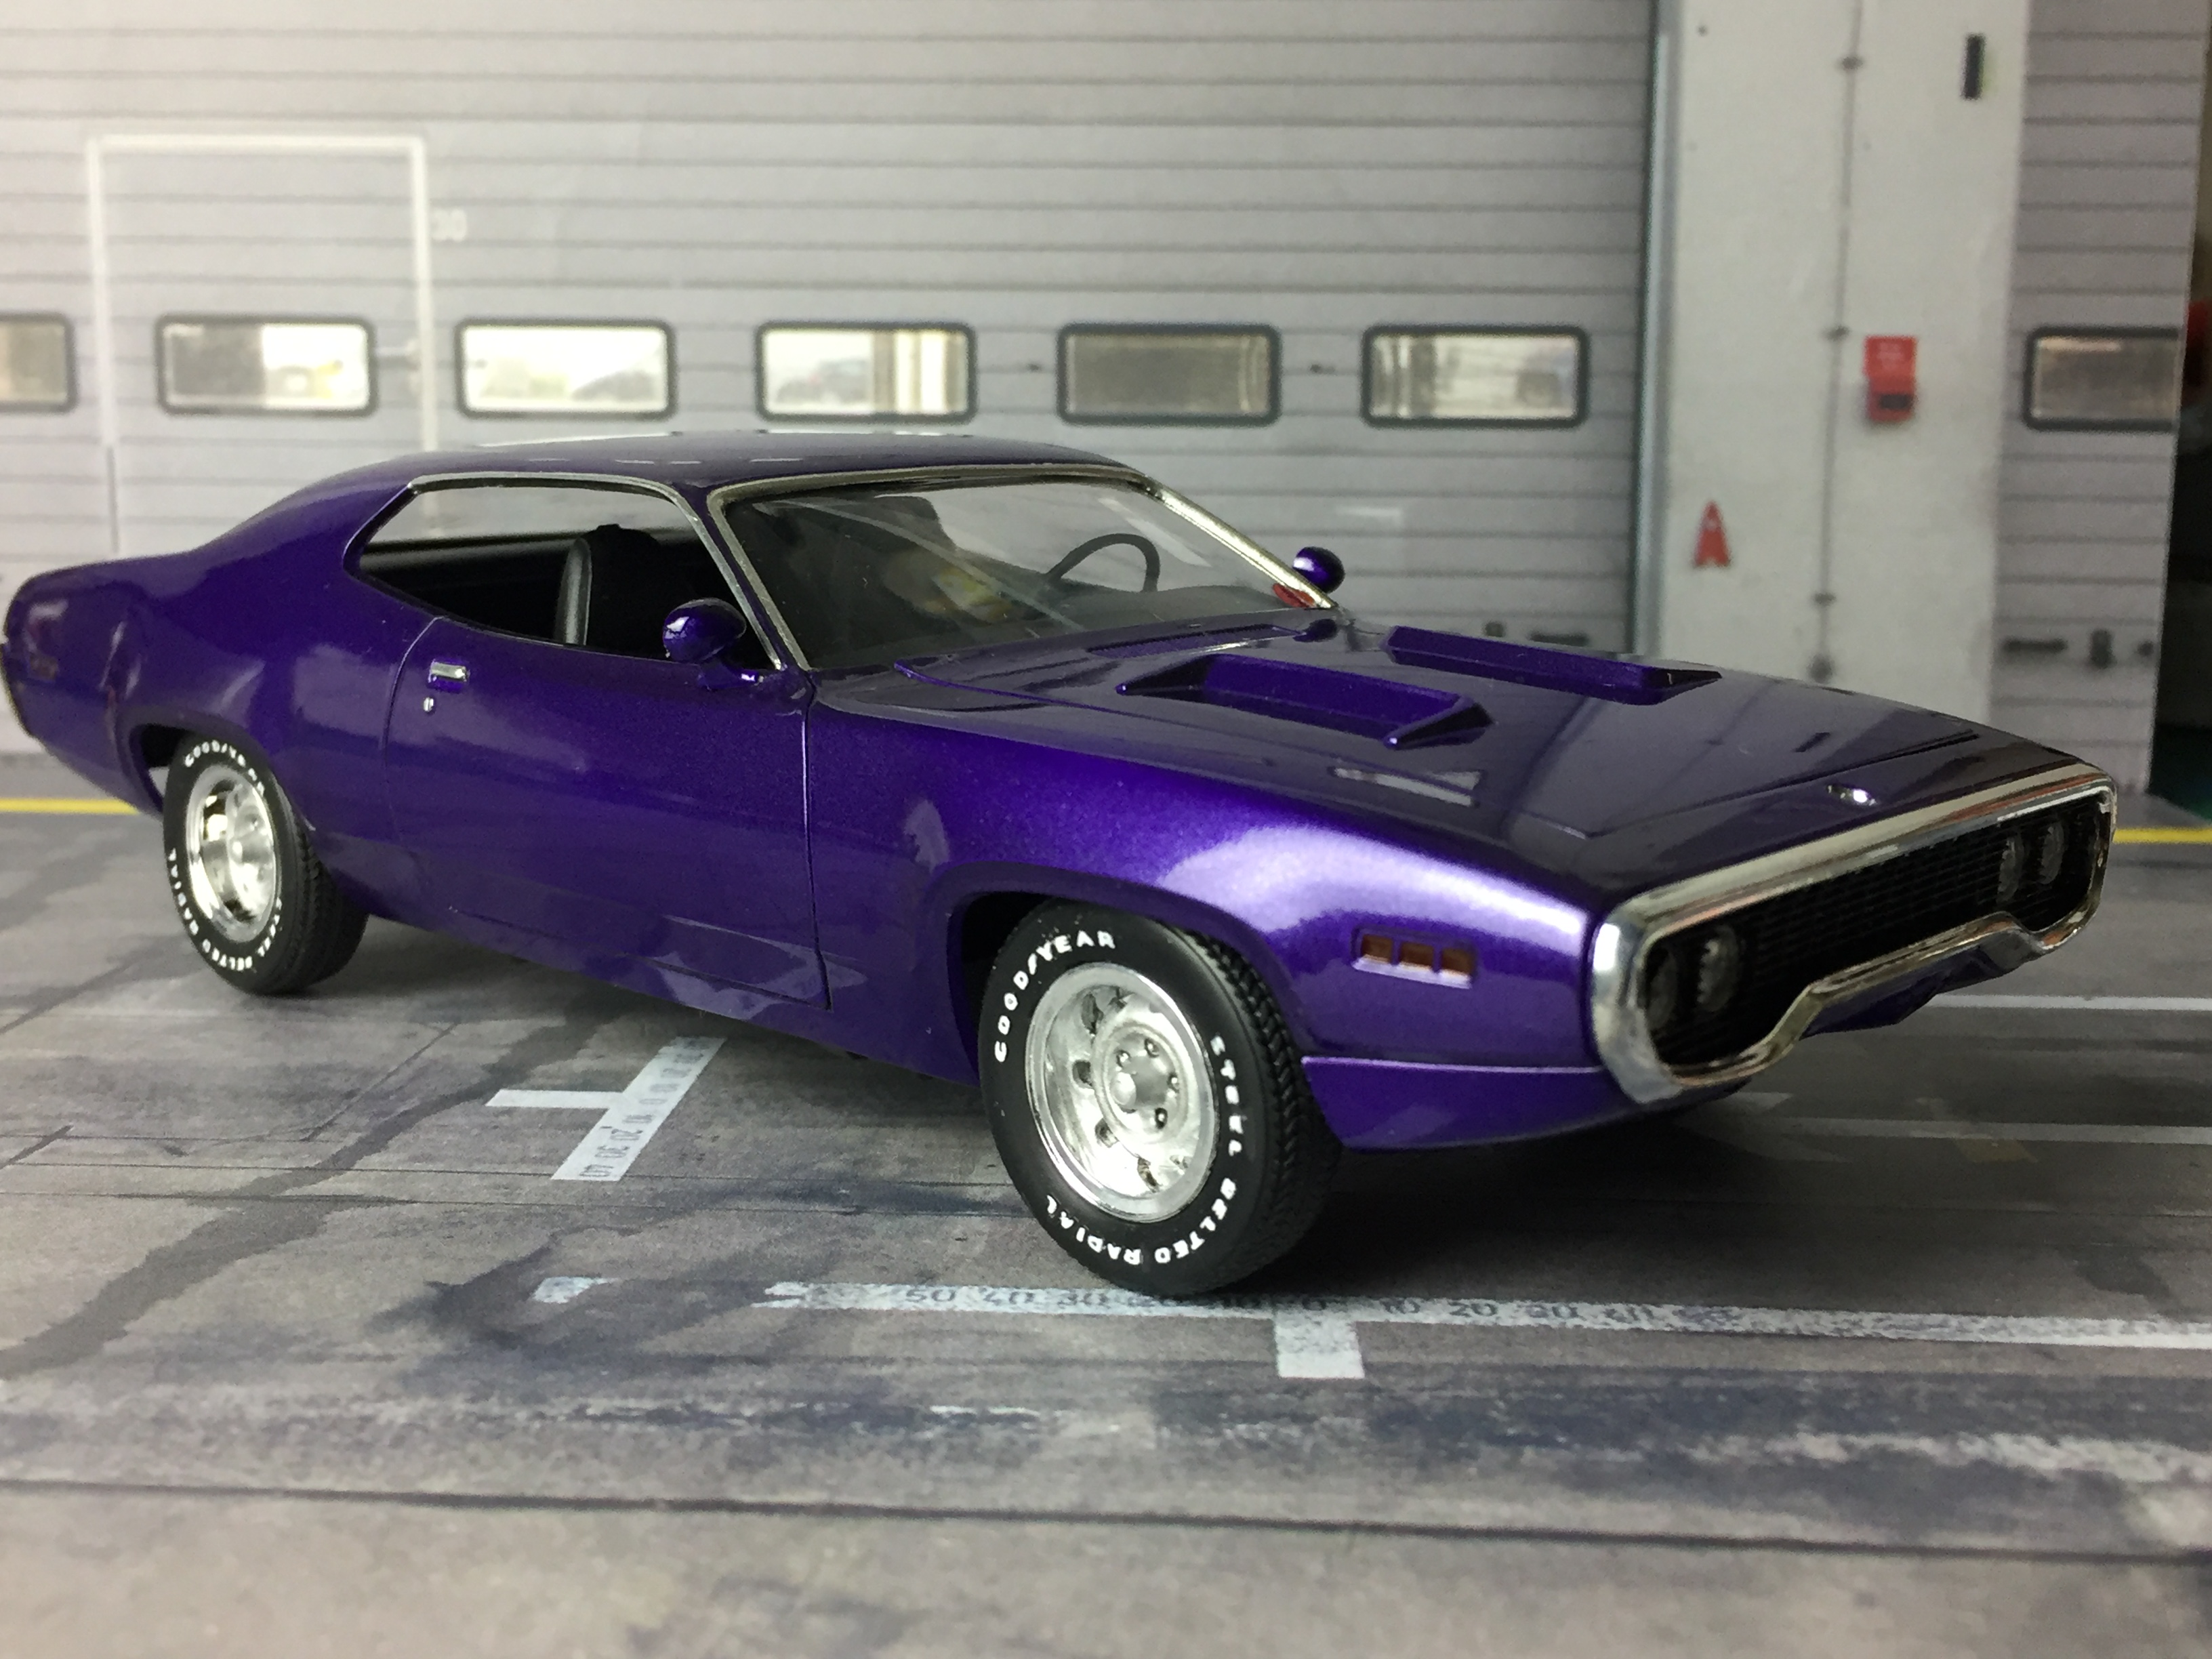
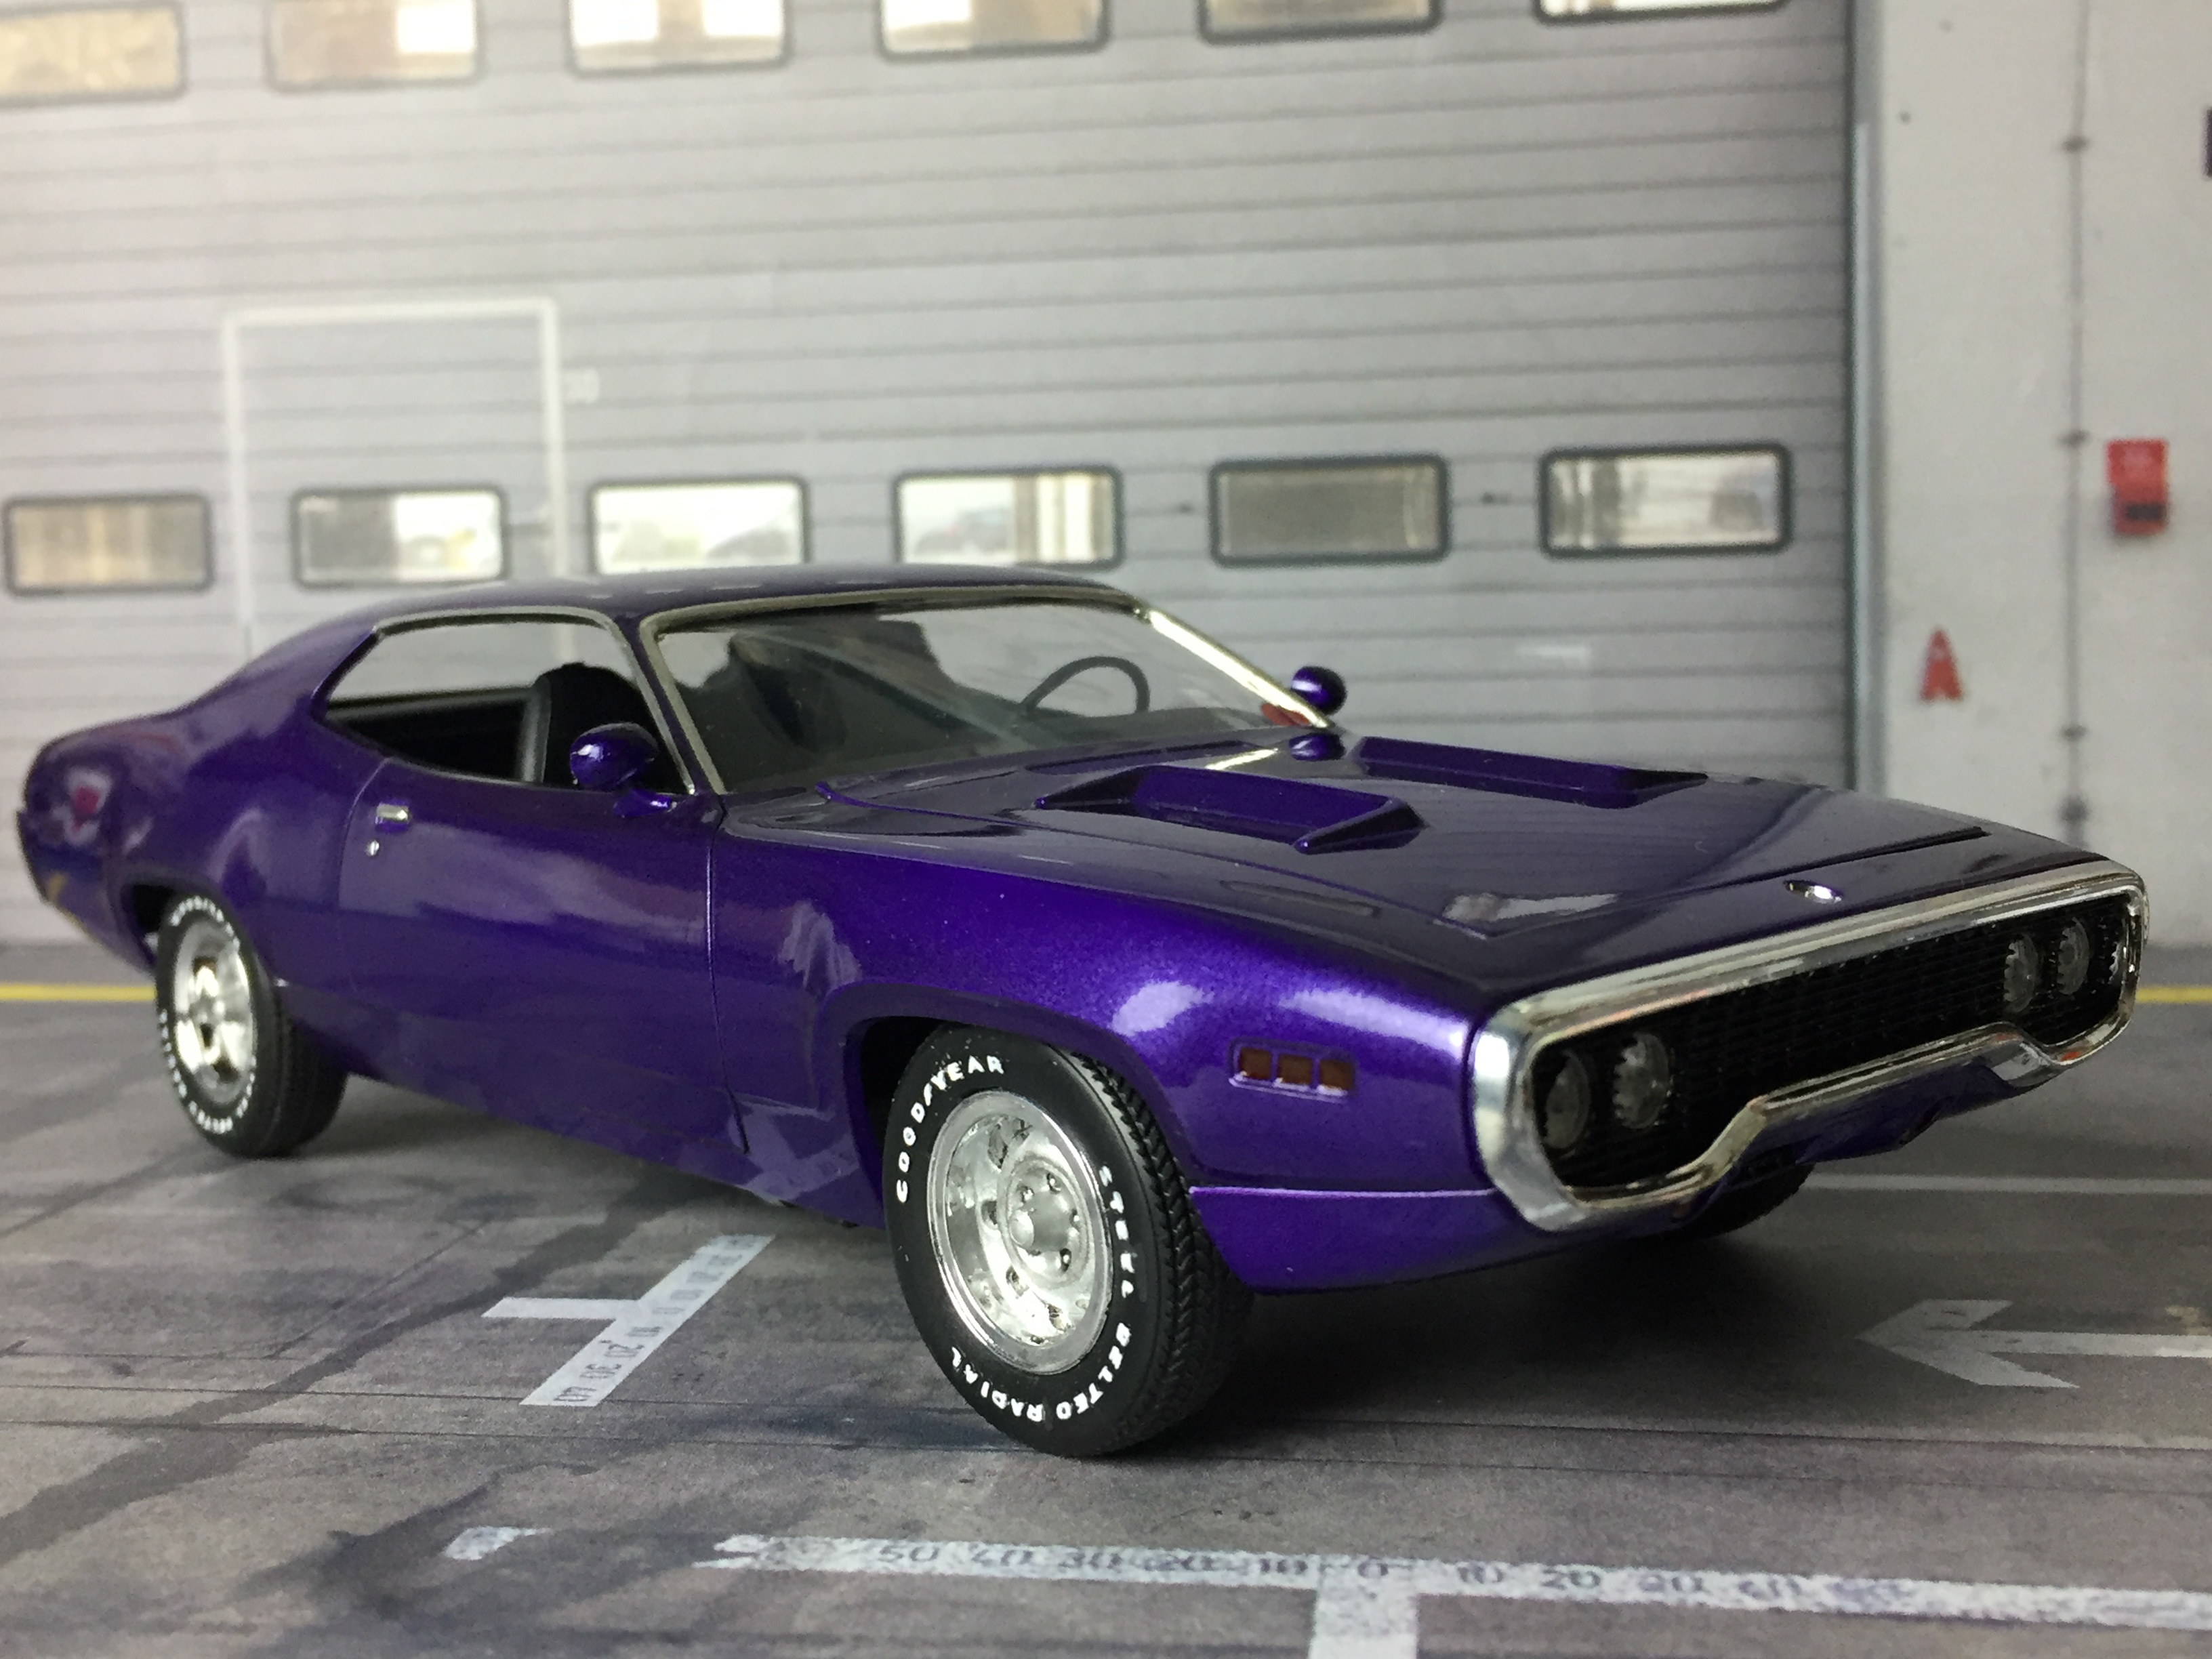
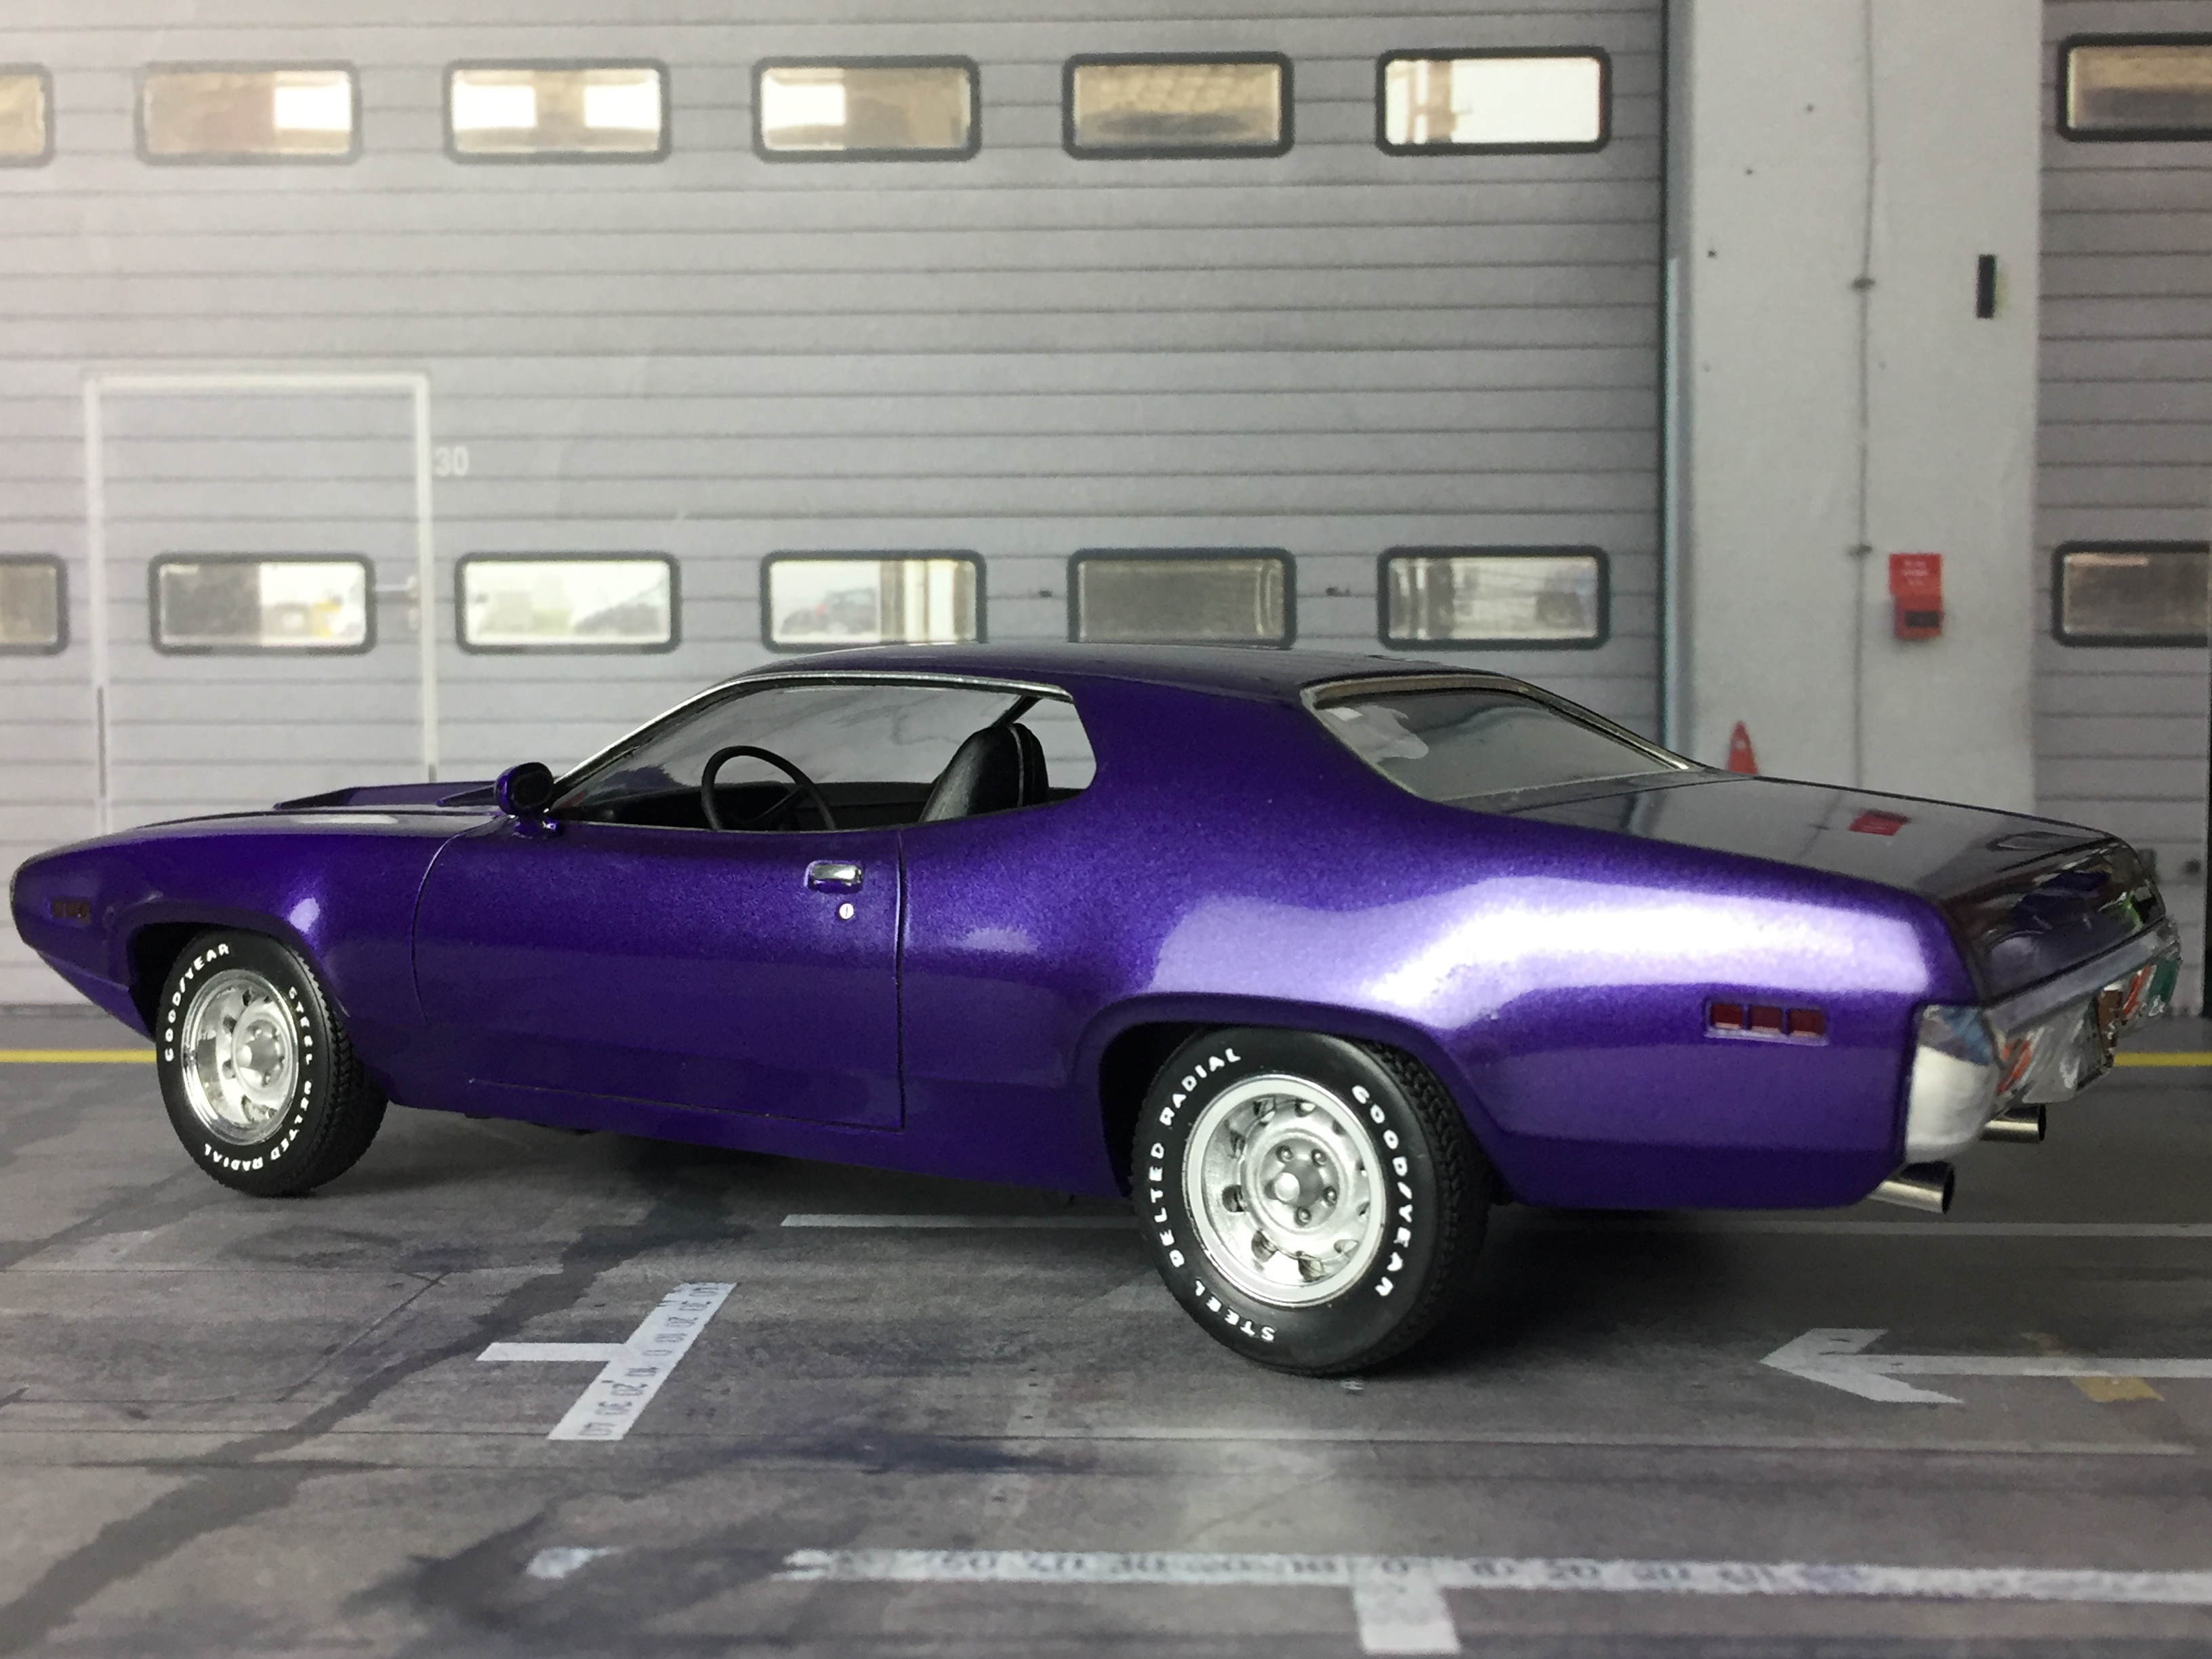
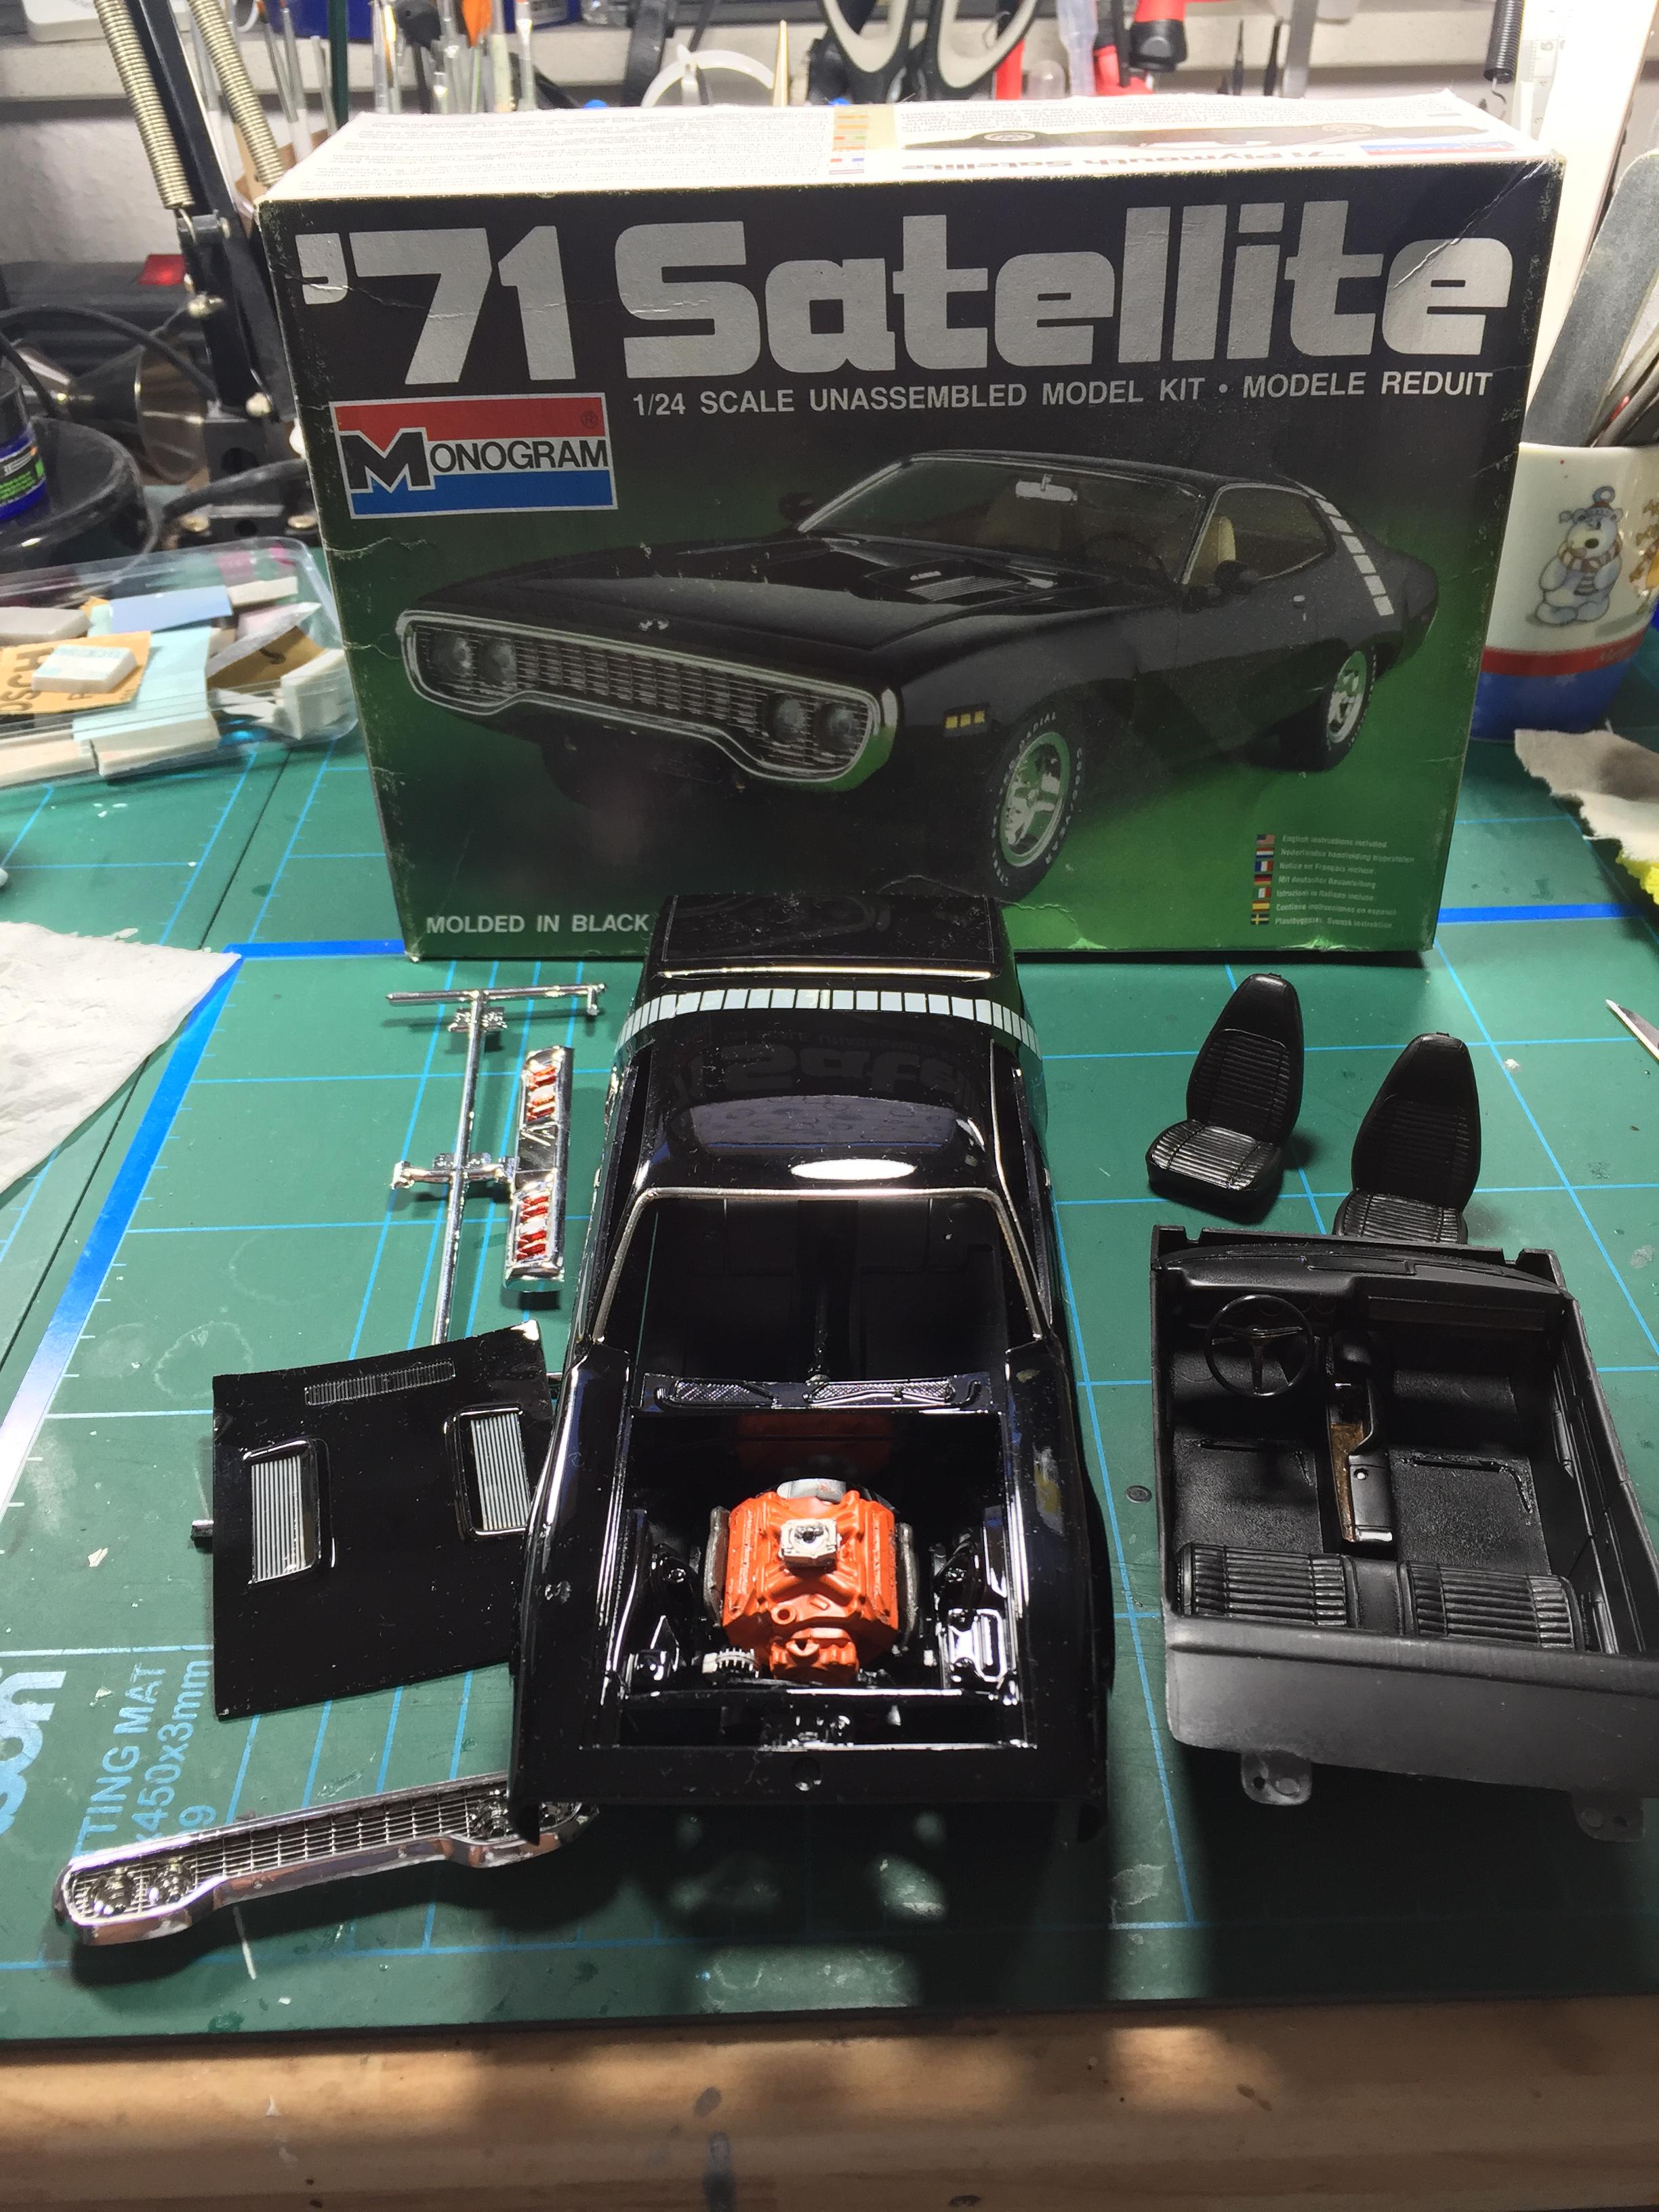
First, thanks to you ALL for your kind words! I'm happy you like my result. Thanks Hugh! Yes, I gave this quite a bit of thought and got me some white gel pens as I thought this would be the best bet but even the one with the finest tip didn't work out for me. So I tried it old-school, white paint and brush... And it worked. I used a 5/0 brush and Tamiya XF-2 flat white. Apart from a steady hand and a strong enough magnifying glass I think the most important thing is to keep the paint thinned to the right degree and clean the brush constantly because the paint will dry on it quickly and won't allow for precise painting. Thanks, Lee! Those are regular wire end ferrules. Thanks to you too Chris! That is a decal I've taken from a sheet sold by ScaleProduction. It has a lot more Mopar decals on it, plus some Mustang decals and some other US car stuff: https://www.scaleproduction.de/product_info.php?info=p2157_decals-street-racing-musclecars.html As I mentioned, stripping the old decals wasn't easy at all. So I took some photos of my efforts on these. Maybe this is interesting to see for those who like the model. So I'll just post them here: The paint was stripped using my usual chemicals, but the stripes on the roof and on the hood couldn't be removed by that: They were so resilient that I even used a special scalpel blade: But in the end all that helped was heavy and coarse sanding them down: After that the body looked okay and I proceeded with the primer coat: The primer coat was nice but to my surprise the "ghost stripe" on the roof was still visible: So again, SANDING, the hard way: Applying primer in such a way as to have an even coverage on the roof wasn't easy, but it worked out in the end: I then could proceed with the first coat of Plum Crazy:
-
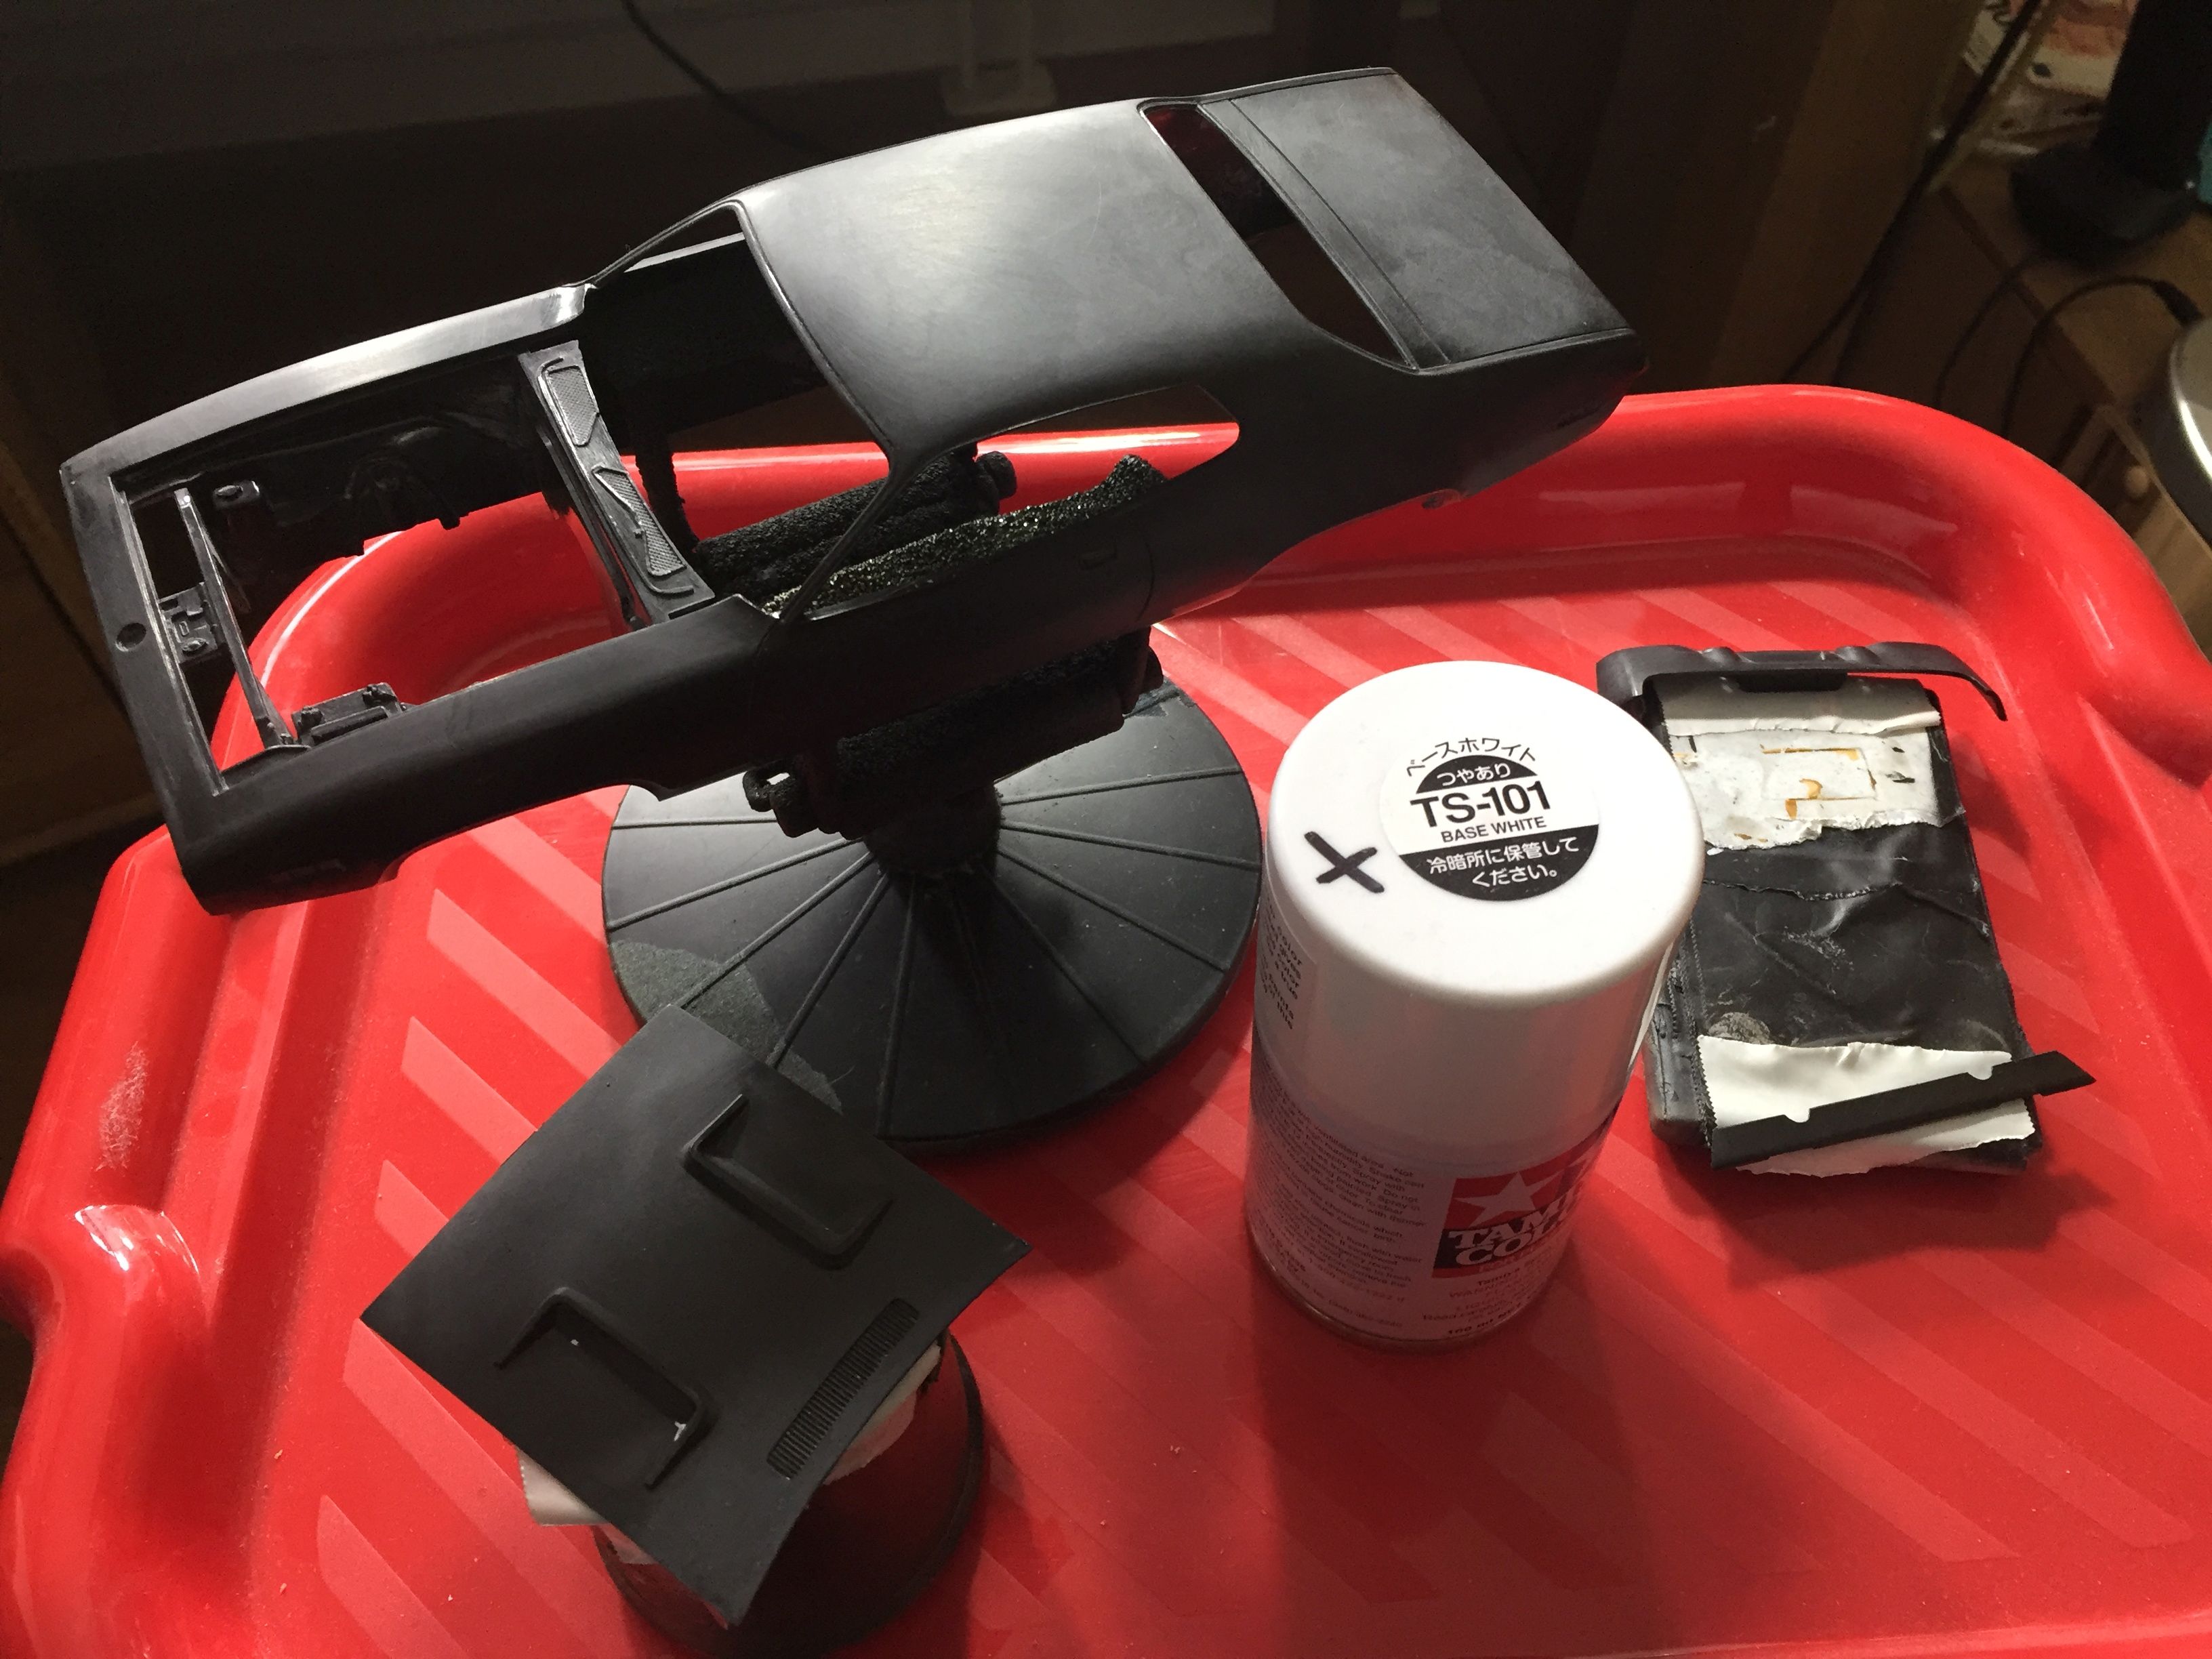
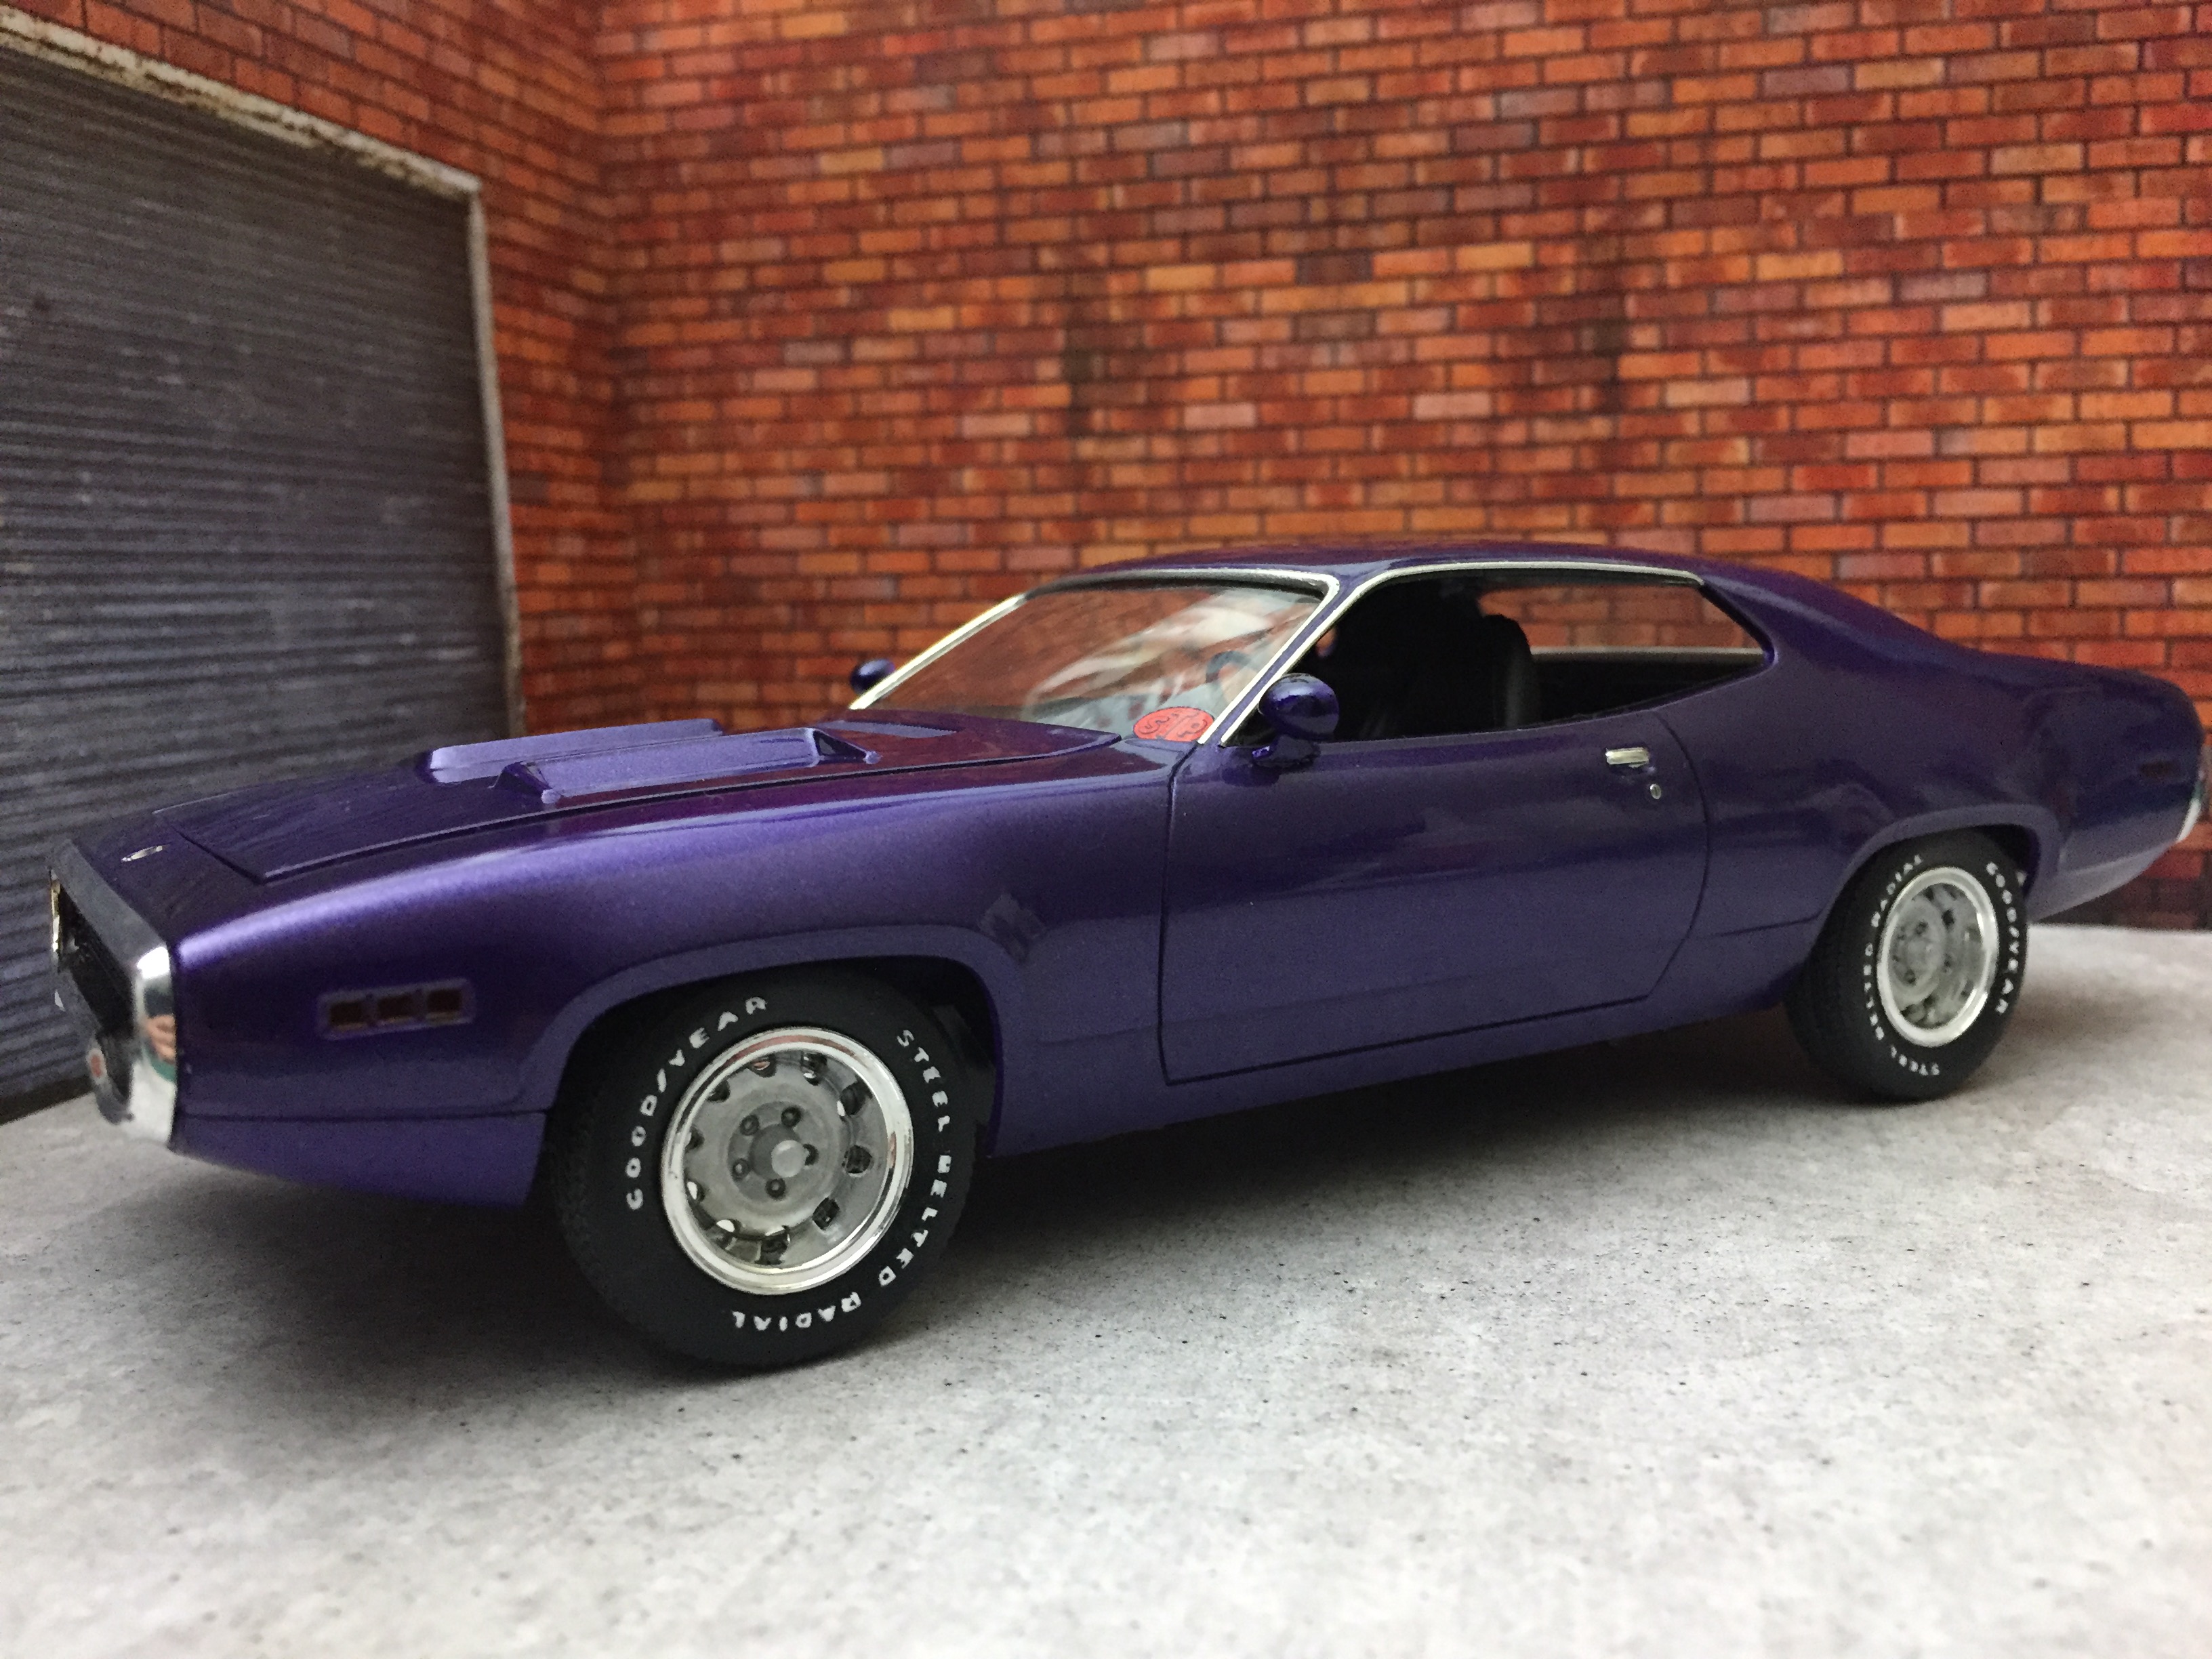
Hi folks, I did another restoration... This is the 1/24 scale Monogram kit. Bought it some time ago from a modelling mate and it looked like this: The hardest part was getting rid of the white stripe decals that had practically "eaten" into the plastic, even after stripping the paint. I may show some WIP photos of that later on. The paint I used is Testors Plum Crazy to replicate the In Violet Plymouth purple. The first time in decades that I used enamel on a car body and I was quite annoyed by the 72 hours plus dry time so for the next step I used a food dehydrator which helped to save a lot of time and patience. I also did my very first tyre lettering on this kit. By the way, no clear coat on this one, just elbow grease...
-
You're welcome JC. I trust the Tamiya kit (hopefully) will be an uncomplicated build. It's a simple curbside kit after all. Paint the body in white, the wheels in red, maybe do some detailing in the interior. I gather the most work will be applying the decals with the use of lots of setting solution...
-
Decaling-Before or After Clearcoat
Tommy124 replied to 69NovaYenko's topic in Model Building Questions and Answers
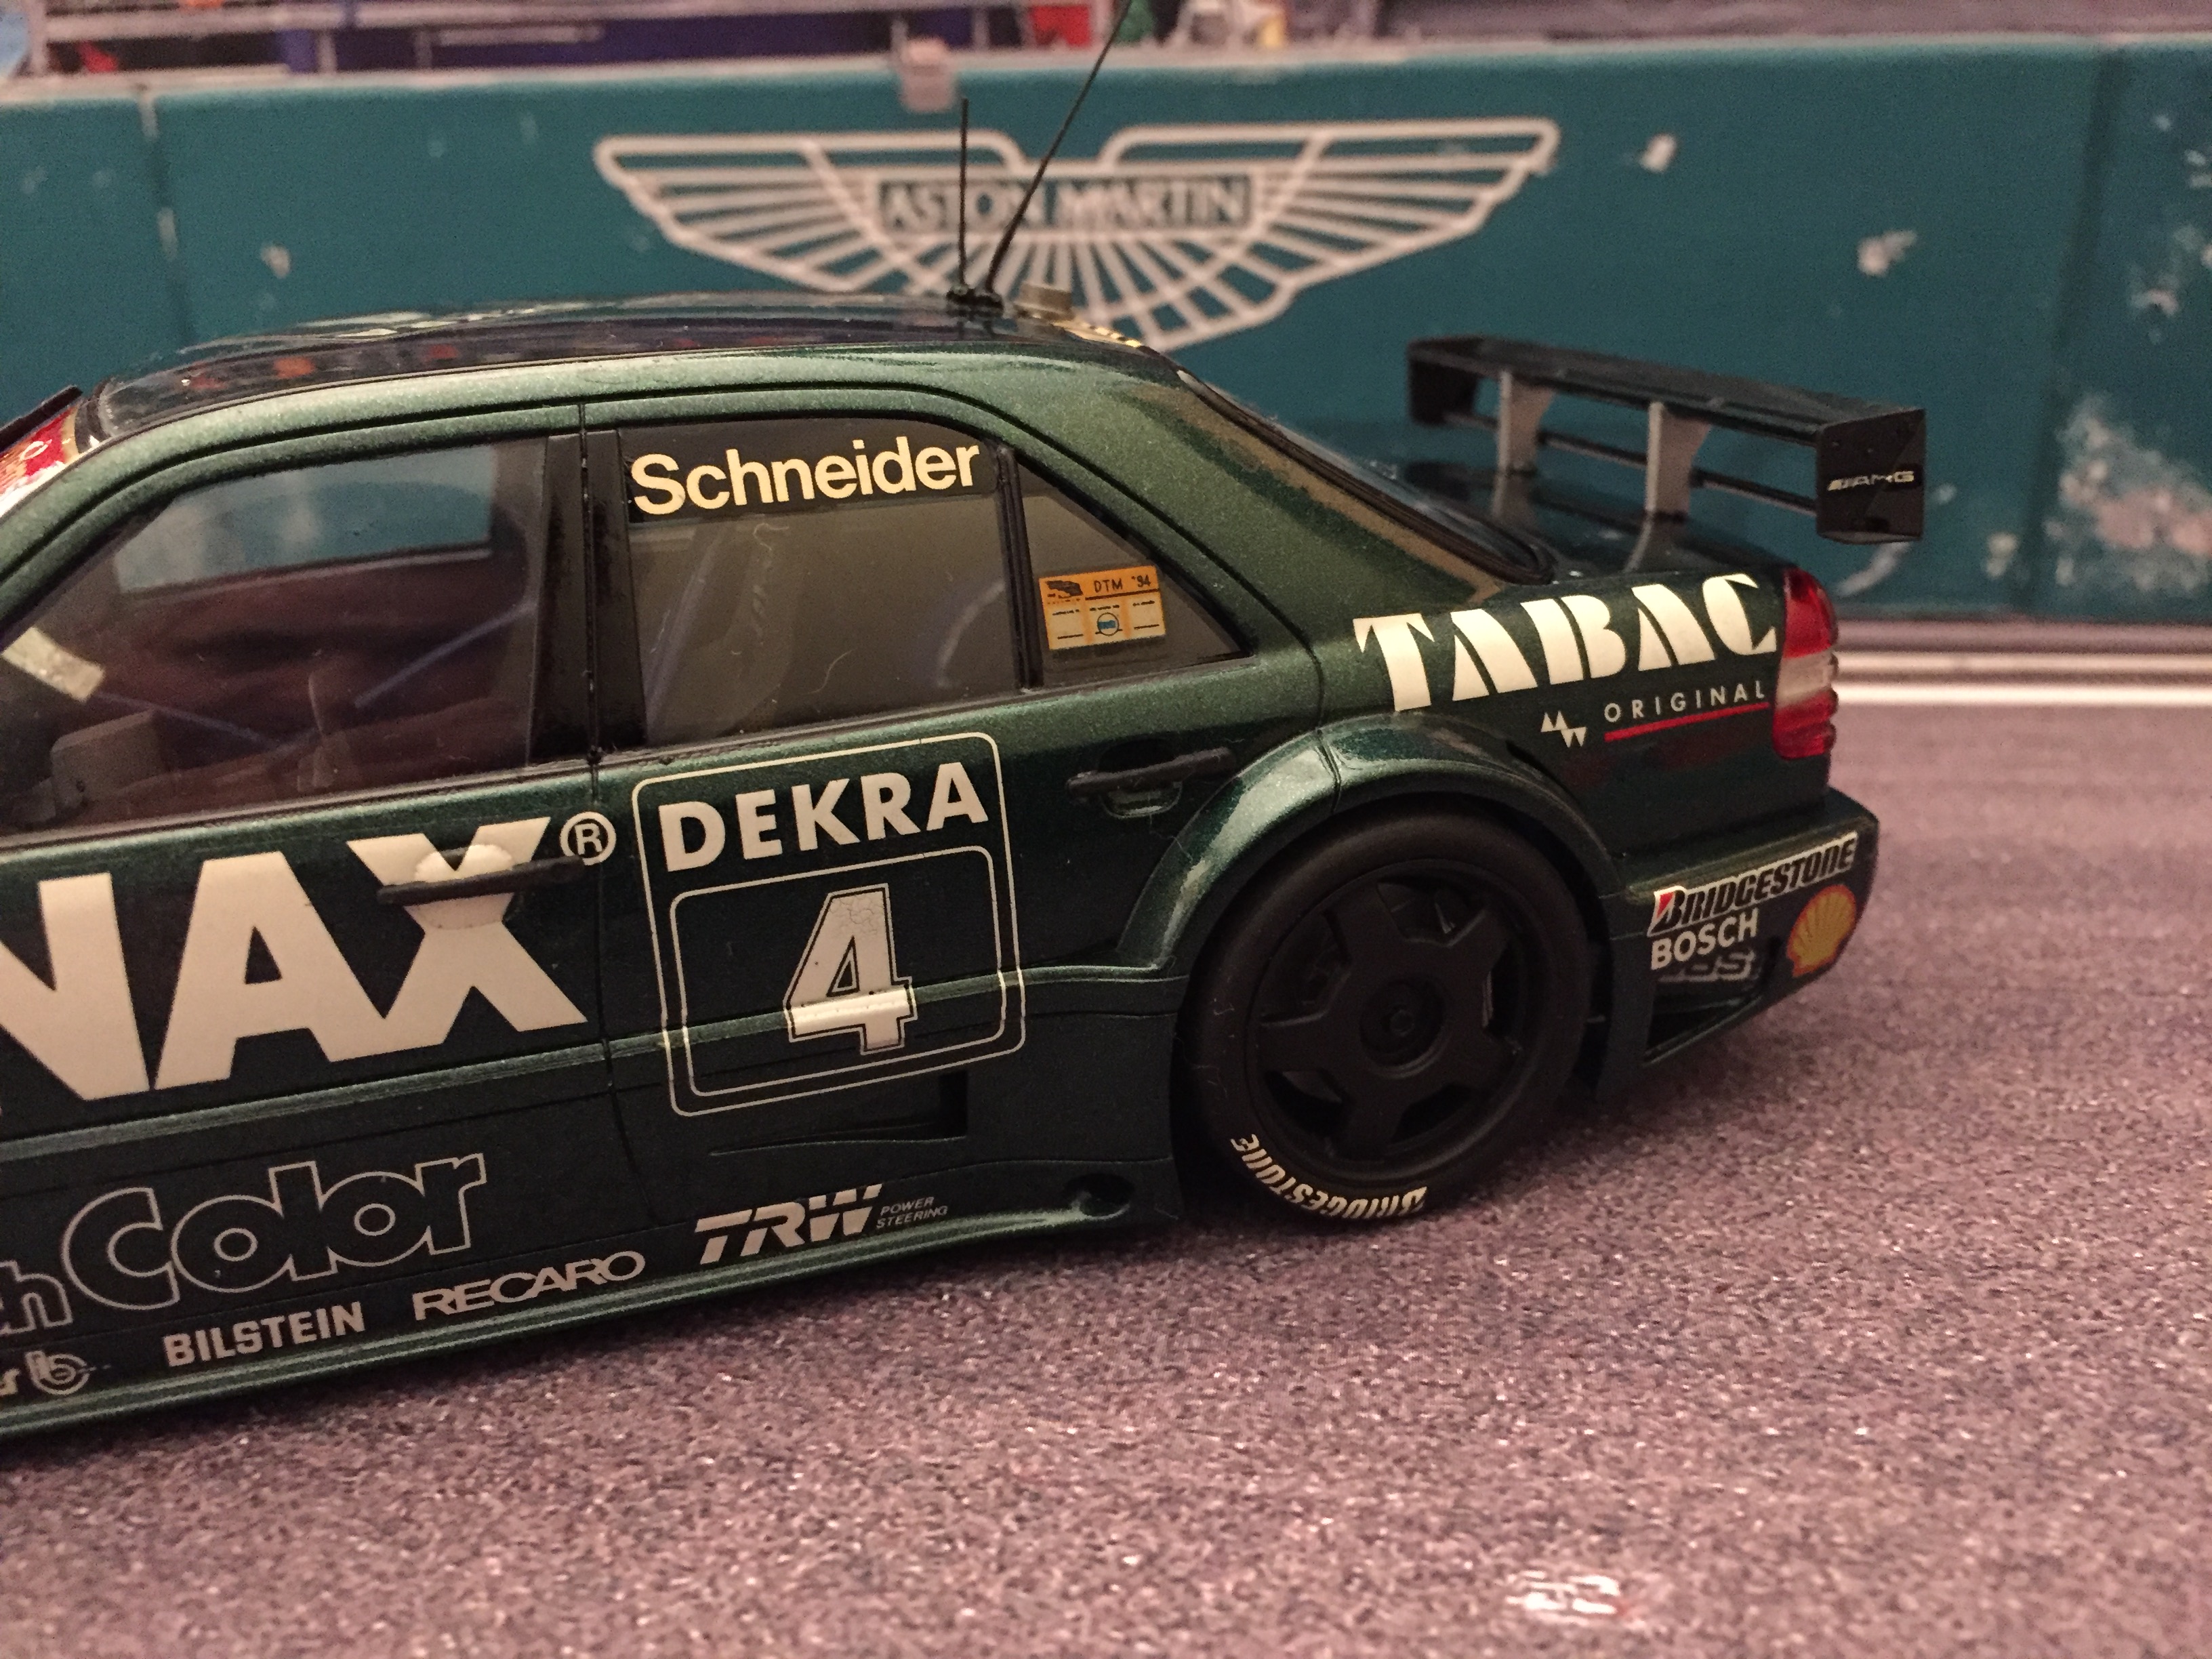
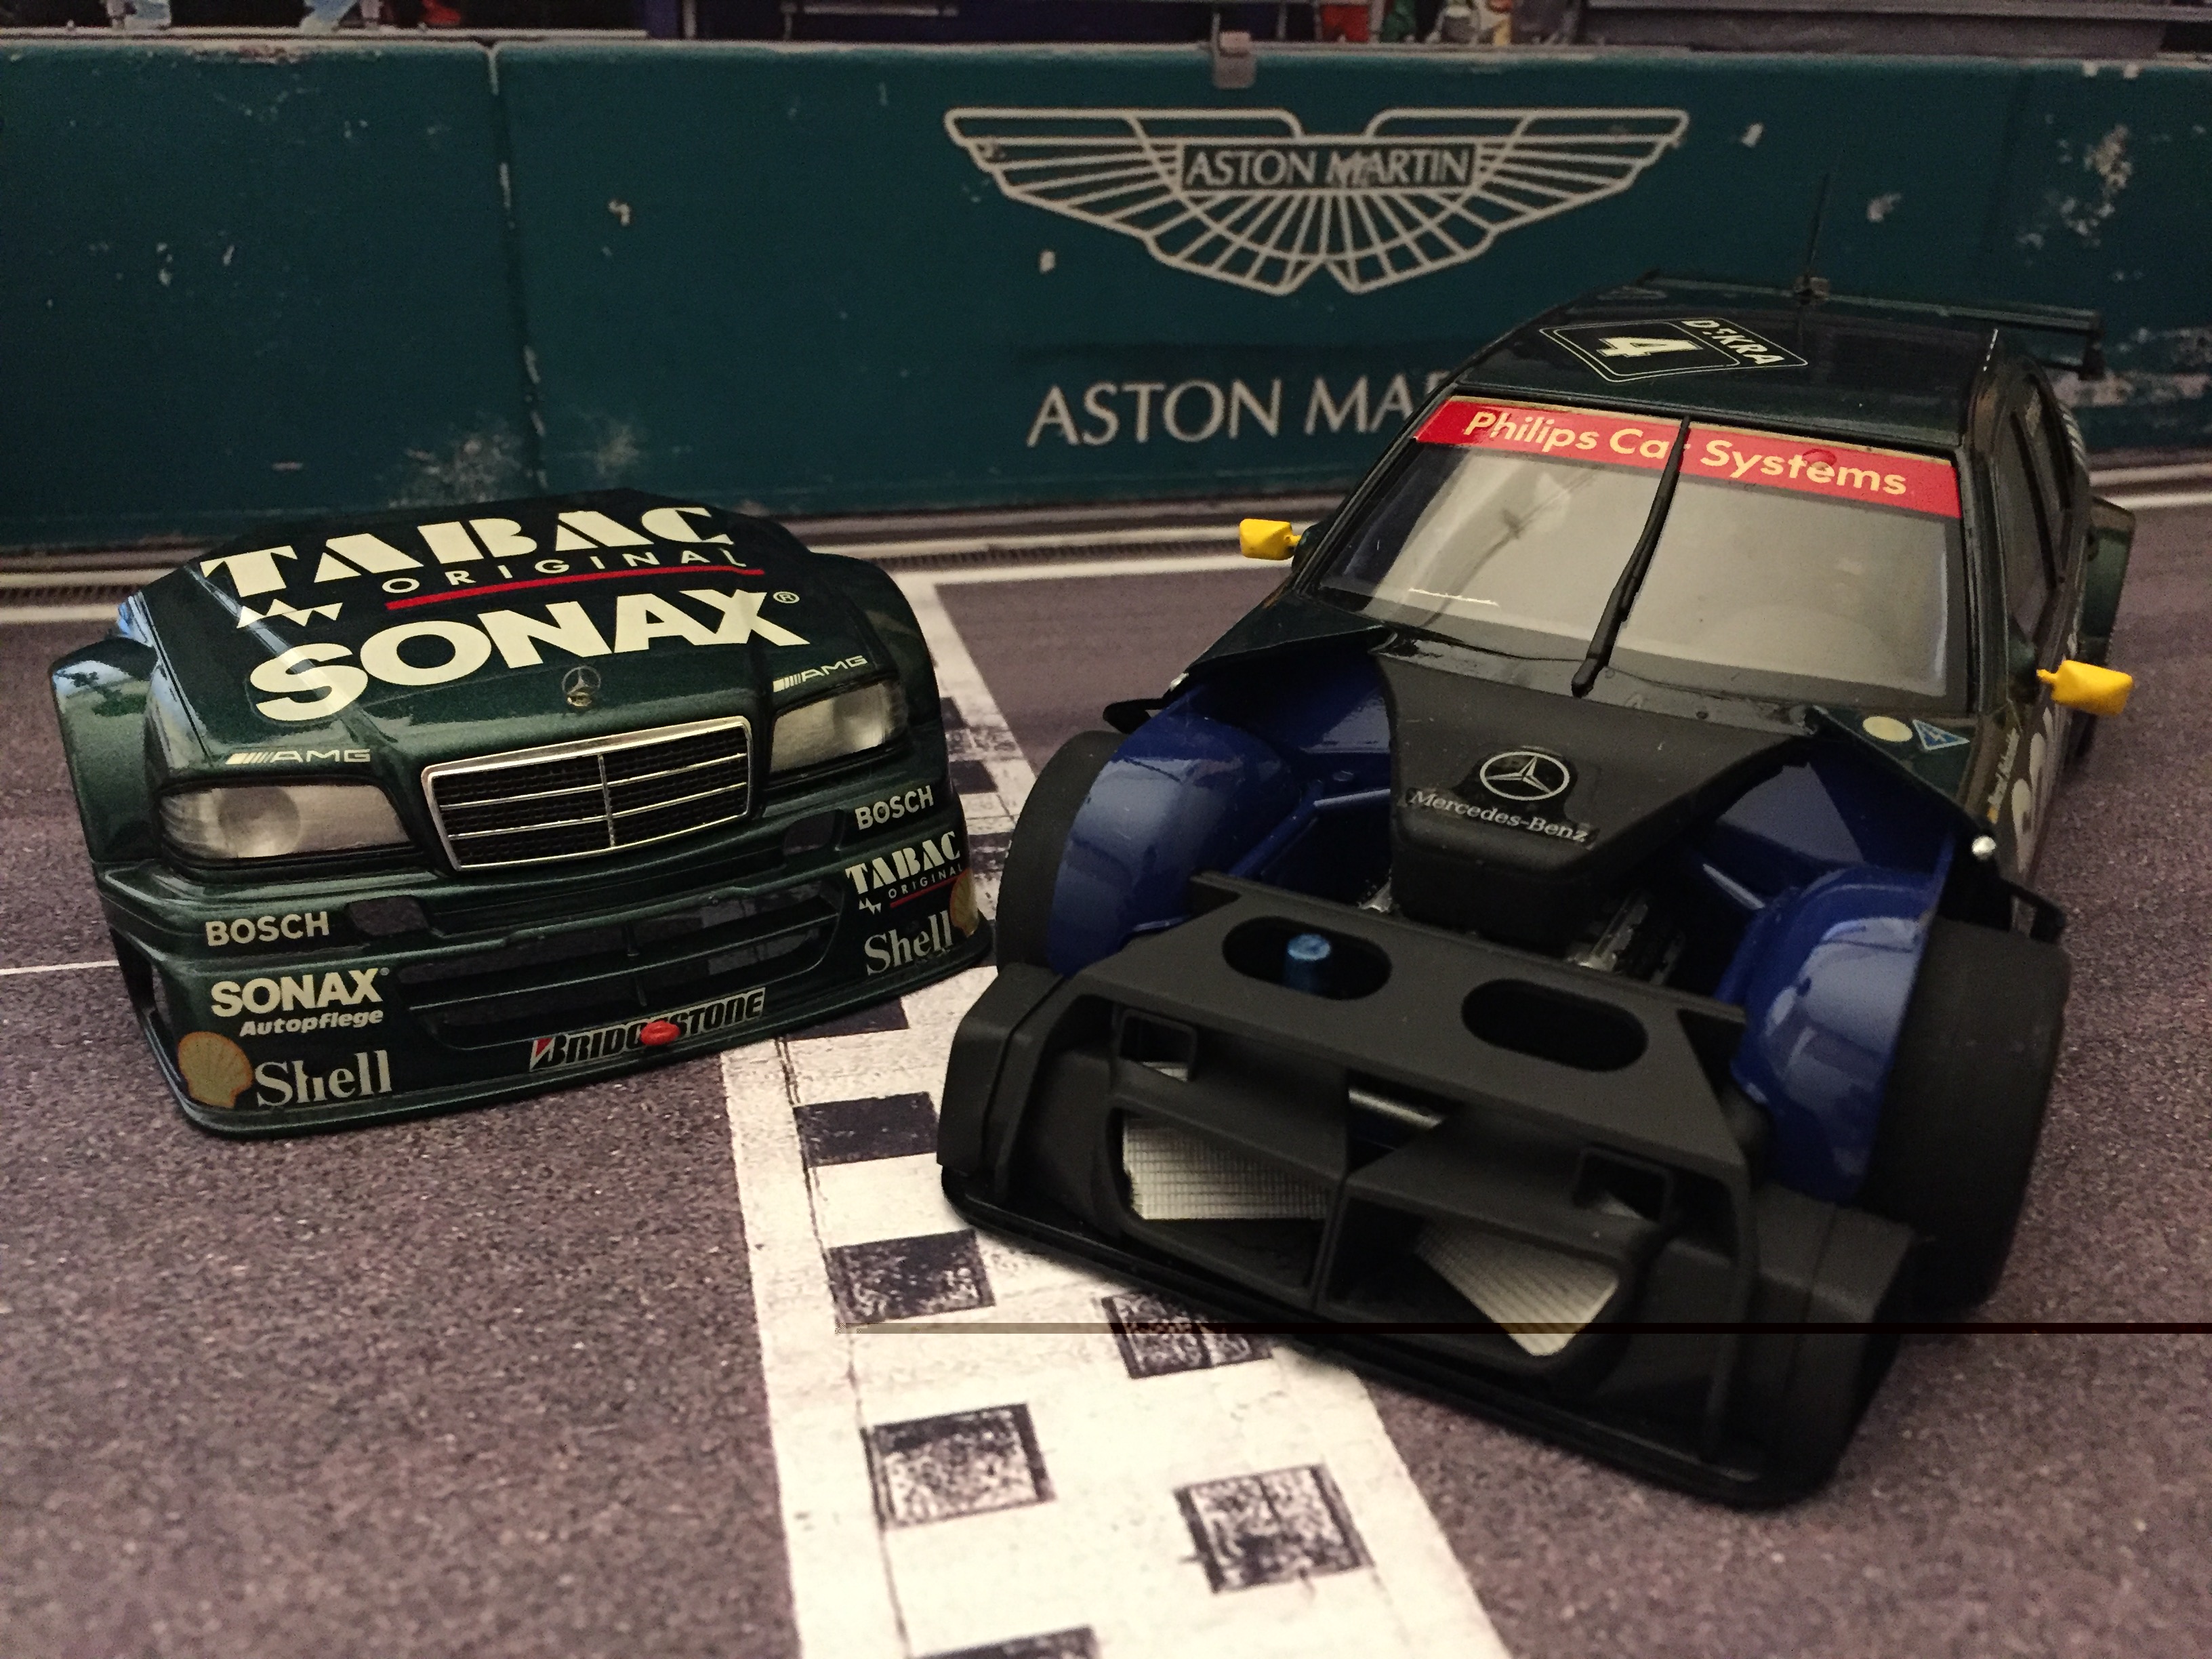
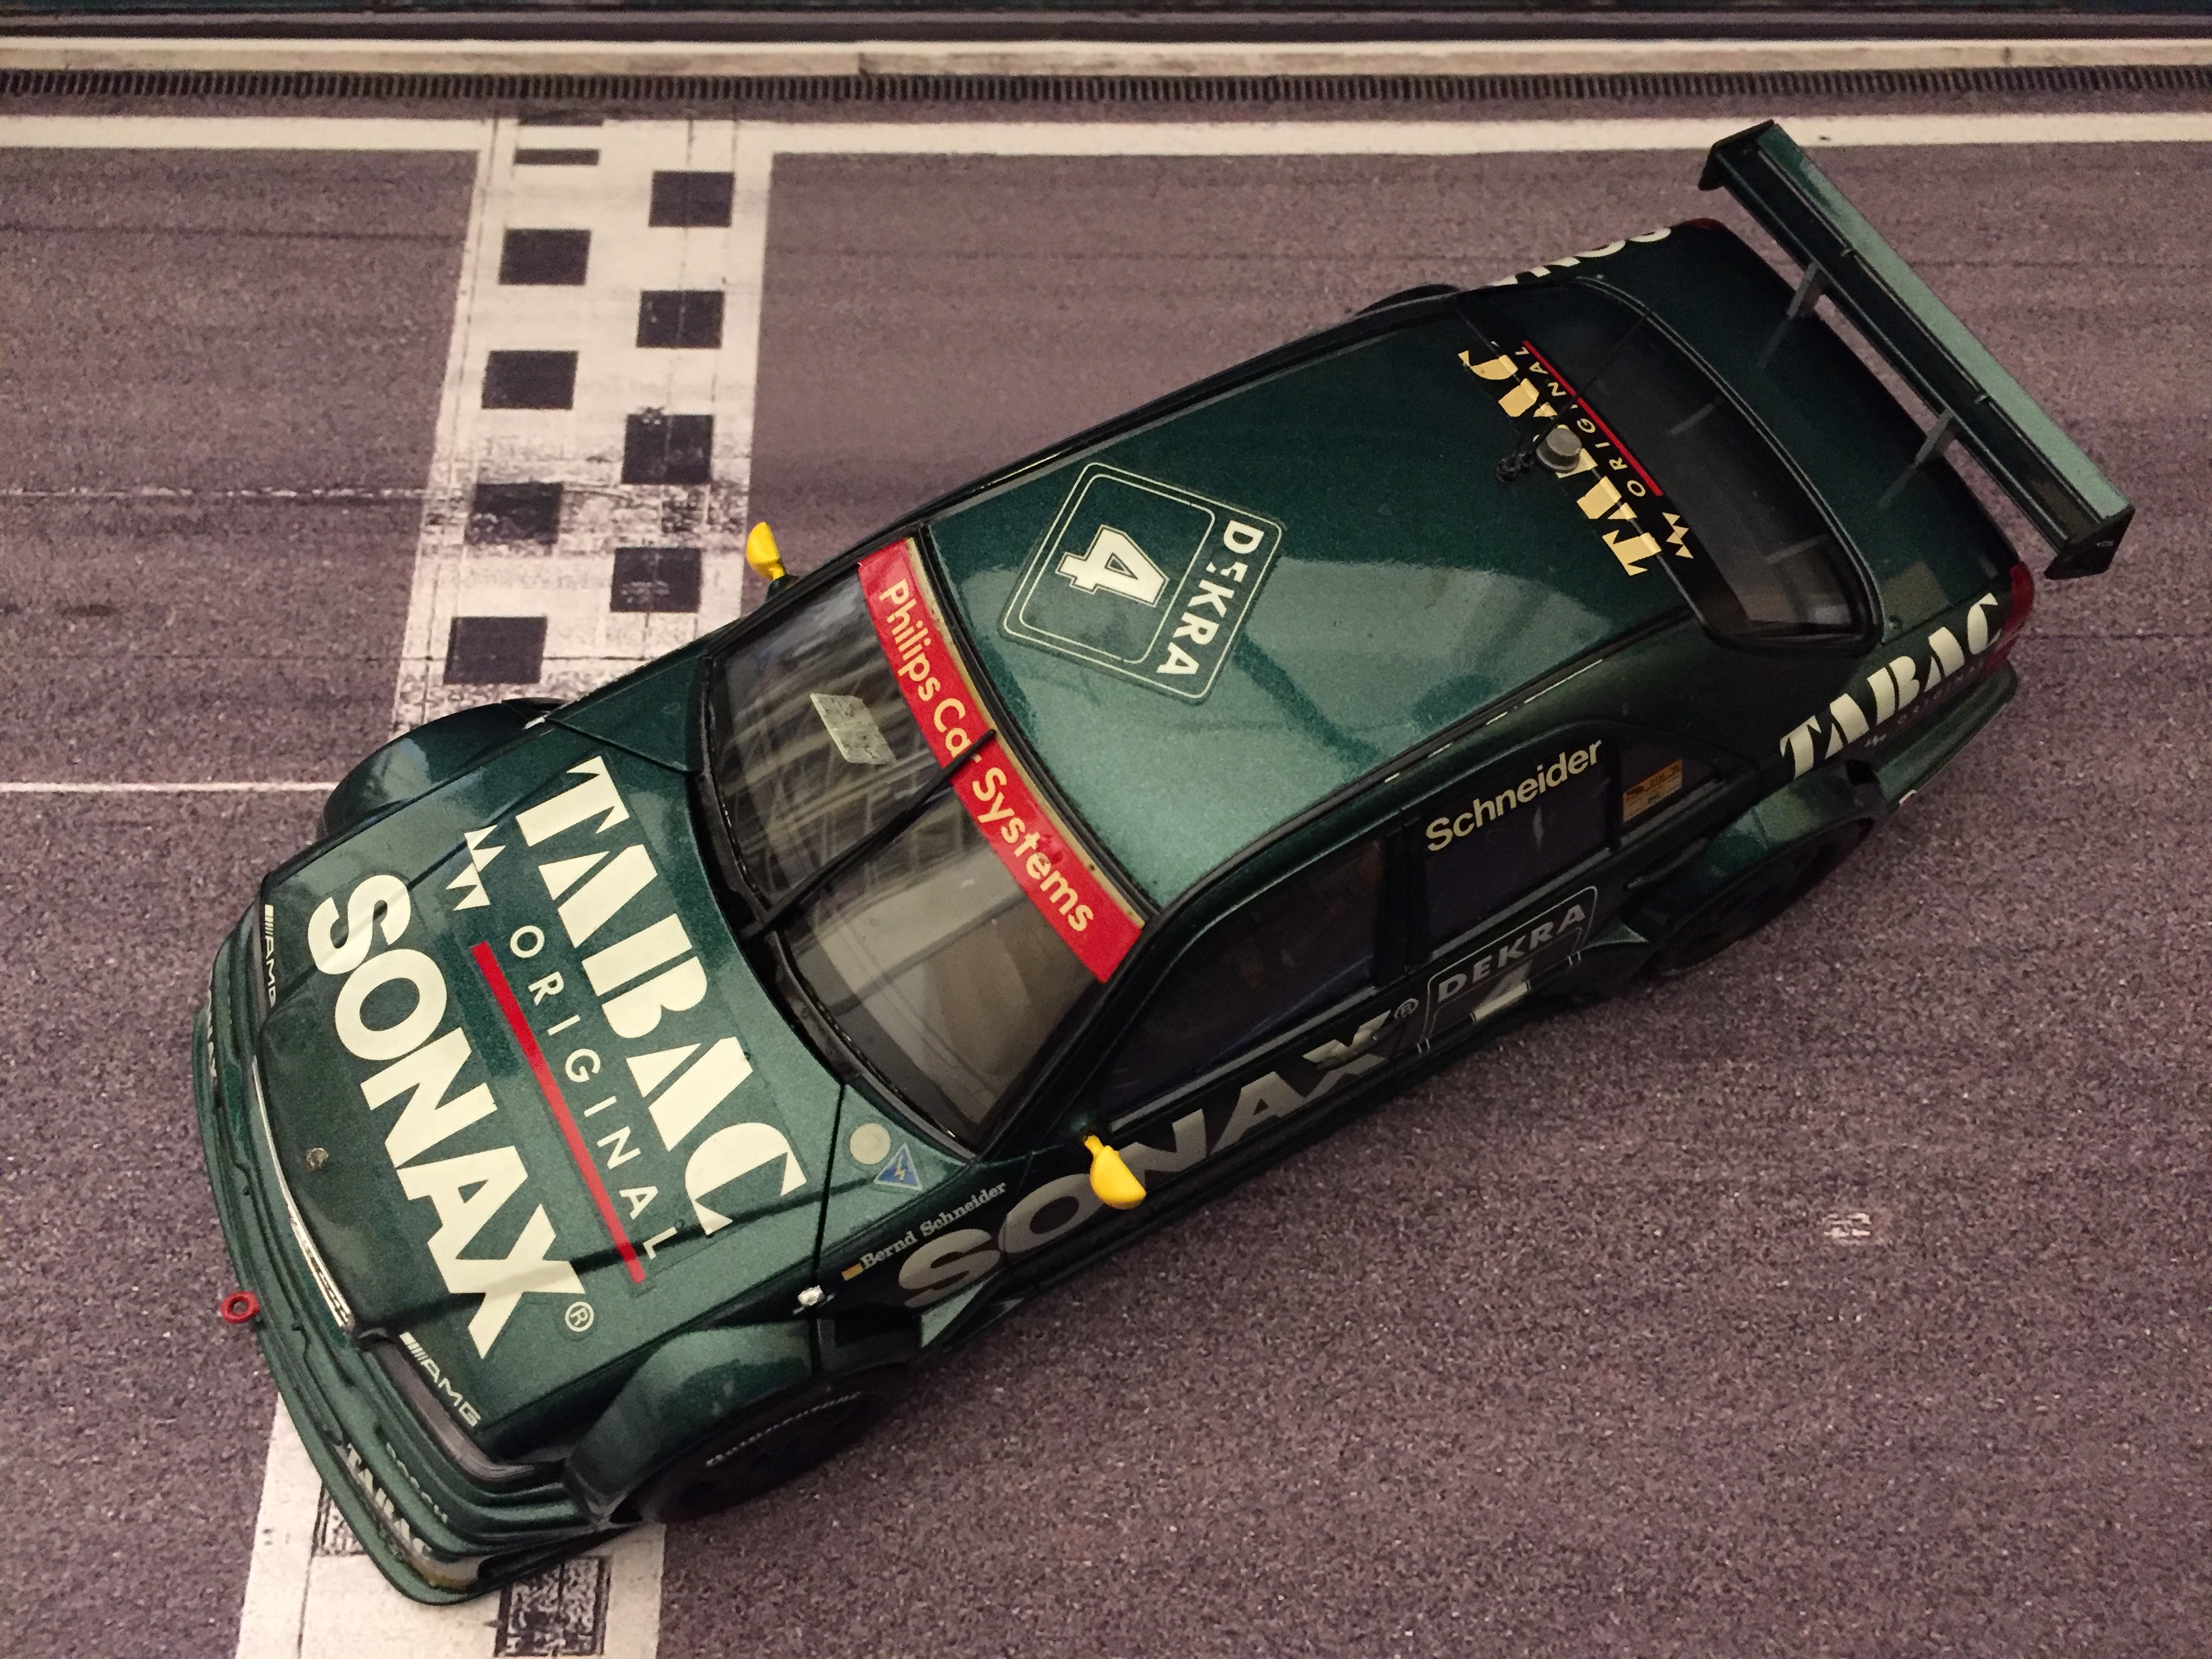
I built an AMG C-Class DTM Tamiya kit back in 1995/96 and that was exposed to pretty much sunlight over quite some time. I used Tamiya acrylics for basecoat AND clear coat back then. Yes, the white letters of the "Tabac" livery yellowed quite a bit (especially the one on the rear side of the roof) but it's mainly the non-cleared decals on the clear parts ("Philips" sticker on the windscreen and the "Schneider" sticker on the side) that took the most damage...
-
I thought they were one and the same kit for some time, but... the Tamiya kit is different and more realistic in some details, the main one being the air intake on the side of the car. It actually has an open structure while the Airfix only has some structure to replicate the air cooler that should actually be much deeper in the intake. As the Airfix would not properly have worked with the Alitalia details I already bought some time ago (https://www.spotmodel.com/product_info.php?products_id=18260), I decided to buy the Tamiya when it was re-released some months ago. The Tamiya kit has much better wheels also. Other than that, they are very similar kits.
-
Decaling-Before or After Clearcoat
Tommy124 replied to 69NovaYenko's topic in Model Building Questions and Answers
I think that the extent of "damage" that can possibly happen to decals which have been properly applied to a scale model is a bit overrated. Of course, decals will probably change their color or bleach if exposed to direct sunlight for a long period and they are prone to physical damage if the completed model is not stored or handled properly. If one cannot make sure of avoiding these things, they probably should seal the decals with a clear coat anyway. I only do so for race car models which carry a lot of decals, or maybe models with larger decals like big bonnet stripes. But I won't generally clear coat a model because of some smaller stripes, emblems etc - unless I will clear coat the car anyway. @Ace: good point, a lot of livery decals were stickers on the original cars. -
Nice kits, JC. I'm more a fan of the Turbo Stratos. So I only have the Hasegawa Stradale kit, and the re-released Italeri (formerly Esci) kit, I couldn't resist buying it because it came very cheap while carrying the rallye parts and Alitalia decals. And I have the Turbo Stratos kits from Airfix and the re-released Tamiya one. The latter being one of my next projects, in order to replicate the #539 car that hardly ever raced or finished but sure looked cool: https://www.racingsportscars.com/photo/1977/Giro_d_Italia-1977-06-16-539.jpg
-
Great result and certainly not a "typical" Charger for a change. I especially like what you did to the trunk. Does it only look like that on the photos, or did you not open the exhaust pipes?
-
I second that. I don't have access to the conversion stuff used in this build, but then again I wouldn't mind using the GSX kit as is, but I definitely wouldn't paint it yellow!
-
Long time ago... You looked pretty young on the picture back then too... @Jim: congrats! Soon it will be 20.000...
-
Thanks Randy. Btw., the Stratos may be the "forgotten" EM kit, but I am sure there is one most have never even heard of - as far as both, 1:1 and model kit are concerned: https://www.scalemates.com/kits/fujimi-082424-dome-zero--210116 Yeees, that is an EM series kit... But there is also a curbside version. I got hold of the EM kit some months ago on a slot car fair. Reasonably priced, and the kit in shrink-wrapped condition...
-
Black Bare Metal Foil(BMF)?
Tommy124 replied to crowe-t's topic in Model Building Questions and Answers
For things like black trims on modern cars, you can use black 3M ElectroCut foil. This is some kind of self-adhesive plotter foil, available in many colors, pretty flexible and easy to cut. The black foil has a semi-gloss look about it so it'll look good for this purpose. ScaleProduction has it on sale, but you can buy this (or probably similar products) from other sources without problems. https://www.scaleproduction.de/product_info.php?info=p805_3m-electrocut-foil-a4-210x290mm.html -
How much will dehydronators reduce dry times
Tommy124 replied to 69NovaYenko's topic in Model Building Questions and Answers
Guess it goes to show, that even with mother nature on your side, you will get punished for being sloppy... (Sorry, Randy!).