Bills72sj
-
Posts
4,586 -
Joined
-
Last visited
Content Type
Profiles
Forums
Events
Gallery
Everything posted by Bills72sj
-
Way cool gasser!
-
Thanks guys. I still have some minor things left to do.
-
 Nice job with the interior details.
 -
Wait no more! Go ahead and jump in!
-
Just finished the chassis for my 1967 Mustang GT. Plans for it have changed to the chassis will go into this Shelby.

-
Stalled 1967 Mustang GT coming back in the queue.
Bills72sj replied to Bills72sj's topic in WIP: Model Cars
Well, change of plan, found a 427 SOHC motor in my 68 Shelby kit. I want to go with that. The chassis I just finished with the 289 Hi-Po will now be used in my 1967 Shelby GT-350. I finally decided I am not liking the mediocre dark green paint job so it is going in the purple lake for a lighter color change. -
Very nice. I wouldn't mind have one of these.
-
That is SO Very nice. I would be proud to put that in my display cabinet.
-
Thank you gentlemen for the advice. I can see where I could grow into more tooling to make a larger variety of parts. It is just right now I do not have the budget or the space to get a larger and/or nicer one. An alternate short term option would be to find someone who has a lathe to make a custom set of hoops from time to time. But I don't know how I would go about that. Is there a machinist community like there is for 3D printing like Makerbot?
-
Thank you Brian.
-
Thank you all for the compliments.
-
Well something went sideways. My order was cancelled as of today.
-
1969 Rossi/ Brooks Daytona Charger
Bills72sj replied to MarkJ's topic in Stock Cars (NASCAR, Super Stock, Late Model, etc.)
Very nice result. -
Way cool! Good choice on the white wing.
-
I missed one final task before posting. Here it is with the real metal exhaust tips installed.
-
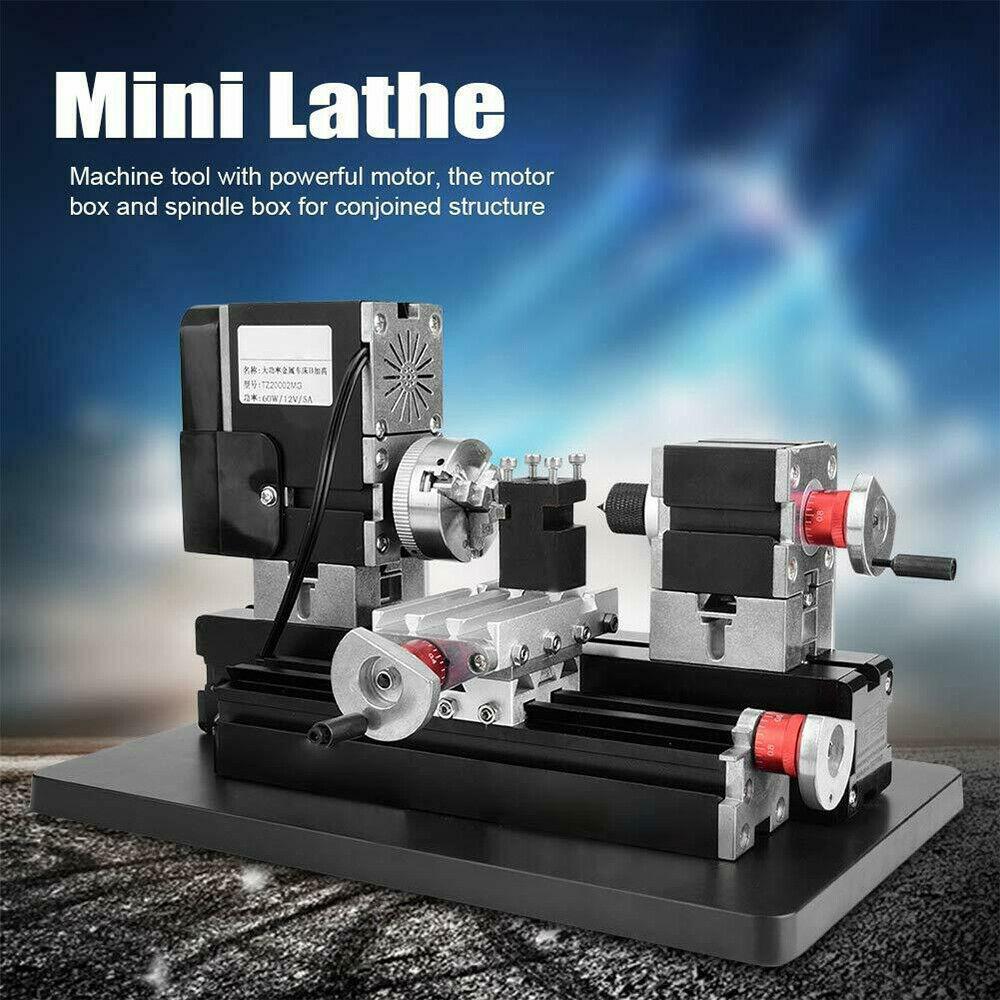
I have been wanting to machine my own rims for some time now. Over the years, I have acquired one FULL model box of rims and 3 Full model boxes of tires. My problem has been that most of the rims do not fit most of the tires. Add to the fact that I build day-two rides that really need wider rims for bigger tires in the rear. For awhile, I sanded the backs out of some deep dish spares to add to a pair of wheels to accomplish the look. The problem is I keep running out of deep dish donors to sacrifice. Way back, I got a set of after market wheels with aluminum hoops. I had a hell of a time gently changing the depth of the step inside to obtain the desired offset with a rototool (what a PITA). I really wanted a mini lathe but had a hard time justifying $650 (and up) for a decent start and am very wary of the cheap chinese one with a 24W (or less) motor. Well today I ran across one with a 60W motor with enough features to get me started for $261. Since all I basically want it to do is turn short chunks of aluminum tubing into wheel hoops, I hope it is good enough. We shall see.
-
Payhauler 350 Build.
Bills72sj replied to Oldmopars's topic in WIP: Model Trucks: Big Rigs and Heavy Equipment
What you have there has potential via frame extension. If you get two Lowboy trailer kits you could get very creative with the axle count, dolly possibilities. -
New Cases Filled
Bills72sj replied to OldTrucker's topic in General Automotive Talk (Trucks and Cars)
You have lots of cool cars there. Could you share pics showing them say, 4 at a time or do you have a link to your builds? -
That is super sweet! I would be proud to have that in my display cabinet. Thank you for sharing the the info on the paints you used upfront.
-
BRBO 2020 ProStar and Race Trailer
Bills72sj replied to kilrathy10's topic in Model Trucks: Big Rigs and Heavy Equipment
Very nice. Does the trailer rear door open? Do you have sponsorship graphics decals in the works? -
Good plan.
-
It is finally raining after 2 weeks of forest fire smoke coming from every direction. Salem, OR
-
Very nice truck.
-
Very nice. I just added one of those bodies to my stash recently.
-
Nice custom. Keep up the good work.