Steve H
-
Posts
2,535 -
Joined
-
Last visited
Content Type
Profiles
Forums
Events
Gallery
Everything posted by Steve H
-
Cool idea, and great execution.
-

71 Ford Ranger (custom)
Steve H replied to Hodrodz's topic in WIP: Model Trucks: Pickups, Vans, SUVs, Light Commercial
Great looking build so far James. Love the stance, and fantastic work on the doors and interior. I’ll be following… -
Ford F100 Foose
Steve H replied to eran_k's topic in WIP: Model Trucks: Pickups, Vans, SUVs, Light Commercial
Very cool Eran. Nice colour combo. That green is awesome. -
Cyber punk ‘88 Dodge Daytona/Mercedes C9 kit bash
Steve H replied to Steve H's topic in WIP: Model Cars
Thank you Greg! I appreciate the compliment. I’m always learning, and trying to improve my skills. I thought about my Mad Max comment and afterwards thought, the build will be sort of “Mad Max but maybe in Beverly Hills”… It’s definitely been a bit of a learning curve working on a style of kit that I don’t have any previous experience with. I’ve had to use instructions a few times!!???♂️? -
Awesome looking interior Mozzi. I really like how you have tied in the orange colour on the body, interior, and engine. It’s something I often do on my builds. I would never have been brave enough to do a full orange interior, but it looks outstanding. Look forward to the engine progress.
-
Hi Carl, great project! I personally think these make killer looking pro street cars, although I love anything tubbed. I did one a few years back. Nice engine choice, I will be watching. Cheers, Steve
-
Excellent progress Mozzi. That orange REALLY pops against the body colours. Nice choice. The MaXtang lettering is perfect, well played!
-
Cyber punk ‘88 Dodge Daytona/Mercedes C9 kit bash
Steve H replied to Steve H's topic in WIP: Model Cars
Hi Brian, it’s a small space for sure. I’ll see what I can do with it. Not going to get TOO carried away on details with this build, just enough to keep,it somewhat interesting… if you’re into this sort of thing…?? Thank you Anton! Always good to hear from you sir. Loving what you have planned for your Grand Cherokee build. Thanks Chris, hope all is well with you my friend. I appreciate the comments guys, should have some bench time this weekend. Hope to have another update soon ?? -
Nice wagon! Very clean work throughout, and the 2 tone paint is really well done John. I have one of these in the stash, just not sure when I’ll get to it… so much styrene…
-
Really nice clean build Curtis. The colours work very well together, along with the added detail. Curious what paint you used for the back up lenses.
-
Cyber punk ‘88 Dodge Daytona/Mercedes C9 kit bash
Steve H replied to Steve H's topic in WIP: Model Cars
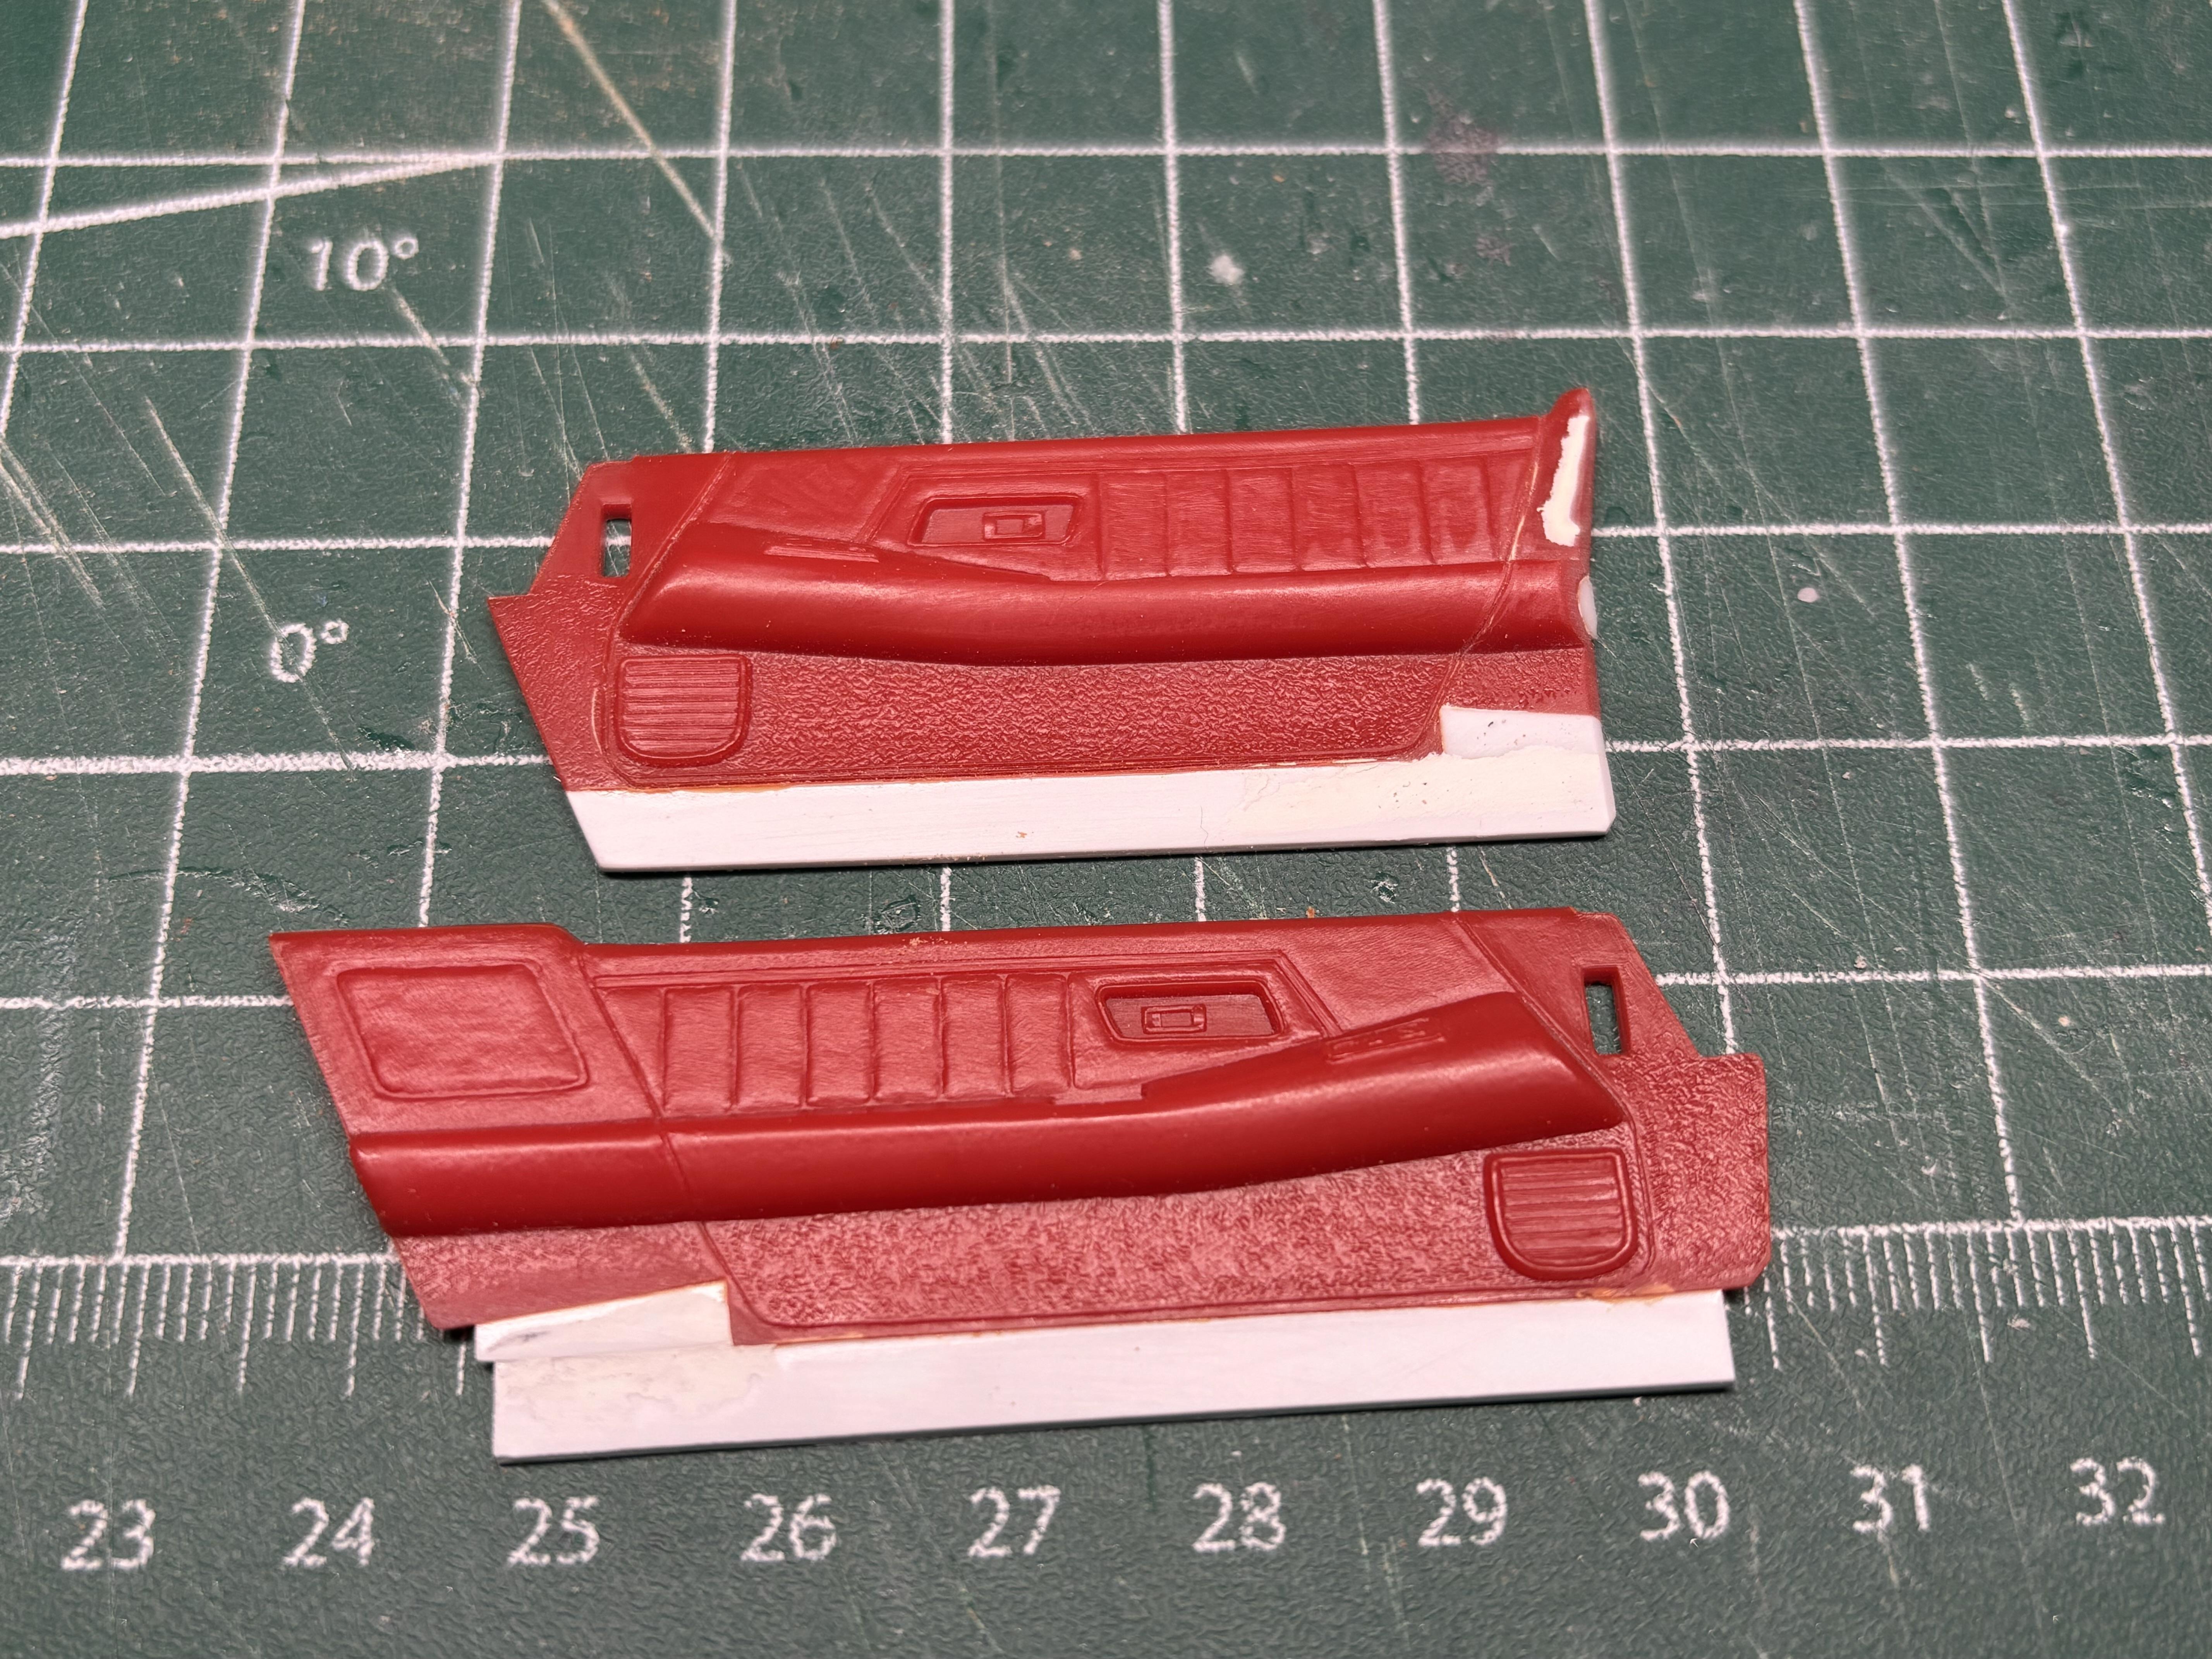
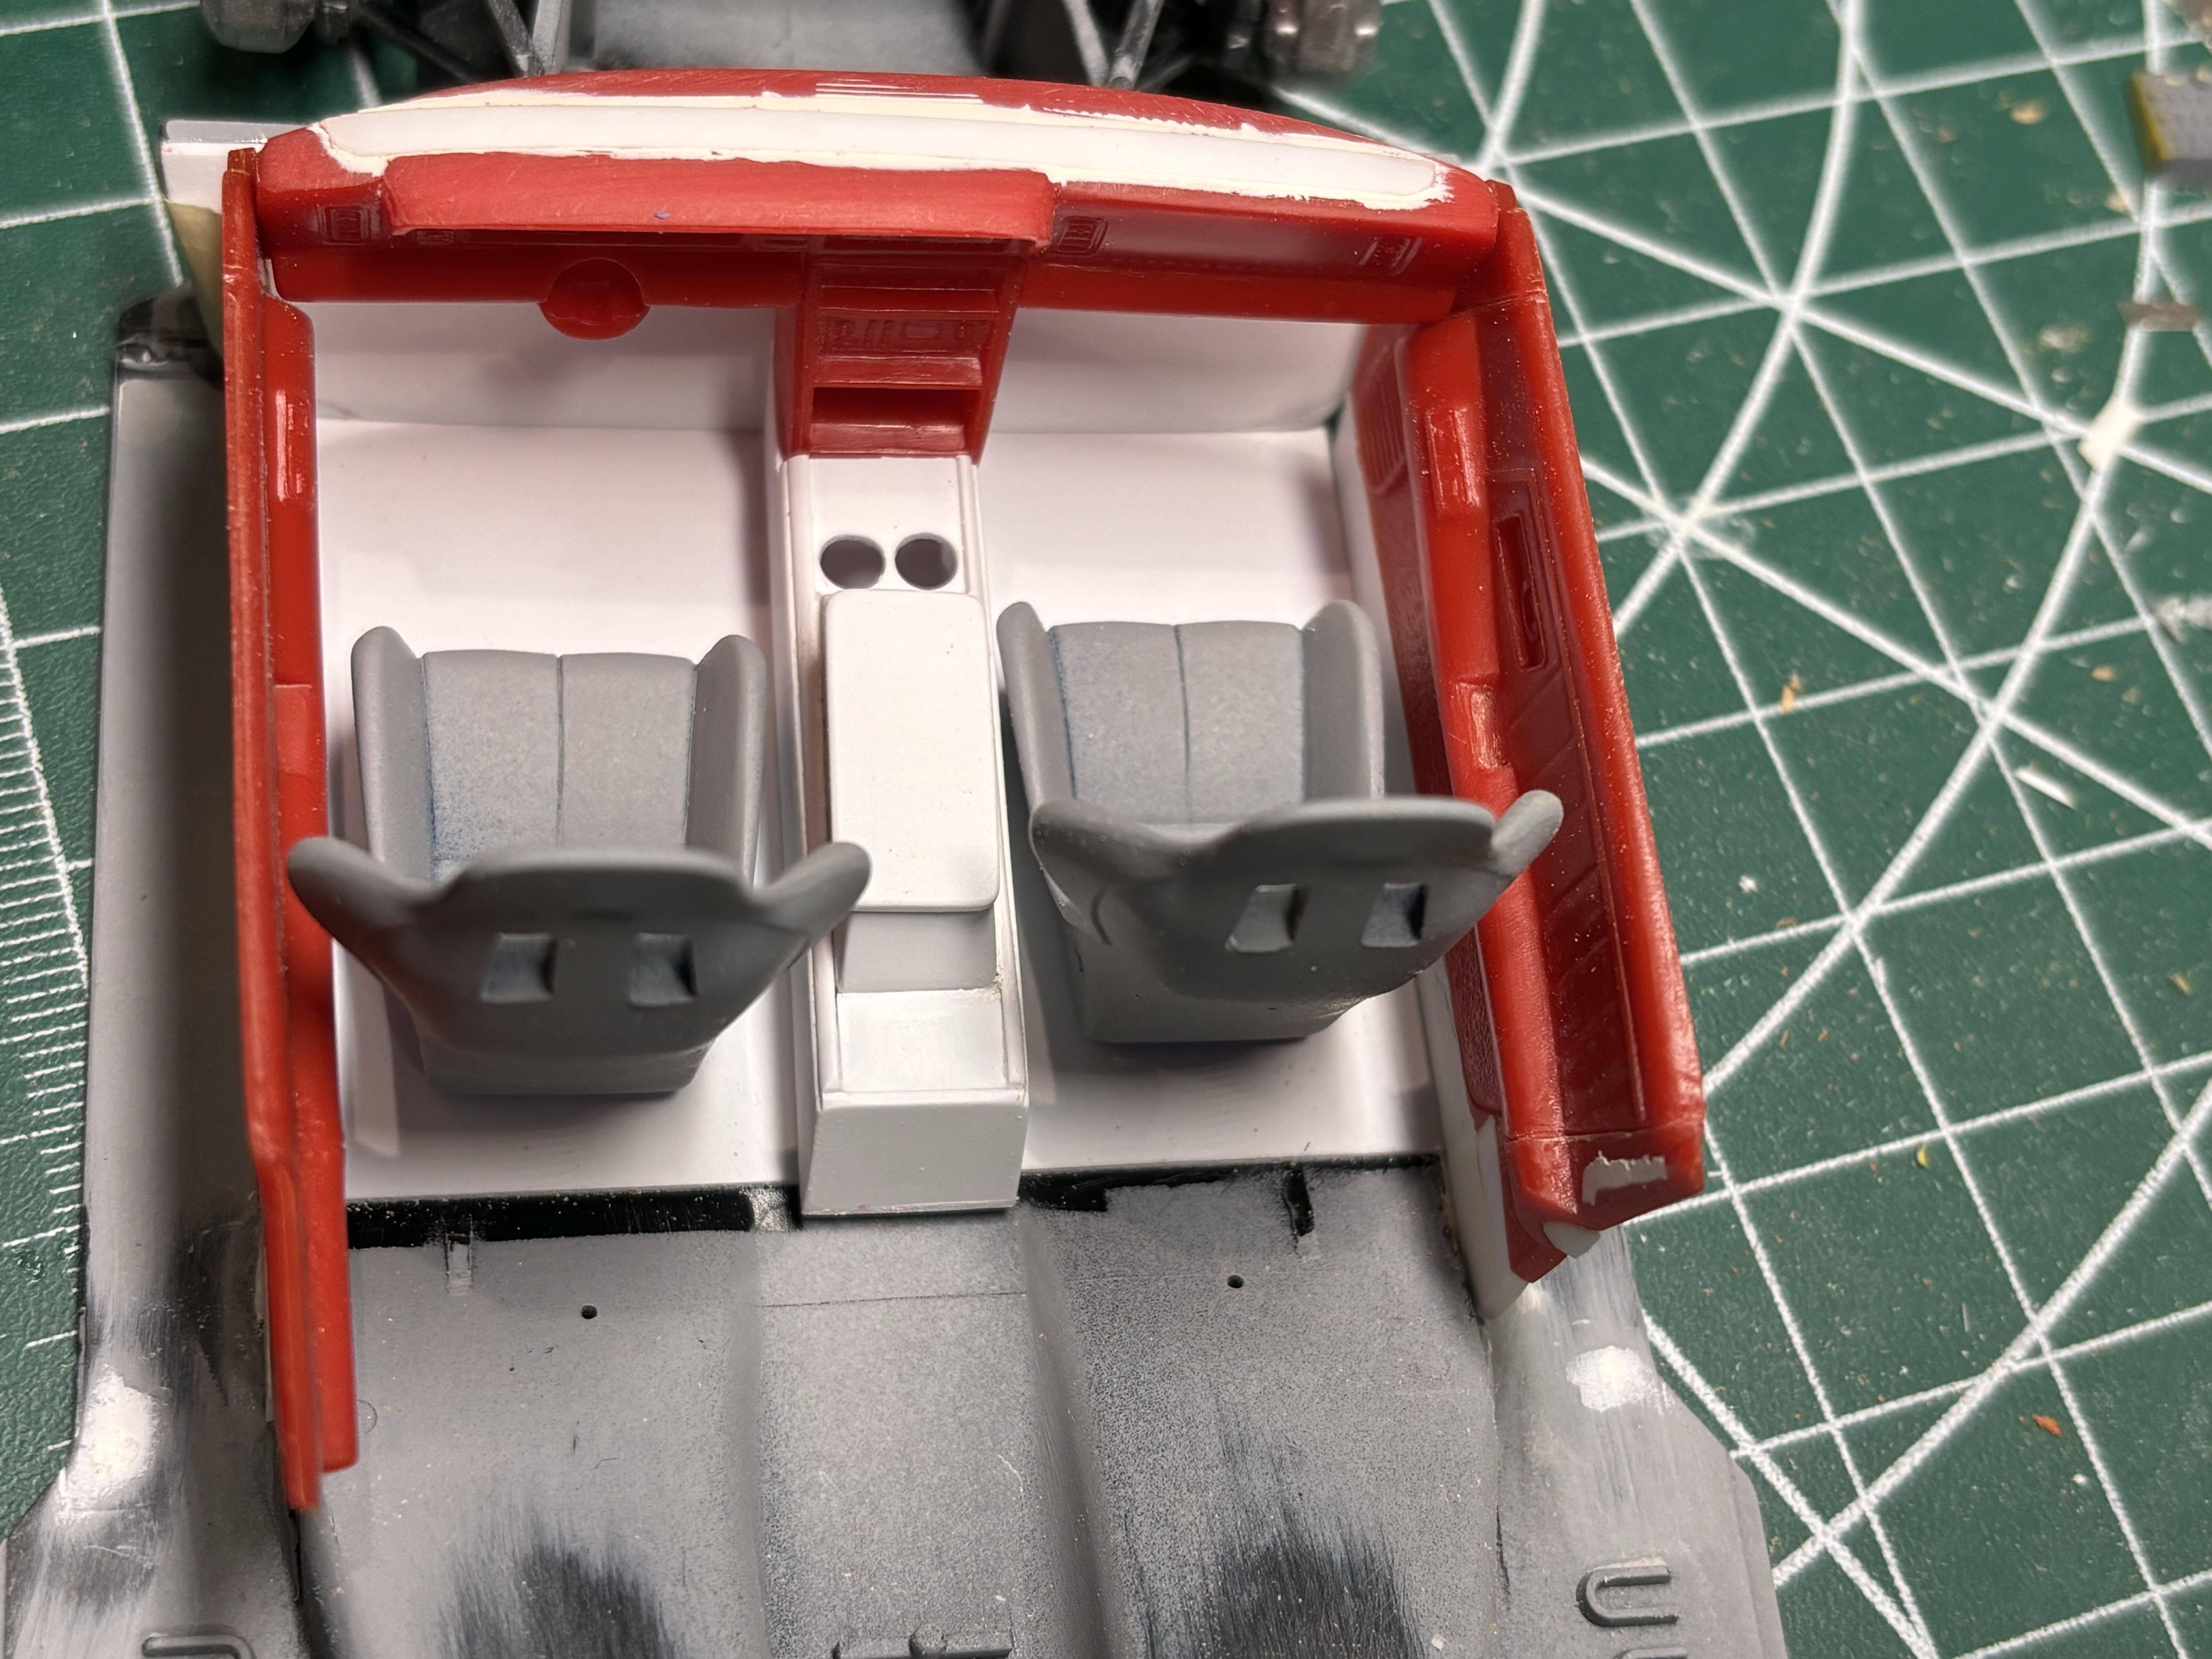
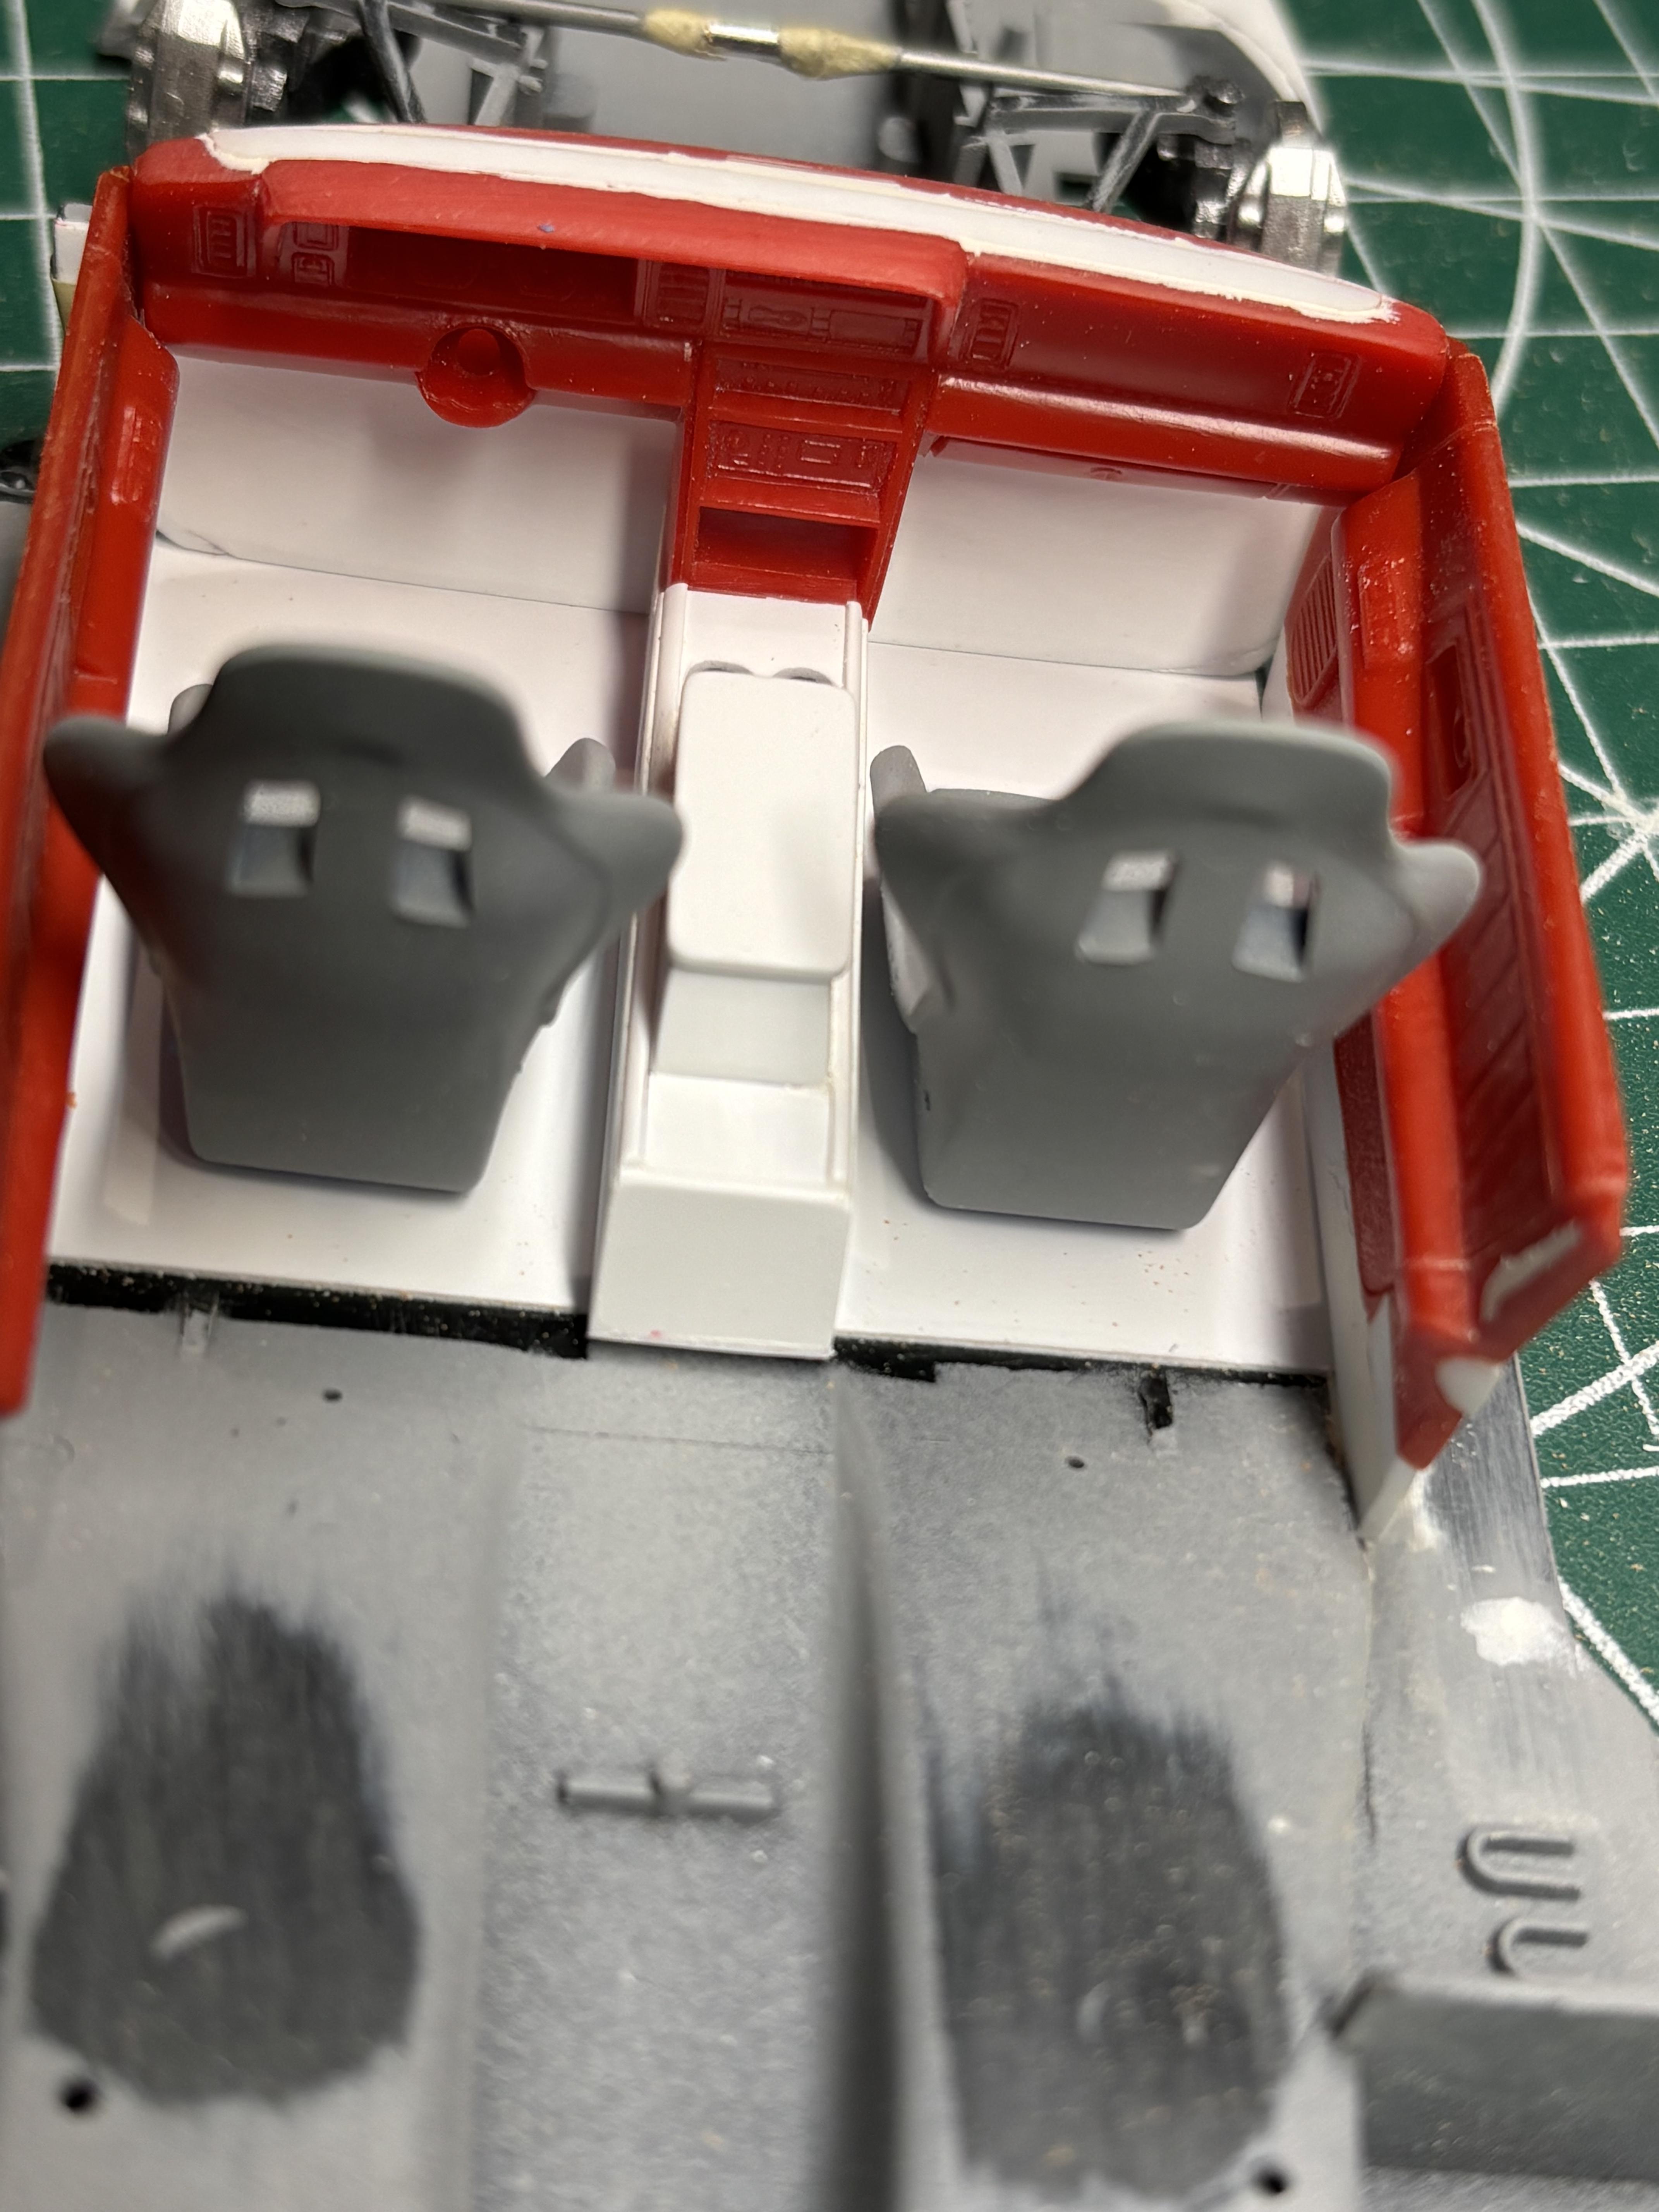
A bit of progress on the interior. Just sorting out some of the pieces that will be used. The plan is to use the factory door cards, but they will be somewhat modified. The passenger side has been shaped to fit with the chassis, not shown is the rear bulkhead/firewall that the door cards will butt up to. There will be some carbon fibre details, and new photo etch power lock/window switches. I deepened the door pull on the passenger side too, although hard to tell in the photos. This will be done on driver side as well, as you can see, I haven’t started shaping the driver side yet.. Obviously, a bunch of work to do yet, especially at the bottom. Not sure how the re-release of this kit will be, but ALL of the panel lines inside and out are very shallow on the Daytona. I’ve spent a lot of time scribing the panel lines deeper. The dash will be completely re-worked. Top will be smoothed out, I think I will scribe in some defrost vents, not 100% on that yet though. Gauge faces will be different as well. Seats are from a Tamiya Subaru WRC , and I’m almost done with the scratch built console. I have scratch built a shifter, and Hoonigan style hand brake. (No photos yet…) Haven’t started the steering column yet. The pieces are slowly coming together. Thanks for having a look!
-
Ability to take pride in one’s work, seems to be a thing of the past, along with attention to detail
-
Very cool idea Douglas. Is that Tamiya light pearl red on the body? I will be following along as you progress. I am interested in the “space stuff”, as one day, I would like to try this type of build.
-
1965 Acadian Beaumont Sport Deluxe Coupe
Steve H replied to Mike Slapattack's topic in WIP: Model Cars
Hi Michael, I love seeing someone else building a Beaumont. I will be watching with interest. I own a ‘67 Beaumont Sport Deluxe which I plan to build a replica of, but realistically, that’s a couple of years away. Cheers, Steve -
Ohhhh yaaa… that’s cool. Very sweet looking ride, my wife and I had a couple of Grand Cherokee’s. I will definitely be watching this one come together. Wondering if you can tweak the top of the front fender flares a bit to be parallel with the body line? I think it could just be sanded, and tapered down a touch at the front edge. Just a thought. Looks killer as is. A Jeep with some serious attitude, I love it.
-
I needed another project....T800
Steve H replied to gotnitro?'s topic in WIP: Model Trucks: Big Rigs and Heavy Equipment
Hi Jeff, wow, this turned out very nice. That trailer was a ton of work, and looks fantastic. I spent many years in civil construction, and built dozens of miles of highways in my career. One of my favourite parts of highway construction was placing/grading the road base. Specifically, I really enjoyed working with belly dumps, bulking in the road base. I worked with some amazing truck drivers, and we developed a language of our own all using hand signals. Thanks for sharing your process, some extremely talented scratch building here. Cheers, Steve -
STITCHES
Steve H replied to TopherMcGinnis's topic in WIP: Model Trucks: Pickups, Vans, SUVs, Light Commercial
Awesome looking build Topher. Love the low aggressive stance on this. ?? -
Nice start James. I’m a big fan of anything tubbed.
-
Nice work as always Greg. The stance is spot on. I like the inner front fender mods, great idea. Oh.. and drilling the door handles out, ??
-
Awesome work Dennis! I’m a little late, but wow, very cool build sir. Lots to comment on but first, sheesh!, that hood was about 3scale inches thick! Yikes. I absolutely love the 63 with the Coyote motor, great looking build. I will be watching…
-
Hi Claude! Hope you are well my friend. I know VERY little about salt flats cars, just the basics. Go fast in a straight line! That said, you always build extremely well thought out, and engineered vehicles. This is another fine example of your creativity, and craftsmanship. Bravo sir! Cheers, Steve
-
Hmmmmm…. Very interesting. At a quick glance, and with full disclosure that I like to look for an easy way, here’s my thought. Could you split the difference by removing a section (by eye, maybe 4 scale inches) from just ahead of the rear wheel opening. Then move the rear door line back about half the distance from where it is, to where the trim jogs upward? (Looks like maybe 3 scale inches?). The downside would be that the vehicle is then 4” shorter, which might be a hard no for you, this would also result in chassis mods/shorter wheelbase. However, it might make it look sportier?! The bonus would be minimal trim reworking… As for the upper tail fin extension, I think it’s styrene, sand, fill, prime , sand, fill, prime… Just my initial thoughts.
-
AMT 70 1/2 Camaro headlight bezel repair?
Steve H replied to atomicholiday's topic in Model Building Questions and Answers
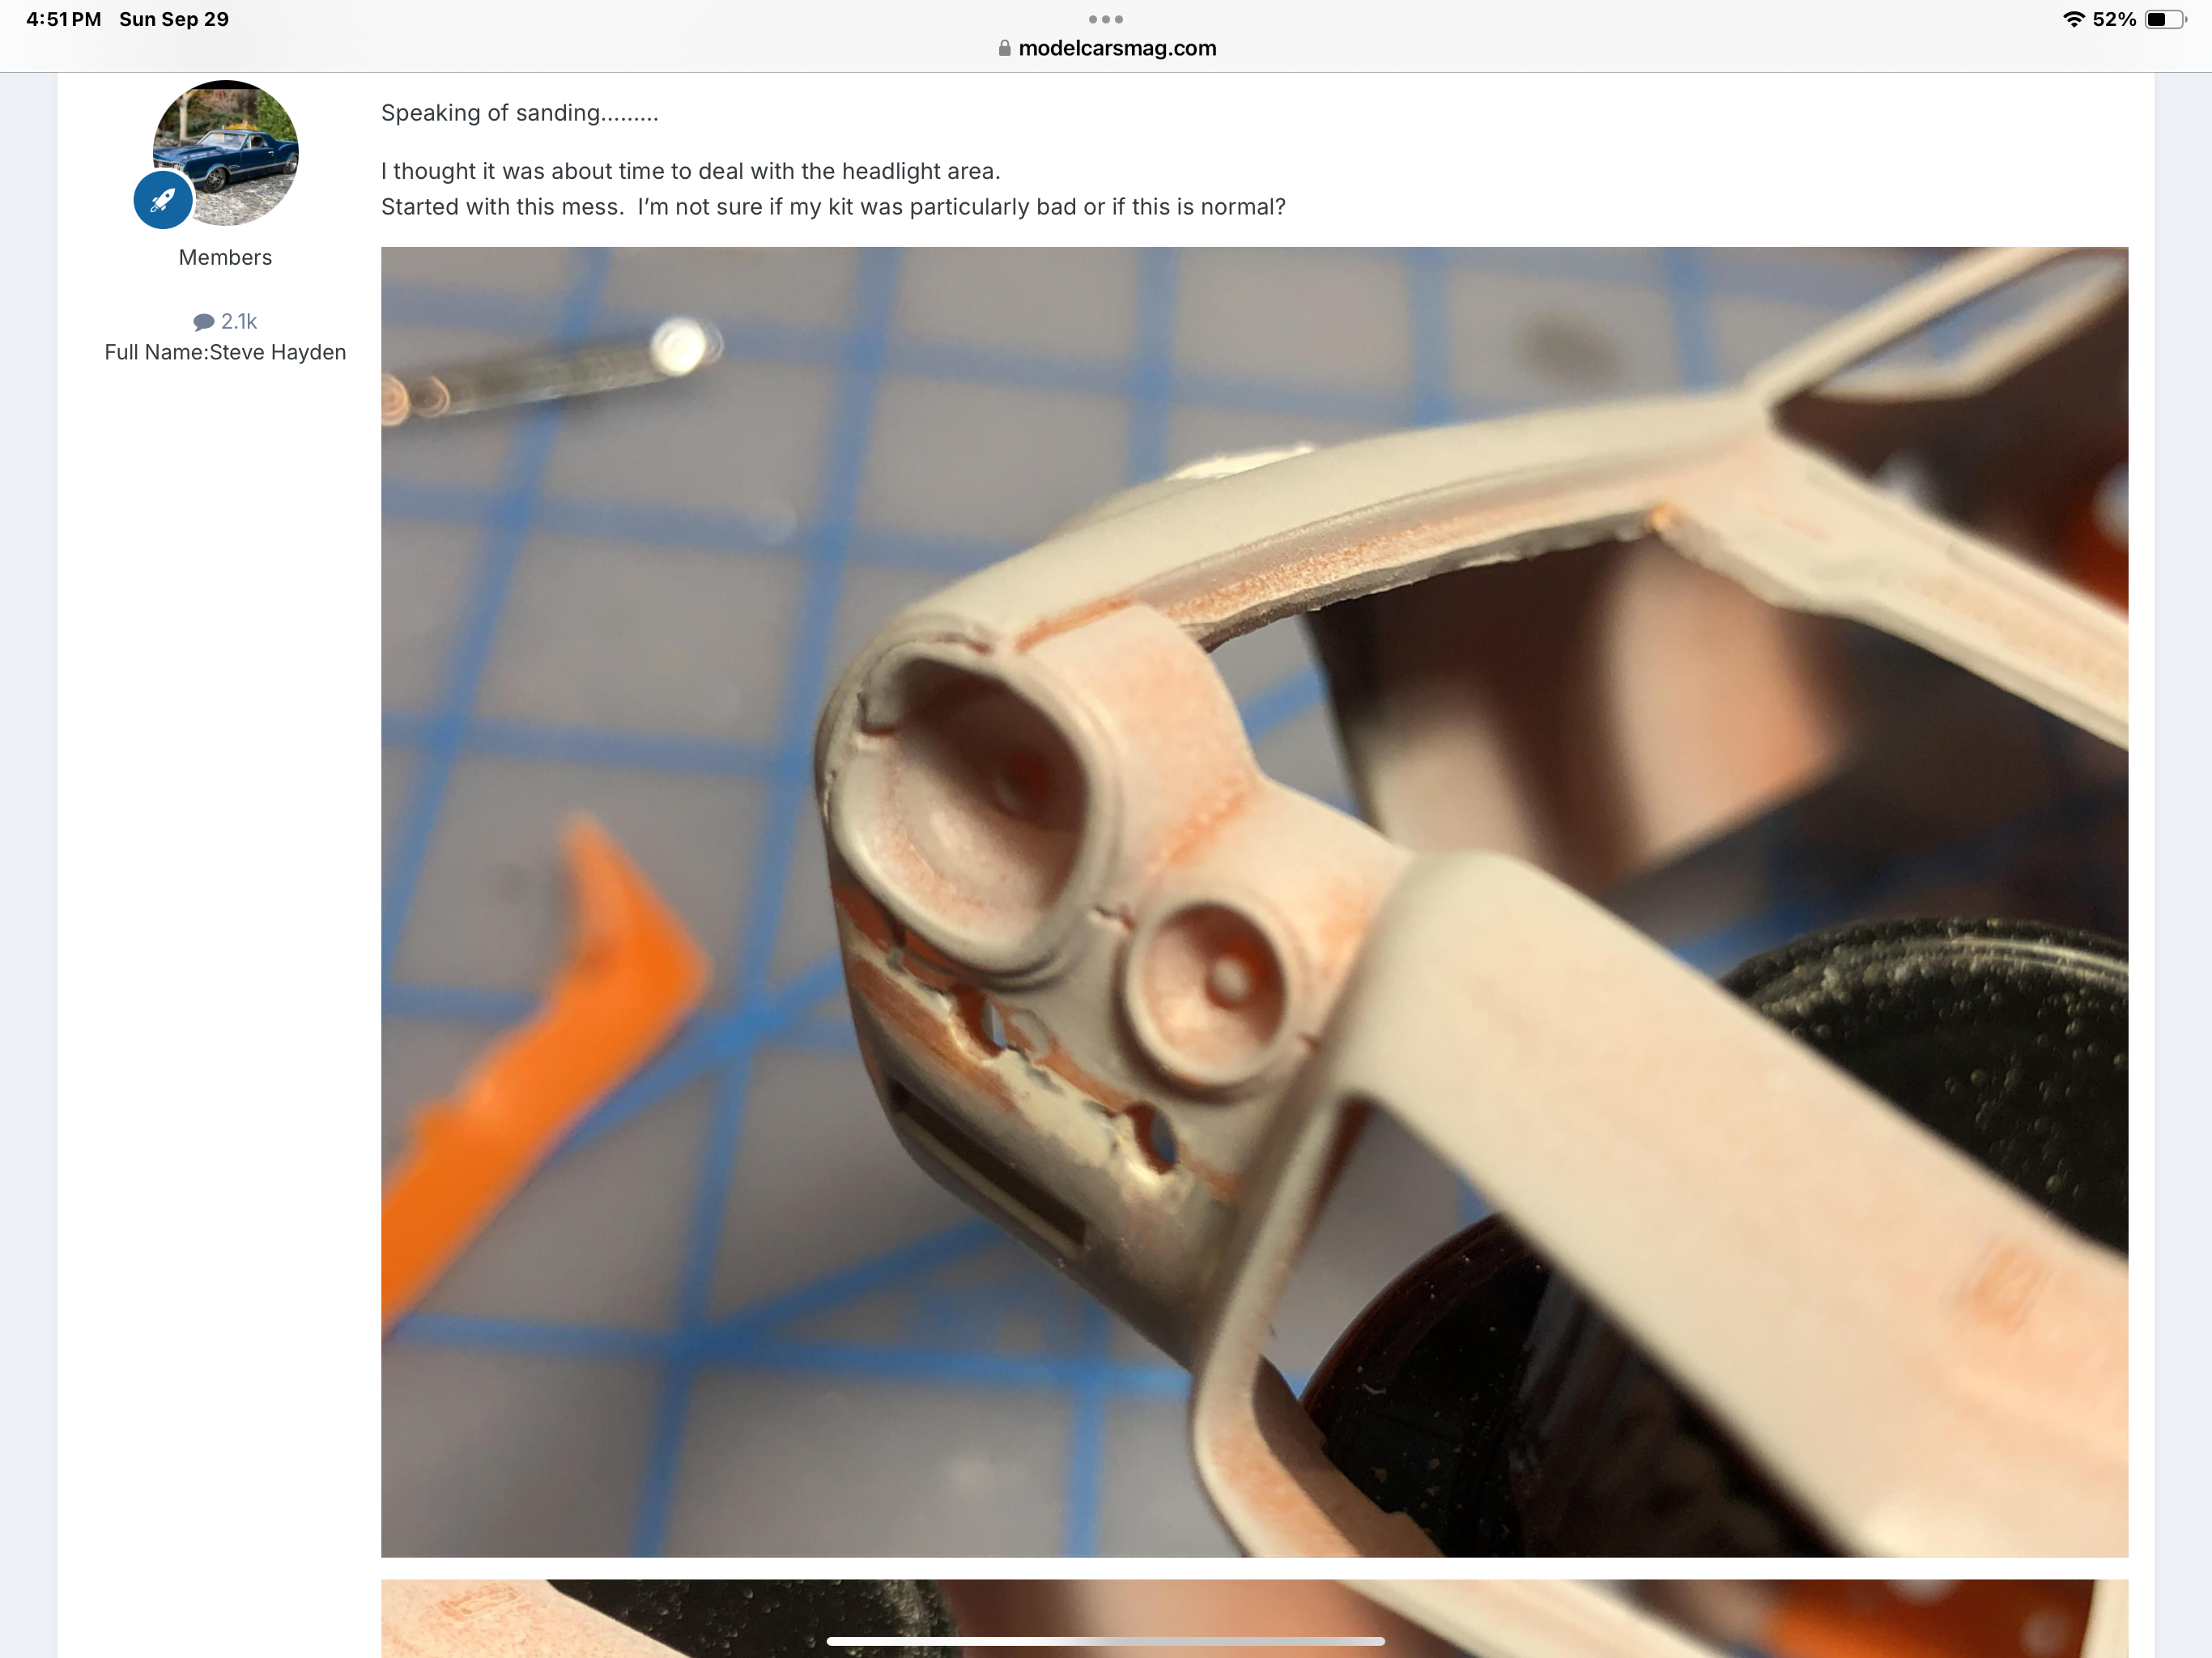
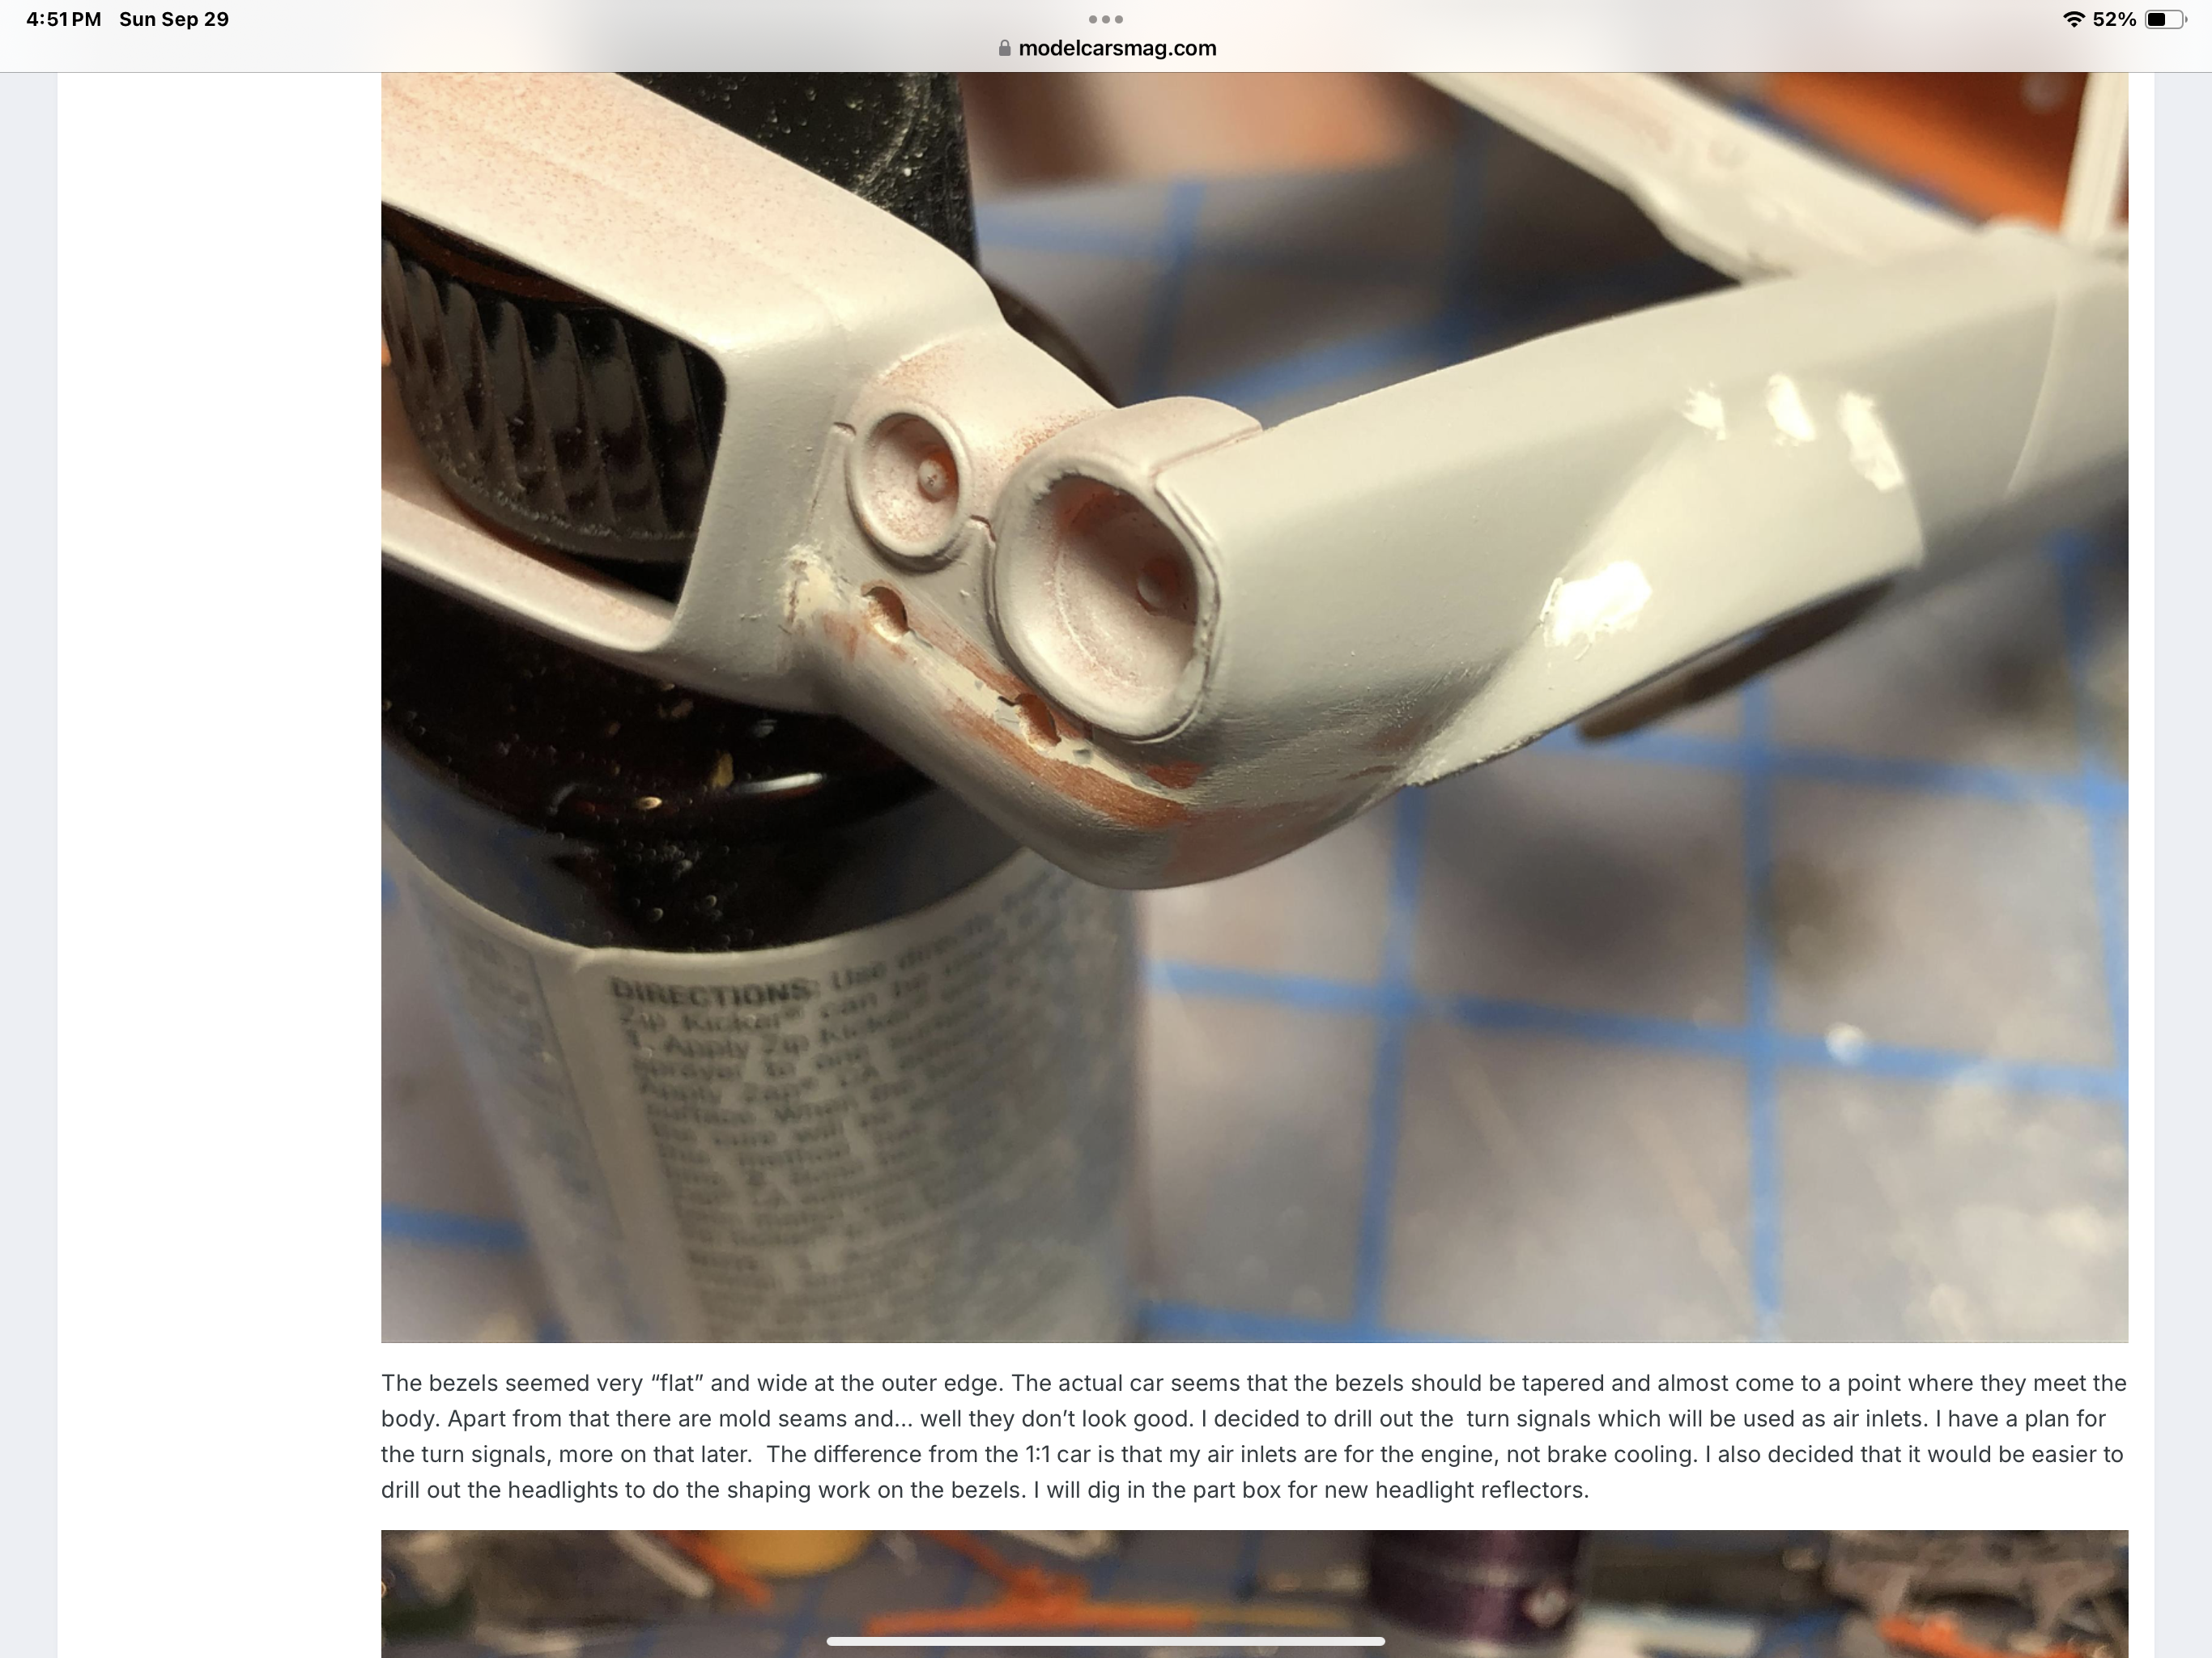
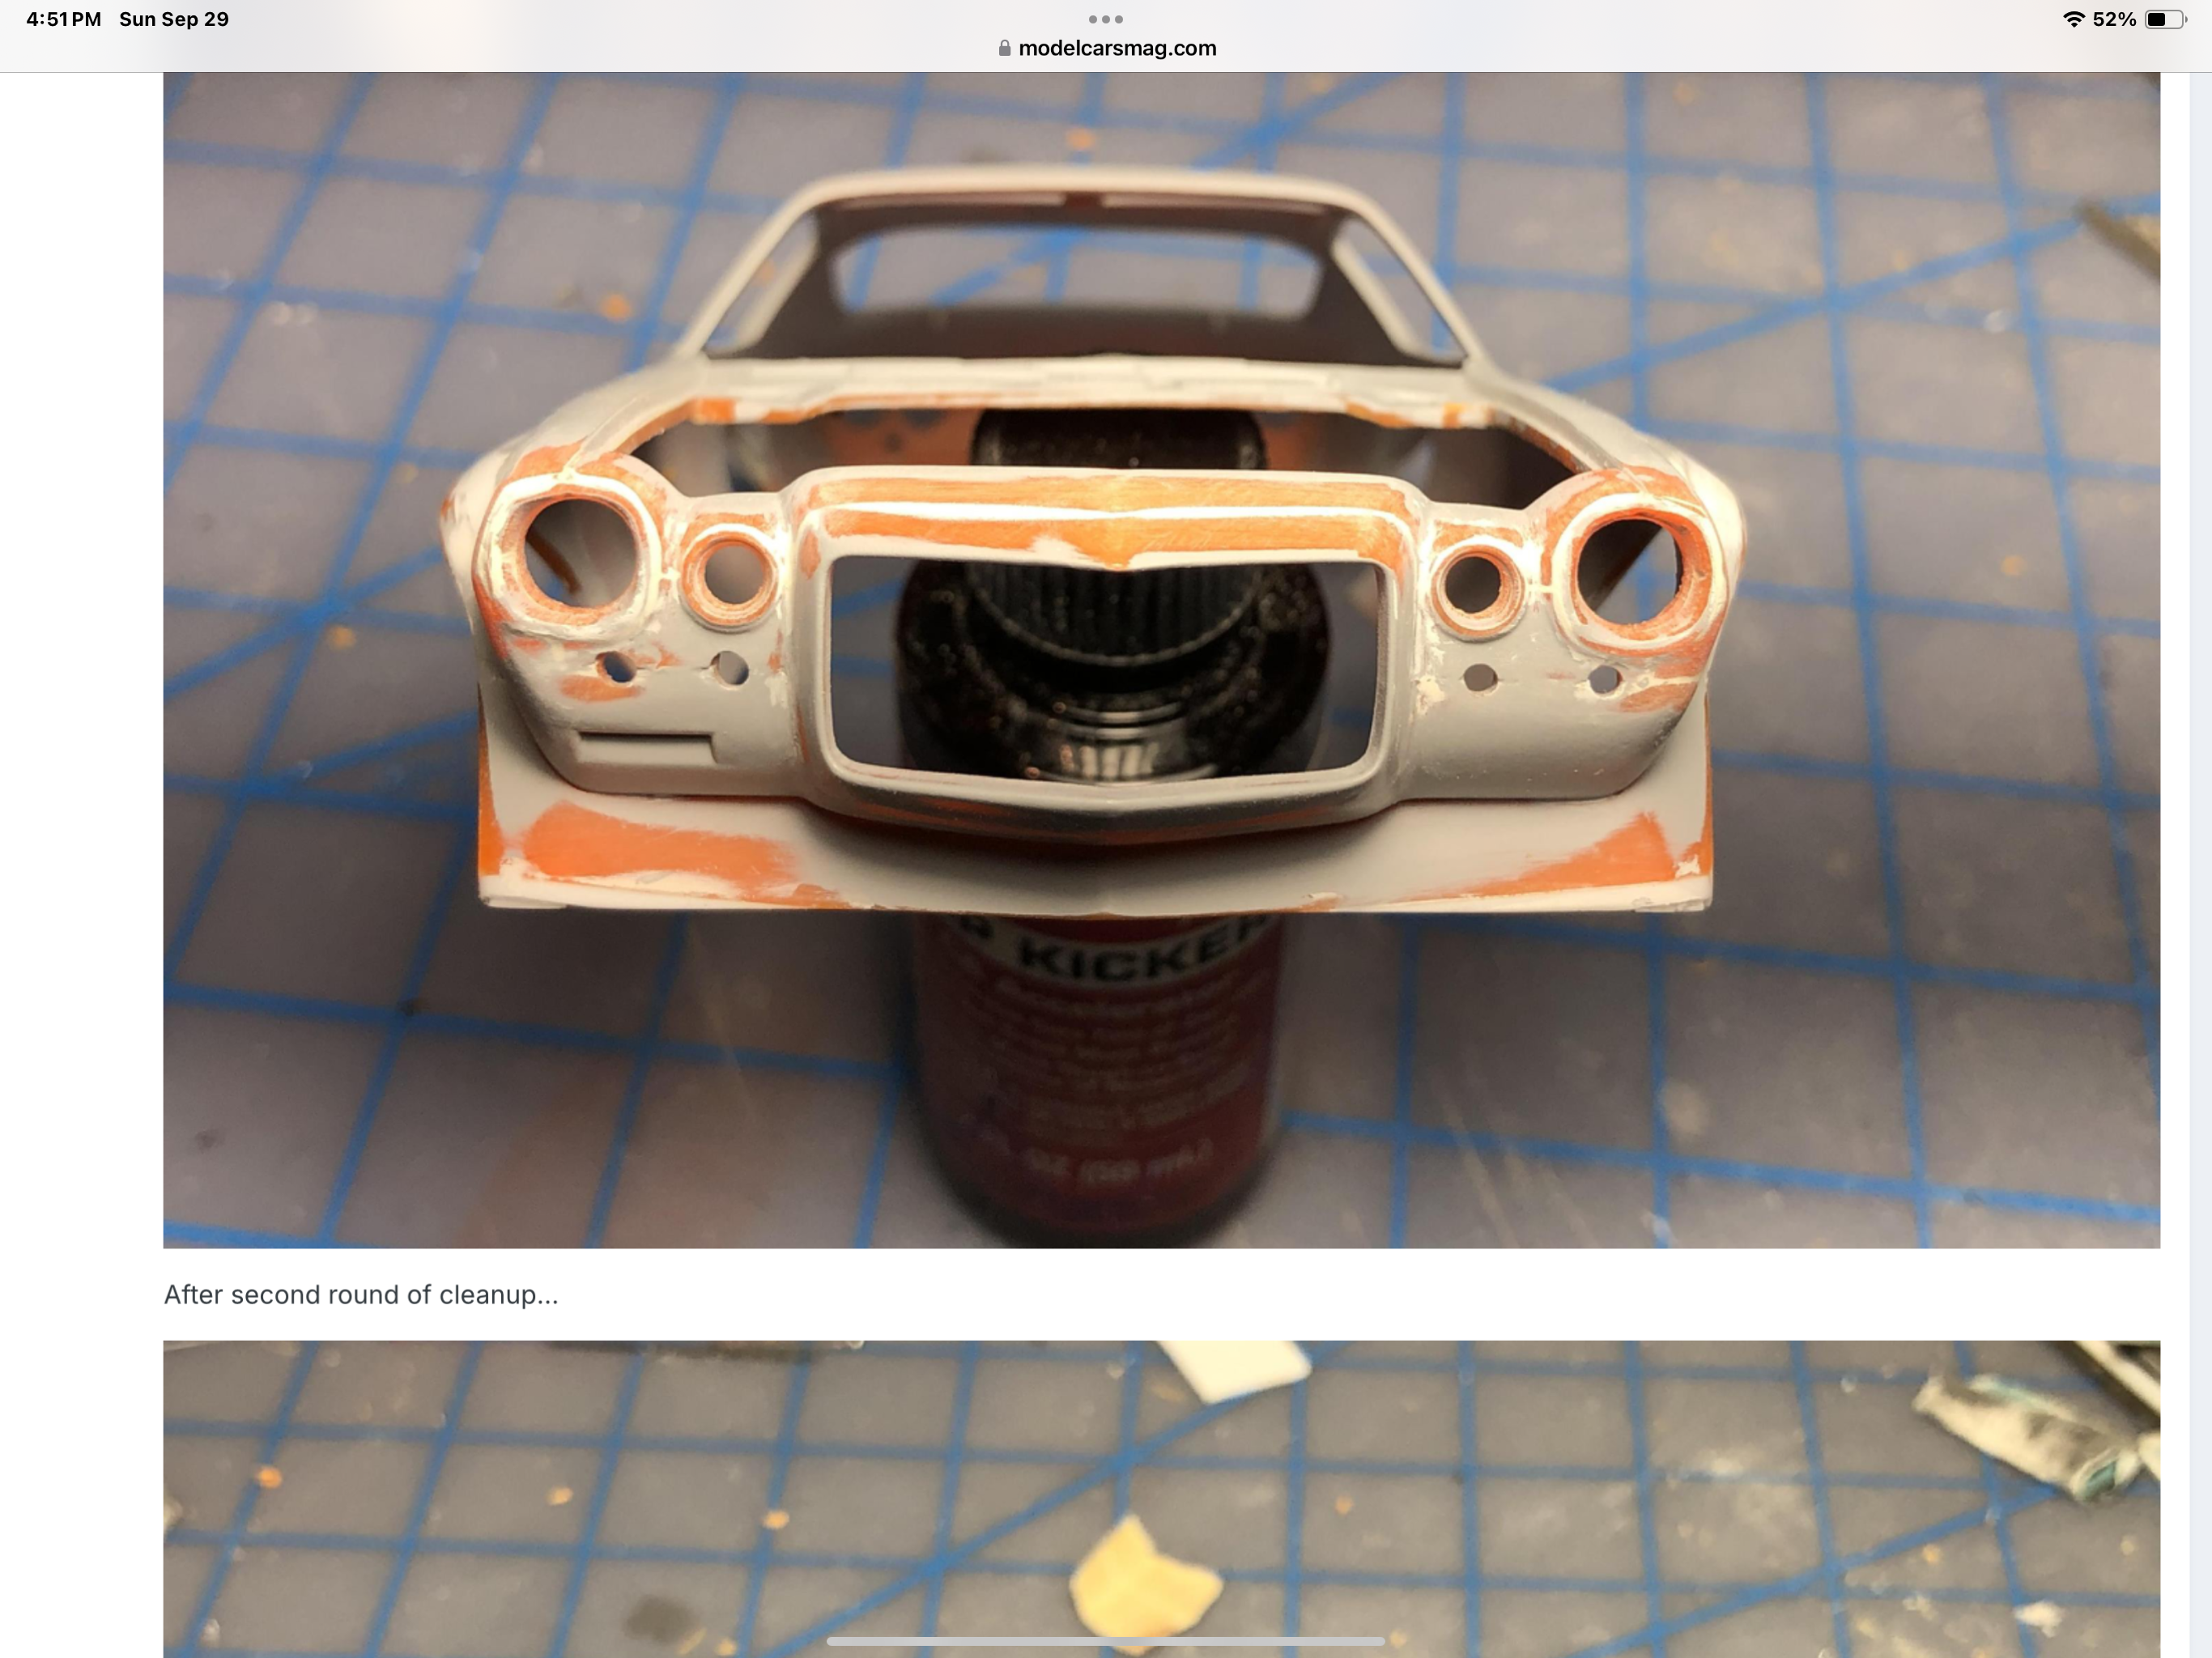
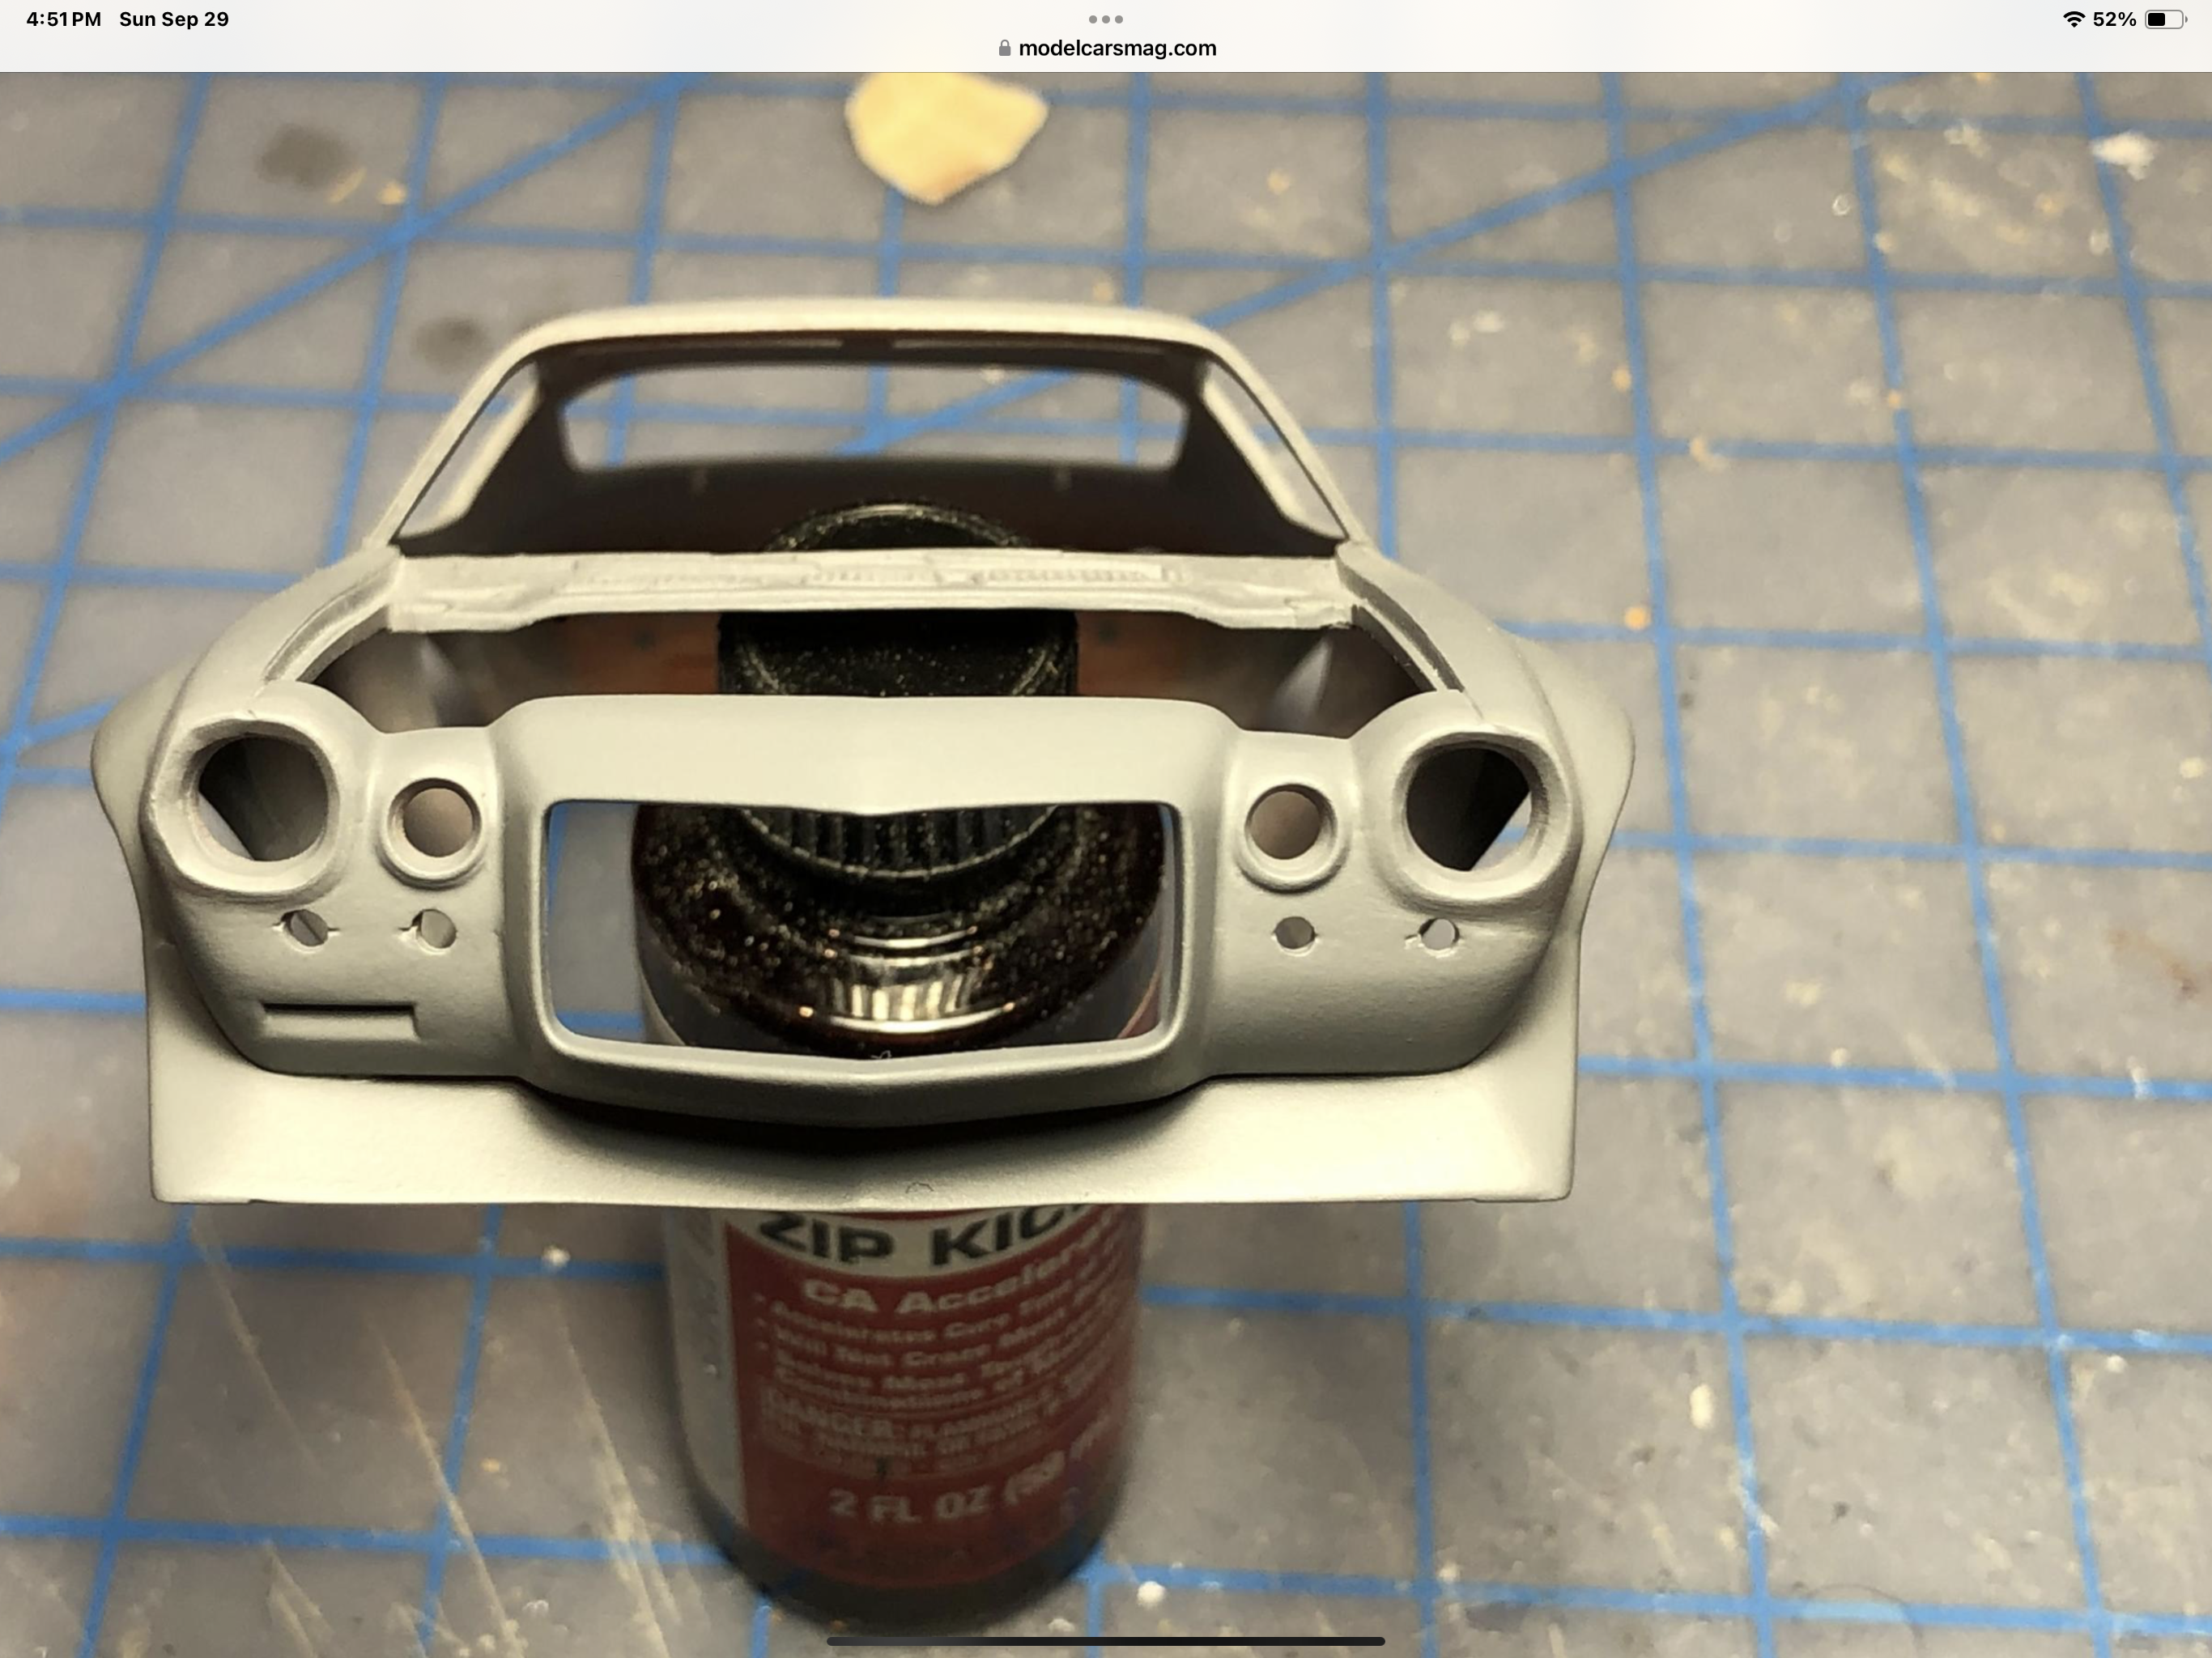
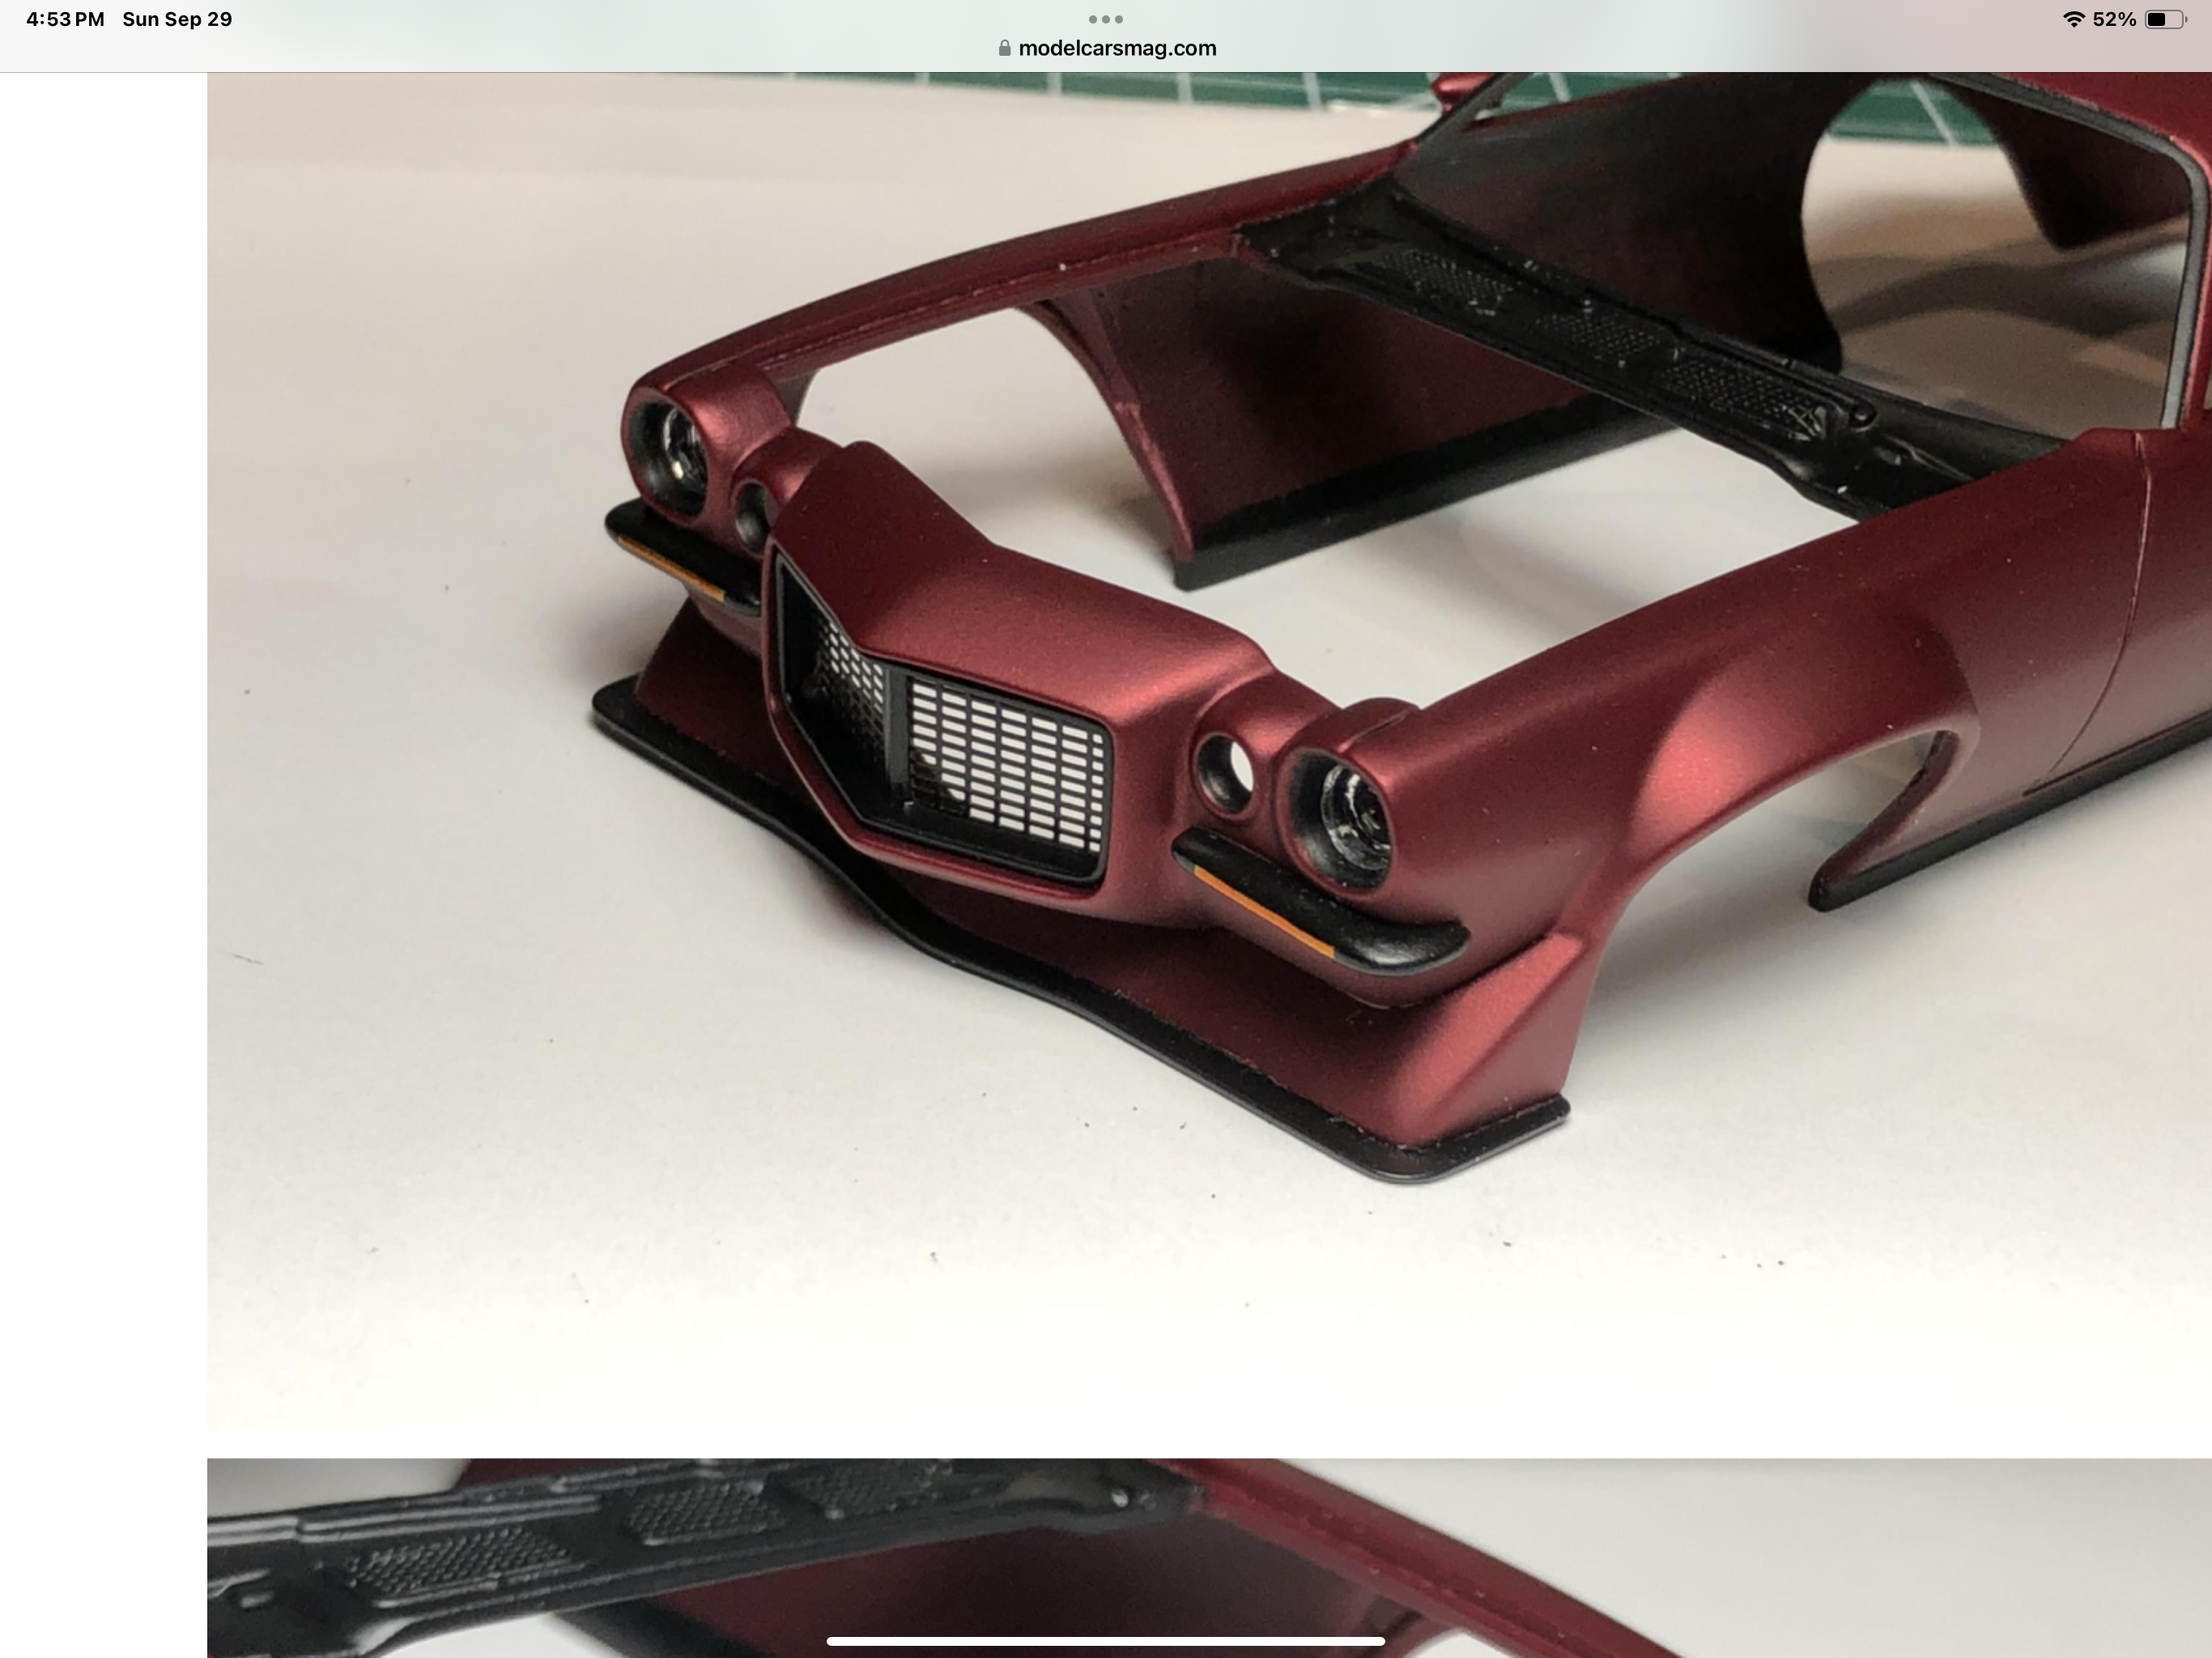
My kit had a very similar mess for headlights. My attempt at a fix below… (from a pro touring build) The finished product… except for headlight lenses… Not sure if this will help at all. Good luck, it’s a very difficult area to work on.
-
Cyber punk ‘88 Dodge Daytona/Mercedes C9 kit bash
Steve H replied to Steve H's topic in WIP: Model Cars
Hi Brian, ya, the small parts get attached right away or they disappear… Thanks for checking in. That plow truck you are building is absolutely amazing, very nice work. -
Very cool Corvette Len. Interesting seeing the different bodies blended together, looks like it could have been on a GM showroom floor. Good choice on the engine in my opinion. Not sure what clear you are going to use, but Tamiya TS 13 doesn’t usually play nice with decals… Cheers, Steve