Steve H
-
Posts
2,535 -
Joined
-
Last visited
Content Type
Profiles
Forums
Events
Gallery
Everything posted by Steve H
-
Very nice, and cleanly built Chevelle. The addition of the rear side windows, the body colour pan below the grill, and the engine details really make a difference. Thanks for sharing this.
-
Smooooooooth…. Another beautiful build Luke. Removing some of the iconic trim of the 57 creates quite a different look. ??
- 26 replies
-
- 1
-

-
- revell
- snaptite max
- (and 2 more)
-

Hello everyone, from North Vancouver
Steve H replied to BK9300's topic in Welcome! Introduce Yourself
Welcome aboard Brian. Another fellow Canuck here, just across the water from you on the island. You’re off to a great start figuring out the quote for replies. I don’t spend much time over in the big rig section, but I do know there are some extremely talented and very friendly folks over there. Every one here is more than happy to share knowledge tips and tricks. My builds are much better than they were before joining here. Keep an eye on the tips and tricks section, always great stuff there, and post any questions in the Q and A section. Cheers, Steve -
Nice looking GTO Jeremy. That colour is tasty on it! She looks like she just rolled off the dealership showroom. The macro lens experiment turned out good too. I just got a new phone, haven’t played with the camera yet… Cheers, Steve
-
1955 Ford F-100 Street Rod
Steve H replied to Zippi's topic in WIP: Model Trucks: Pickups, Vans, SUVs, Light Commercial
Another great looking build shaping up Bob. Nice job on modifying the chassis. I have the Iceman back half chassis, but haven’t used it yet. As for the bed, it might look good to clean up the hole and leave it so you can see the rear suspension etc. It’s often done that way on 1:1 trucks, just my 2 cents… Look forward to watching it come together. -
Beautiful work all round here Ron. All the mods and fabrication are very well done. The green looks great too. I think it’s time for me to buy some wheels and tires from Jay’s, they look good. Are you going to make your deadline?! Cheers, Steve
-
Hi Rooster, I love that Tamiya colour, and it really looks great with the custom work you’ve done. I hope you will keep posting updates. Personally, I think both wheel choices will look great, your build, your way. Please post it under glass when complete so we can all see the finished product. It’s going to be a beauty for sure. Cheers, Steve
-
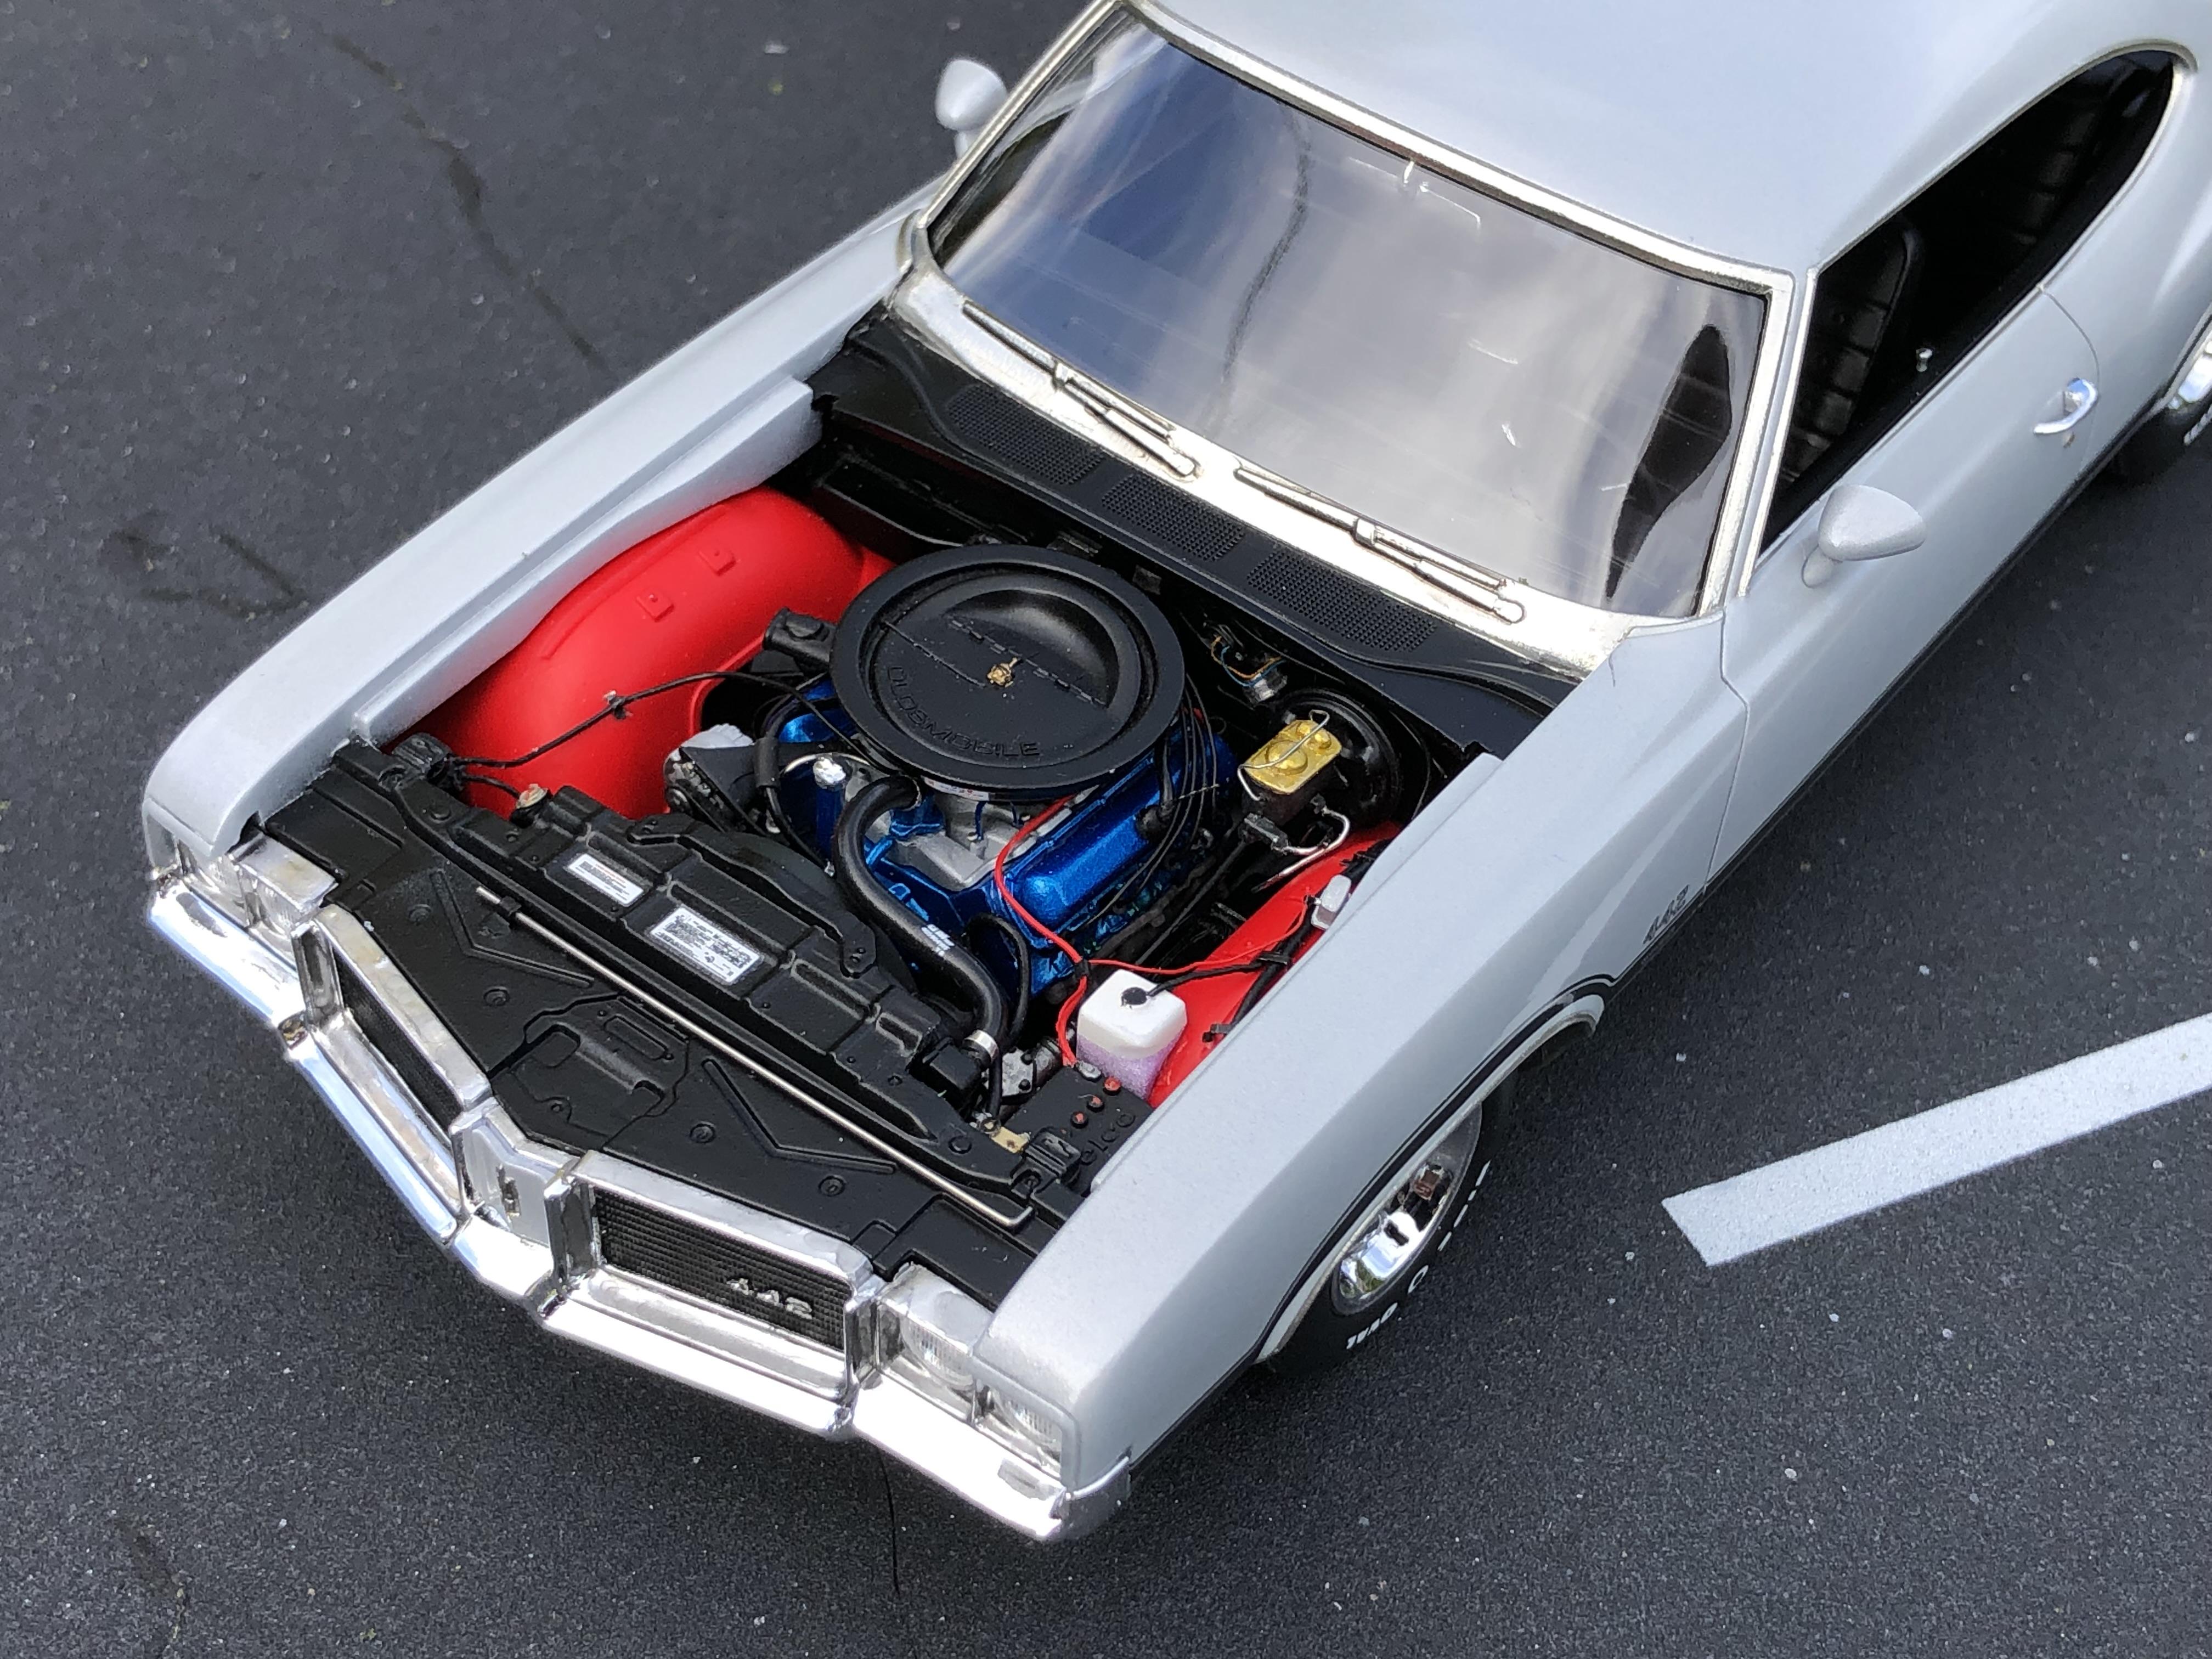
Very nice 442 Ludwig. They do look tough in black! I too am curious what colour you used for the engine? Cheers, Steve
-
I think we have the sluggish forum problems solved
Steve H replied to Dave Ambrose's topic in How To Use This Board
Hi Dave, thank you very much for everything you do here. We have a wonderful community here, and the work you, and your team do to keep it that way is truly appreciated. Thanks for keeping things smooth, clean, and safe!! Cheers, Steve -
‘55 El Camino
Steve H replied to NOBLNG's topic in WIP: Model Trucks: Pickups, Vans, SUVs, Light Commercial
Great project Greg. That roof looked like a real mess to start with. Obviously no match for your talents tho. I think you have convinced me to try that putty, I’ve been using Tamiya, and it’s good, but not great. That stuff looks like it feathers out really nice. I’ll follow along, I love Elky’s, especially phantoms… -
71 Olds 442 W30 (replica of my brother in law’s car)
Steve H replied to Steve H's topic in WIP: Model Cars
Thanks a bunch Brian. I appreciate you taking the time to have a look and comment. Hoping that I can get better quality photos with my new phone! I’ll wait til it’s 100% complete for that tho… I’m enjoying having it in my display case for now. It really is quite an interesting colour. Cheers, Steve -
71 Olds 442 W30 (replica of my brother in law’s car)
Steve H replied to Steve H's topic in WIP: Model Cars
Thank you Carl, always nice to hear from you sir. Hi Rich! Thanks for the comments. I am looking forward to seeing the look on his face when I give it to him. -
1950 Chevy 3100 Pickup WIP
Steve H replied to Duddly01's topic in WIP: Model Trucks: Pickups, Vans, SUVs, Light Commercial
Hi Donald! Well… I’m a little late to the party here, but WOW!! Another beautiful build sir. Excellent colour choice and love your lighting. Cheers, Steve -
71 Olds 442 W30 (replica of my brother in law’s car)
Steve H replied to Steve H's topic in WIP: Model Cars
Thanks Jim, I think it looks pretty decent. Hi Phil! I’m glad you got to see it in person, it is indeed a beauty. I was supposed to be there too, just couldn’t quite get there. Thanks for your comments Phil, I hope you get to see the model in person as well. Once I hand it off I may not be able to borrow it again tho…. I hear it was a big turnout for the show, and weather was perfect. Talk soon. -
71 Olds 442 W30 (replica of my brother in law’s car)
Steve H replied to Steve H's topic in WIP: Model Cars
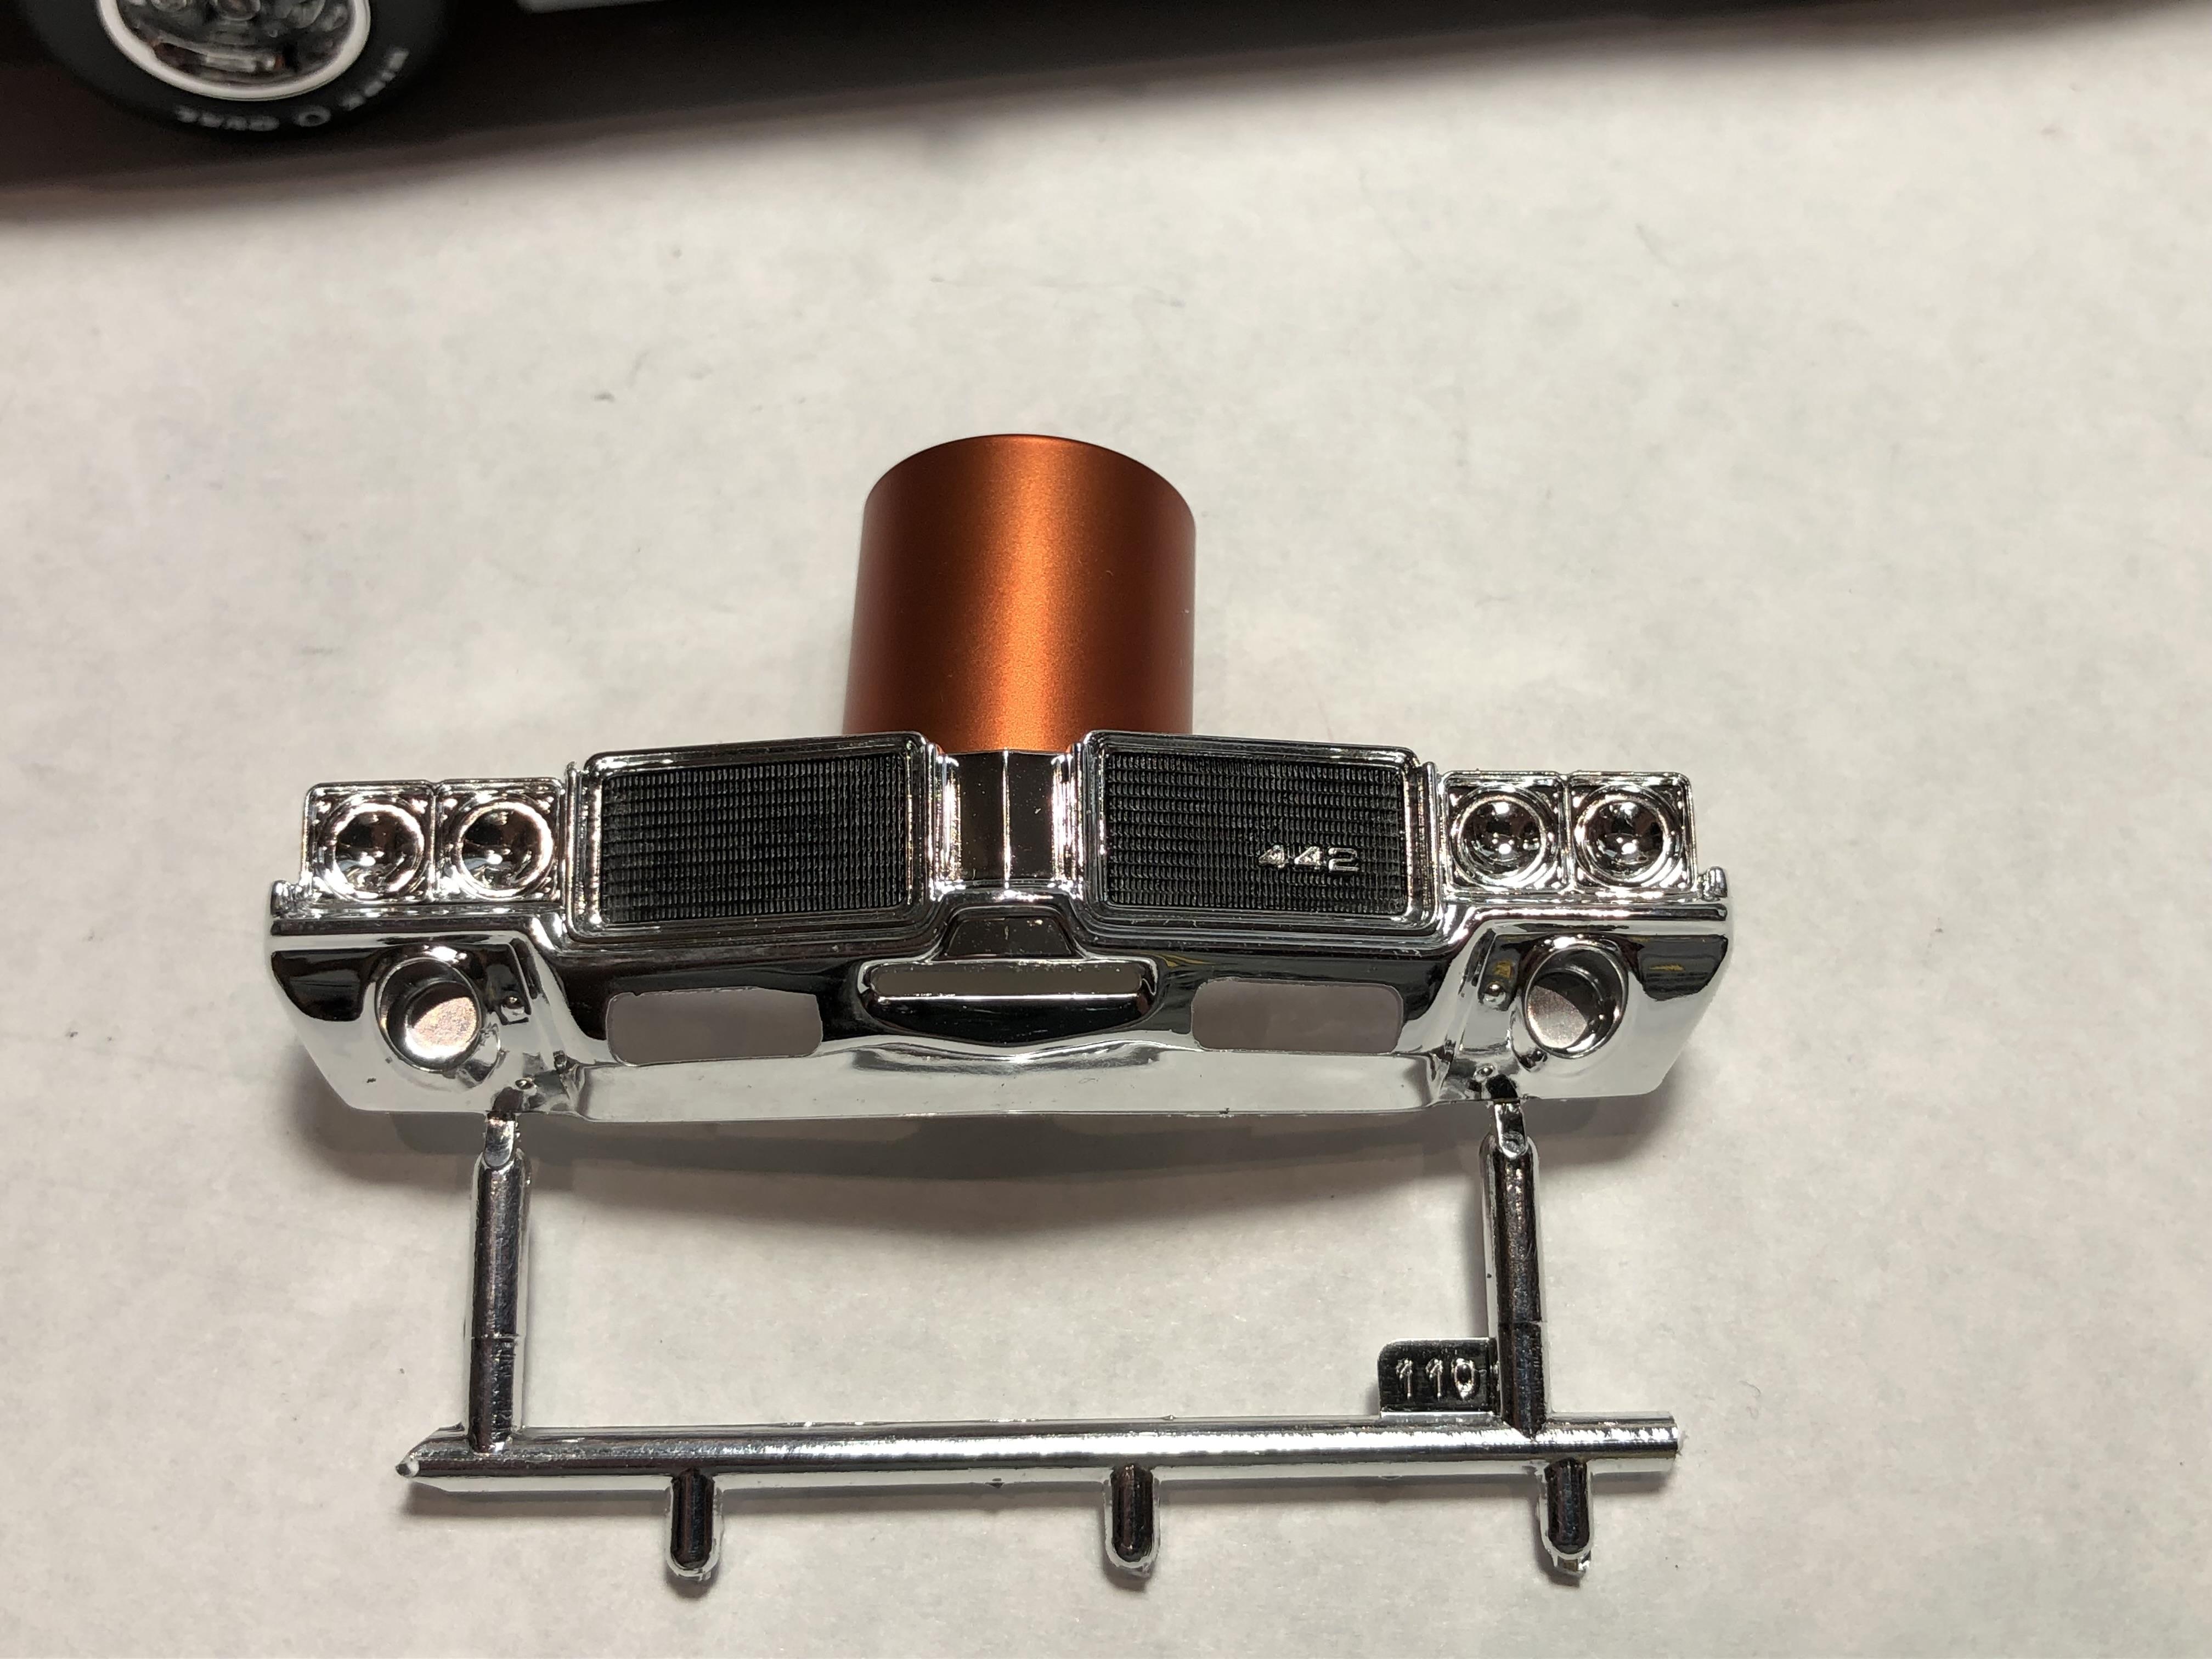
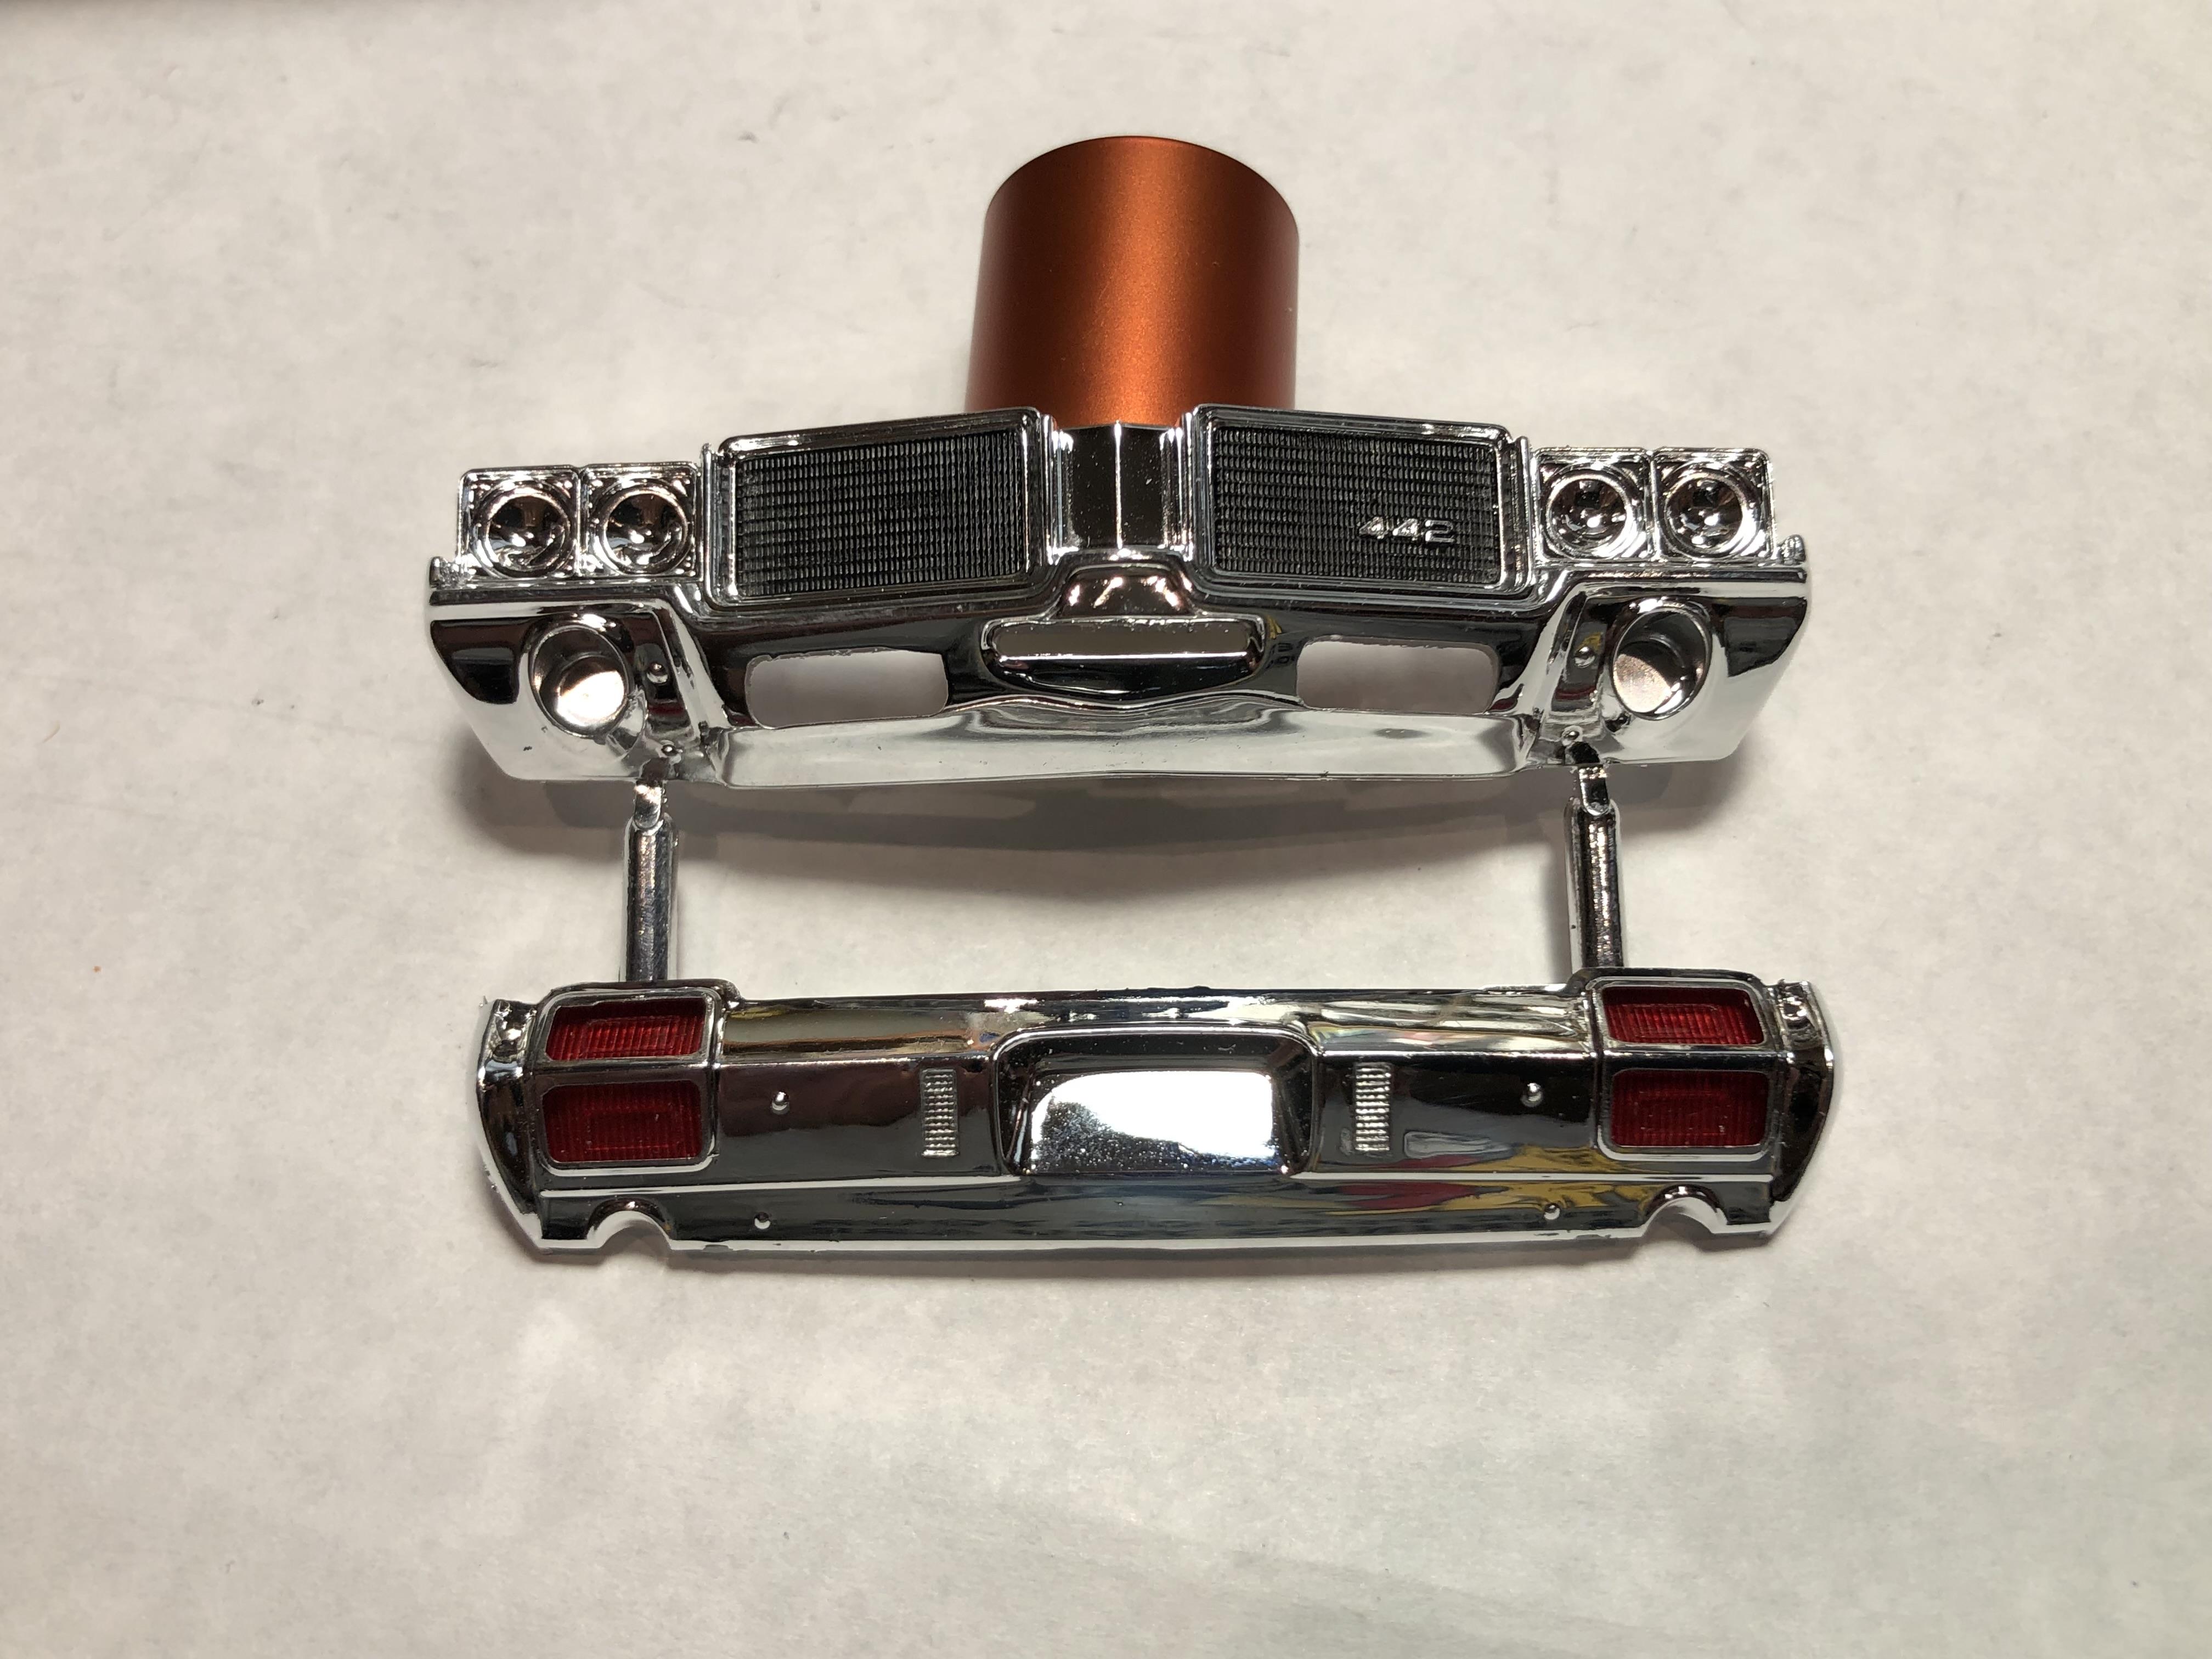
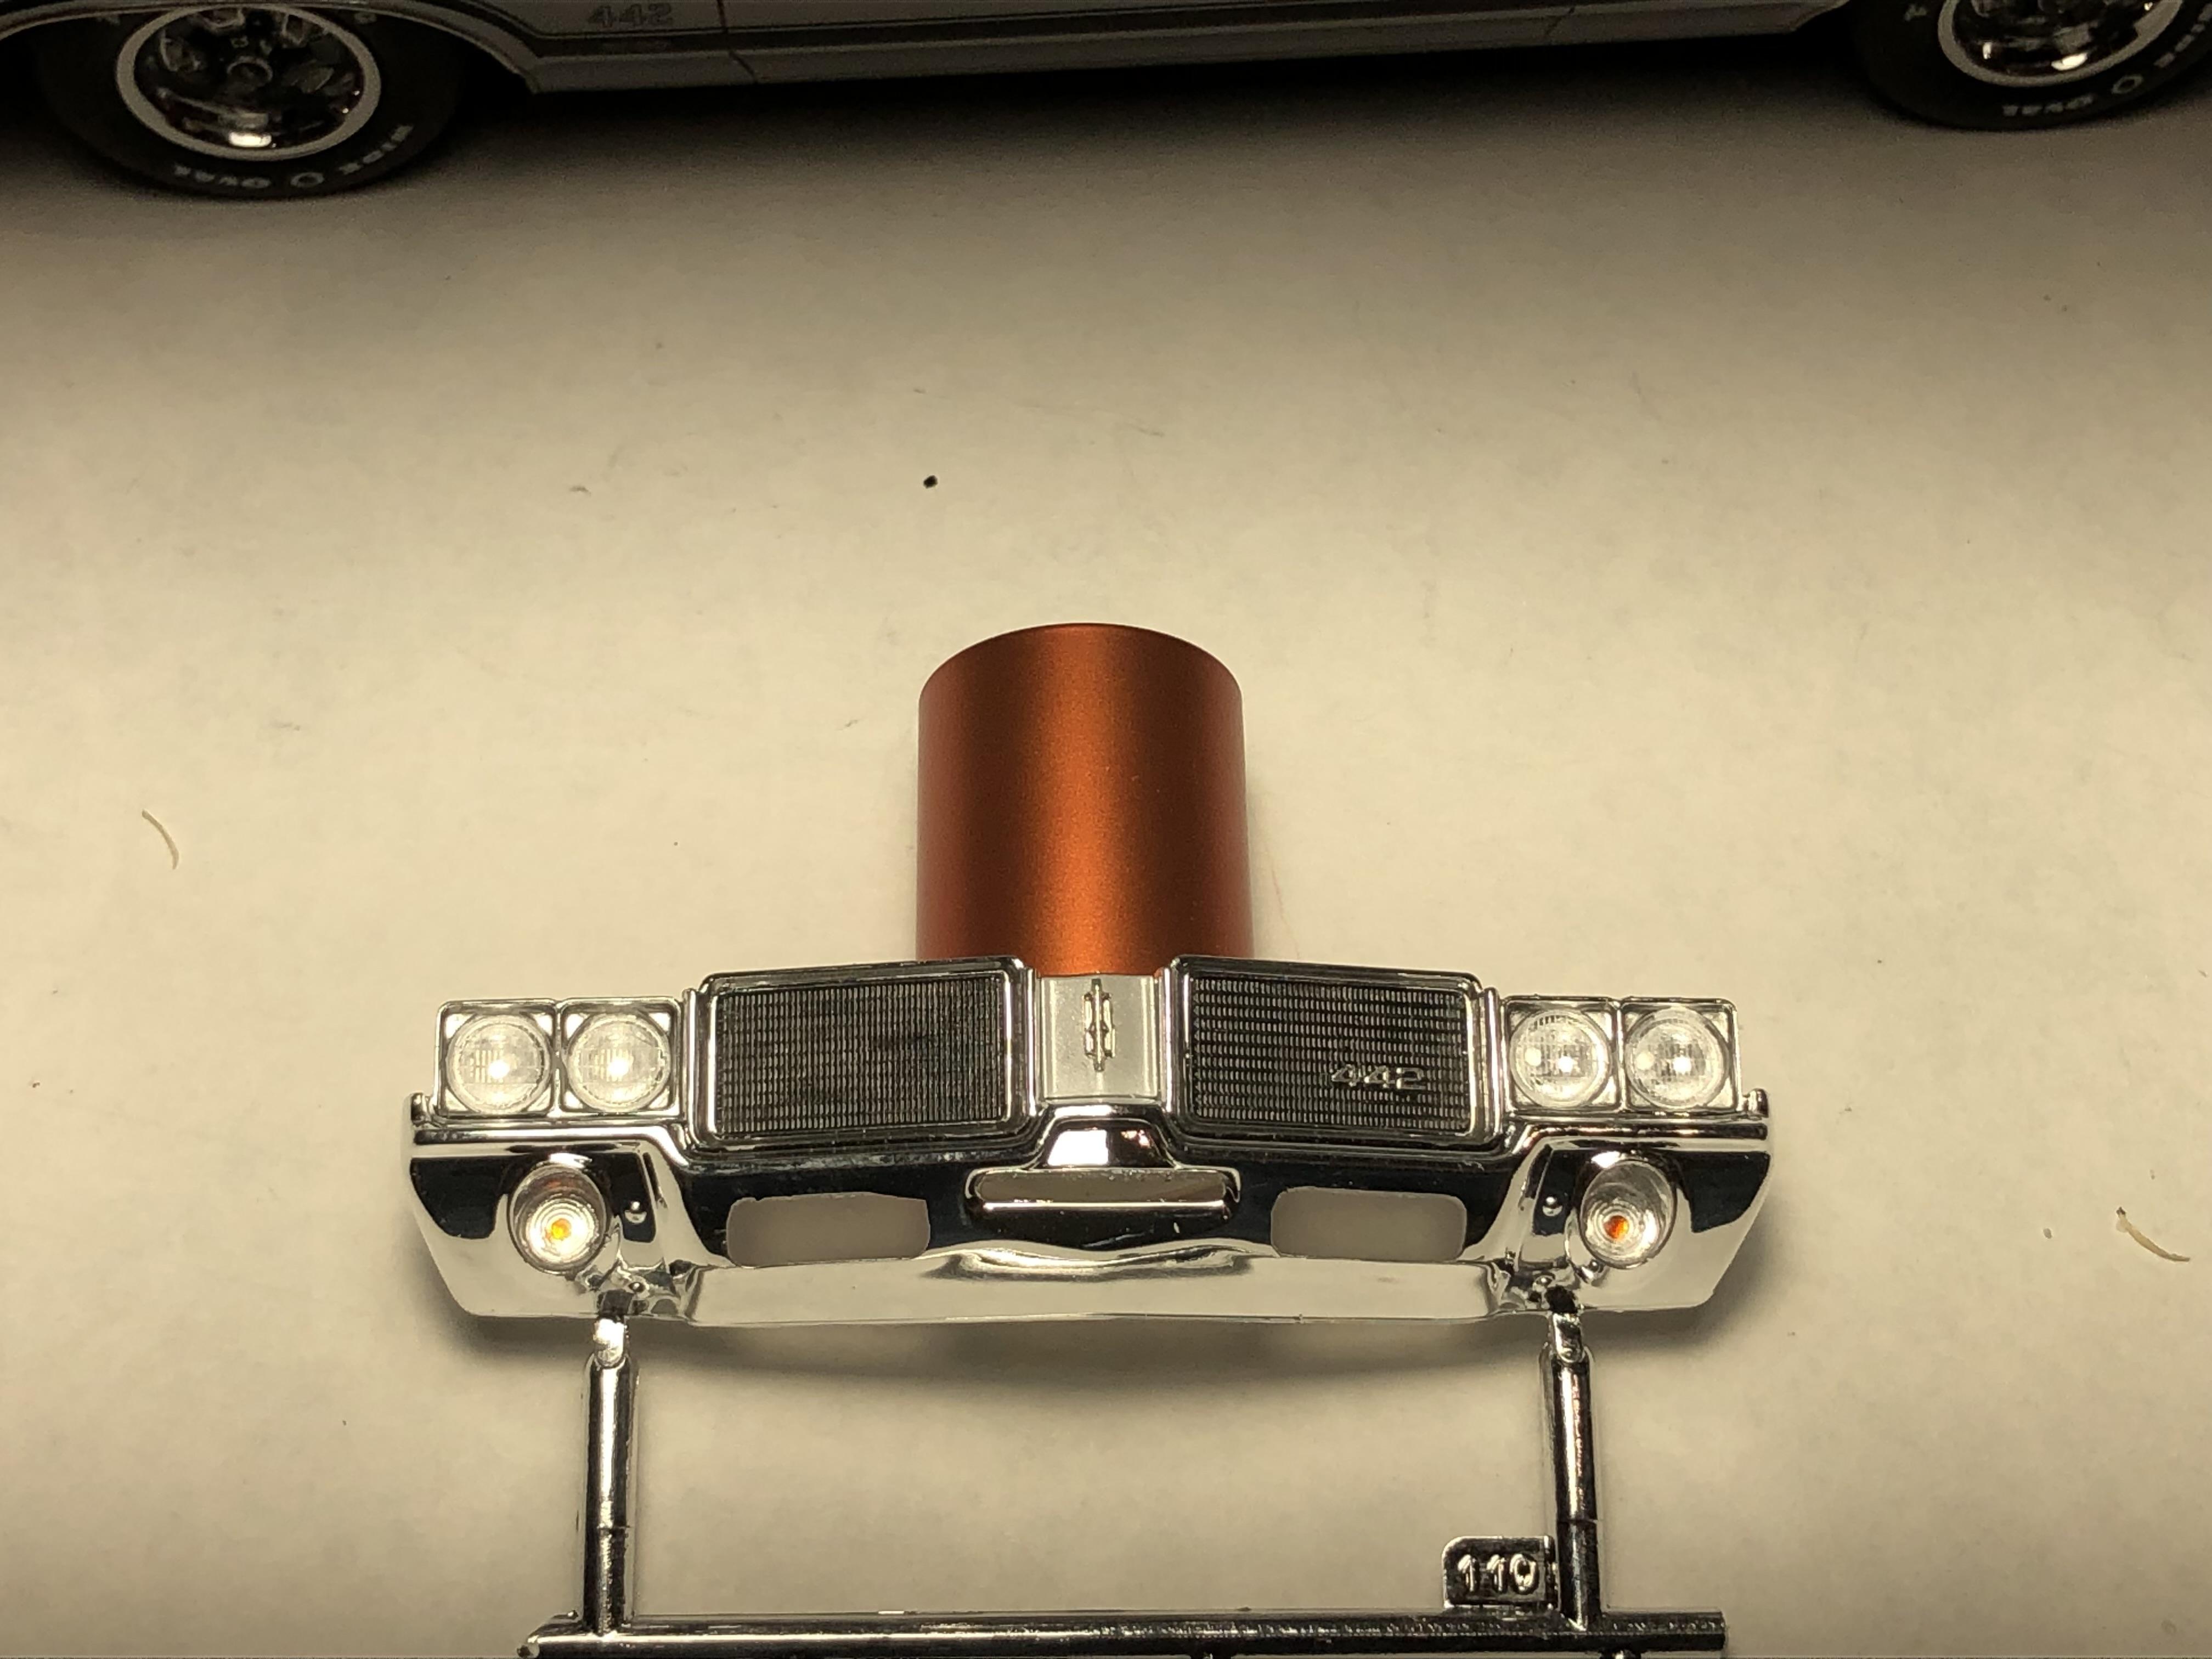
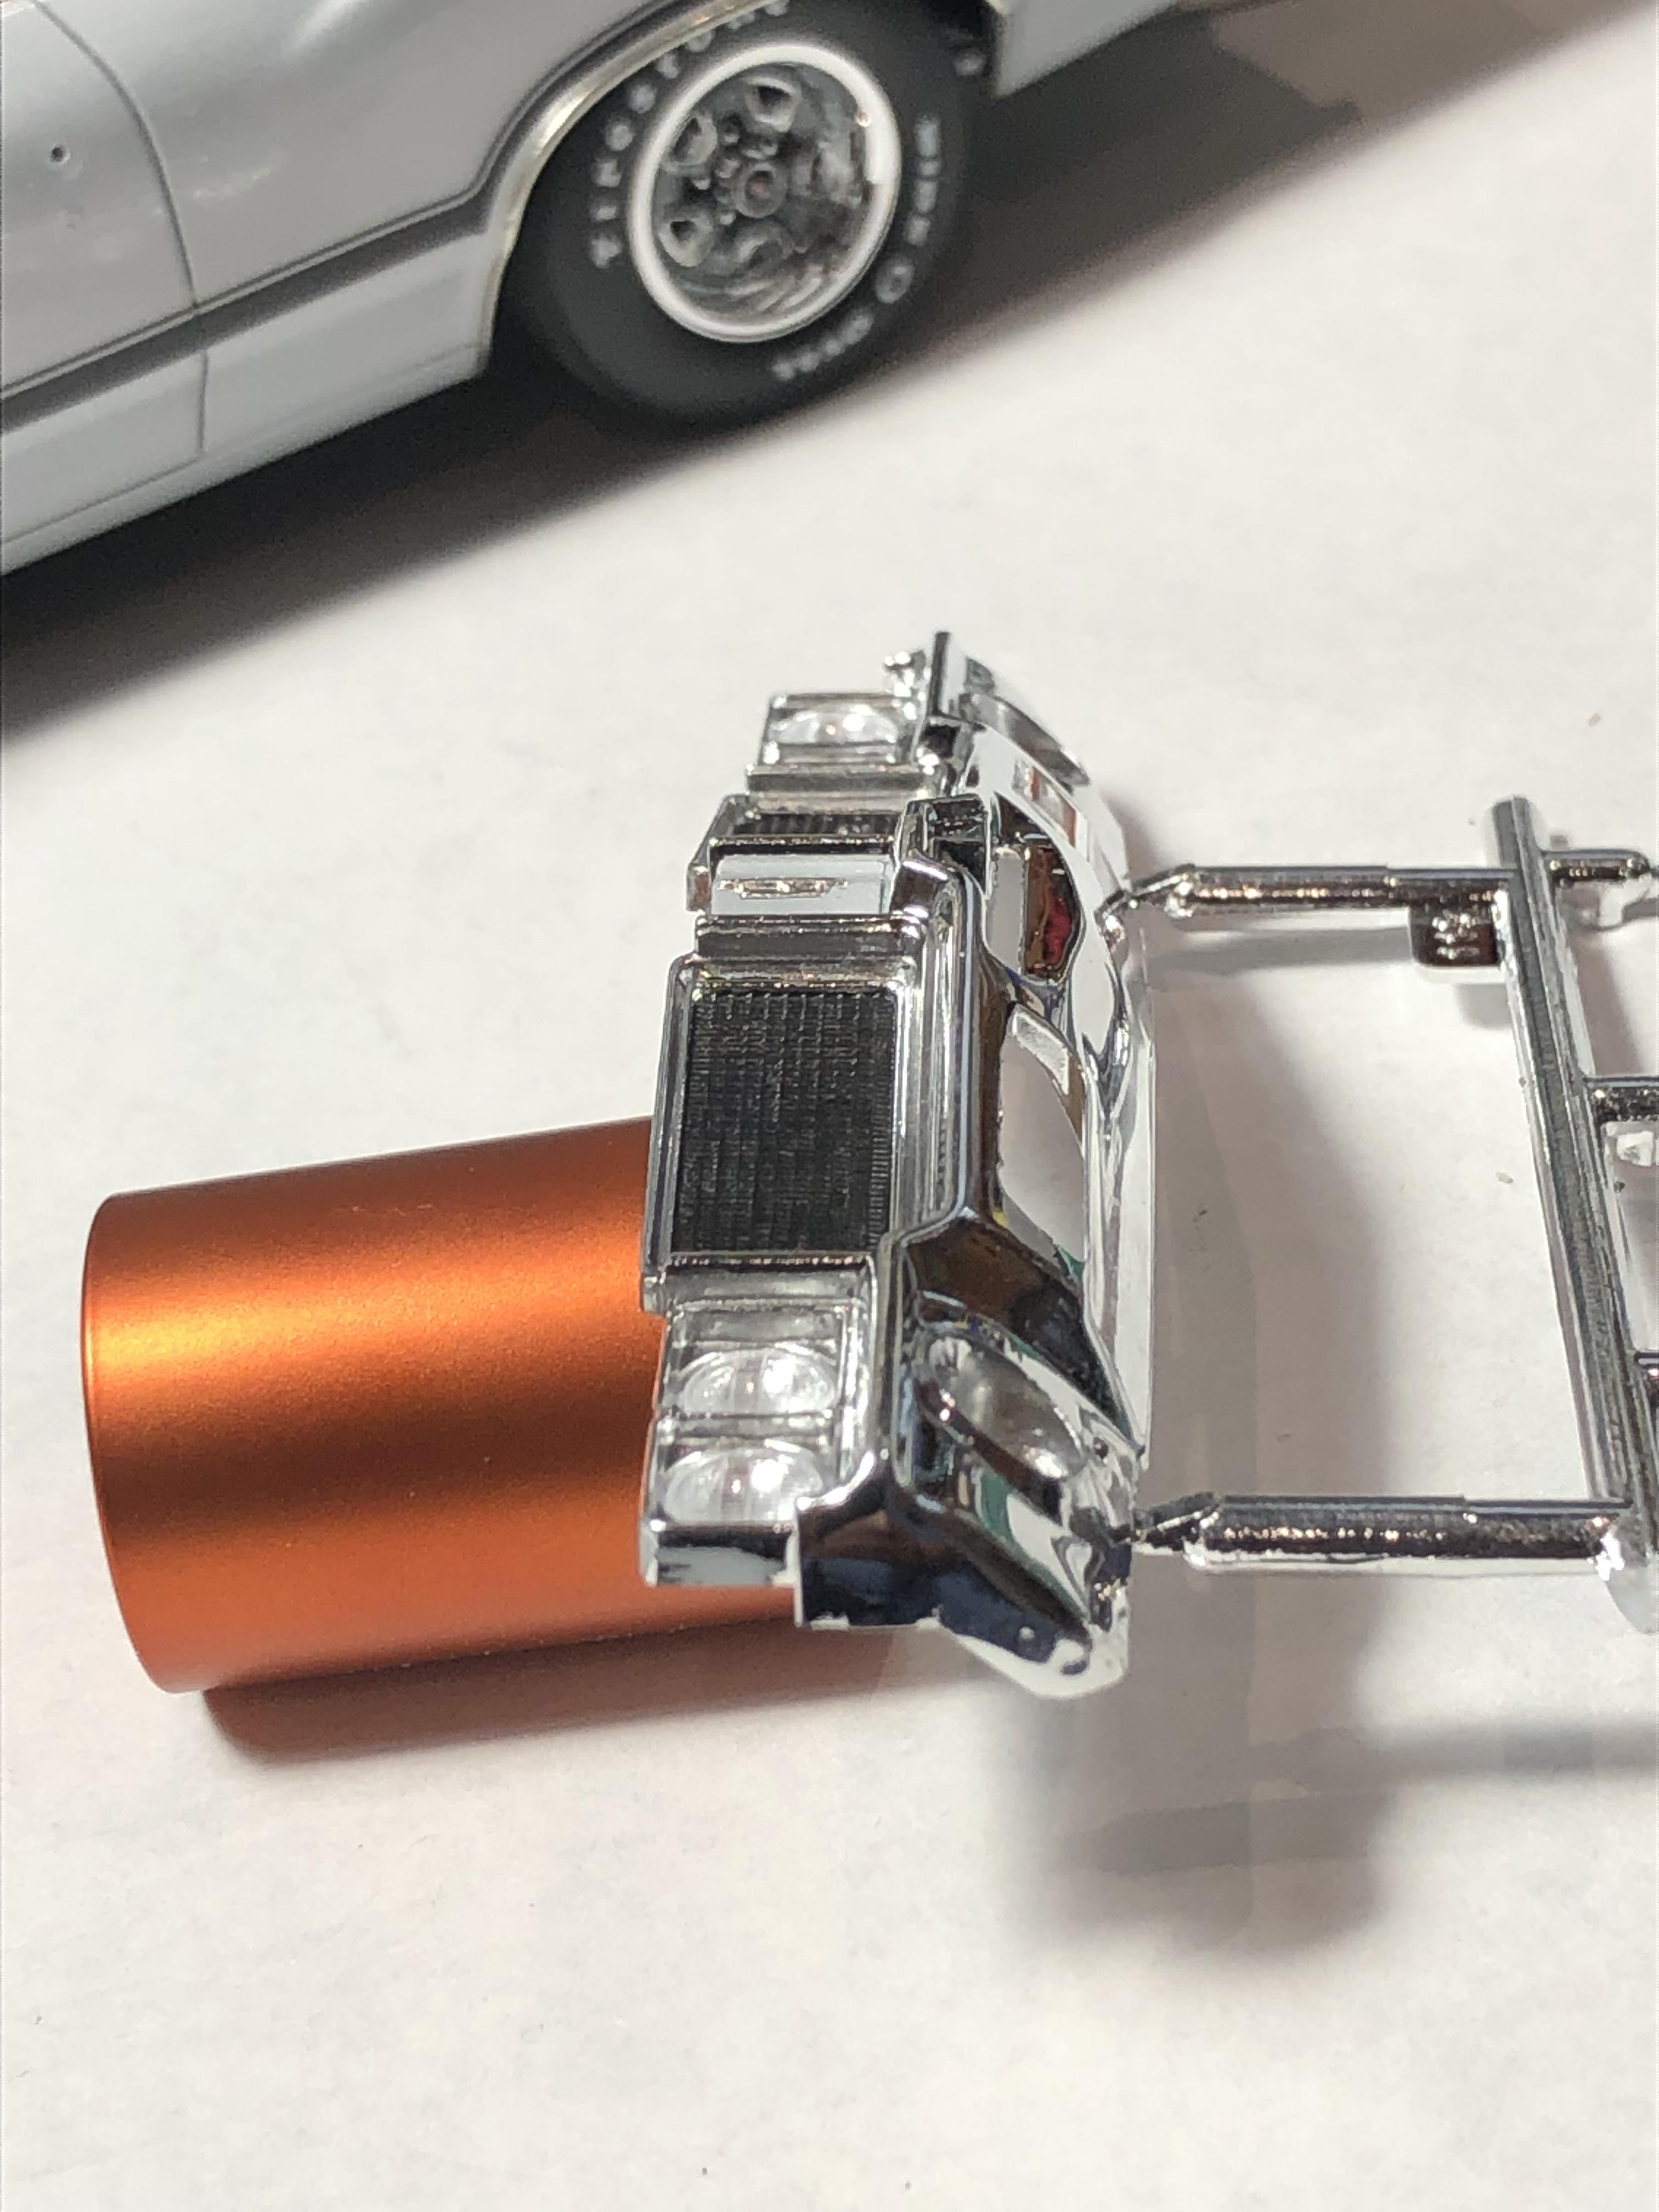
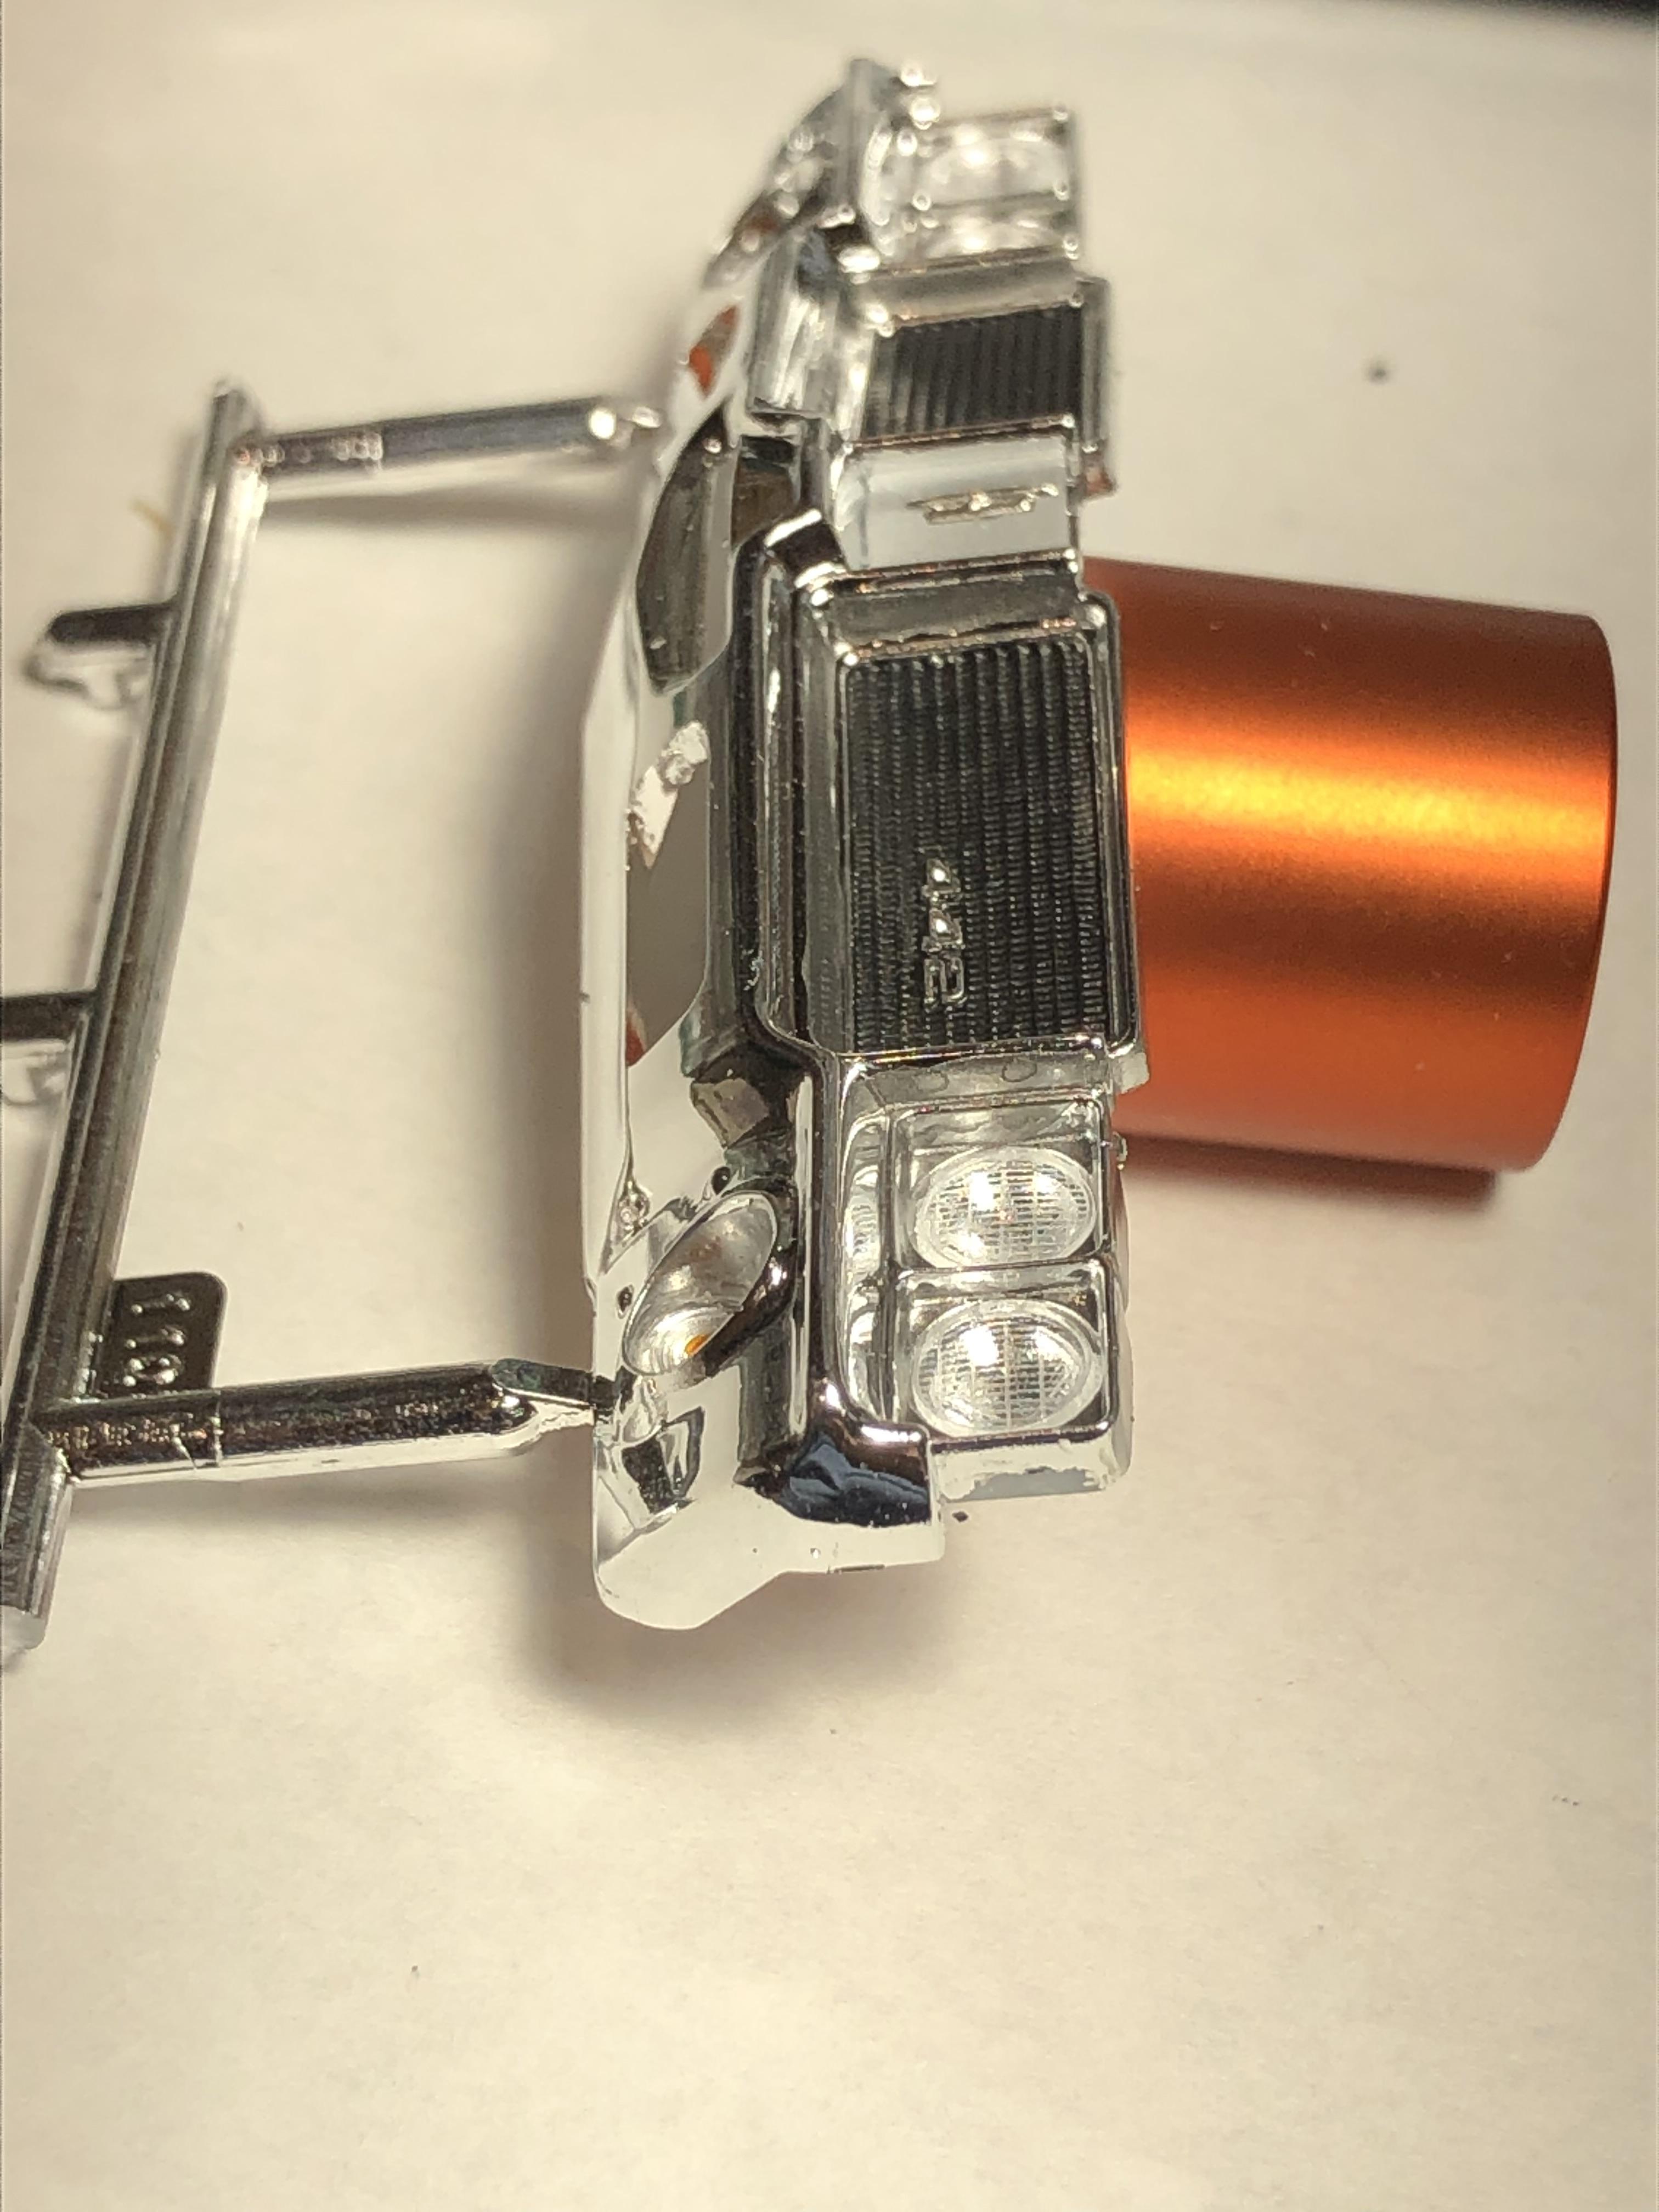
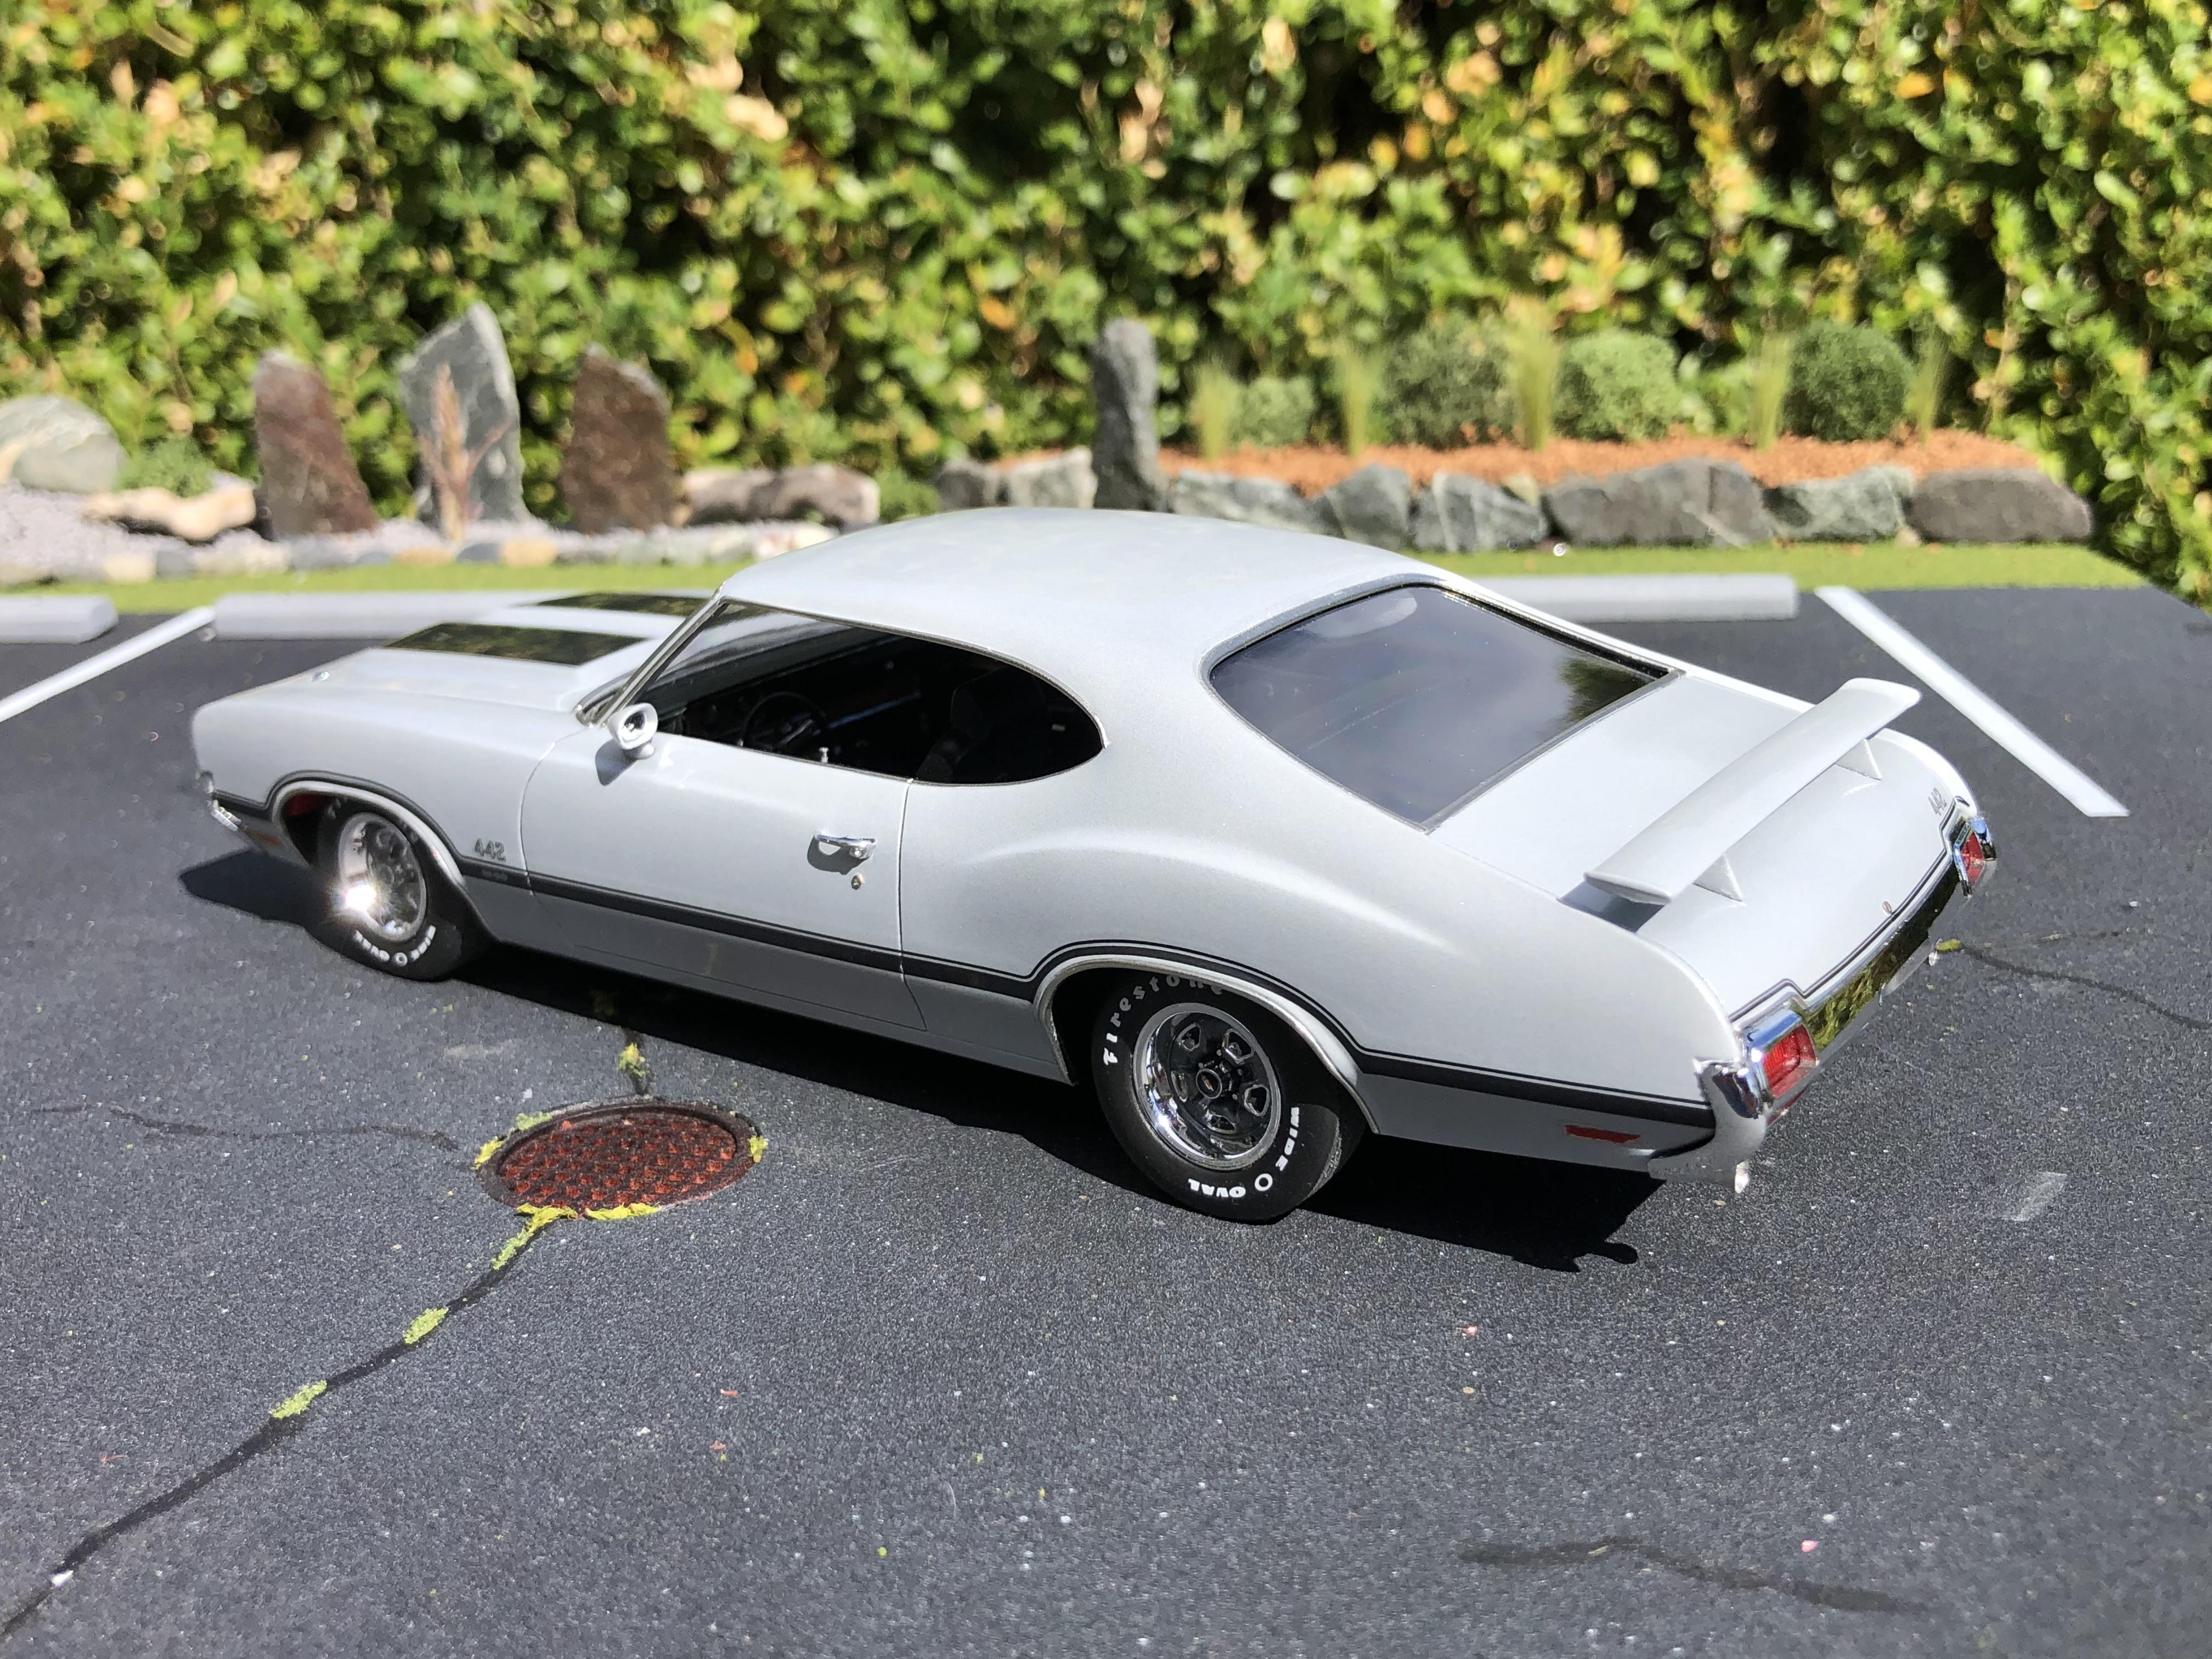
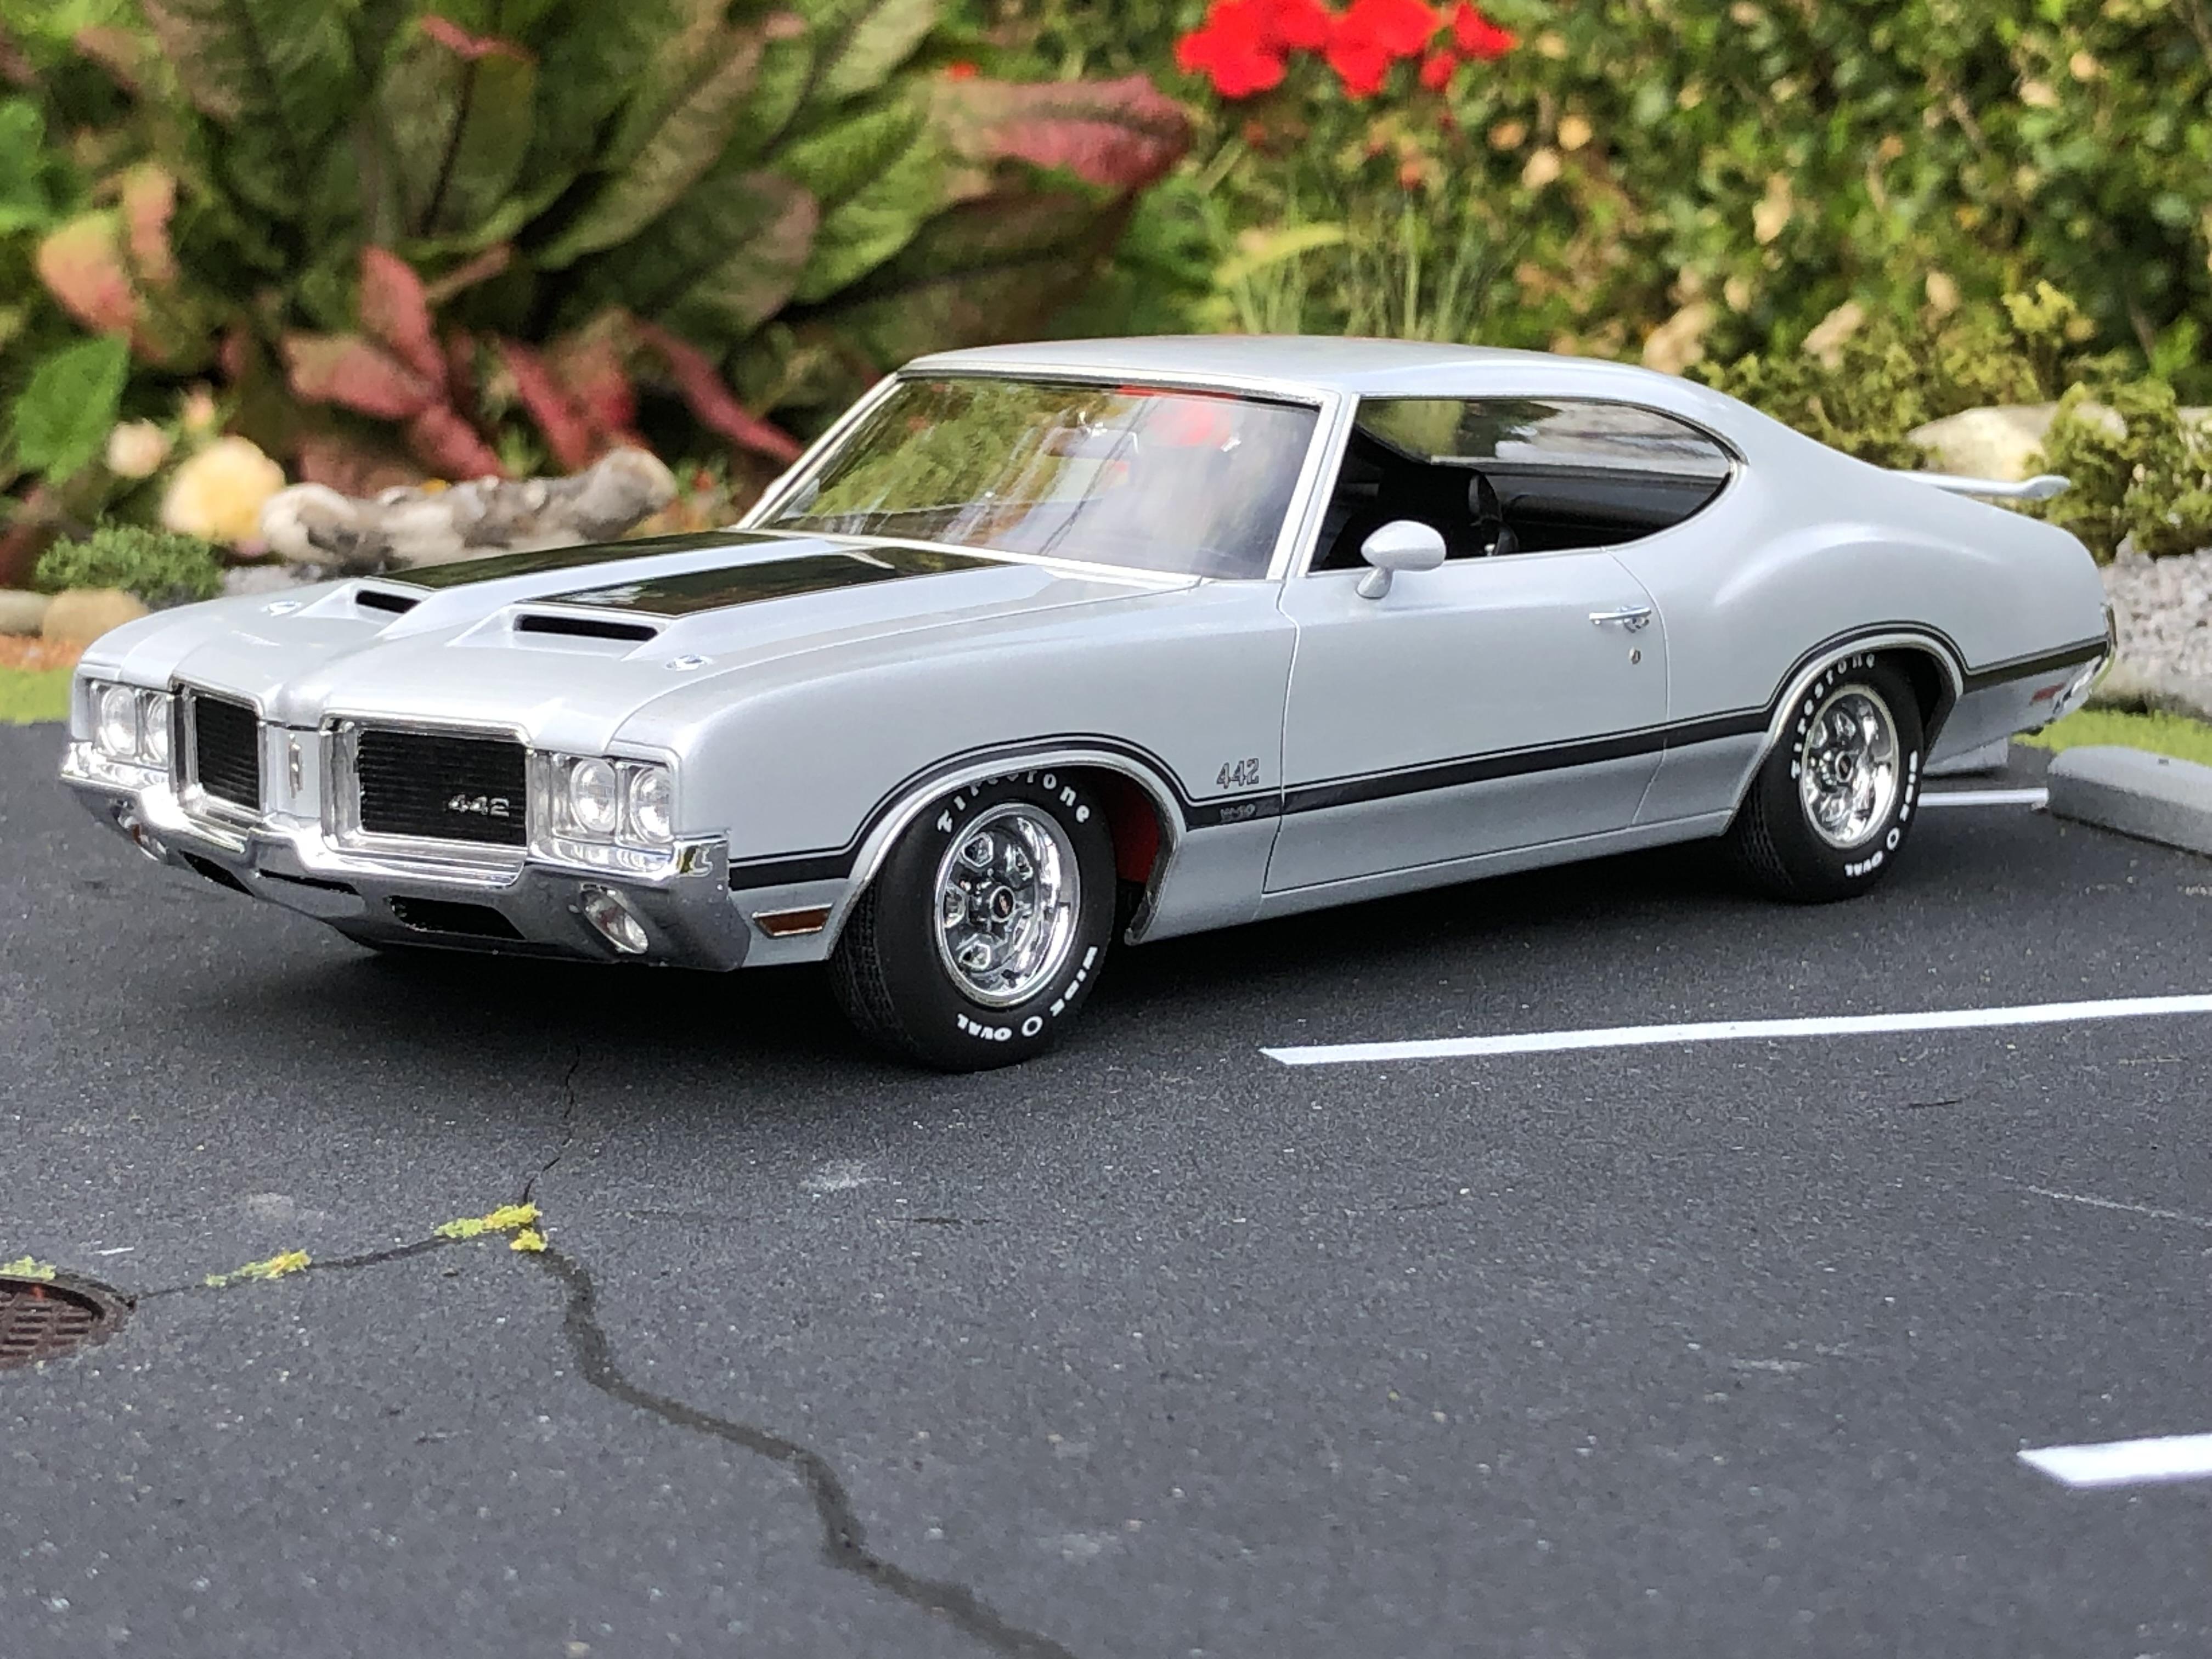
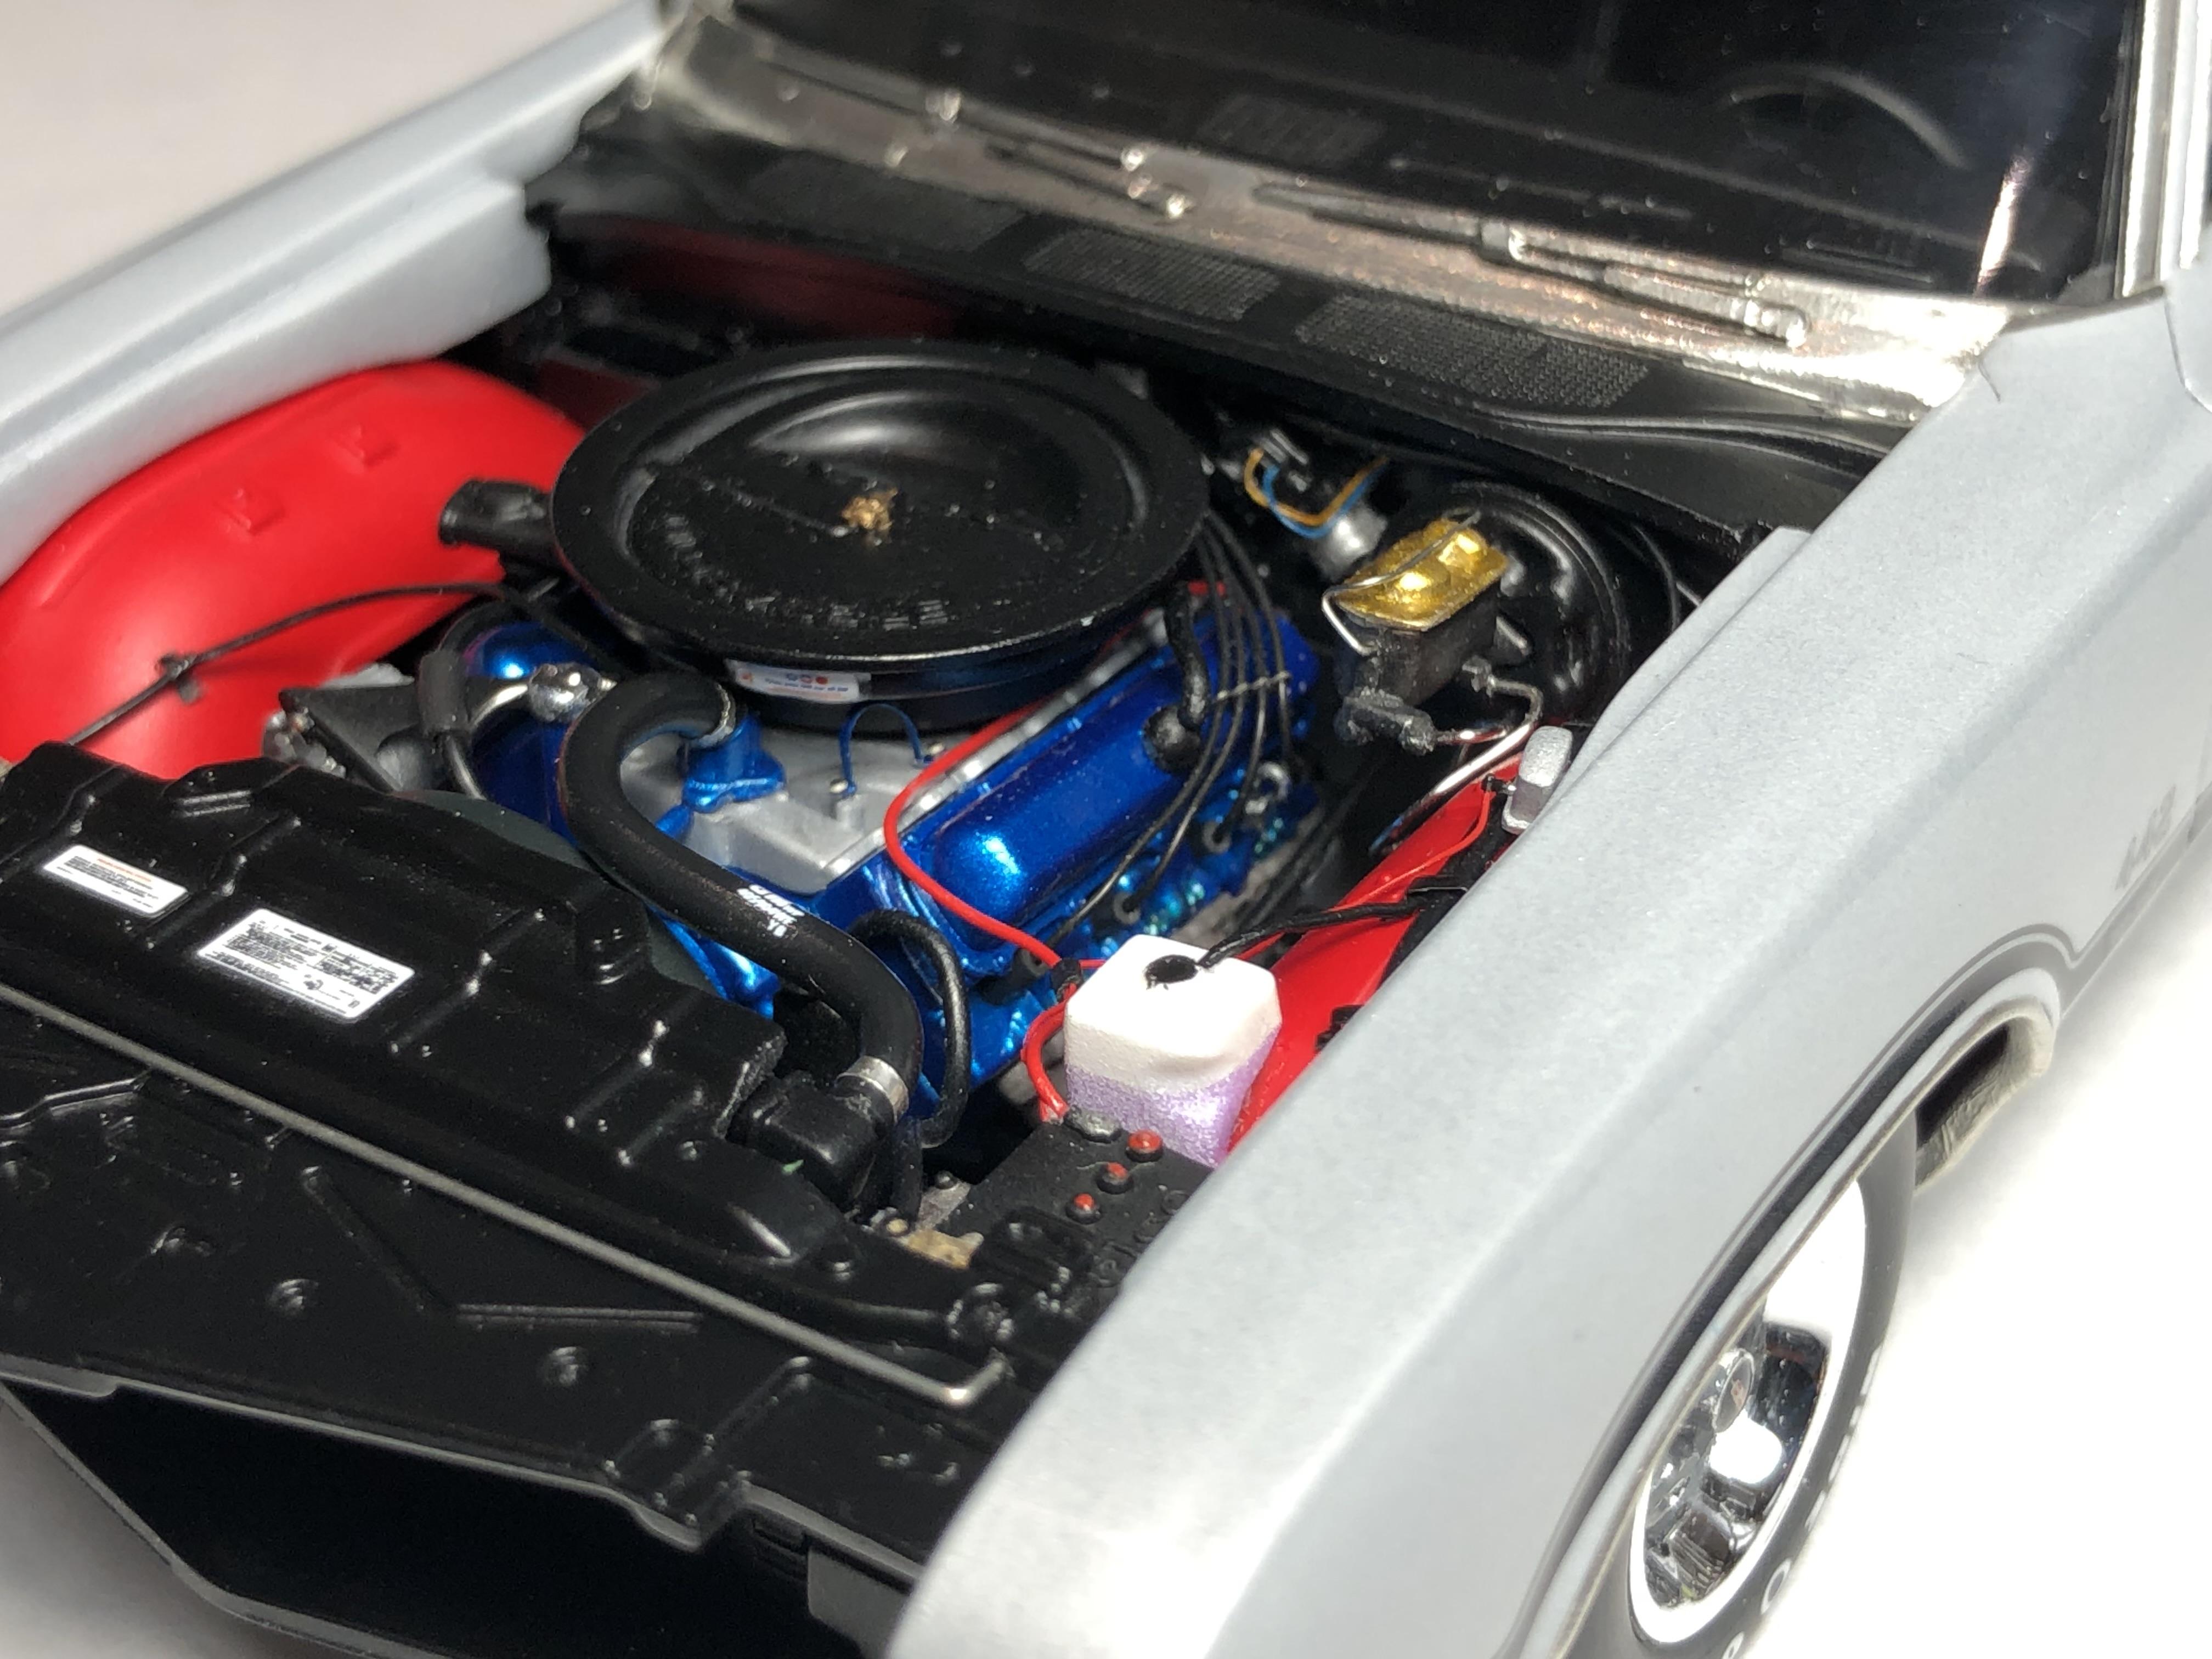
Hi guys, this will be the second to last update. Time to wrap this thing up!! The front grill recessed areas on the real car are not chrome, they are silver. These areas were brush painted with AK aluminum, same for the headlight bezels. This could also be done using matte clear instead of the aluminum paint. The result is subtle, but it does make a difference to the overall look. The grills themselves were painted with 3 light coats of Tamiya flat black. The turn signals have a dot of clear orange in the centre to represent the orange bulb. Real car… Before adding silver… After…. For the rear bumper, the recessed areas around the taillights is also silver not chrome. I used the same AK aluminum for that, again subtle, but makes a difference to the look. The back up lenses were also painted Ak aluminum, then I added .005” clear styrene for lenses. As a side note, I am aware that the car has bumperettes. I am considering making some, but I may leave as is… With that done it’s time to assemble! Door handles installed, photo etch locks. I used bootlace ferrules for the exhaust trumpets. Not 100% accurate as the real car has tapered outlet, but very close. So….. without further ado here she is… First, my apologies again for the poor photos. My phone has taken on a life of its own. New phone coming this week! I will be ordering custom decals in the next day or 2 for the license plates, and a decal for the back window. The decal order kept getting delayed , as I keep thinking of more ideas for future projects. So my decal order keeps growing. Once I get the last details added, I’ll post one more update here then it will go under glass! Probably few weeks… It has been an enjoyable project, and fun to push myself a bit on the details. You know, just a simple “box stock” build.? It is also very rewarding to do something like this for someone who has done a lot for me. I’m looking forward to the handoff and seeing his reaction. I also think Wayne will enjoy reading through this thread and seeing the process. There are a handful of “oops” here and there on the build, but most of them, you have to really look for. I did put a nasty little scratch on the top of driver side quarter panel right at the bottom of the A pillar. There was some very colourful language that followed… Thank you to all of you who followed along on the journey, sorry it took so long!! All of your comments were very much appreciated, thanks for taking the time to add your thoughts. Now, with this one in the rear view mirror, time to get back to some serious kit-bashing!! Thanks so much! Cheers, Steve
-
71 Olds 442 W30 (replica of my brother in law’s car)
Steve H replied to Steve H's topic in WIP: Model Cars
Thank you Curtis! I appreciate you following along, sorry it took so long… Hello Jim! It’s been an interesting journey for me. Building a kit “box stock”, is extremely rare for me. Actually… probably only a handful of kits when I was young, then it was stance adjustments, swapping wheels and tires etc., then kit bashing. So, building this “out of the box” provided an opportunity to dive a little deeper into the detail, rather than the usual kit bashing surgery. Also, I really wanted to try and step up my game a bit, for me, and also for Wayne. I’m hoping that this thing puts a smile on his face. I have really appreciated you following along Jim. Hi Rich, thanks for taking the time to comment. It has finally come together, and for the most part, I’m pleased with how it turned out. -
Very nice custom Caddy Claude! Your creations are always a treat for the eyes sir. The colour really shows the lines of the car well. Another masterpiece from the house of Claude, bravo ? Cheers, Steve
-
71 Olds 442 W30 (replica of my brother in law’s car)
Steve H replied to Steve H's topic in WIP: Model Cars
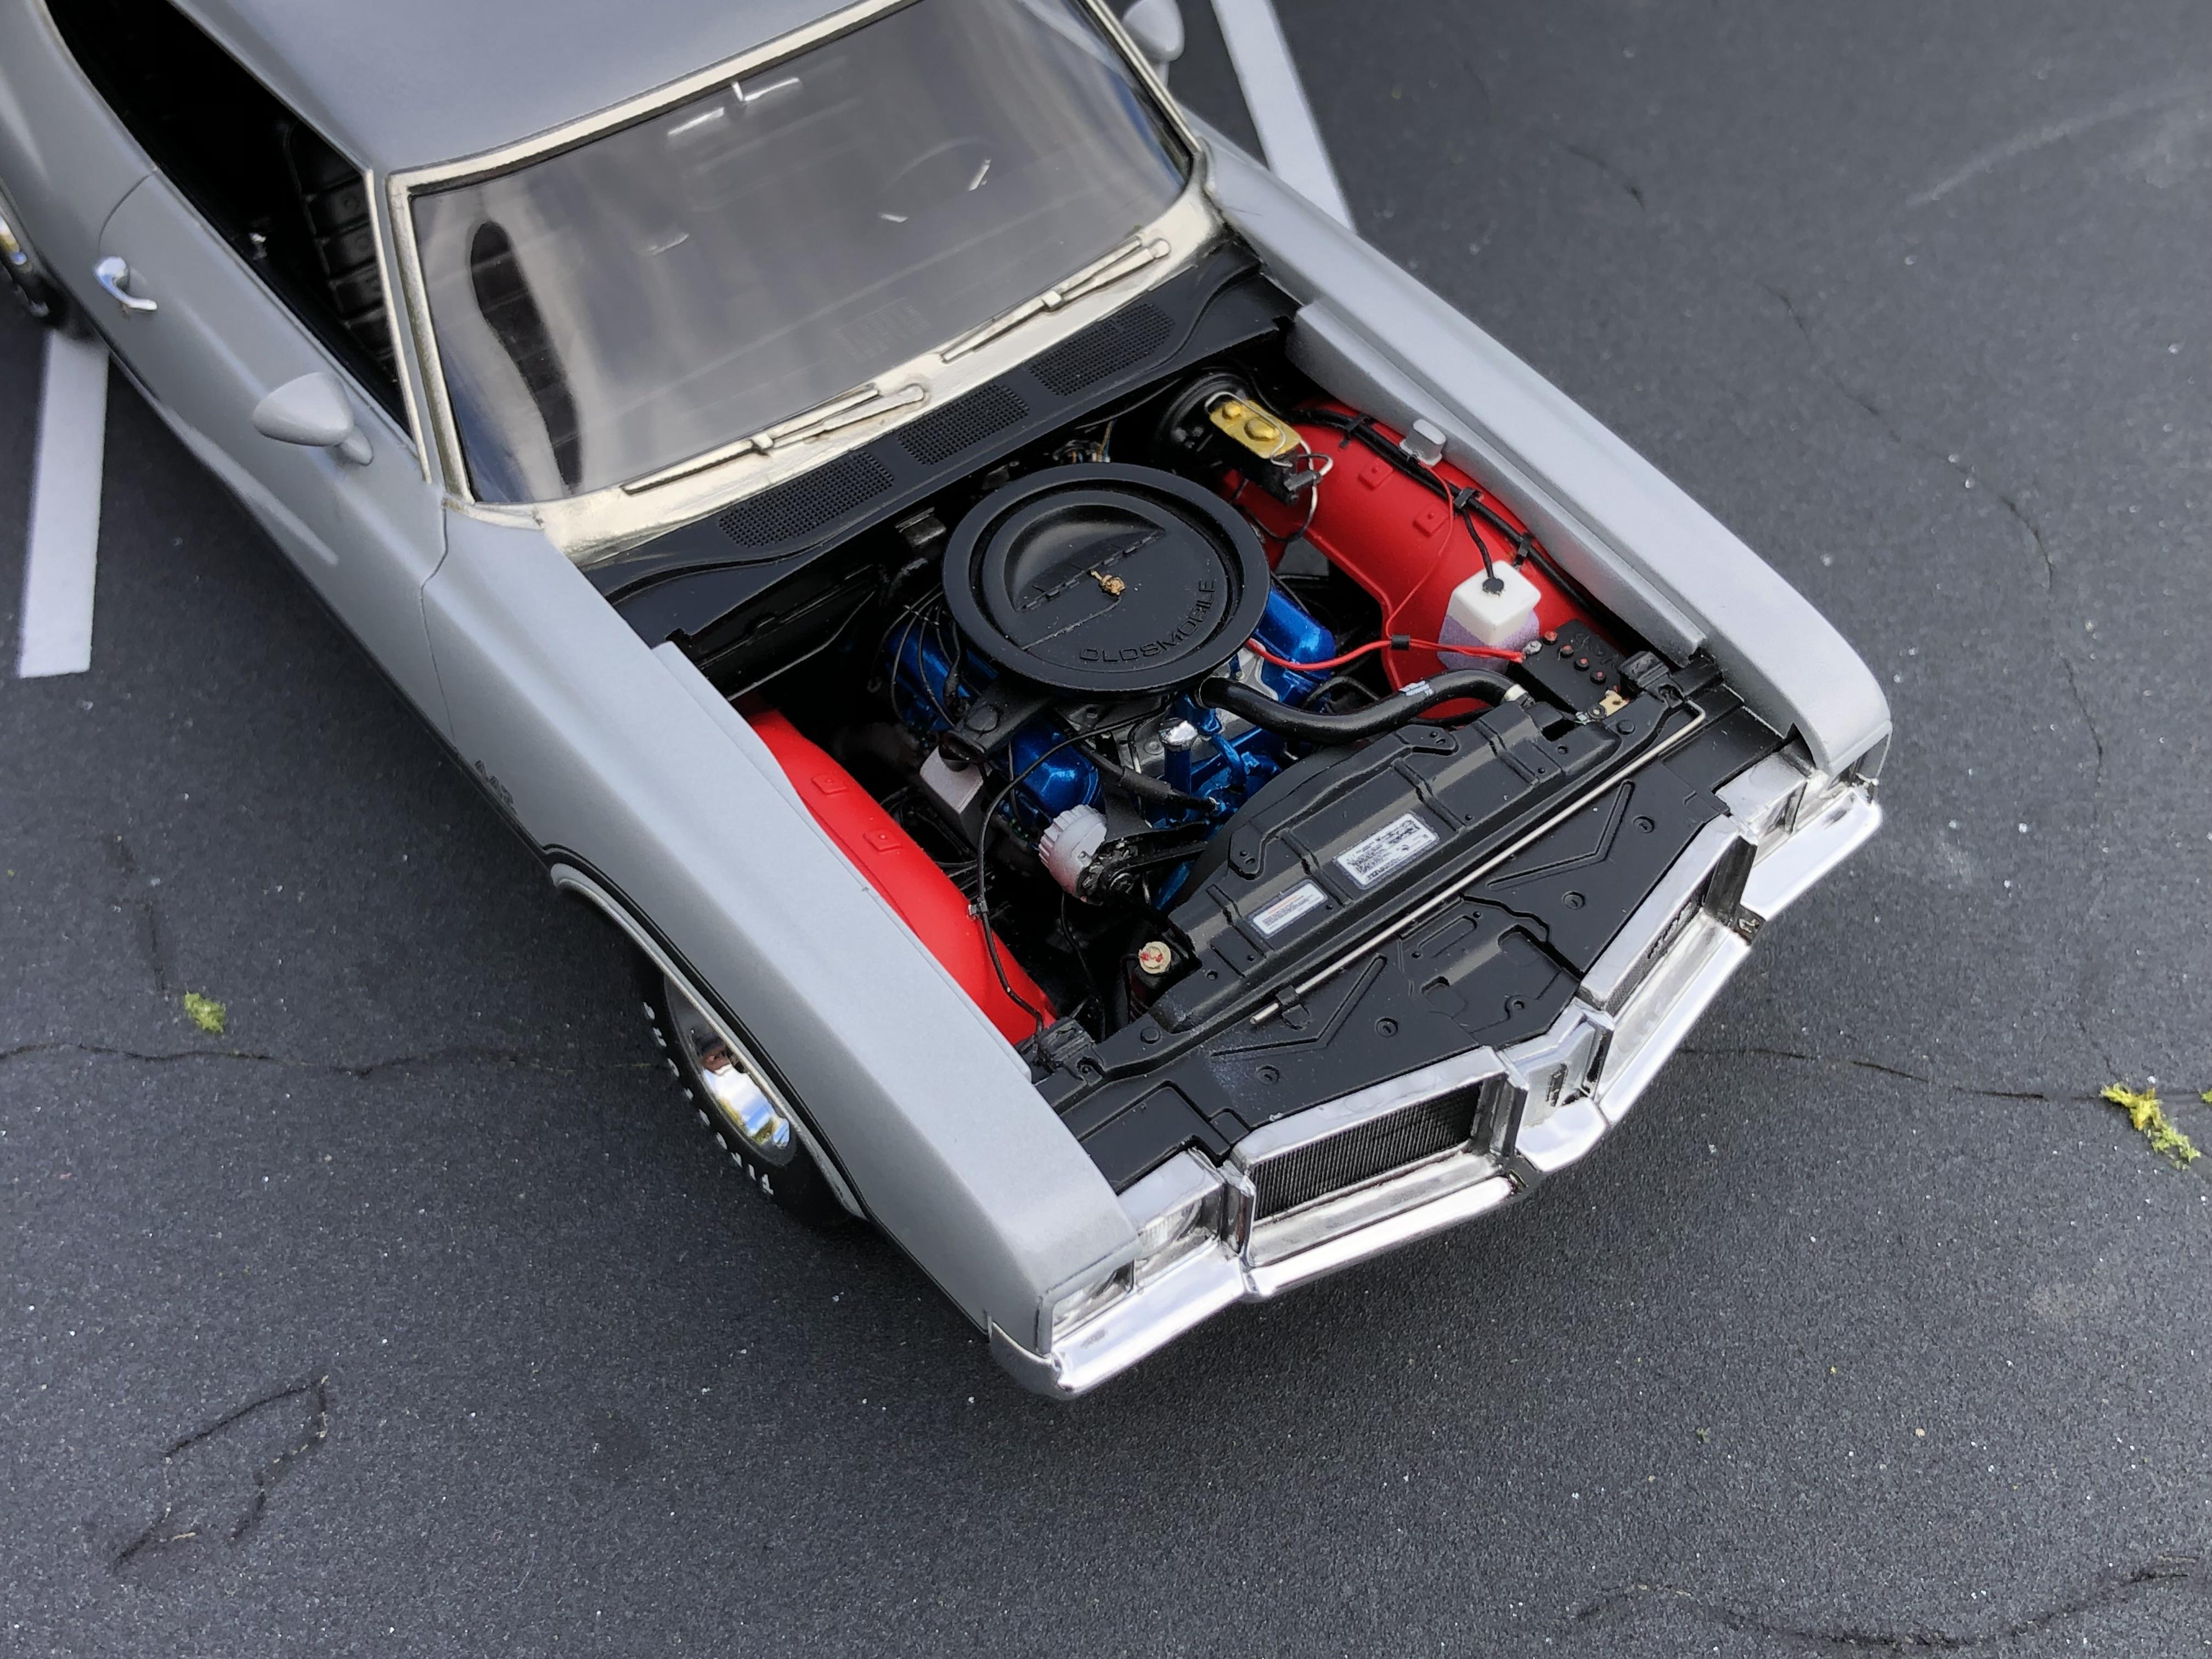
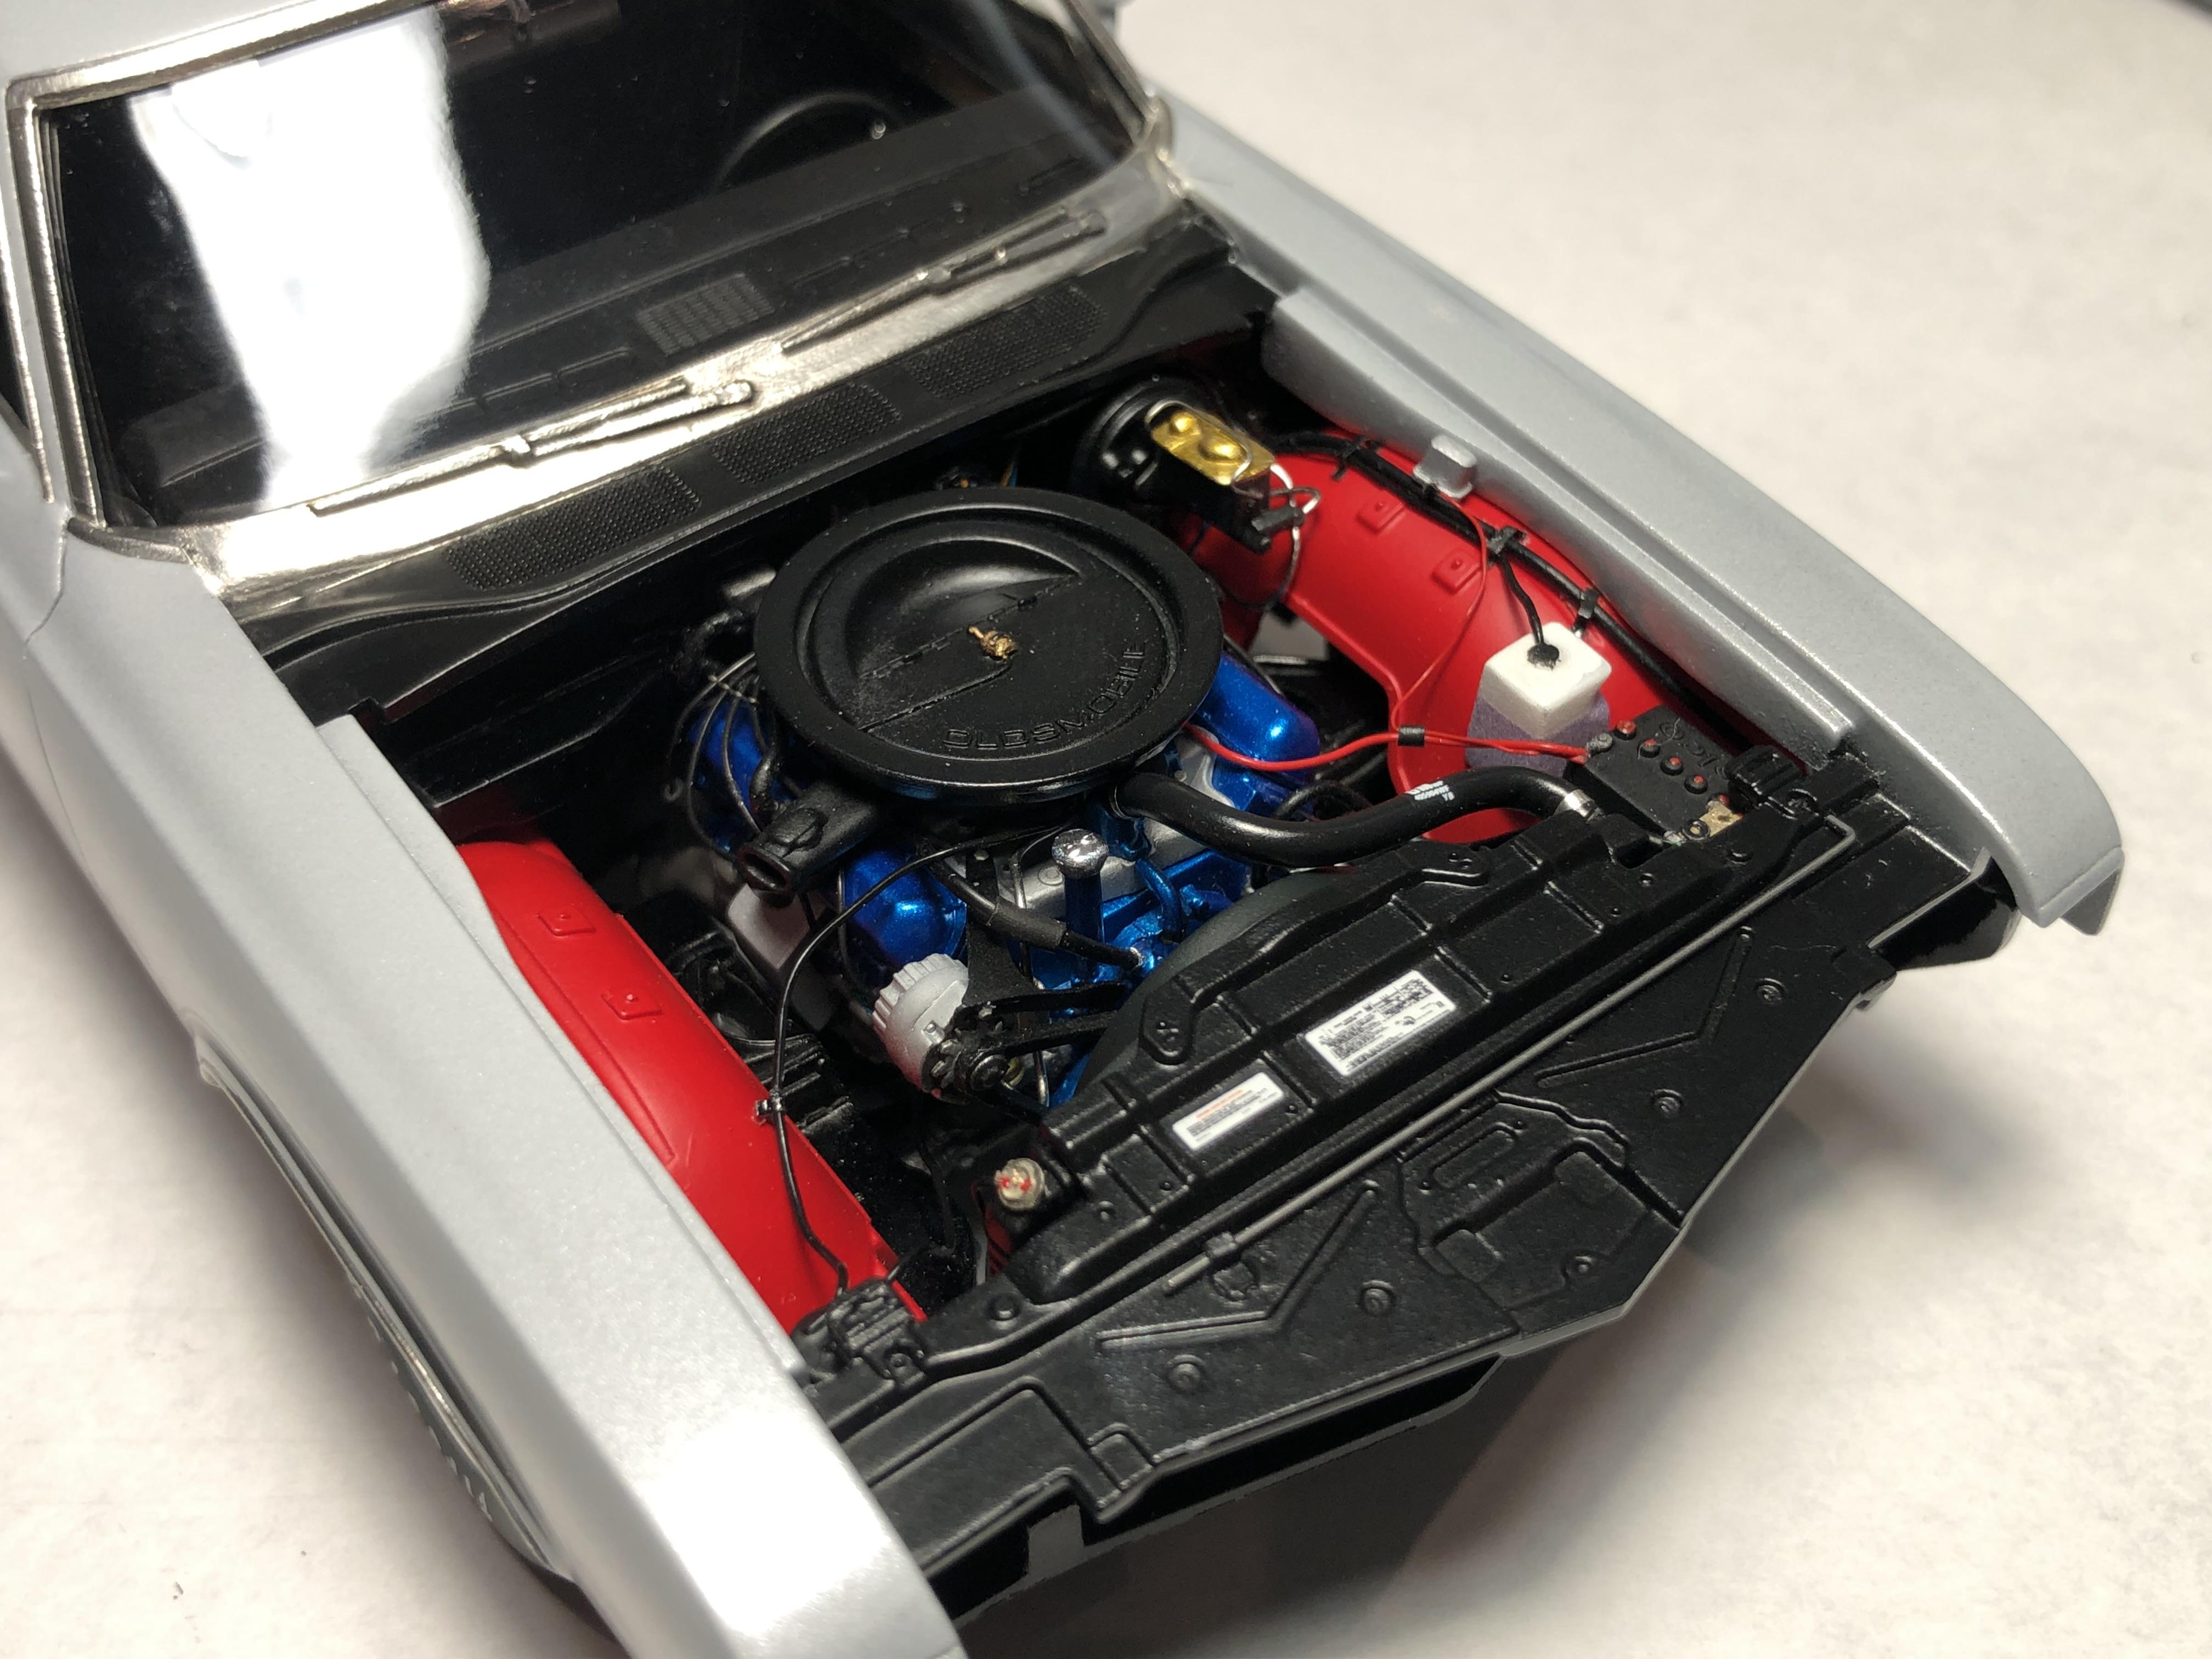
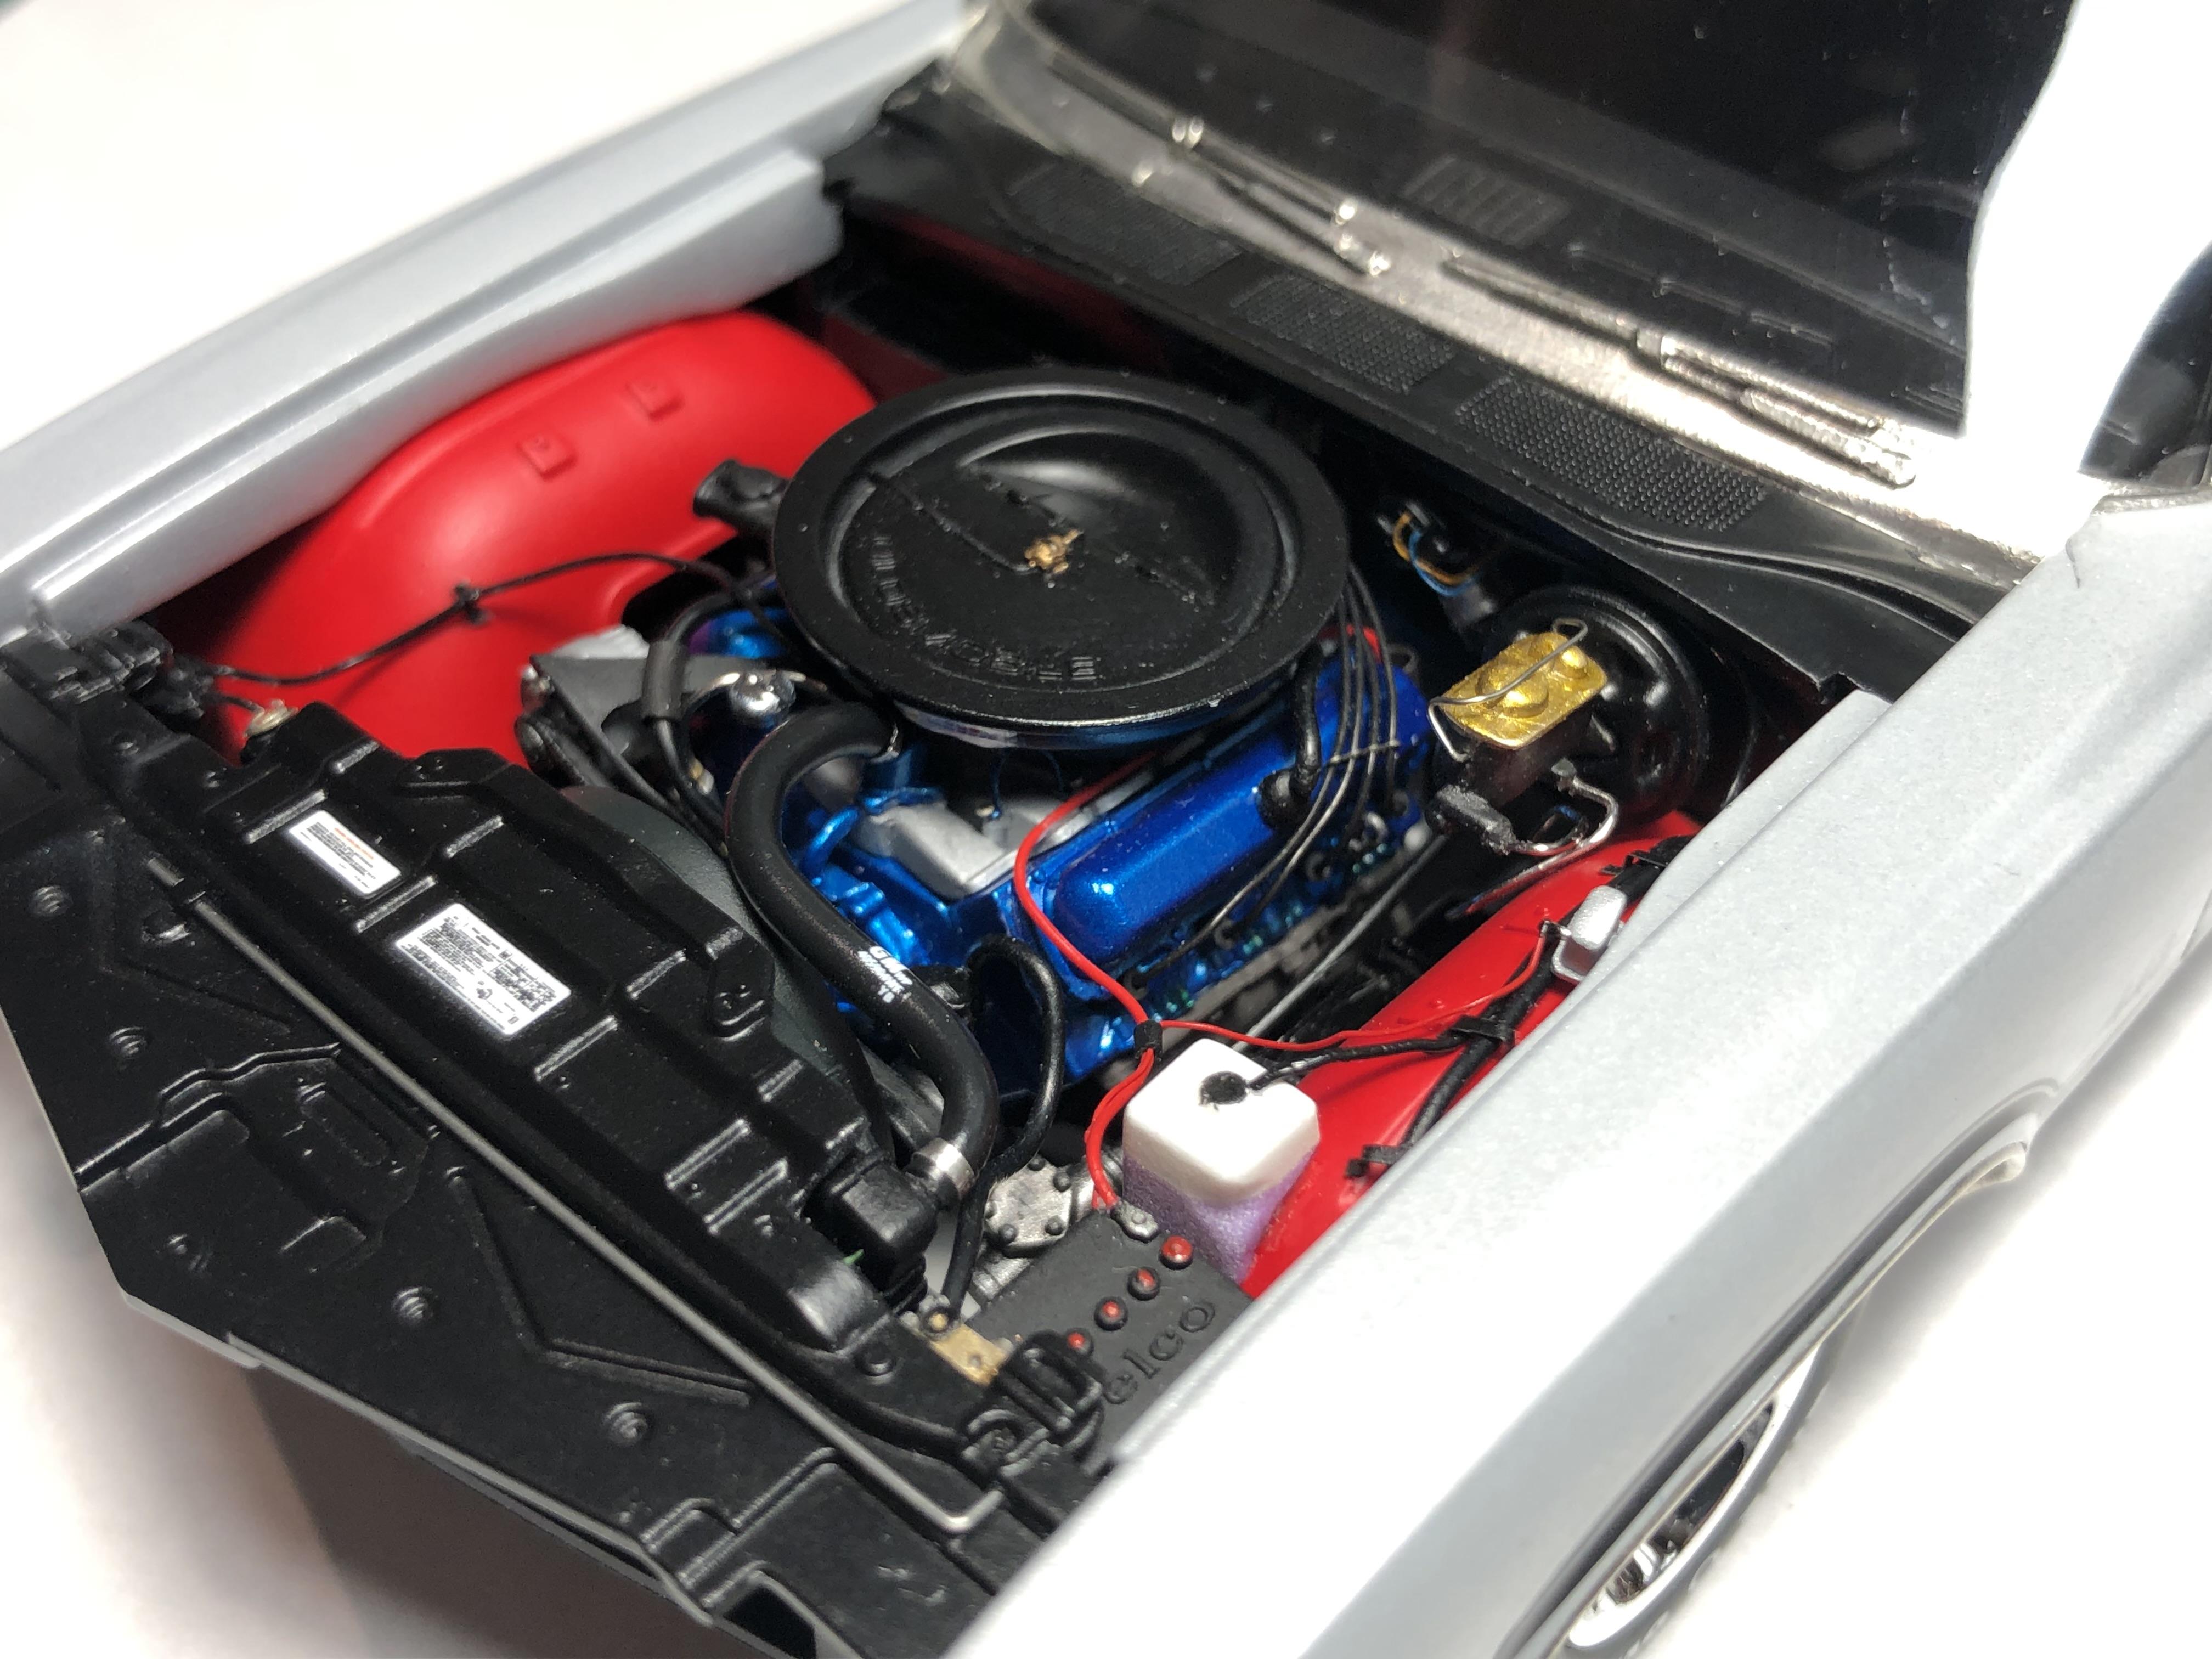
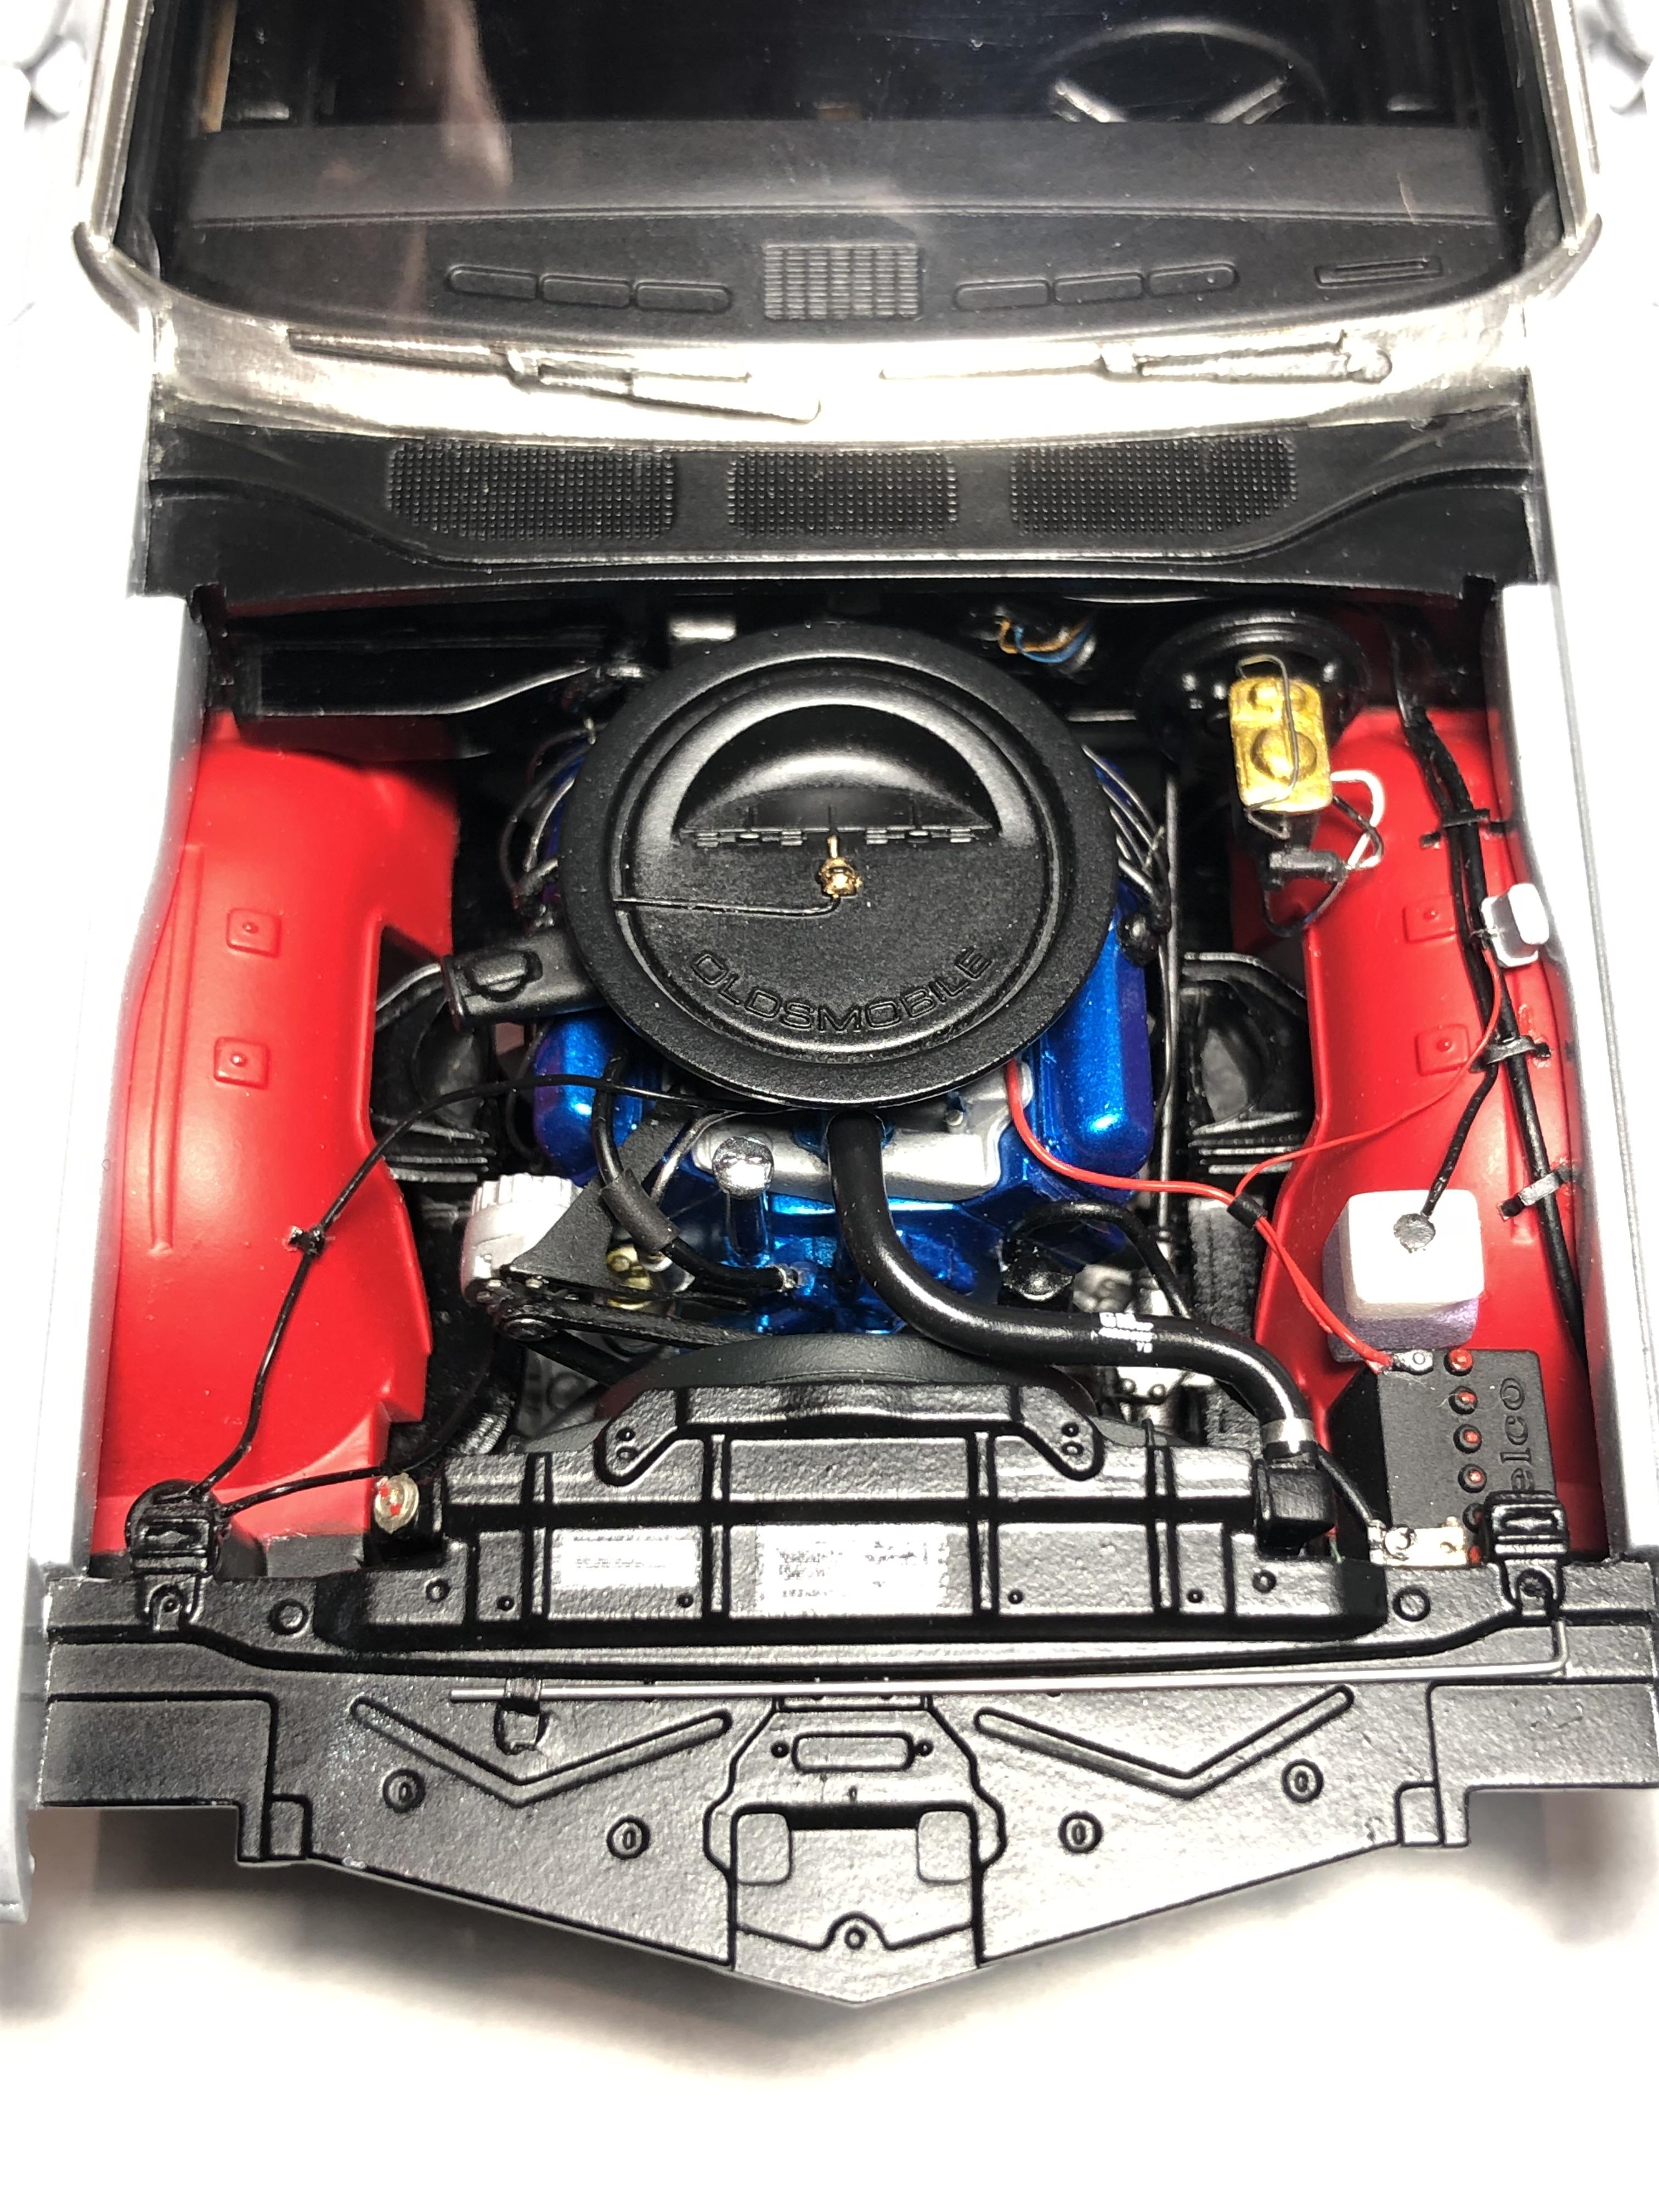
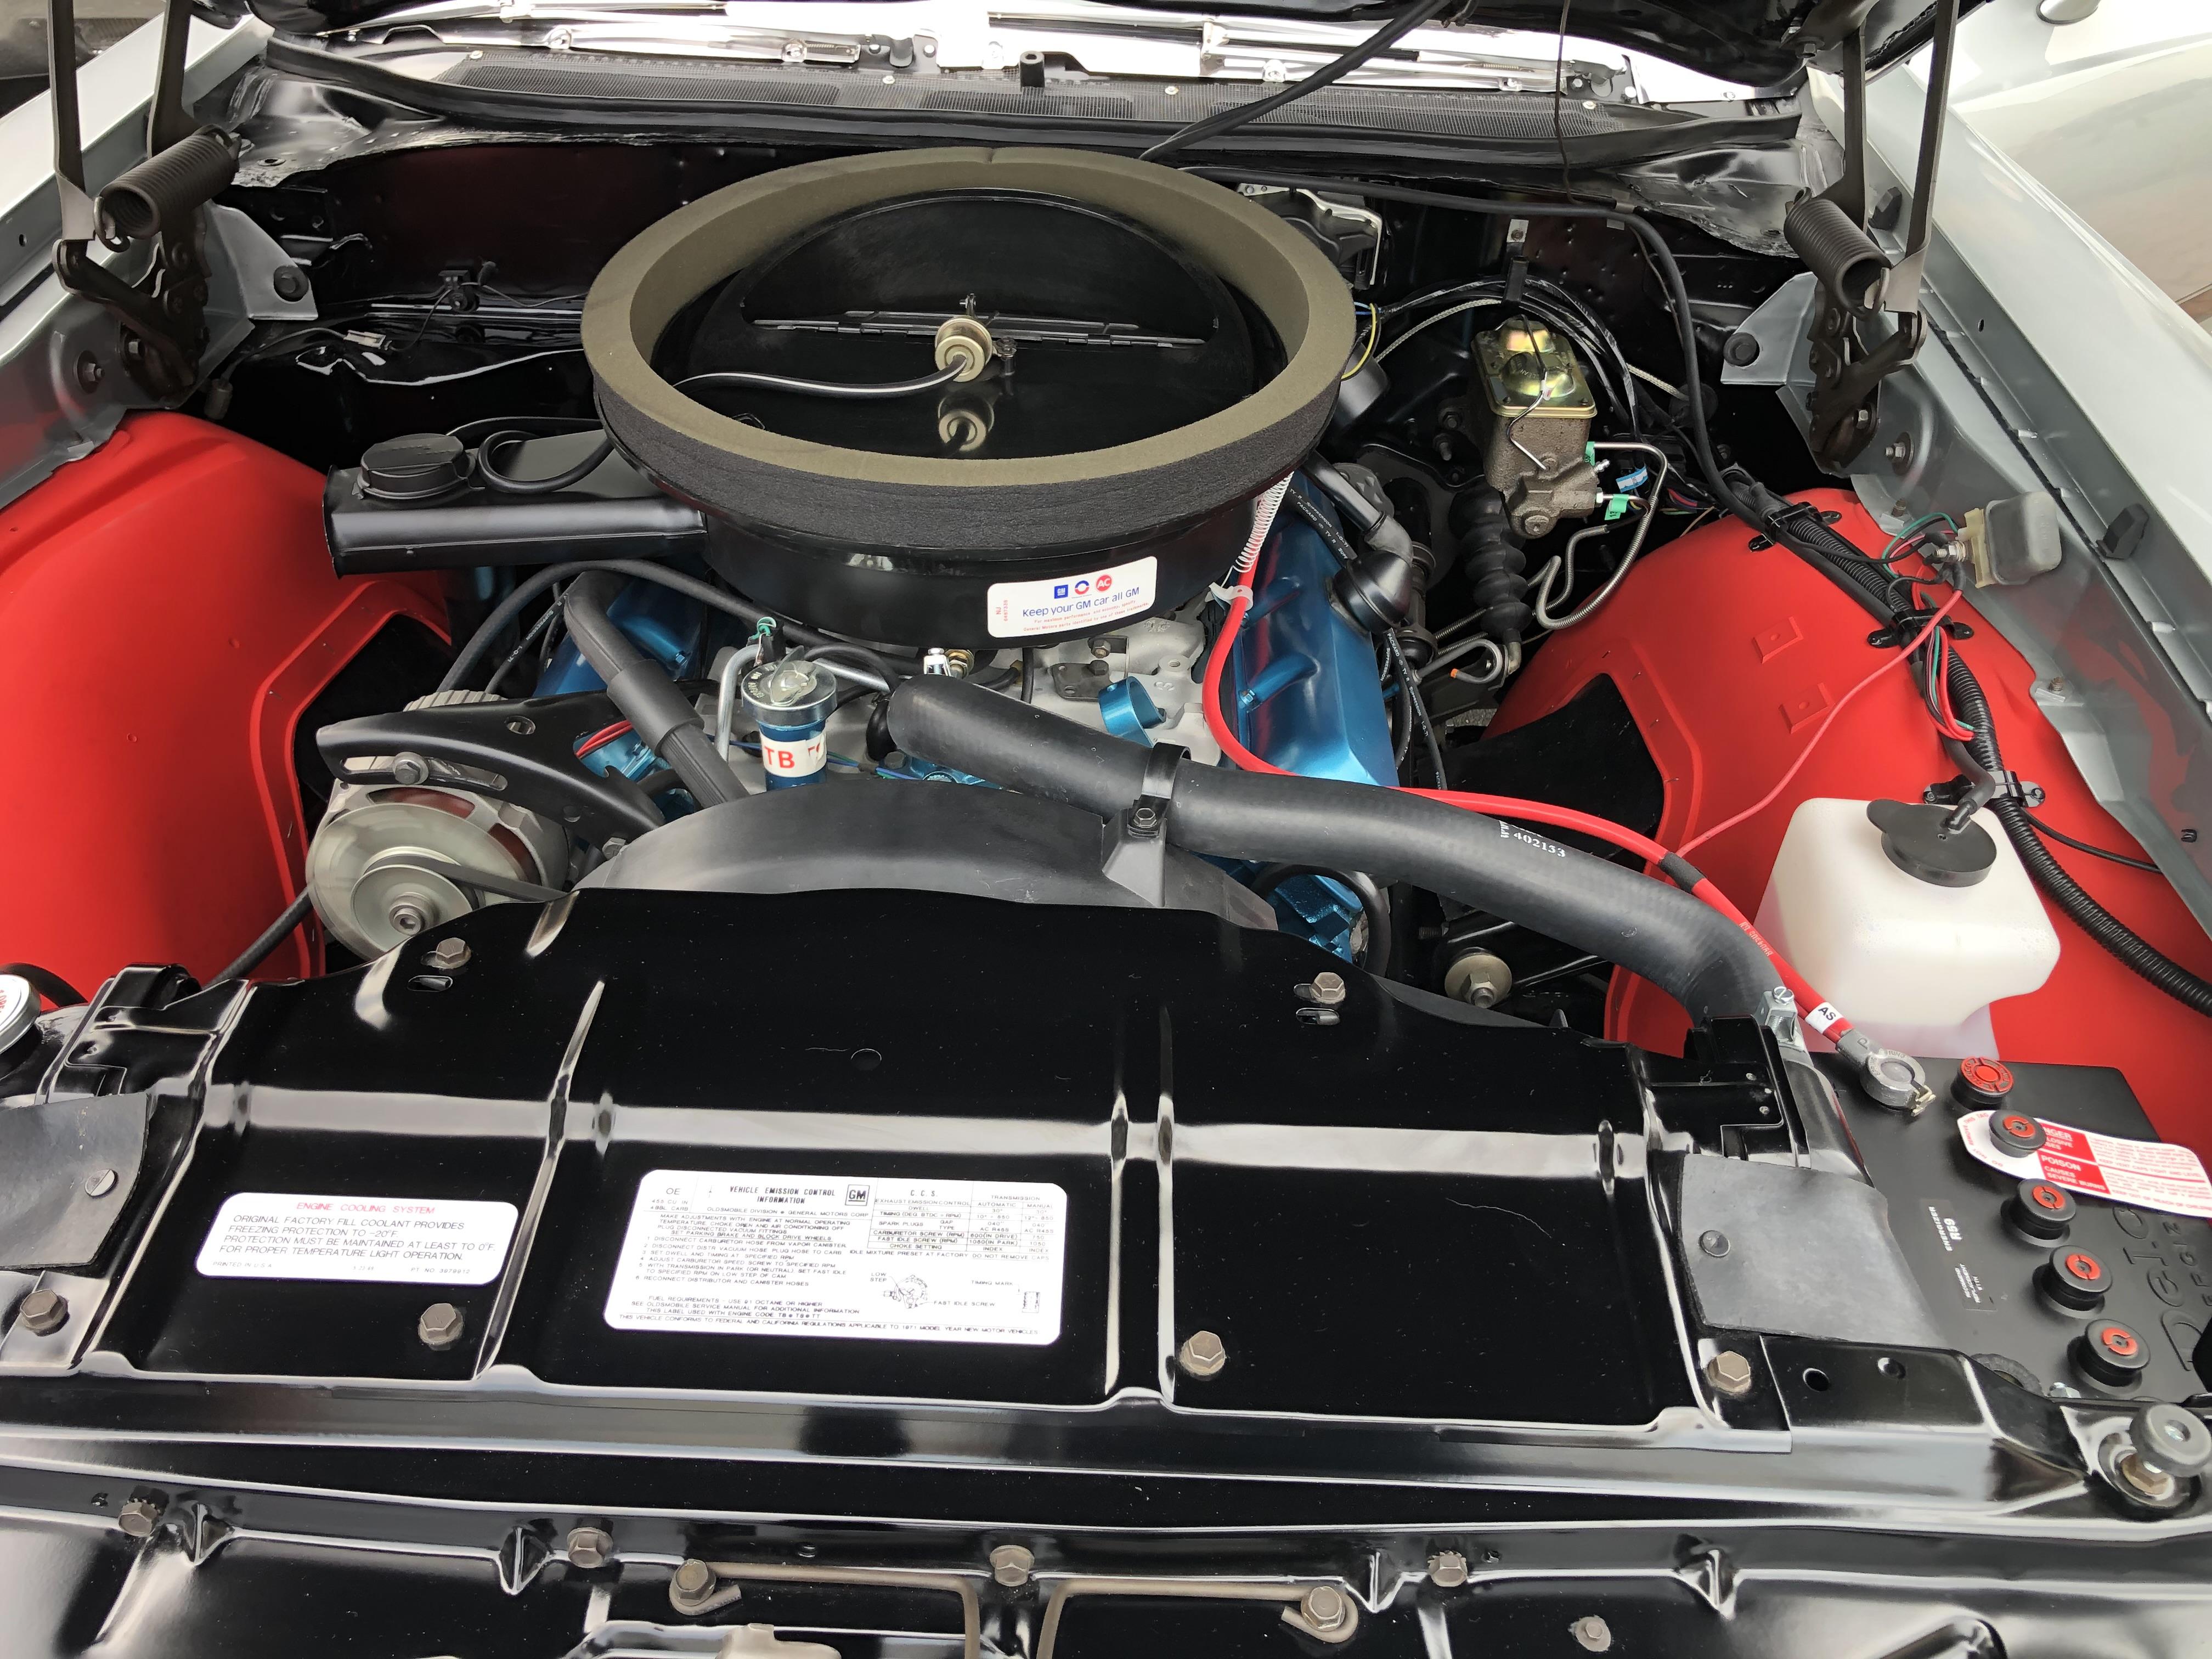
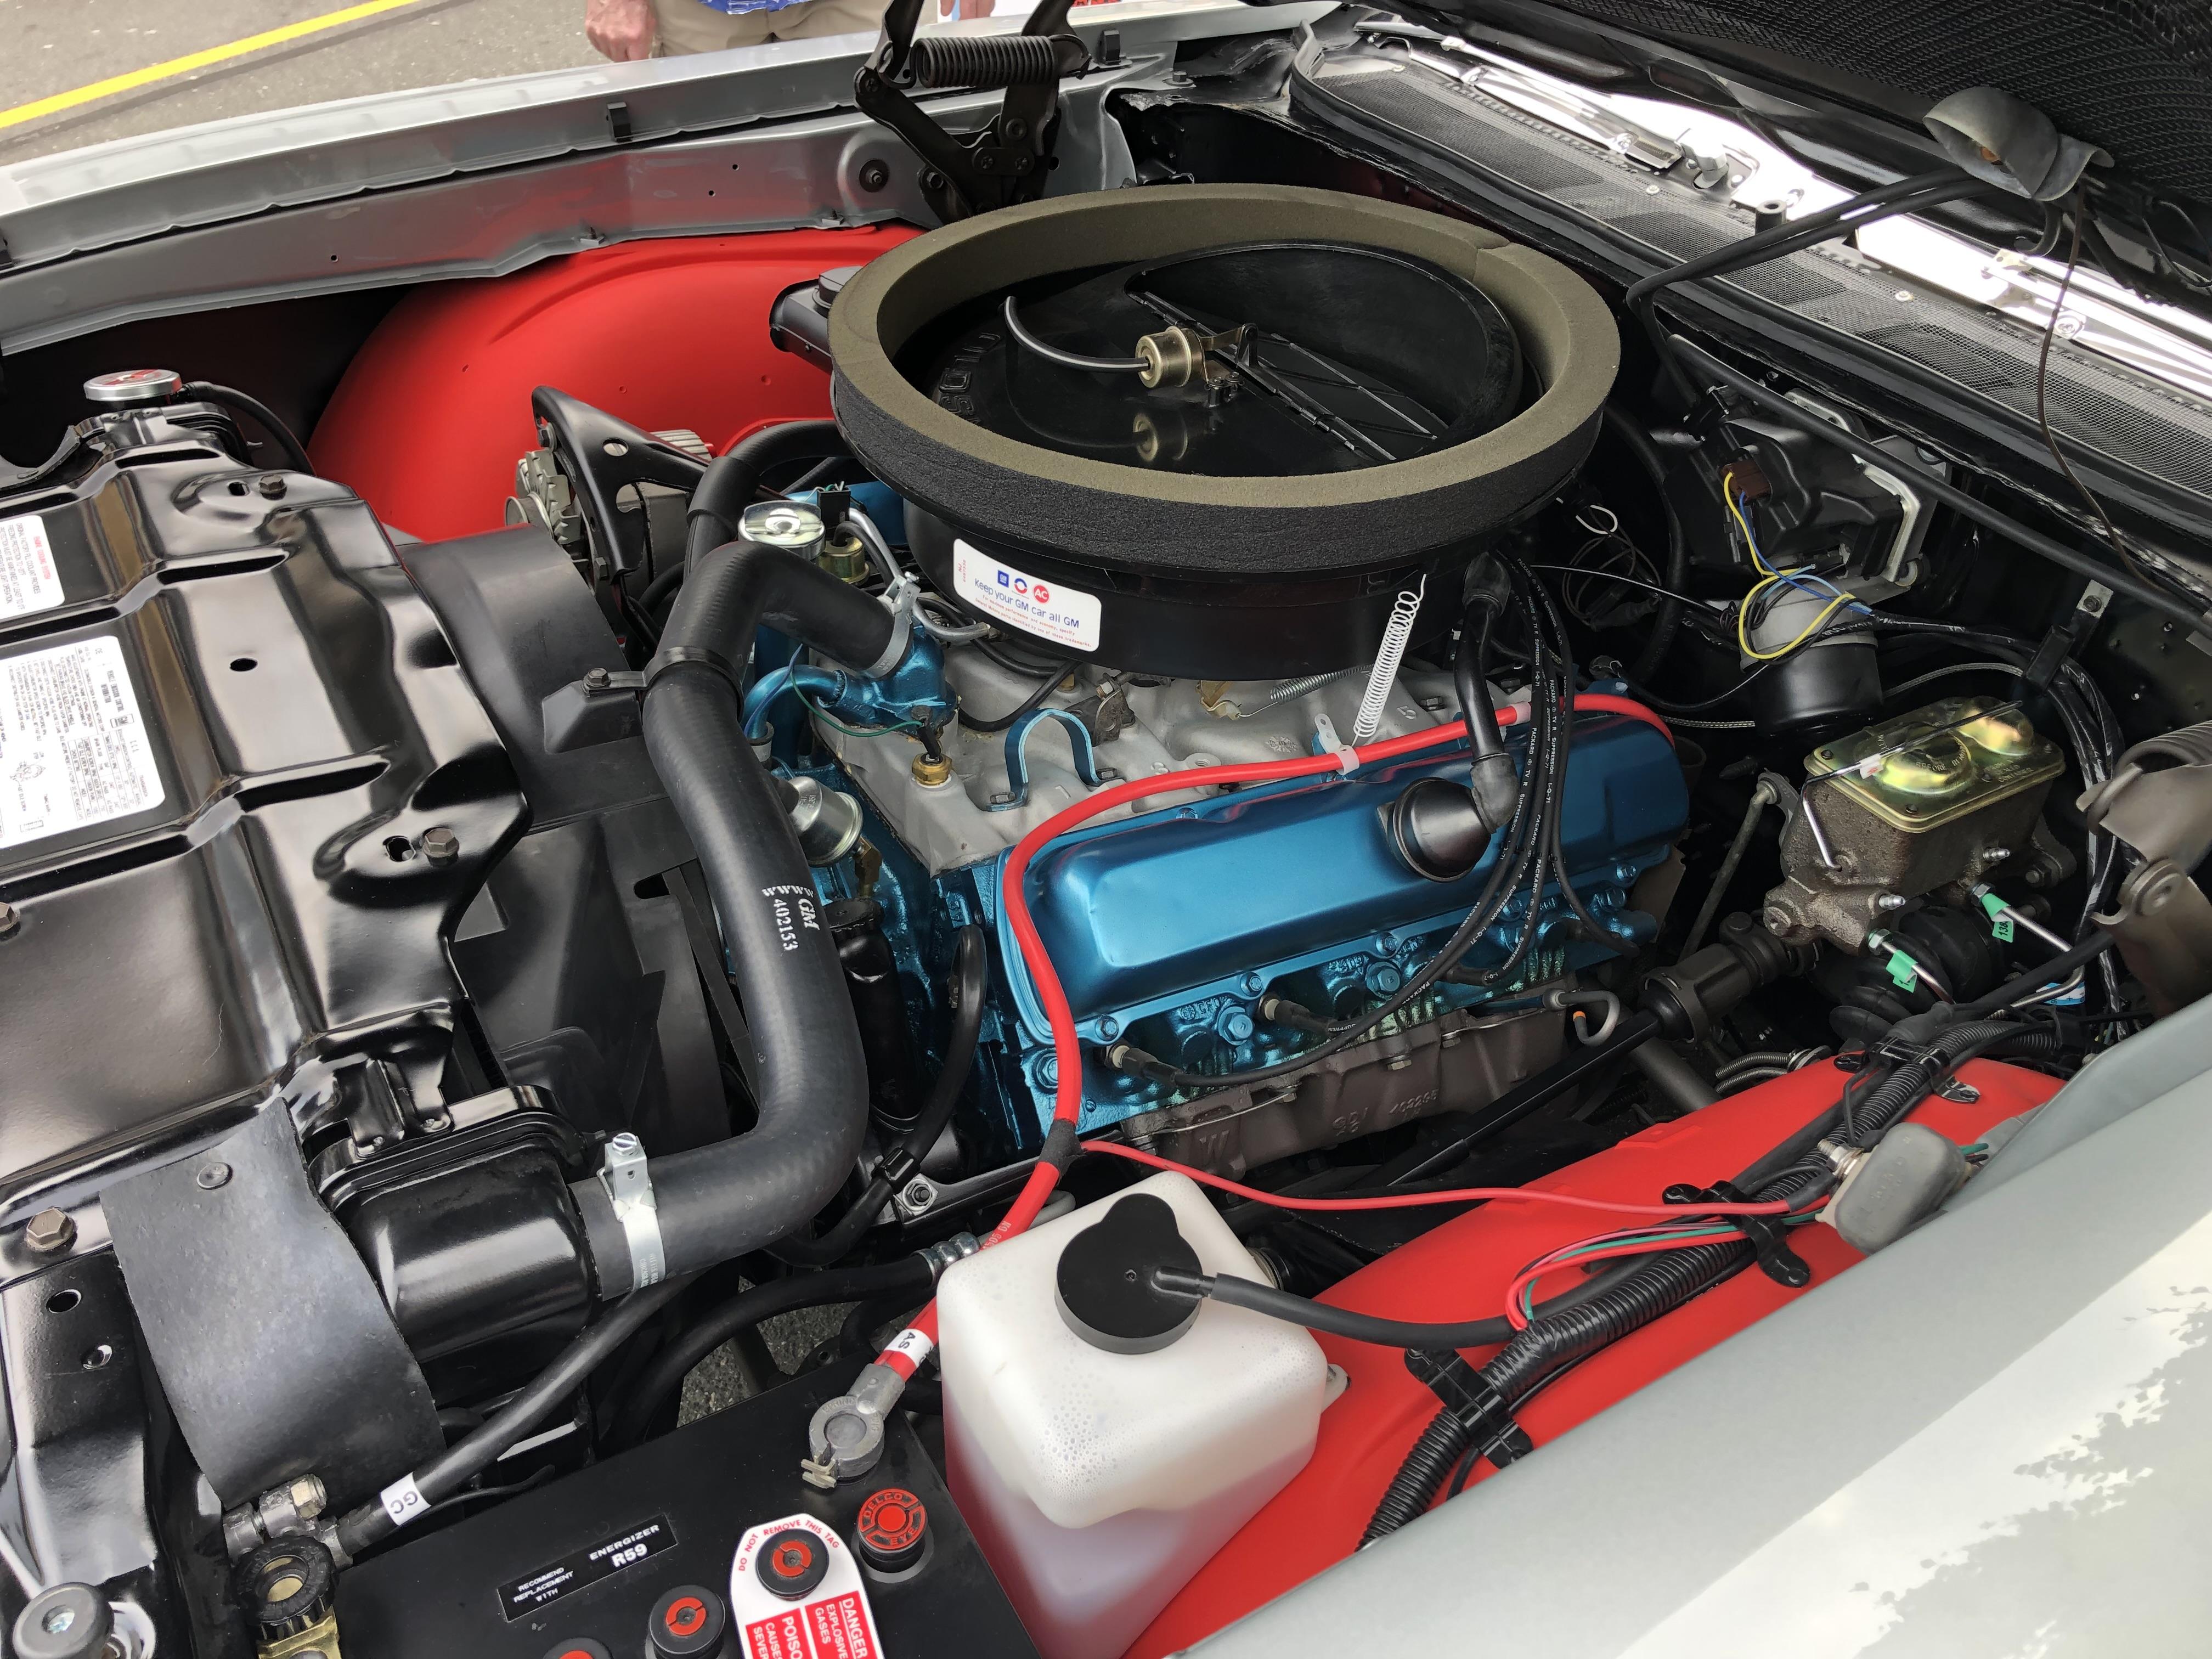
Yet another SMALL update. I wasn’t happy with the brake lines, just a bit off of scale and didn’t look right. So those have been redone. All the spaghetti has been attached at both ends now. Decals have been added, and upper and lower rad hoses installed. Rad cap is 2 pieces of photo etch from a door handle kit. You will also notice a prop rod for the hood…. I know, there is not one on the real car. I initially planned on magnets to hold the hood open, but I could not get it engineered to my liking. The long cowl created geometry issues for me. So in the end, I had to add a prop. I’m a little disappointed, but it is what it is now. A refresher on the real car engine…. And where we are now with my replica… I’m getting close!! Still a few as all touch ups to do here and there. Tail lights are installed on the bumper, and I’m partially done on the front bumper/grill. Probably one more update, then a pause before completion as I have dragged my heels on ordering some custom decals. Thanks for having a look. Cheers, Steve
-
Hi Allison, welcome to the forum. Be careful as the Tamiya clear can “eat” the decals. I recommend two light coats over the decals, wait a day, then a medium coat.
-
Mark, your weathering is always top notch sir. Proof that rust can be beautiful…
-
71 Olds 442 W30 (replica of my brother in law’s car)
Steve H replied to Steve H's topic in WIP: Model Cars
Thanks Greg, that is quite a compliment coming from you. Hi Stu, I appreciate your kind words. It’s not my most complicated build by any means, but it may be one of my most detailed. Happy that it may be some useful reference material for you. I do have all the wires connected now, and it does look better. Just need to do few touch ups, and add the rad hoses and the engine compartment is done. I did create a problem for myself regarding the hood hinges and their fitment. Still working on a solution for that… Thanks for taking the time to leave a comment guys. Cheers, Steve -
Really cool Duece Phil. This is a cool trend indeed. Great stance and very clean build as always. What black did you use? Looks like it has a blueish pearl look to it, very cool. Cheers, Steve
-
Hot dang! Very nice Chevelle Carl !! You can lay down a beautiful paint job sir. Do you recall what paint you used? I REALLY like that colour. I’m aiming for colour very similar for my next project. Keep showing us your older builds my friend, they look fantastic. Cheers, Steve
-
Great looking build Carl. I’m embarrassed to say, that I think that’s the first build I have seen of yours. Purple looks nice on it. Cheers, Steve
-
71 Olds 442 W30 (replica of my brother in law’s car)
Steve H replied to Steve H's topic in WIP: Model Cars
Thanks Donato. I’m looking forward to connecting all the wires and hoses, then finishing this one up. I have a few more ideas I’m pondering but it’s getting close to done.