Steve H
-
Posts
2,535 -
Joined
-
Last visited
Content Type
Profiles
Forums
Events
Gallery
Everything posted by Steve H
-
Francis! How are you? Thanks for having a look, as always you’re way too kind. You set the bar for being incredibly humble. I’m patiently waiting for more pics of the Dodge… To be honest, this one really catches the eye in the display case. She’s under glass now with more photos
-
Thanks Rob! Hi Rob, very much appreciated Hi Dennis, I have always been a pro street kinda guy, but recently have really been into the pro touring style. Hi Jeremy, thanks for the kind words! Welll….. you are gonna laugh when you see what’s next. Keep an eye on the truck/van WIP section in the next day or two Thank you Greg. I appreciate hearing from you. Hi Mark! Thanks for chiming in sir. I’m always sneaking around your builds too, I don’t always comment, but I really enjoy watching your builds. I have a “Rat Rig” idea rattling around that will require some weathering knowledge, I know exactly where to look… Thank you all for taking the time to comment
-
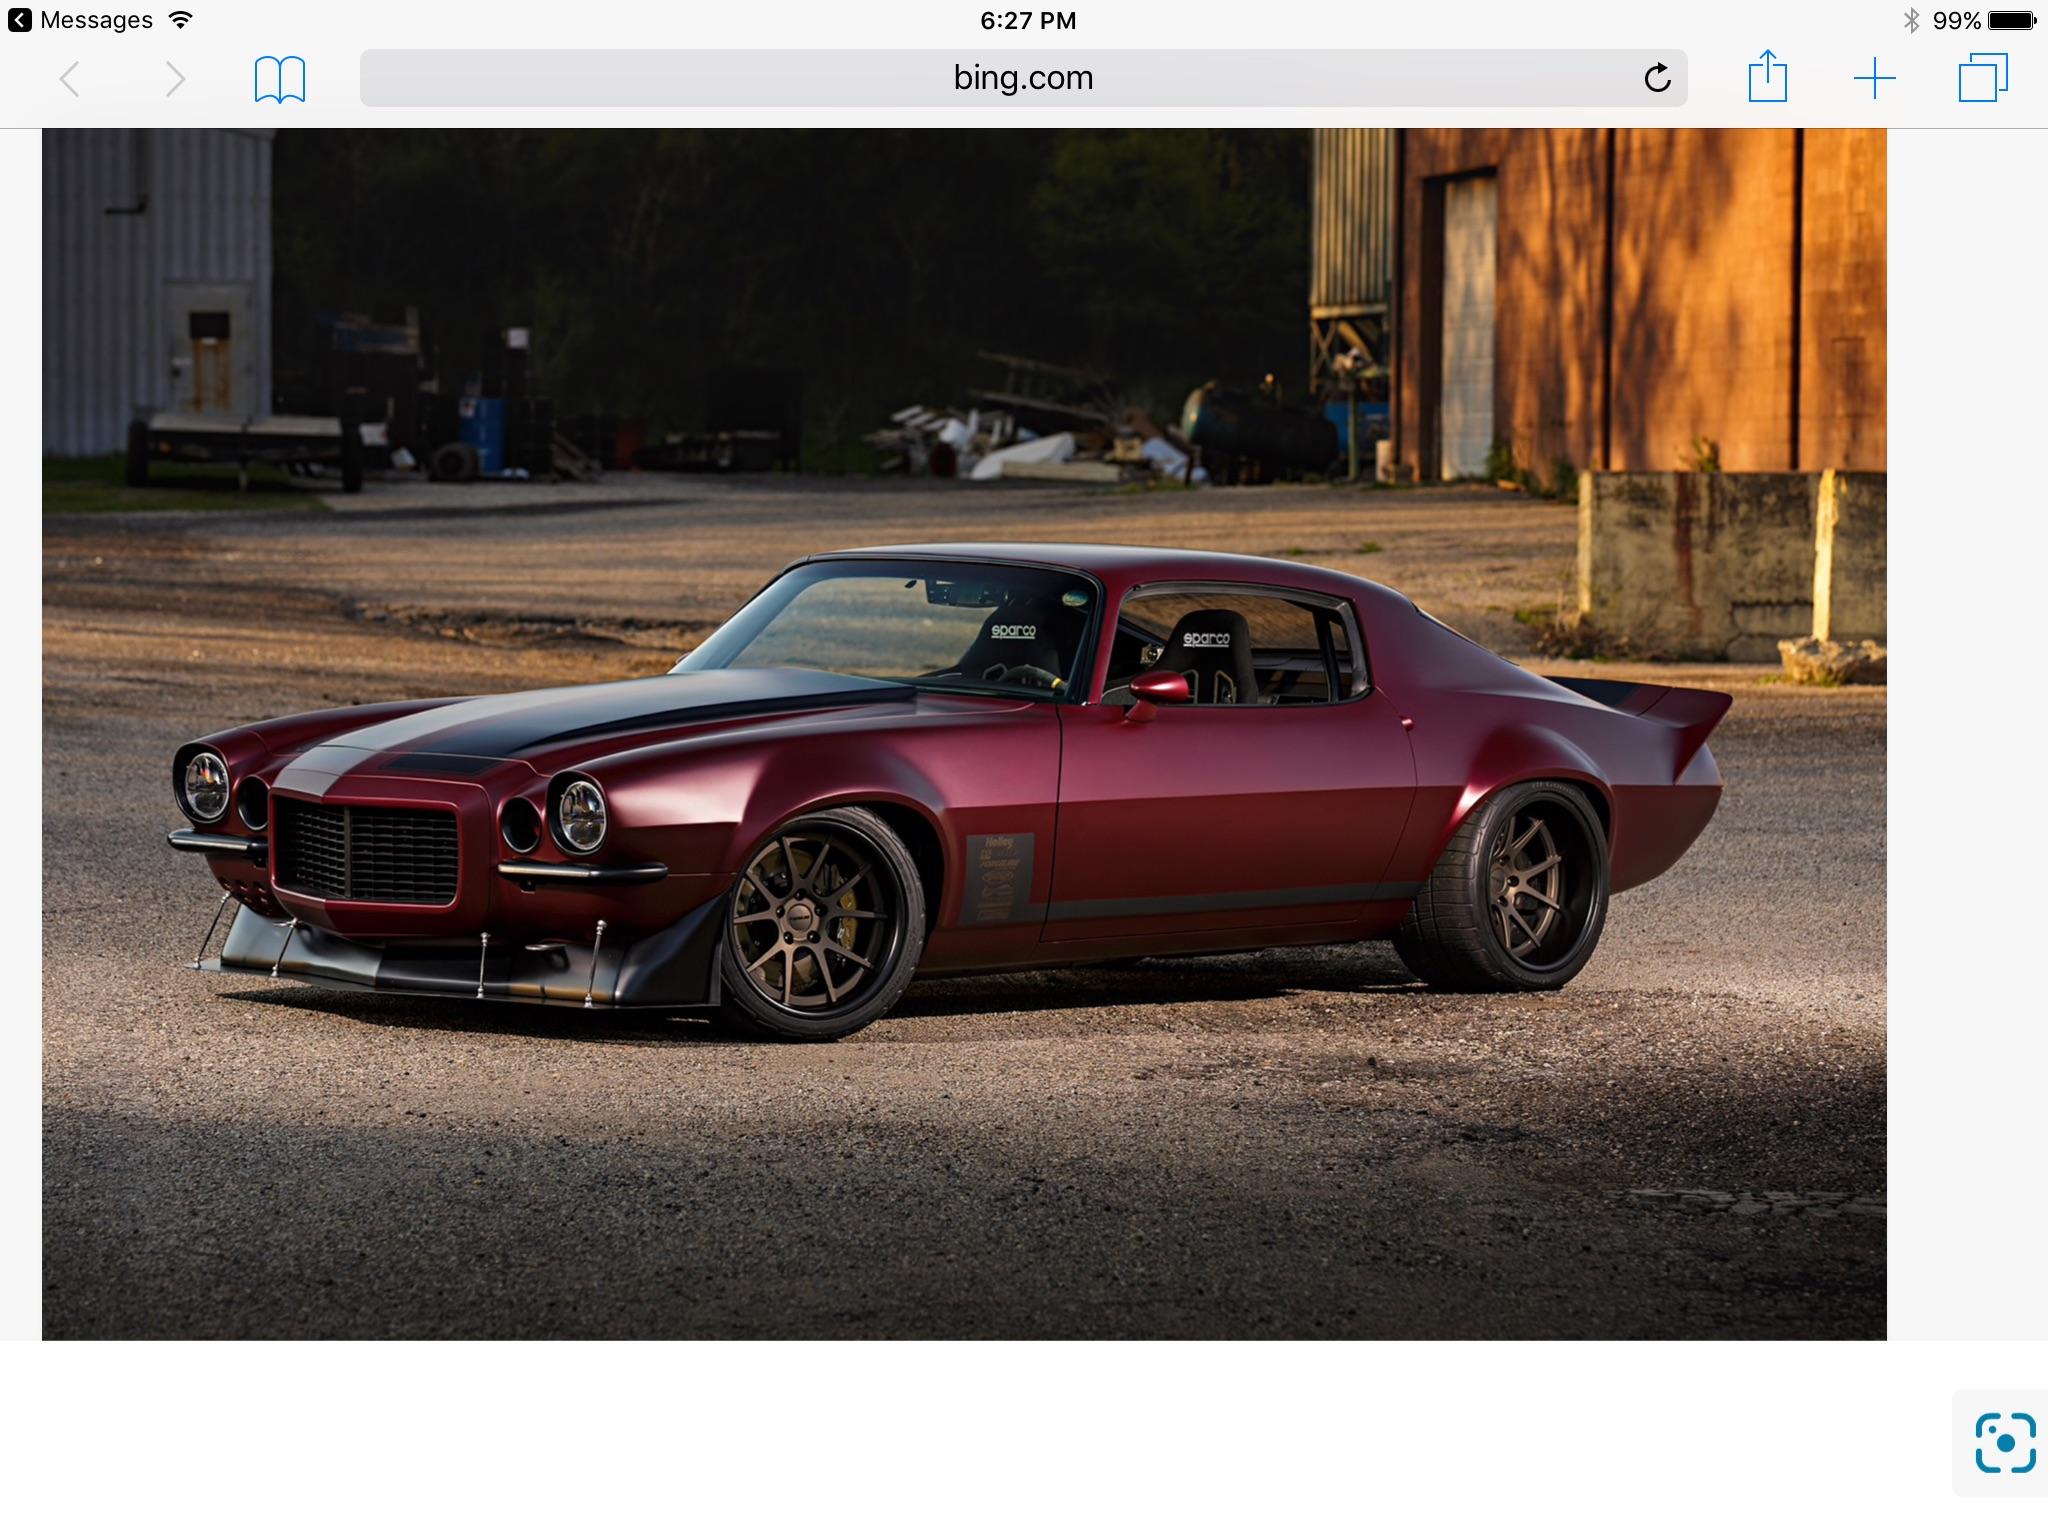
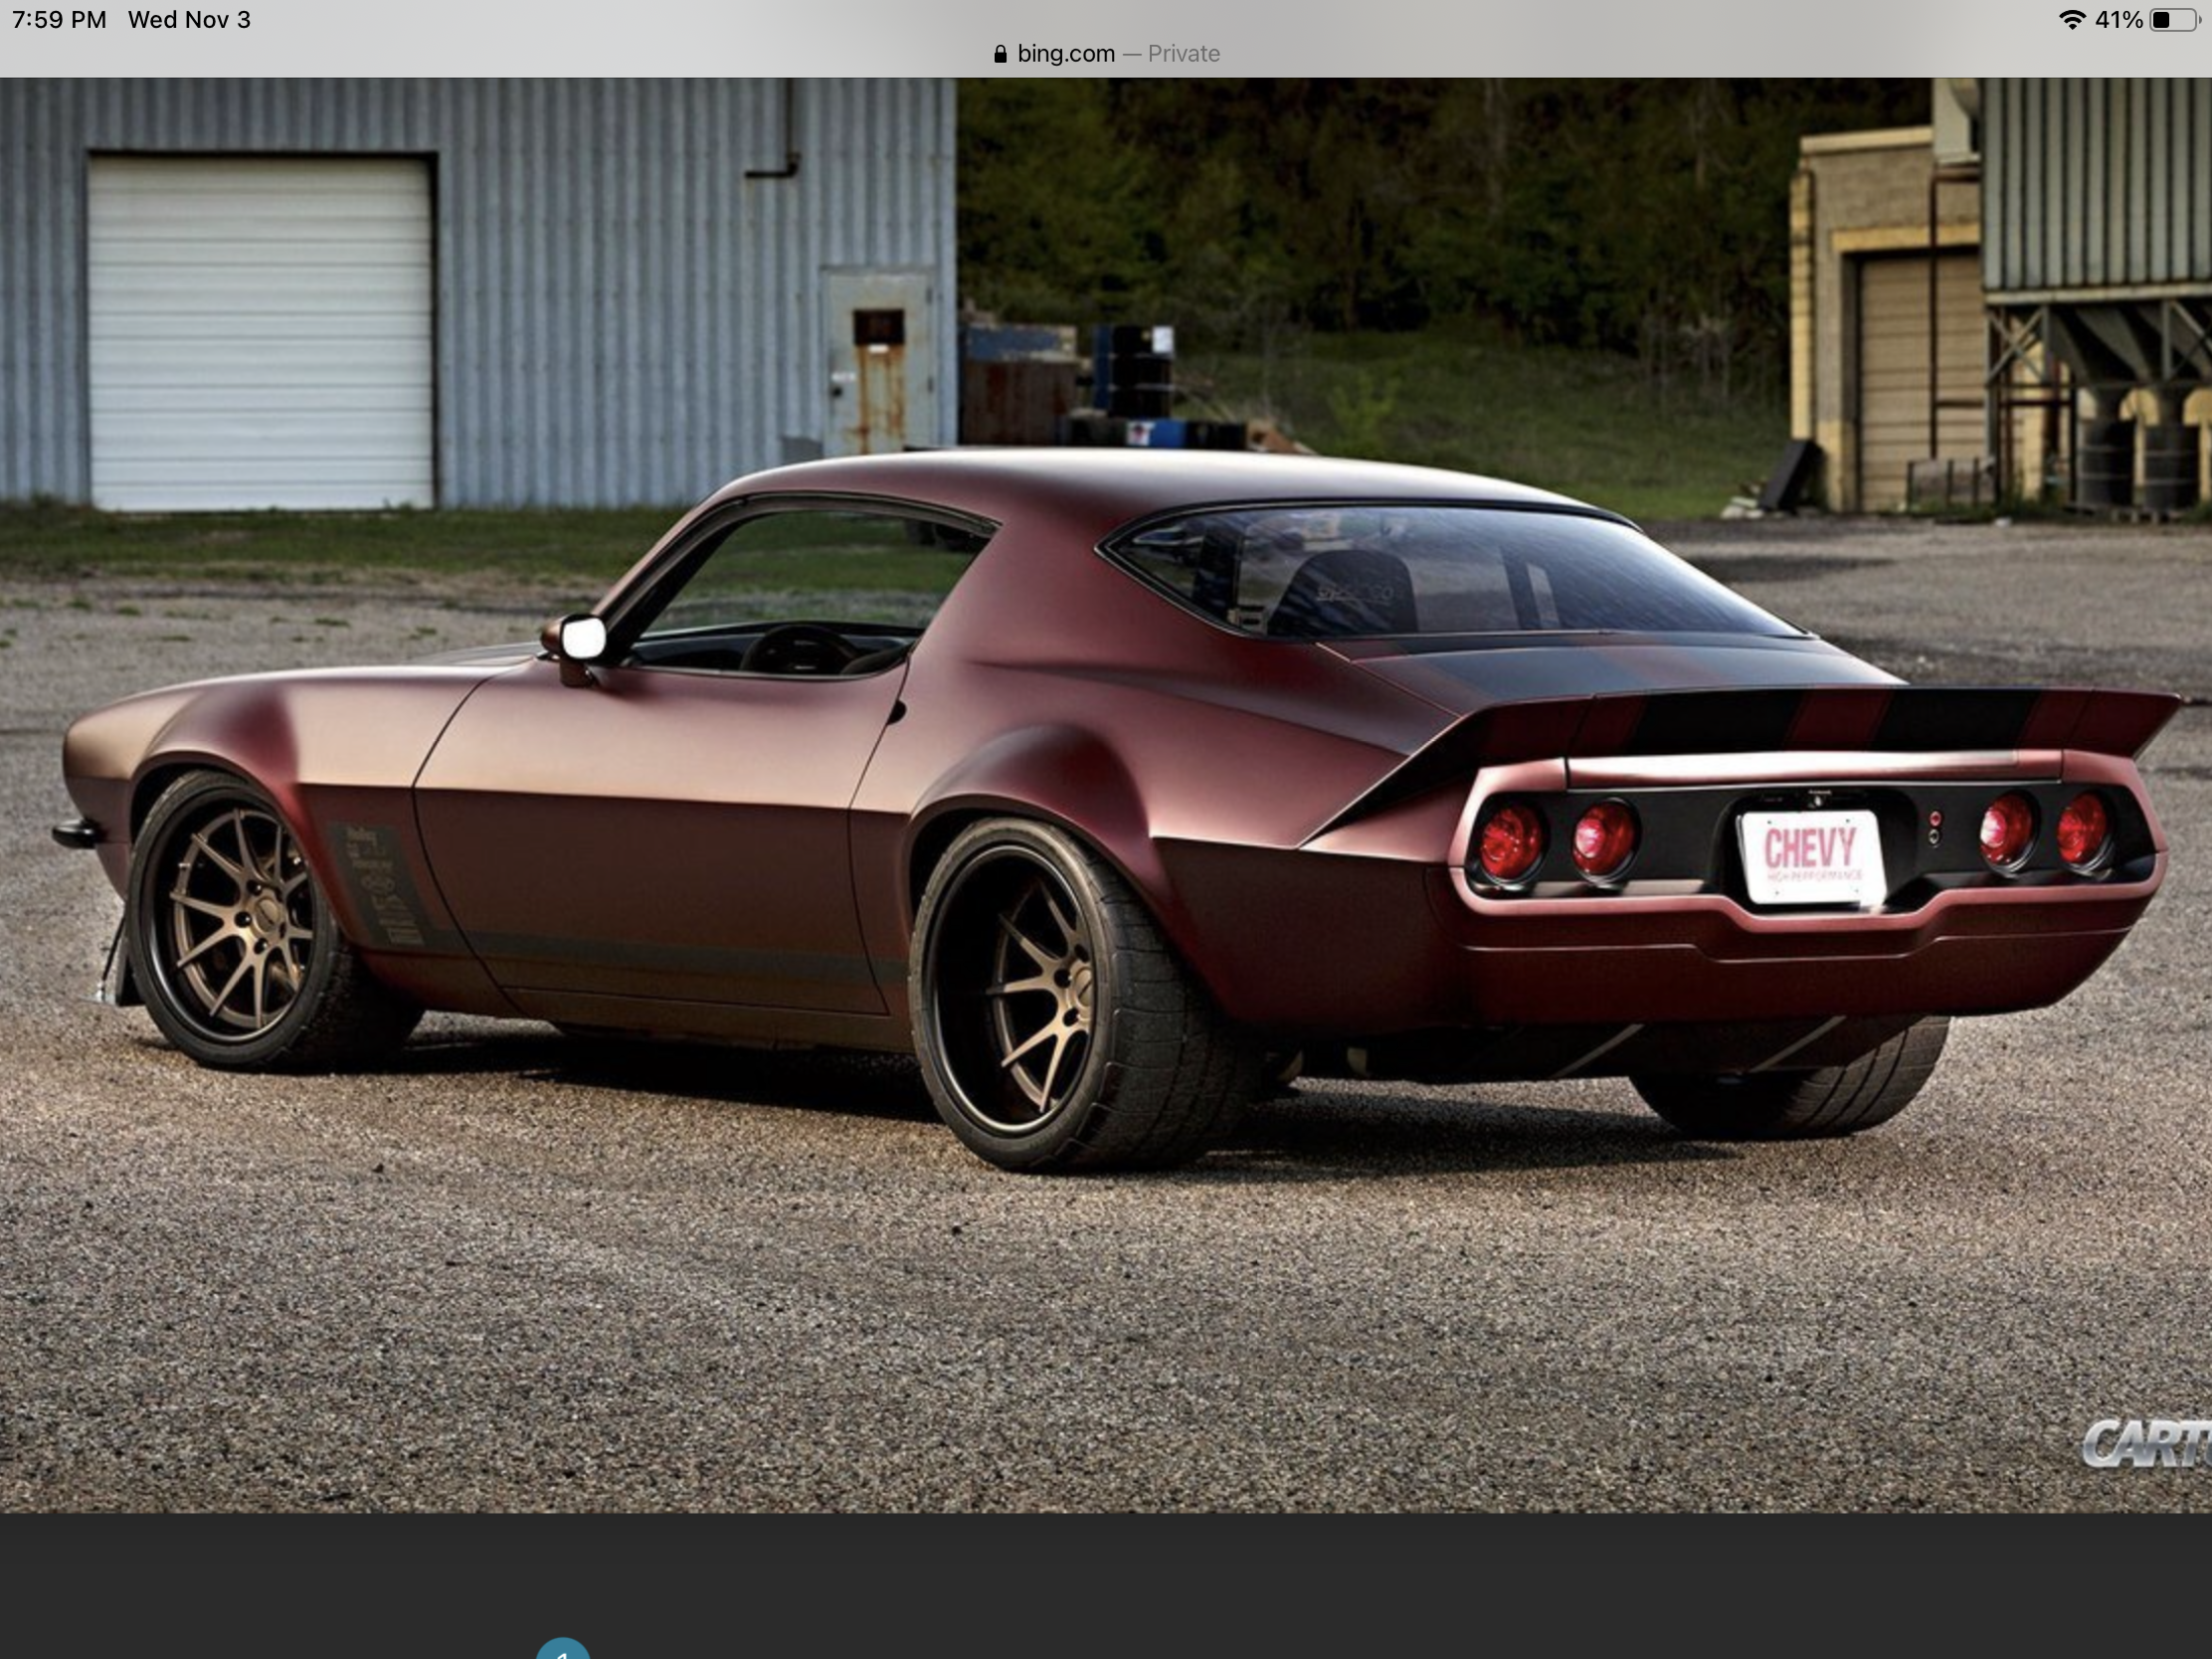
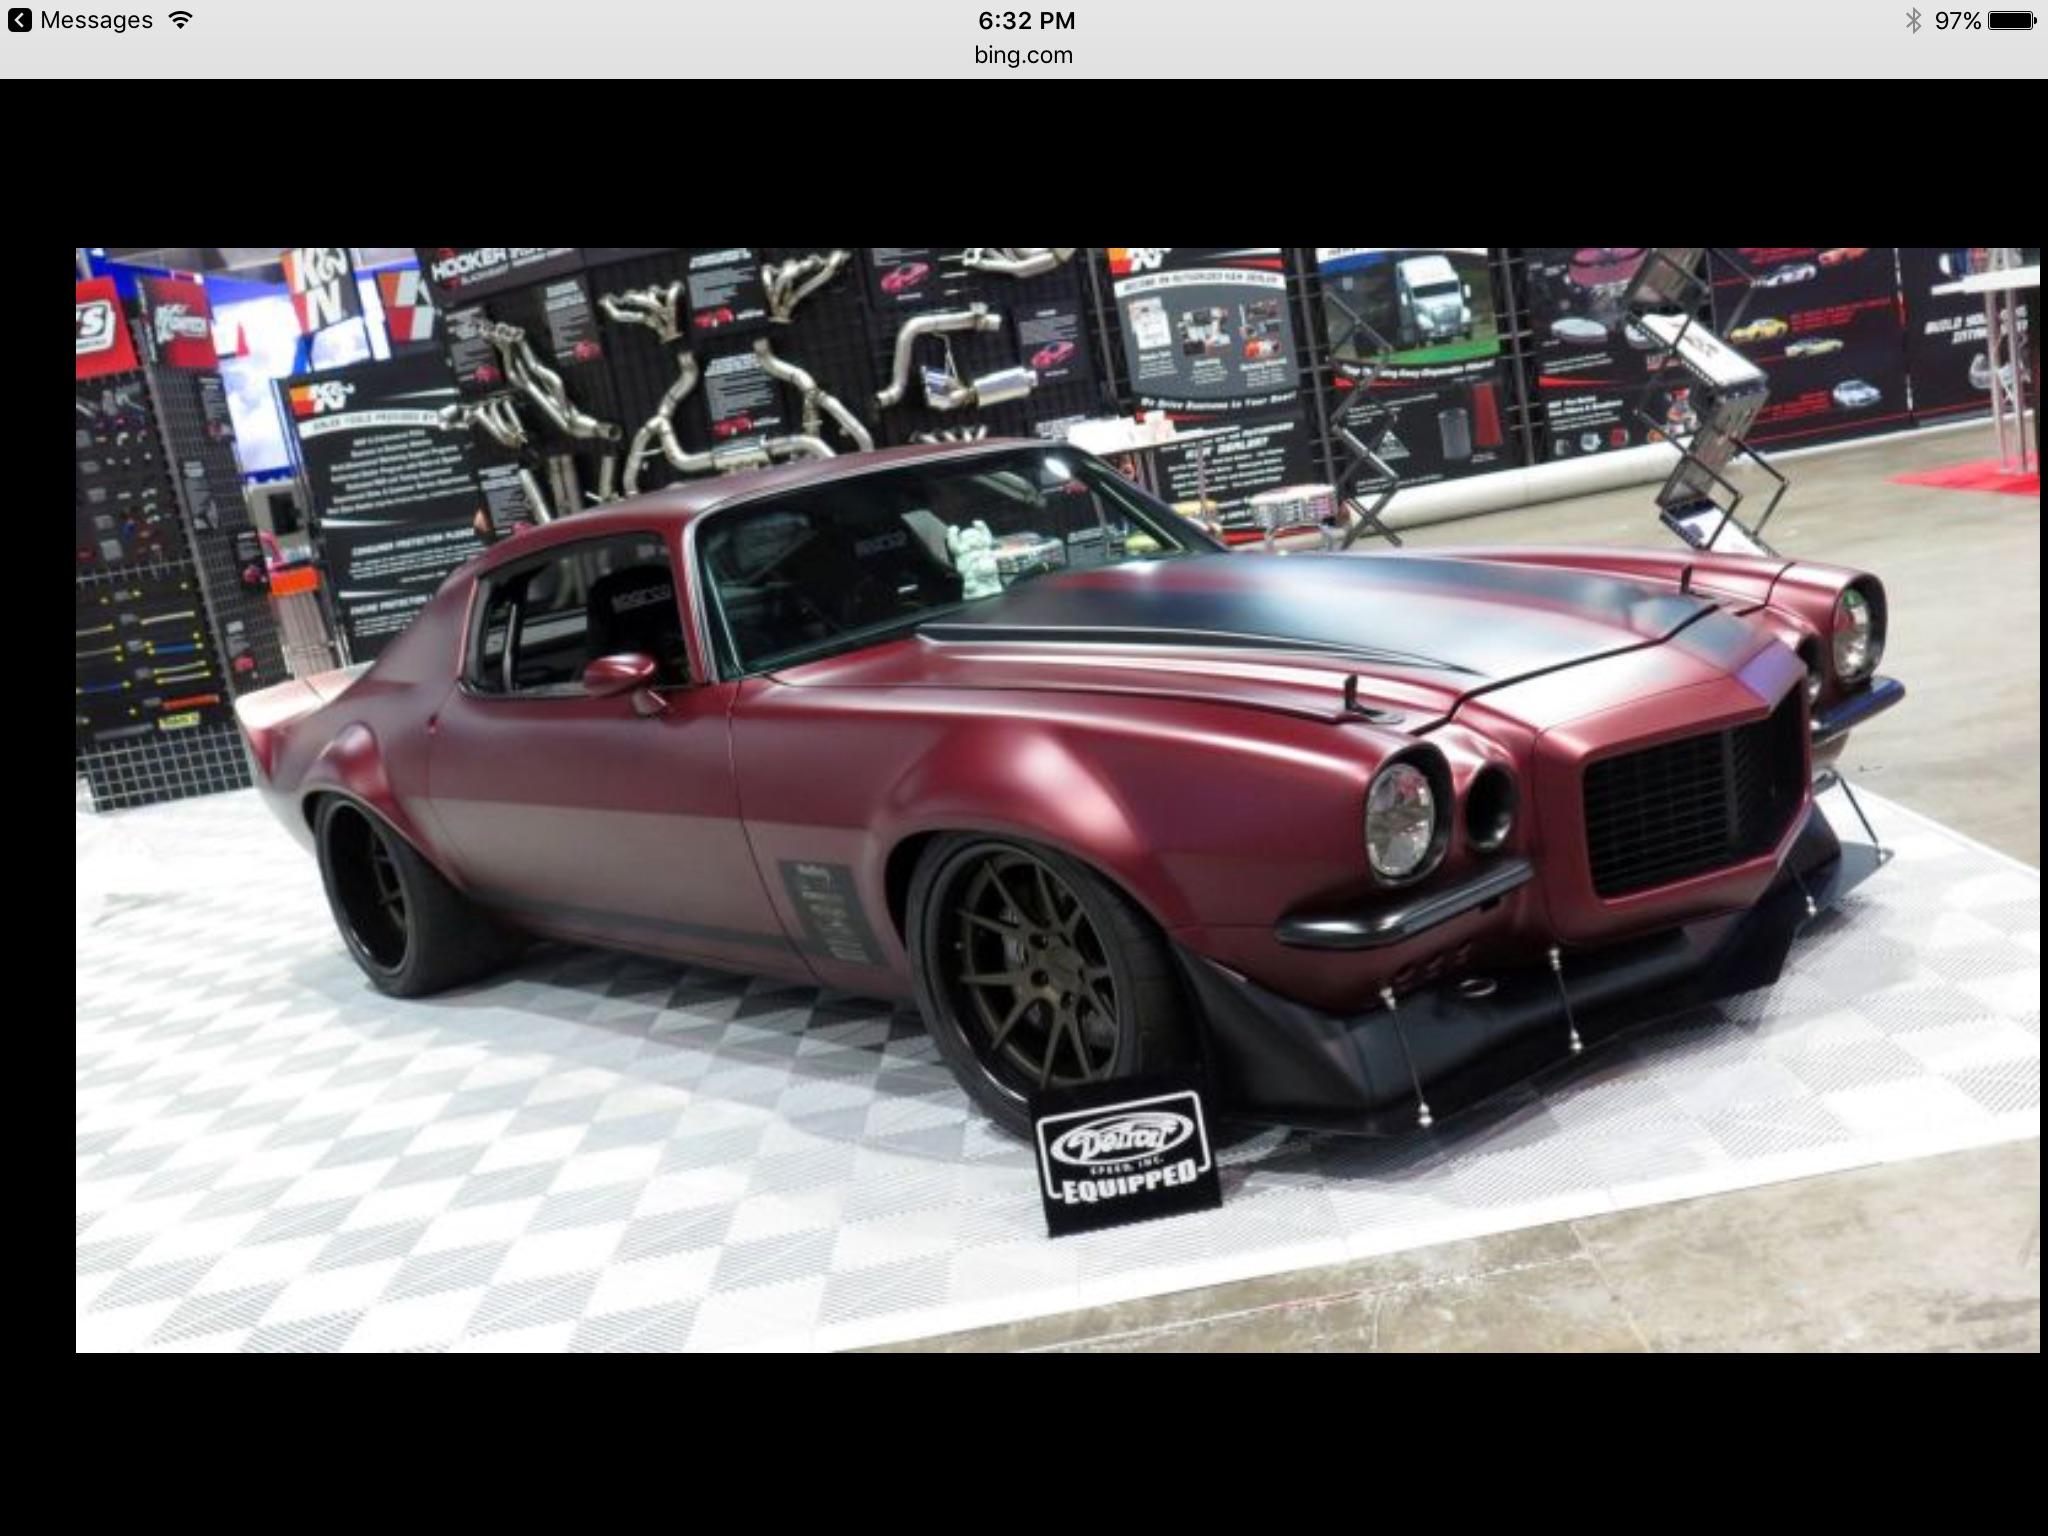
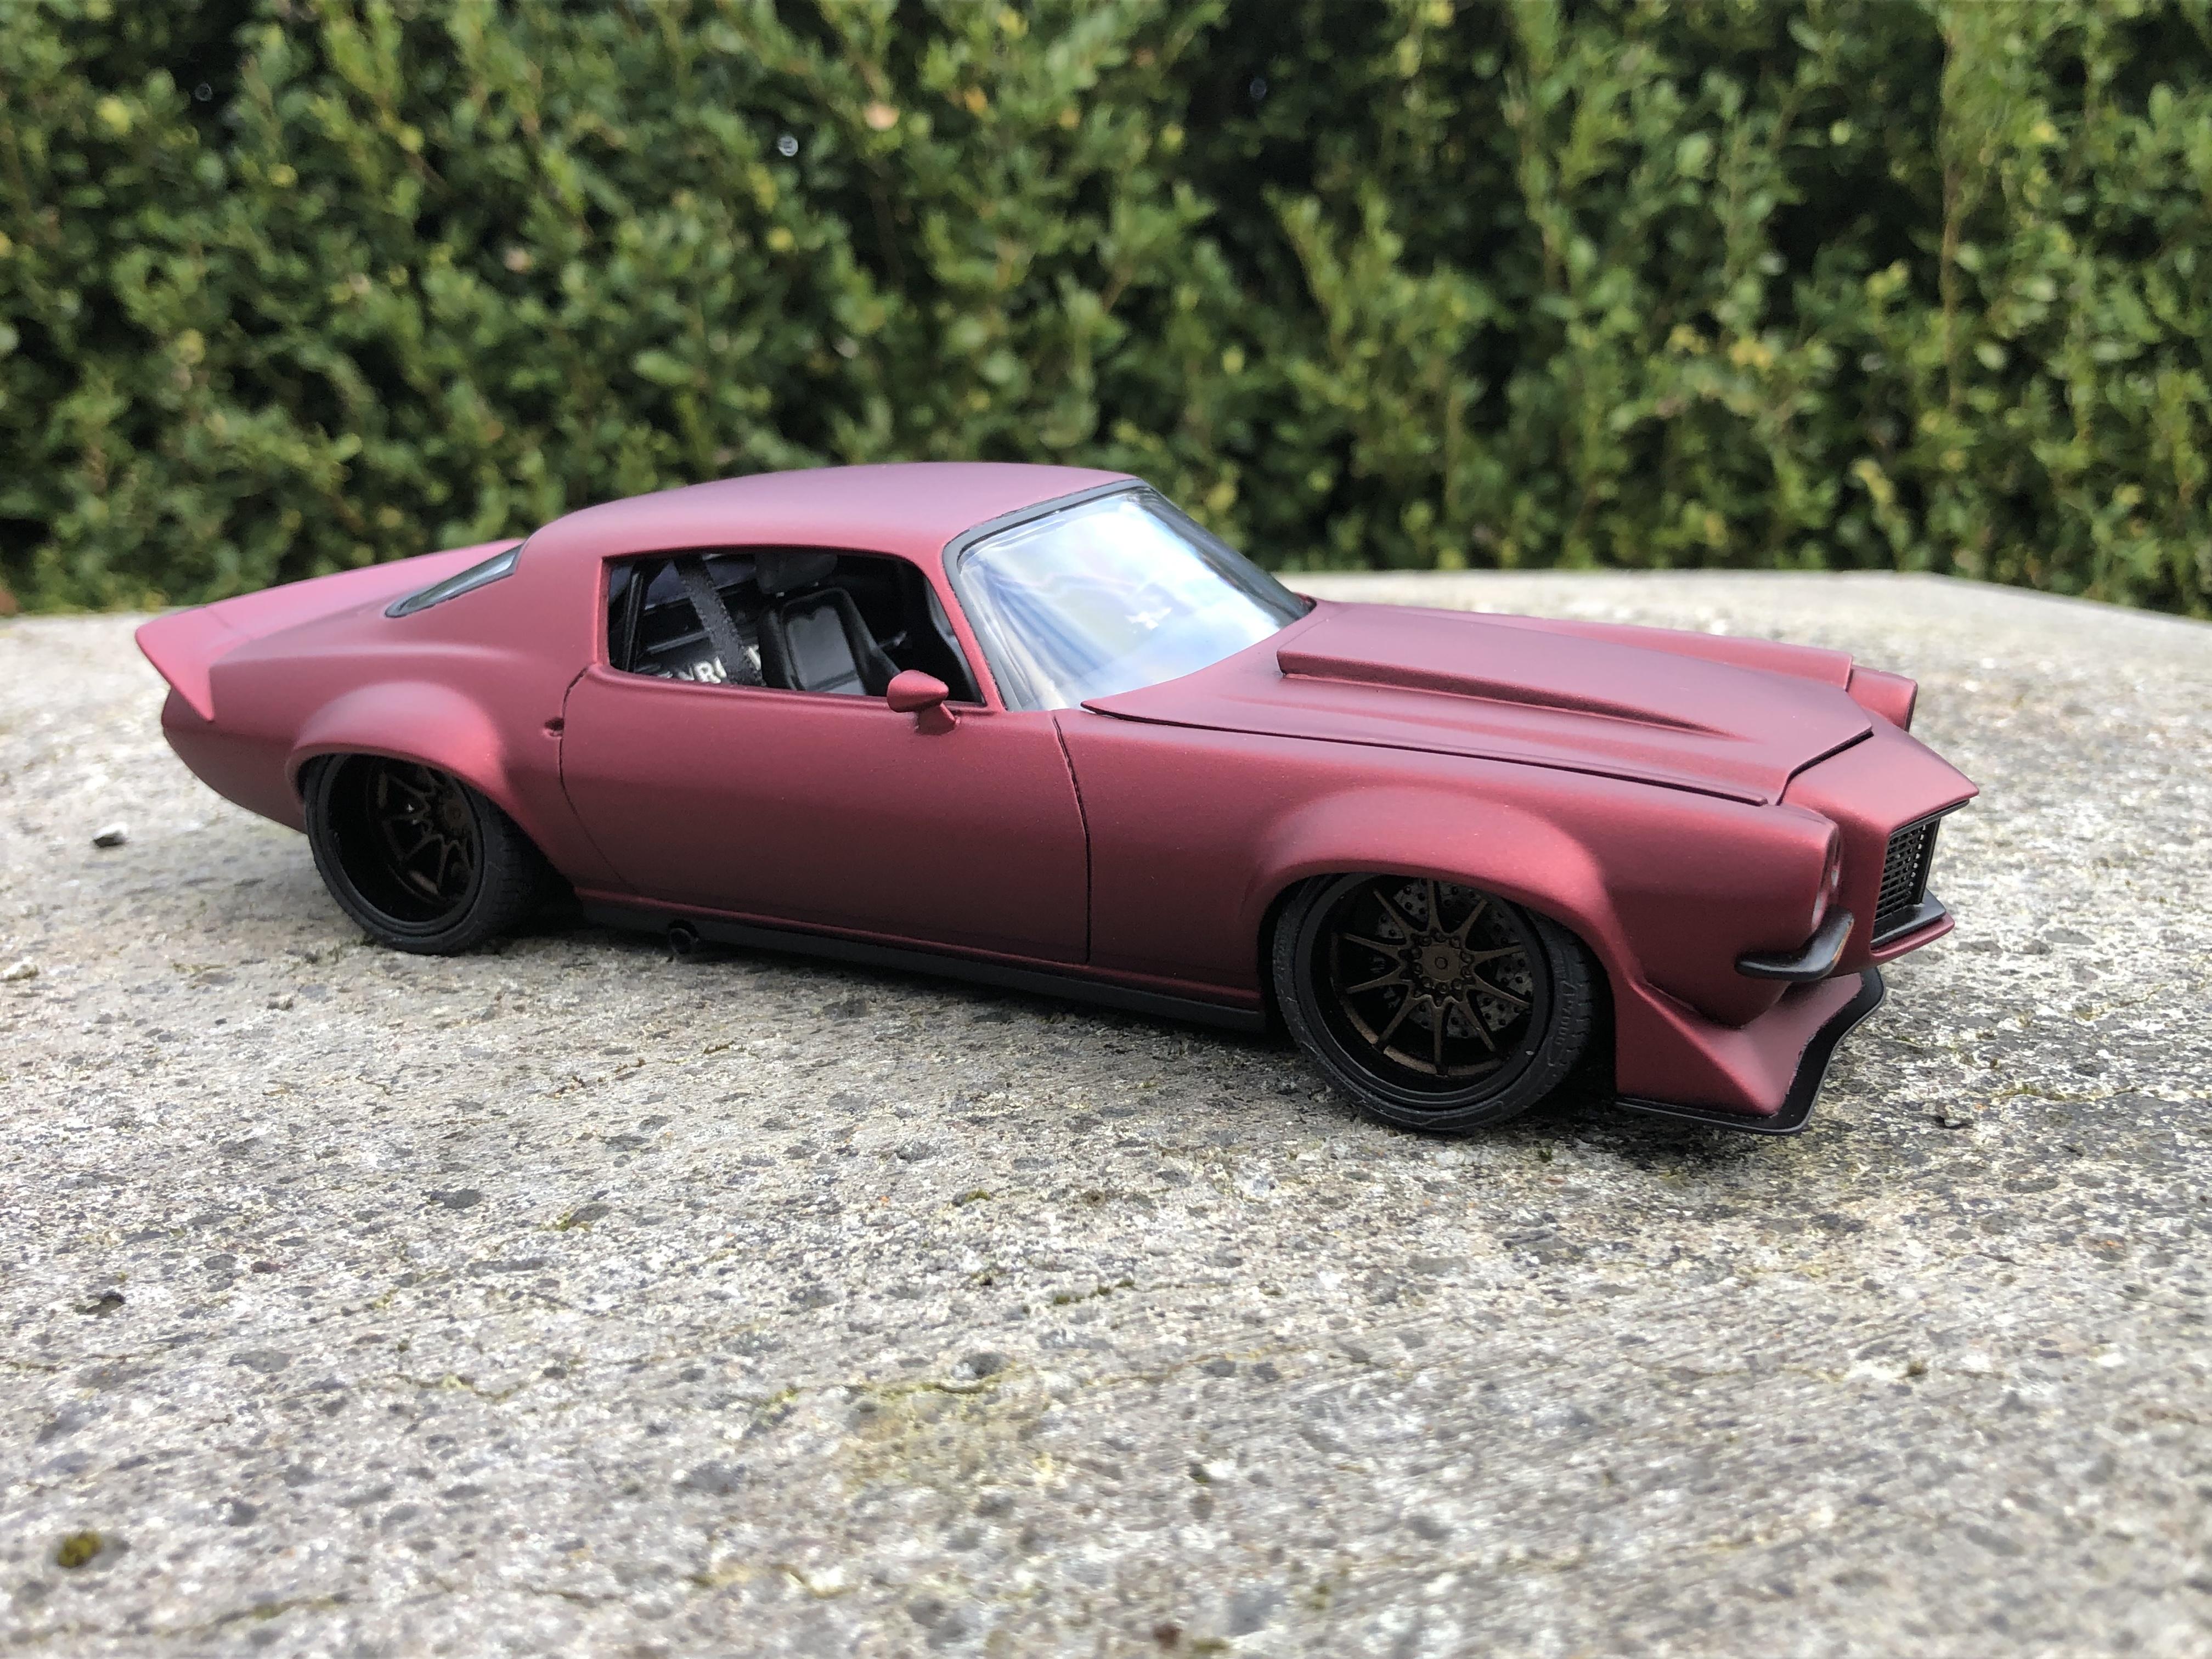
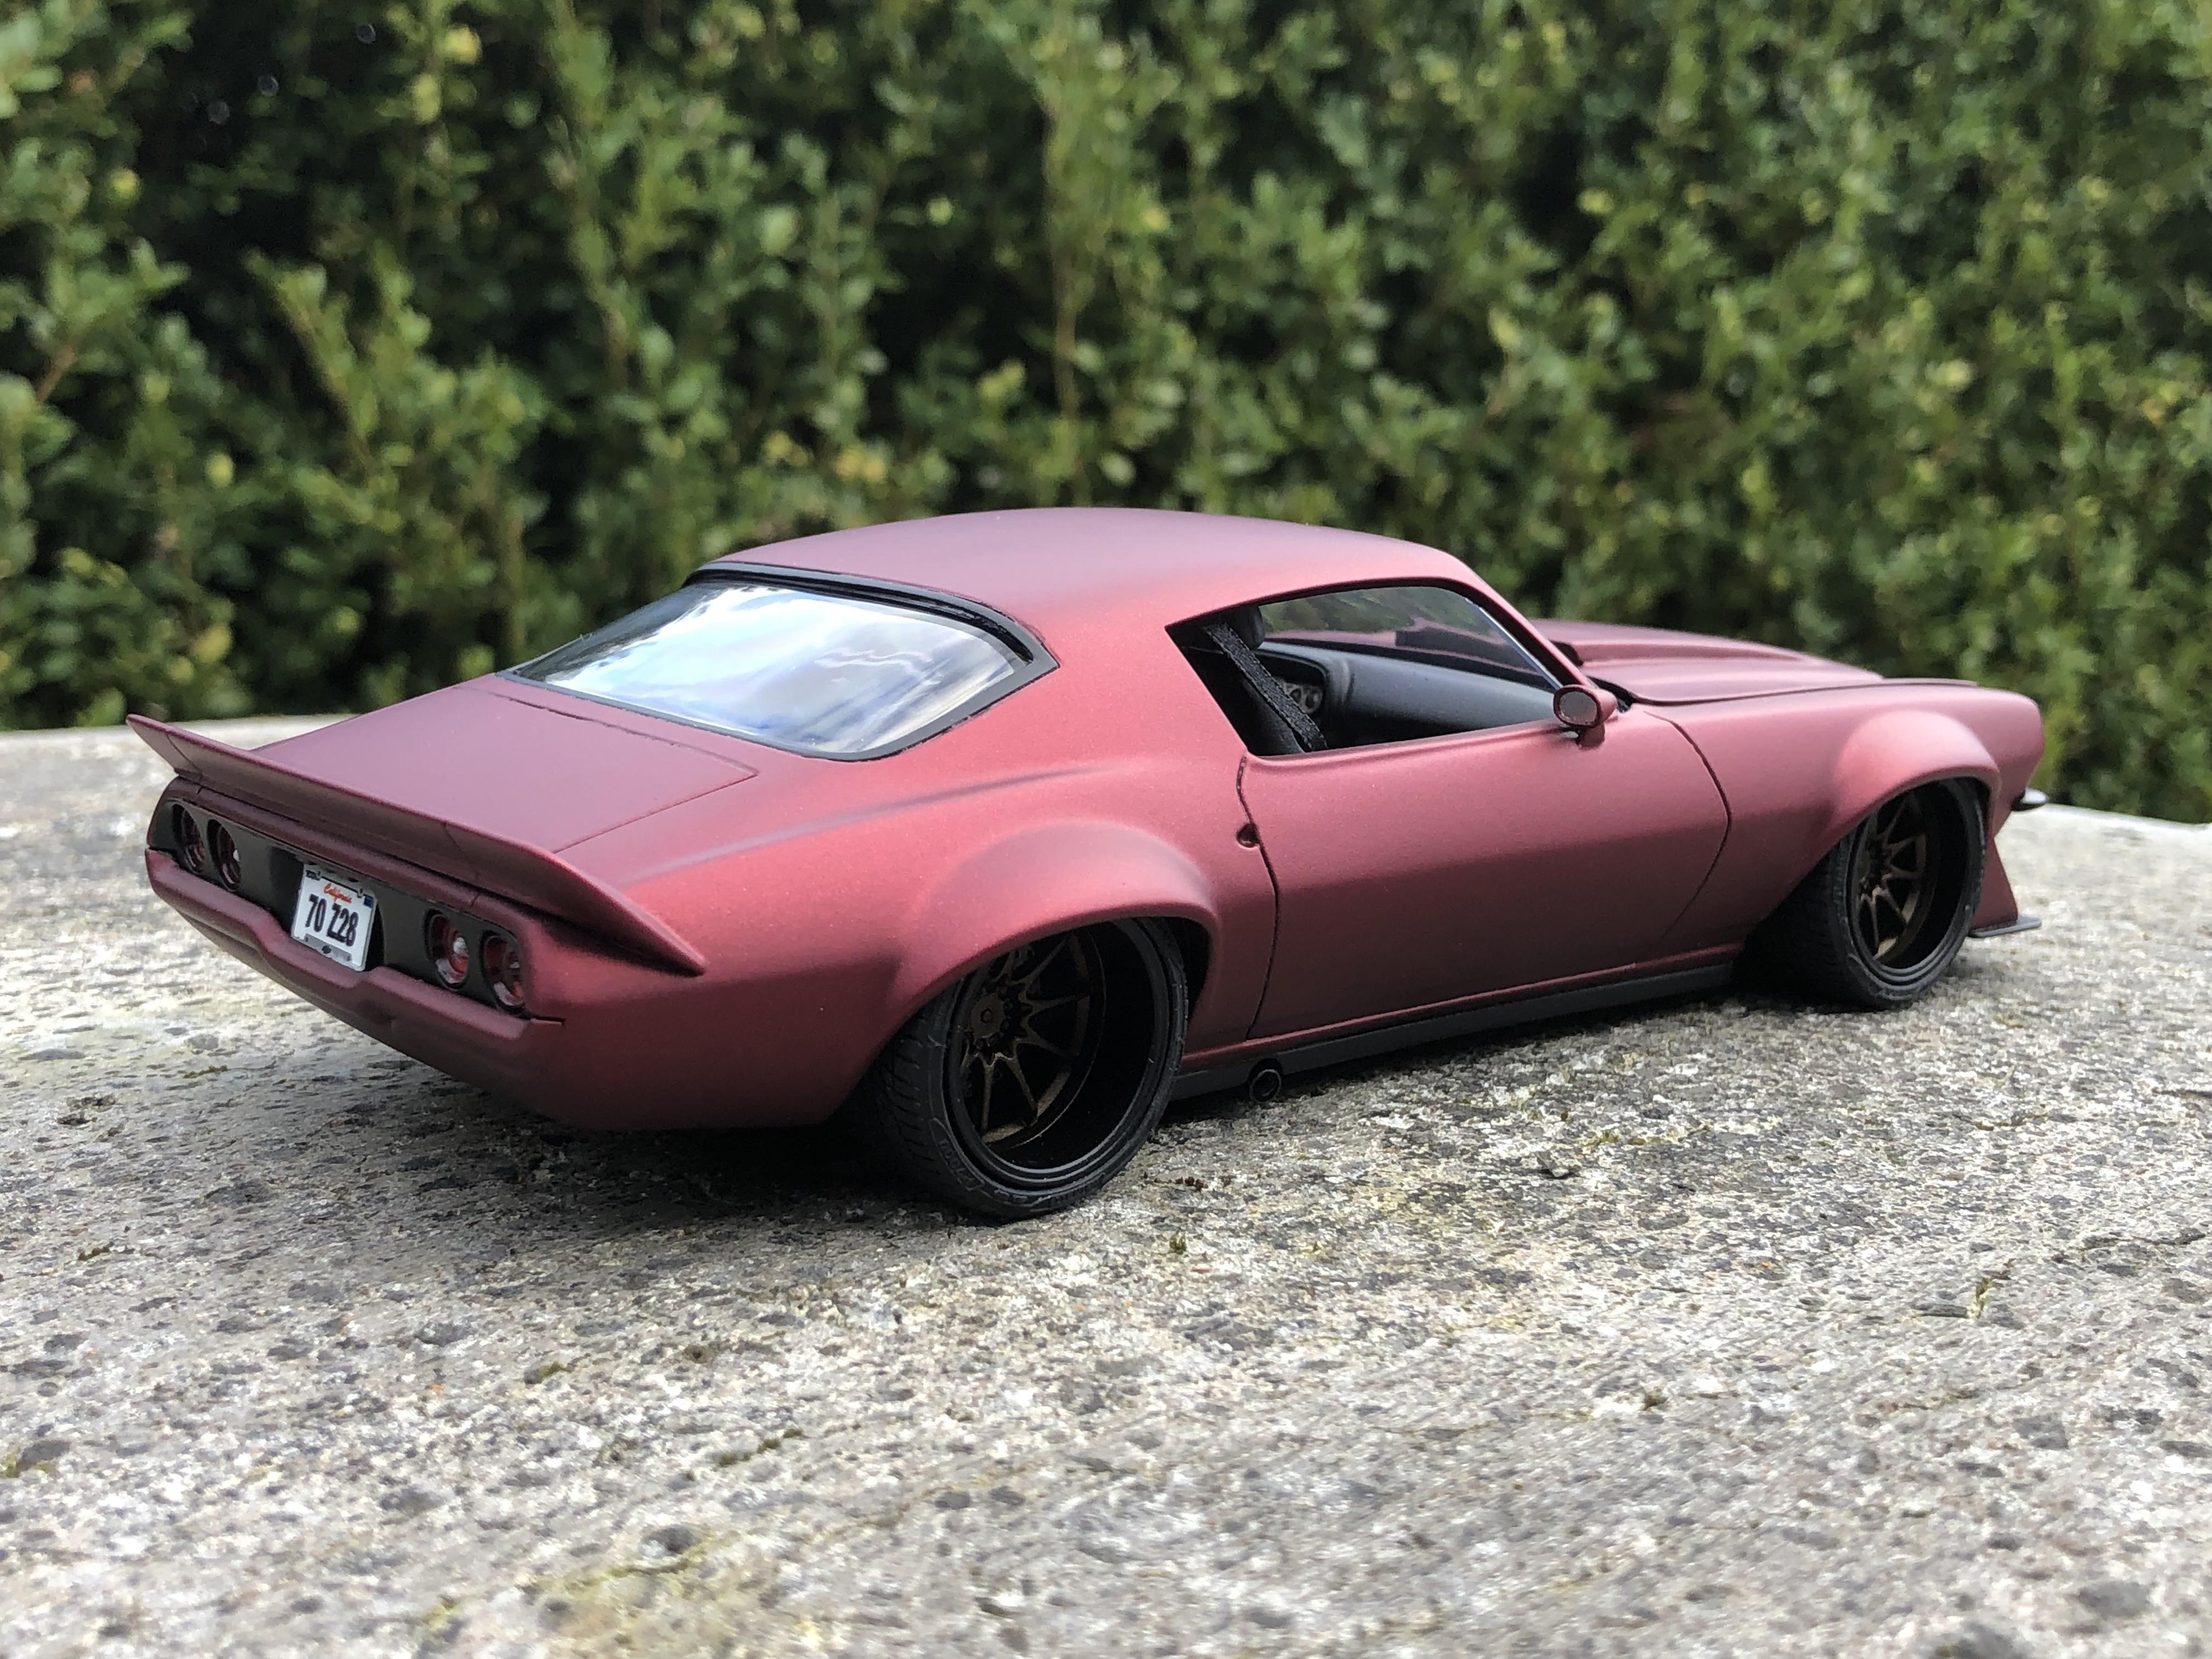
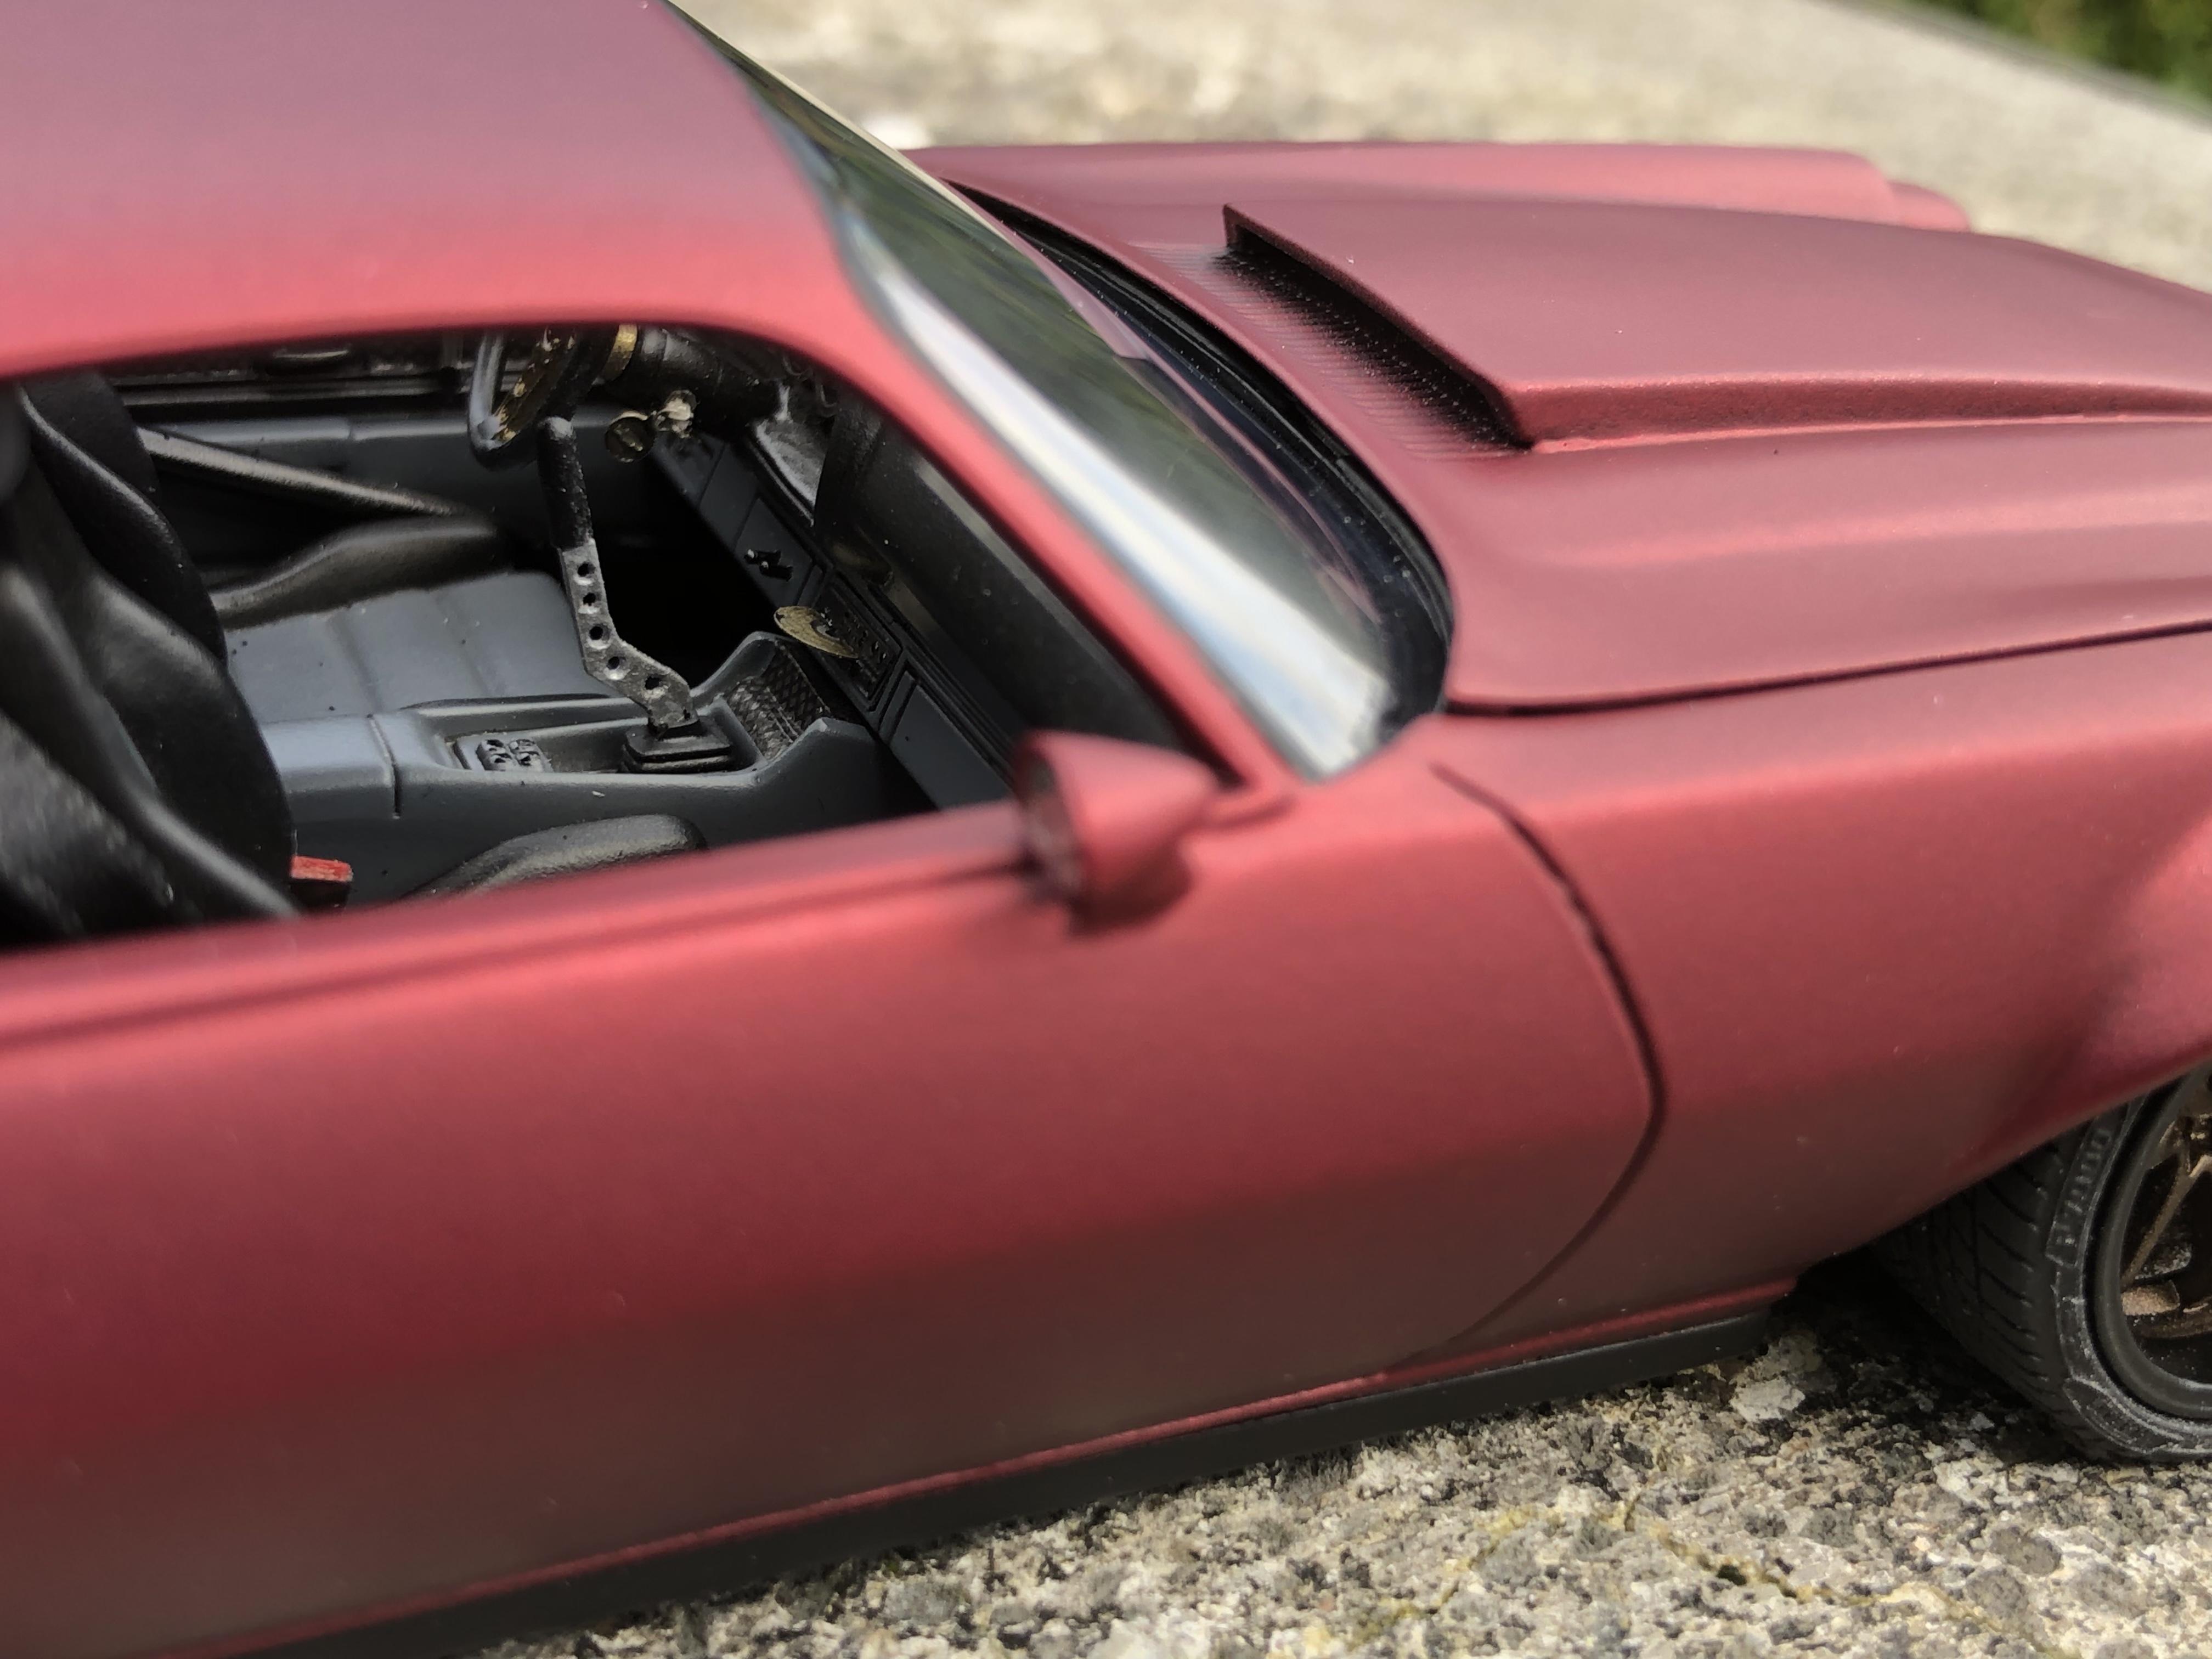
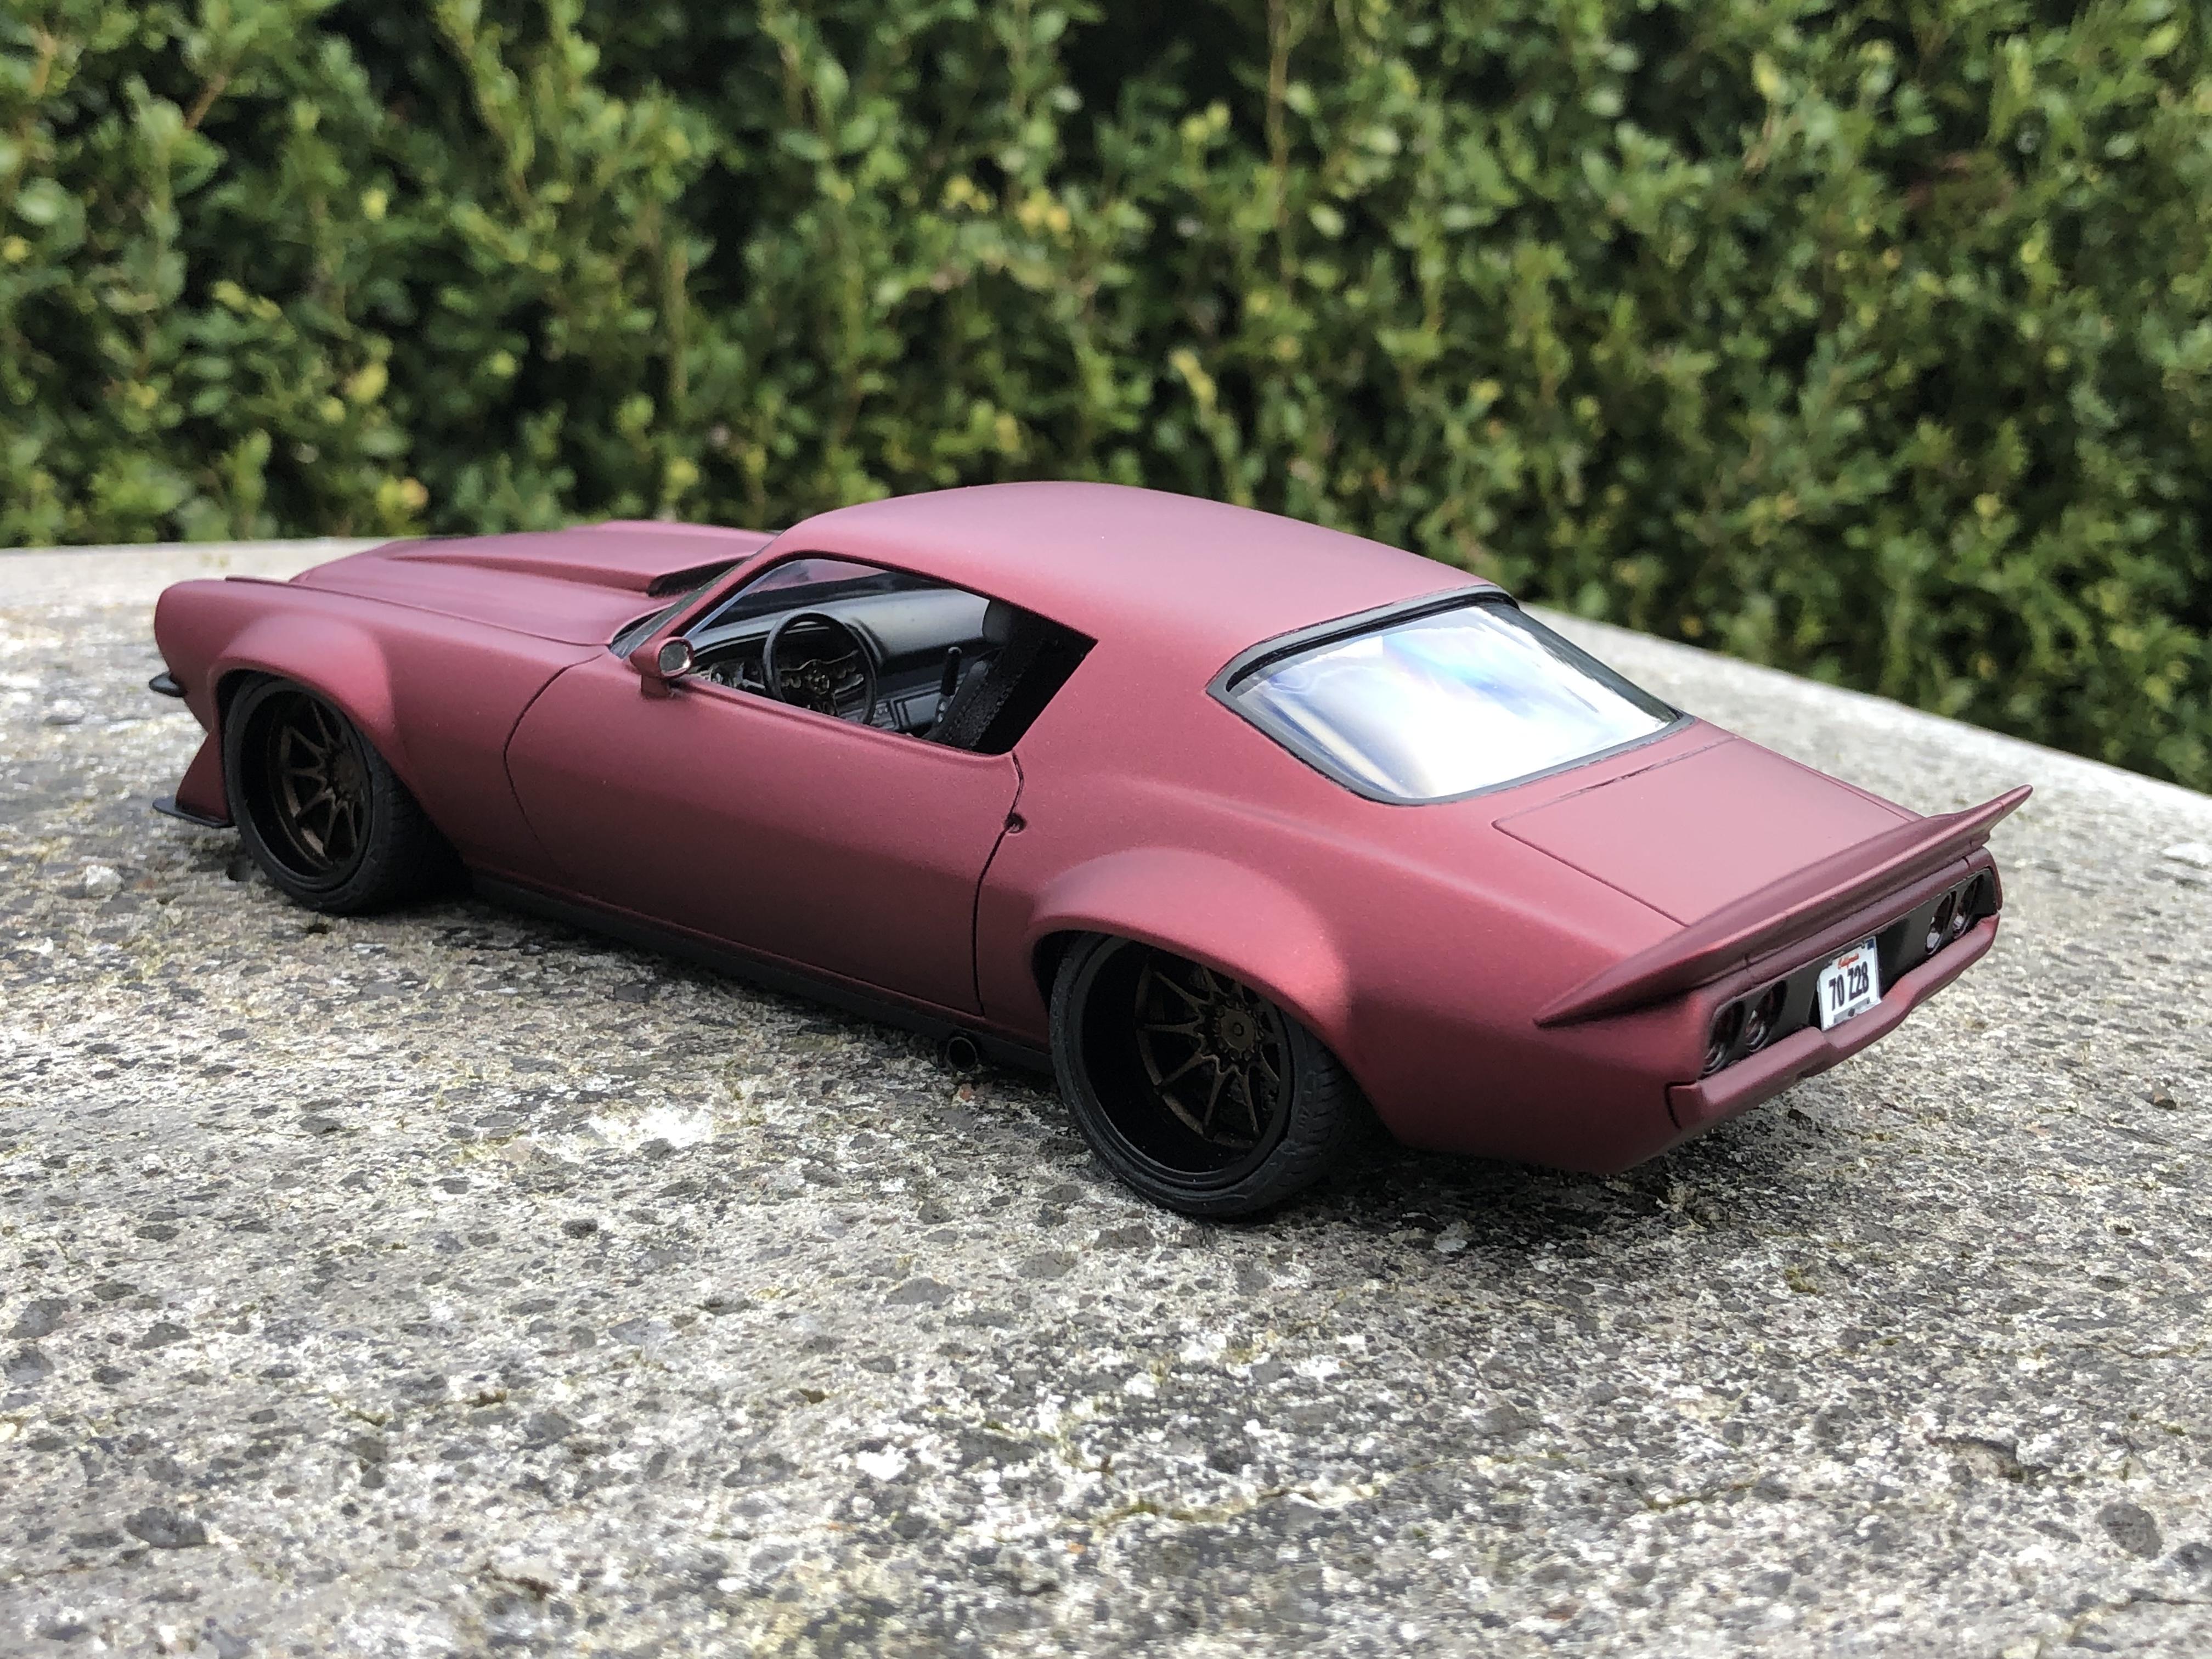
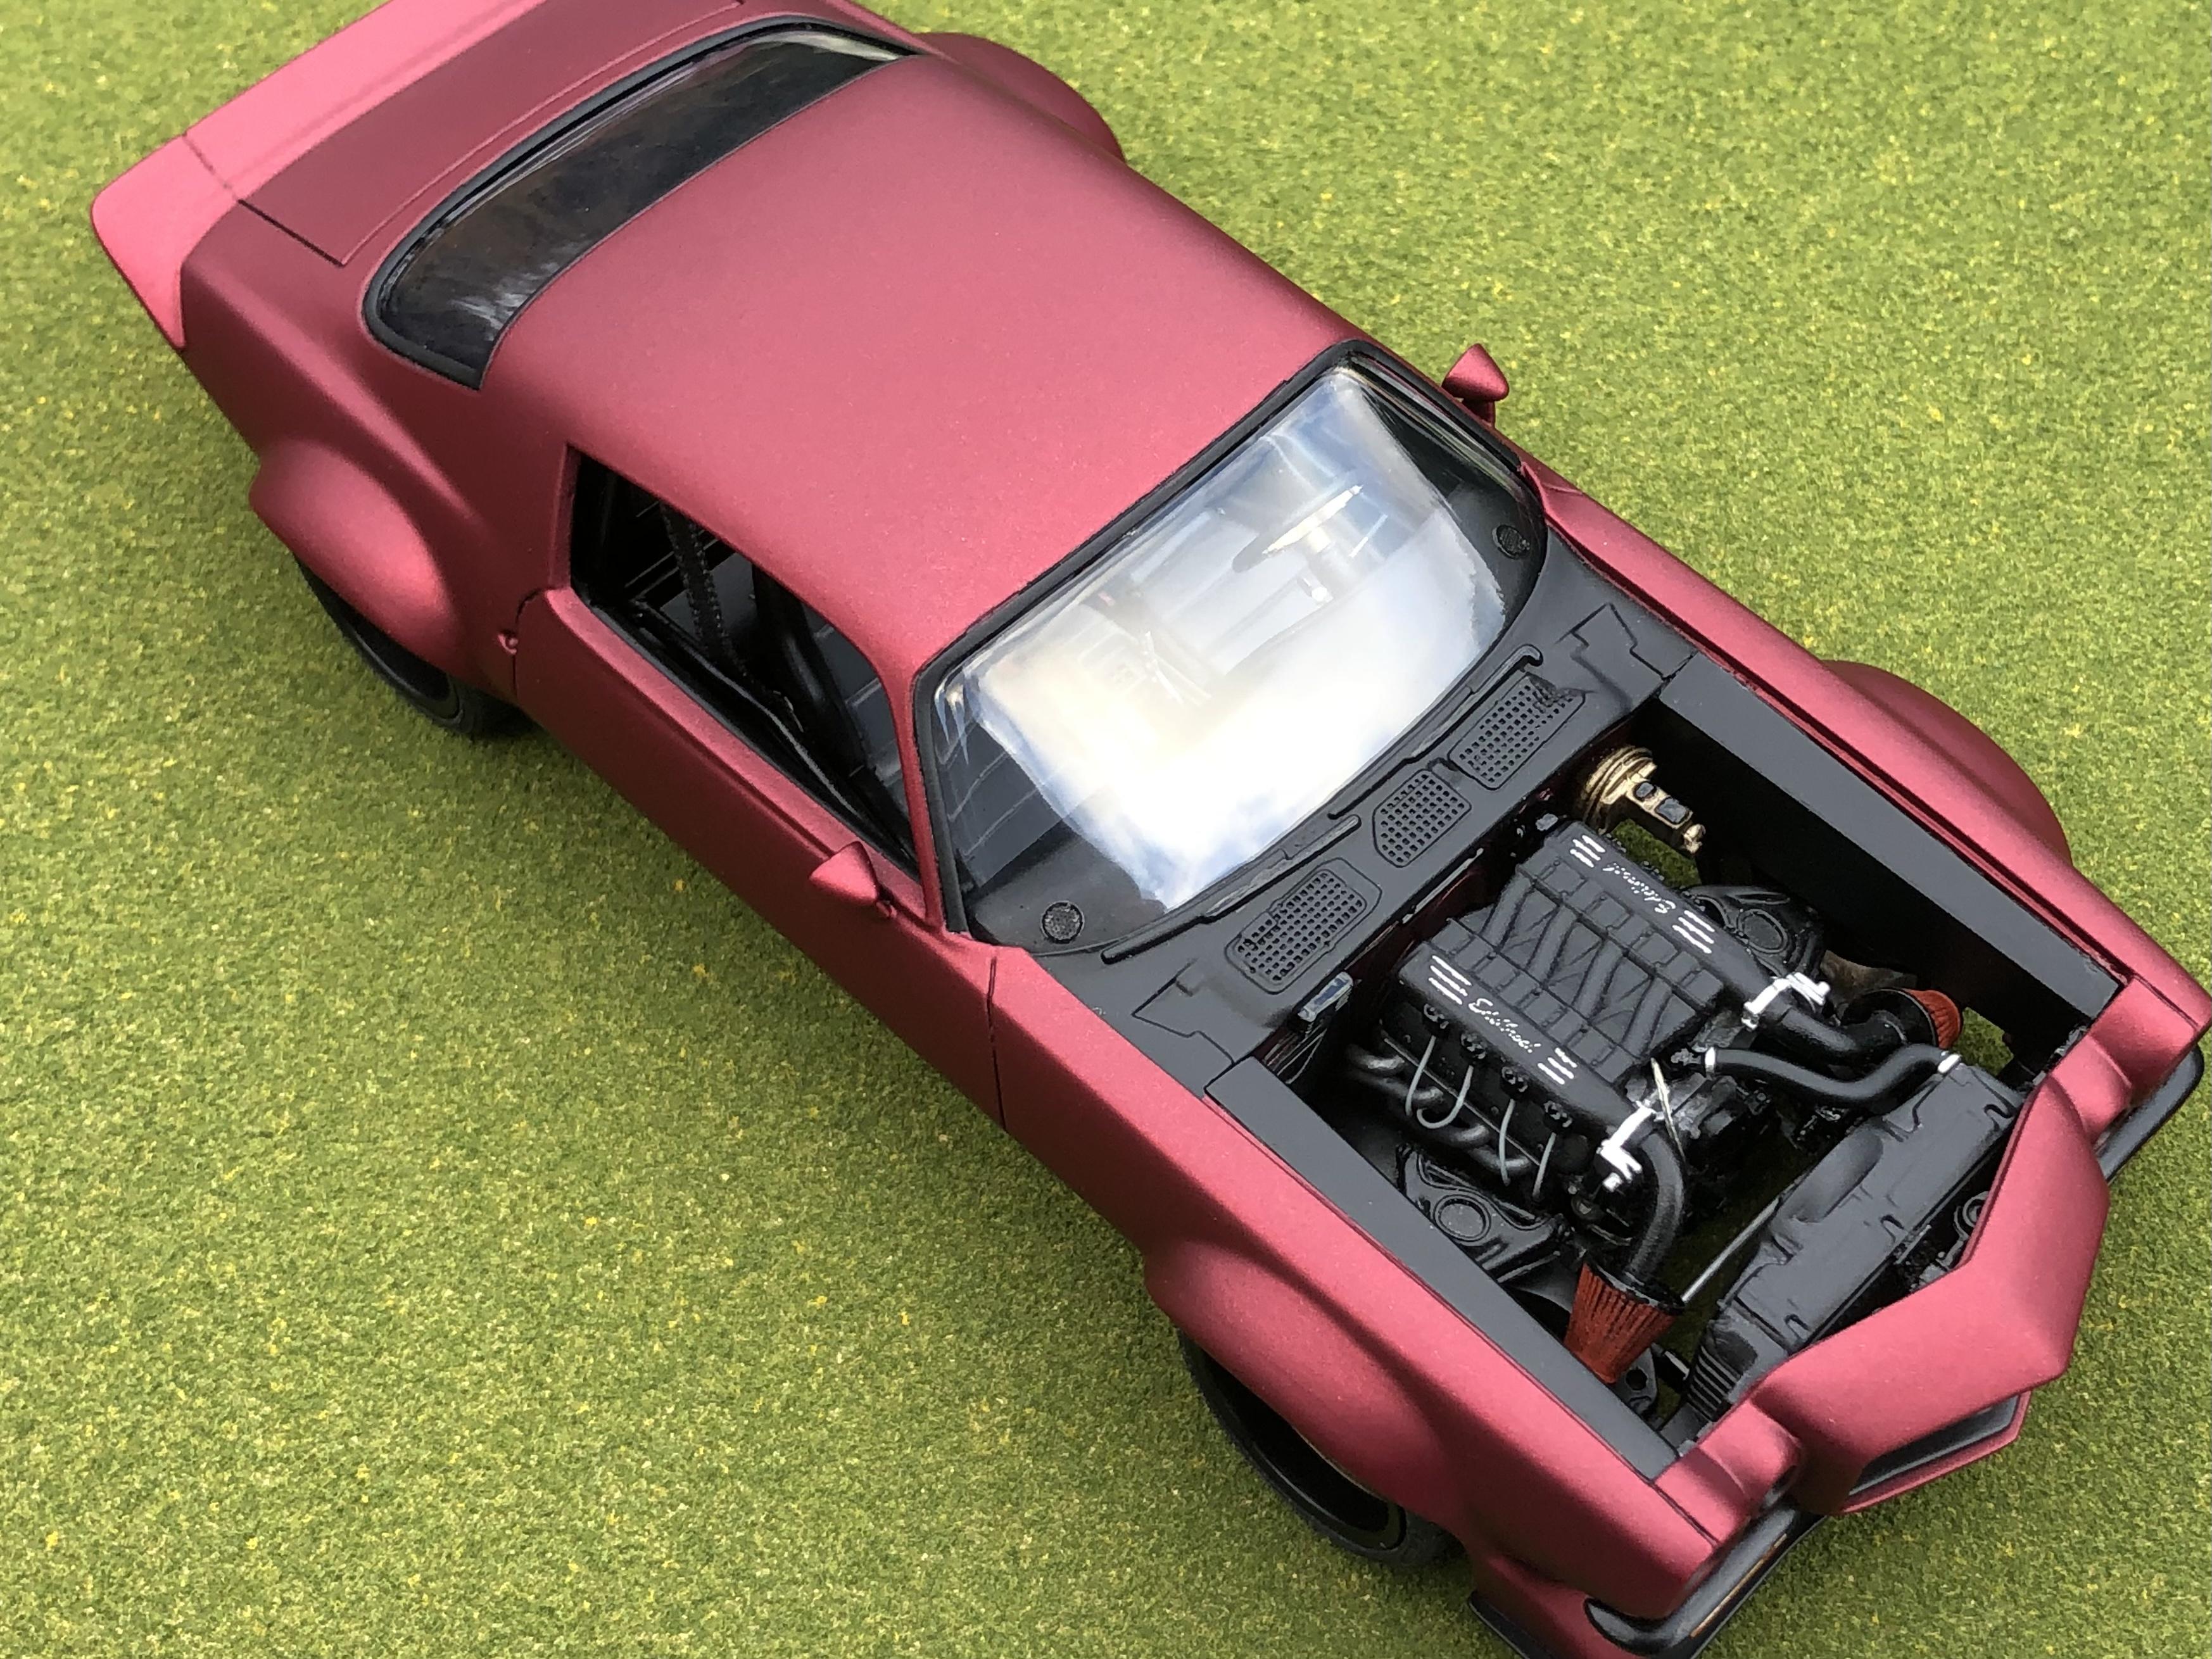
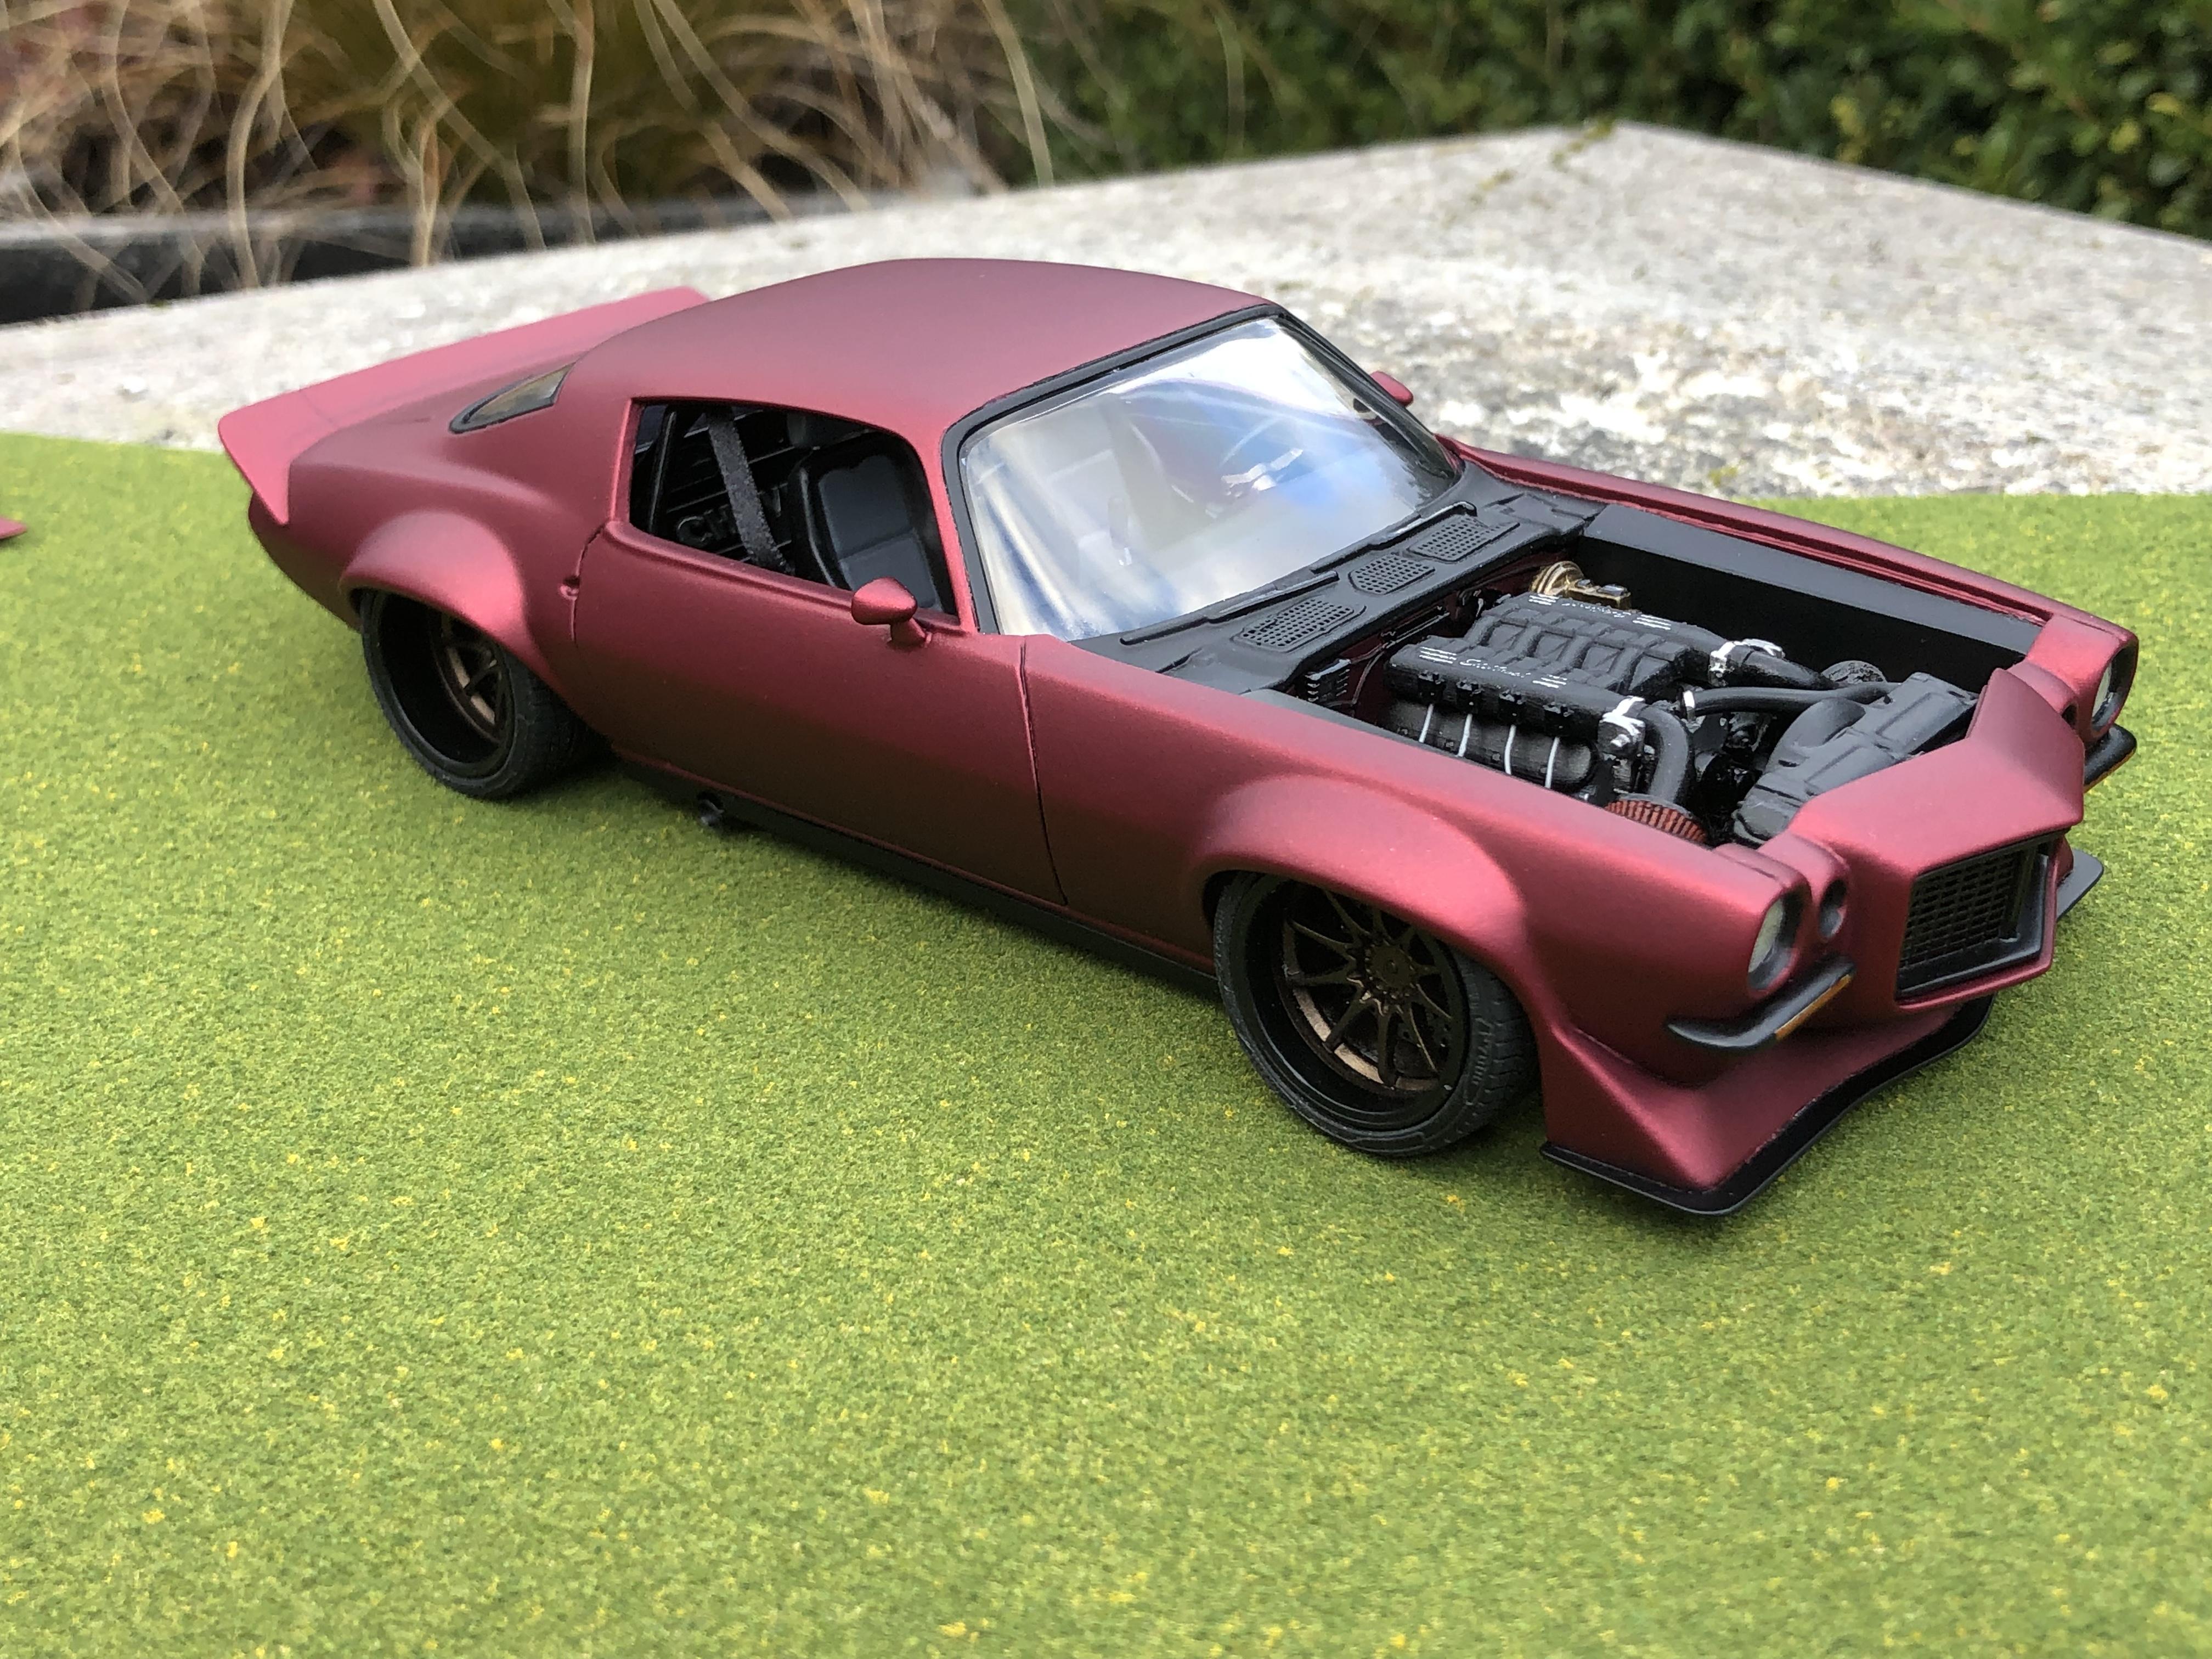
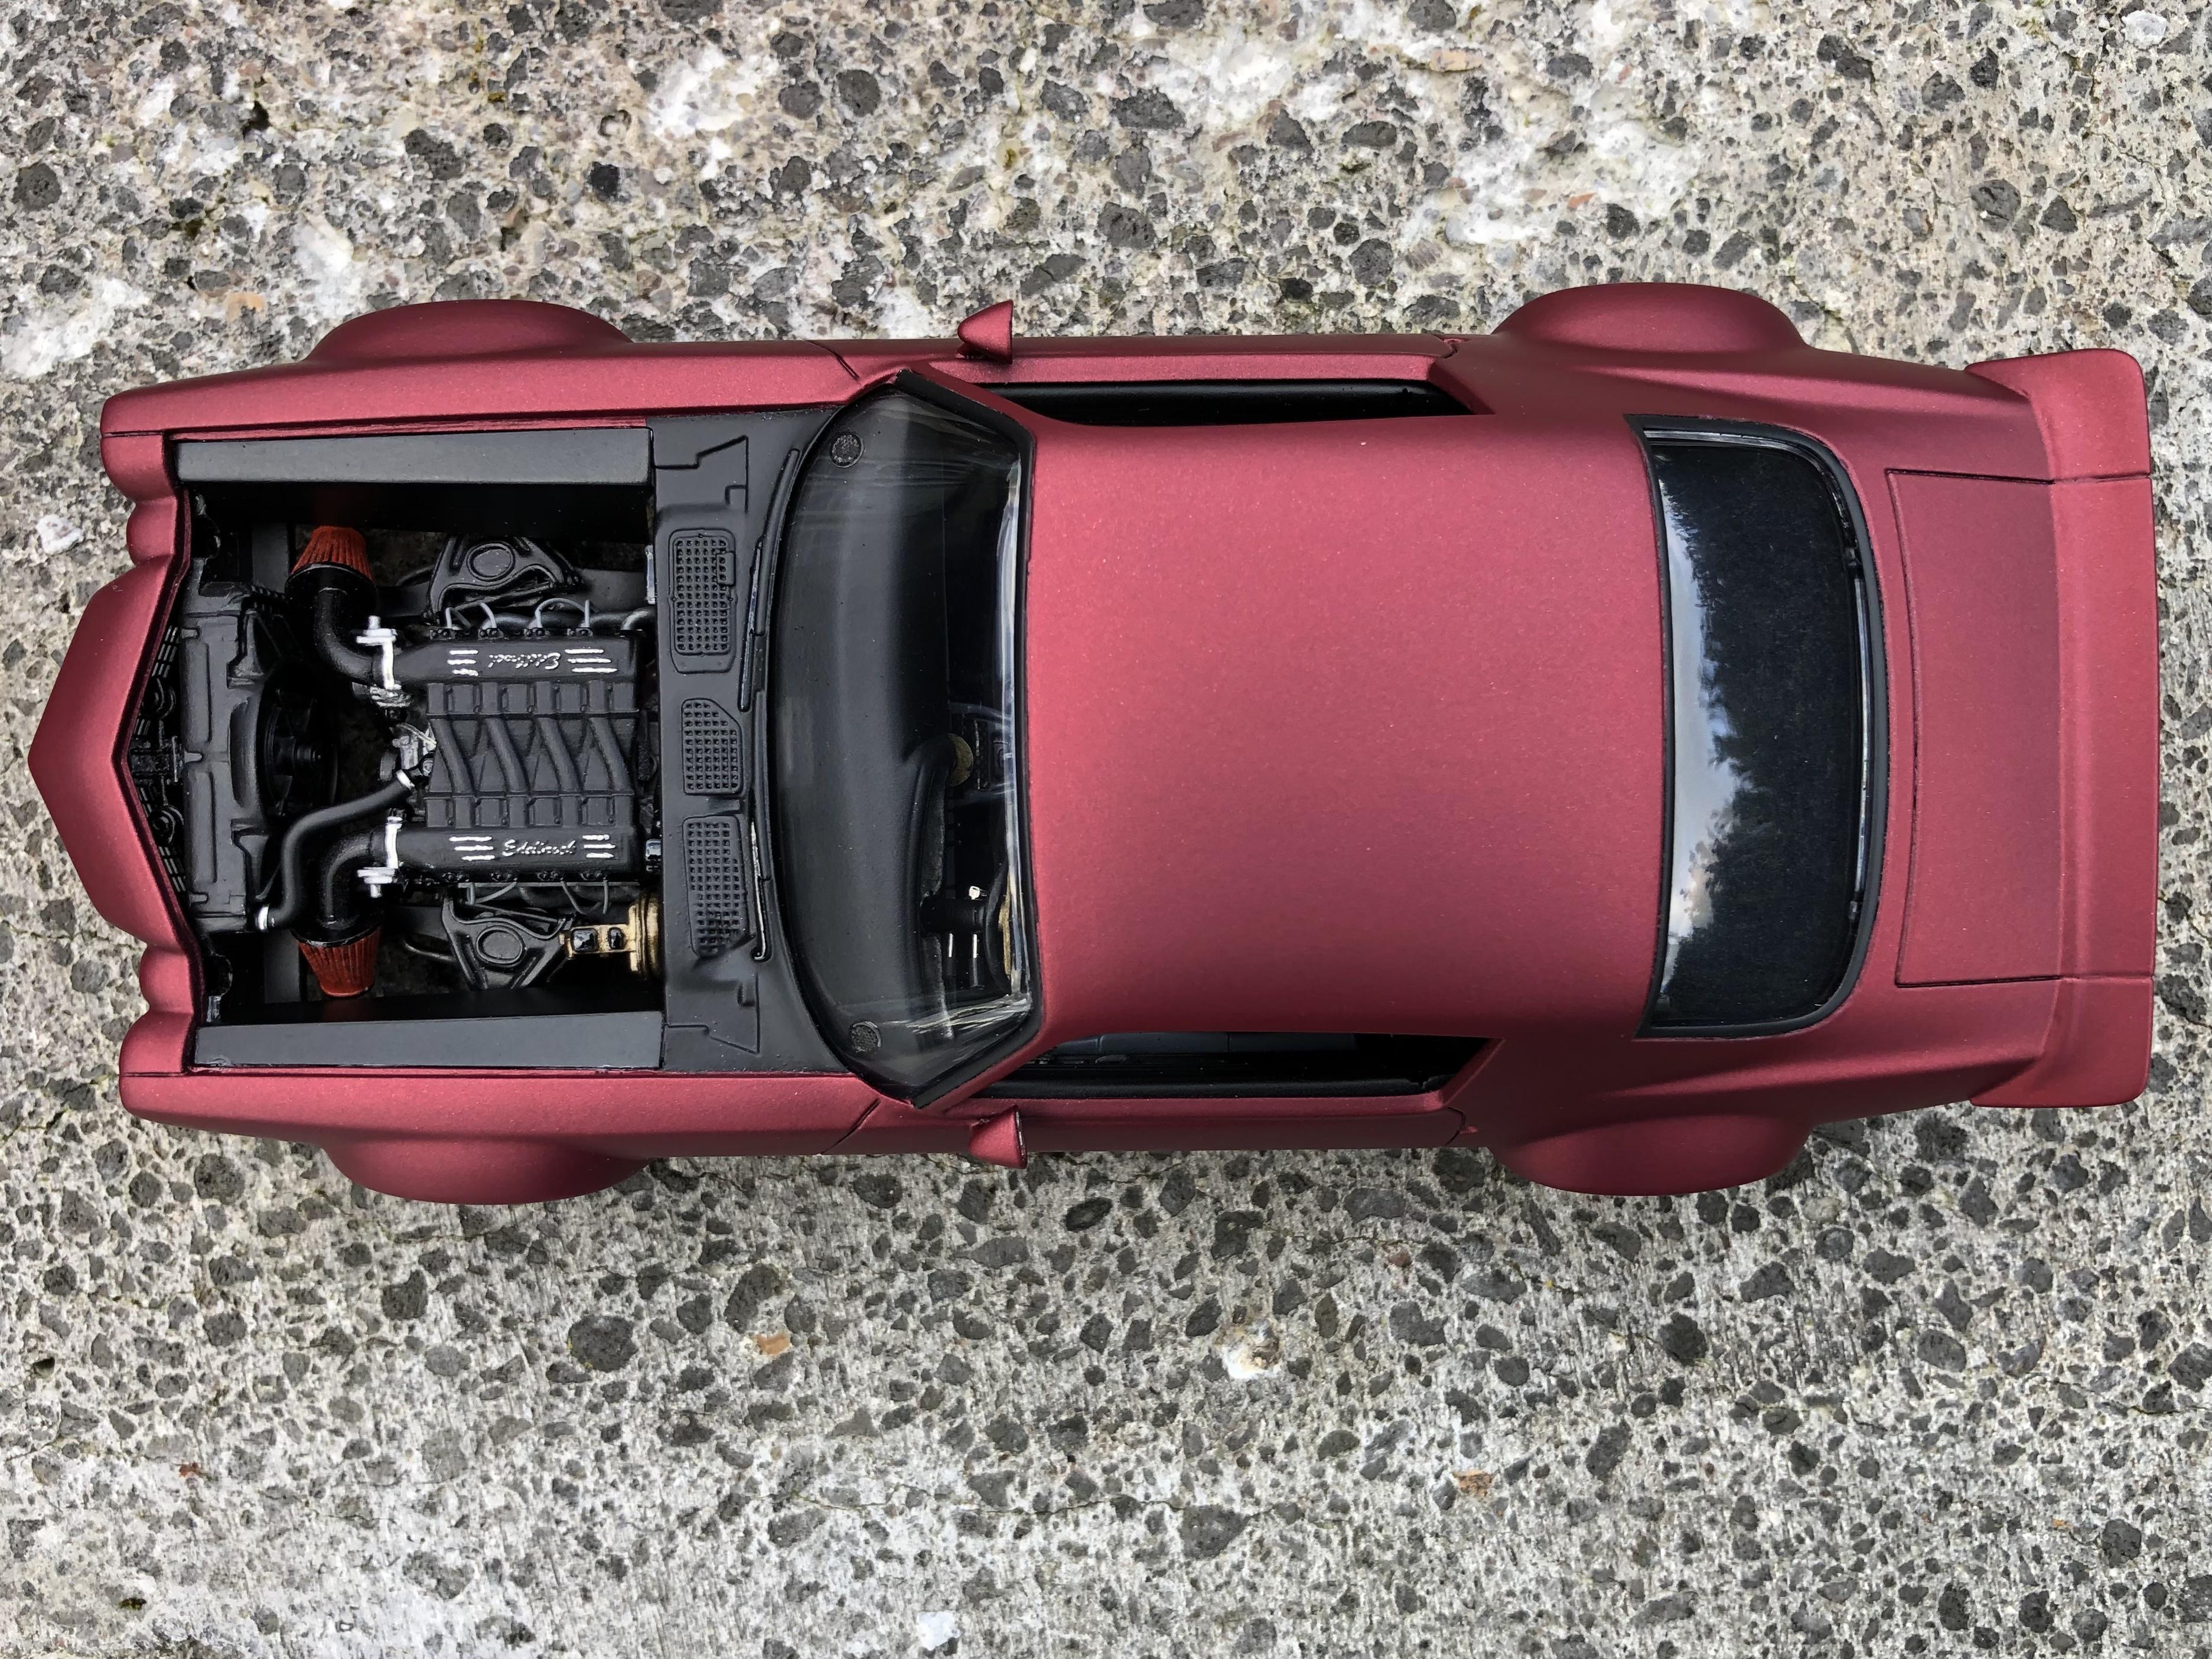
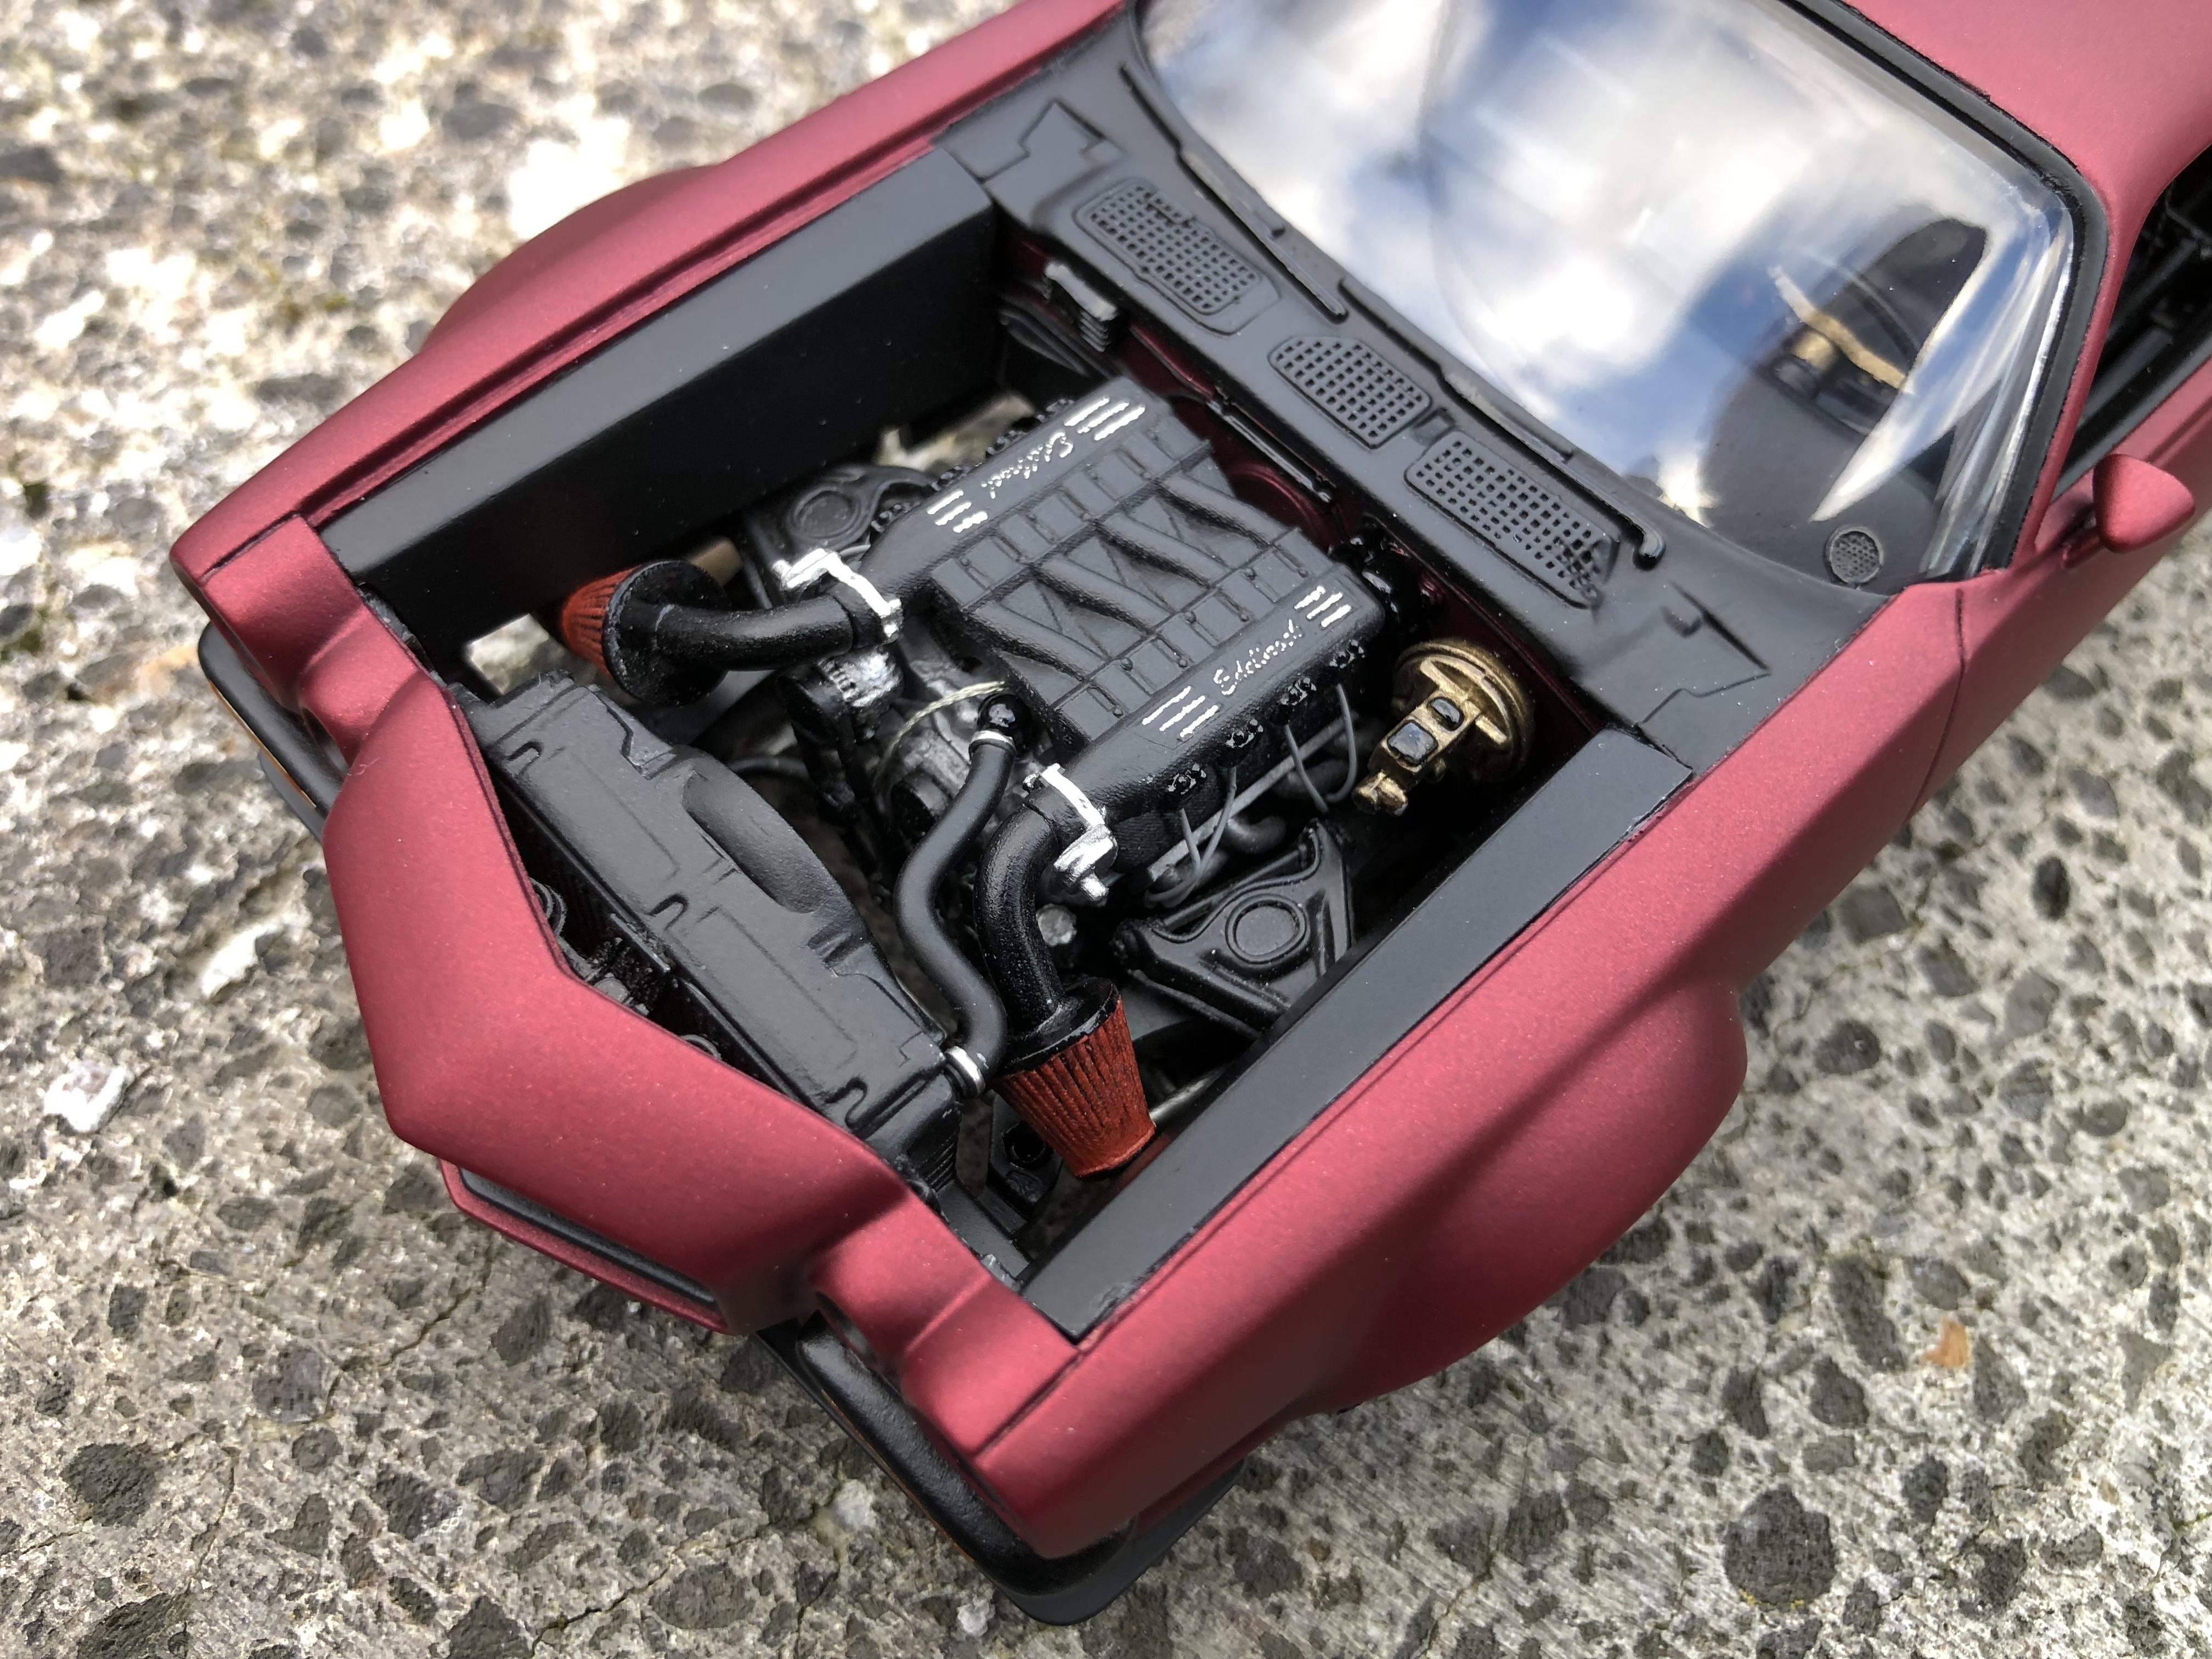
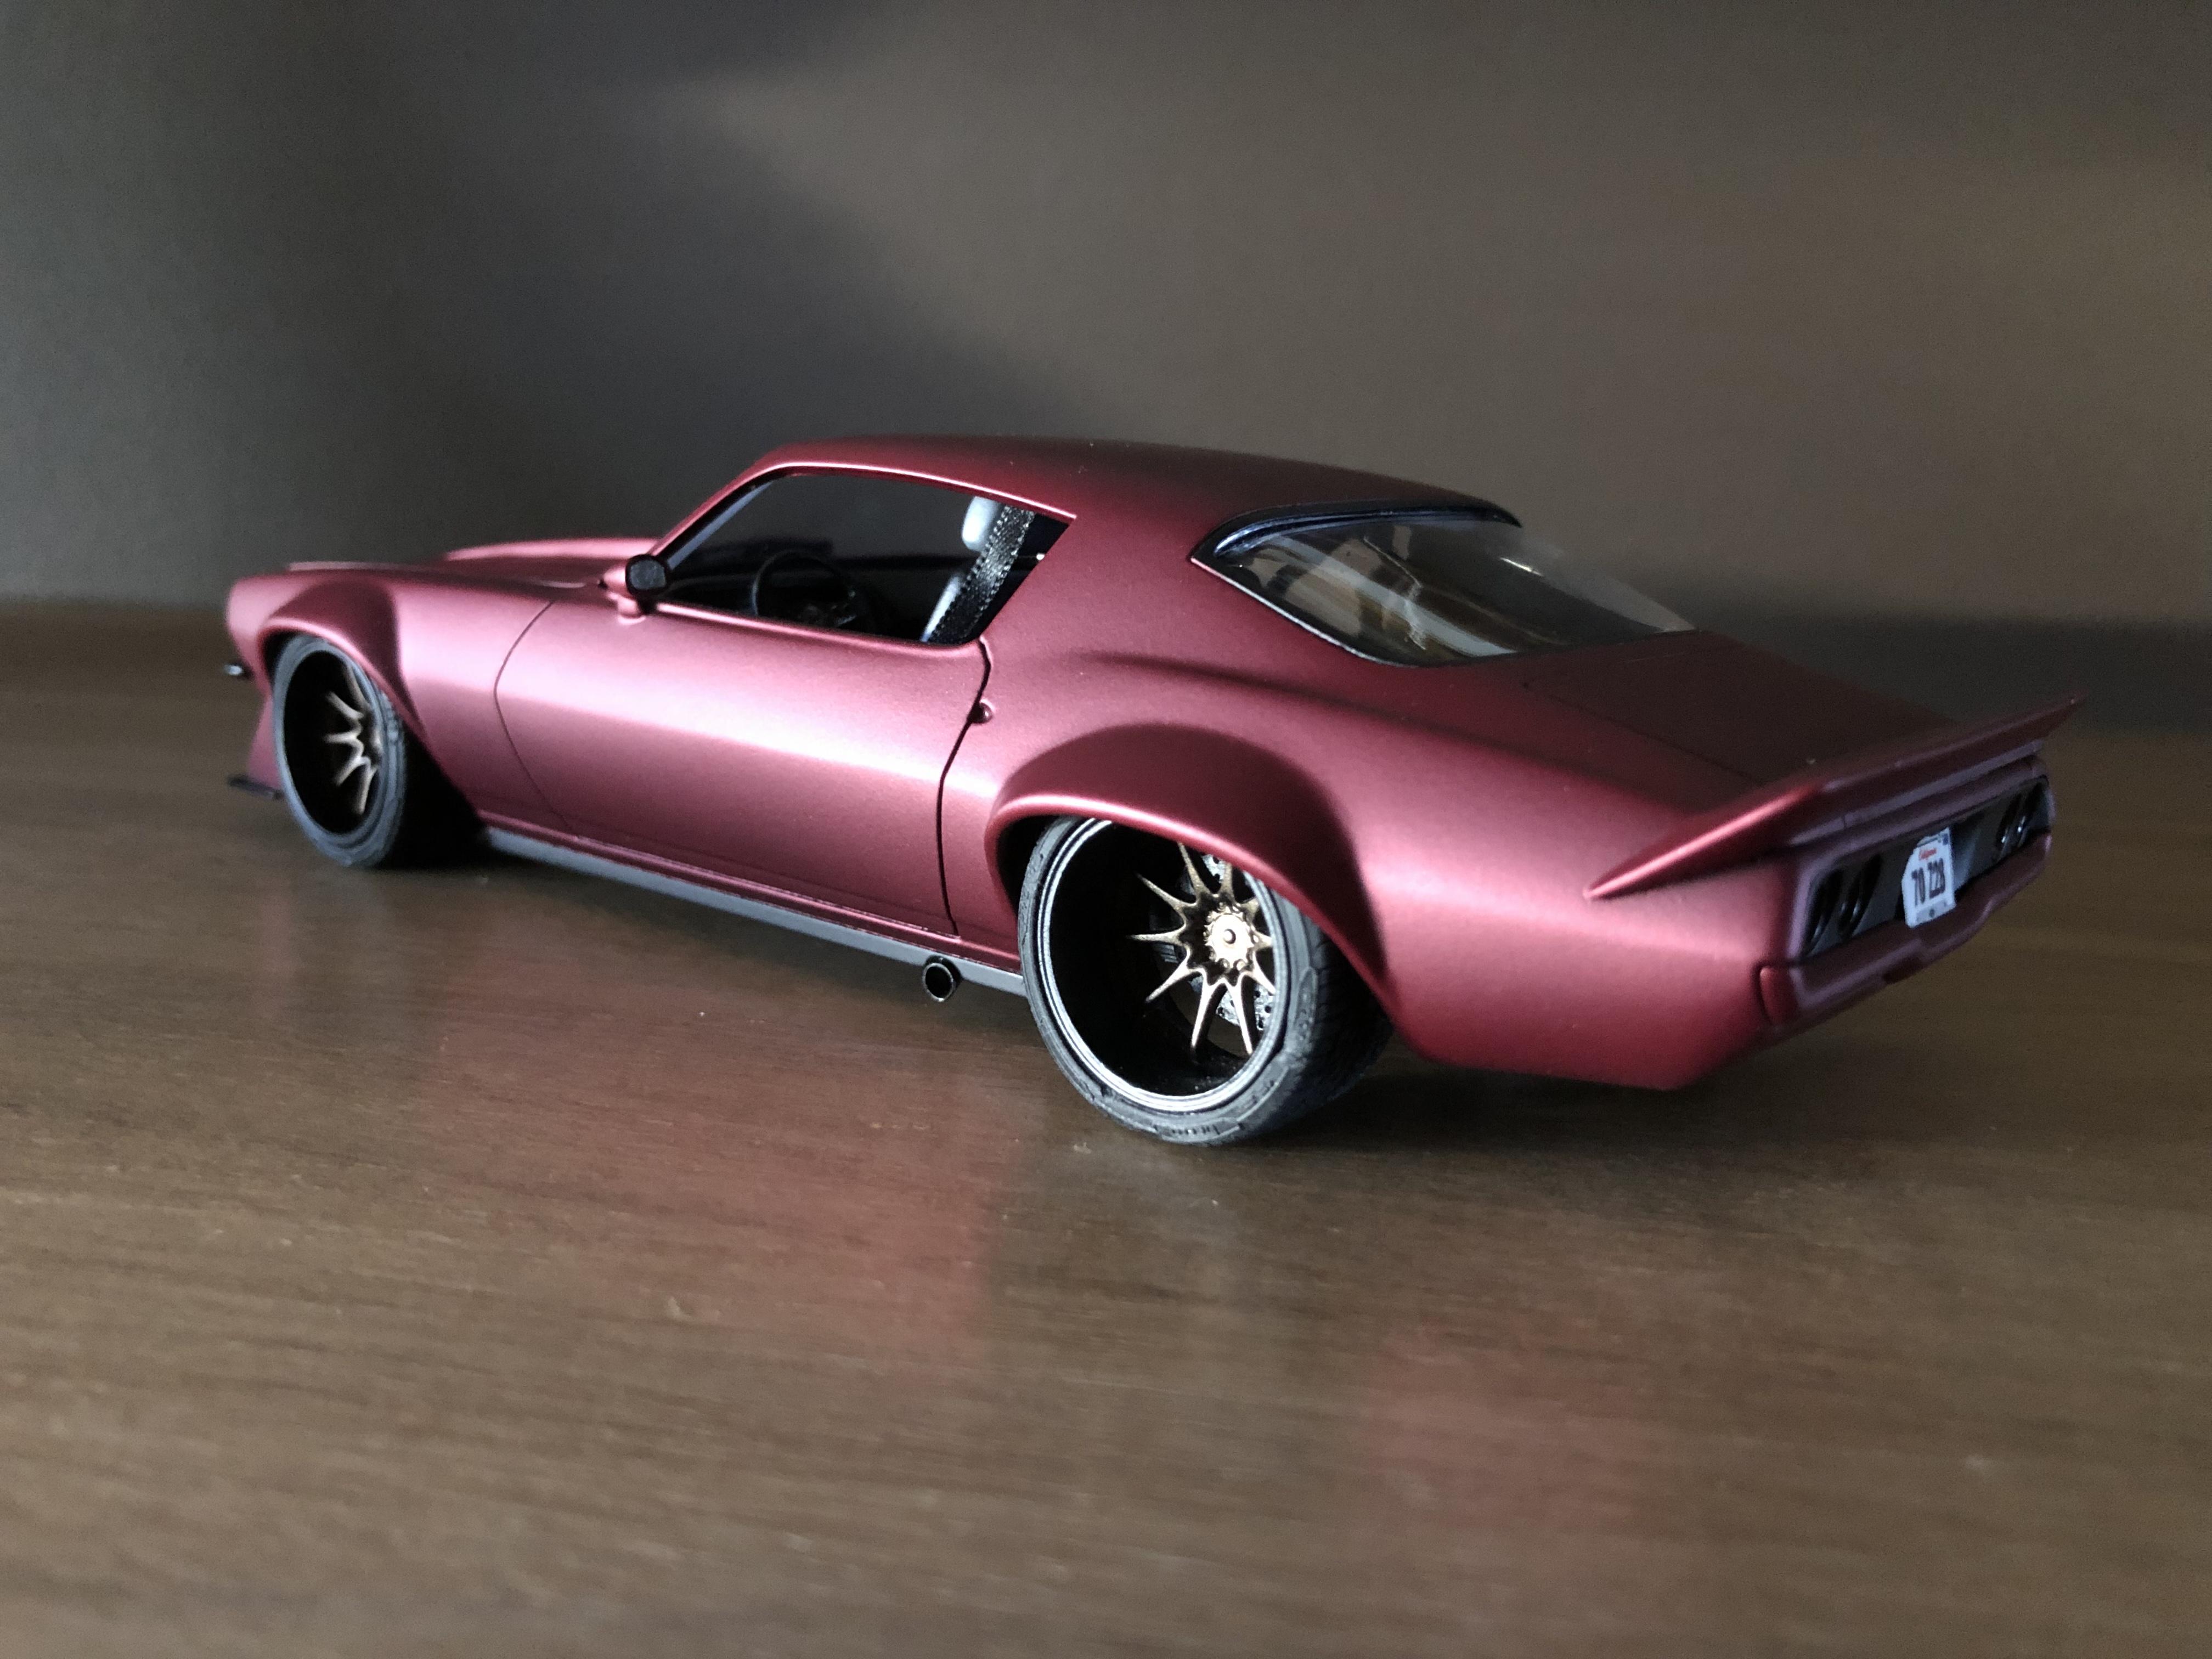
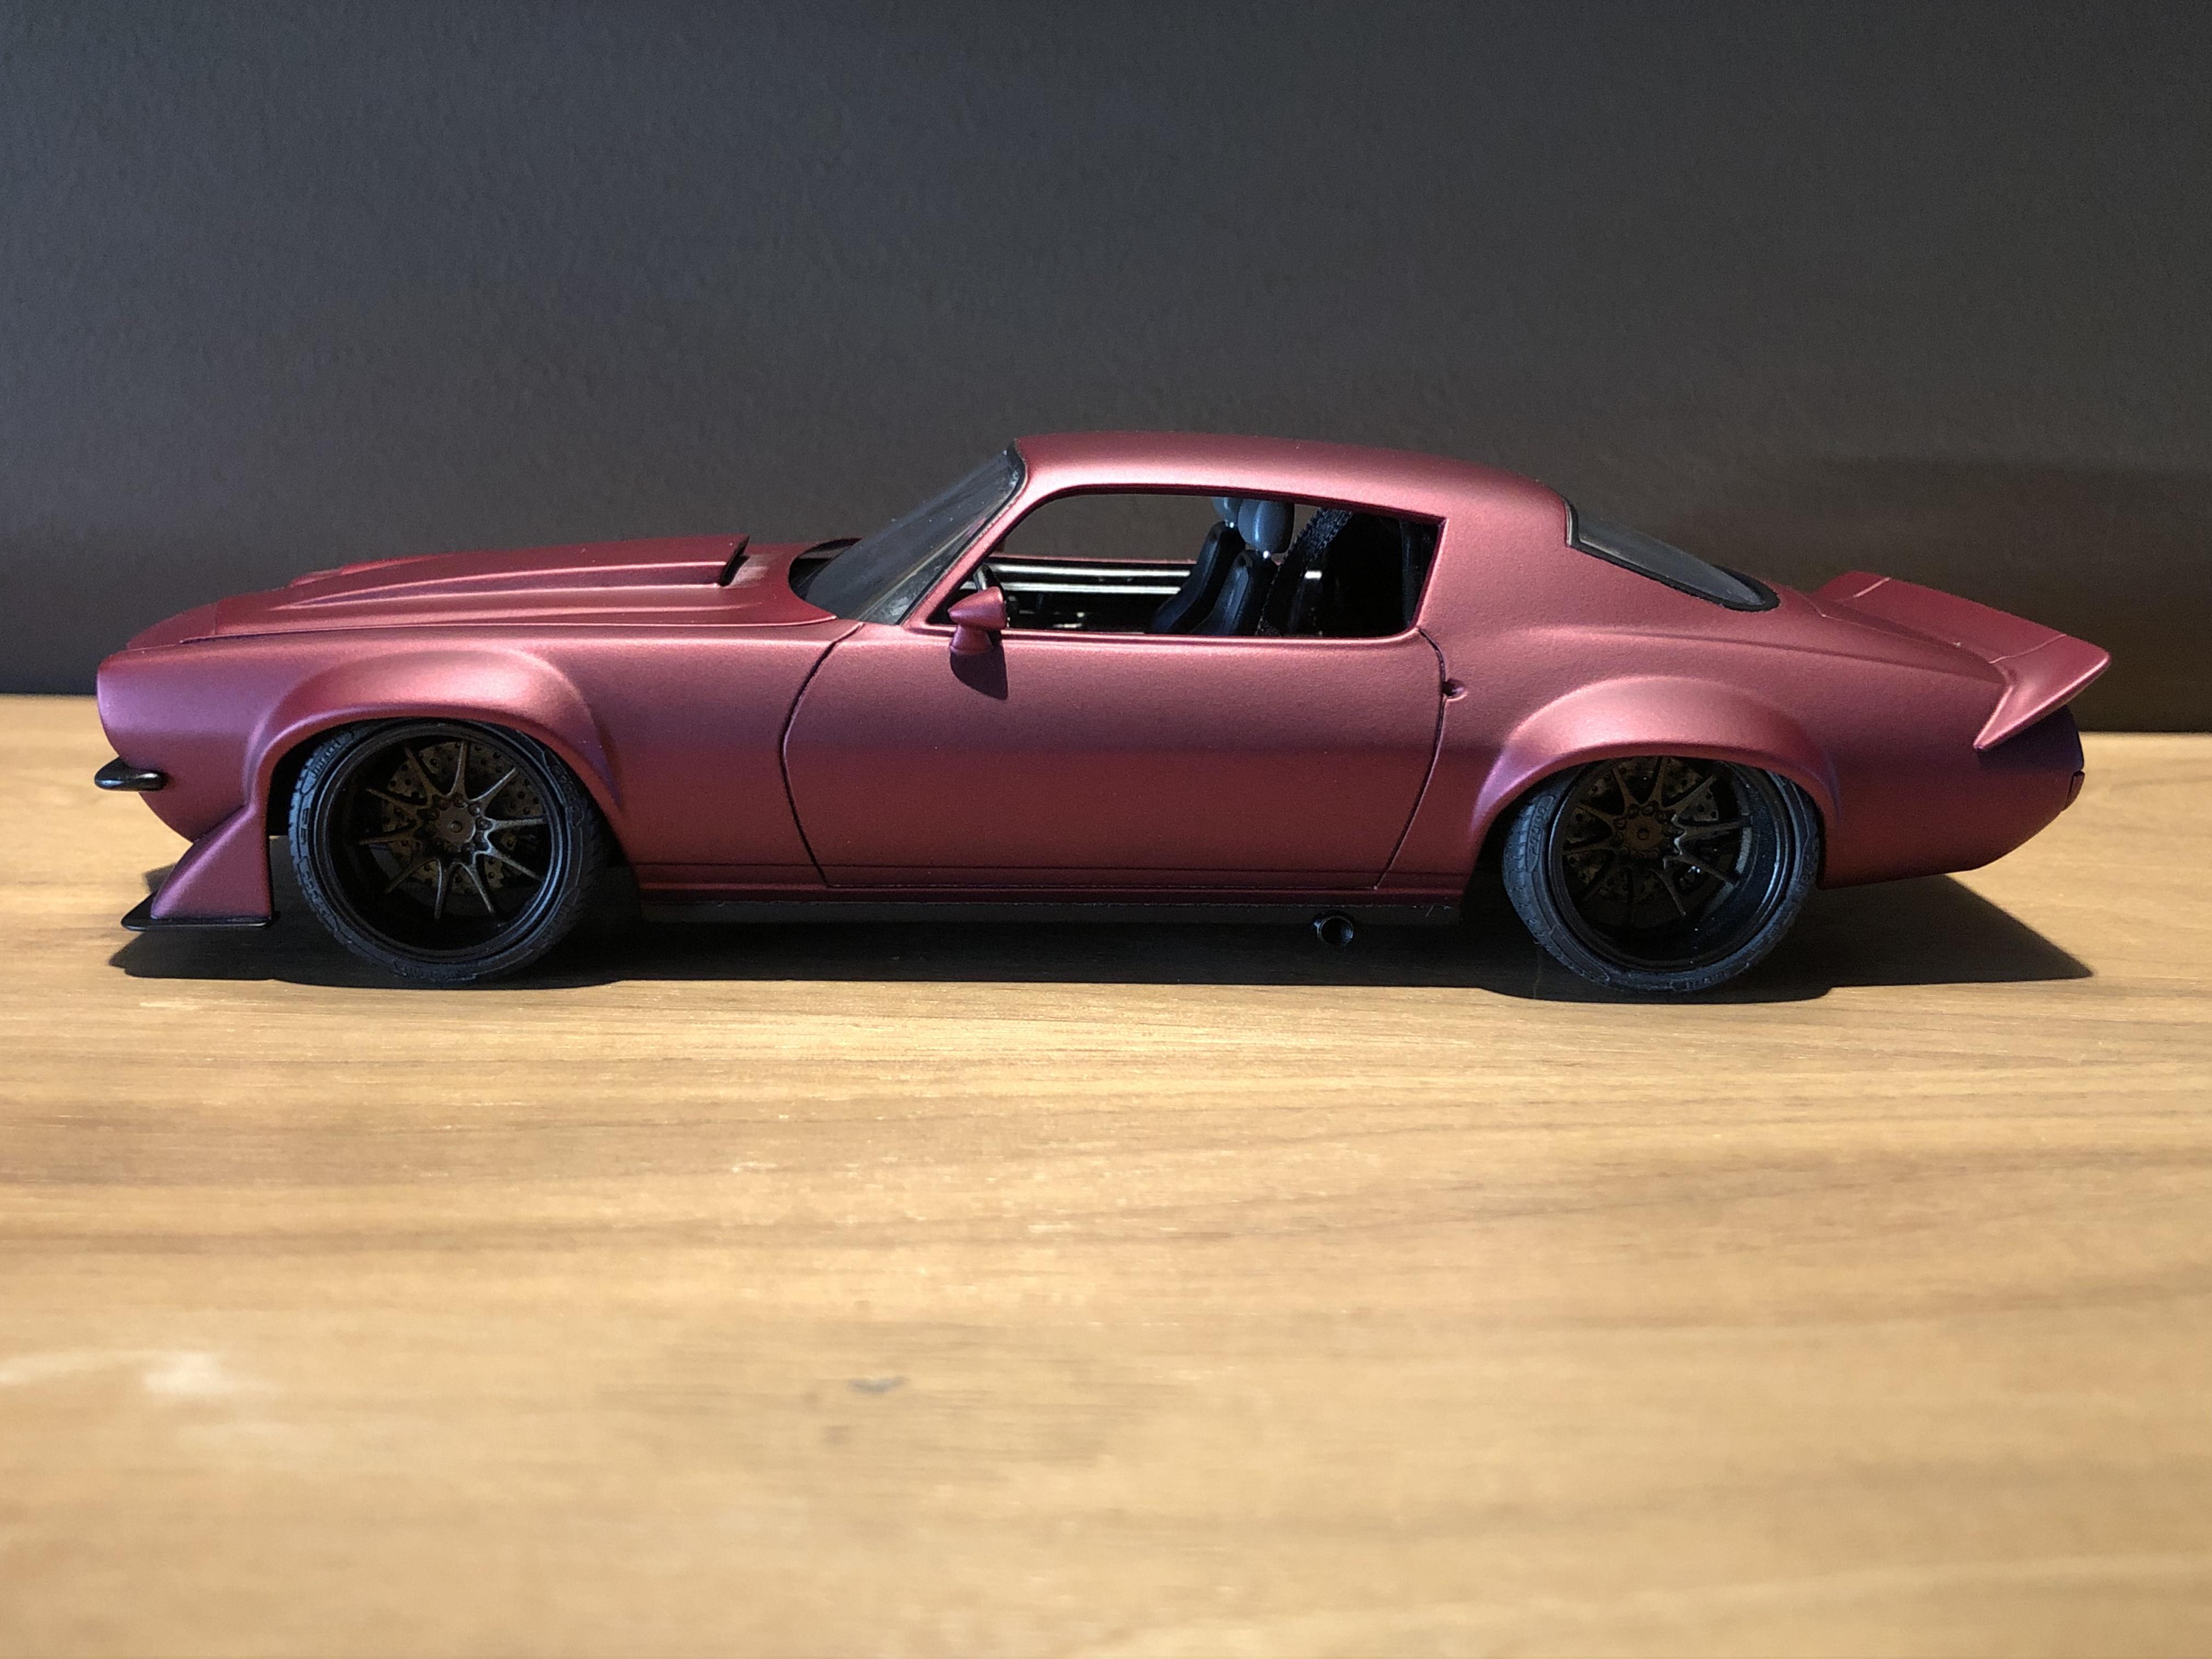
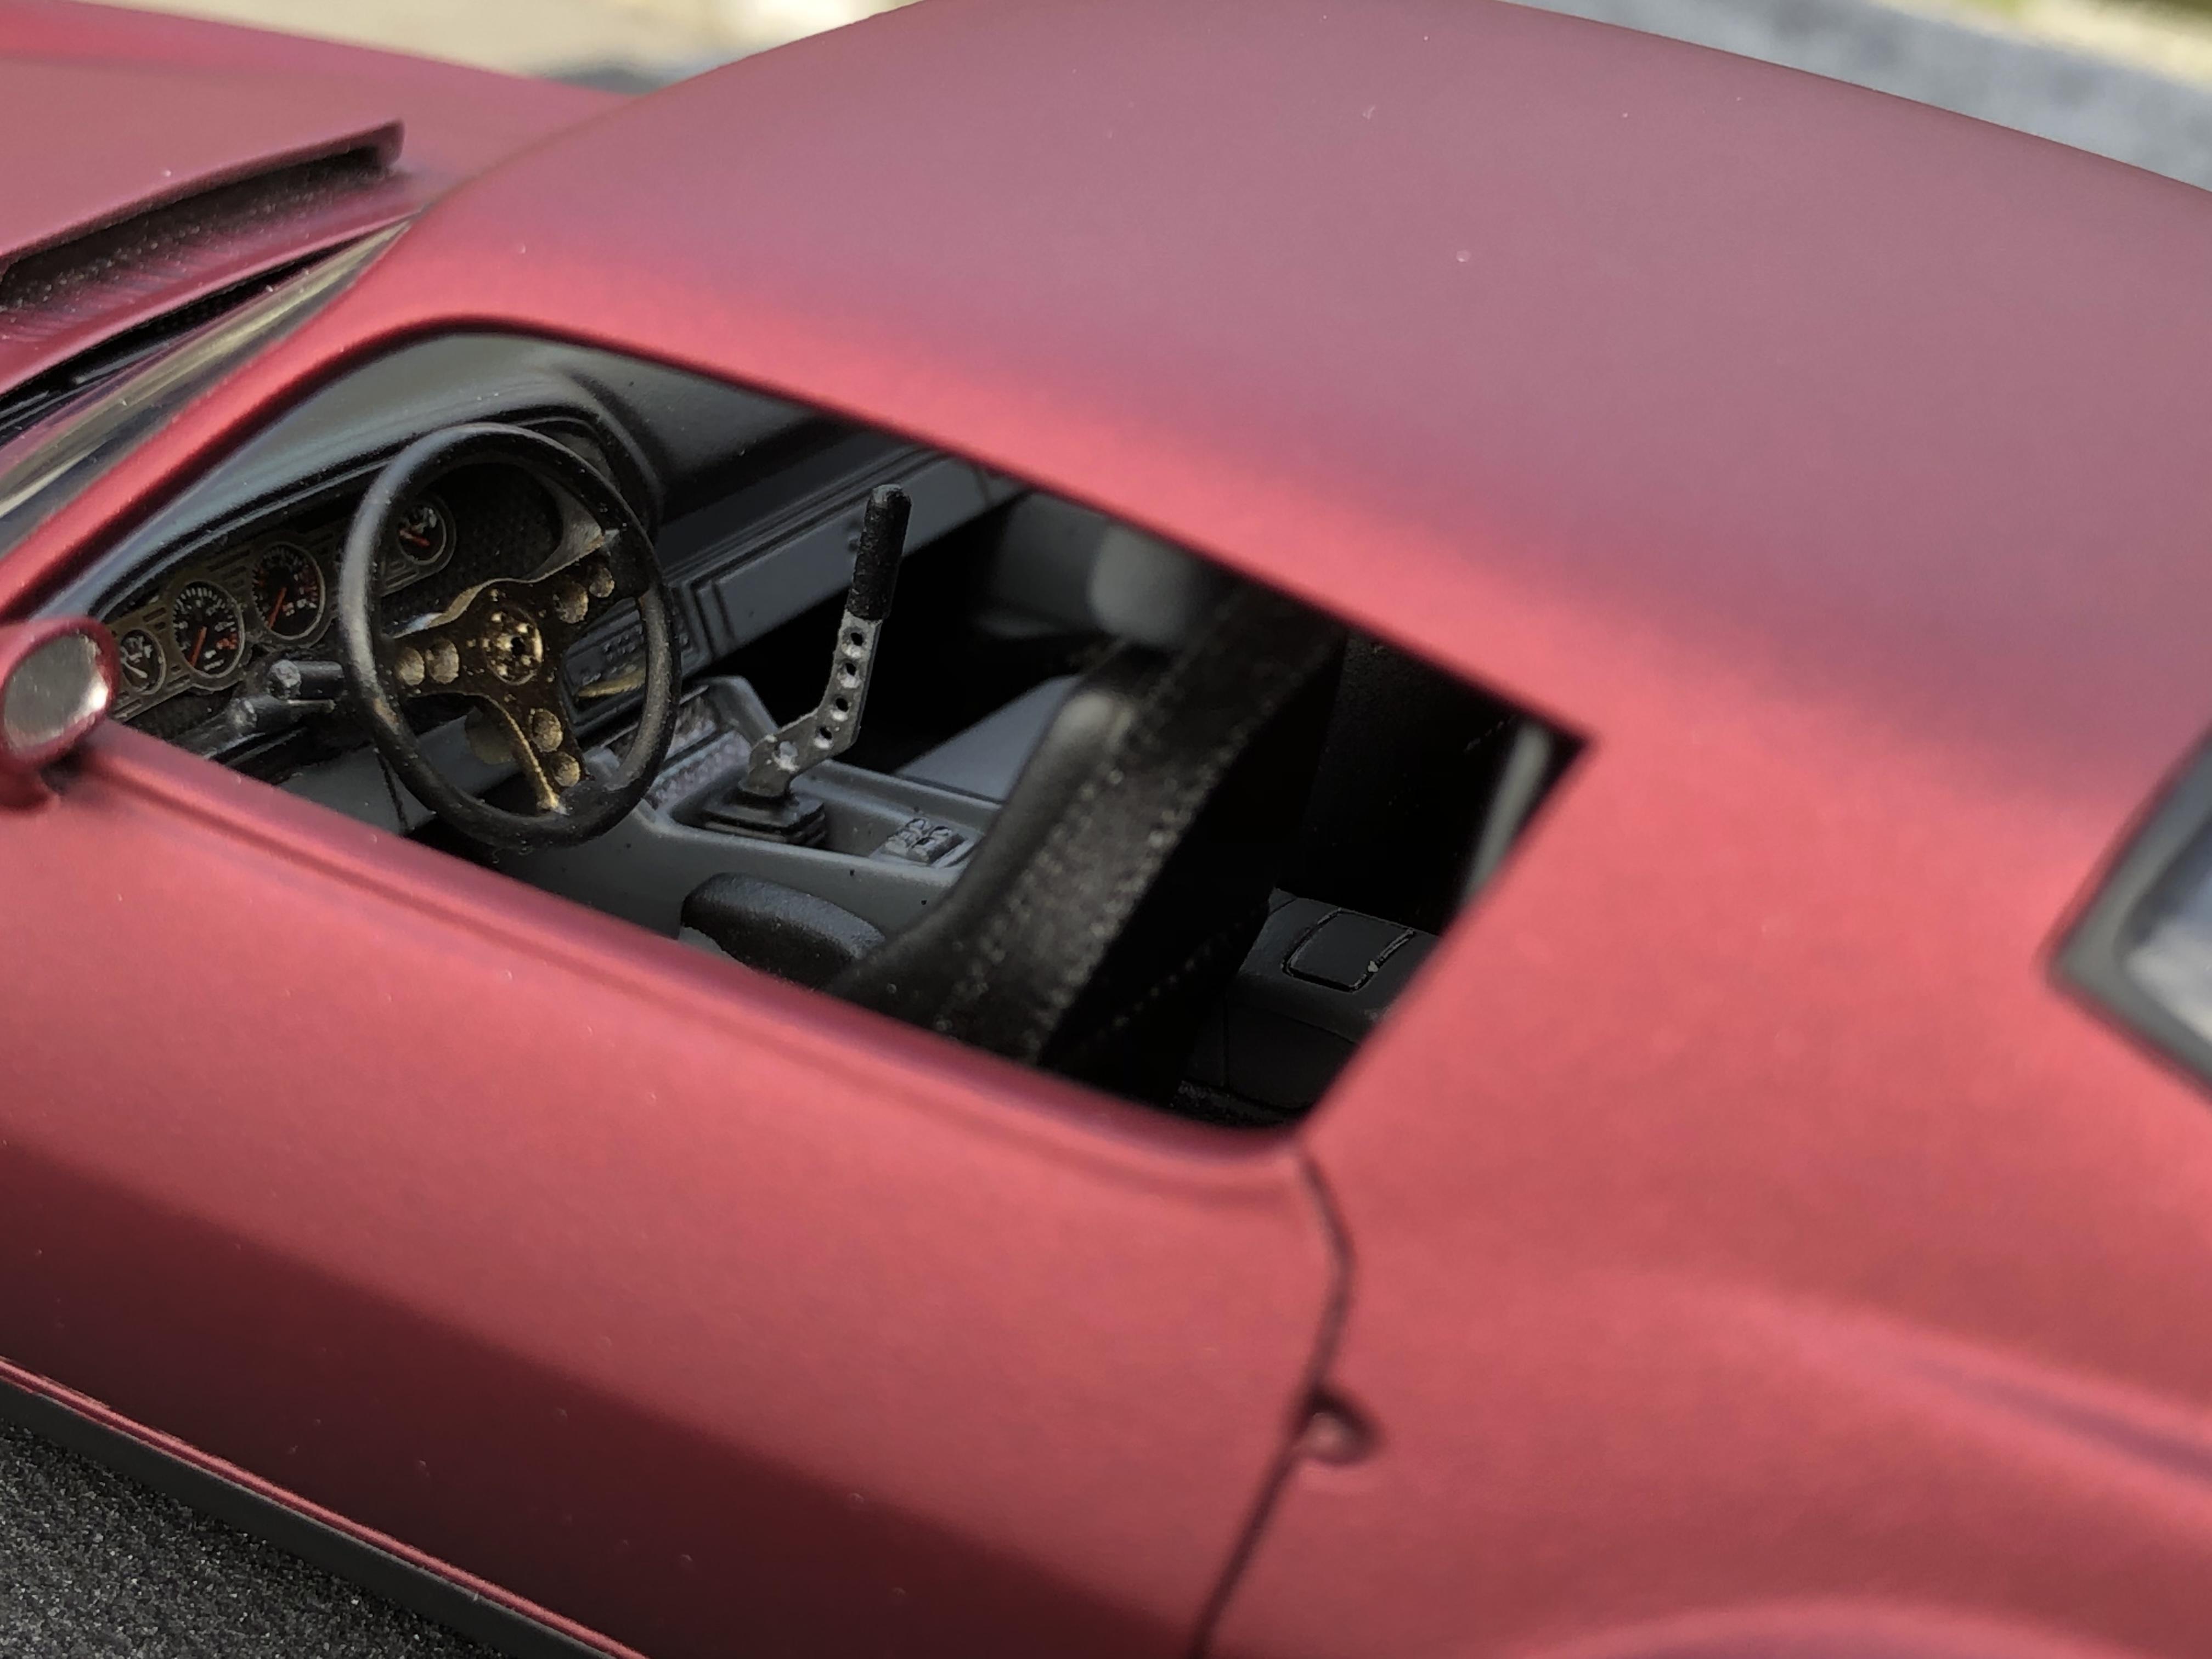
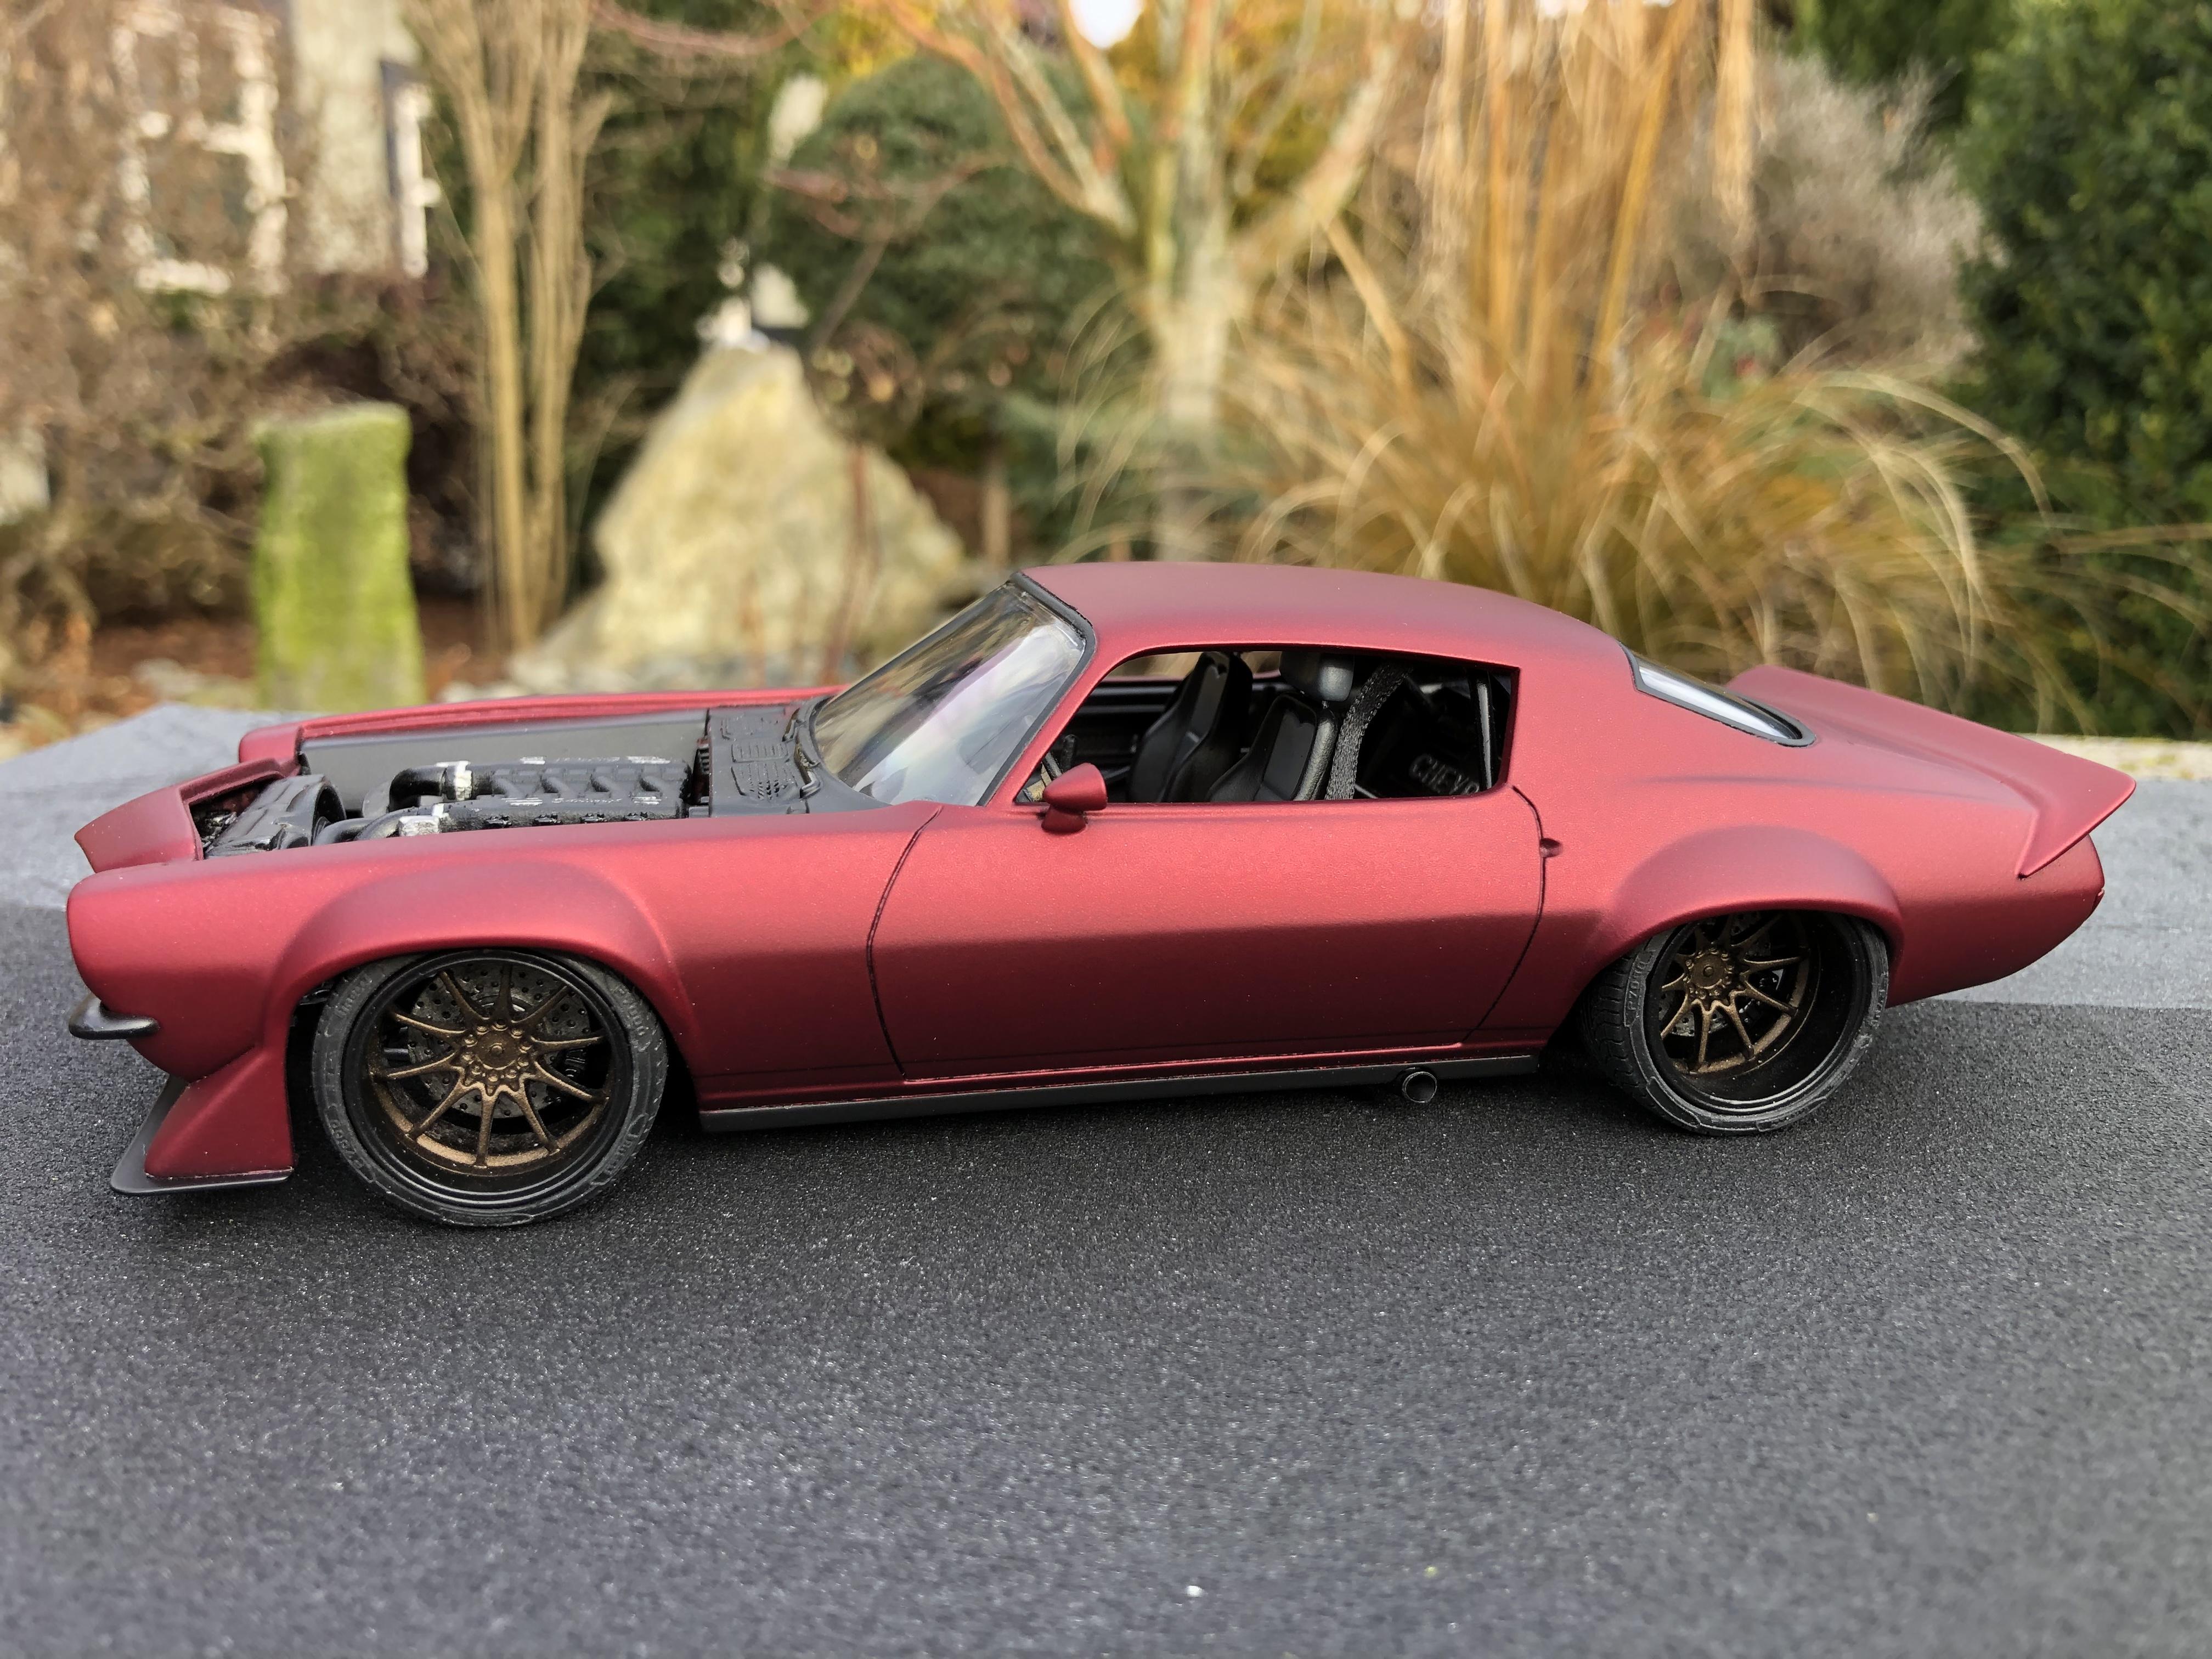
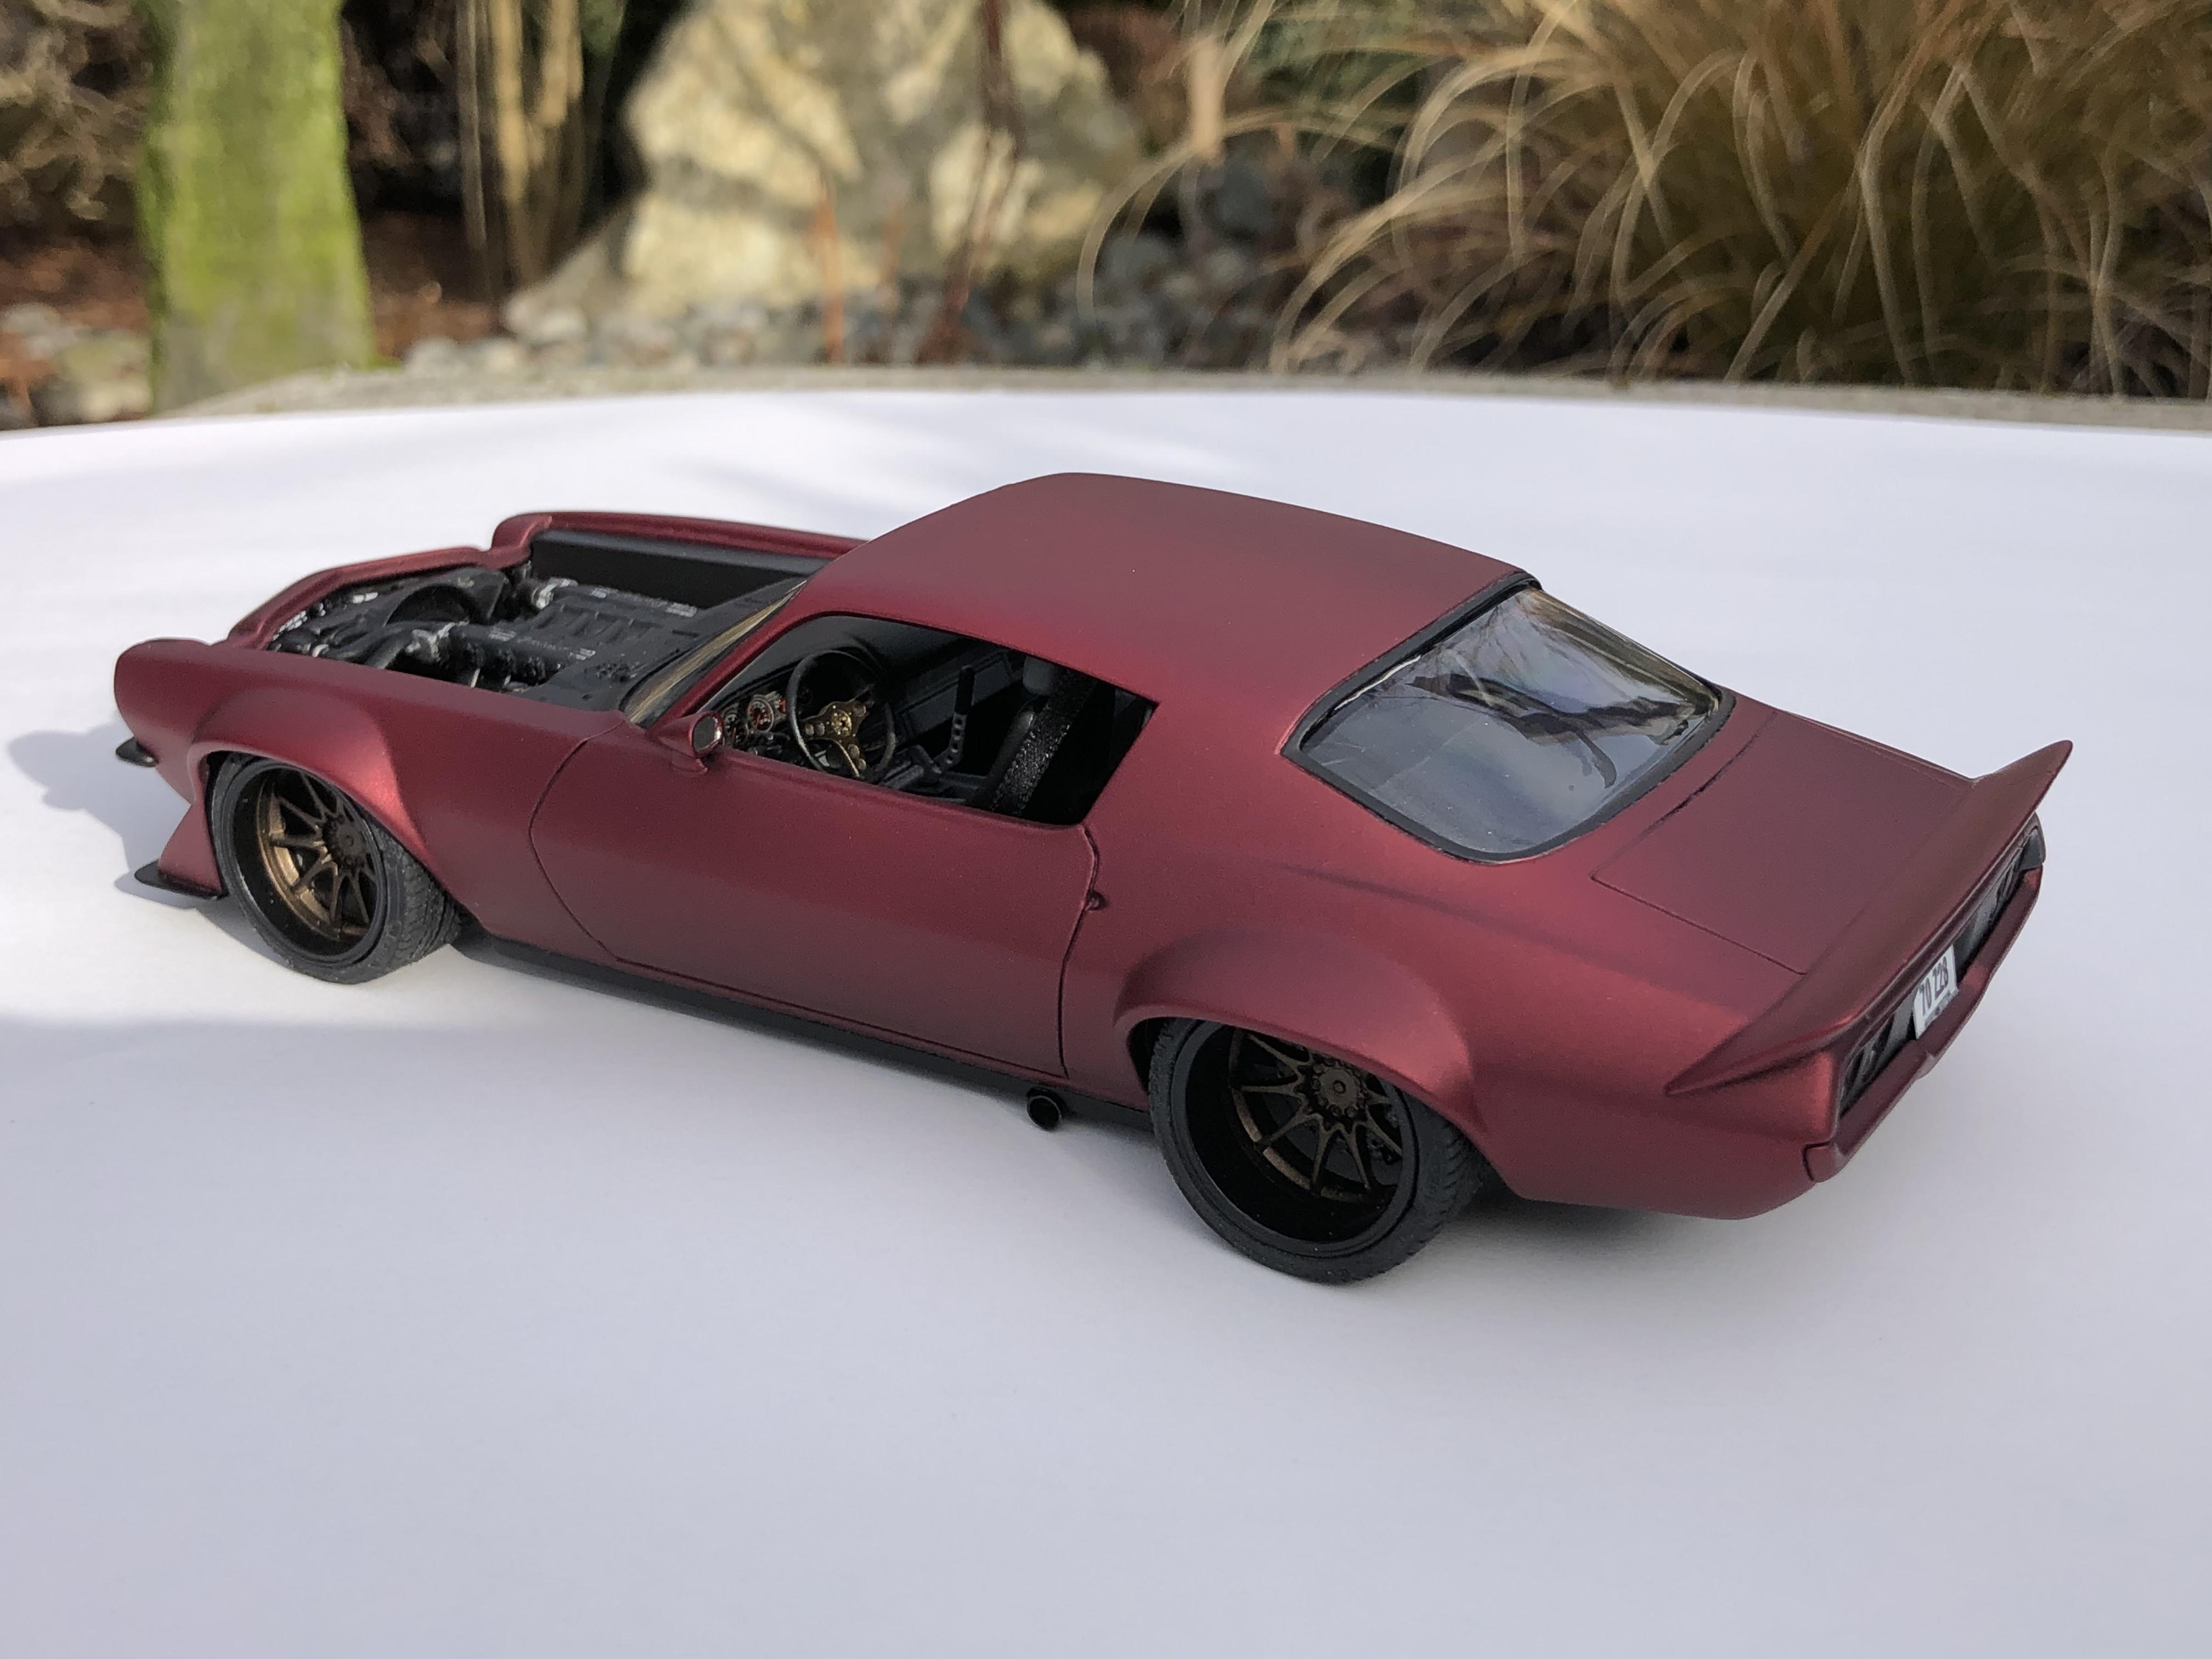
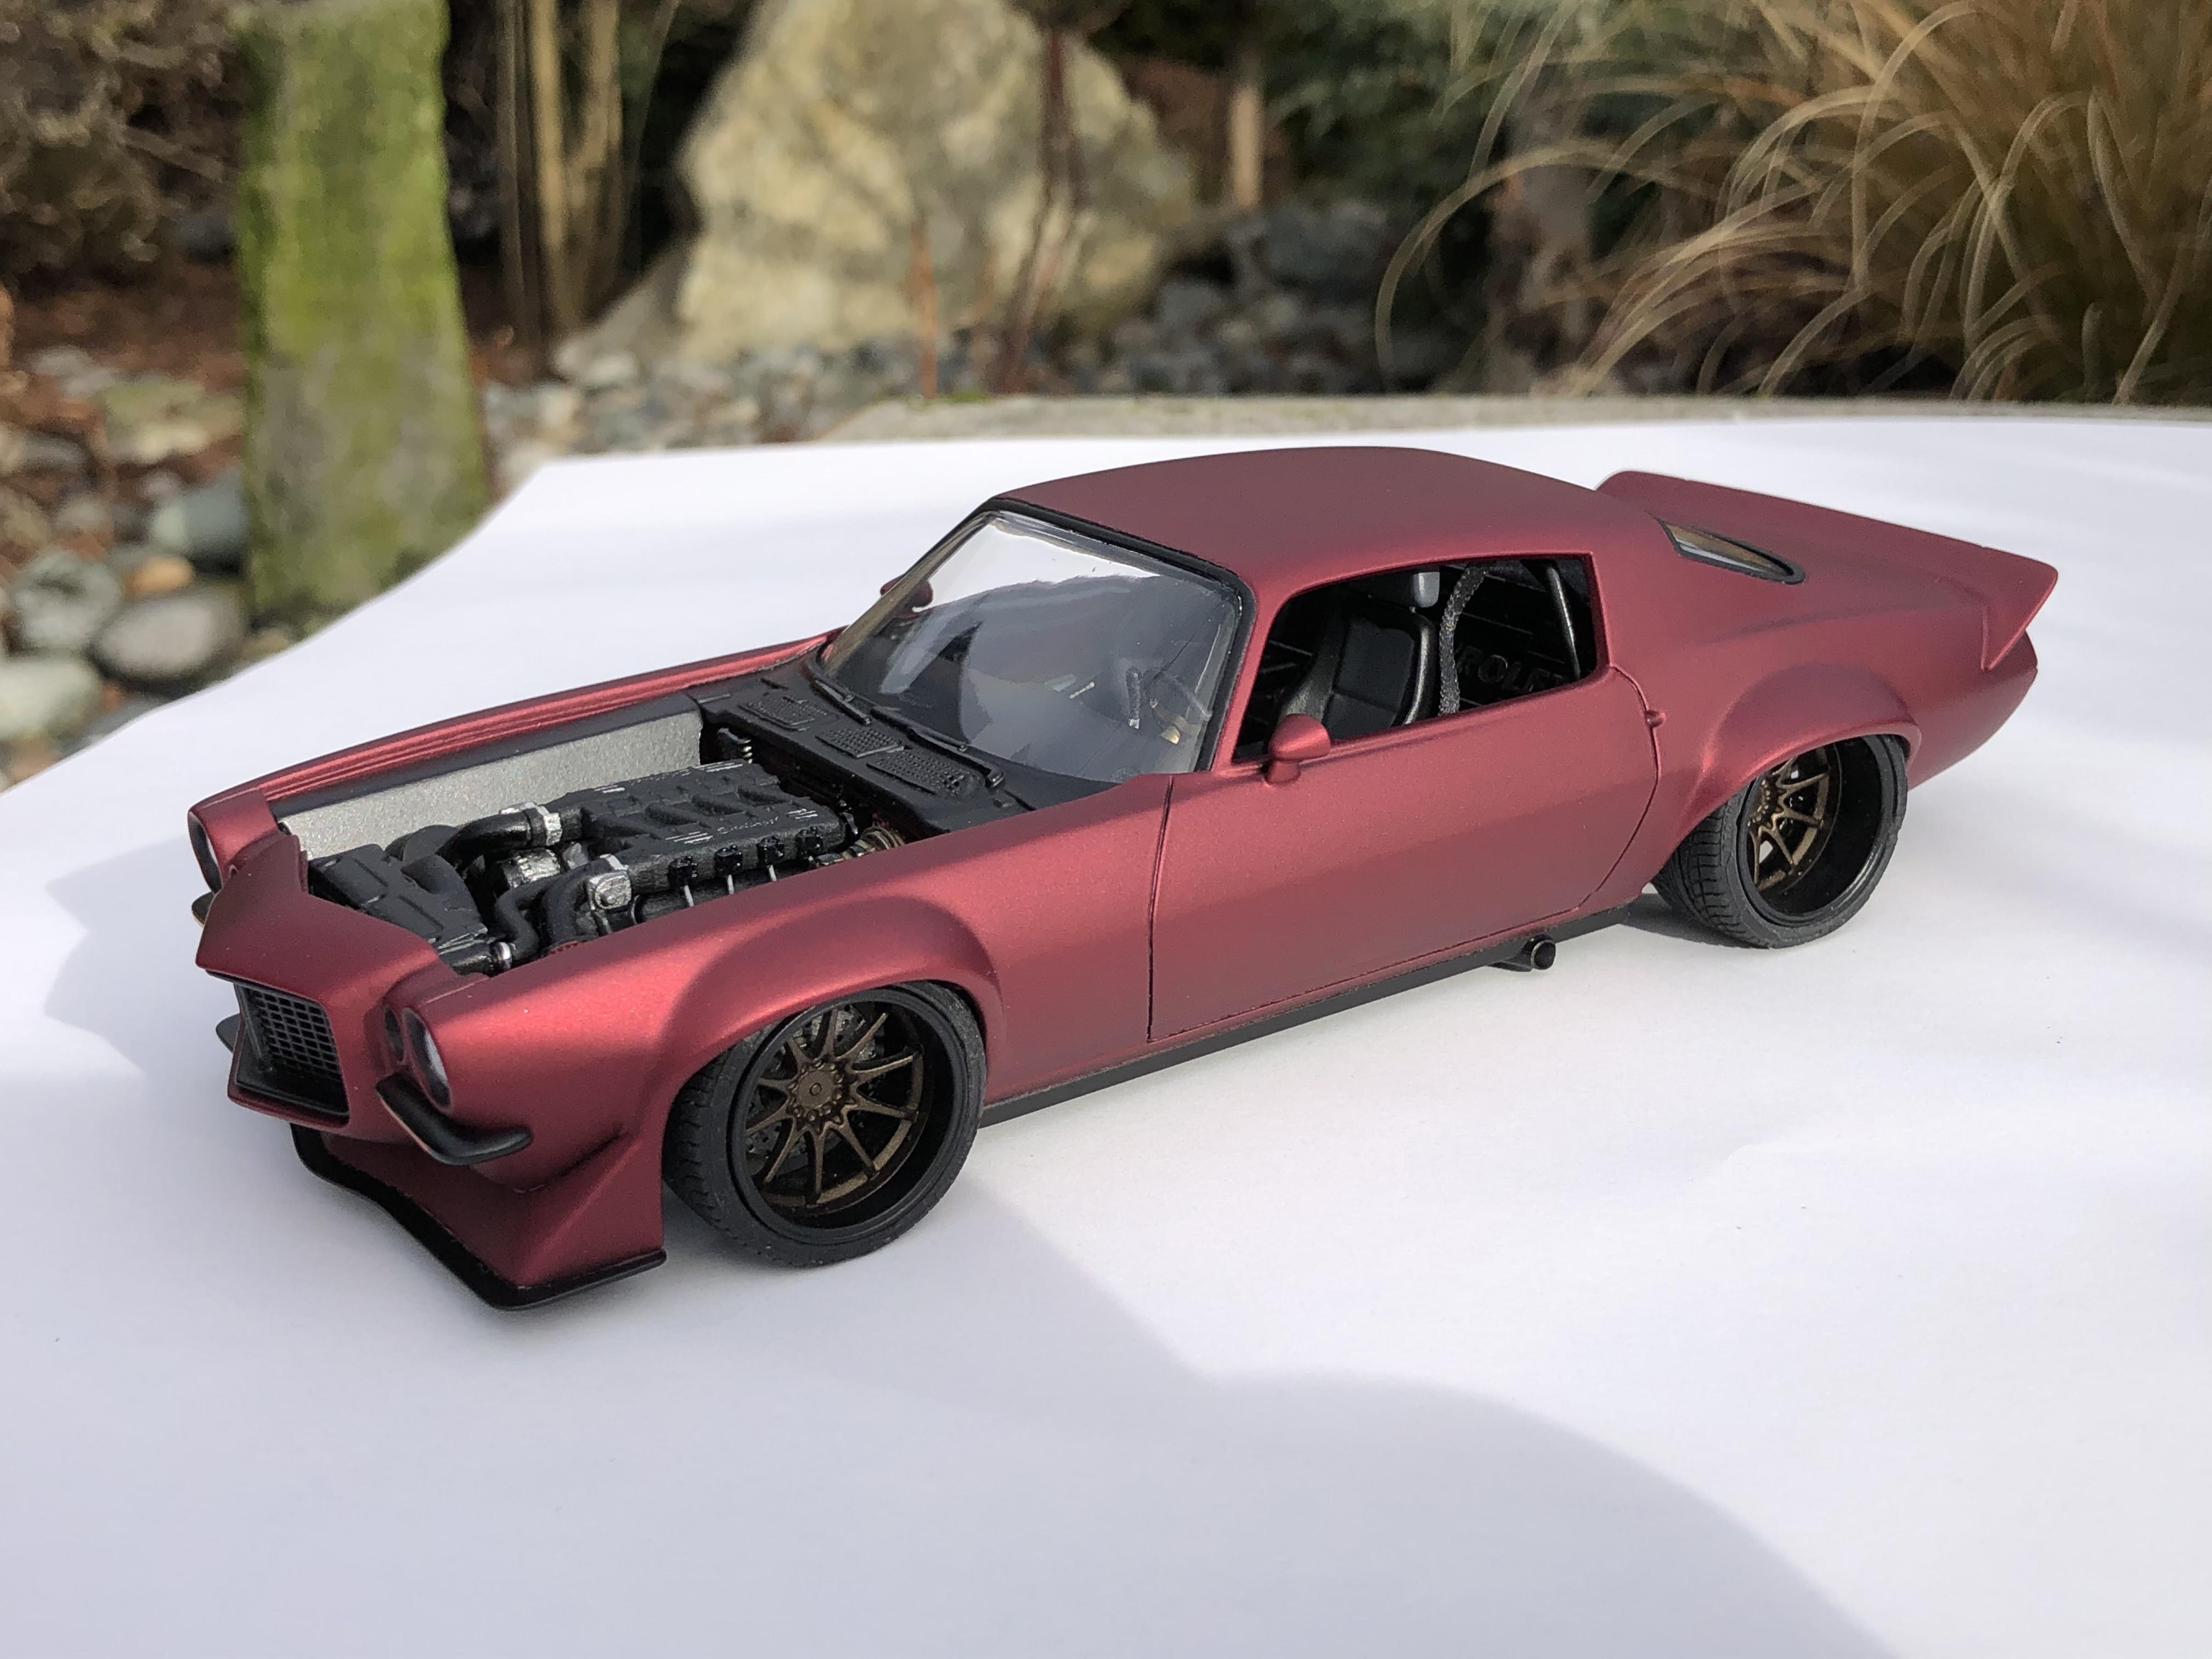
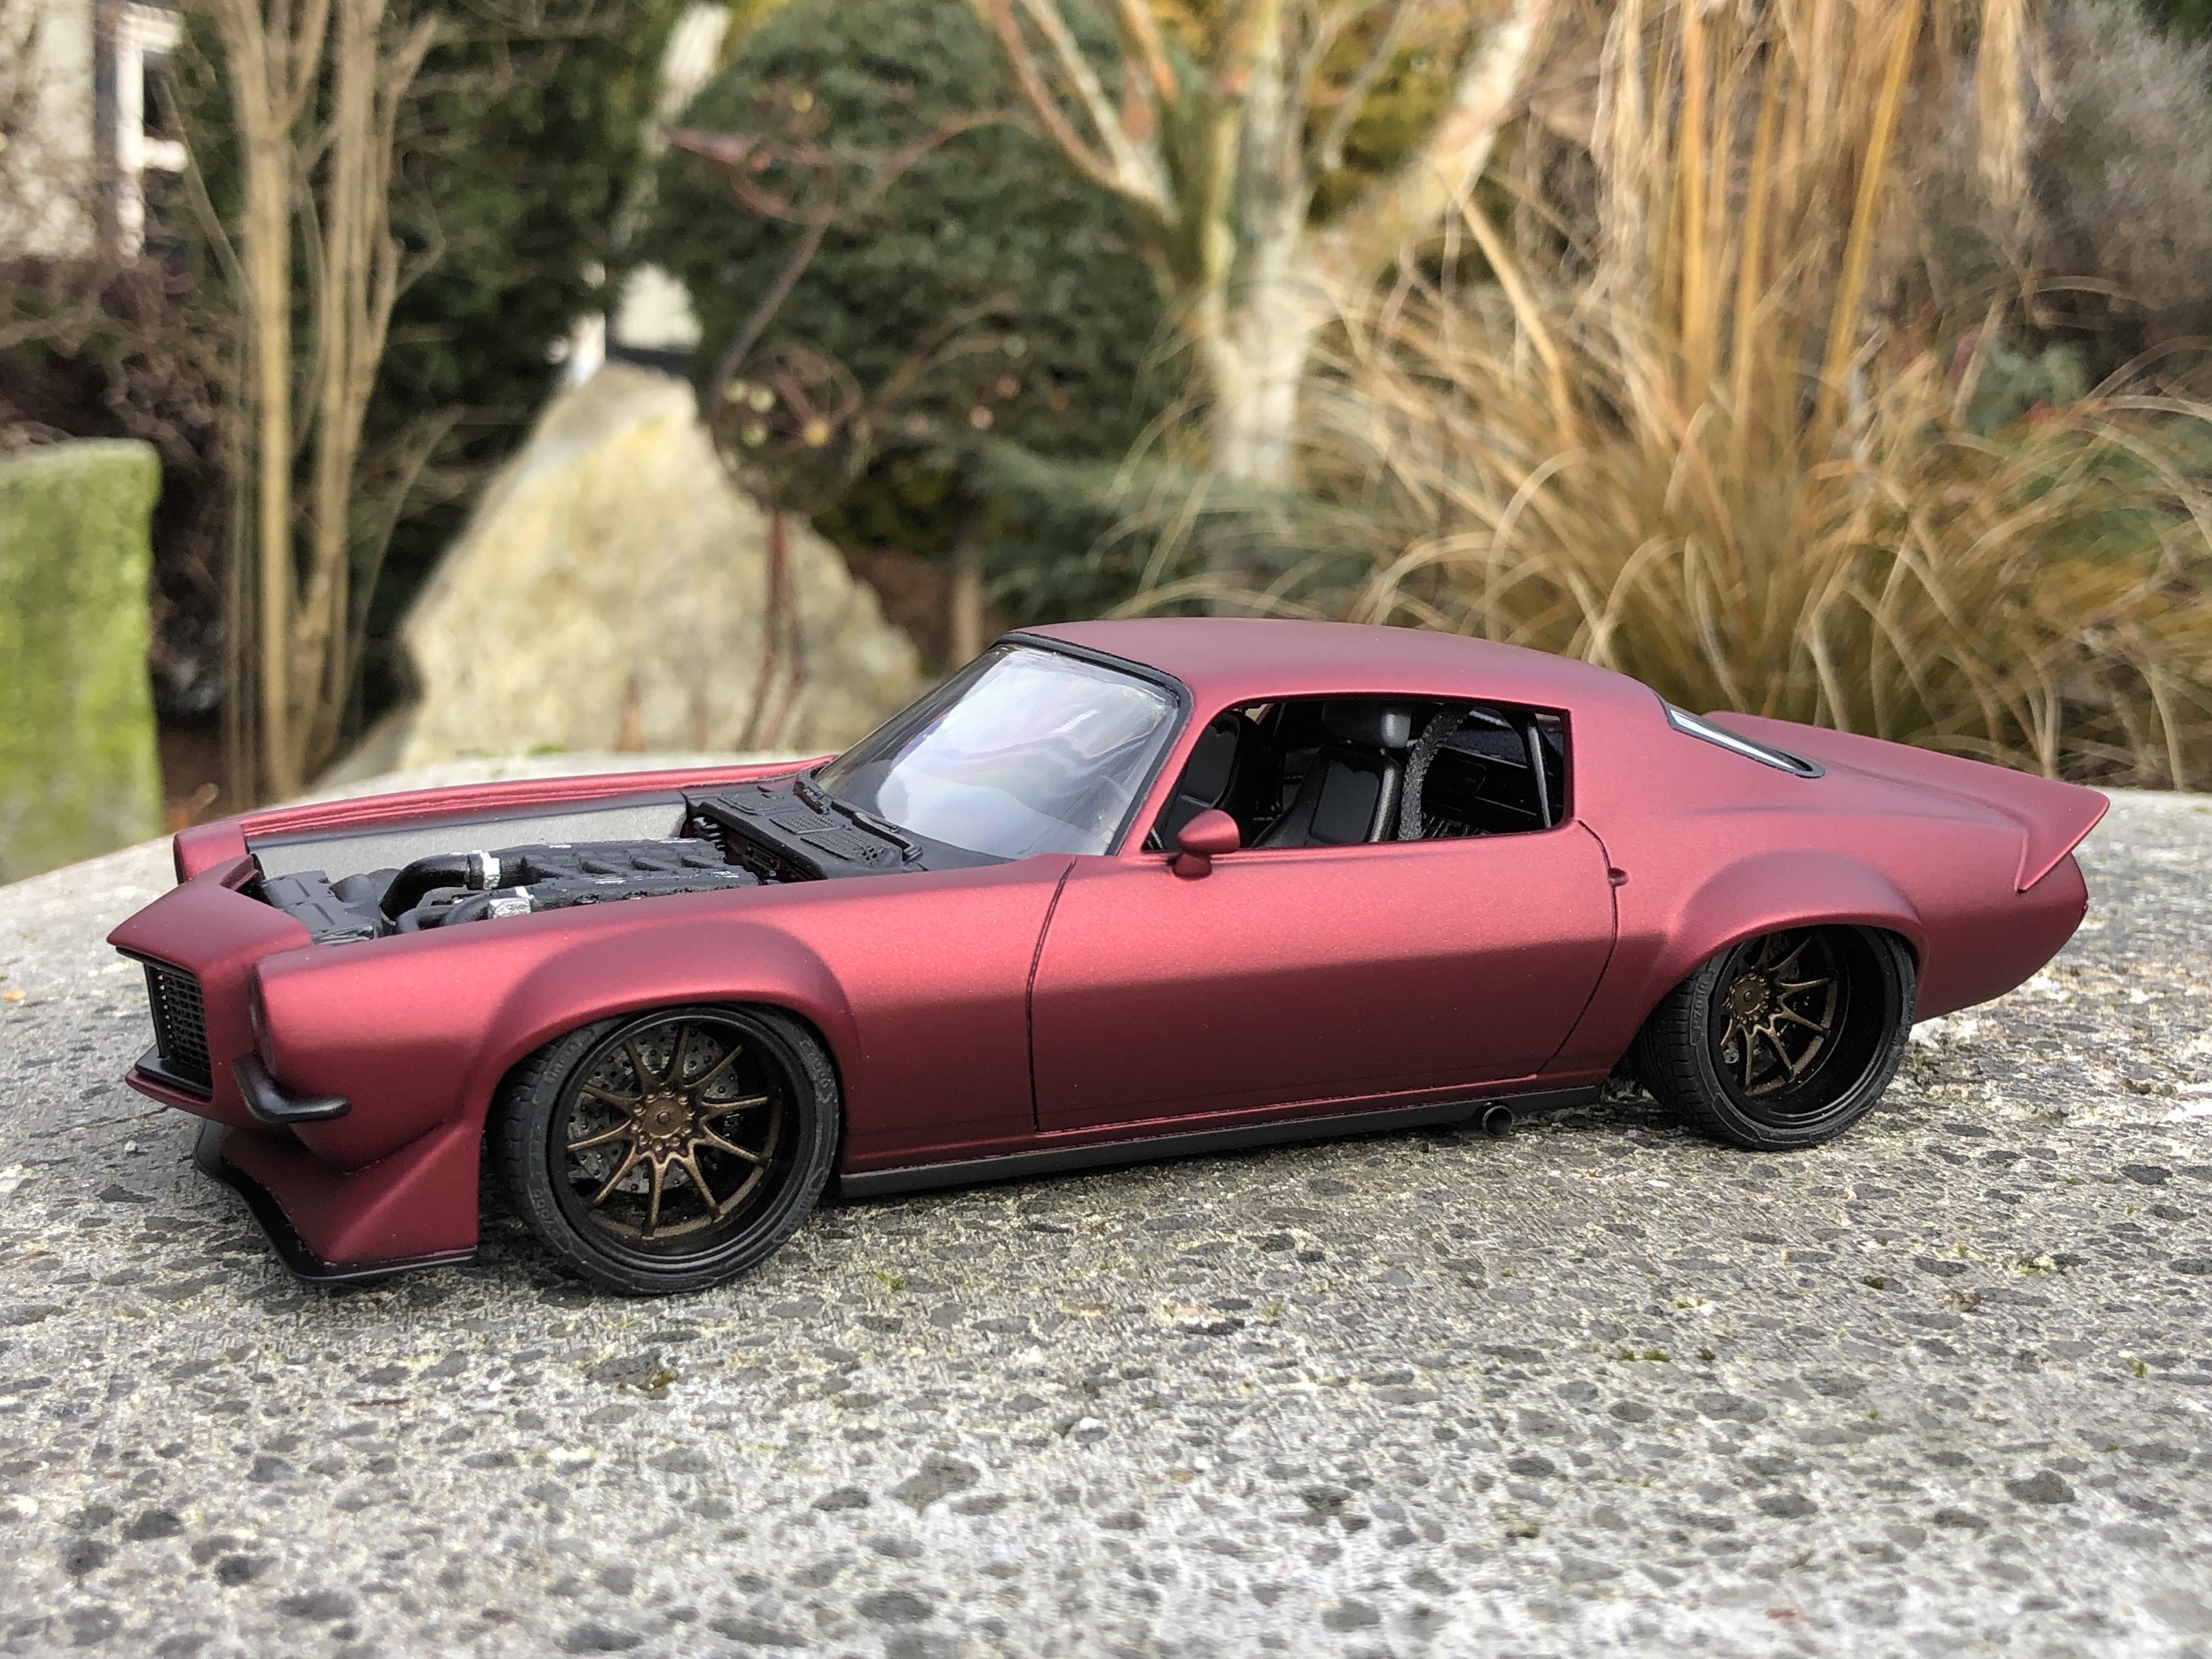
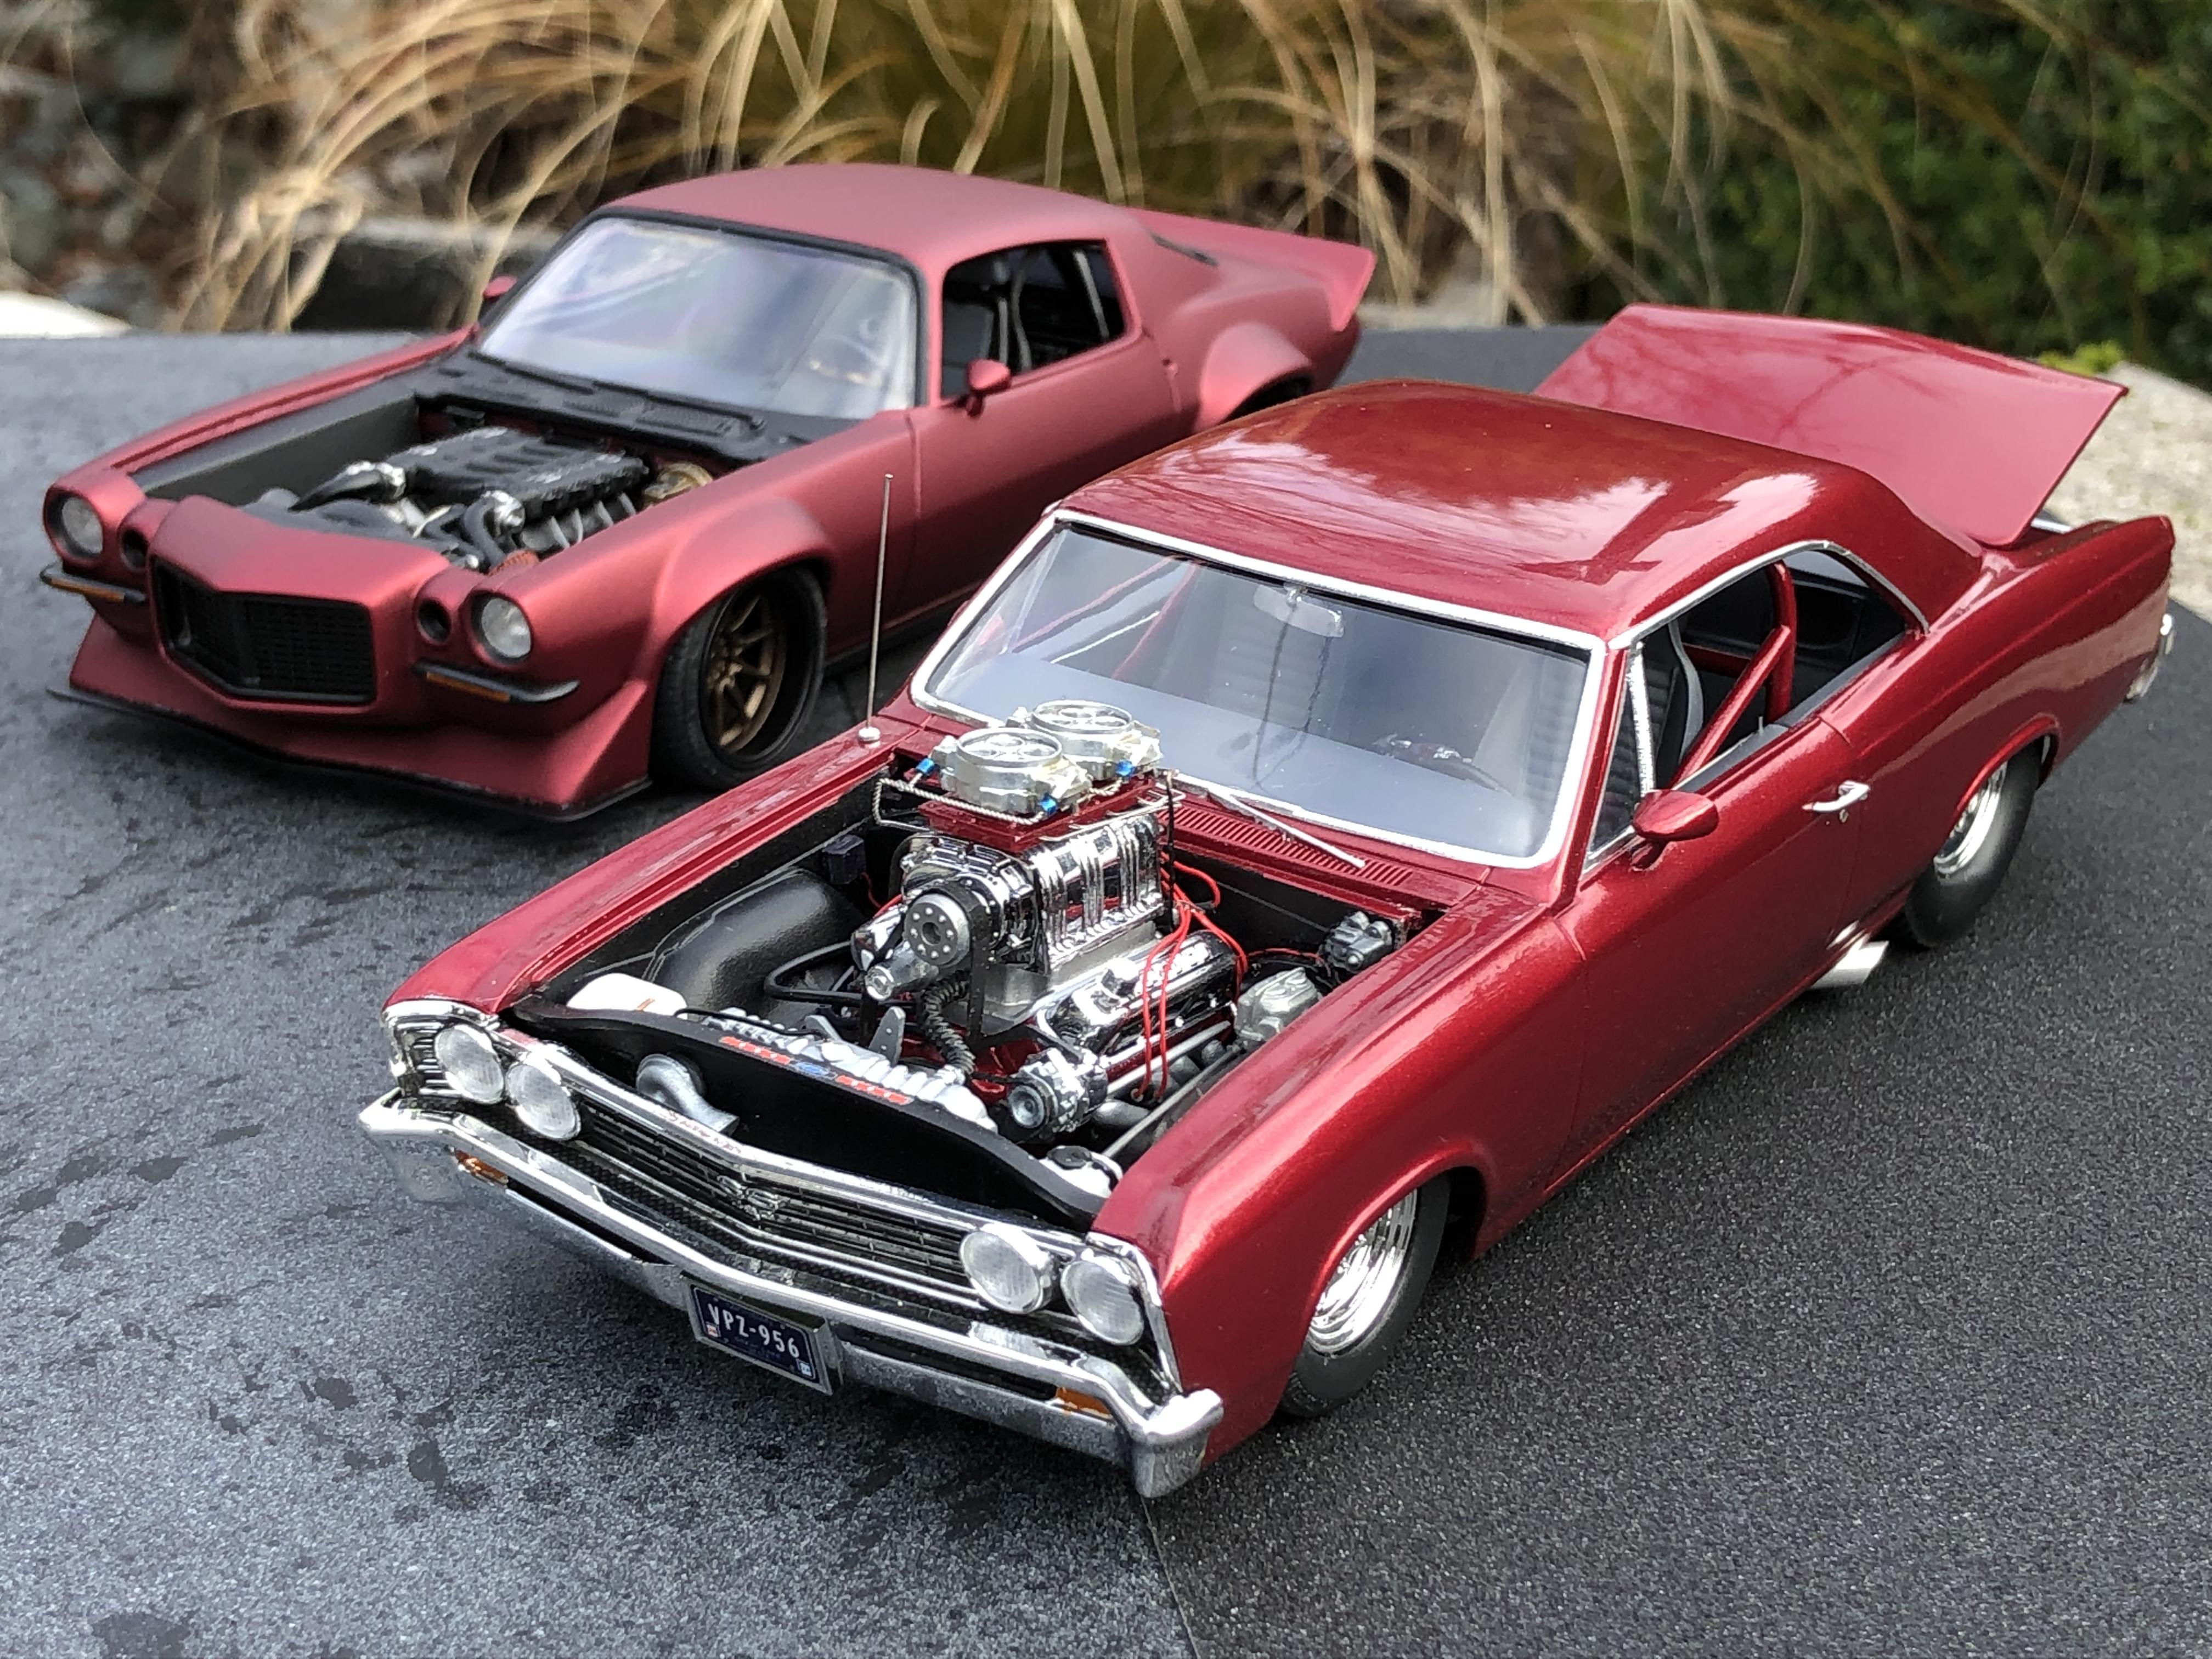
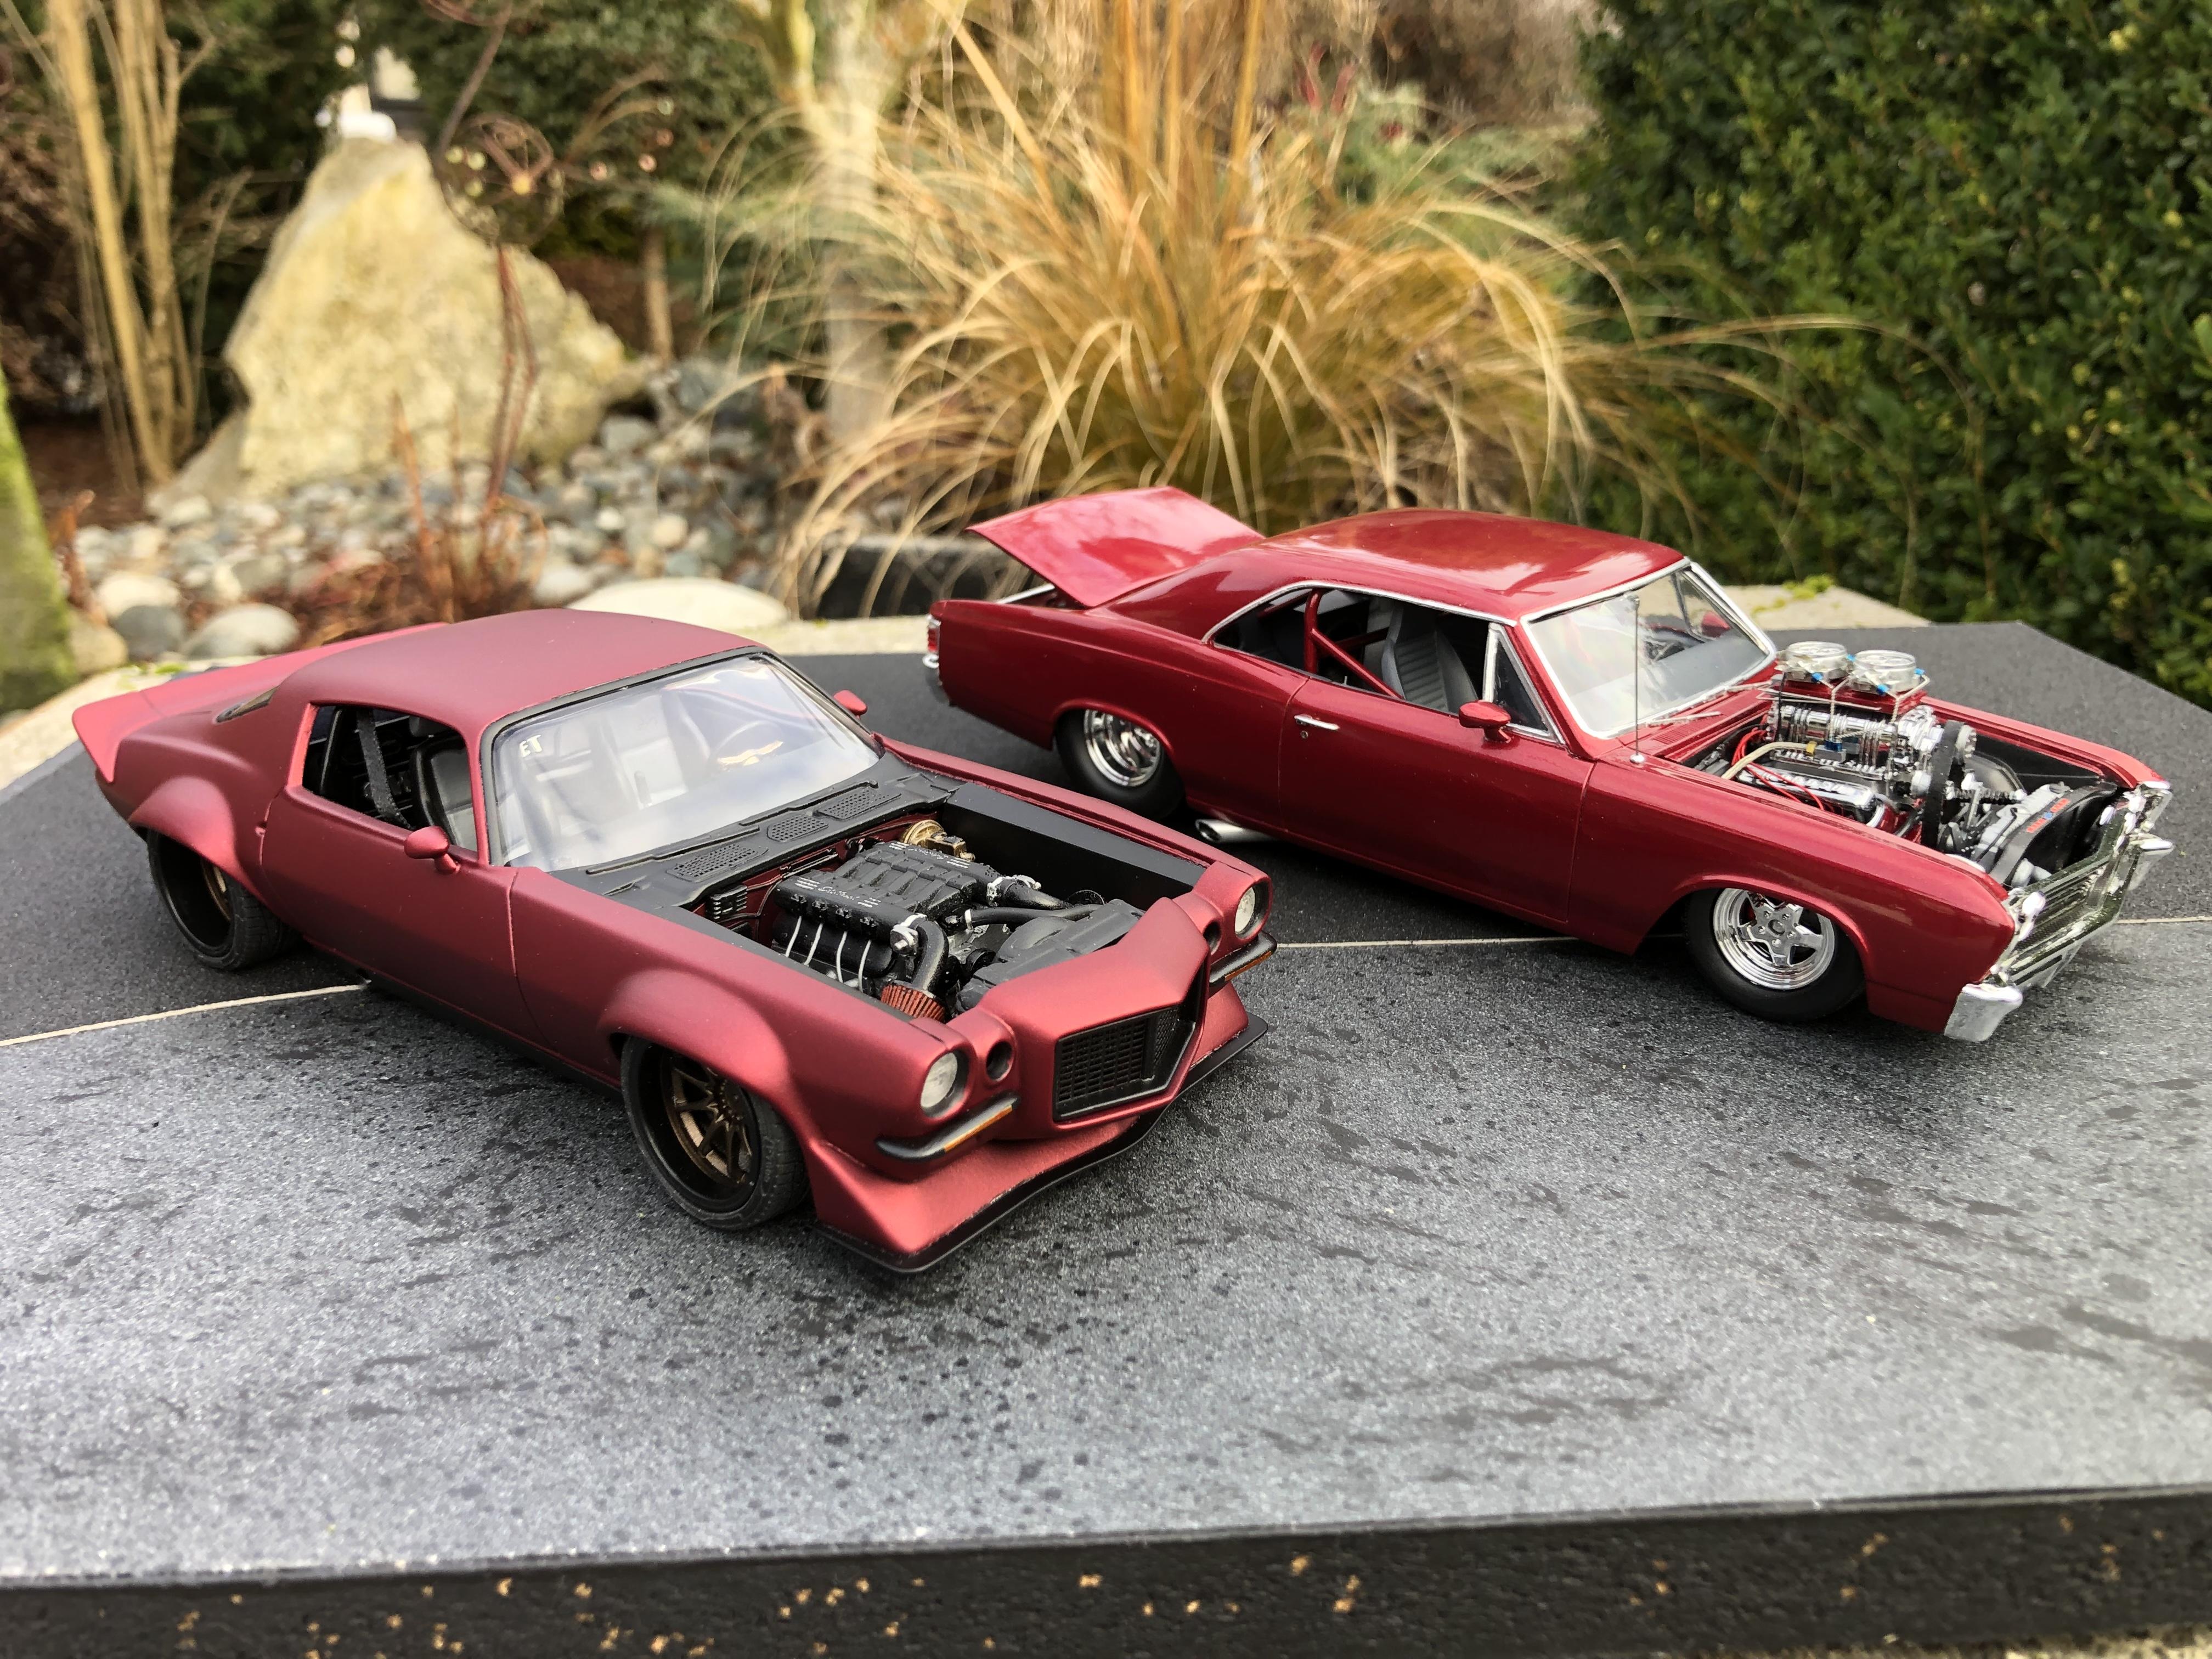
Hi all, A quick backstory on the 1:1 car. I don’t know a lot of the details, but what I learned is that the Dutchboys took this car to SEMA in 2015. The car set, and raised the bar for pro touring cars. My build is NOT intended to be a replica, just a tribute to capture the look of the car. I fell in love with the paint job when I saw it. Soooooo….. I added fender flares, and raised the wheel openings on the body modified Aoshima wheels added a splitter, modified the rear spoiler and bumper, photo etch grill, removed front turn signals for air intakes, added turn signals in bumpers 3d printed intake and air cleaners, made headers from 1.5mm solder, interior has a roll bar, hand made shifter, carbon fibre decals, photo etch door handles, speakers, gauge surround, and keys in the ignition. MCG printed gauges, sub woofer, fire extinguisher, embossing powder carpet and package shelf paint is Tamiya grey primer, Tamiya gloss black, Dupli-Colour GM medium Garnet red followed by Mr Hobby super smooth matte clear As I mentioned above, this is not intended to be a replica, just a tribute. I put my own spin on a few things. I am including more than my usual amount of photos to try and show the paint in different light. Still need a good sunset shot…. I’ll add that when weather permits. Honestly, the colour is hard to capture with my limited photography skills. Anyhoo, enough babbling here it is. First 3 photos are obviously the real car and inspiration Sorry for excessive photos…. just trying to show how much the paint changes in different light. Here is a couple of photos for comparison. The 67 Chevelle is painted the same colour with gloss clear… A big thanks as always to all of you that followed along on the WIP. I always appreciate the input and comments. I’ve been on the forum for 1 1/2 years now, and have learned a lot of tricks in that time. Thanks to everyone who shares their tips, tricks and techniques on this forum!!! As always, thanks for taking the time to look and comment Cheers, Steve

-
Here it is, the final instalment… Finally added this one to the display cabinet. A couple of teaser photos, I should have it under glass Sunday. Thanks again to everyone who checked in, followed along, and took the time to comment, and offer input. I truly enjoy the sharing on this forum. So many great talented builders to learn from. I am happy with the final look of the build, I think it captures the look of the 1:1 reasonably well. The suspension should have been built more racey, but I’m ok with it.
-

1990 Mustang LX - SVT Cobra DOHC Powered! UPDATE! 1/22/23
Steve H replied to Dennis Lacy's topic in WIP: Model Cars
Absolutely beautifully detailed engine and suspension sir. Love watching your builds Dennis, I always learn good stuff. Cheers, Steve -
Very handsome! He’s got beautiful “human” looking eyes. Great to see he’s got a nice home and a new friend. A tired dog is a happy dog!
-
Thanks Anton. Hi Mark, glad you think so. The 1:1 is aggressive looking in my eye, so maybe I got it close… Hi Joe! Thanks for the kind words sir. It’s been a crazy busy couple of weeks, so I haven’t been able to do the final touch ups and get glamour shots. I’m optimistic that I should have it under glass this weekend. Thanks for having a look. Hey Claude! I’m pretty happy with the overall look, but I probably should have done a little more on the chassis. This is the first time flattening the contact patch of the tires. I will do it again for sure. Just one of the many little details I’ve learned from the incredibly talented builders on this board. As always thanks for checking in sir! Cheers, Steve
-
I love me an El Camino. Very nice builds Glen. I agree with Rusty’s comments on phantoms, these are both very well executed and look fantastic. Cheers, Steve
-
Hi Jim, very nice build sir. 56 is my favourite of the tri fives. I’m a huge fan of polished aluminum tips! Cheers, Steve
-
MPC '82 Chevy Step 4X4
Steve H replied to Plowboy's topic in WIP: Model Trucks: Pickups, Vans, SUVs, Light Commercial
Nice to see you back at the bench Roger. Hope all is well with your Mom. -
Looking good Mark! As for the sand, maybe a grey embossing powder? The woodwork on the deck and rails is very nicely done. Cheers, Steve
-
Forgot… The 1:1 car… The 1:1 car has had a couple of different intake set-ups, I was only aiming for “the look” not an exact replica. Obviously, here you can see the 1:1 car is autocross ready, brake cooling ducts, suspension etc.
-
Hi guys, Finished engine compartment… You can see in the photos I have added the homemade inner fenders, and on the dash you can see some speakers, and the keys in the ignition… The air cleaners are cut-down 3d printed units. Glamour shots soon!
-
Hi Steve, Absolutely THE best introduction to a WIP thread I have seen. I read it this morning having my breakfast, great way to start my day! Thumbs up from my wife too. Not my usual subject of interest, but I am definitely in for the ride, bring it on…
-
I agree! Wow, no easing back in, I like it. I’m a huge fan of pro street cars, so I’ll be watching. As mentioned above, a chassis swap might save you some work. Having said that, the work you have done looks good so far. Cheers, Steve
-
Thanks Mark, not quite done, but you get the idea now. Still aiming to have it finished by the end of this weekend. Busy week this week… The gloves aren’t something I normally wear, although I may use them more now. They are definitely necessary on flat paint in my experience. On a shiny car, finger smears get removed when I do my final wax. Thanks again for the compliment and for having a look. Hi Dave, if I understand your comment correctly, just head back to page one of this thread. If you read thru it gives the play by play, along with credit to my friend Phil Daphne who did a beautiful job on some flares for his Trans Am race car. (Phil, if you read this, feel free to post a link to your build thread) I tried my best to duplicate Phil’s technique, and replicate the 1:1 inspiration. The photos on page 6 of this thread are the final product in paint. Thanks for having a look and taking the time to comment.
-
I missed this one first time around. Beautiful build Tim, I love the pro touring style, this car captures the look perfectly. Great stuff!!
-
That is a BIG beautiful Caddy Tim. Beautiful job on the roof, and as the others have said, that colour is perfect. Did I mention it’s BIG…. I need to get a big ‘ol Caddy, great looking cars. Cheers, Steve
-
Hi guys, spent a bit of time getting the exhaust built today. A big thanks to Greg (nobling) for his tutorial on making your own mufflers. I decided to give it a try, and for a first try I’m satisfied with the results. The rest is just bent styrene tube with wire inside to keep the shape. As always, aluminum tubing with thinned walls for tips, this time black instead of polished. I also added photo etch flanges on the headers. Undercarriage is pretty much complete now. I may add some sort of traction bars to the rear end. Still a handful of details to add before it’s complete. I had an unfortunate fitment issue with the hood. The inner fenders I made caused the hood to not fully close at the front. I was a bit displeased with myself for not seeing that coming, but because the inner fenders were installed after body was mounted, it just slipped thru the cracks… Got it fitted and touched up tonight, not perfect, but acceptable.
-
Thanks Kyle, much appreciated. Thank you Ian Hi Greg! I am definitely going to try for some “sunset” photos when she’s done for that reason. I think will look quite sinister, maybe not quite as much as my 300c, but close…Thanks for taking the time to look and comment. Francis my friend, I have A LOT to learn about paint. I do really enjoy experimenting with different techniques. Sometimes I want shiny and smooth, sometimes a bit rusty, sometimes just flat like this. Thanks for your kind words sir, truly appreciated
-
Hi Dave! Thanks for your enthusiasm sir. I keep saying it, but the paint colour looks considerably cooler in person, it has a real eye catching shimmer to it. I will keep an eye out for your build, I would appreciate a PM to alert me when you get going on it. One thing to keep in mind, definitely use nitrile gloves when handling the flat paint. The oils from your fingers will put a shine on the paint otherwise, I learned this on my 41 Chev truck…. Thanks Luke!
-
AMT '67 Mustang Fastback-Now in Under Glass Section
Steve H replied to mustang1989's topic in WIP: Model Cars
Joe, my heart aches for you. Very sorry to hear this news. Take good care my friend, lean on your loved ones for support. We will all be here to welcome you back when you’re ready. -
Hi Jim, the colour is gorgeous on that! I am not familiar with the kit, but having everything frenched (which I assume you did?) really adds to the overall look. Very nice build. Cheers, Steve
-
Hi Pat, I’m with Bob on this, I hope you will reconsider. Cheers, Steve
-
Well….. I’m almost there!!! Finally got the body on. Overall, I’m really happy with how it is turning out. I somehow missed the stance I wanted by a touch. The front should be just a whisker lower, but it’s still low enough that I’m good with it. The seat belts turned out good for a first effort, I will get more photos of details when she’s complete. Here’s a couple of teasers, one in dim light, the other in somewhat filtered sunlight. It needs exhaust, some engine compartment detail, air intakes, some touchups, and a good dusting. I will probably do one more update here, but hopefully by this time next week she’s under glass. I’m looking forward to getting some photos outside in different light with this paint. Thanks for taking the time to have a look. Cheers, Steve