Steve H
-
Posts
2,535 -
Joined
-
Last visited
Content Type
Profiles
Forums
Events
Gallery
Everything posted by Steve H
-

Tamiya TS65 Pearl Clear questions
Steve H replied to bh1701's topic in Model Building Questions and Answers
Here it is over primer grey and purple. As mentioned, photos don’t really capture it well.
-
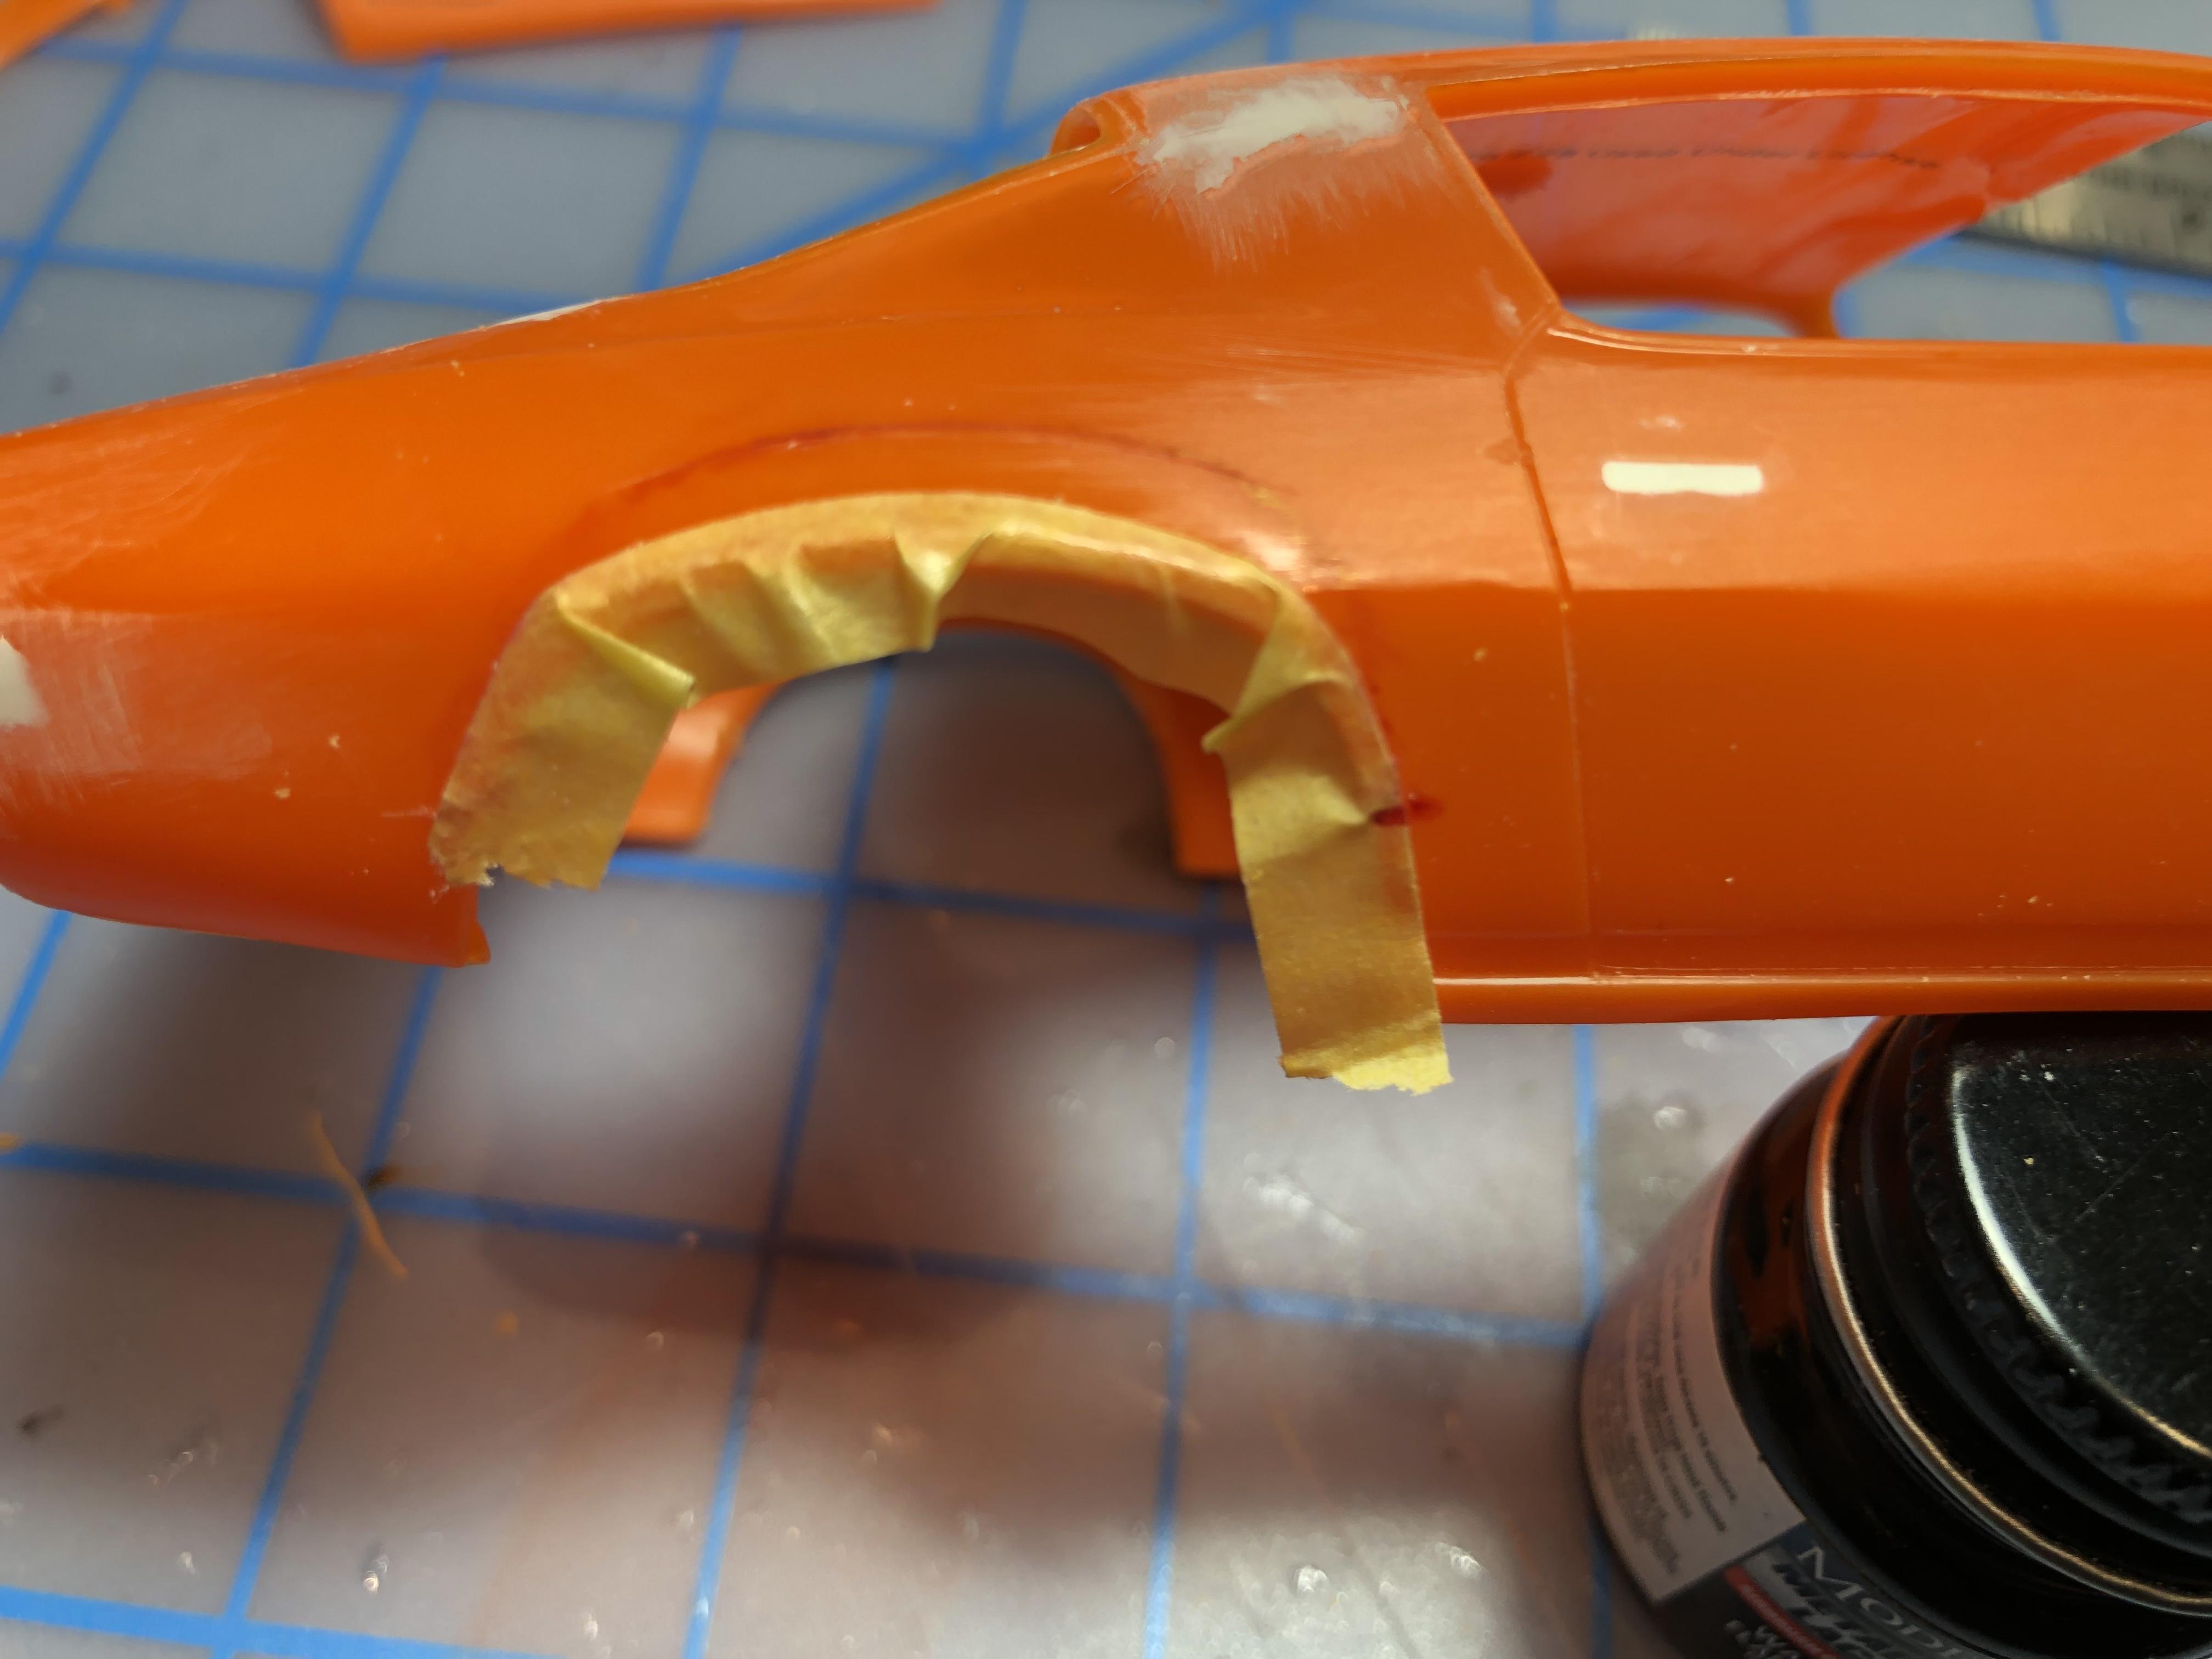
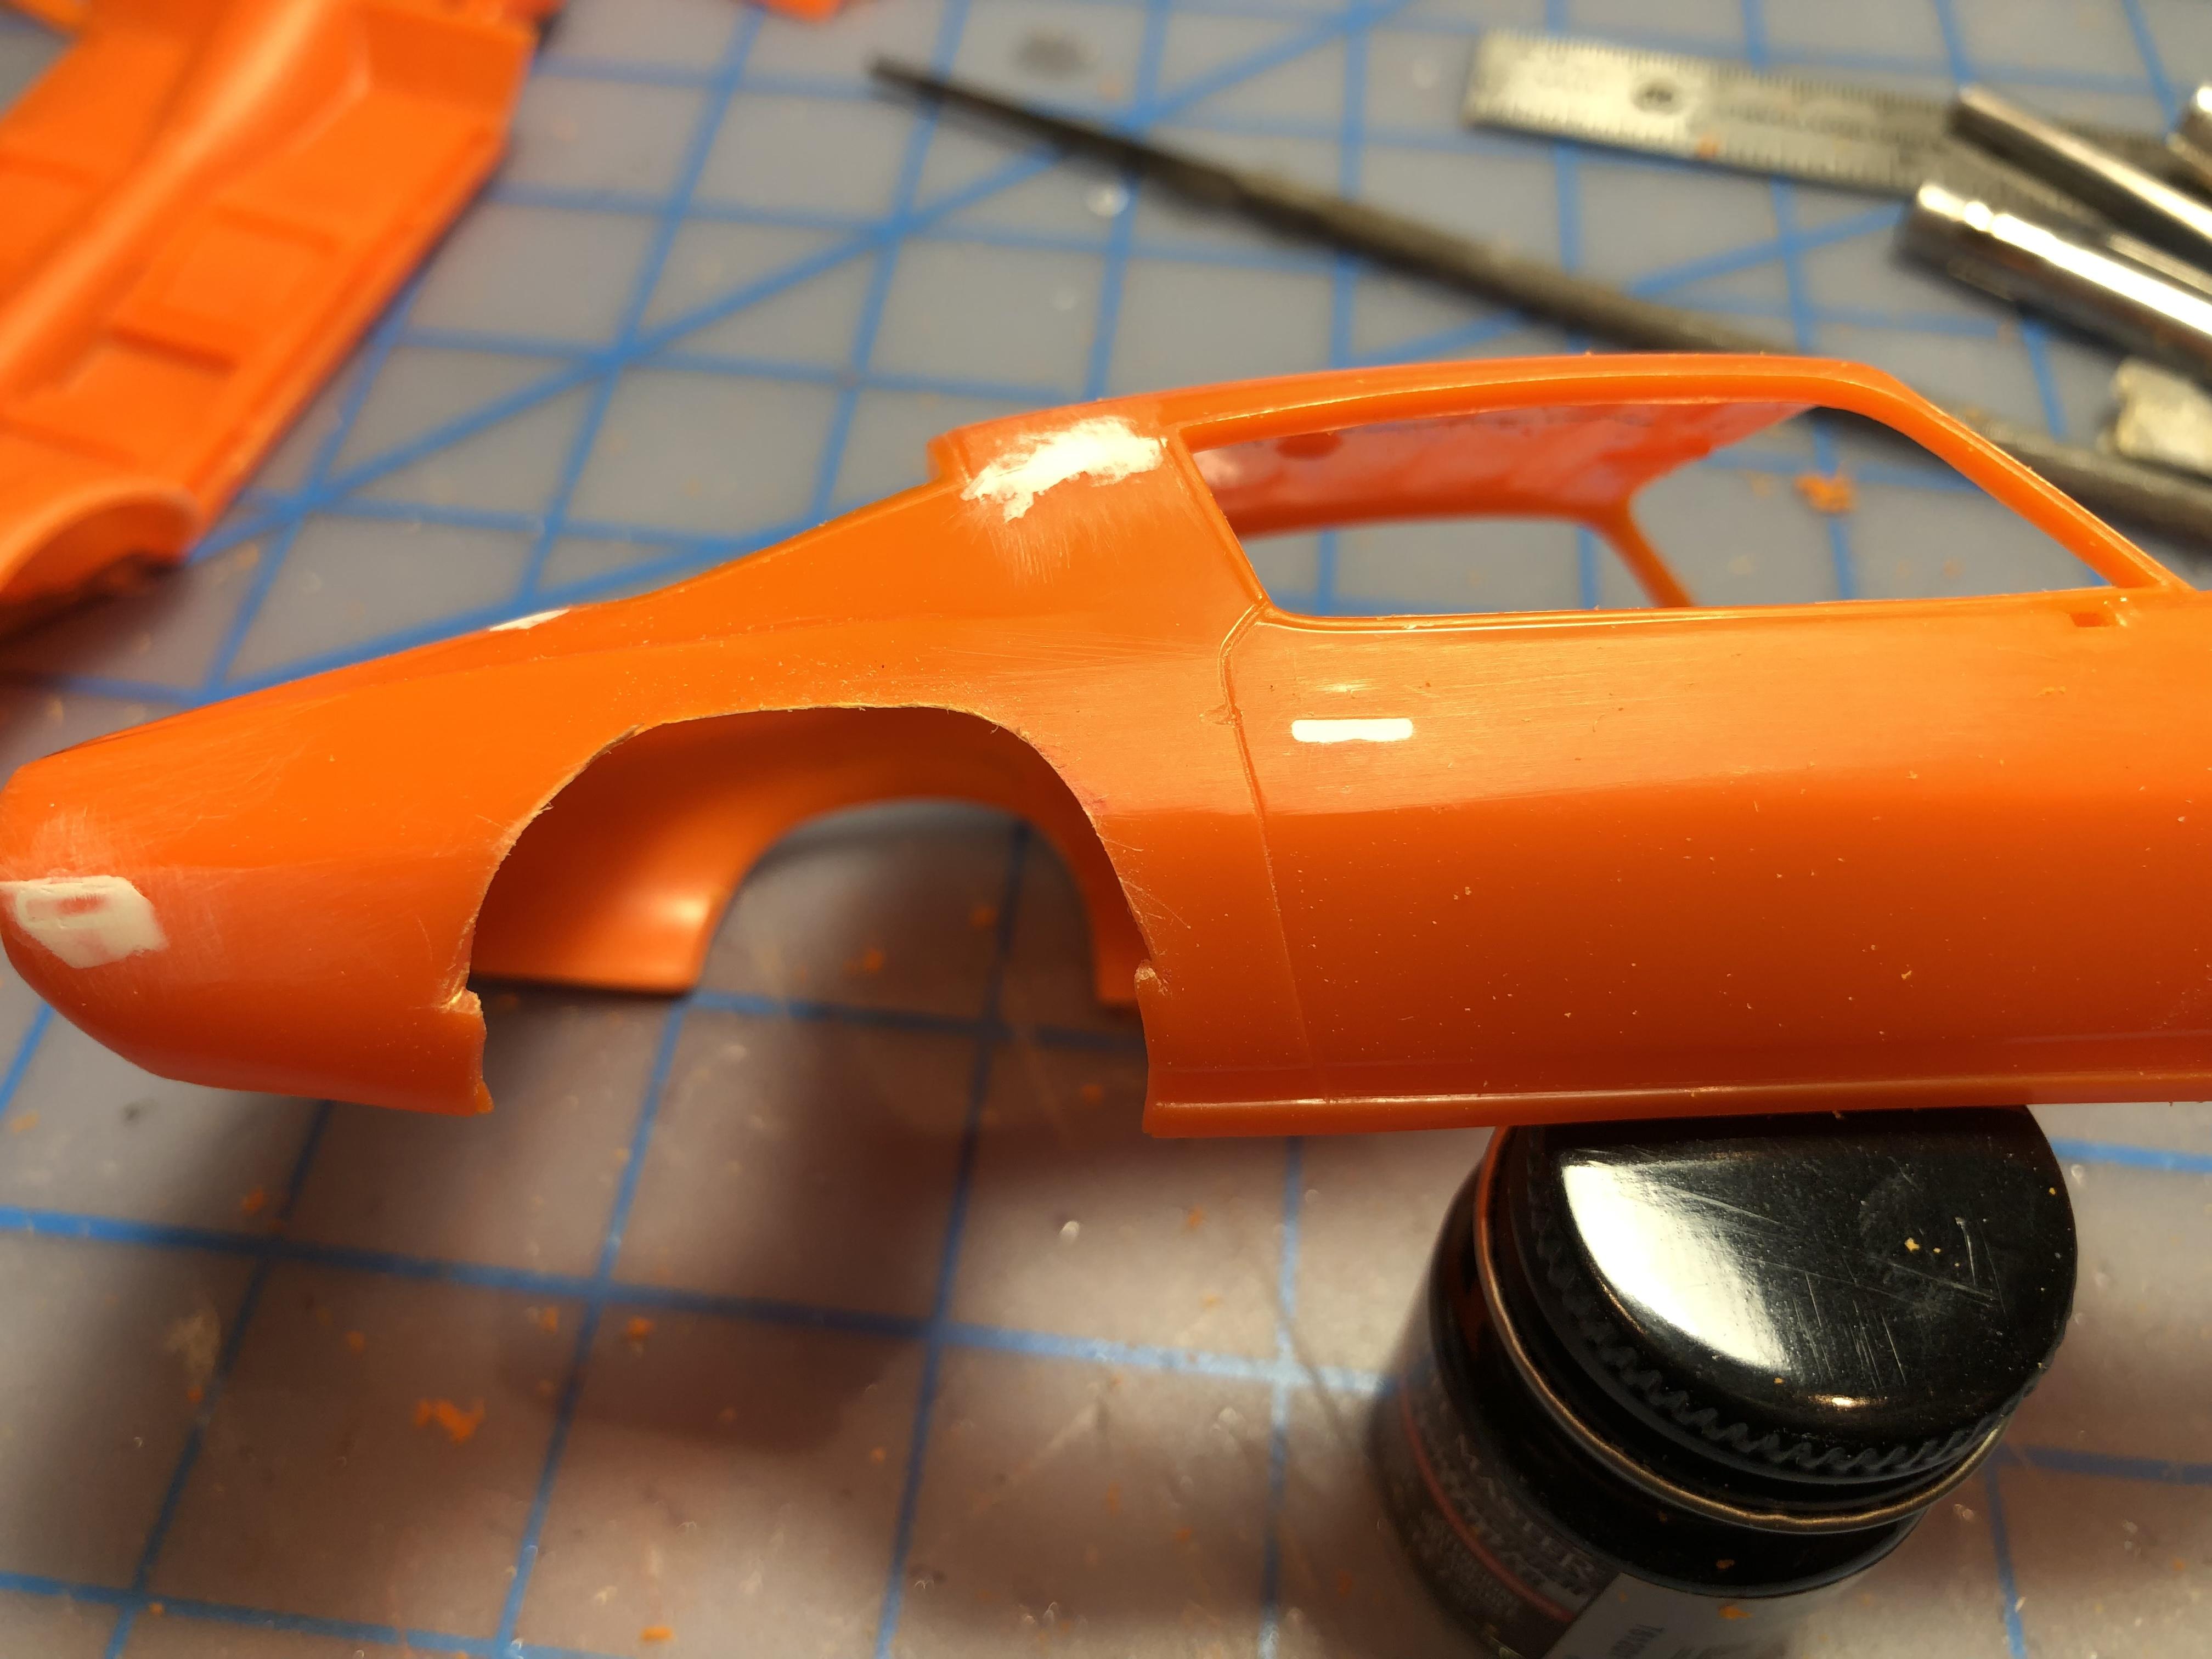
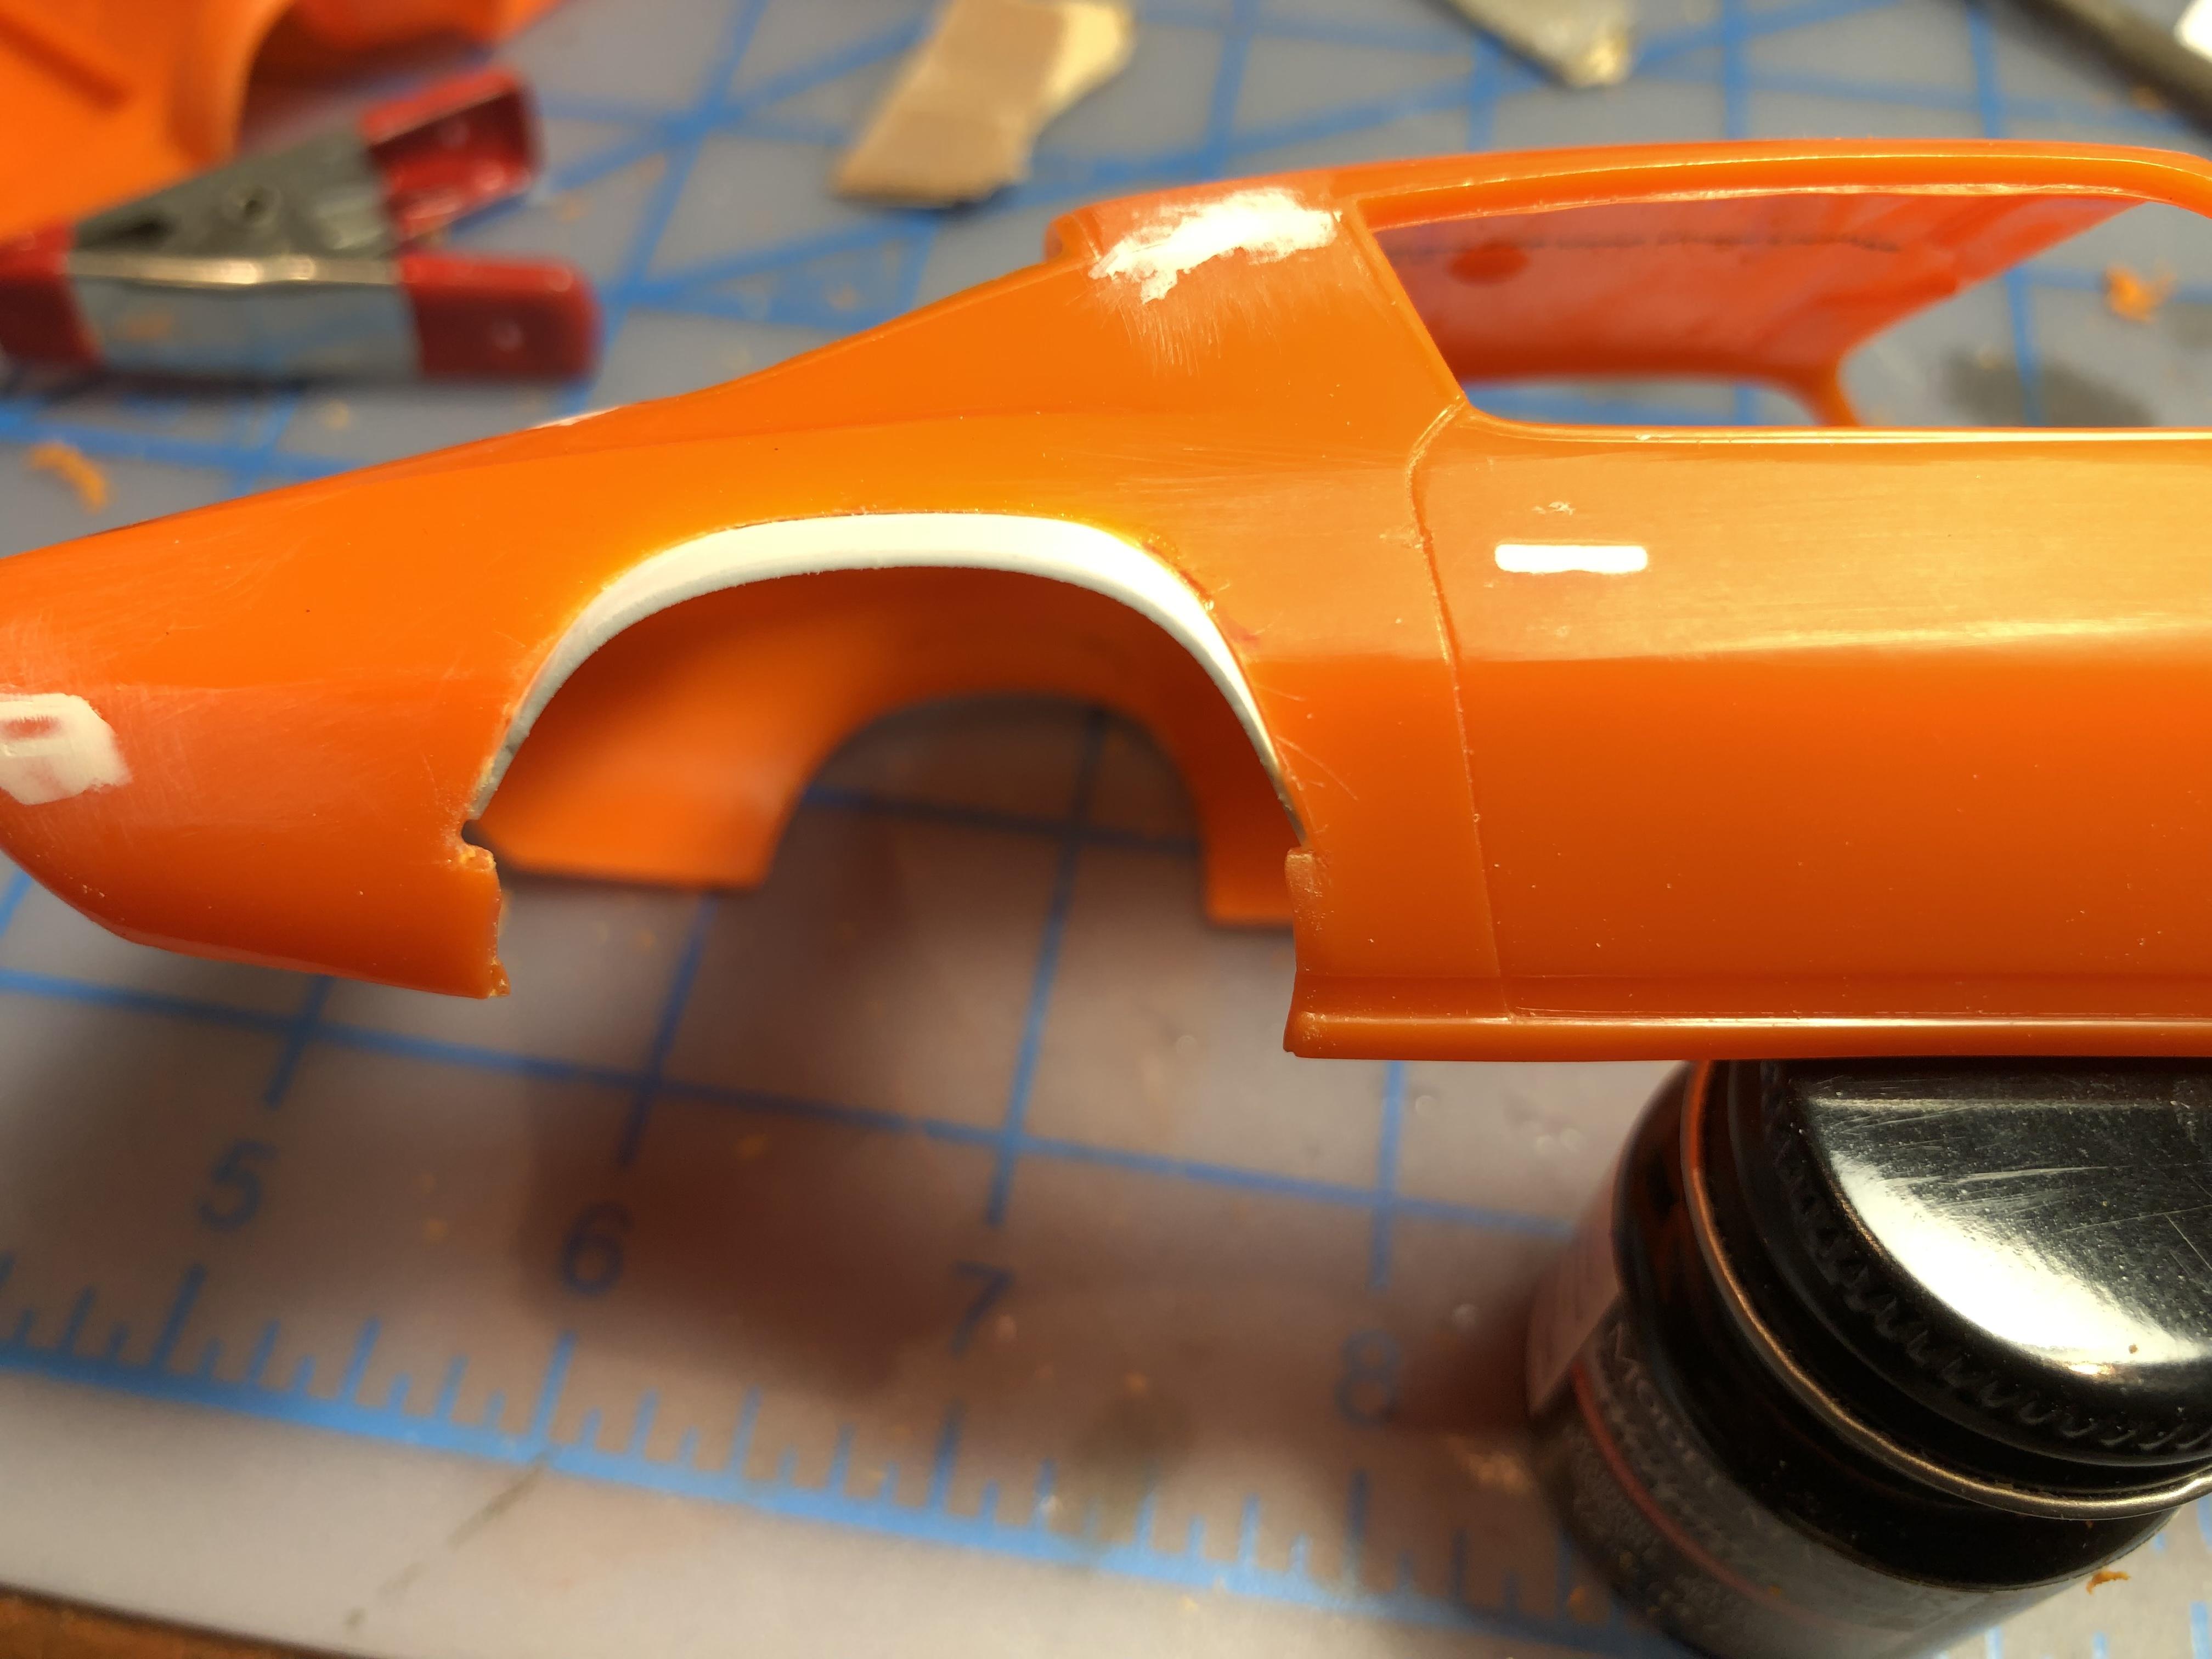
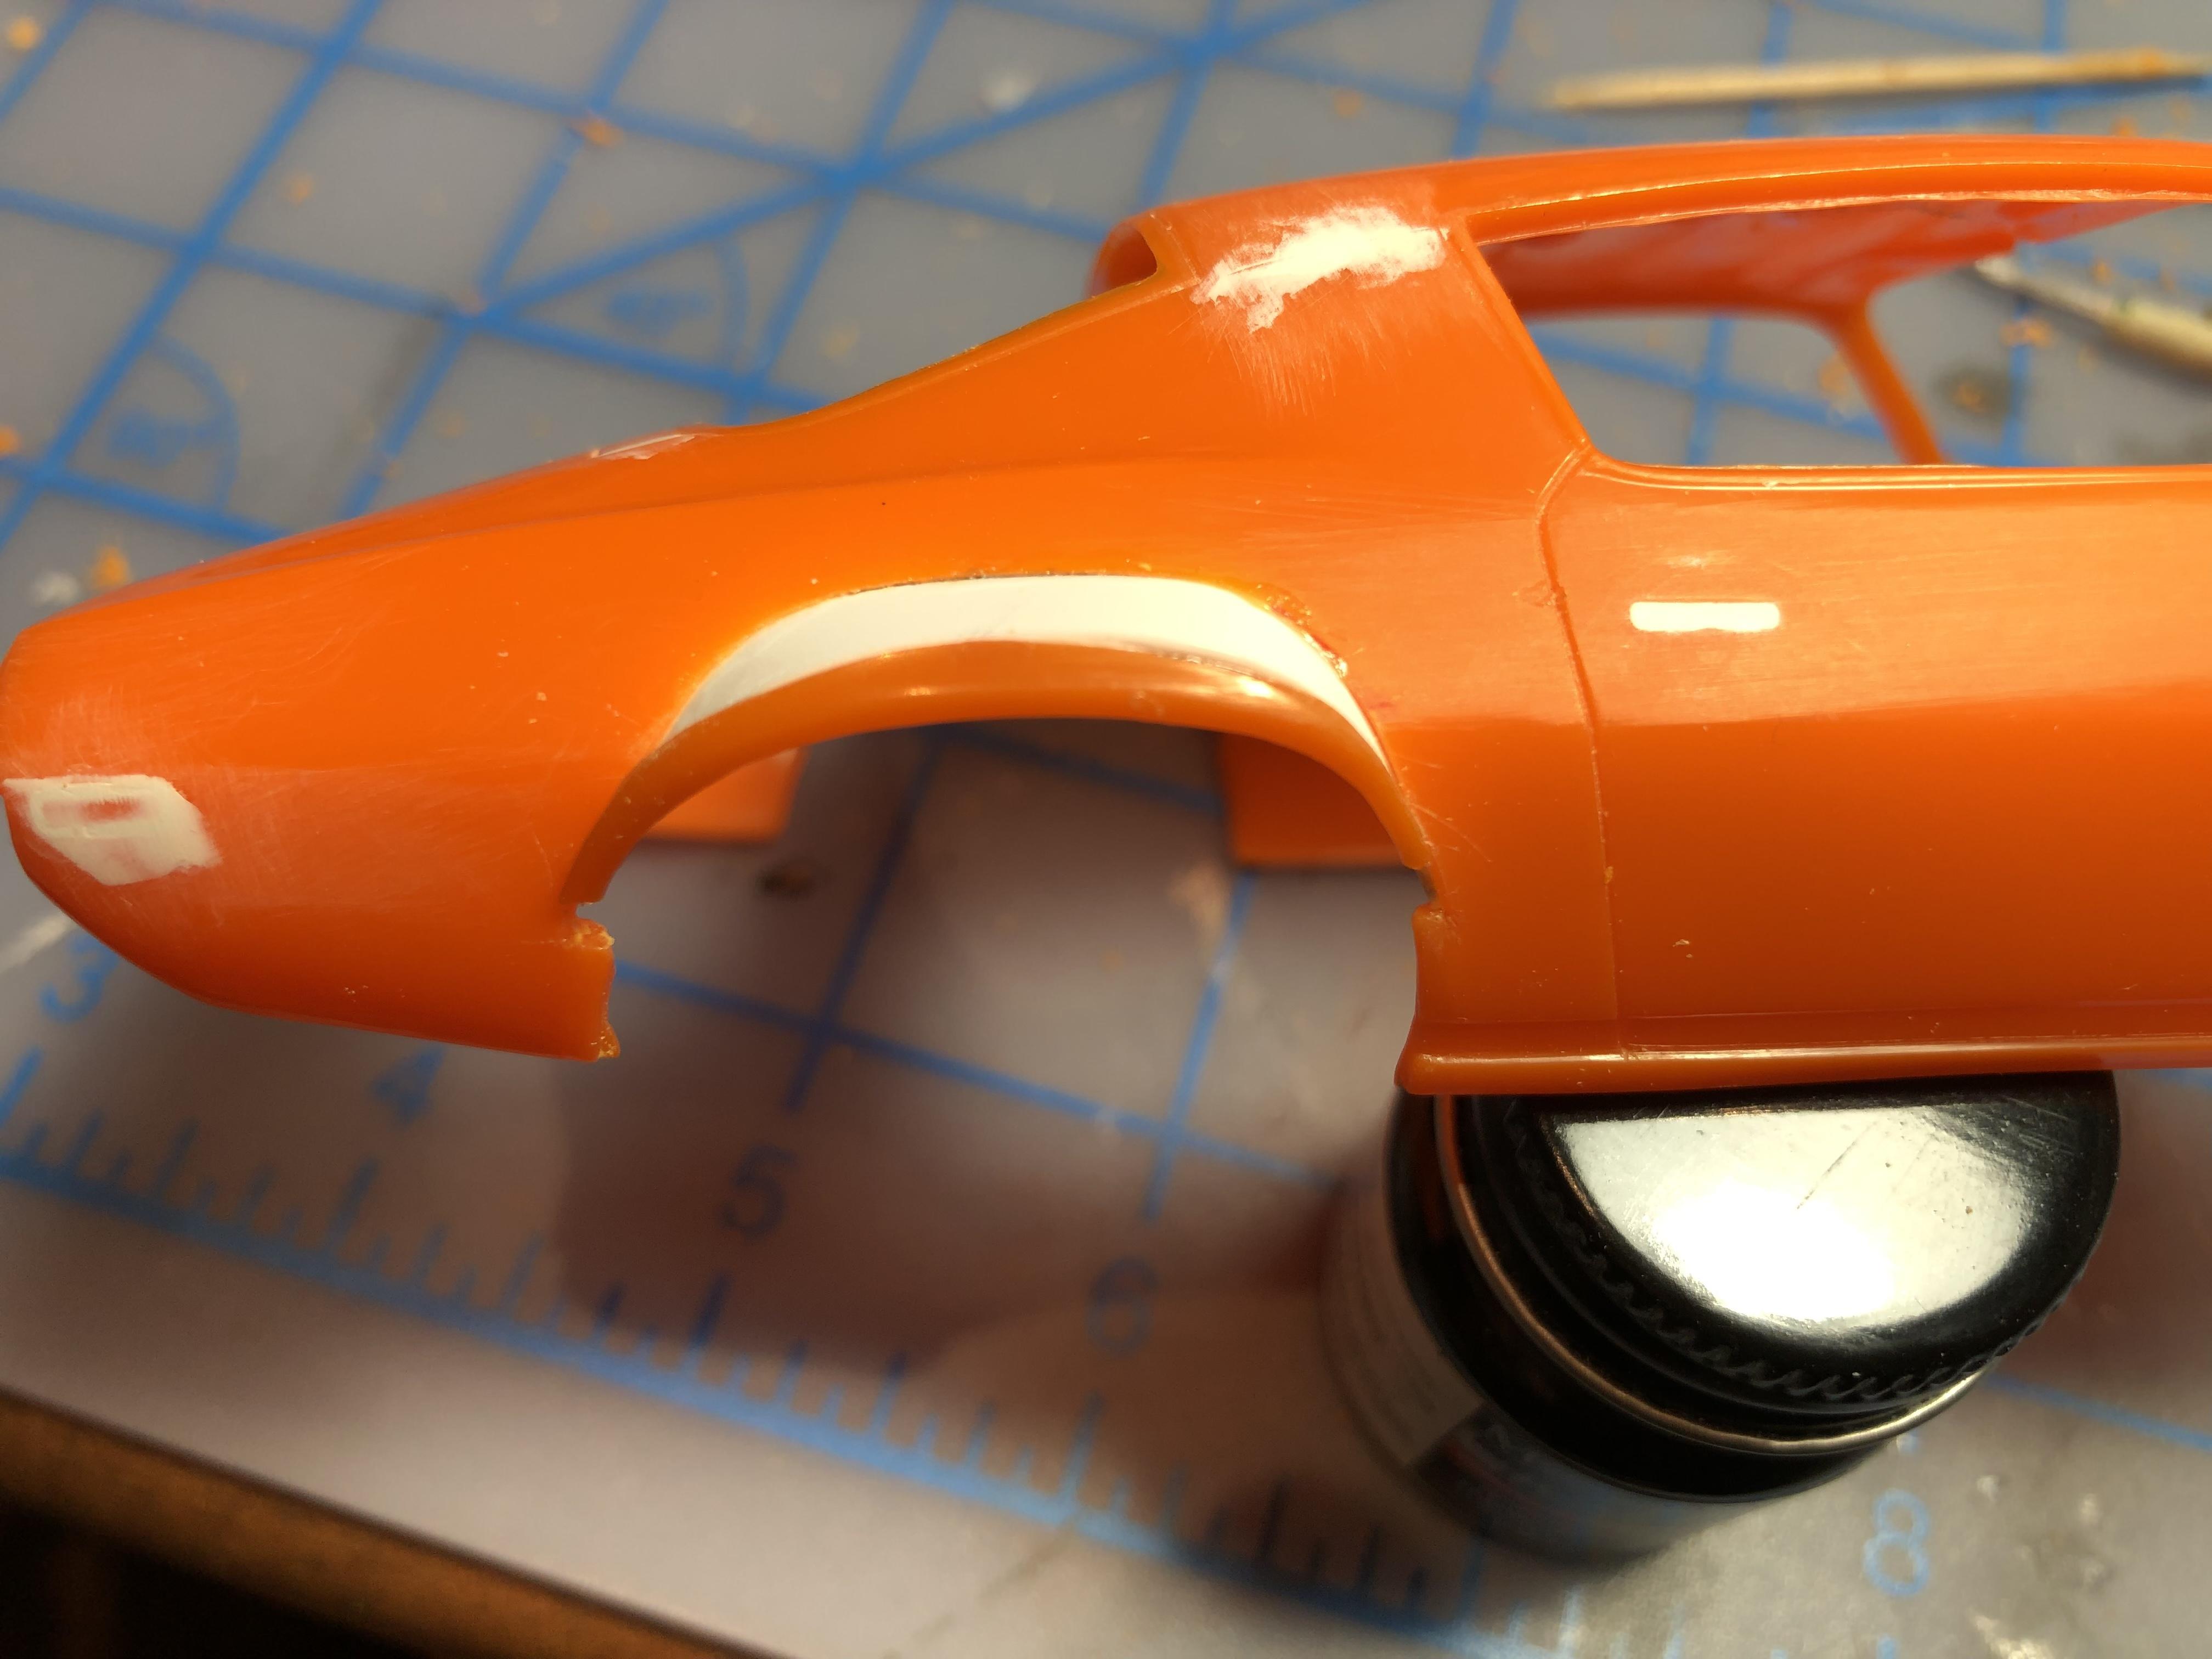
Time to get started… I want to tackle the main bodywork first. Once flares are done I can go about setting ride height and track width. I wasn’t sure how to go about the fender mods until I saw Phil Dauphinee (Phil Daupho) tackle them in a WIP using the same body for a Trans Am race car. I can’t say enough good things about Phil. He is a fantastic builder, does lots for our hobby locally, he is largely responsible for me getting back to the hobby, and he’s just an all ‘round nice guy who is always happy to share his knowledge. Thanks Phil !! My fenders will have a slightly different shape, but the process will be the same. I marked out roughly where the top of new fender opening will be. Pardon the rough Bondo work, that will get cleaned up later… Next I taped around the fender lip as a guide to cut and remove. Scriber was used to remove lip. Then a sanding drum in the Dremel to remove material Sheet styrene cut into strips to create flares Then re-attach fender lips Here you can see that the fenders are raised by about 2 1/2 scale inches at the outer edge, at the body I removed about 5 scale inches. I have since added filler pieces fill that gap. LOTS of clean up and Bondo to go, but it’s a start! Same process up front.. Got a long way to go yet, but feels good to have this one under way. It’s been in my head for about 2 years now. Thanks for having a look, as always all comments welcome. Cheers, Steve
-
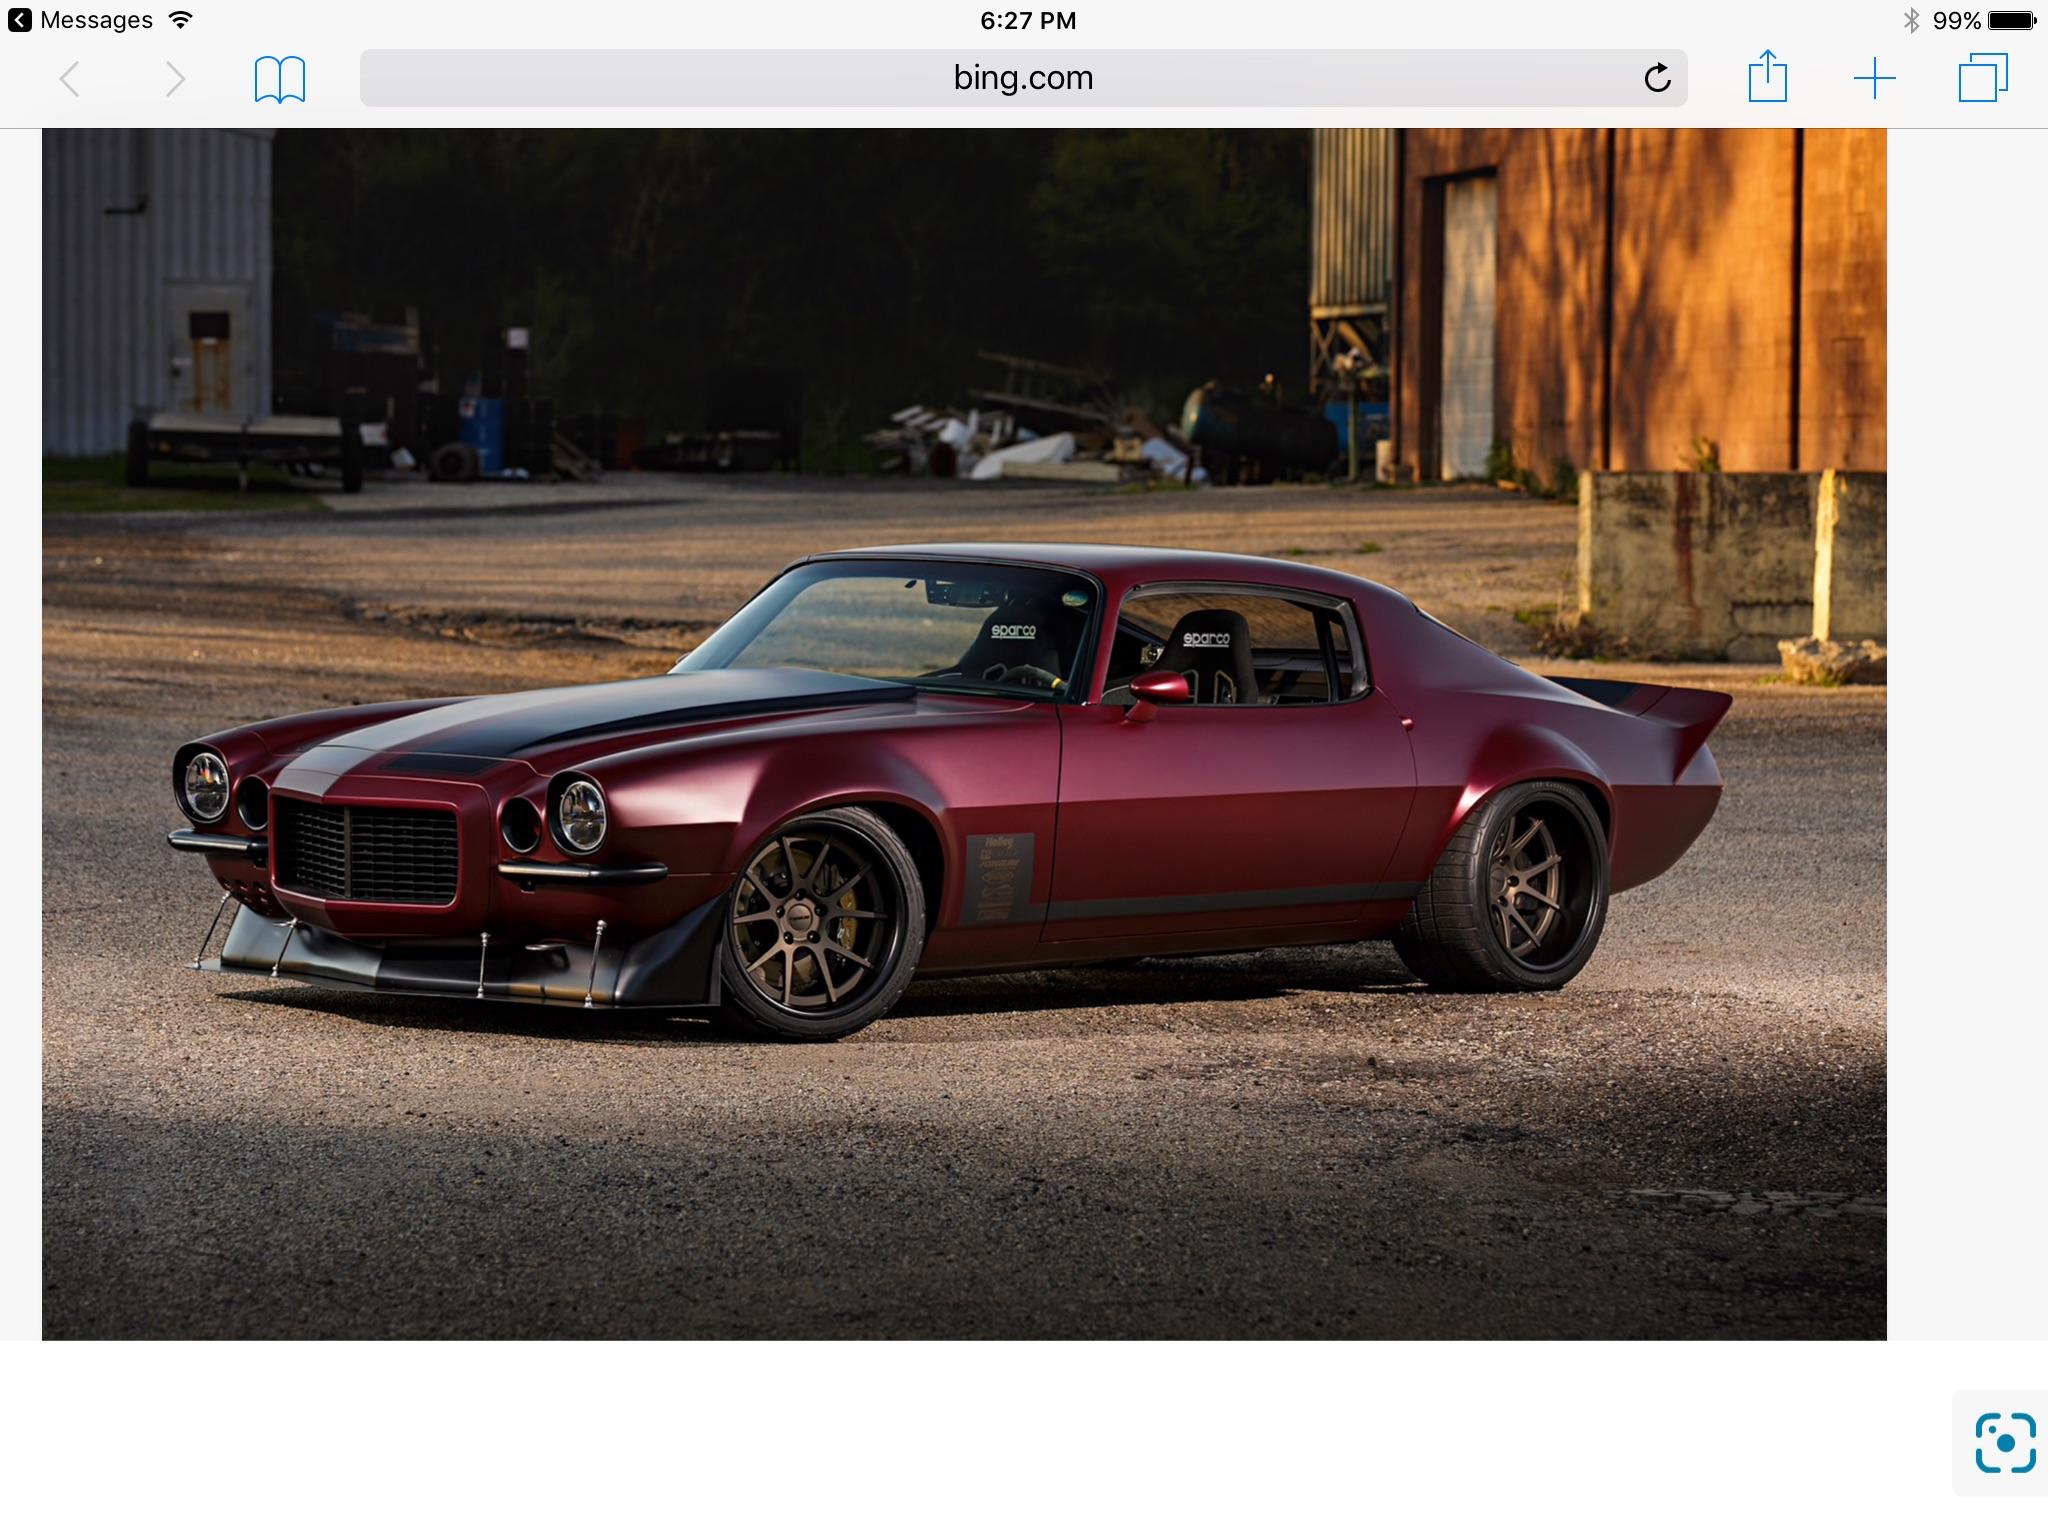
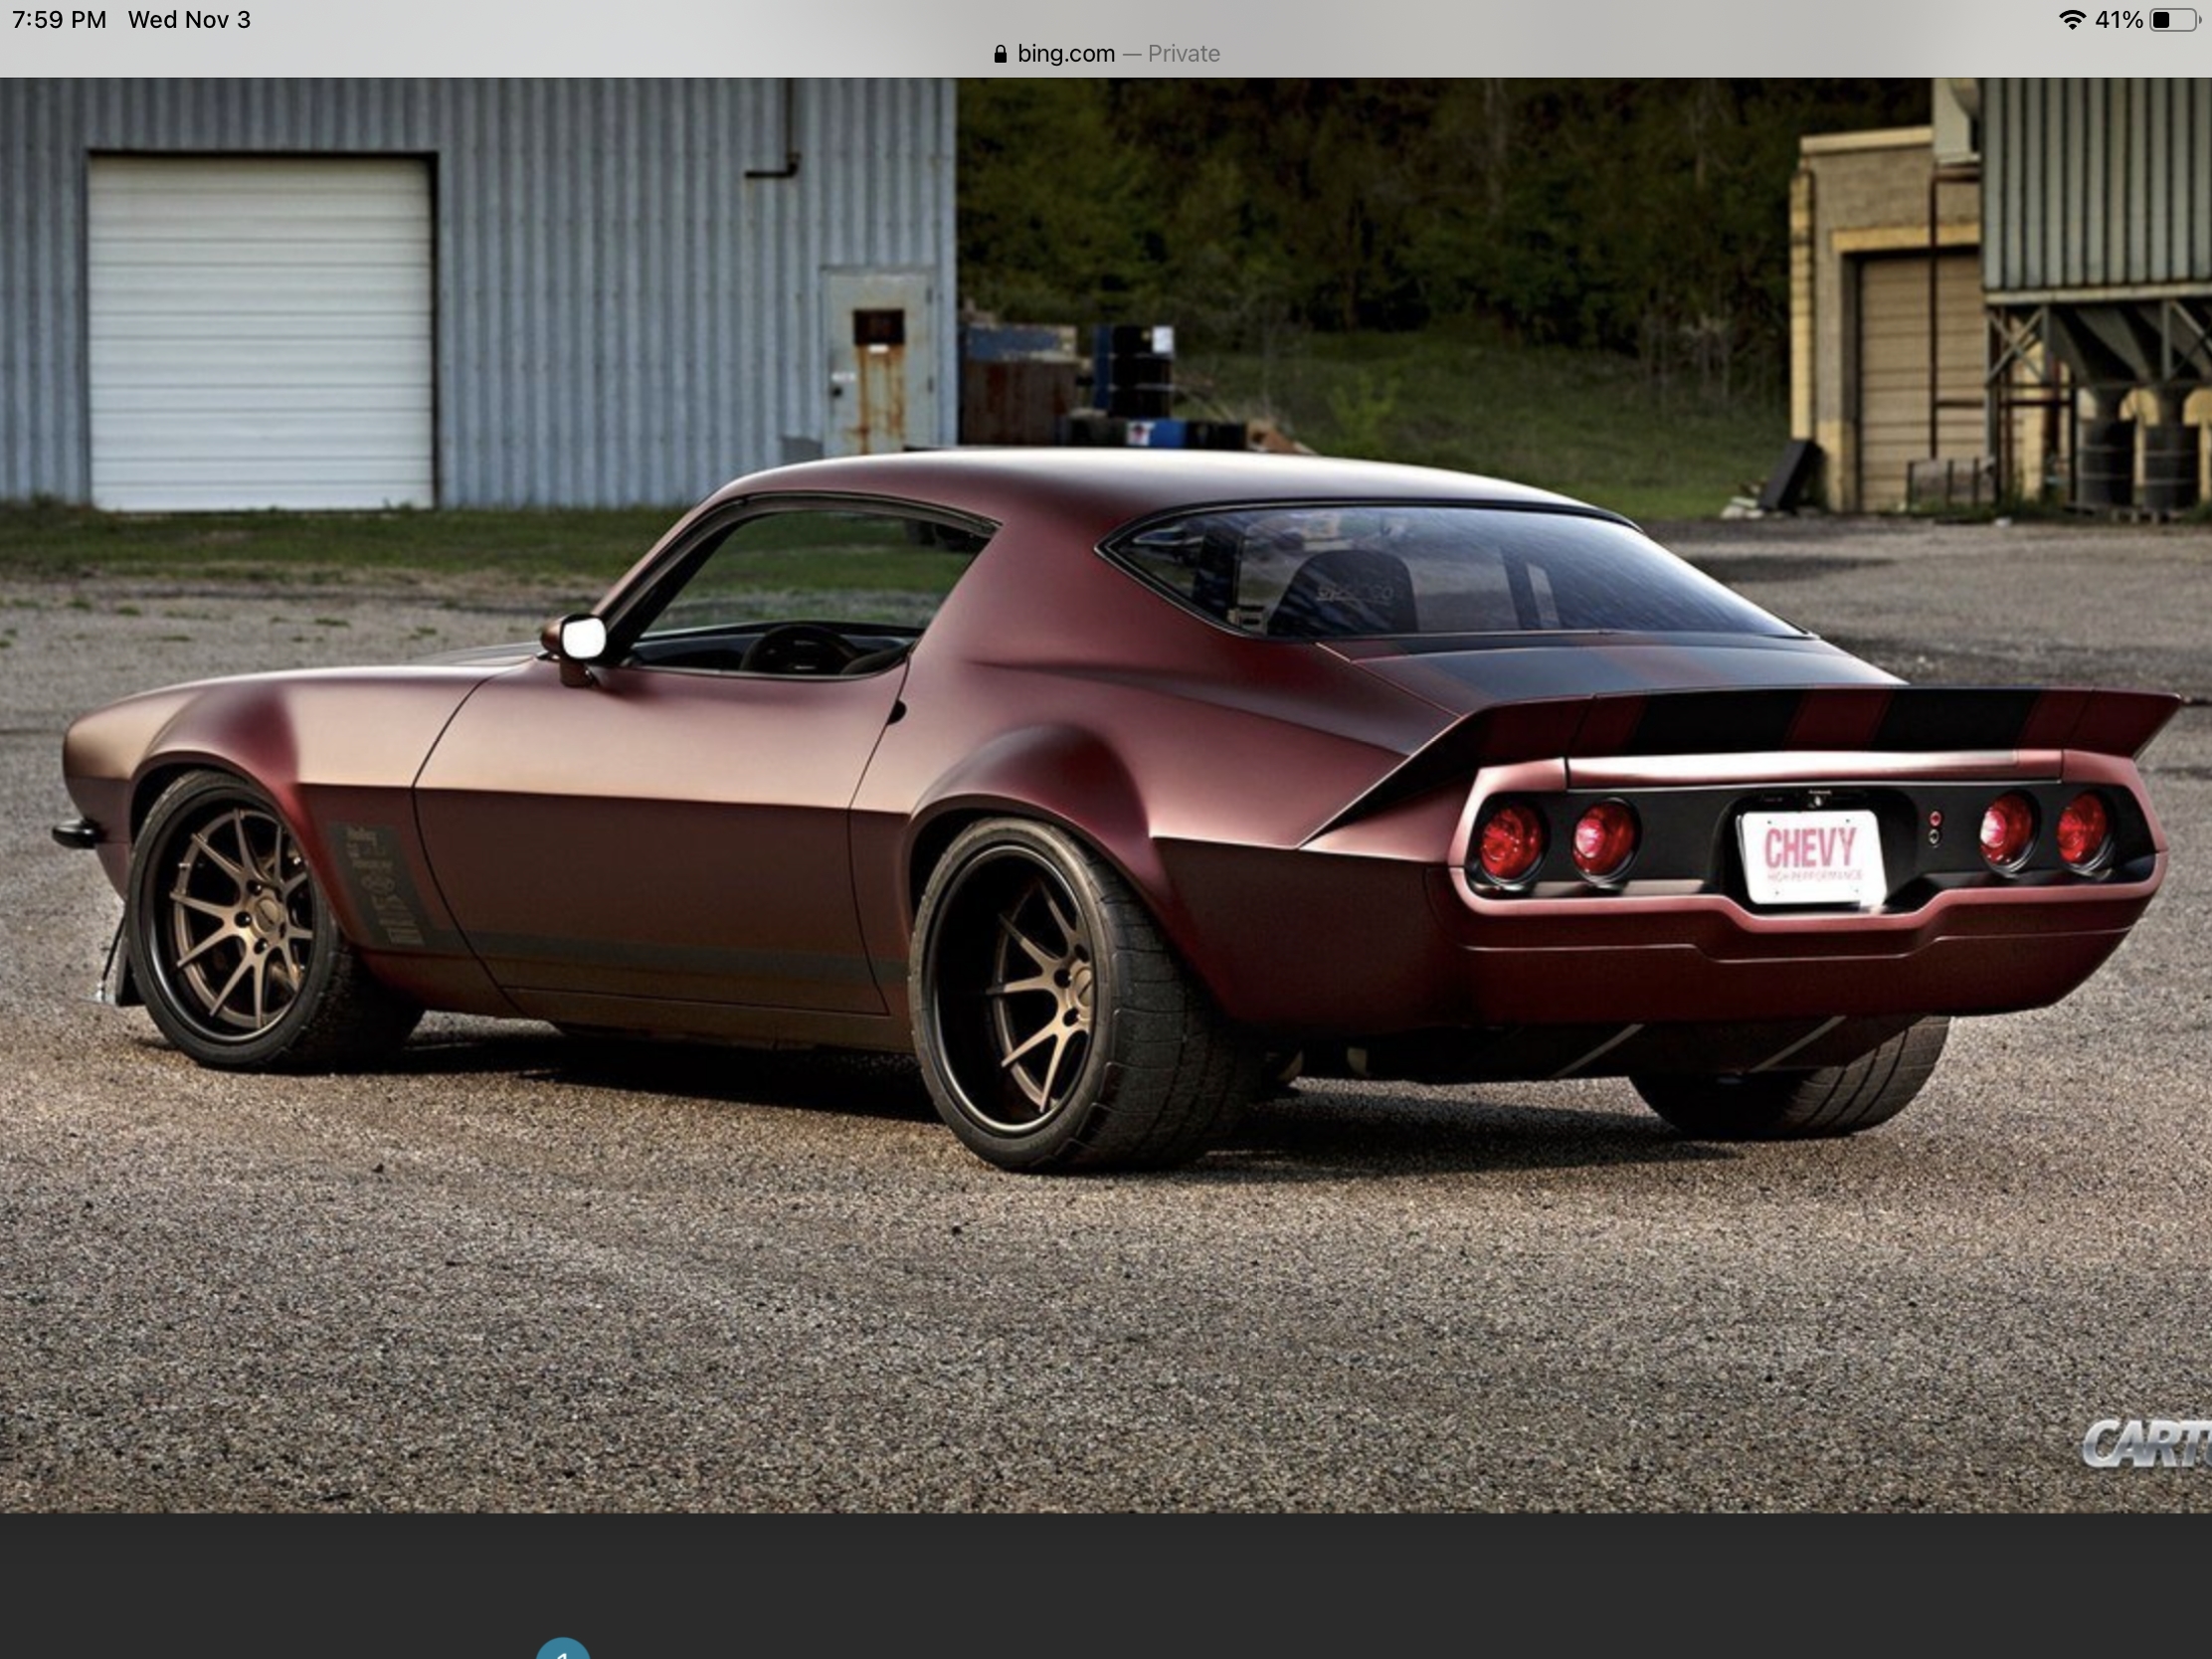
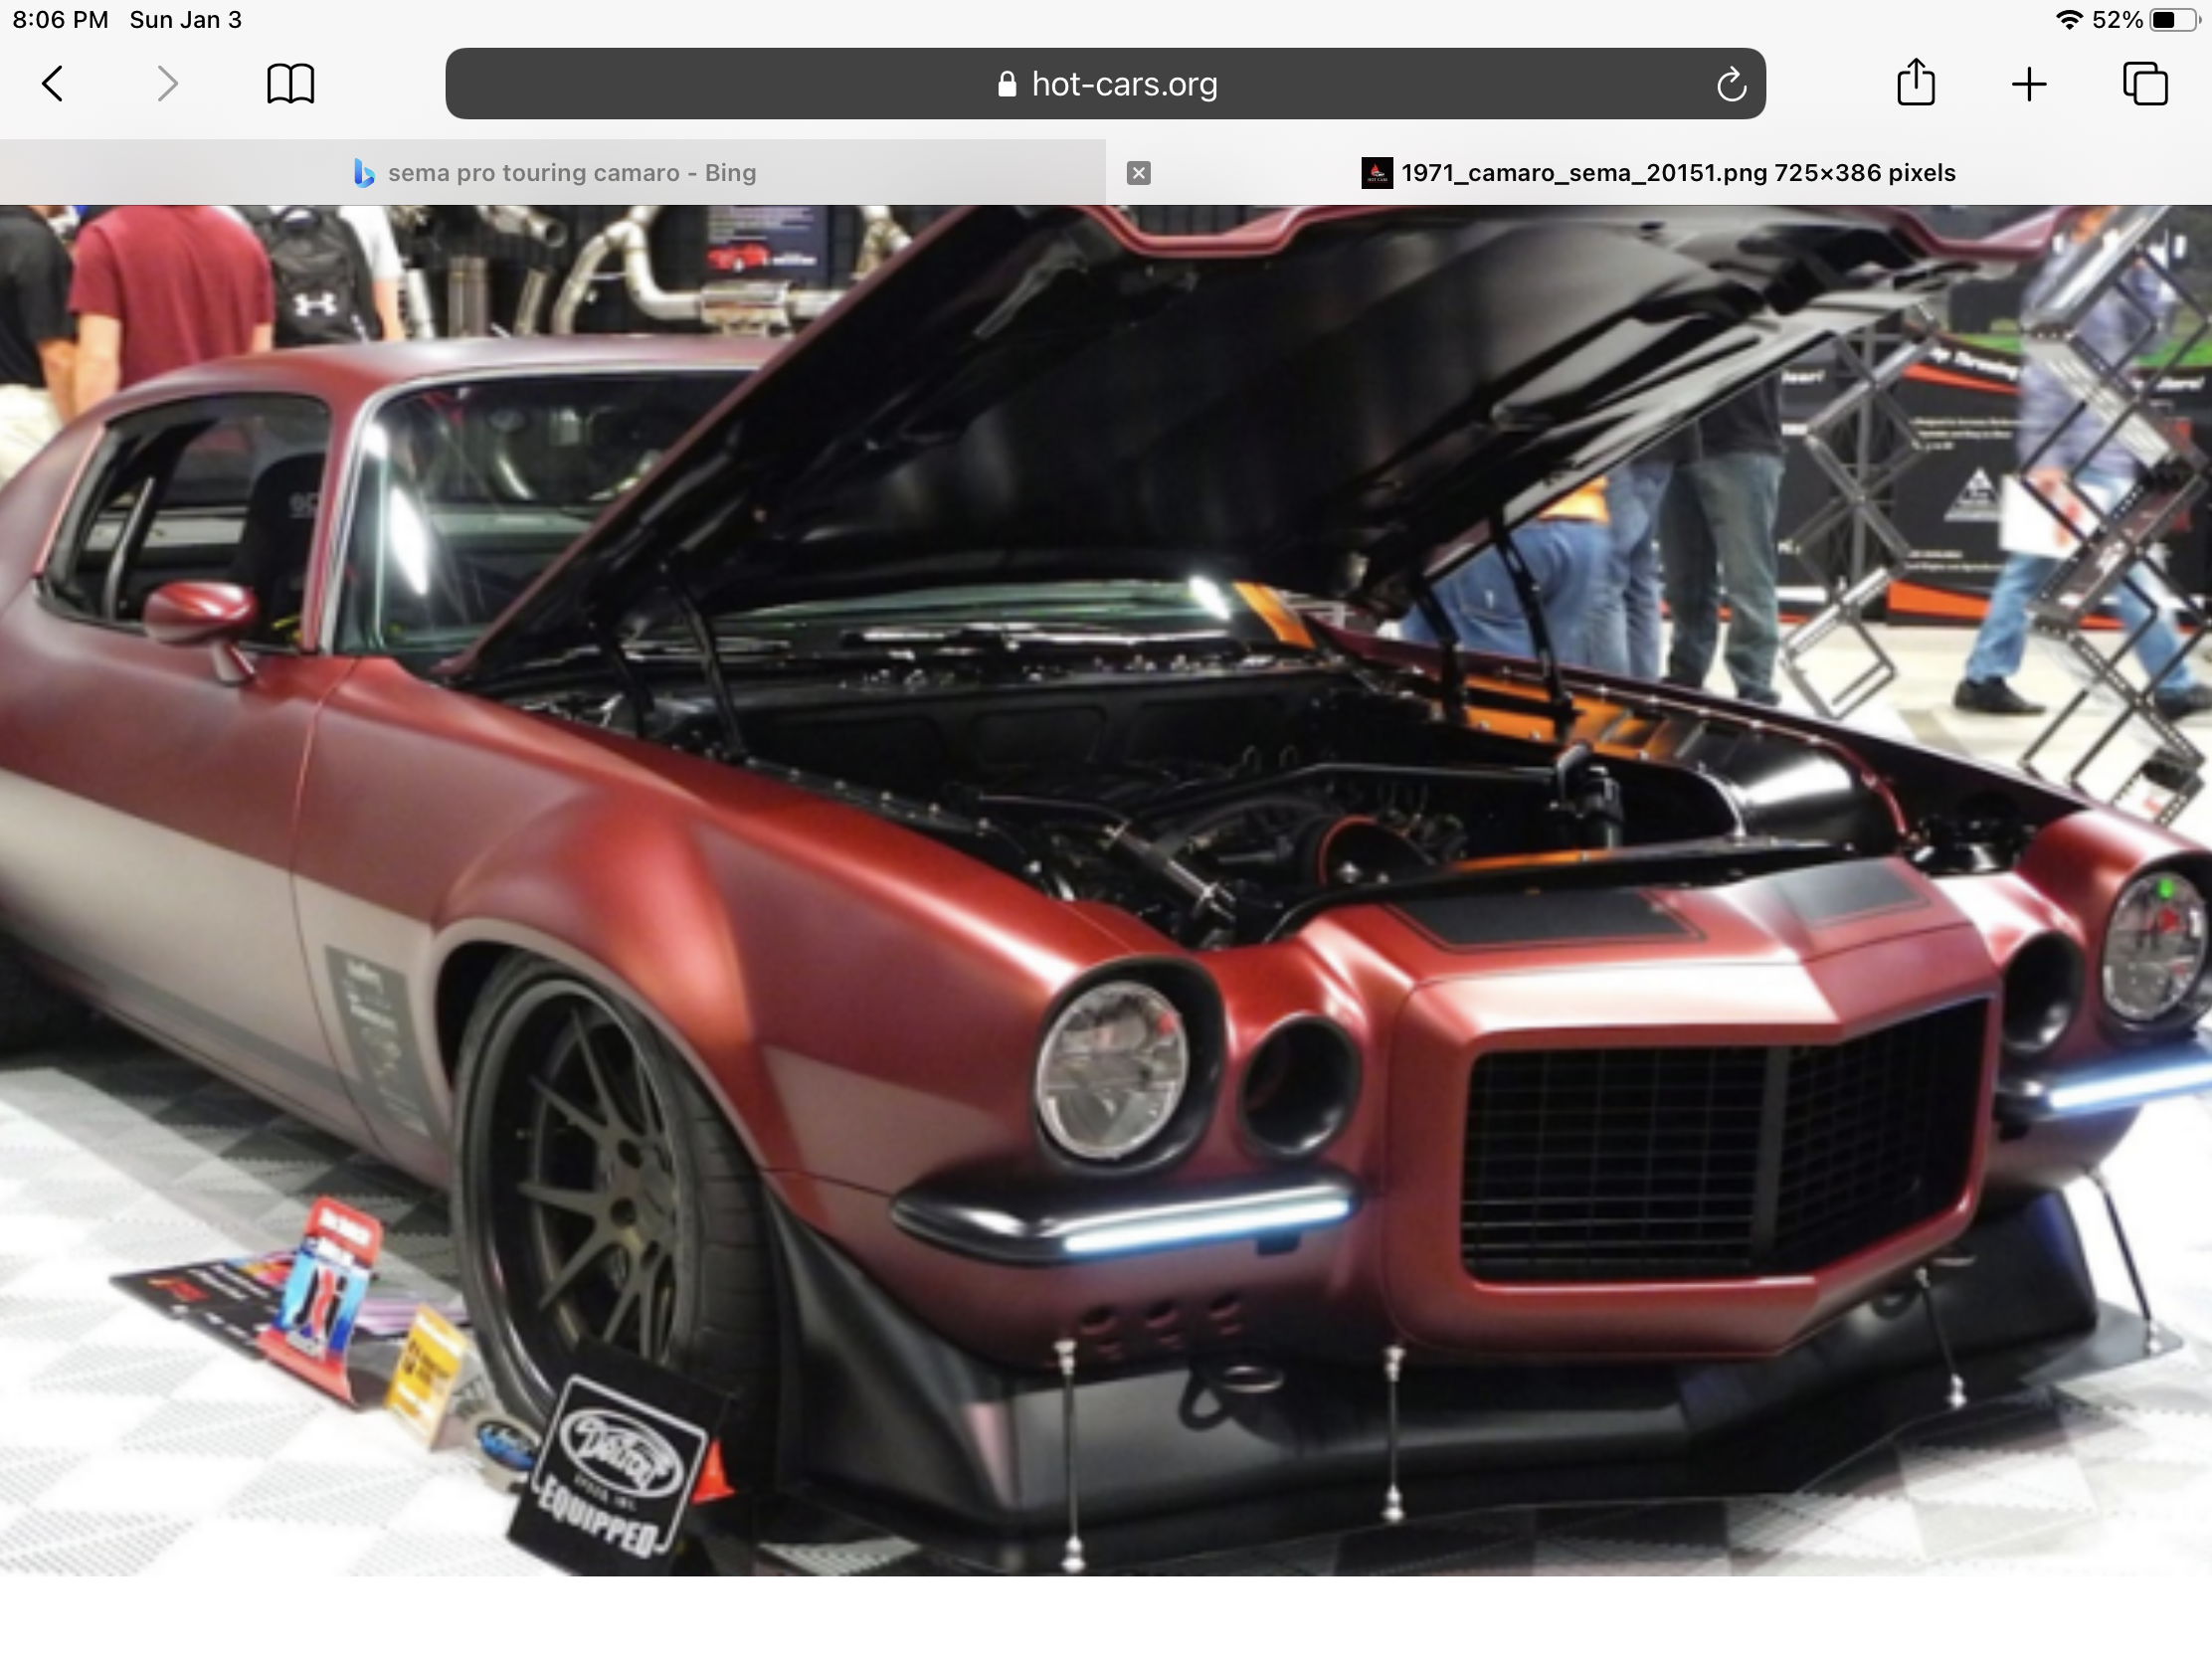
Hi guys, Time for the next build. I’m really liking the pro touring style of cars right now. I still like pro street too of course, and… well anything low. So here’s the inspiration. Dutchboys 71 Camaro built for the 2015 SEMA show. I haven’t done a deep dive on the car, just some images online. I fell in love the second I saw this beast. The colour is absolutely killer. I will not be doing an exact replica, but I intend to capture the overall look of the car. For any of you that saw my 300c build, that was a build to prep for this one. As I understand it, this car set the bar (and raised it) for all pro touring cars in 2015. Some of the mods include air intakes where the turn signals were to cool the brakes. Turn signals are in the front bumpers, not sure yet if I will do that, (still lots of planning and decisions to make) but it’s on my “maybe” list. I am going to replicate the door handles, and the trim will be black, I also intend to do my best to replicate the body colour. I’ve started work on the body and will post some pics of progress tomorrow. Cheers, Steve
-
OMG, that made made me (and my lovely wife) laugh. That’s a good one, I’ll be using that for sure.
-
The Blue Crab
Steve H replied to Nosferatu's topic in Model Trucks: Pickups, Vans, SUVs, Light Commercial
Hi David, this turned out really cool. I remember having a look at the WIP, I need to go back and check what colour you used on the body, looks great. Looks like it would have been a fun build. Steve -
‘64 Chevy shop truck
Steve H replied to Steve H's topic in Model Trucks: Pickups, Vans, SUVs, Light Commercial
Hello Jeremy! You can send me a PM if you like. I built this several years ago, but I would be happy to help in any way I can. Thanks for bringing this one back up, I had forgotten about it! Oops ? -
‘64 Chevy shop truck
Steve H replied to Steve H's topic in Model Trucks: Pickups, Vans, SUVs, Light Commercial
Hi Fellas, I’m a bit embarrassed. I posted this shortly after joining the forum and kinda forgot about. Thank you all very much for the kind words, and my apologies for a VERY late reply. -
1963 Chevy Nova Wagon Street Rod FINISHED 3/20/22
Steve H replied to Dennis Lacy's topic in WIP: Model Cars
Looking good Dennis! I have the same billet gauges but haven’t used them yet, so looking forward to seeing how they look. My next project will be using them, so great timing. All the interior bits look great, the speakers, amps, and sub box really look the part. Keep that pesky squirrel away from the speaker wires!! Can’t wait to see your colour choices. Cheers, Steve -
*1934 Slammer Modified*
Steve H replied to Zippi's topic in WIP: Stock Cars (NASCAR, Super Stock, Late Model, etc.)
Hi Bob, NO FOIL !! yay! Good start so far, I need to get some of the paint you used on the wheels. Not sure if the tubing down south of the border shows metric size too, but if it does, 1mm is approximately 1”. So for a 4” exhaust pipe, 4mm tubing as an example. I’ll be watching… Cheers, Steve -
I have some of those in my work shop and they are BRIGHT! my hobby desk is already lit fairly well, but I would recommend those bulbs to anyone needing more light. The panels are somewhat adjustable too, so you can direct light where you want it.
-
Tamiya TS65 Pearl Clear questions
Steve H replied to bh1701's topic in Model Building Questions and Answers
Hi Bart, I have used pearl clear over several colours including grey primer. The effect is great, and as mentioned above more subtle than metallic. Your best bet is to paint the back of a plastic spoon with your intended colour combo and play with it to get your desired result. Spoon tests are always a good idea. I look forward to seeing your results! Cheers, Steve -
Hi Bob, this turned out great! You nailed the colour combo, the blue with white on the body and blue /white interior look fantastic. I know you had bad luck with the foil, but as others have said, you must have a steady hand cause I can’t tell the foil from Molotow. Nicely done ?? Cheers, Steve
-
Another beautiful build Steve. Very nice mods, those wheels are a great choice. I may have missed it, but what did you use for the flocking? Cheers, Steve
-
Oh ya… that’s cool. Very nice job on the sleeper look, including the colour choice. I’ve thought about doing a NASCAR to street car conversion for years, this is great inspiration. Very nicely done Anthony. Cheers, Steve
-
Hi Joe, thank you for the enthusiastic response! The WIP didn’t cover all the issues I had with this beast, but it fought me most of the way. I was glad to park it in the display case. In the end, I achieved the look I wanted, but the paint issue that followed was extremely frustrating. Thanks for checking in sir and stay tuned, next WIP will start soon! Cheers, Steve
-
Thank you Pat!
-
Thank you Jeremy. Glad you like it. Hi Bob. I appreciate the kind words sir. Thanks Thomas, as I mentioned at the top, much credit to Jeff Bulmer (got nitro) for the inspiration. He did a similar build which is absolutely beautiful. I believe his was a ‘72 Olds, I used the same approach as him for the body mods. Hi Rob, this one does have a certain “truck like” look to it doesn’t it. I very much appreciate your comments. Dropping it in the weeds gave it that extra bit of attitude. Thanks for having a look!
-
Hello Rastislav, these are extremely well done! What a fantastic idea. Well done! Cheers, Steve
-
Thanks Pat. I haven’t seen that one.
-
This turned really nice Dan. I love seeing unusual builds like this whether they are stock or custom. Thanks for sharing sir! Cheers, Steve
-
This thing is a beast! Very nicely done Pat. Love the patina on the paint. What wheels are those please?
-
Anton, for lowering the body over the chassis, I have often sectioned the bottom of the interior door panels, then reattached them to the interior floor. It’s a bit of work, but yields the low stance. That area is usually hard to see once a kit is built. Of course it would depend on the shape/detail of the door panels, all kit bashes have their nuances. I know you have the talent, so whichever way you go it will be sweet. KEEP IT LOW!! Cheers, Steve
-
Italeri Opel Blitz 1/24 scale
Steve H replied to happy grumpy's topic in Model Trucks: Big Rigs and Heavy Equipment
Hi Mario, another fantastic build sir. Everything looks fantastic, but, tell me about the “tarp” over the back. That is one of the most realistic/scale “fabric” representations I have seen, very convincing. -
40 Dodge pick-up
Steve H replied to Pat Minarick's topic in Model Trucks: Pickups, Vans, SUVs, Light Commercial
Hi Pat, very cool looking truck! The patina is spot on. I would also like to know the source for this kit, it’s a beauty. Cheers, Steve -
Hi Kurt! I had missed this build first time around. I will spend some time this weekend having a close look thru the thread. Your builds are always full of creative ideas. Hope you are well sir, look forward to you being “active” again. Cheers, Steve