Pierre Rivard
-
Posts
2,579 -
Joined
-
Last visited
Content Type
Profiles
Forums
Events
Gallery
Everything posted by Pierre Rivard
-
Chaparral 2D
Pierre Rivard replied to Pierre Rivard's topic in WIP: Other Racing: Road Racing, Land Speed Racers
...I don't understand why the white bracket, box, whatever is ahead instead of over the cooler... -
Chaparral 2D
Pierre Rivard replied to Pierre Rivard's topic in WIP: Other Racing: Road Racing, Land Speed Racers
I was gonna do it without the oil cooler but you leave me no choice. So much pressure. Dave & Steve plz post close up pics of your oil cooler solution....might as well copy from the masters! ? -
Thanks fellows. Apart from the nose decal issue I am very happy. Moving on to interior fabrication.
-
Ferrari 312T4
Pierre Rivard replied to Belugawrx's topic in WIP: Other Racing: Road Racing, Land Speed Racers
Amazing, your engine looks so much like the real one. That's a lot of small stuff all piled up in such a small space. Wonderfully done sir! -
You are a brave man Rich. Painting chrome, nearly impossible. Clear over chrome paint, even more risky yet unavoidable. Somehow you pulled it off. I very much enjoy watching this build knowing it is one I will never dare to try. I salute you sir!
-
Pennzoil Porsche 911 GT1
Pierre Rivard replied to Pierre Rivard's topic in Other Racing: Road Racing, Salt Flat Racers
Yes I did...but it was quite the challenge. Flat yellow with a bit of mica added to give it a bit of pop. My mistake was in mixing up a light yellow primer underneath. Wherever I got primer cut throughs in prep showed through the base color because of the very low hiding power. I worked my way through...and learned a few things... -
I second your comment about GSW. I tried their chrome and it looks spectacular but you can't touch it. Alcohol based.
-
Chaparral 2D
Pierre Rivard replied to Pierre Rivard's topic in WIP: Other Racing: Road Racing, Land Speed Racers
Thanks. They are a 2004 release and look good but you never know. -
Chaparral 2D
Pierre Rivard replied to Pierre Rivard's topic in WIP: Other Racing: Road Racing, Land Speed Racers
Wove Dave, you have set the bar quite high. -
Not finished with my current project but this one keeps whispering in my ear.... I'm sure I can handle this one as a side project, with a staggering part count of... 36! Simple curbside kit but the body looks fabulous, the tires are surprisingly good and the decals look to be in good shape. If possible I'd like to do something better with the wheels and the very visible velocity stacks. However the credit card is still in embargo so I'll see what can be done with spares.

-
Yet another, the tenth!
Pierre Rivard replied to PatW's topic in Other Racing: Road Racing, Salt Flat Racers
It's beautiful Pat. Is it curbside? If not pop the hood please? Sorry, the bonnet! ? -
1963 Lola GT
Pierre Rivard replied to Gramps46's topic in WIP: Other Racing: Road Racing, Land Speed Racers
Yup, that transporter is definitely one of my all time favorite builds. Simply fabulous. Now Mr. McNutt back to the Lola please? -
Still a long way to go sir. I still need to do all the exterior glass with that delicate edge painting, plus all the exterior trim bits and all of the interior with race hardware mods. For now I have completed decals and Future seal coat. I made a mess of the nose number. The white round decal would not conform to the hood bump so I removed it but a part got stuck and was impossible to remove. So I decided to cover it with one from a Gofer sheet and disaster struck again, same problem... so anyway I fixed it as best as I could. Looks ok in pictures but it's bumpy. Bummer...
-
Wow, wonderful imagination and perfectly crafted model. I agree with you that the original car was quite beautiful and stretching the front clip further optimizes it's proportions. A beautiful scale model in so many ways. Congratulations Sasaki-san
-
MFH Ferrari 333SP 1/12
Pierre Rivard replied to 2whl's topic in WIP: Other Racing: Road Racing, Land Speed Racers
Beautiful work Paul. You did a slight rub of the wheel edges right? Nice touch. Looks like Mr Smith is getting a little nervous looking at your pace of work...? -
Beautiful build Thomas. It must have been quite the "decal" challenge. I'm sure you felt pretty "wired" after that. I love the diorama you built for your photo setting. It's beautifully crafted yet keeps the car at center stage. Bravo!
-
1963 Lola GT
Pierre Rivard replied to Gramps46's topic in WIP: Other Racing: Road Racing, Land Speed Racers
Just curious Gary, was there multiple Bartoletti transporters or just the one up here being the same as the Cobra and Ferrari teams, just different periods? Going back to the Lola, will the engine be visible through the rear glass or is there a spare tire blocking the view? -
Curtis Turner 56 Ford
Pierre Rivard replied to raisin27's topic in WIP: Stock Cars (NASCAR, Super Stock, Late Model, etc.)
That's a beautiful build. The body colors and trim look extra crisp. This should be a great model. -
Nope, interior is next, gotta add roll bar, fuel tank, spare tire etc...and it won't be red.
-
Thanks...I guess. I took the easy way out. If it was you we would be looking at lovingly crafted brass A arms.
-
Fugimi Lamborghini Countache 5000 qv: WIP
Pierre Rivard replied to David G.'s topic in WIP: Model Cars
This is a great build David. You are giving me the itch to acquire a Countach kit. After the beautifully fluid Miura, Lambo stepped up with a beautifully outrageous design. Following your build with great interest. Thank you for sharing your work. -
Thanks Bruce. Looking at the pics I see a few spots that could use a bit more weathering but it's pretty much done.
-
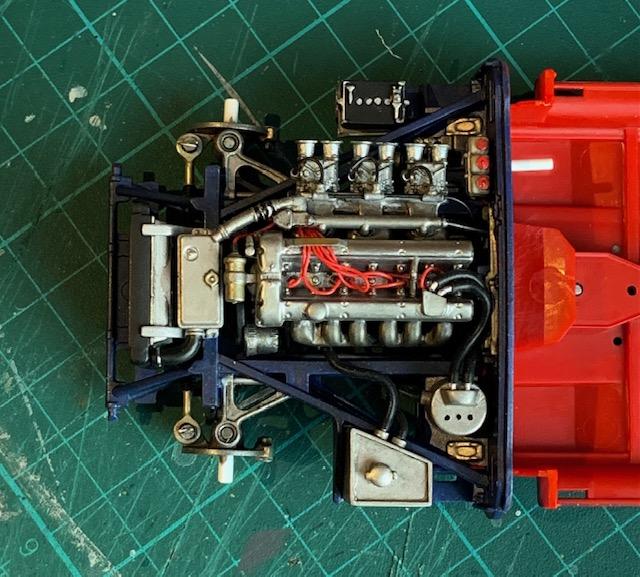
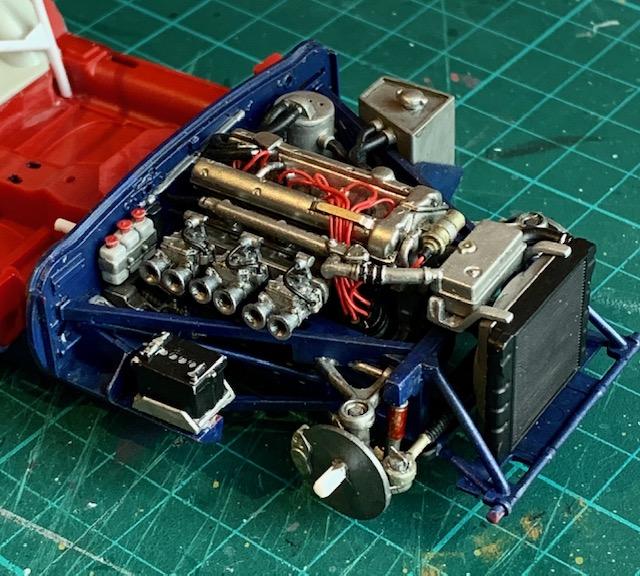
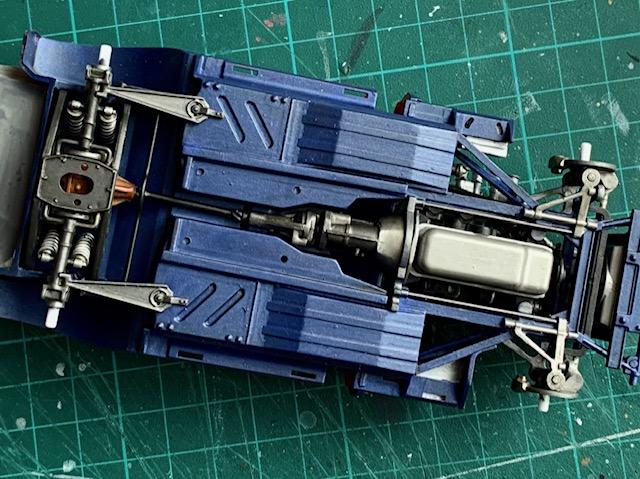
Chassis (minus exhaust) is completed. Engine installed and plumbed. No construction pix of underside because I basically built as is. Some mild weathering added. I'll do the exhaust at the very end with mods to remove mufflers.
-
Wow, that diff cooler and window net are so nice. Superb craftsmanship.
-
1985 Waltrip Budweiser Chevy
Pierre Rivard replied to Wakefan77's topic in Stock Cars (NASCAR, Super Stock, Late Model, etc.)
Super build Randy. The way you built and photographed it make it look so real. If I had built it for sure I would have "forgotten" the pinstripes...?