alan barton
-
Posts
2,105 -
Joined
-
Last visited
Content Type
Profiles
Forums
Events
Gallery
Everything posted by alan barton
-
Yep, this one gets better every post. Like it a lot. Colour choice, wheel choice, the whole vision is working for me. A very contemporary custom using very old components. Cheers Alan
-
Down memory lane for fun
alan barton replied to John1955's topic in General Automotive Talk (Trucks and Cars)
Yeah, I'm with you Snake. Not to say that blowing one up wouldn't have been great fun but money was hard to come by when I was a kid and it usually took a month or more to save up for a kit , or paint and glue. To this day I am still working with parts that I got back in primary school or high school, so it must have paid off. I think about the most destructive thing I ever did as a kid was throw rocks at bottles at the rubbish tip when we accompanied Dad to dump garden rubbish or whatever. But like I said, it sounds like fun. Maybe if I found a totally destroyed, glued bombed, paint burned monstrosity at a yard, I could contemplate it but fireworks are banned in Australia so it is a moot point anyway! Cheers Alan -
Thanks Kit, thanks Tim. No photos tonight but have primer on the body and its looking OK. I have also repaired two ancient bits of damage on the mouldings on both the running board and rear fender. The.pickup bed is close to primer and centre crossmember is looking ready as well. Still need to fab up a Jag rear end crossmember to get the stance on the money. might get some photos up next weekend , all going well! Cheers Alan
-
Every day is a school day, Rodney! At some rod runs, these events were called rodkhanas. Was very popular for a while - Aussies have tended to have very active rod runs for decades - more about cruises, drags, gymkhanas or go- whoas, even burnout comps, than lawn chairs. Cheers Alan
-
Tom Geiger's house, where strange ugly toys and models go to die! Hee hee hee, sorry Tom, couldn't resist! Cheers Alan
-
What they said! Simply one of the coolest T bucket models I have ever seen. This is a very inspirational model that overcomes many of the awkward proportions that often plague T bucket models. Just stunning! Cheers Alan
-
That's the one. A young guy built it in the late eighties, on unemployment benefits, would you believe! Did absolutely everything himself. The thing handled like a go-kart and regularly won gymkhanas. I seem to remember it was his only car at the time. Cheers Alan
-
Jackson, there was a very nice metallic blue, flamed South Aussie Model A roadster pickup that ended up in Perth years ago - I think Lance Fussel owned it. It had an HR Holden front end. The original builder fabricated quite squared off box structures to clear the wishbones but because the headlight bar was dropped low enough to nearly touch the top of them, you barely noticed it - might be a plan for your front end. And yeah, my body cracked a windscreen post the other night. It is a little known fact that the industrial chemists at Revell once offered their plastic formula to the Pringles potato chip people. Pringles rejected the formula as they said it would make their potato chips too brittle! Undeterred, Revell used the same formula to make models into the 21st century - only more recent white plastic models were actually buildable! Cheers Alan
-
This just might be the best seat cover I've ever seen! Reeeeeally nice texture and authenticity there, Roy! Cheers Alan
-
Mr. Speed '53 Studebaker
alan barton replied to Rocking Rodney Rat's topic in WIP: Drag Racing Models
The Bare Metal foil is a clever solution to the frame tin. I will be putting a rear engined 27 T body on my Piranha frame , shades of Ol'Noisy, the Speed Sport Special and will be sure to borrow that trick! They say that what doesn't kill you makes you stronger but I don't know, that paint snafu would have hurt a lot. Unfortunately you do not belong to a very unique club! My last coat of clear on a Candy Apple green Aurora 34 coupe turned out to be gold........ And did you know that if you try to polish a minor paint blemish on a glossy black Deuce, with Tamiya Filler Putty instead of Tamiya Polishing Compound, it does the blemish no good at all???? Sigh. If you want to get those headers right out to the sides of the body, what about the ones in Monogram Snake/Mongoose kits? They go under the frame. Revell Buttera funnycar kits over the frame could bridge the distance as well. Cheers Alan -
Oh yeah, after much deliberation, I have finally settled on a colour - Lip Gloss by Dulux. It is very close to Boyd's red, perfect for the eighties, and though It is a hardware store paint, I have had very good results with it over Tamiya pink primer. Cheers Alan
-
Still no earth shattering movement but the bodywork is getting closer! Surprisingly, none of the brains trust here noticed my earlier gaff - turns out that shortened smoothie bed up the top is not from a Hot Rod series Revell Model A, but from the Monogram T bucket trailer - I couldn't work out what the odd mounting brackets underneath were all about! Turns out they are the axle and towbar mounts. It is also about 5mm shorter than the stock bed which suits this build perfectly. A happy accident! I seem to be bogged down with a lot of heavy bodywork lately and my efforts to refine the swage lines on this cab were not going well so last night I threw caution to the wind and filed everything off and started again. It will need primer to tell me if it was worth it but so far so good. The roof and the sunvisor were scratchbuilt from flat styrene and the swage lines are down with Evergreen. If I can get the bodywork finished by this weekend I can get back into fabricating the mounts for the Jag rear end and generally tidying up the chassis. Cheers Alan

-
My brain must work a bit different! I never noticed the Ford engine ( and should have) but I did think "That's odd, cobraman's building a Chevy!"
-
Hi Guido, I have the Ramchargers, Garlits Wynns Charger and young American kits, all built, and have the remaining frame from my childhoods Galloping Ghost 2 and I can assure you that it is indeed based on the Ramchargers kit with different body panels. Cheers Alan
-
“Joker Is Wild” - AMT / Revell 32 Roadster Kitbash for DSC
alan barton replied to OldNYJim's topic in WIP: Model Cars
Those lights look magic - and you are right about the chrome rings, it needs them. Just drill your holes a fraction bigger and recess the chrome ring inside the frenched tunnel - yummy! Cheers Alan -
“Joker Is Wild” - AMT / Revell 32 Roadster Kitbash for DSC
alan barton replied to OldNYJim's topic in WIP: Model Cars
That Revell stuff is doing a good job of correcting AMT's shortcomings on this kit, Jim. I like the overall theme a lot. One suggestion, the AMT windshield frame is very thick in all dimensions. With a sharp X-acto followed by sanding sticks you can put it on a diet which helps immensely! Cheers Alan -
Congrats Steve Guthmiller
alan barton replied to Classicgas's topic in General Automotive Talk (Trucks and Cars)
Well done and thoroughly deserved. Your work never ceases to amaze and educate me. Thank you for being so willing to share. Cheers Alan -
These are the toughest builds when you have to restore rough filed and sanded bodywork. Congrats for getting this so far along from a body many would have left behind. Personally, I would leave it nosed, decked and shaved. The OB did you a favour - by removing the junk, you don't feel bad about removing them yourself and in my opinion, it allows the pure clean lines of the little Falcon to shine through. Good luck with your paint! Cheers Alan
-
60's Banger Geek '27 T Touring - Updated 10/13/18
alan barton replied to Dennis Lacy's topic in WIP: Model Cars
Those wheels are simply stunning! When I think of how many I have of these in my stash and how much I have hated them all these years, and then you pop up a photo and completely change my perception! Your talent with colour selection, especially on mechanical parts, is beyond compare and you now have me rethinking how I look at these parts. I think the next model I do I will be stripping and priming everything and then thinking "What would Dennis do?" Cheers Alan -
Full credit for tackling a detailed replica build like this. I went through exactly the same process you are tackling with the louvres on a replica of the Tony Nancy roadster. And I encountered the same problems as you have, a knife mark here, a filing mark there. One of the great frustrations I find in modelling is that you only have to take one swipe too many with a file, a gnat's whisker in time, and then you have hours of repair and clean-up to follow! For what it is worth, I have now used on several builds, the separate louvre strips that came in early AMT customizing kits. They turn out better than you would expect! Isn't it comforting knowing you have a spare part, just in case?!?!? Keep up the good work on this iconic car. Cheers Alan
-
This is such a "complete" model. By that, I mean everything looks just right - wheel choice, stance, positioning of the Clevo in the engine bay, not too high, not too low, the proportion of the stakebed to the body and even the choice of Deuce grille over a Model A grille. The black stakebed is, indeed, a happy accident - it suits the colour of the body perfectly whereas a brown bed might have looked a bit much Beverley Hillbillies. Can you imagine how much harder this build would have been without the Revell Model A kits? I ended up with six roadsters and two coupes but already I am feeling like that is not enough! That platform opens the door for soooooo many fine hot rod models. Cheers Alan
-
Ahh, you beat me to him - that would be Drew Hierwater! Great writer, great model builder, and a sweet ride! Cheers Alan
-
Using a model to help build a 1:1
alan barton replied to Sam I Am's topic in General Automotive Talk (Trucks and Cars)
Yep, I have carved up a 1/24th Spec Cast diecast 35 Ford Sedan Delivery so that I can get my head together on the 35 Phaeton that I am building as a late 40, early 50s style custom. Will get some photos on here when ! have more to show! Cheers Alan -
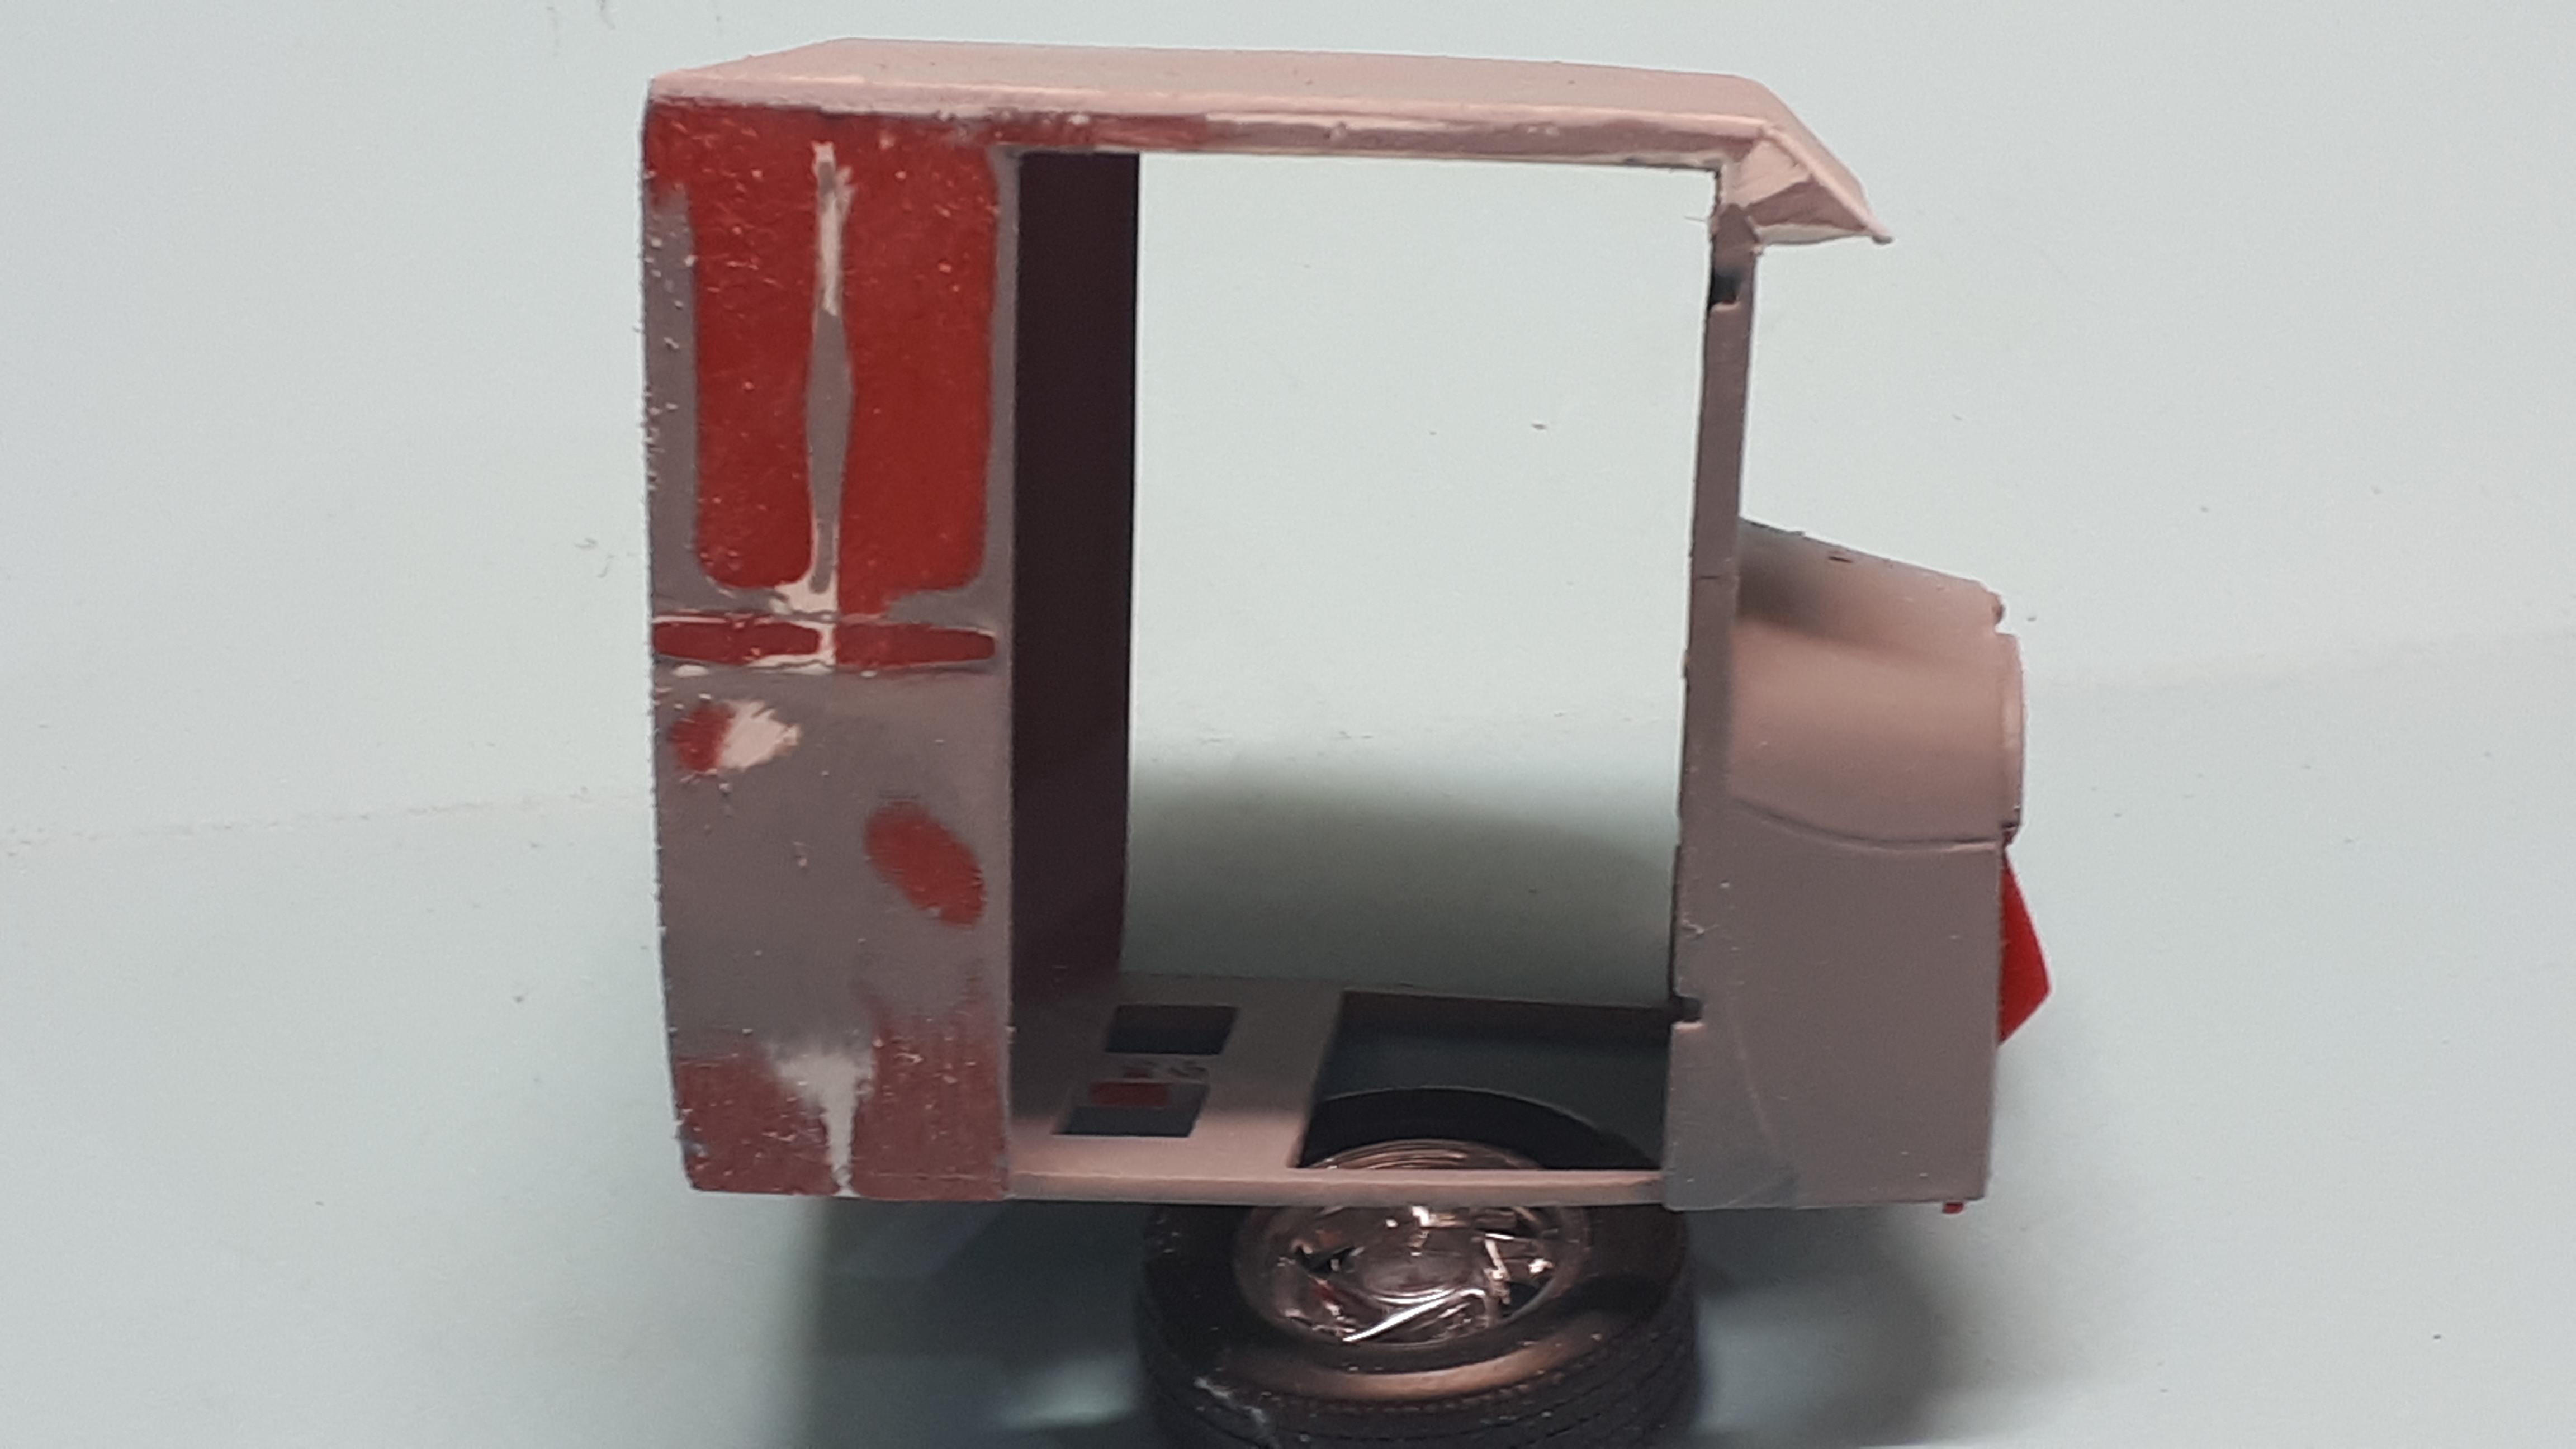
Mission Impossible - American Graffiti cop car from a wreck
alan barton replied to alan barton's topic in WIP: Model Cars
I can't believe it has been four months since I posted here but to tell the truth, that windshield opening gave a bit of a kick in the guts. Anyhow, our show is definitely on on July 18 so I had better get a move on. I spent last night working out my moves. I really didnt want to split the roof, especially as the rear window had come out so nicely. I wrapped Tarheel Rick's windshield in masking tape and then removed the front posts altogether and separated the B pillar from the door line. I then taped the windshield in place and pulled the roof down to where it belonged. Then, using any plastic scraps that looked like they would fit, I glued a bunch of stuff directly onto the roof and screen and that is where I will leave it until next weekend. Hopefully the windshield will release painlessly and I will start reworking the front of the roof to match the screen. It's not pretty! Wish me luck! Cheers Alan
-
Most Involved Part of Building?
alan barton replied to JollySipper's topic in General Automotive Talk (Trucks and Cars)
Absolutely bodywork! Getting every last piece of putty feather edged, gaps smooth, straight and even, definitely the bit I find the most challenging. My favourite bit is putting decals on race cars - it's the moment when the model comes alive! Cheers Alan