David G.
-
Posts
11,326 -
Joined
-
Last visited
Content Type
Profiles
Forums
Events
Gallery
Everything posted by David G.
-
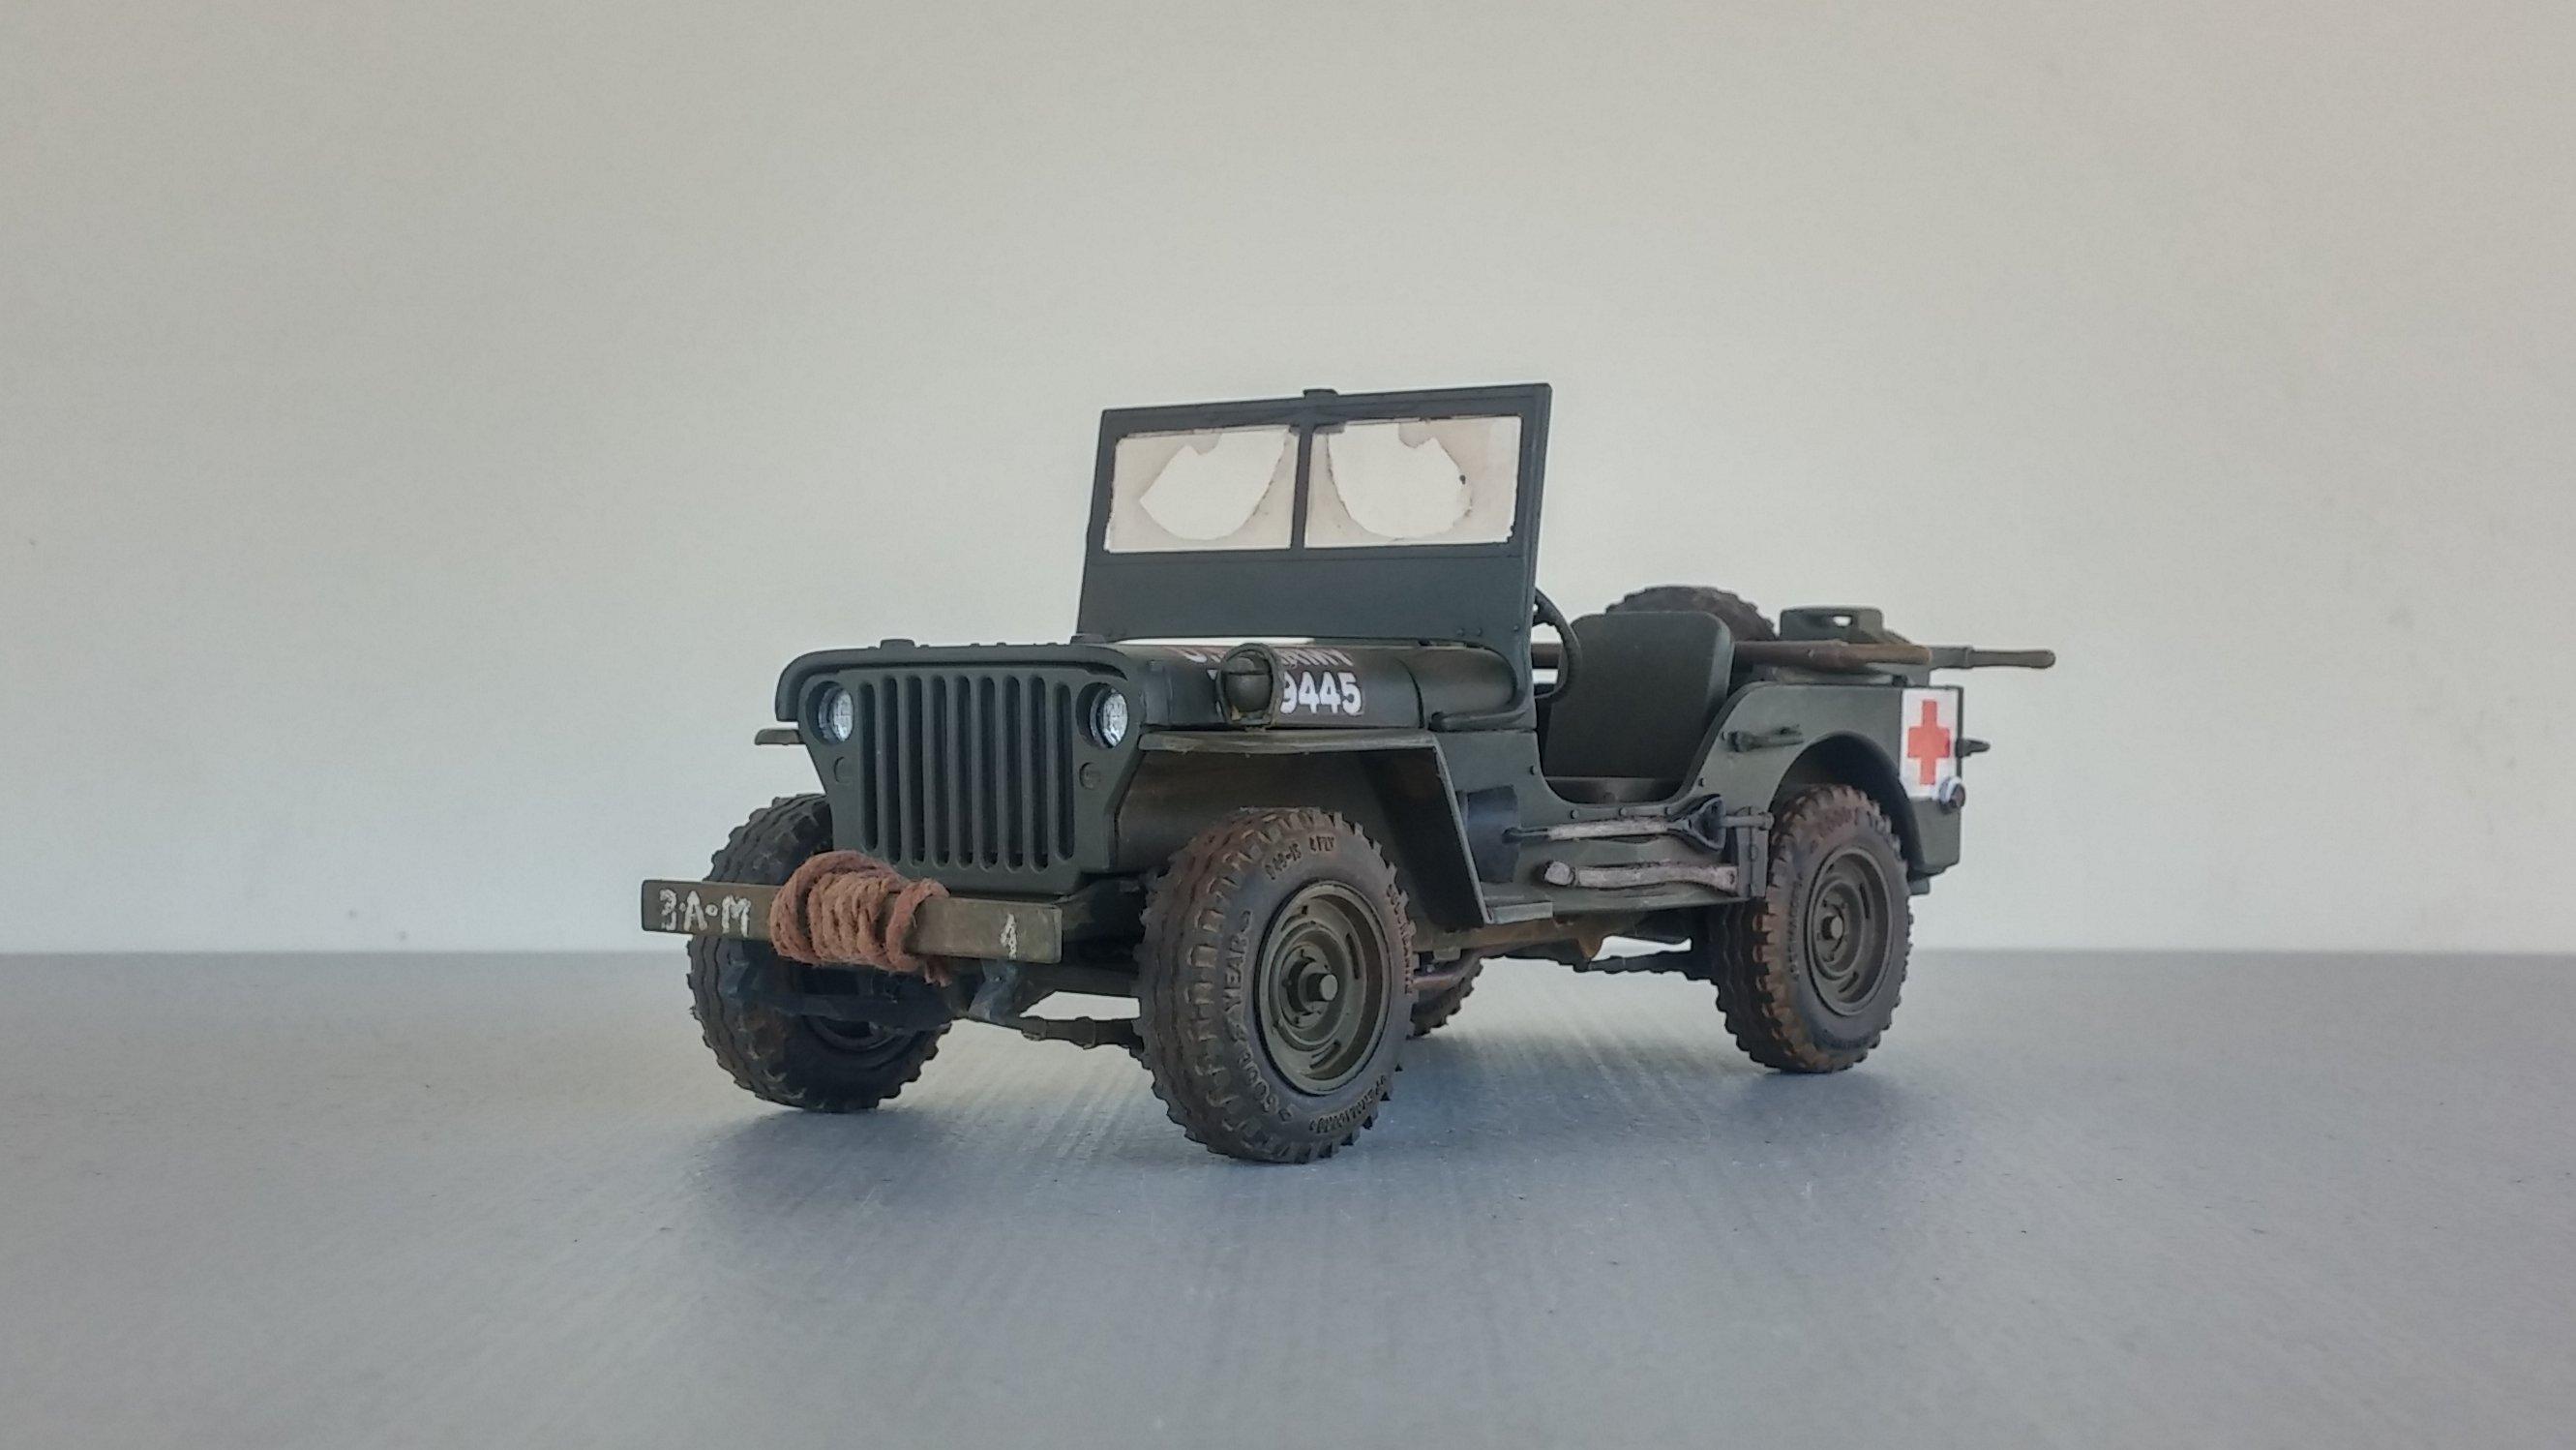
Thanks Roger. There is a time when I would have attempted that but there is no relief cast in the valve covers and my hands are not that steady right now. I painted the bumper markings on this Jeep a couple of years ago and though they came out okay, I don't believe that I could do as well today. Which is kind of a bummer since I used to calligraphy and hand lettering. Great looking truck BTW. Thanks Carl, I'm glad you like it. I hope to have more pics to post either today or tomorrow. Thanks again, David G.

-
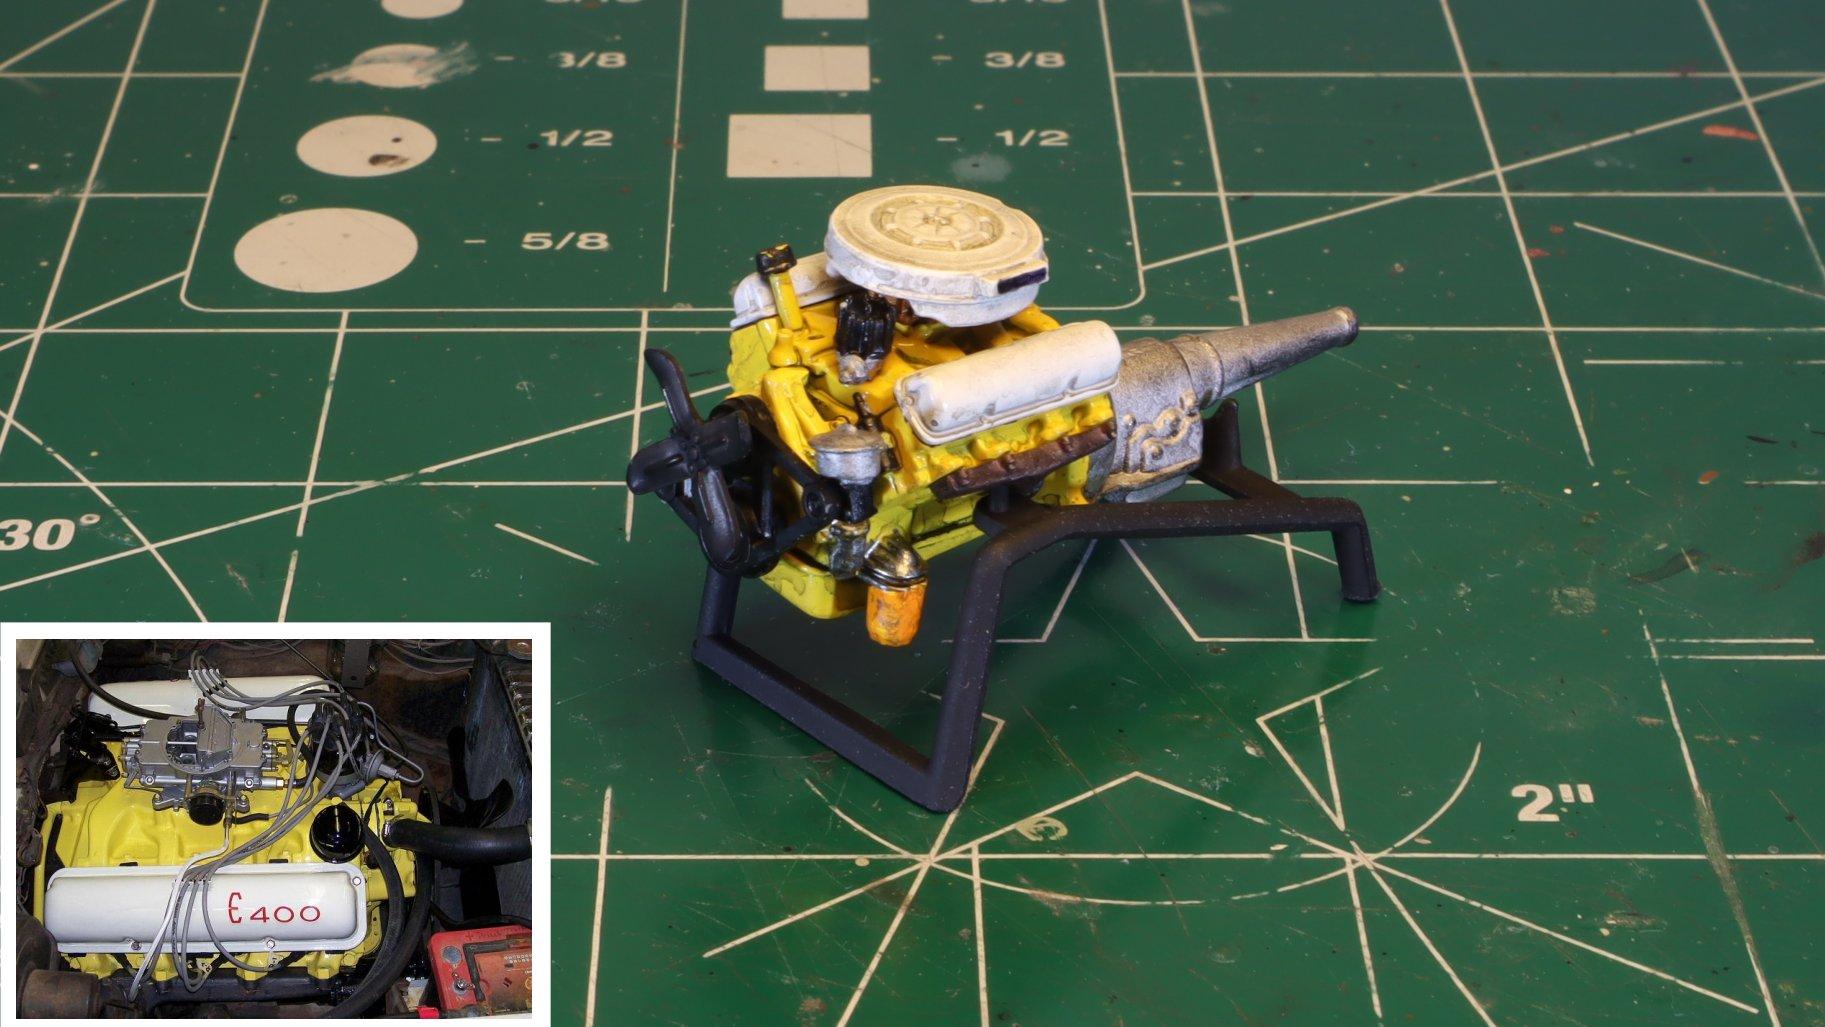
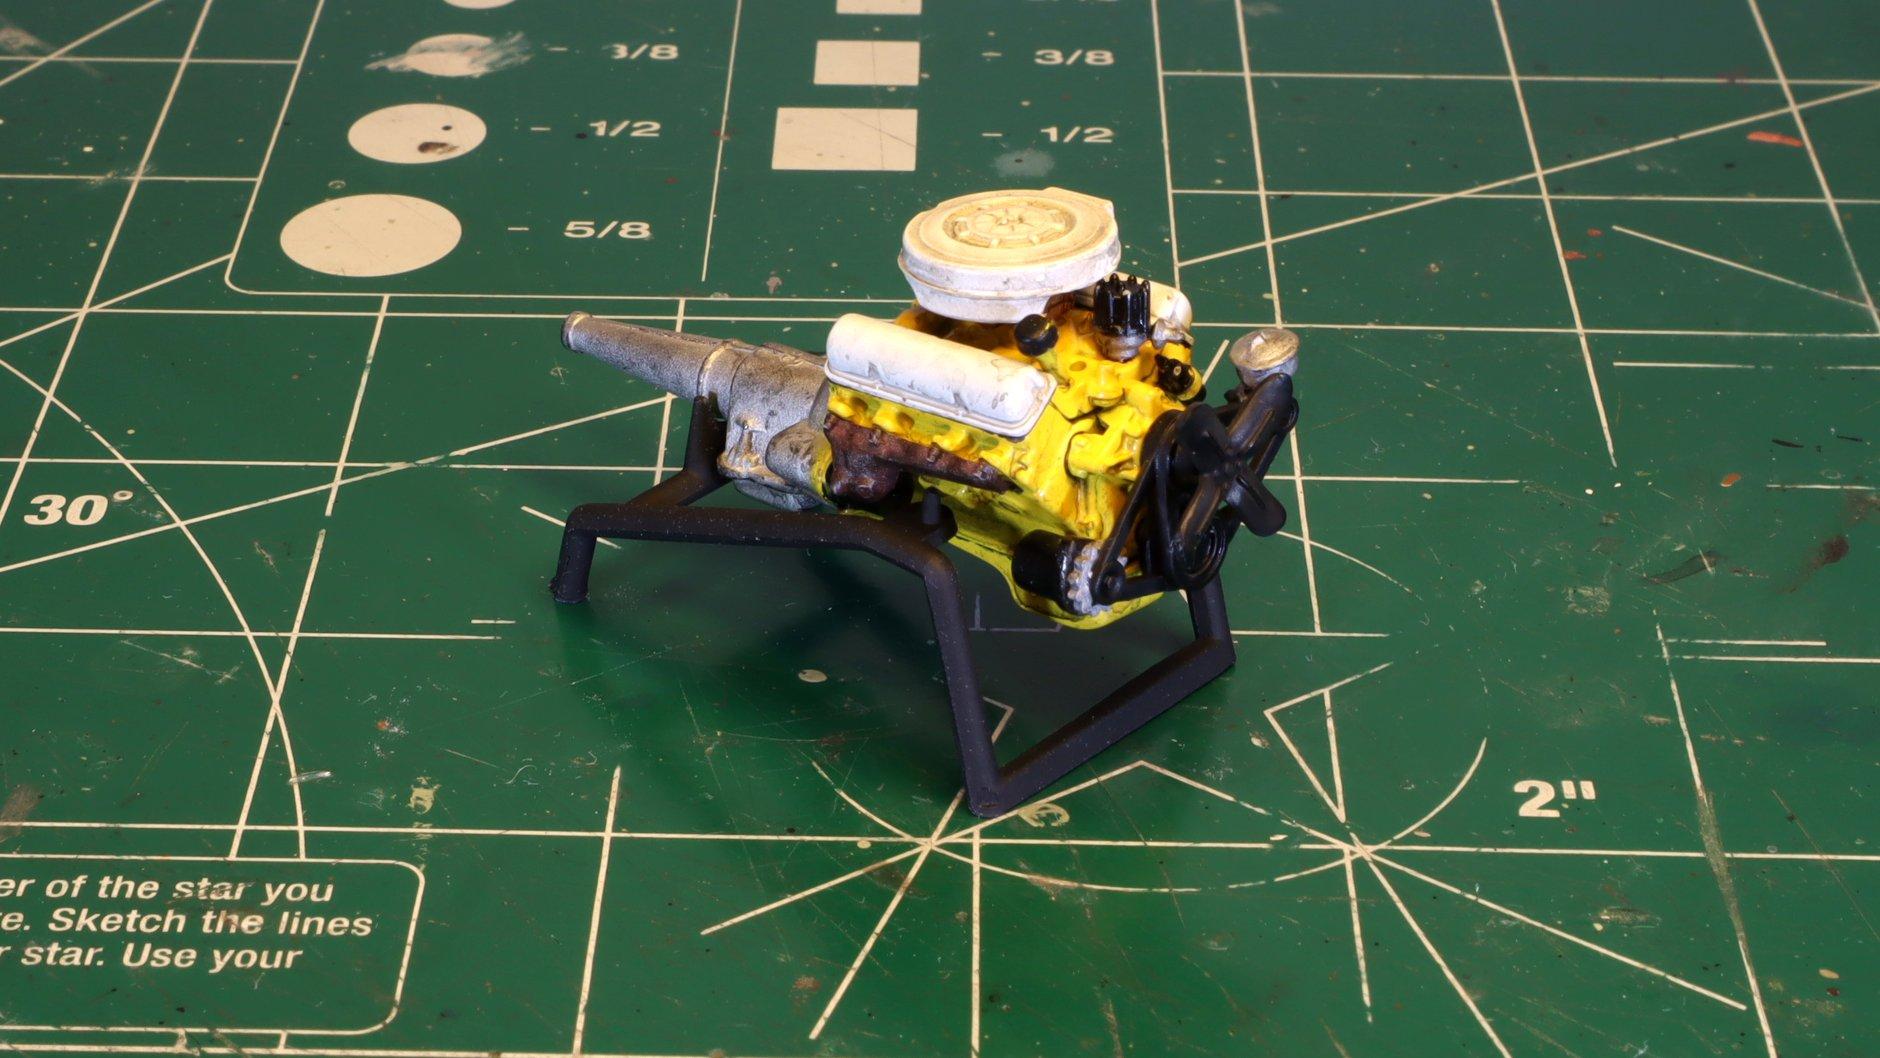
Thank you for your pointer David. Yes, I had considered that option along with a few others. I was actually leaning toward printing my own decals from photos like the example I posted. Then the paint issue with the roof happened and all of a sudden, I was satisfied with not having the lettering on the valve covers. Amazing how that happens, eh? Thank you Gerald. My favorite part of building, aside from finishing one, is detail painting followed closely by weathering. I enjoy building engines because they usually tick all three boxes. There are a lot of details to paint. They're usually the dirtiest part of the car and will almost always require some type of weathering. And they're usually completed rather quickly. I guess that makes them a favorite of mine too. Thanks again to everyone for your support and comments. David G.
-

Absurdly detailed 1/64 Mercedes Actros car transport
David G. replied to traditional's topic in Diecast Corner
Wow, spectacular work! With the detail and proportions I would have guessed that it was 1:32 or larger. Well done. David G. -
Nicely Done! Beautiful detail work and the interior looks fantastic! The color looks great on that car, very much like a factory color of the era. David G.
-
Lovely color choice on a good clean looking build. Beautiful work Si, in spite of the mishaps. But that's what model building is all about. We're problem solvers who create our own problems to solve! David G.
-
Yes Uwe! I meant to mention that I think your models are very well done. I allowed myself to get distracted by my own thinking. You have excellent painting and building skills. Do you favor enamel, acrylics or lacquers? I tend to use lacquers more frequently. I find that I can apply them in thinner coats than the other types and lacquers tend to dry more quickly. Regards, David G.
-
Hello Everybody! It's time for another update. Here is the lightly weathered engine ready for installation. I'm happy with the results but I wish I had some decals for the valve cover lettering. I'm still working on correcting the issues with the roof, it's better but there is still more work to do. Detail painting on the interior is progressing nicely. Thank you all for your continued support. David G.
-
Willkommeen Uwe! Though you'll find that most of our members are from the United States, we do have builders from all over the world on this forum. I have been a member of this forum since 2009 and I find this community to be a kind and respectful group dedicated to supporting its members and advancing the hobby. David G.
-
Nicely done! But that configuration... Yikes! David G.
-
I really like the way the interior looks through the windscreen. The light picks out the seat detailing quite nicely. David G.
-
Thank you Geoff. I can barely wait to see how yours comes out. Knowing the skills you have, I'm sure it will be exceptional. Thank you Larry, I'm glad you like it. Thanks Keith. The trick is to hit it and forget it. Spray the primer on thick and wet, then completely cover the intended area with a generous layer of embossing powder. I place the part on a paper plate to catch the overflow- and there should be overflow. Then let it rest for a day and gently shake the excess powder onto the plate for retrieval. Always keep in mind that the powder layer is very fragile until it's painted and clear coated. even after that it is still rather delicate. Thanks again for the feedback. David G.
-
Hello Si, That's kind of the direction I thought you would take. It's the way I would approach it too- create a "sense of symmetry" rather than a mirror image, thus making for a much more organic machine and helping to save one's sanity in the process. I'm intrigued by your most recent photos and am looking forward to seeing more. Regards, David G.
-
It looks great! David G.
-
Hello People! It's time for another update. Here are the interior panels, painted and ready for detailing. I do have some plans for working with the detail process to try to differentiate the various surfaces and materials with subtle color variations. The carpet is a layer of embossing powder applied to wet oxide primer. After allowing a day for the primer to cure and shaking off the excess powder, I painted it with a mixture of oxide primer and the Rustoleum pink that I'm using for the body and interior. I felt that the carpet should be a different shade of pink. After the paint fully dried, I followed it with a generous spray of Dull Coat to protect the surface. I'm very happy with the way this has turned out. Thank you all for the interest and support you've all shown so far, it really does mean a lot to me. David G.
-
The Pontiac Tempest is one of my favorite cars. Beautiful rescue work so far! David G.
-
Thanks Randy. I've seen a few of his videos. I know he uses Rustoleum almost exclusively and manages to come up with good looking paint jobs so I'll have to search for the one you mentioned. If I can develop a good technique for reliably getting good looking results, then I won't be so disinclined to use it. They do have great colors. Thanks for the compliment Mike. Don't worry about stealing, I openly share my ideas for the benefit of any who can use them. I do remember that part of the Edsel story from when I was researching the car's history. The whole story seems like a case study in what not to do when developing a new automotive nameplate. I have wondered how the story would have changed if Ford decided to use this car to split the Crown Victoria trim package off as its own model line in 1958 instead of waiting until 1992. Thank you for your comment Tom. I didn't do much research as I was building this one and I unfortunately missed those key characteristic traits. Ah well, I'm still happy with the way it turned out. Thanks for taking the time to share that story Tom. I think it's cool that the kid still found a way to enjoy his prize, even if he didn't have to work too hard to get it. Good fortune begets good fortune, I guess. Thank you all for your support. I should have more pics to post in a couple of days Regards, David G.
-
Wow Geoff, you always have the best looking paintwork and your skills at applying the foil details are top-notch. As a side note, I imagine that you have realized that your 57 Chevy looks a lot like the one on the Bare Metal Foil package. Regards, David G.
-
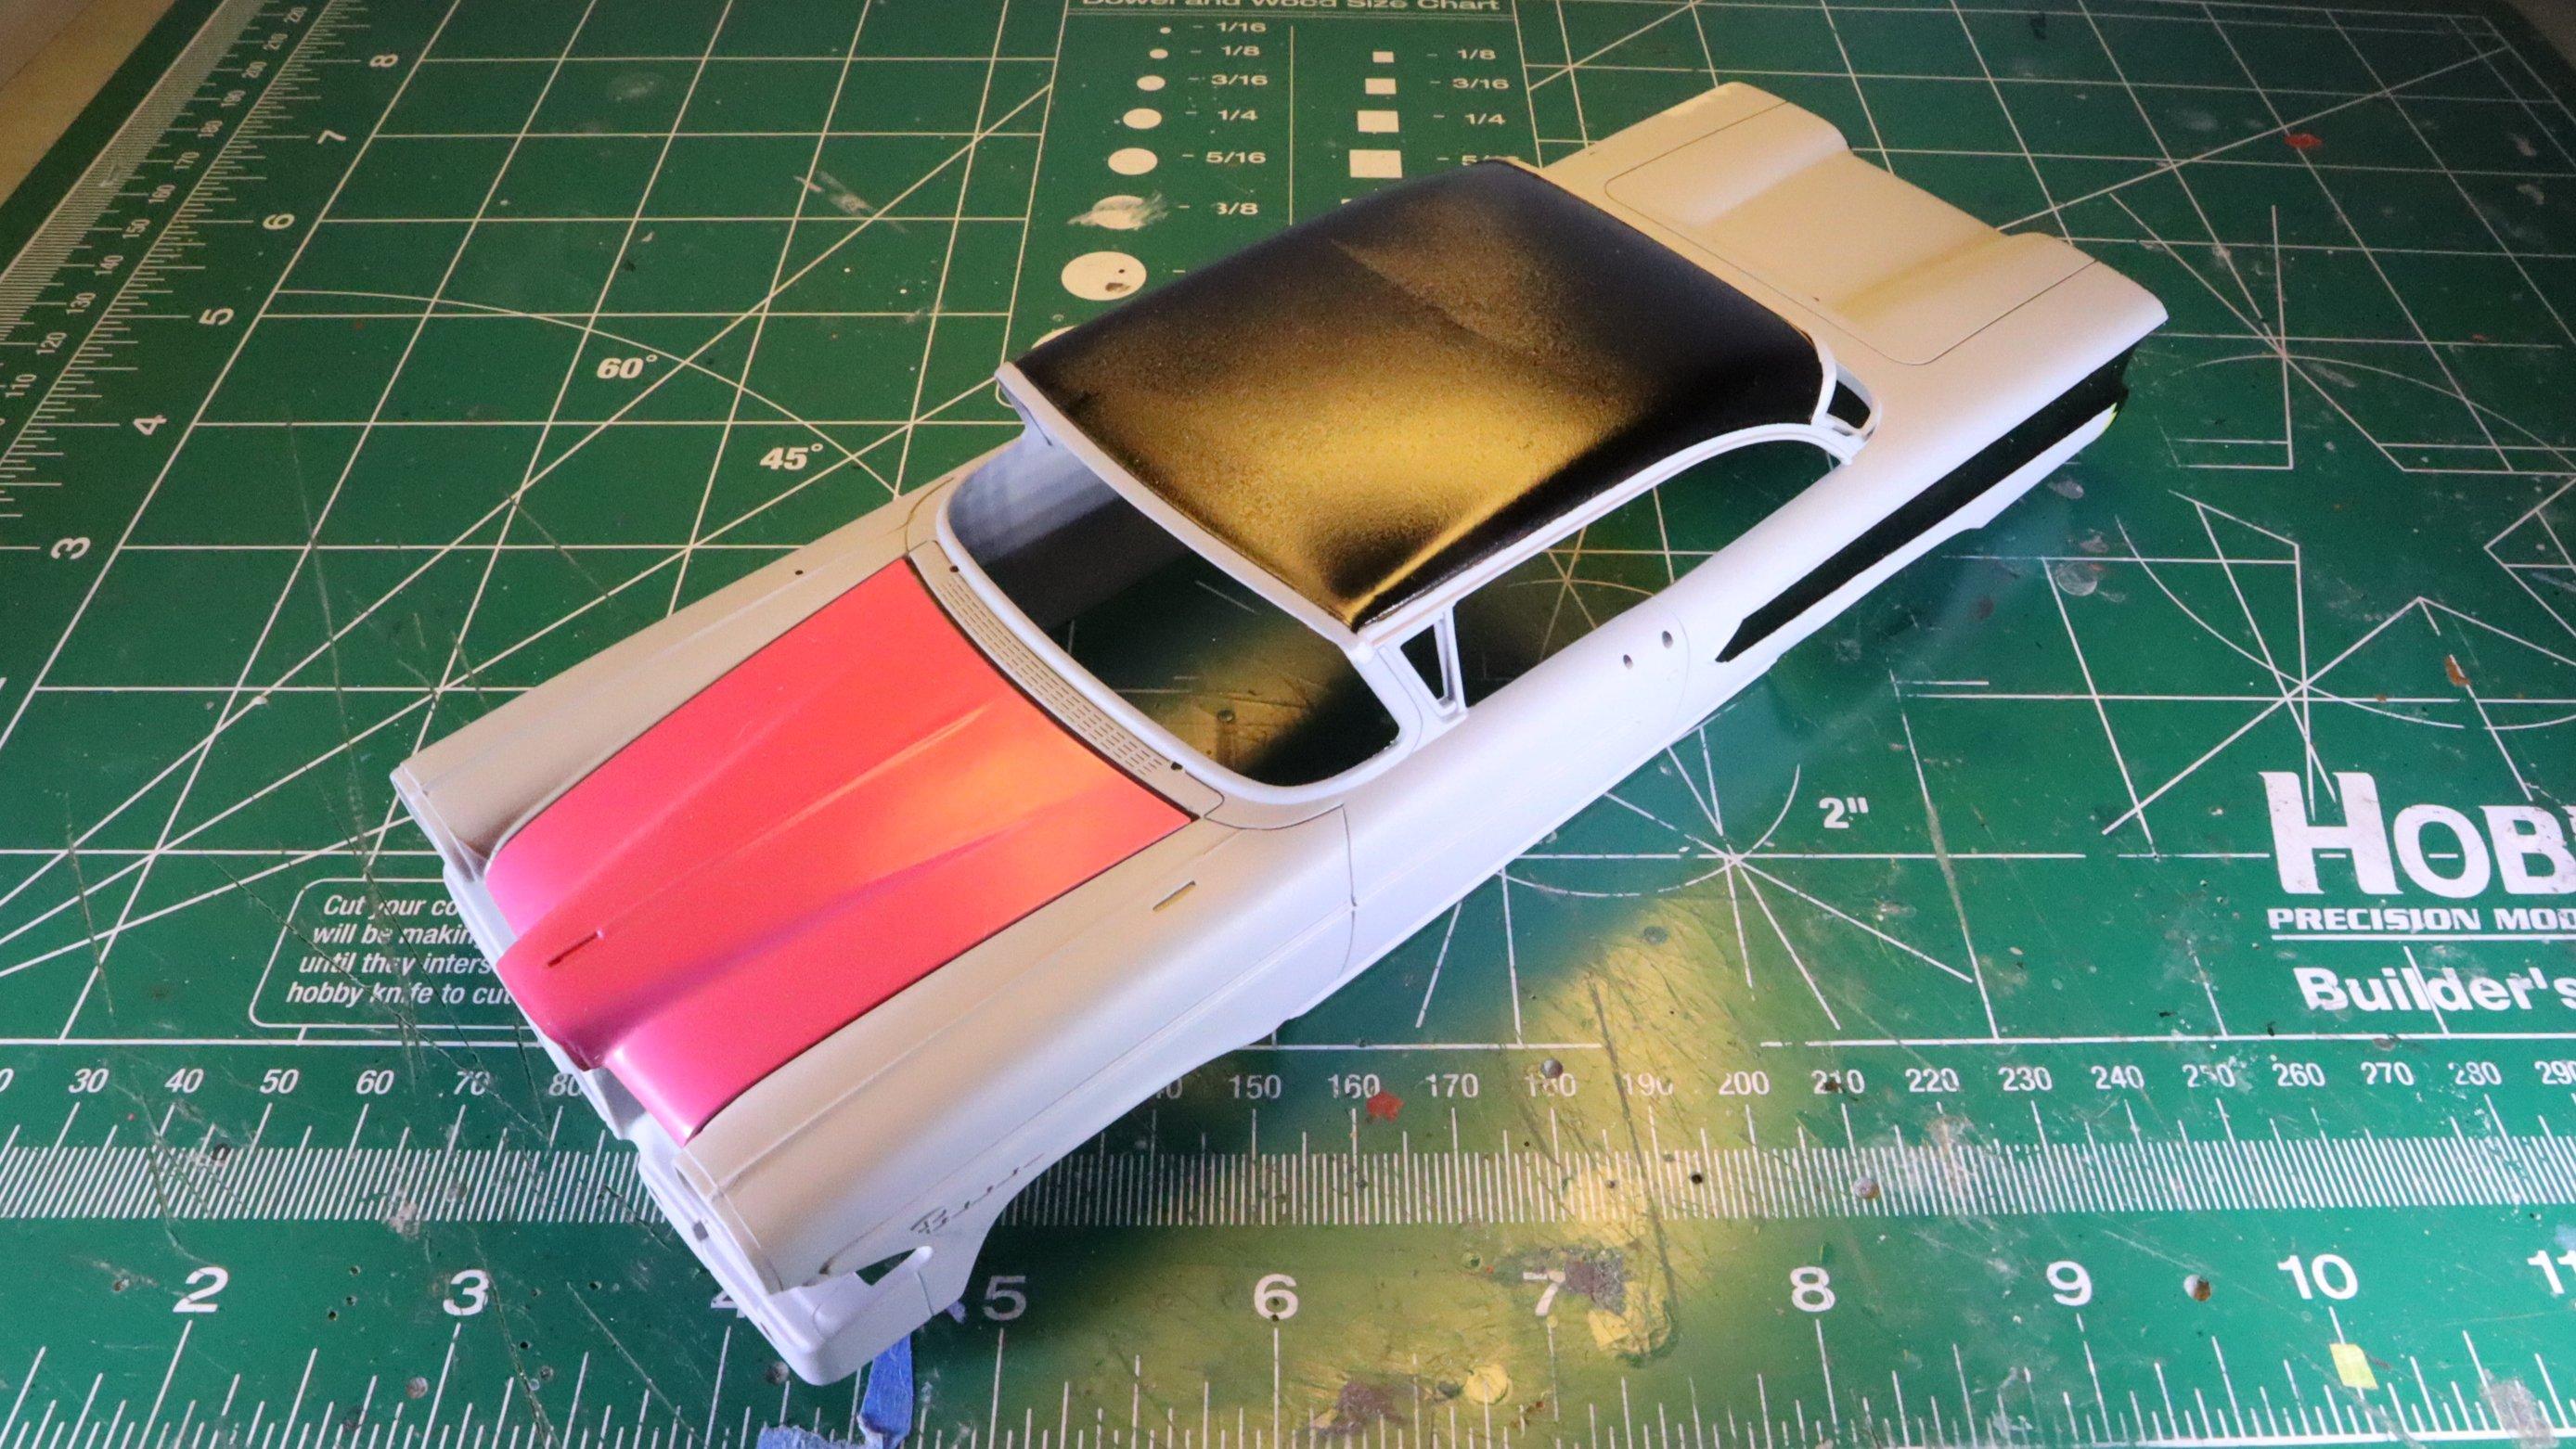
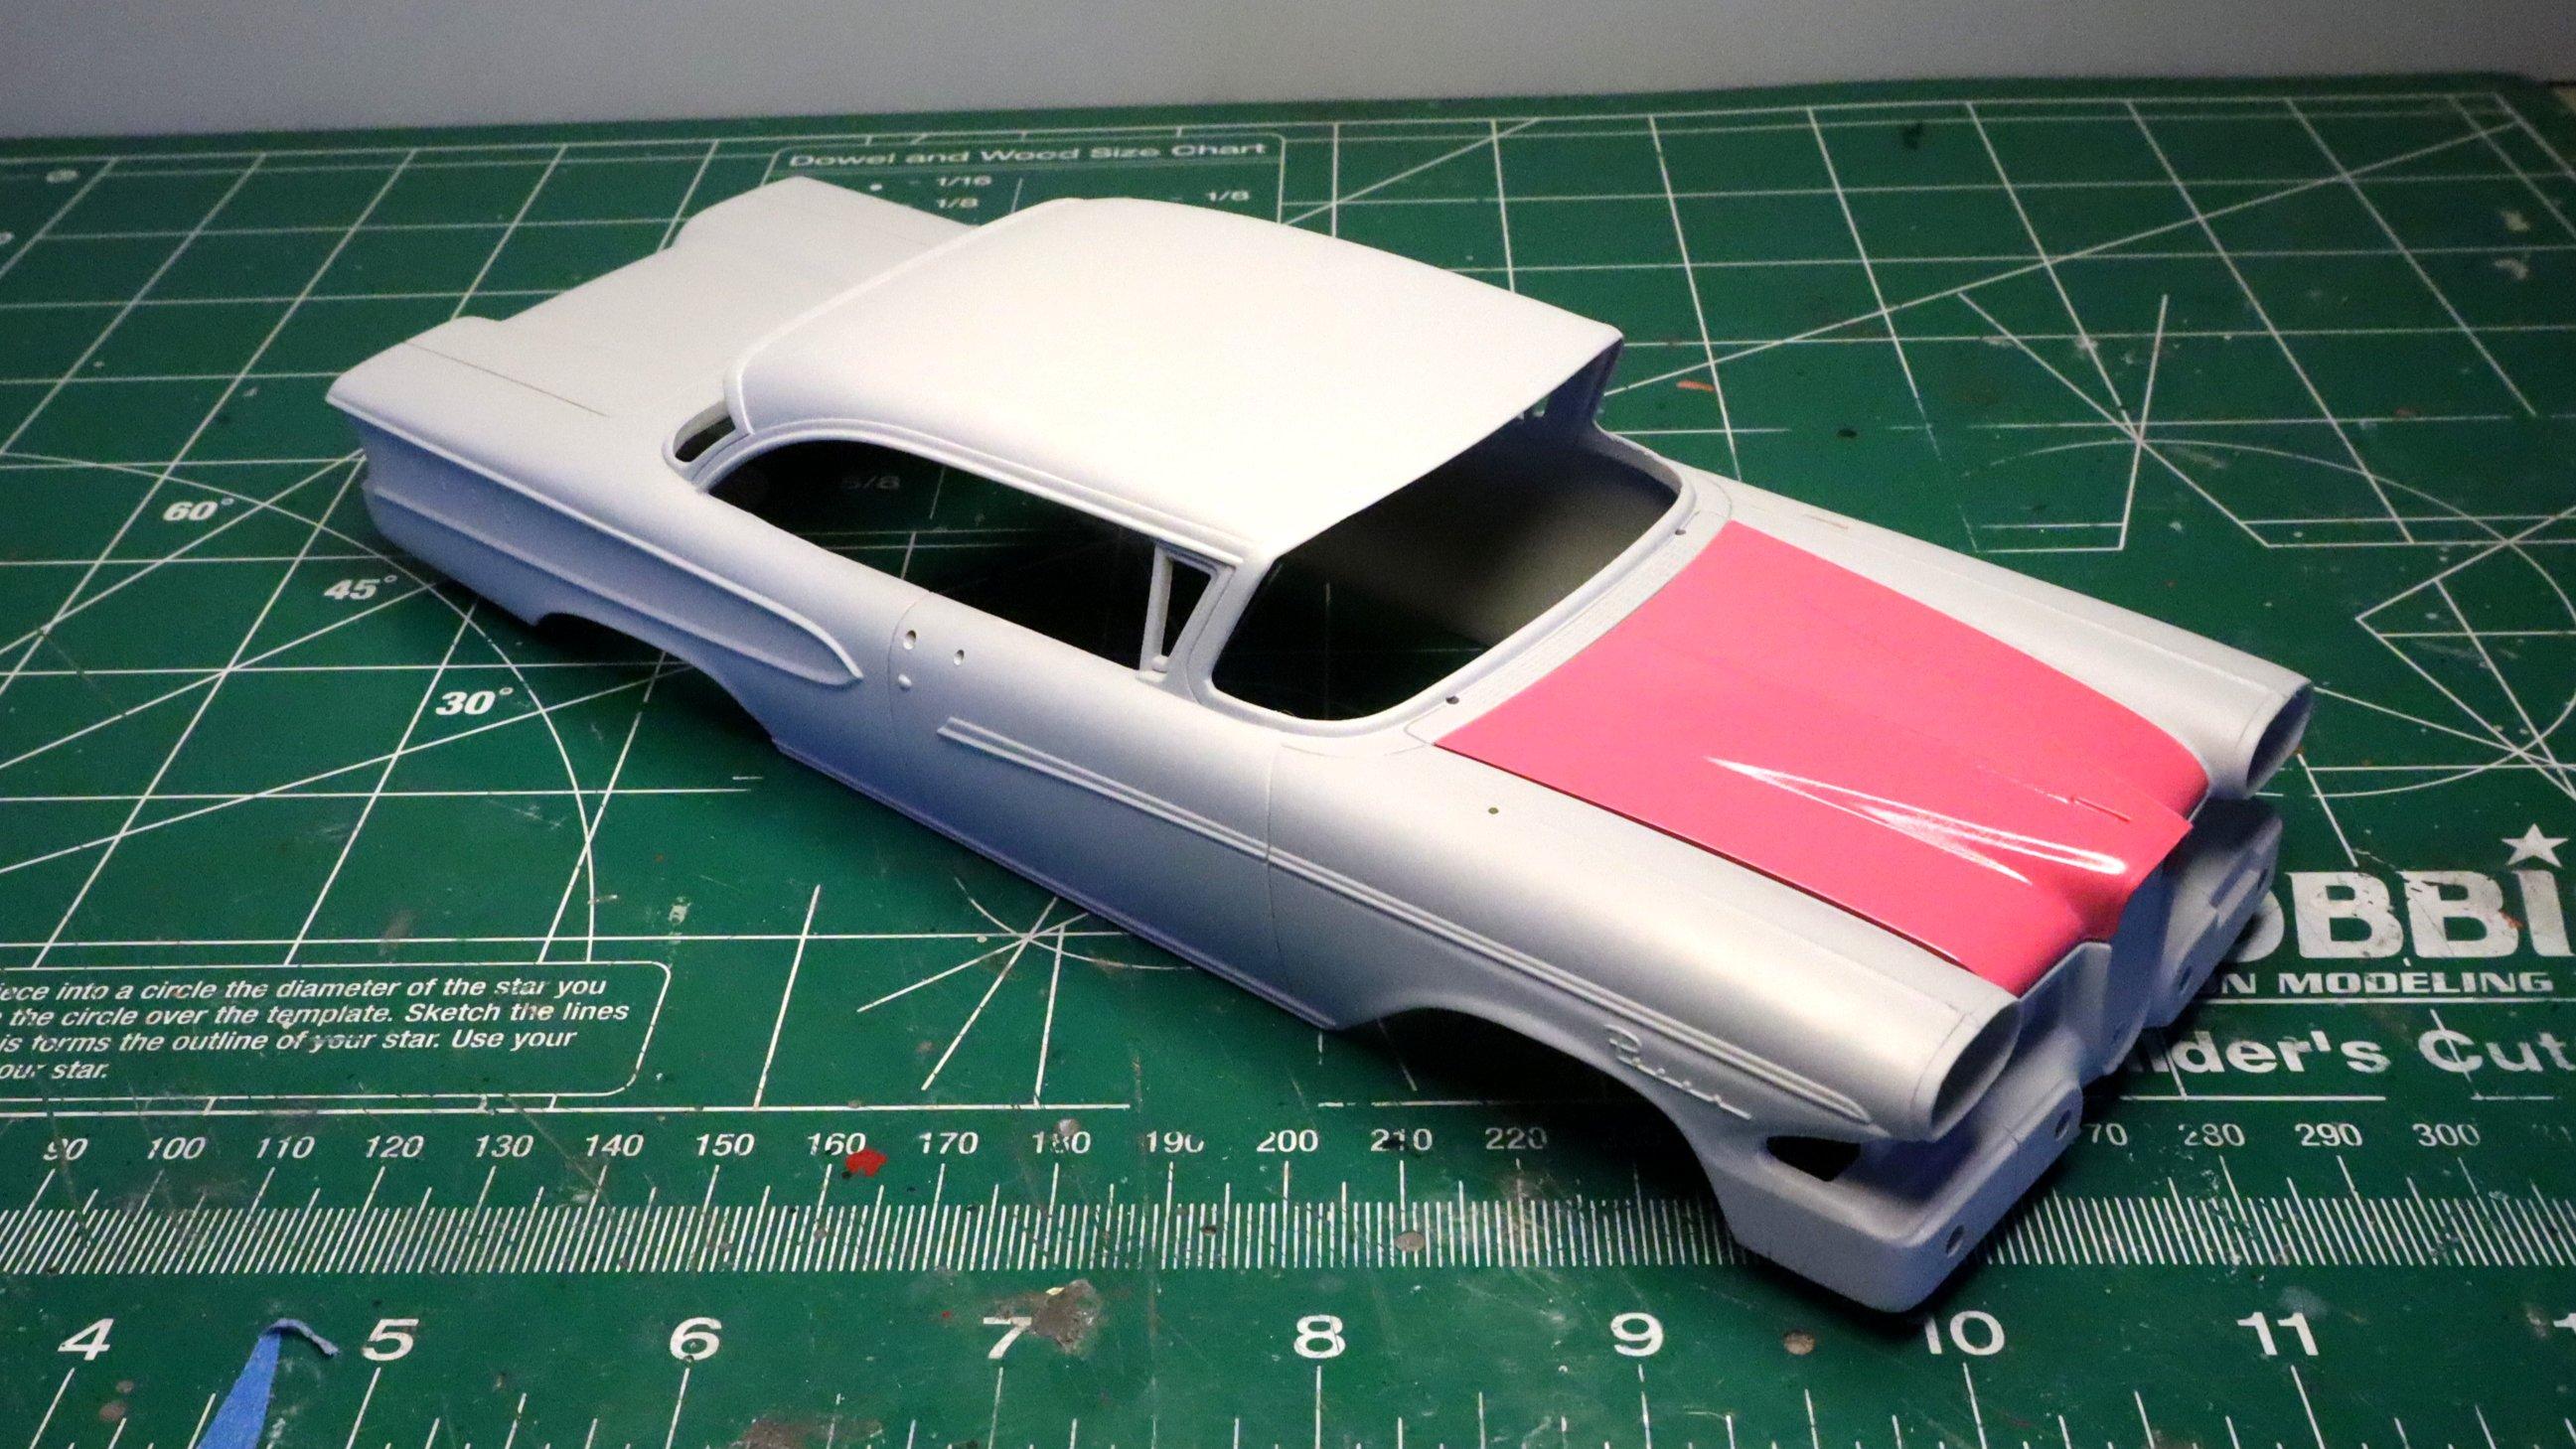
OK, I thought I could get away with standard prep and paint of the casting flaw on the roof. It looks like I was incorrect in that assumption. I had considered pre-coating with Pledge Super-Duper Acrylic Floor Care With Future Shine or whatever they're calling it this year (marketing departments, sheesh!) but I chose not to. So now I have some extra sanding and painting to do. Ah well, it could be worse. The roof is about the easiest panel to panel on which to do this kind of work. Having to sand and smooth this out on the trunk lid would be a bit more difficult to say the least. I'm glad that the rear panel and side scallops turned out decently. Well, it looks like I have a lot of sanding to do so I'd better get to it. As always, thanks for taking the time to look and please feel free to comment. David G.
-
My model building days are coming to an end
David G. replied to slusher's topic in General Automotive Talk (Trucks and Cars)
Wow, what a bad bit of news, I'm sorry to hear that. I understand that it may be difficult for you to not be able to build and post photos of your work but you don't have to leave the community completely. I would certainly miss your kind and honest commentary as well. David G. -
Looks like you're off to a great start! David G.
-
1964 Pontiac Grand Prix. + Outdoor Shots.
David G. replied to StevenGuthmiller's topic in Model Cars
Wow! That is beautiful! It looks perfect from every angle and the detailing is fantastic. David G. -
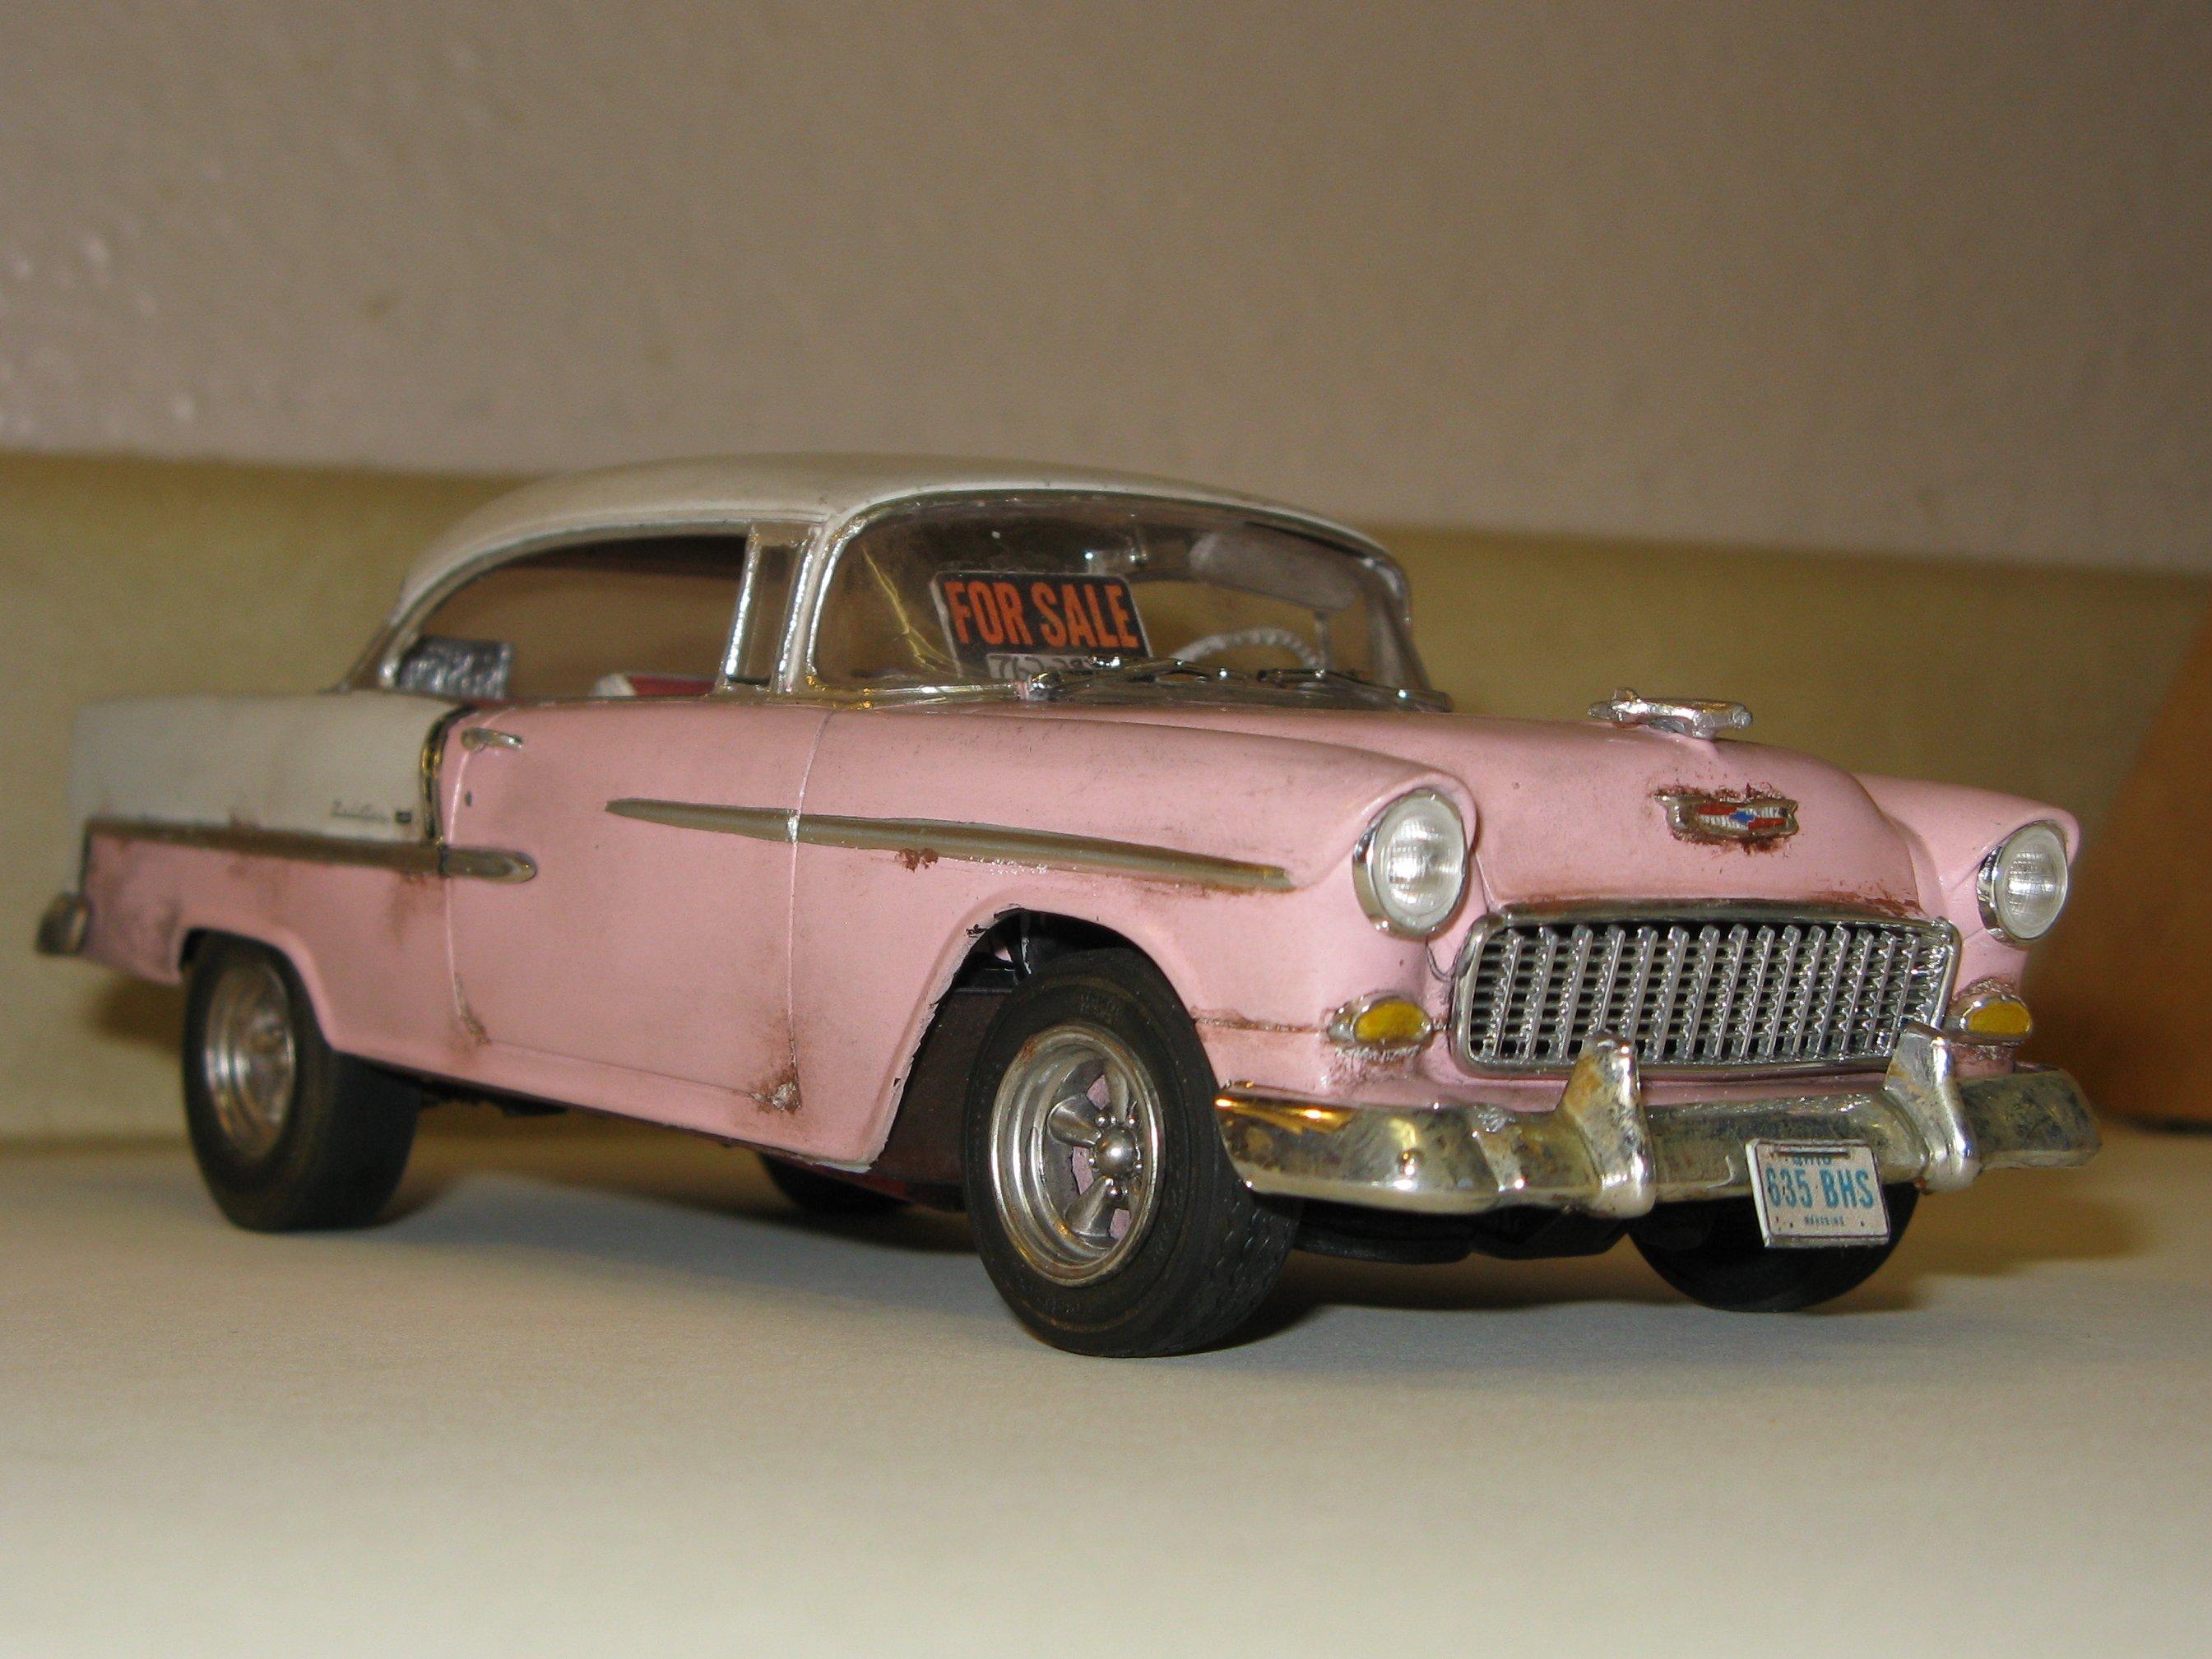
Thank you David. It seems that every few years I forget how much I dislike Rustoleum just enough to give it another chance. And every time I try it again I'm disappointed in both the paint and myself. I guess that means I'm an eternal optimist? I believe that the paint is not in itself terrible, it's probably pretty good paint in actuality. I believe most of the problem lies in the delivery system which seems more suited to painting un-primed wooden lawn furniture than plastic model cars. Pink is probably my least favorite among all the colors but it is also the one that seems to draw more attention than any other color. I think that attracting attention was supposed to be the idea behind the Edsel. I mean, buy a Corvette in any color and it's a Corvette. But take it to a shop and have it painted pink and all of a sudden it becomes "That pink Corvette." I enjoy doing "off-the-wall" builds that wouldn't normally appeal to me. This isn't even the first model car that I've built in pink. Back in 2010 I built a pink '55 Chevy hot rod. Here's a link to the build thread and one to the "Under Glass" post I'm afraid that I don't know much about engines, sorry. Thanks Guido. That's certainly an interesting suggestion but I'm not sure of where I would get a different spray nozzle or what size replacement would be suitable. If you have any experience with this and can offer some advice, I would certainly appreciate it. I'm willing to try, I just have no knowledge base to work from. Thanks for all your comments, I truly do appreciate the feedback. David G.
-
It's time for another update. I think I've decided on pink and black as the color scheme. Here's a color test shot. I was also concerned about some casting flaws on the roof and hood. The hood was the worse of the two so I decided to prep and test on the hood. Though there is some slight texturing, I think a color sand and second coat should take care of it. The only other issue I've had so far is the gap around the back panel insert on the front seat required a little extra filling. It's nothing serious, just standard model building stuff. So I cut a piece of strip styrene and glued it around the edge of the insert. I filled the remaining gap with spot putty then sanded and shaped it. Here it is primed, painted and ready for detailing. The paint I'm using is Rustoleum brand, which I usually try to avoid using for several reasons. Unfortunately, I saw this color on the shelf and decided it was the perfect shade of pink for a 1958 Edsel. So I thought I'd give the brand another try. I thought that maybe some improvements had been made in the several years since I last used it but alas, no. It still sprays like a garden hose and goes on waayyy too thick. I may try decanting some for use in my airbrush when it's time to paint the body. Let's see how ambitious I feel when that time comes. Thanks for taking the time to look and remember, comments, tips and advise are always welcome. David G.
-
You're off to a good start. Looks like this one will be a work horse. David G.
-
I like the first seat option, I think the high back buckets is the way to go. I like your color choice too. The world could always use a few more pink cars. David G.