bisc63
-
Posts
4,171 -
Joined
-
Last visited
Content Type
Profiles
Forums
Events
Gallery
Everything posted by bisc63
-
Couldn't ask for a smoother transaction than my deal with TarheelRick. Thanks again, man!
-
Glad to hear you may be back on these! It's been a fun ride-along.
-

2012 Corvette C5 ZR1 - Revell #07189 / Two of them
bisc63 replied to christian-w's topic in Model Cars
Very nice looking models, and as much as I like a red car, that blue looks VERY cool on that body! -
This is the kind of build I really enjoy following; taking what's in the box and making the very best of it! Keep it up!
-
I agree that this may be coming from the resin itself, and recommend your first coat be a layer of etching primer to serve as a barrier. I use this to prevent bleed-through on kits molded in red plastic. Etching or "self-etching" primers are widely available these days in spray cans. I know my Harbor Freight, Wal-Mart, and Autozone have a version, and I'm sure you'll be able to find some. You may decant it and airbrush it, or some spray good enough right out of the can; you just need a thin even coat. Use your favorite light colored primer on top of this, and paint away.
-
I've been using one of these for over 3 years now; an insanely great bargain: https://www.ebay.com/itm/5Pcs-Electrical-Wire-Cable-Cutter-Cutting-Plier-Side-Snips-Flush-Pliers-Tool-US/133244633012?_trkparms=aid%3D555018%26algo%3DPL.SIM%26ao%3D1%26asc%3D20131003132420%26meid%3D3c800f8721d742e5902bde1781b0eef4%26pid%3D100005%26rk%3D6%26rkt%3D12%26mehot%3Dco%26sd%3D352785013790%26itm%3D133244633012%26pmt%3D1%26noa%3D0%26pg%3D2047675%26algv%3DSimplAMLv5PairwiseWeb&_trksid=p2047675.c100005.m1851
-
So nice.
-
Wow, that really has a very pleasing sculptural quality to it; I just enjoy looking at it! How big is the actual model?
-
Nice over the top 50s-60s custom car! This one has every trick in the customizers' bag-o-tricks thrown at it, and I love it! The interior is my favorite aspect, and I do believe I spy some AMT 58 Impala custom bits in there. The one no-no that nags me is the fact you added a flare to the radiused rear wheel opening but didn't repeat the flare on the front wheel opening; George Barris is rolling over in his bubbletop coffin.
-
Wicked color choice, that really wears that gray!
-
Good job! That color is NICE!
-
Kleeeen refined kustom, nice colors inside and out; what's not to love!
-
Also glad to hear this!
-
New guy just testing a photo!
bisc63 replied to Dave72's topic in Forum News and Questions (formerly: How To Use This Board)
Didn't work... it's not red. -
How did this Revell 55 Chevy become so valuable?
bisc63 replied to Brutalform's topic in Model Building Questions and Answers
It is VERY nice. -
Nice job, I see they are releasing a 1/1000 version in the coming months. I like the look of it, and you did a bang-up job on this little feller!
-
Very neat detail!
-
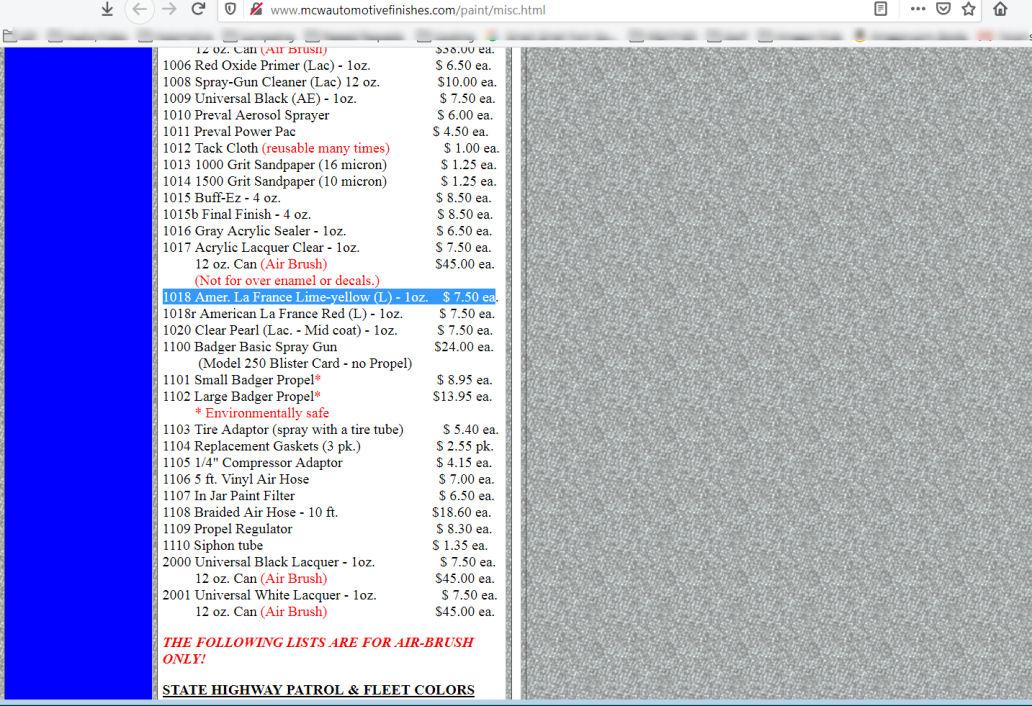
Source for Lime Green Fire Engine Paint.
bisc63 replied to stavanzer's topic in Model Building Questions and Answers
http://www.mcwautomotivefinishes.com/paint/misc.html Scroll down until you see:
-
Pretty cool. Who made that body? The swoop ( or lack of) of the front of the C-pillar makes me think maybe this was mastered from a 4-door body. Any insights on the source? I like the sport coupes a lot, and would like to have a few more. You did a nice job on this one!
-
That is a really cool custom! Great idea, and you are right on that GM couldda and shouldda.
-
Beautiful lines on this bike; I dig it!
-
What a friend you have there! Fun reviews, and while I was there I cast my vote. (It's ALL about the ugly...)
-
Nice job, love that body color! Now I see where you put that engine you accidentally messaged pictures of to me!?
-
Hey, thanks for that info! I am really liking the look of this, even though it's not my normal cup of tea, and I may yet have to add one to the stash.
-
Looks really nice out of the box, but how is the fit and finish of these kits? I'm not familiar with this manufacturer.