Search the Community
Showing results for tags 'Porsche'.
-
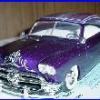
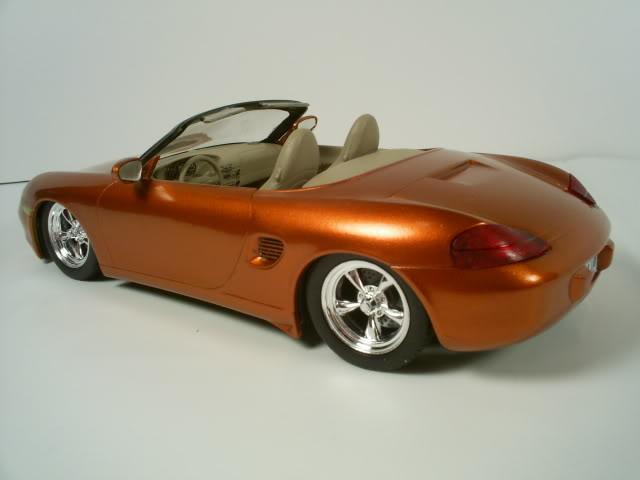
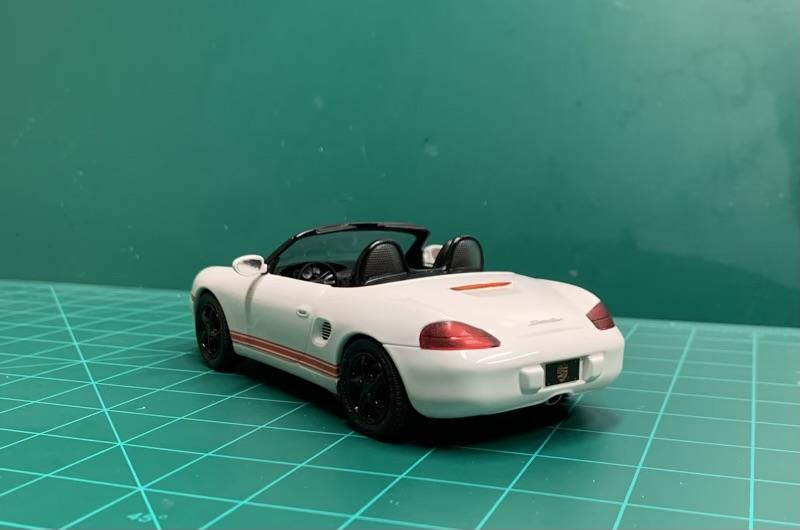
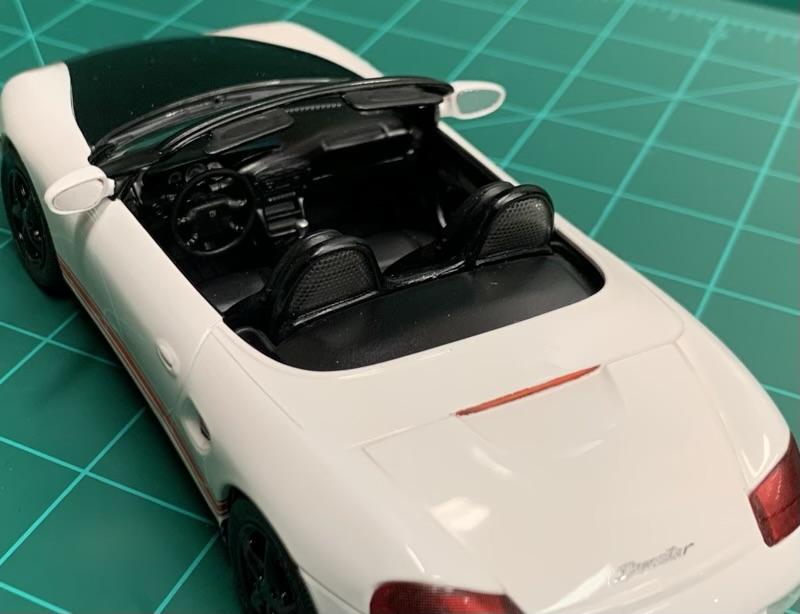
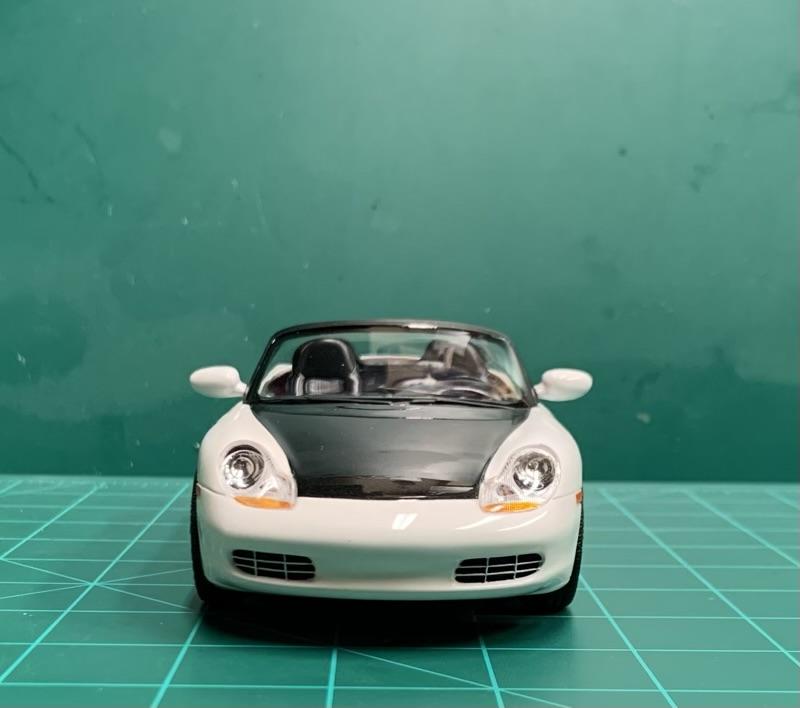
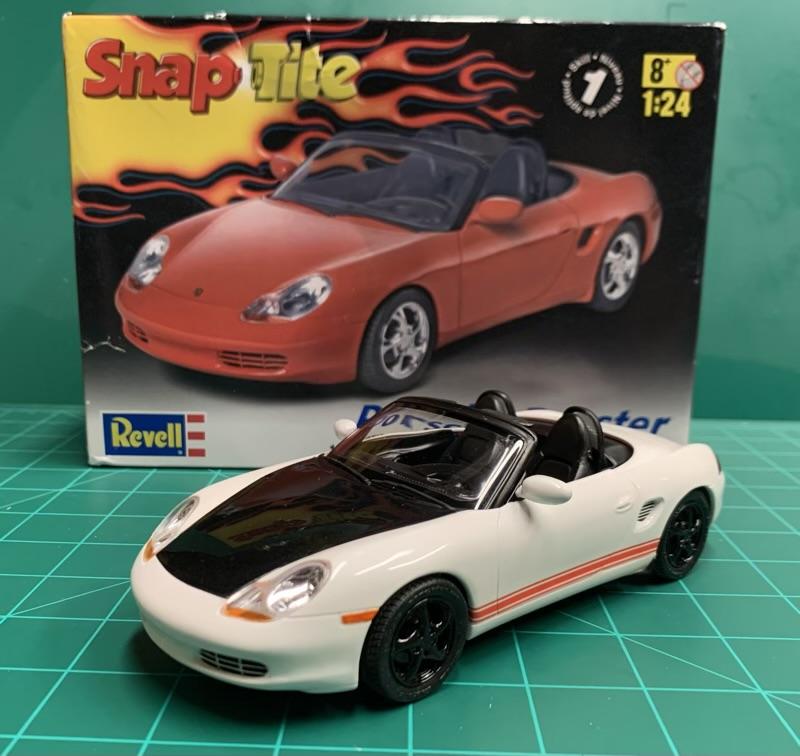
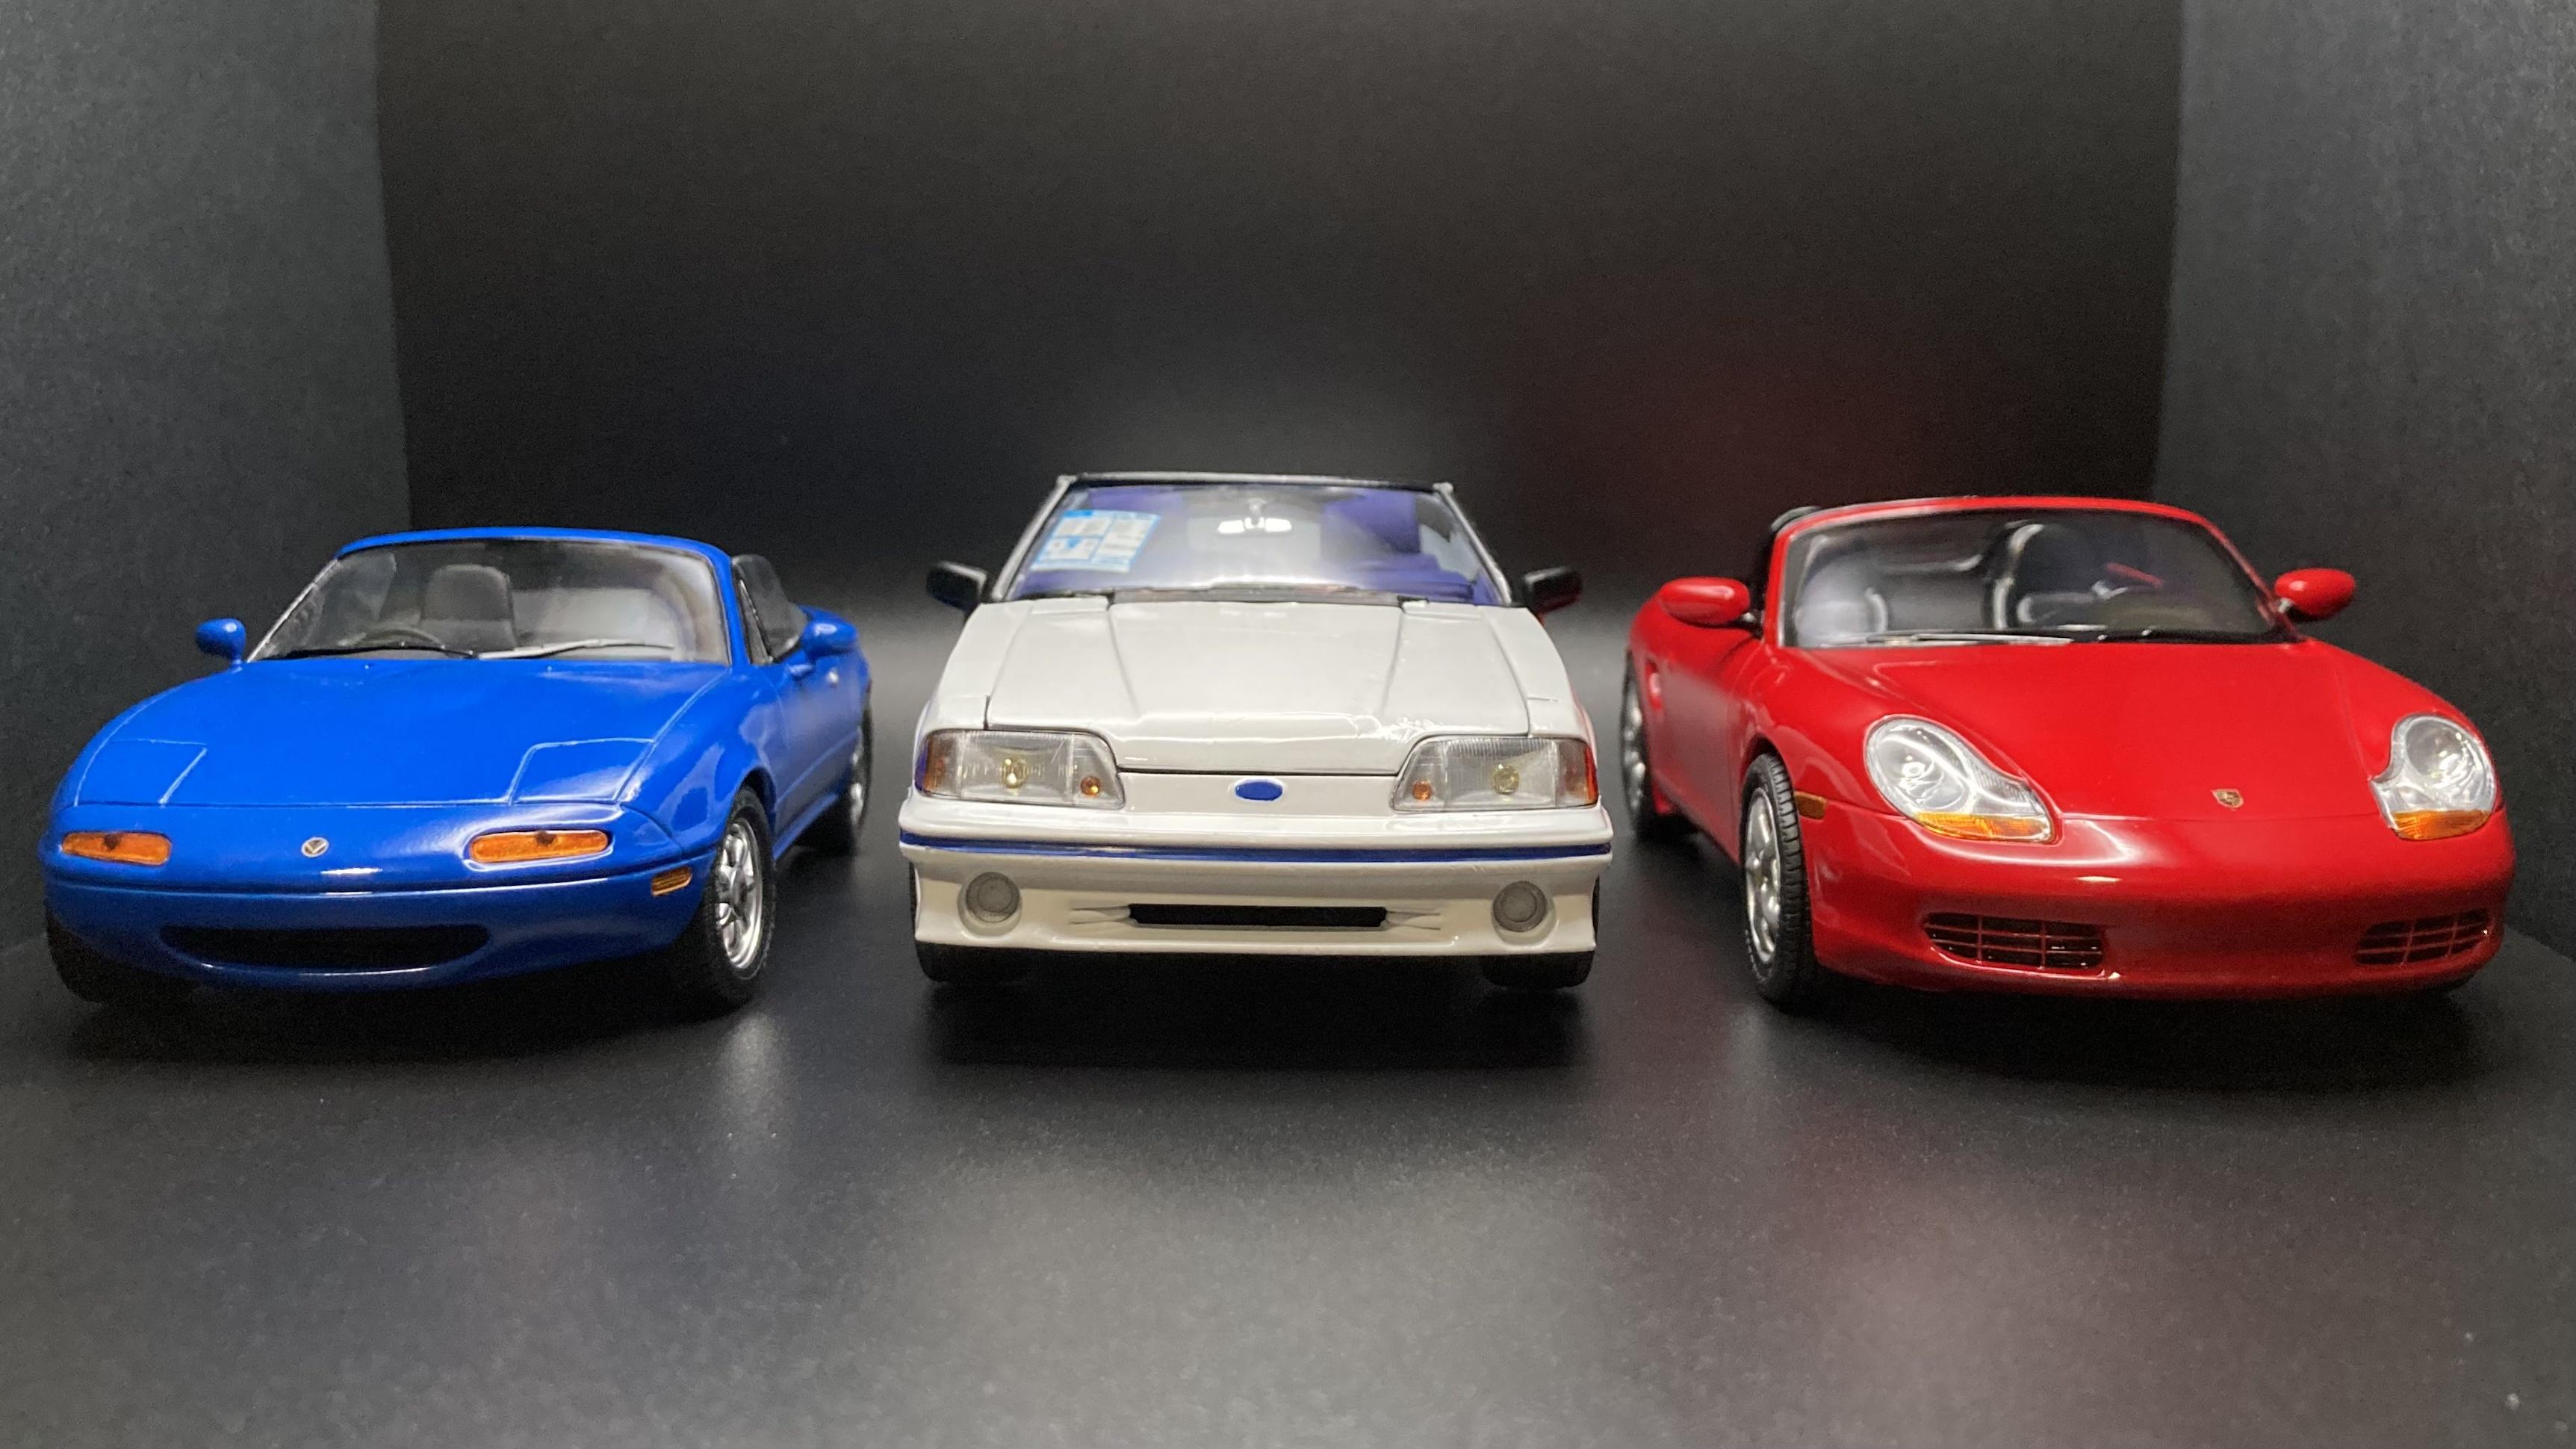
An older quick build that I did probably 15 or more years ago... Revell's Porsche Boxter snapper, dressed up with the big Torque Thrust style wheels from the Revell '63 Vette roadster, and painted with HOK Cinnamon lacquer froml Black Gold...

- 9 replies
-
- 2
-

-
- porsche revell
- porsche
- (and 2 more)
-
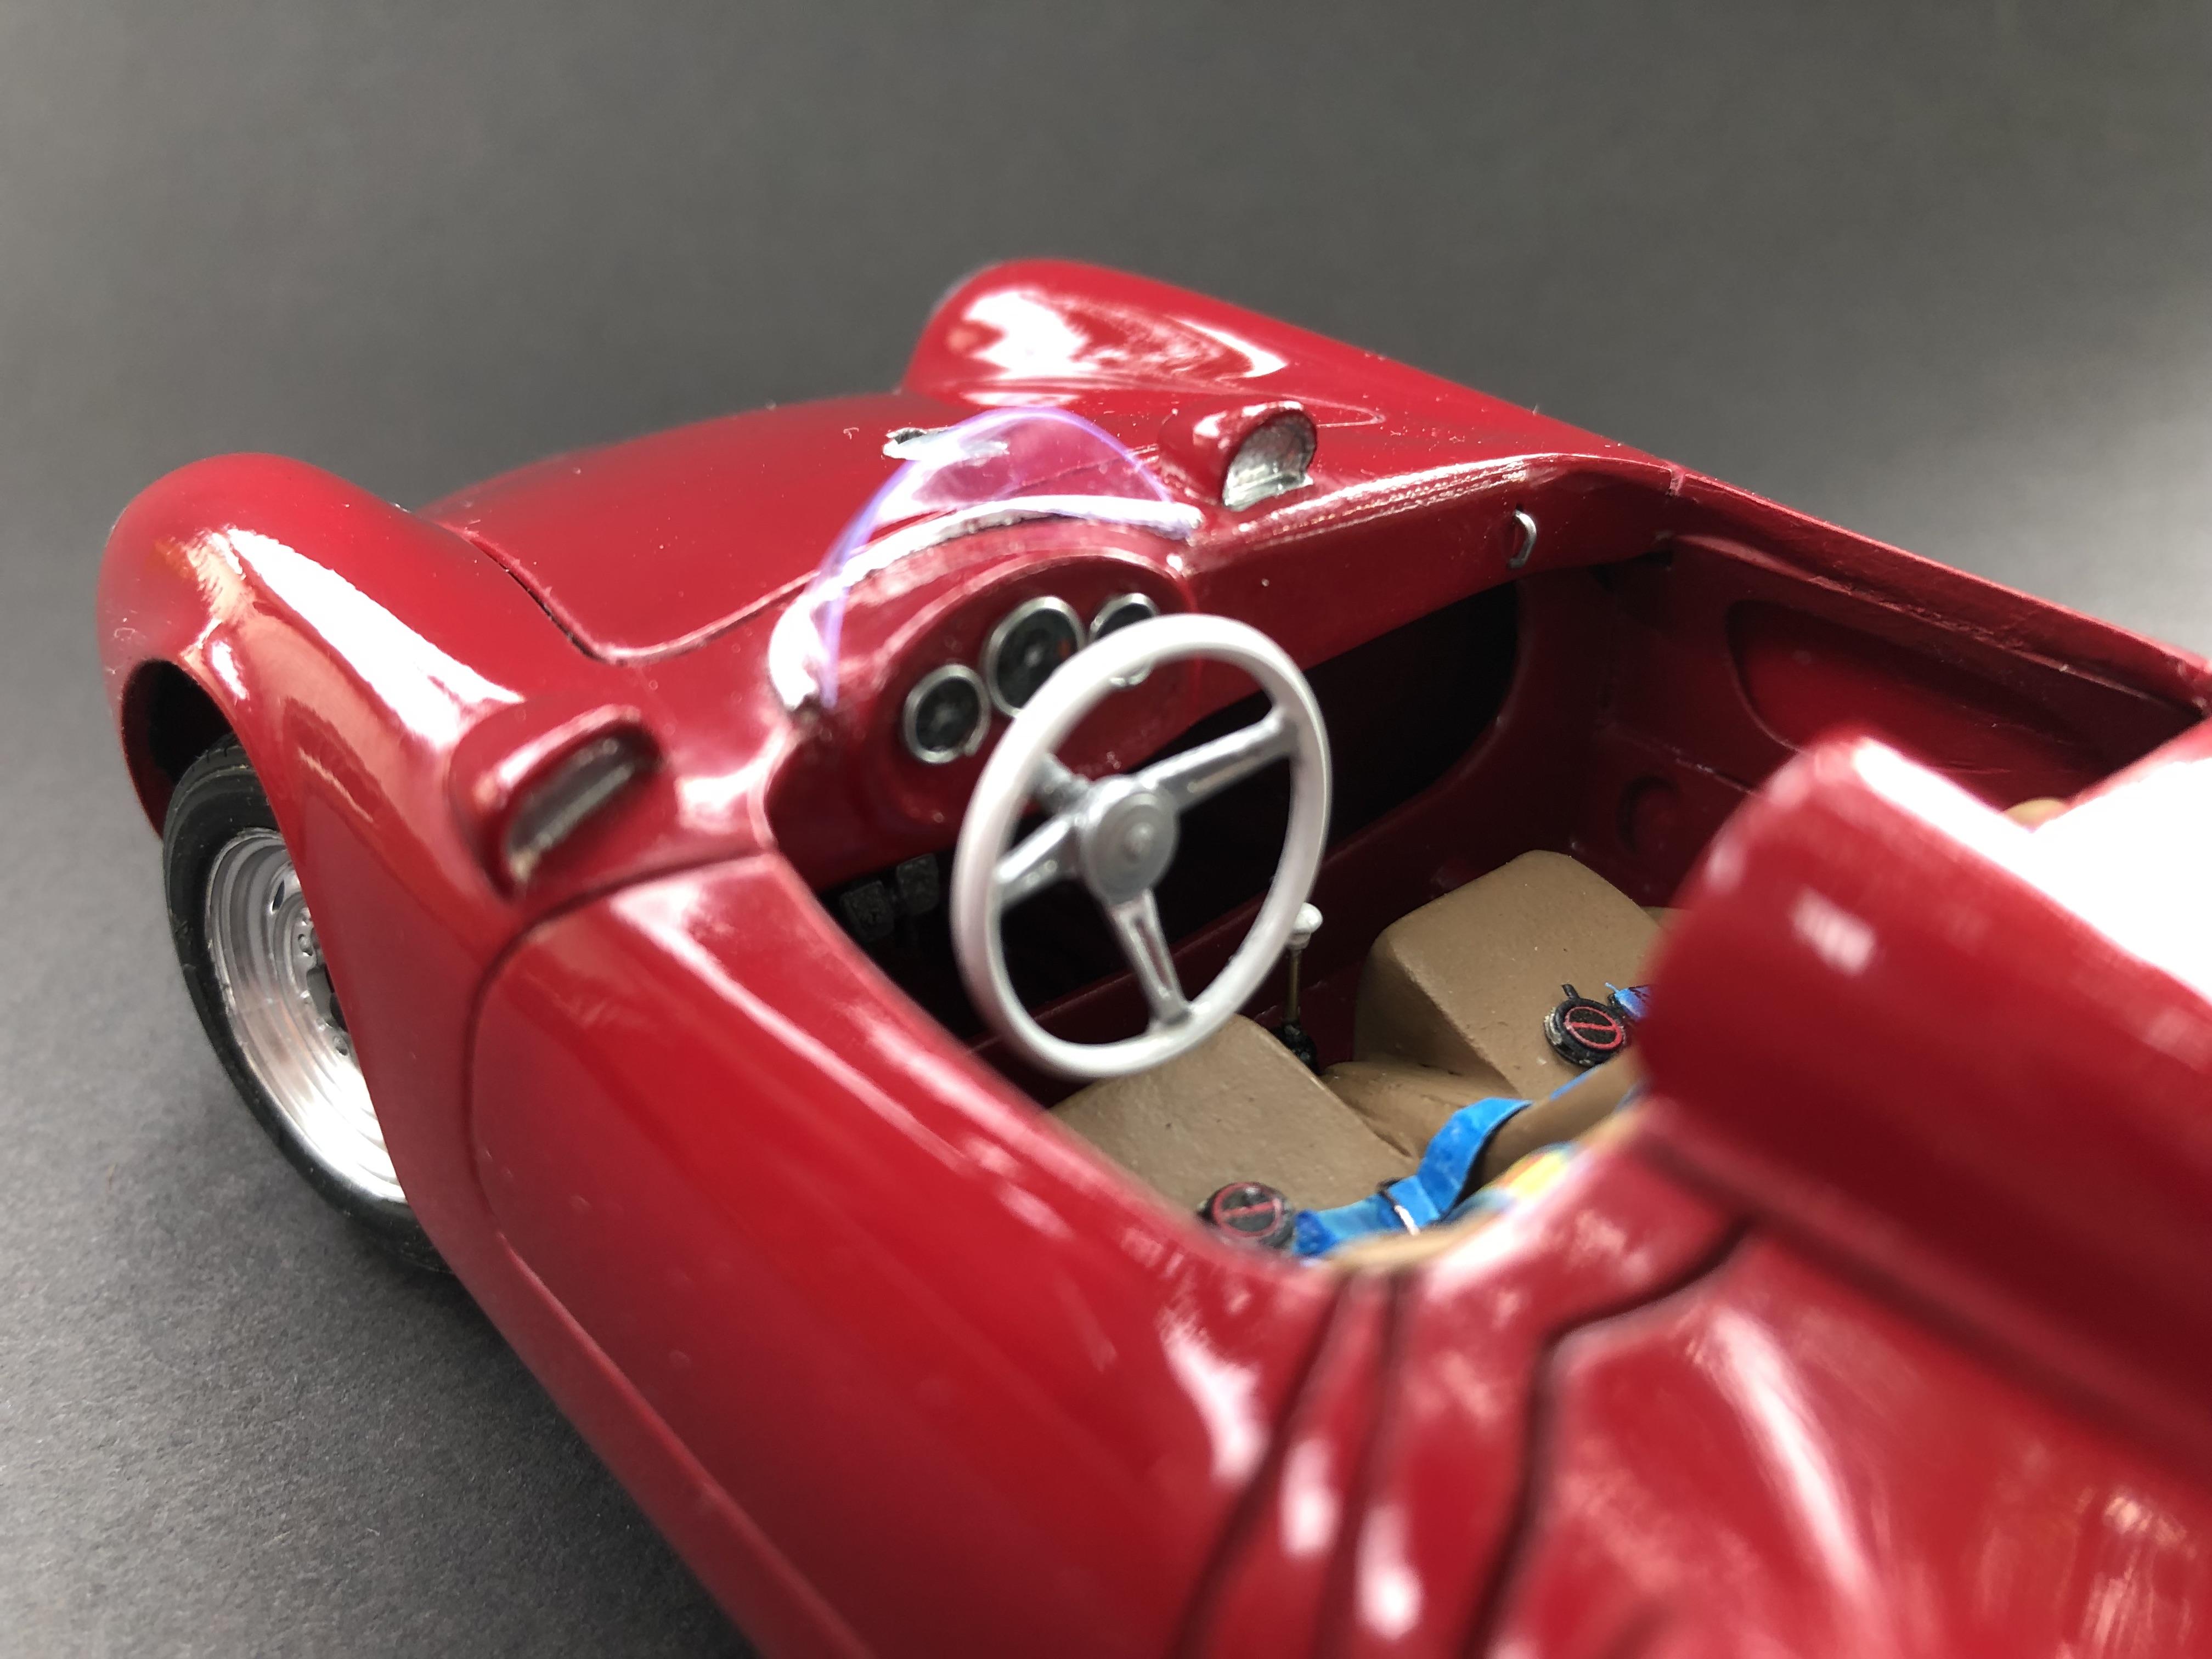
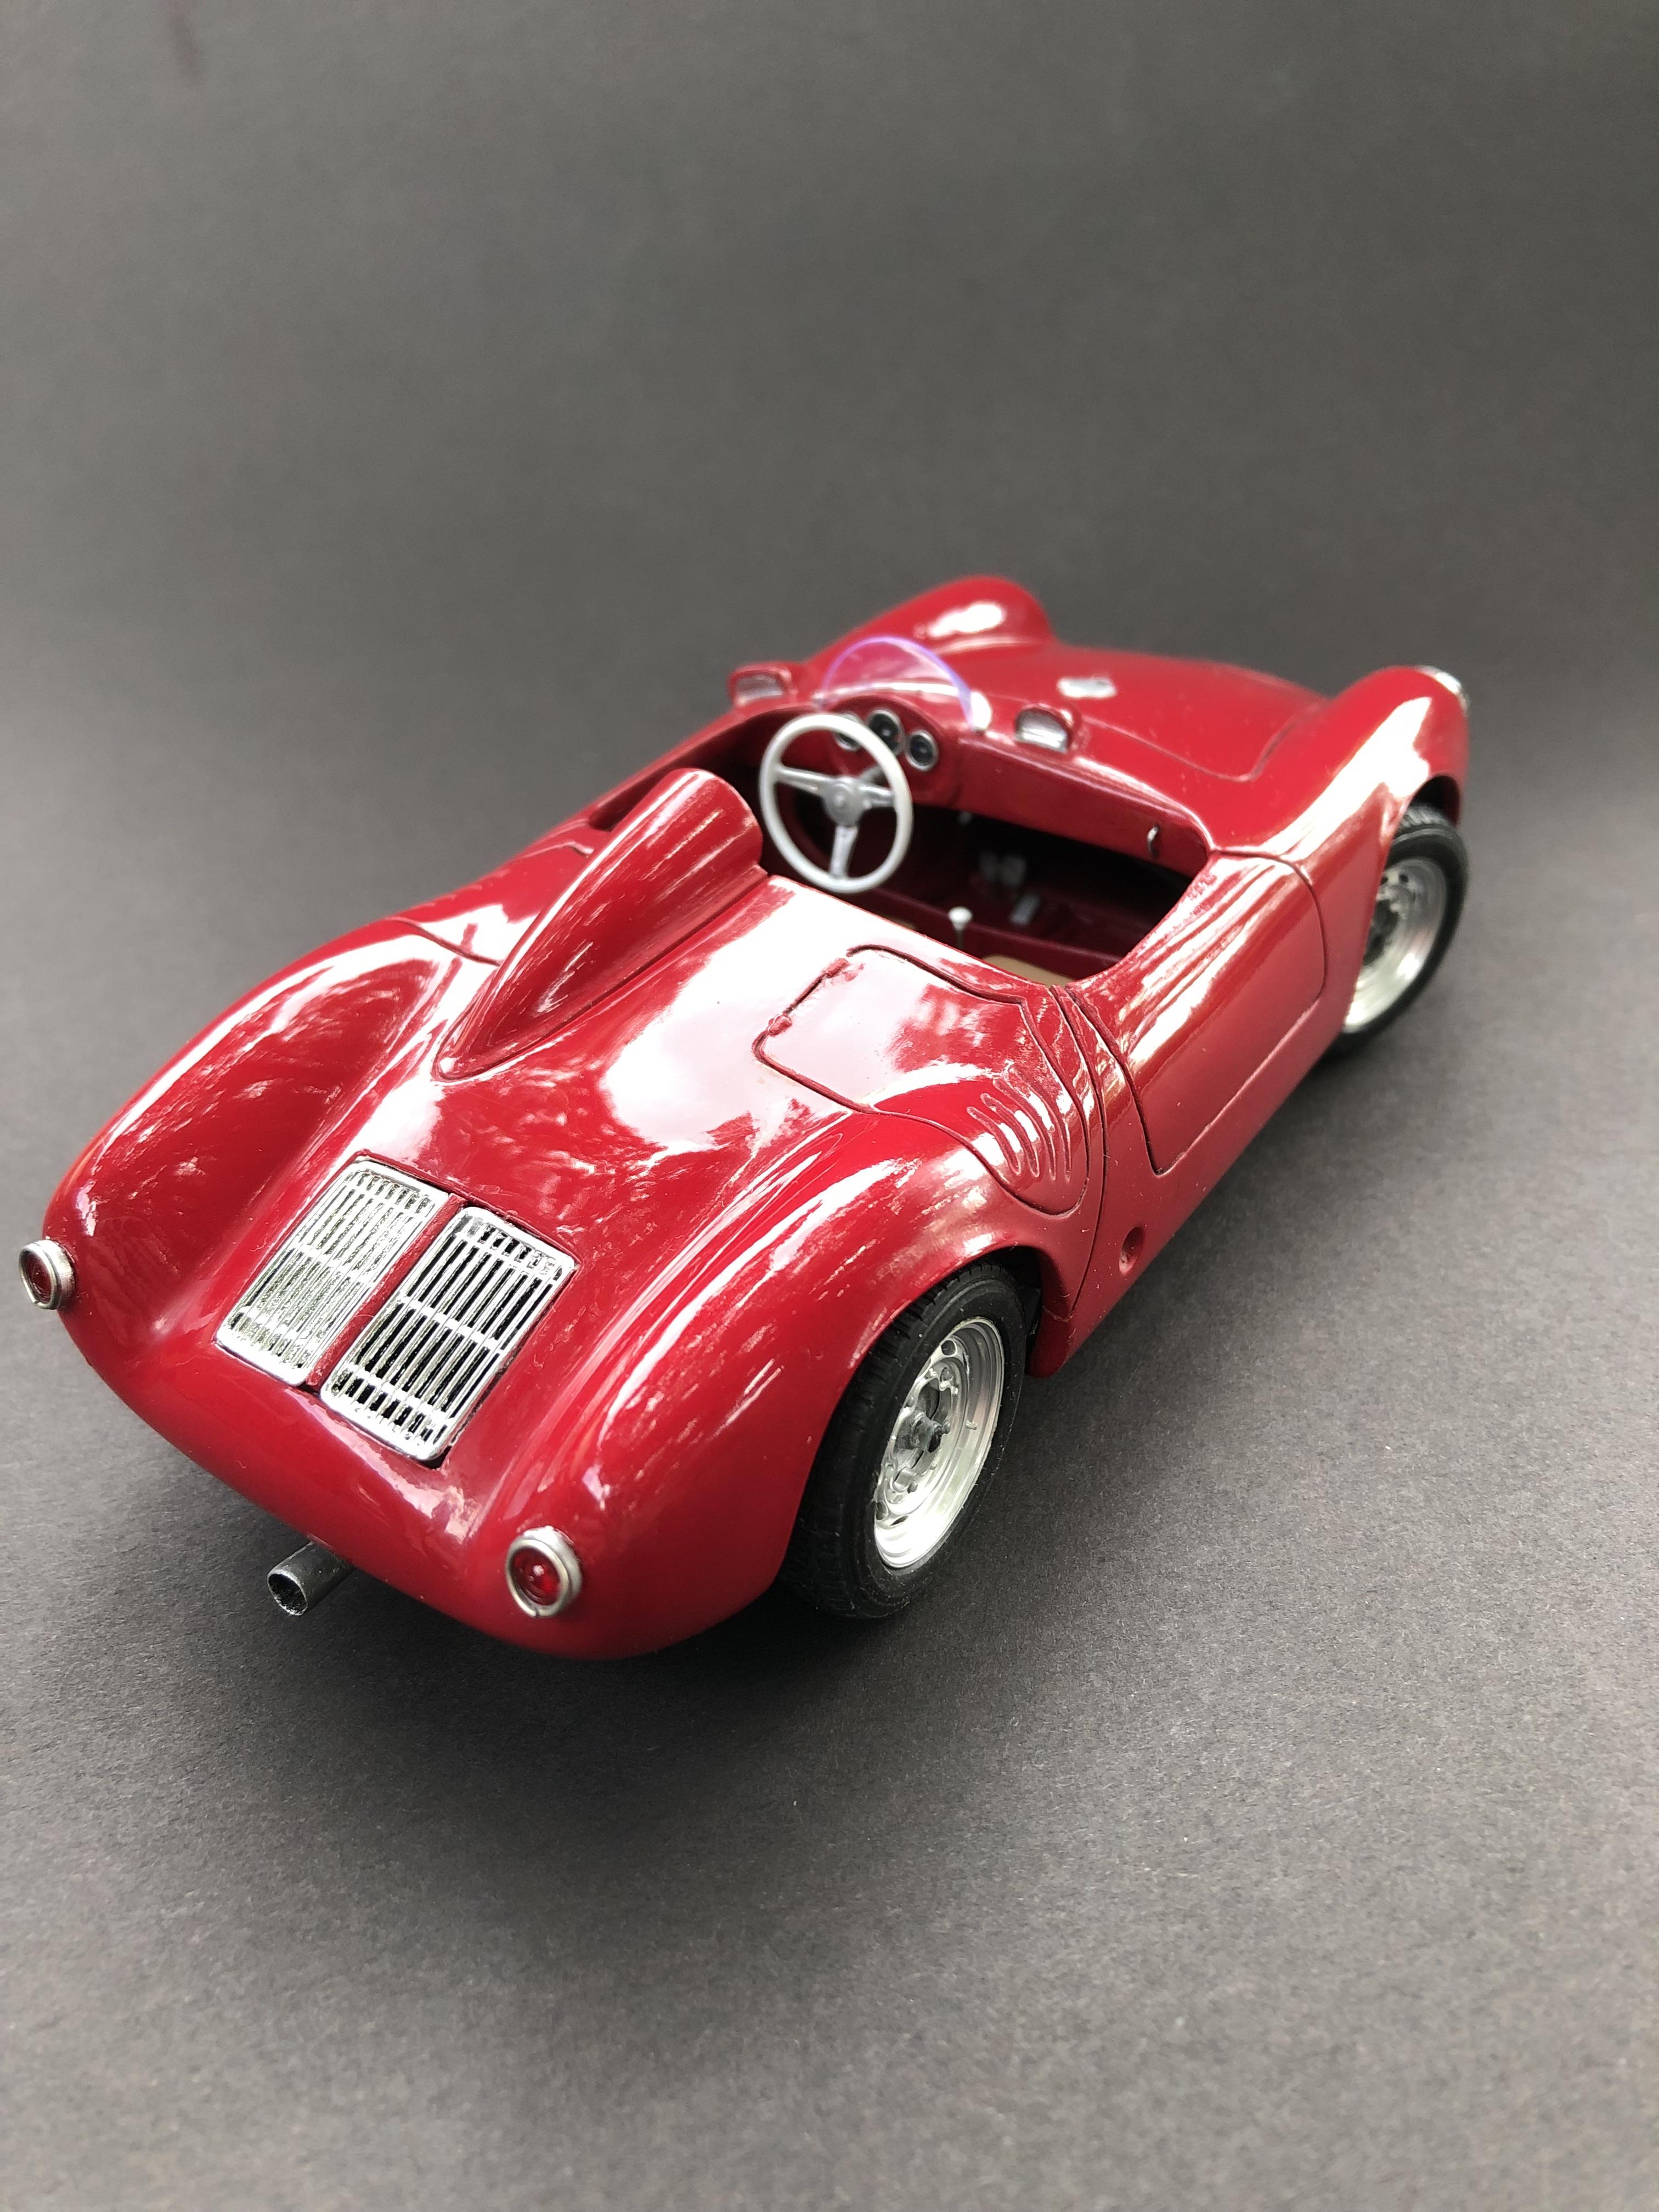
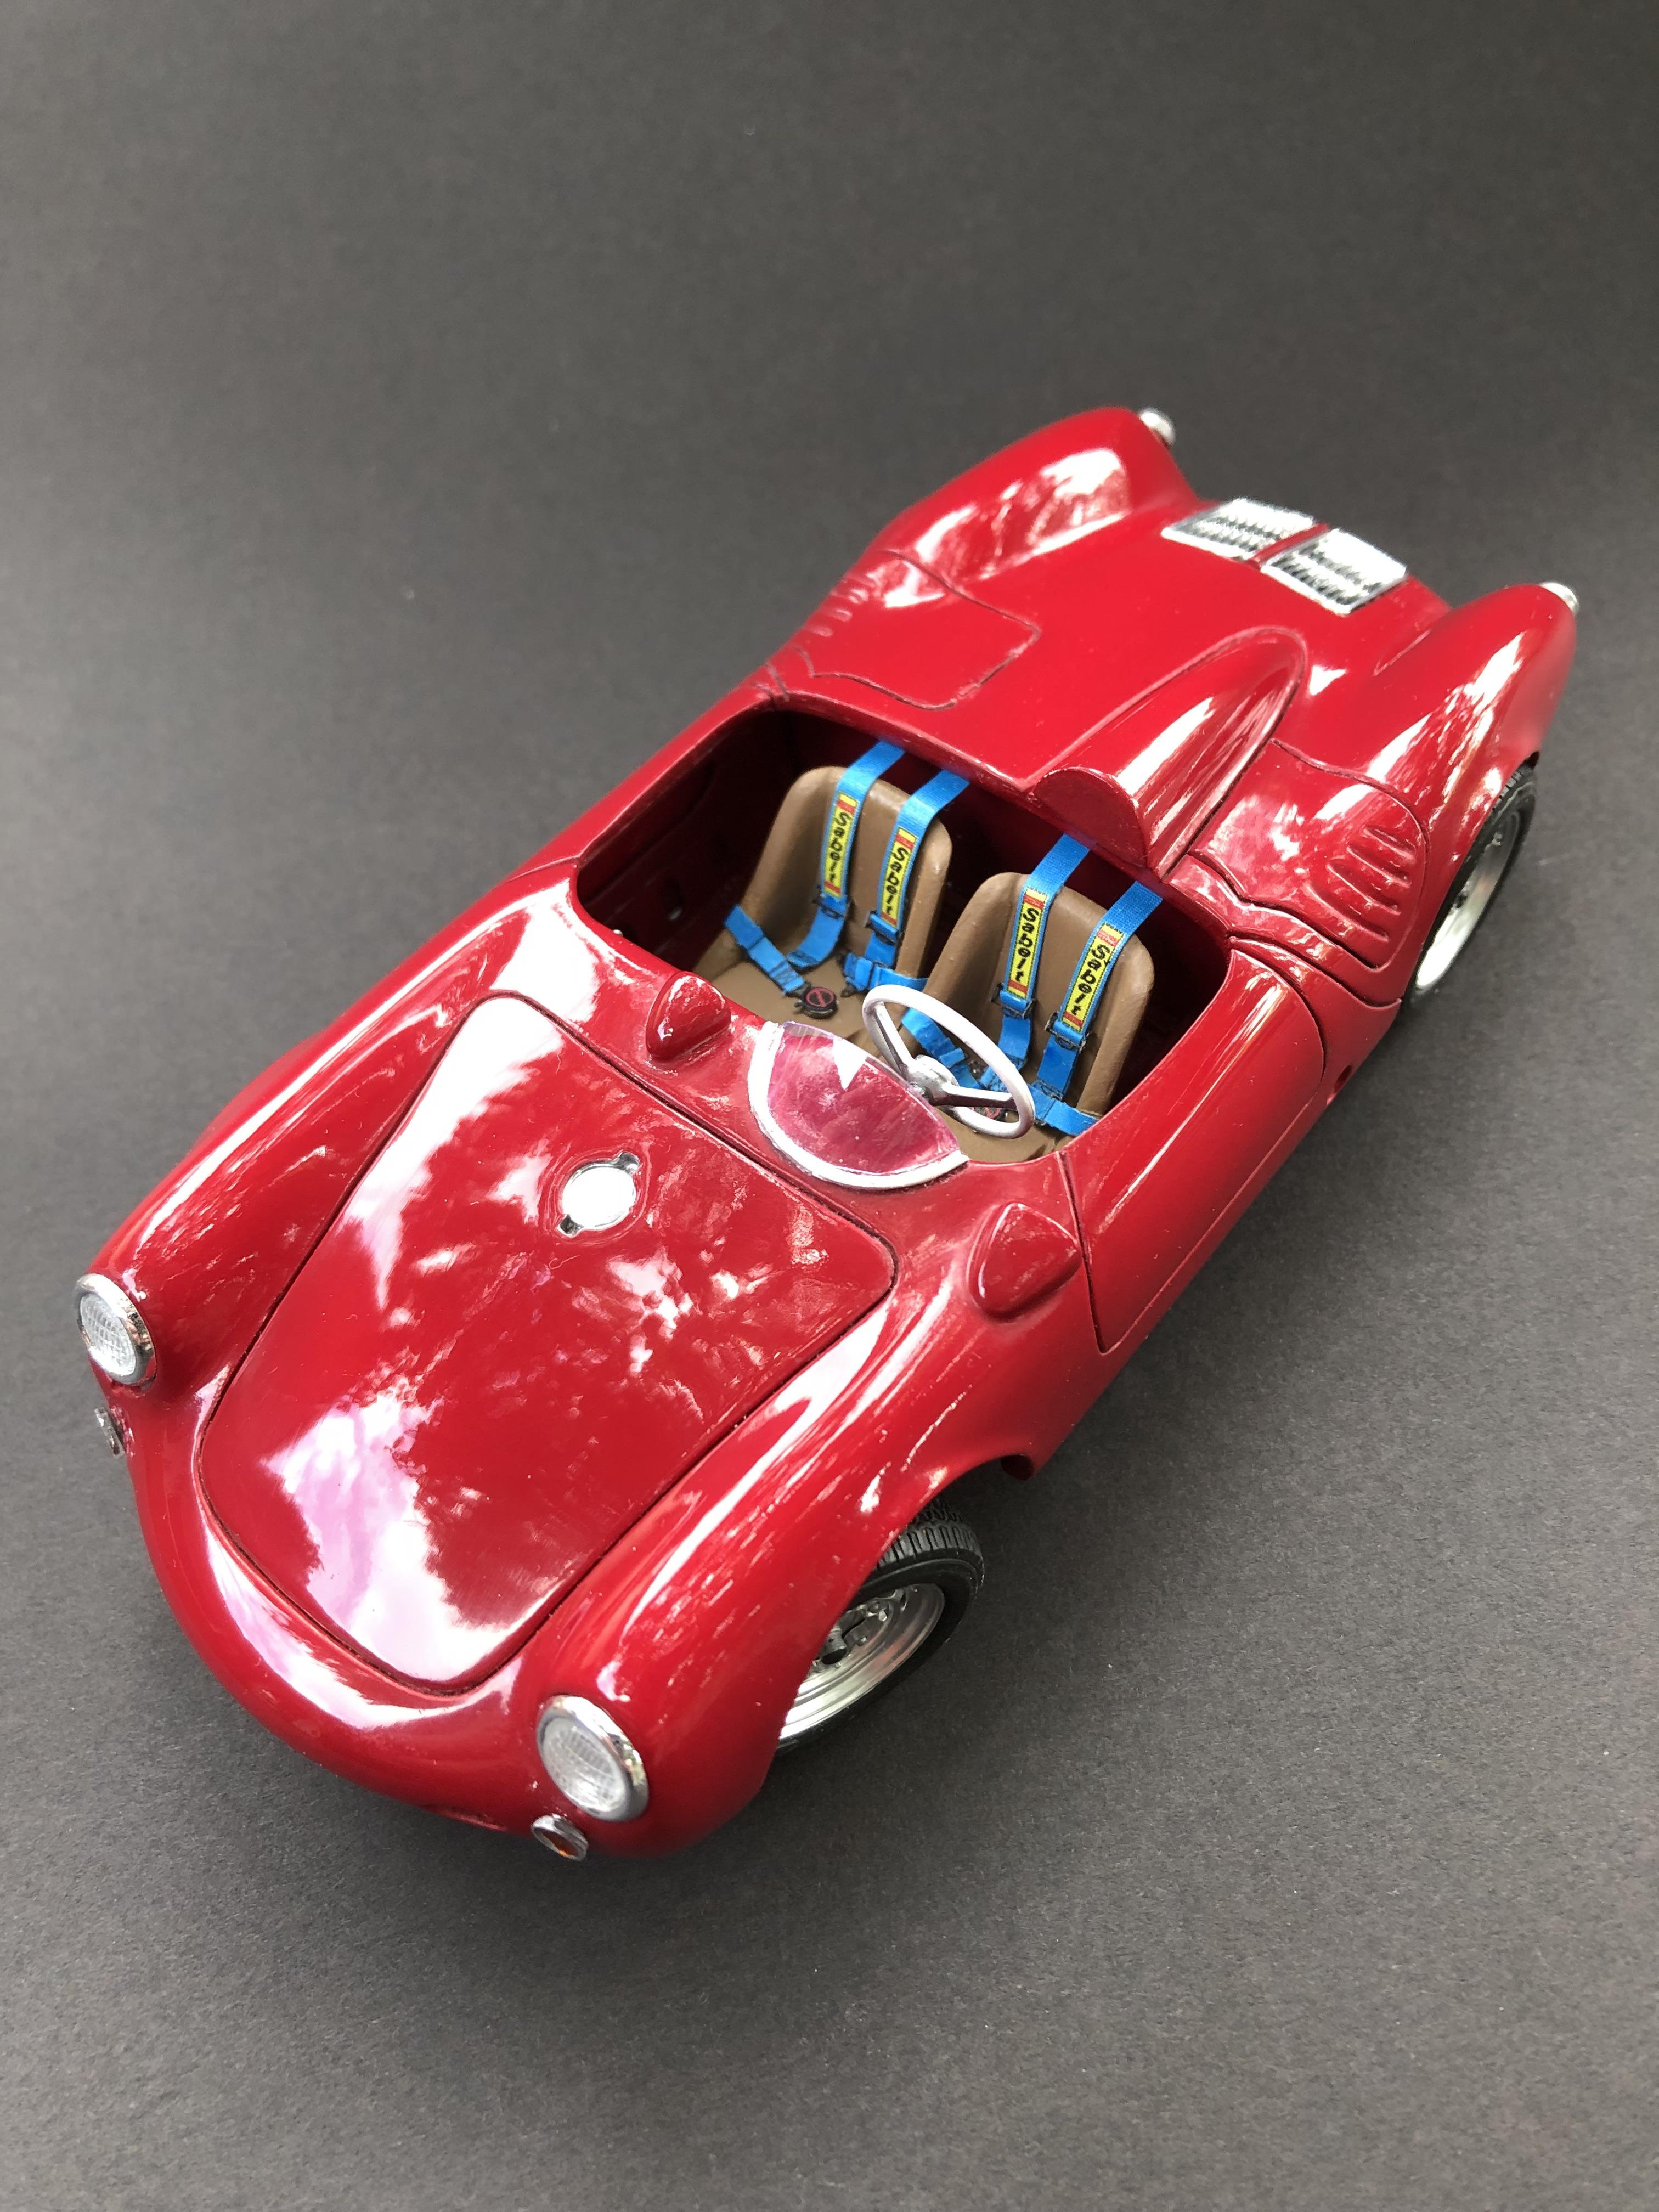
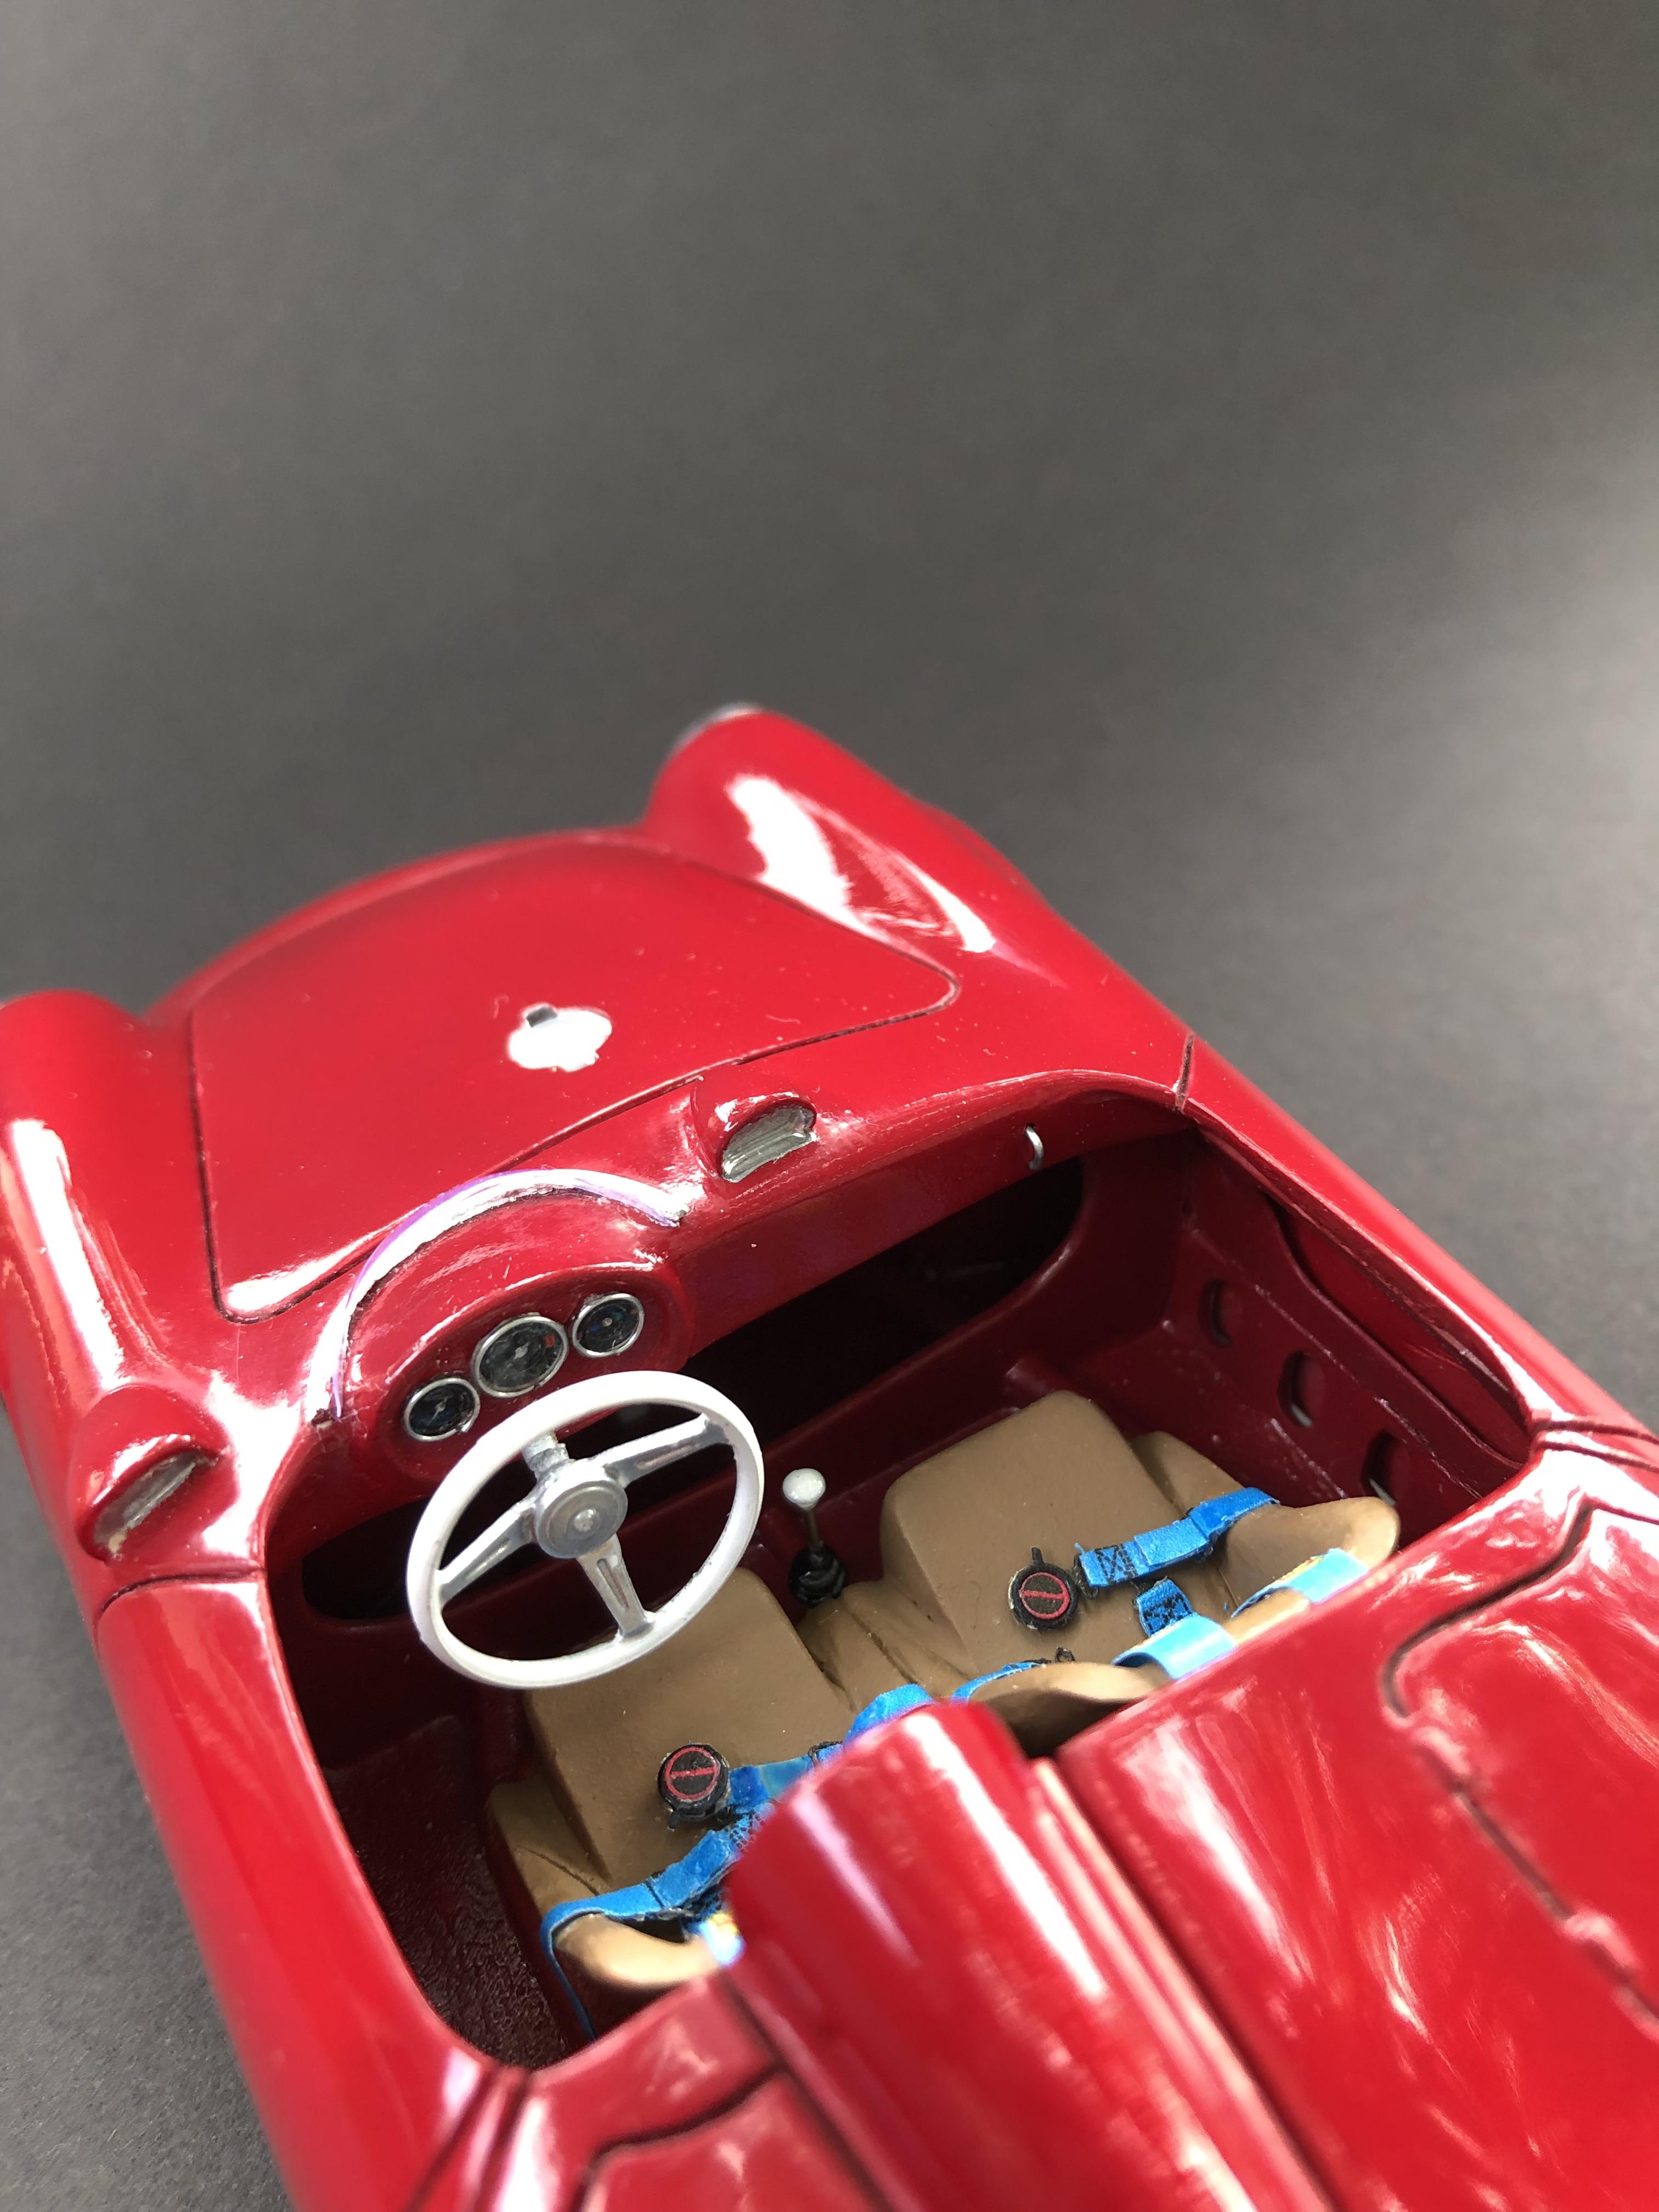
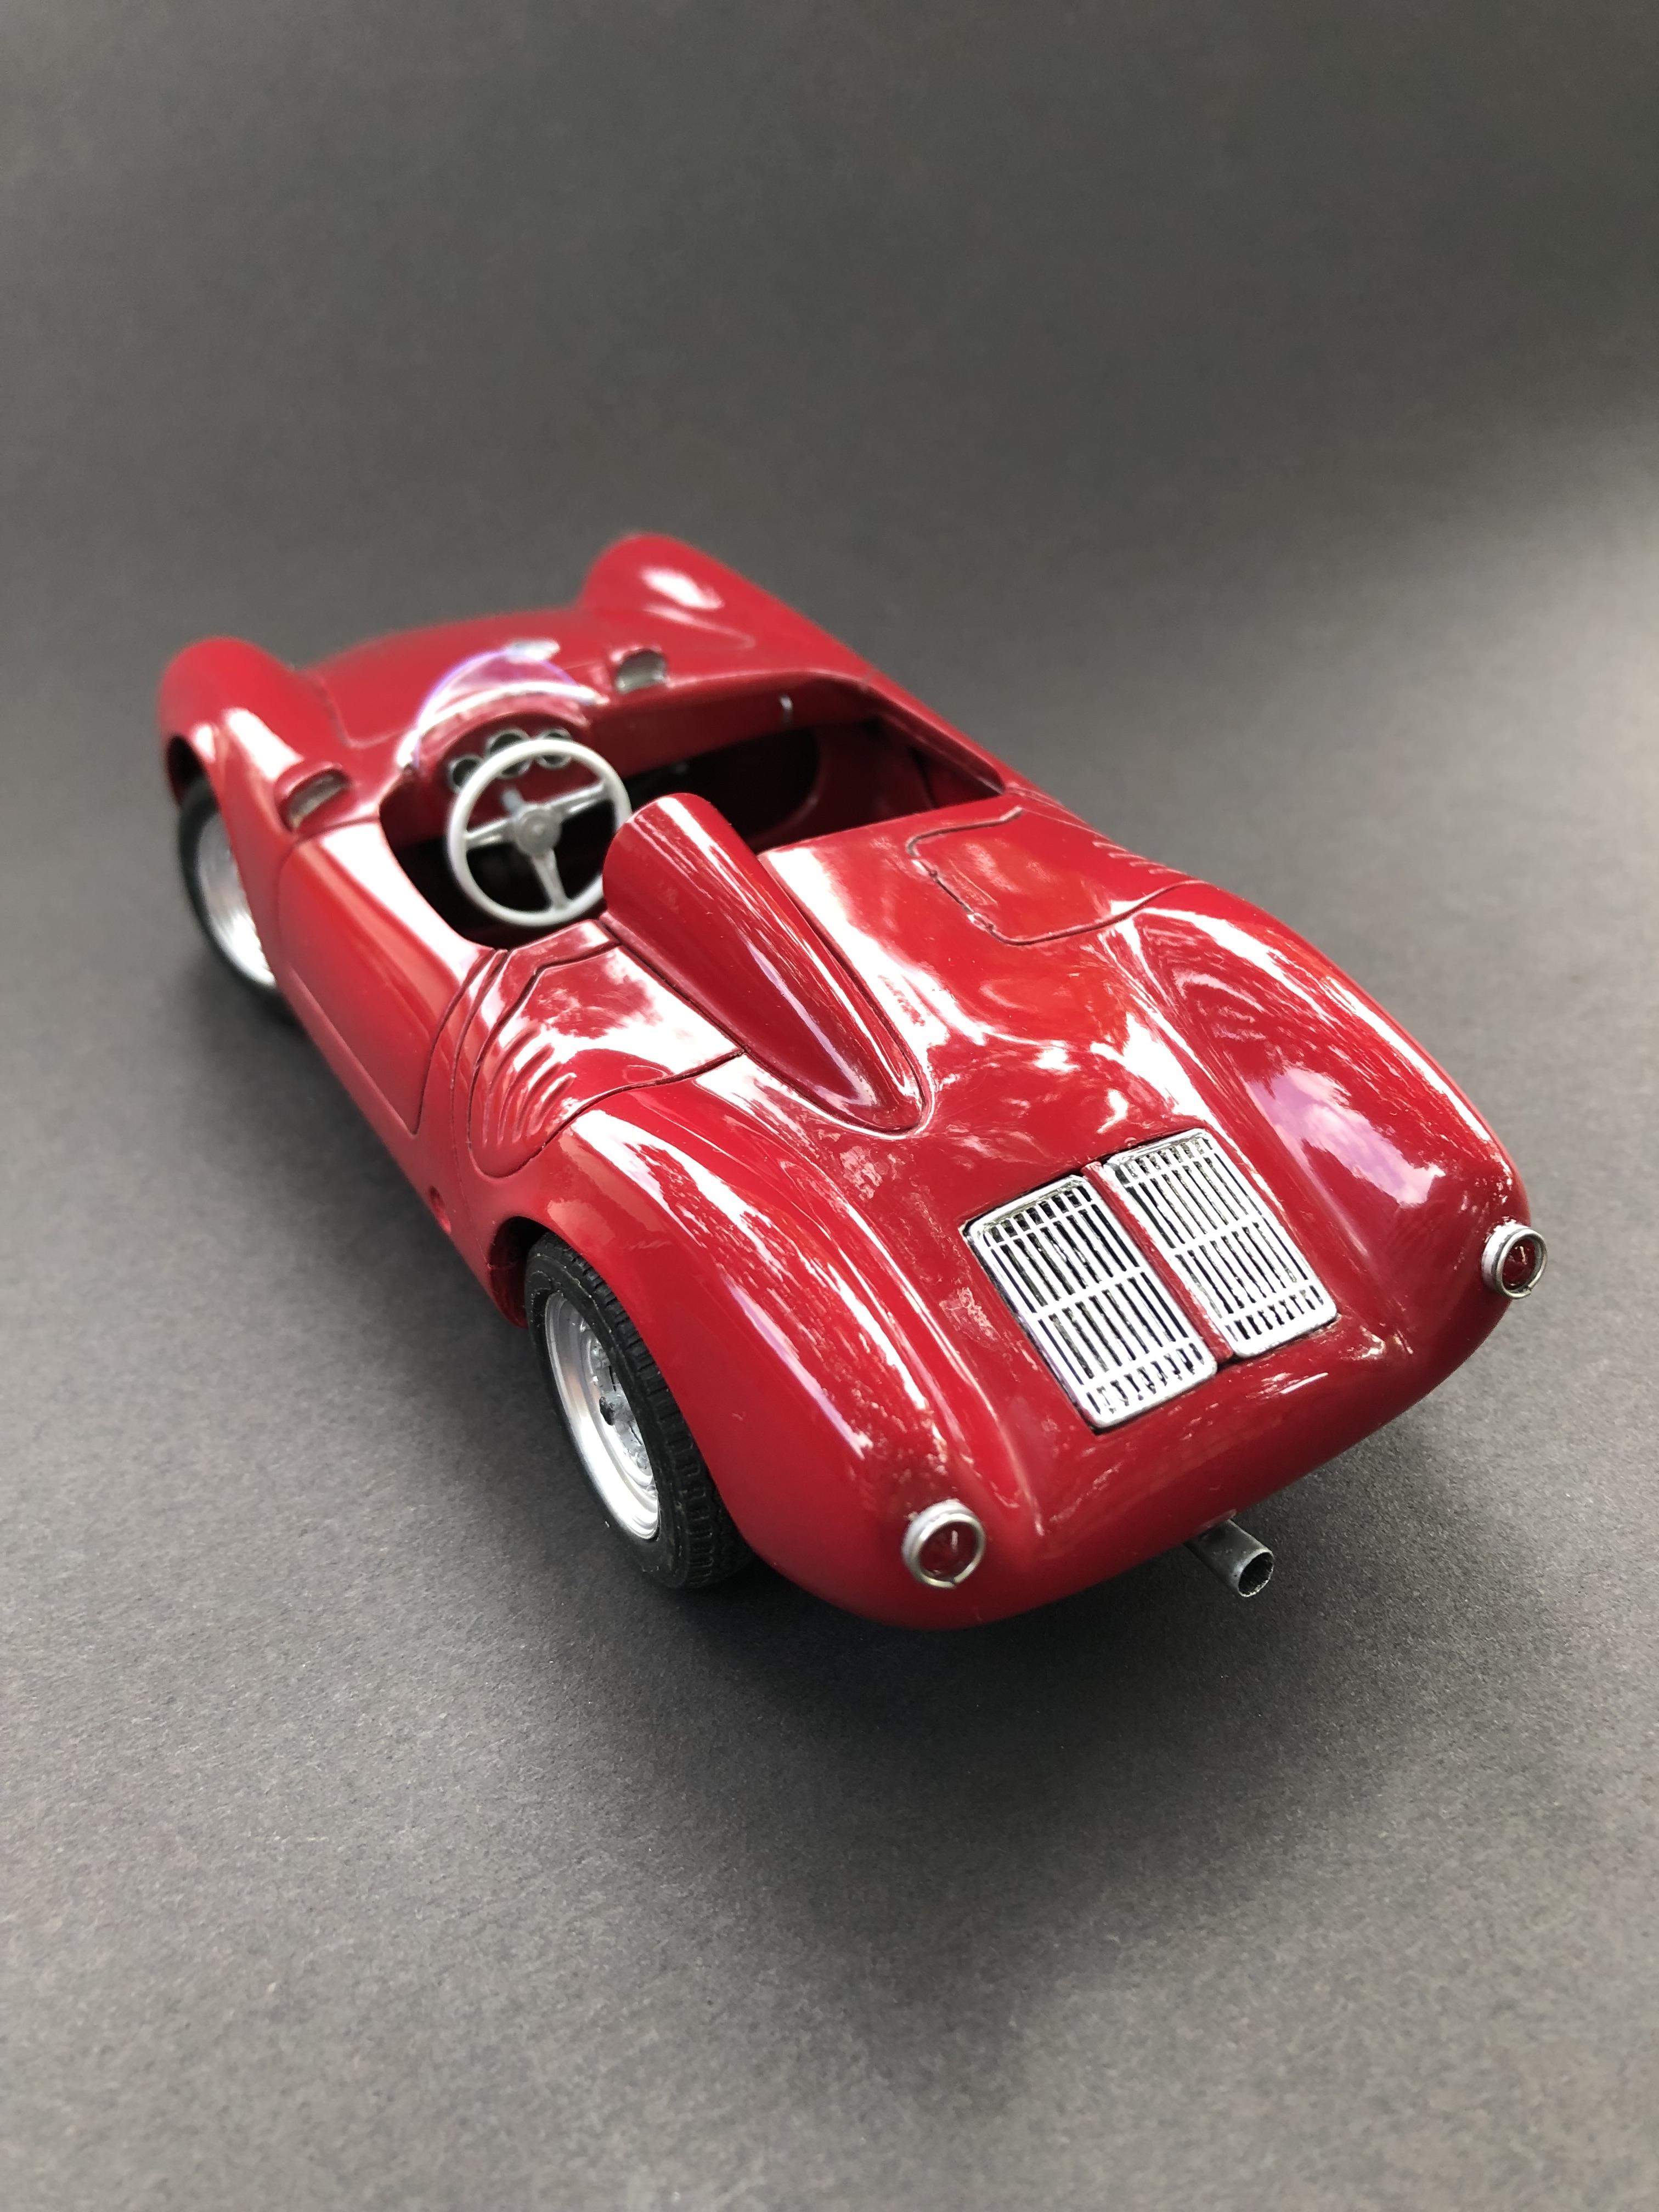
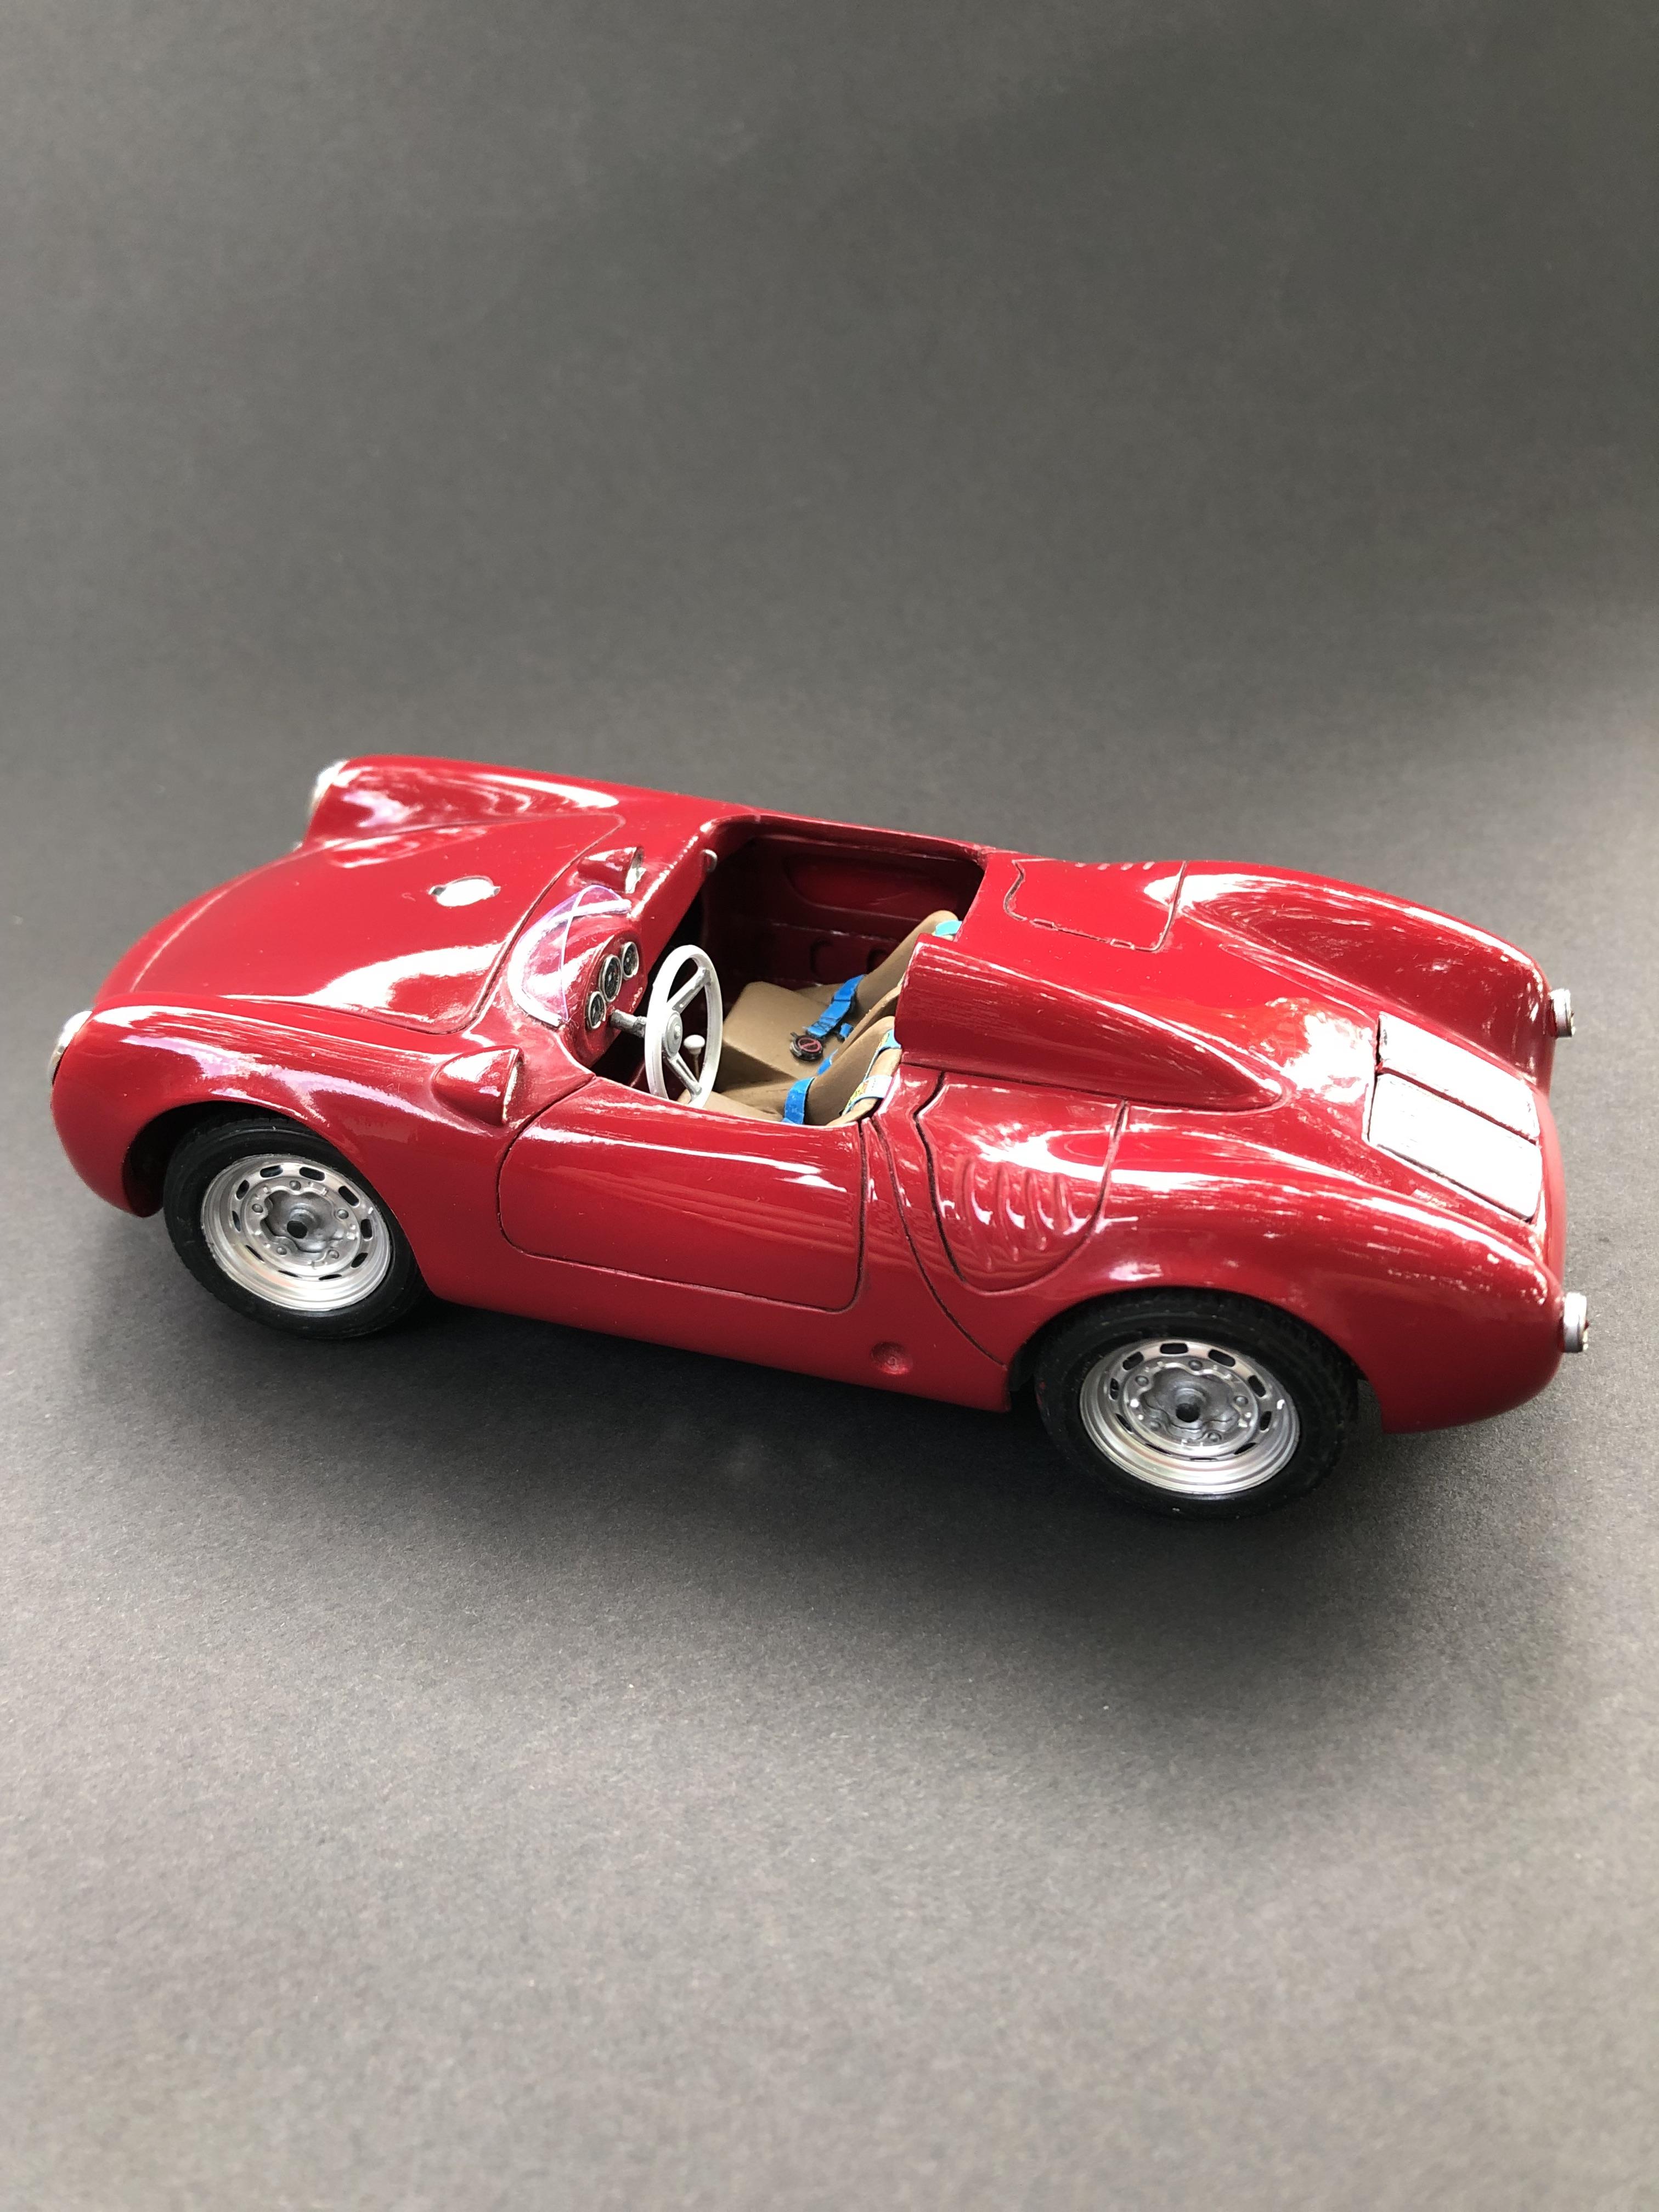
This is the Jimmy Flintstone resin offering with a few parts from the Fujimi Porsche 356 kit. This was a club build that was made possible with the extreme generosity of Rob, a member of my club. I added the interior front bulkhead and side panels, the windscreen, the gauges and seatbelts. I ground down the ‘bustle back’ on the rear end to give it a more mainstream 550 Spyder look. I’m in search of some better, more accurate headlights for it. The paint is Vallejo acrylic ‘heavy red’ cleared with Model Master wet look lacquer. Thanks for looking!
- 22 replies
-
- 10
-
-
With the recent addition of some more early Porsche diecasts to my collection I thought it was wise to take an inventory and photo. New are the Whitebox 356A, Welly 356A Speedster and Welly 550 Spyder. Just for clarity the #32 and #34 aren't diecast but plastic and resin.
-
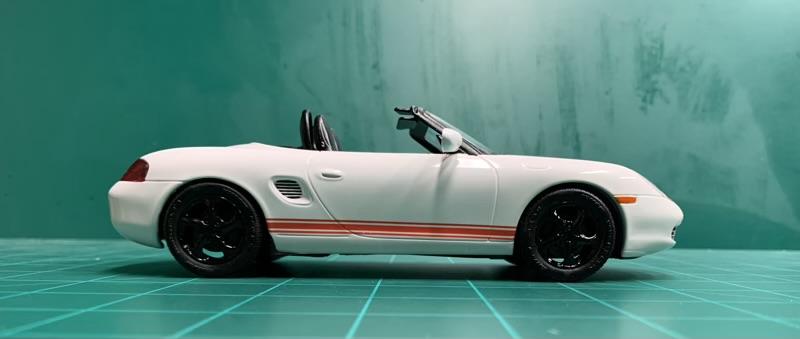
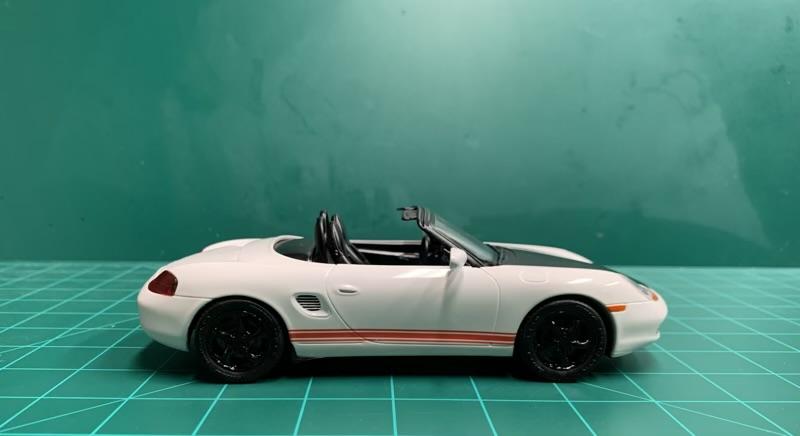
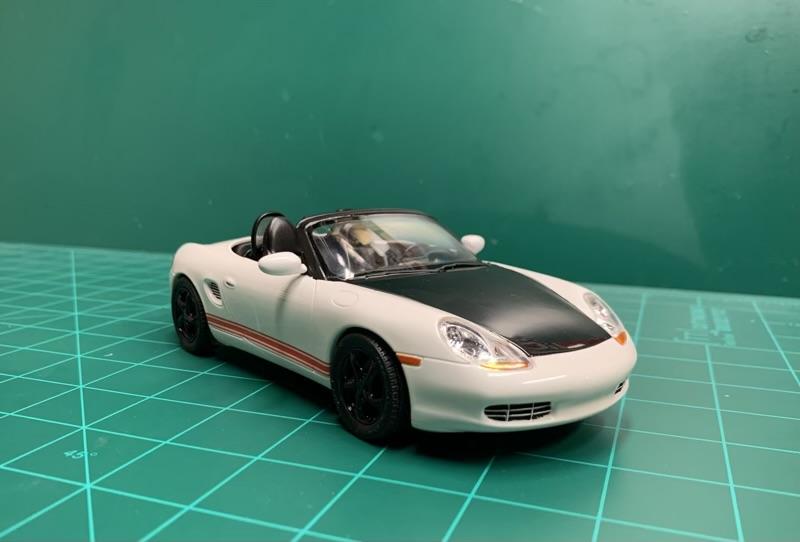
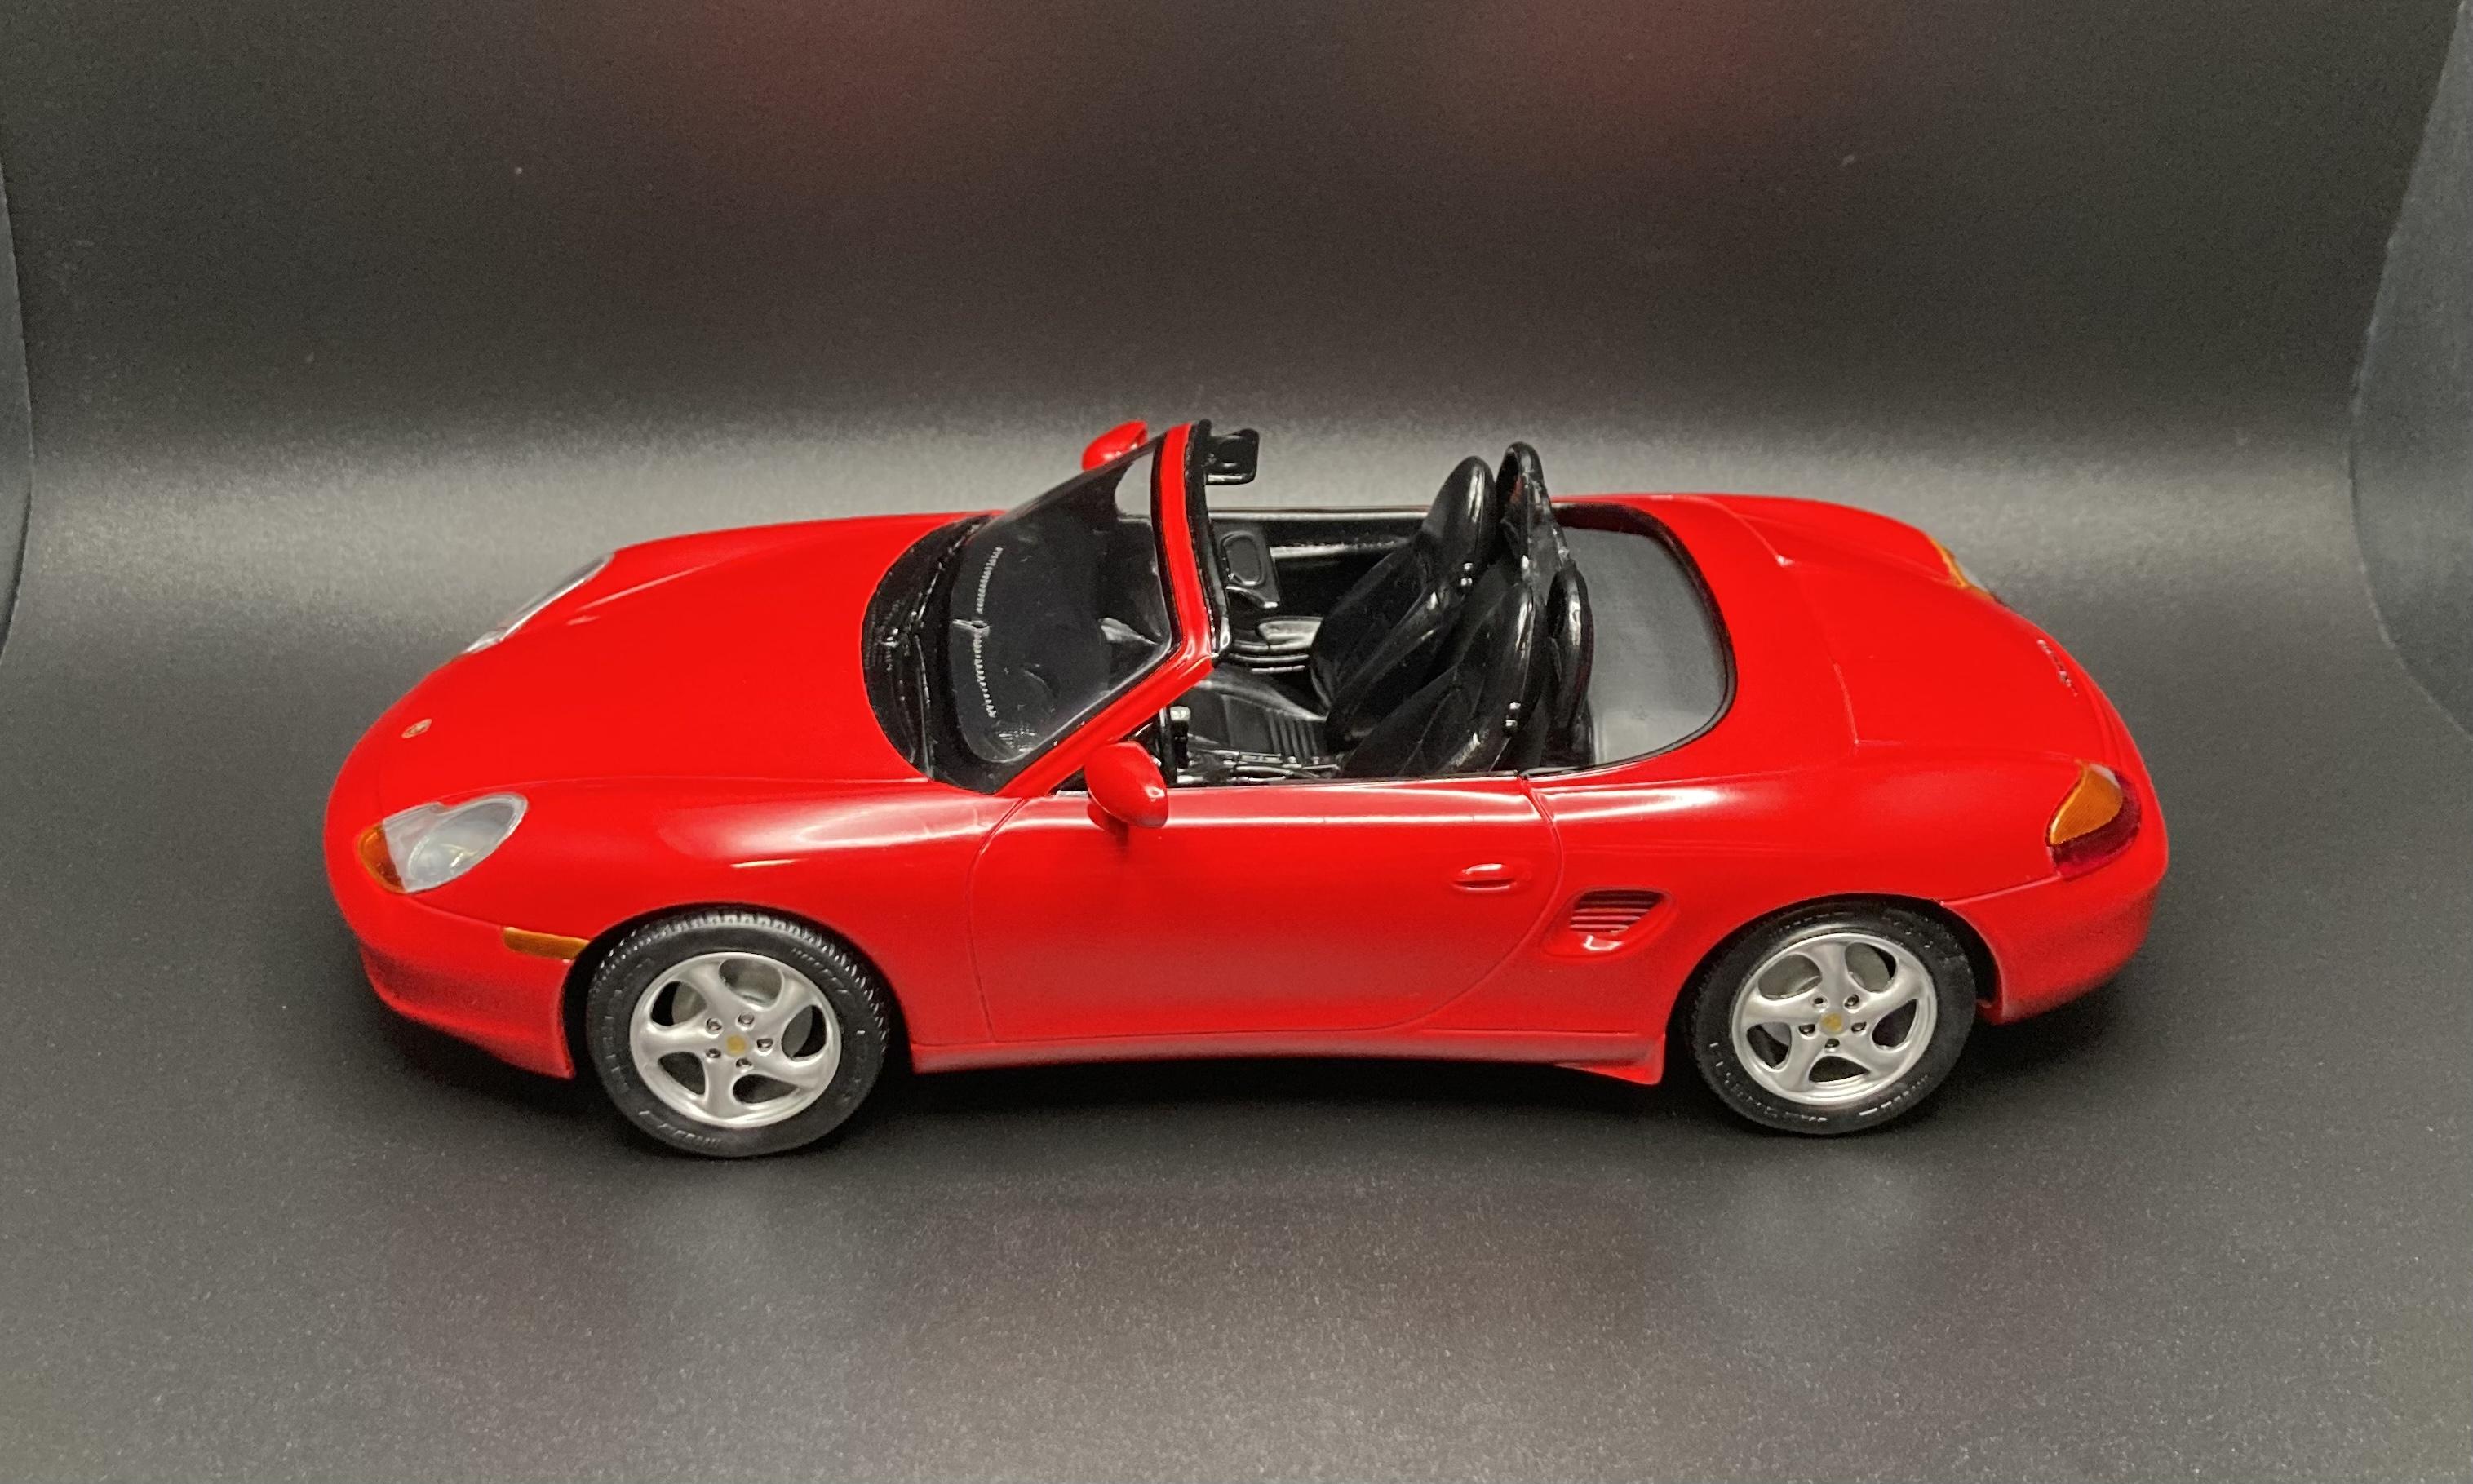
Just finished this one. My first completed build since 2022! This is the Revell Porsche Boxster Snap Tite kit from 2015. It was a gift from my wife and daughter several years ago. I built this as a test bed to try out a few different products and techniques. As such, there are a few “firsts” for me on this project. For starters, the paint. This was shot with Tamiya TS-26 Pure White, Testors Extreme lacquer blazing black, and cleared with Rustolium clear lacquer. I’d never used the Tamiya rattle cans before, and wow! Great stuff! The undercarriage was lightly weathered (another first for me) with Tamiya panel line accent, and Mr. Weathering Color. The kit was built straight out of the box, with the only addition being the stripe decals, taken from the AMT Mercury Comet kit. I hope you enjoy! As always, questions, comments, and constructive criticism are welcome. Thanks for looking.👍
-
Here she is, my Tamiya Porsche 911 GT2 painted in OPI fingernail polish. This is the first time I have painted a model in fingernail polish and I am pleased with the results. It is built box stock as that is the category I want to enter it into at upcoming shows. Below is the link to the WIP. I took a lot of pictures of it because each angle gave a different result. I hope you like it as much as I do!
- 28 replies
-
- 10
-
-
- nail polish
- tamiya
- (and 1 more)
-
My current project is this Tamiya kit of the Porsche 911 GT2. I had recently seen a picture of a Porsche in a very unique color and fell in love with it. That picture was the inspiration for this build. I have been itching to shoot a model car in fingernail polish and I found a color of polish that was fairly close to the color of the real car. I figured now is the time to do it. I have experimented with shooting fingernail polish and am fairly comfortable with it. Before committing fingernail polish to the model, I experimented with the fingernail polish over a white primer and over a black base. I really liked the black base so that is how I shot the model. Here we go. I will caption each photo as needed. The Tamiya kit. The kit parts and the fingernail polish. The test spoon. I usually use a black Sharpie to highlight the mold seams. I am fairly certain that this kit started life as the race car kit. Tamiya have you remove a number of molded on items. These are also highlighted with a Sharpie. While I am at it I always rescribe all panel lines. There are a lot of parts that need to be painted body color. I made a list of these items and prepped them for priming and painting. I primed everything with Gravity Colors (Spain) primer. Next, I shot everything in Tamiya LP-1 Black. I let the black cure and knocked it down for a smooth surface. I only did the last step for the body parts. Here are 2 bottles of OPI fingernail polish slightly over-thinned with Mr. Color Leveling Thinner. Personally, I think it is a beautiful color! Approx. 5 or 6 coats applied. Some people will scoff at the Tamiya anti-static brush and the cost of it, but I use it all of the time and feel it works. I might have had 1 speck of dust in all of those layers of polish. The first two pictures are of the body fresh out of the paint booth. I let the fingernail polish cure overnight. Next up, I shot the body and associated parts in Tamiya TS-13 Clear straight out of the can. Lastly, here are three pictures of just the body shell after the clear has cured. Let me know what you think!
- 29 replies
-
- 8
-
-
- nail polish
- tamiya
- (and 2 more)
-
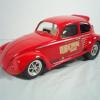
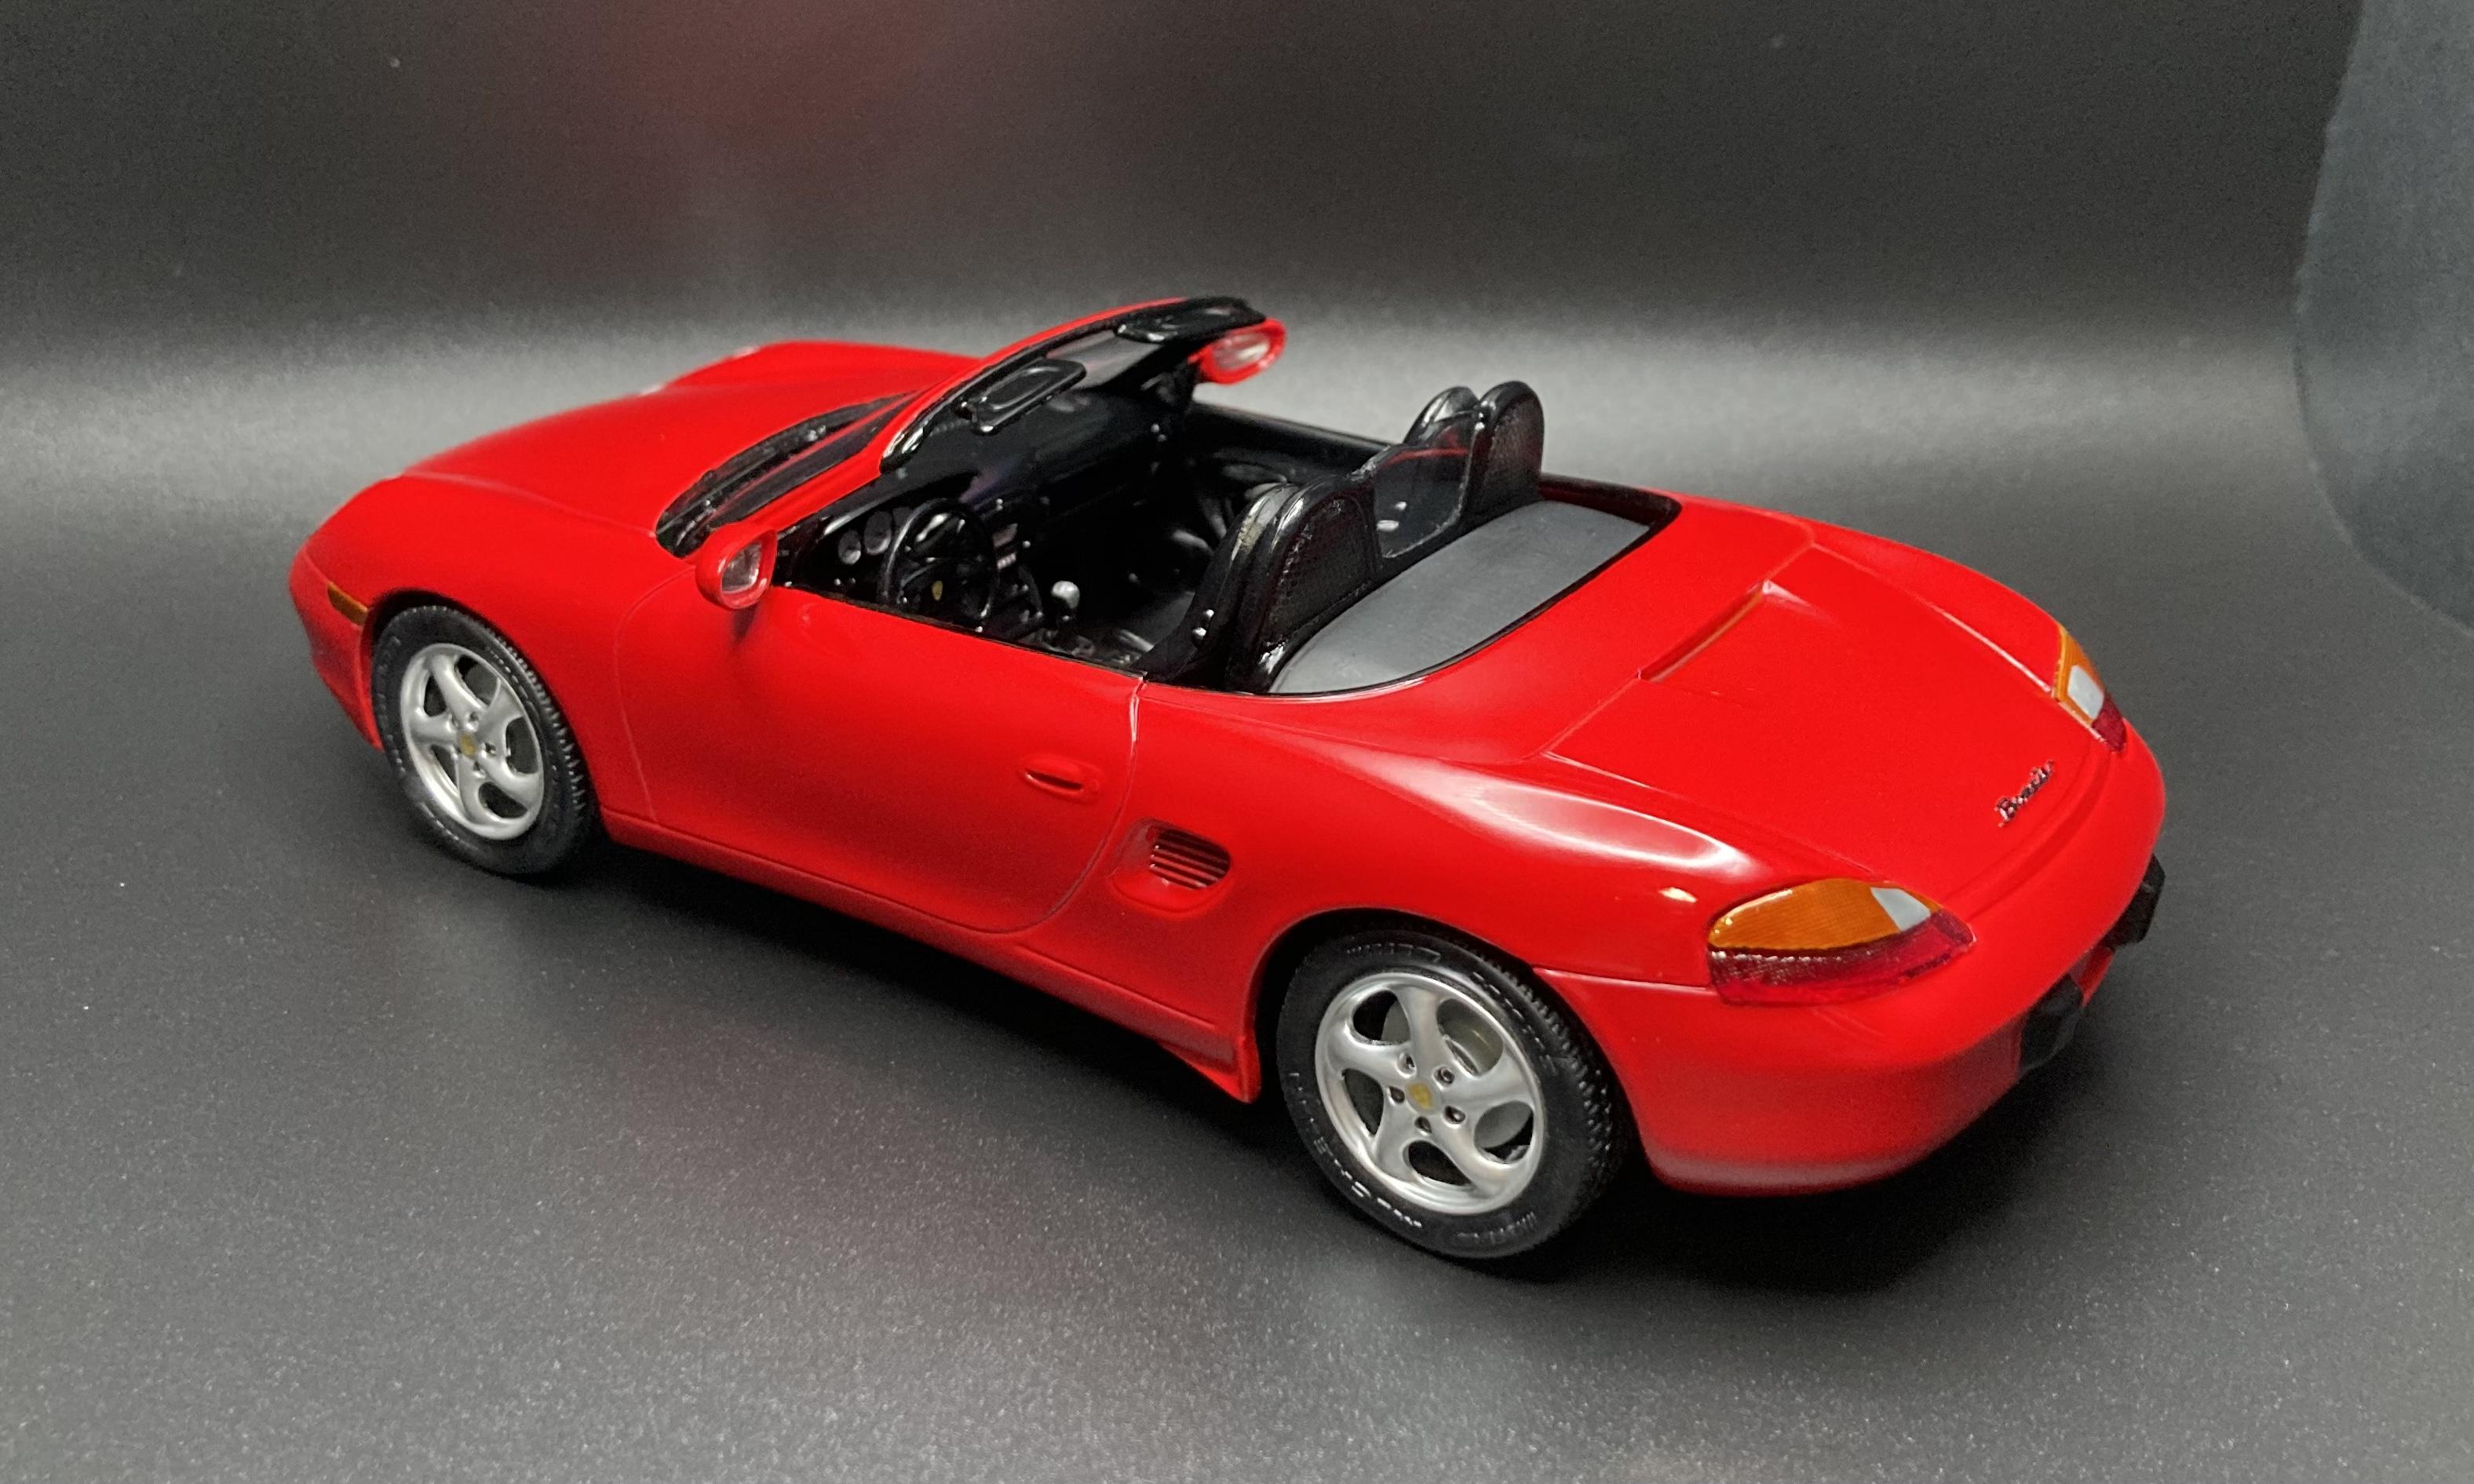
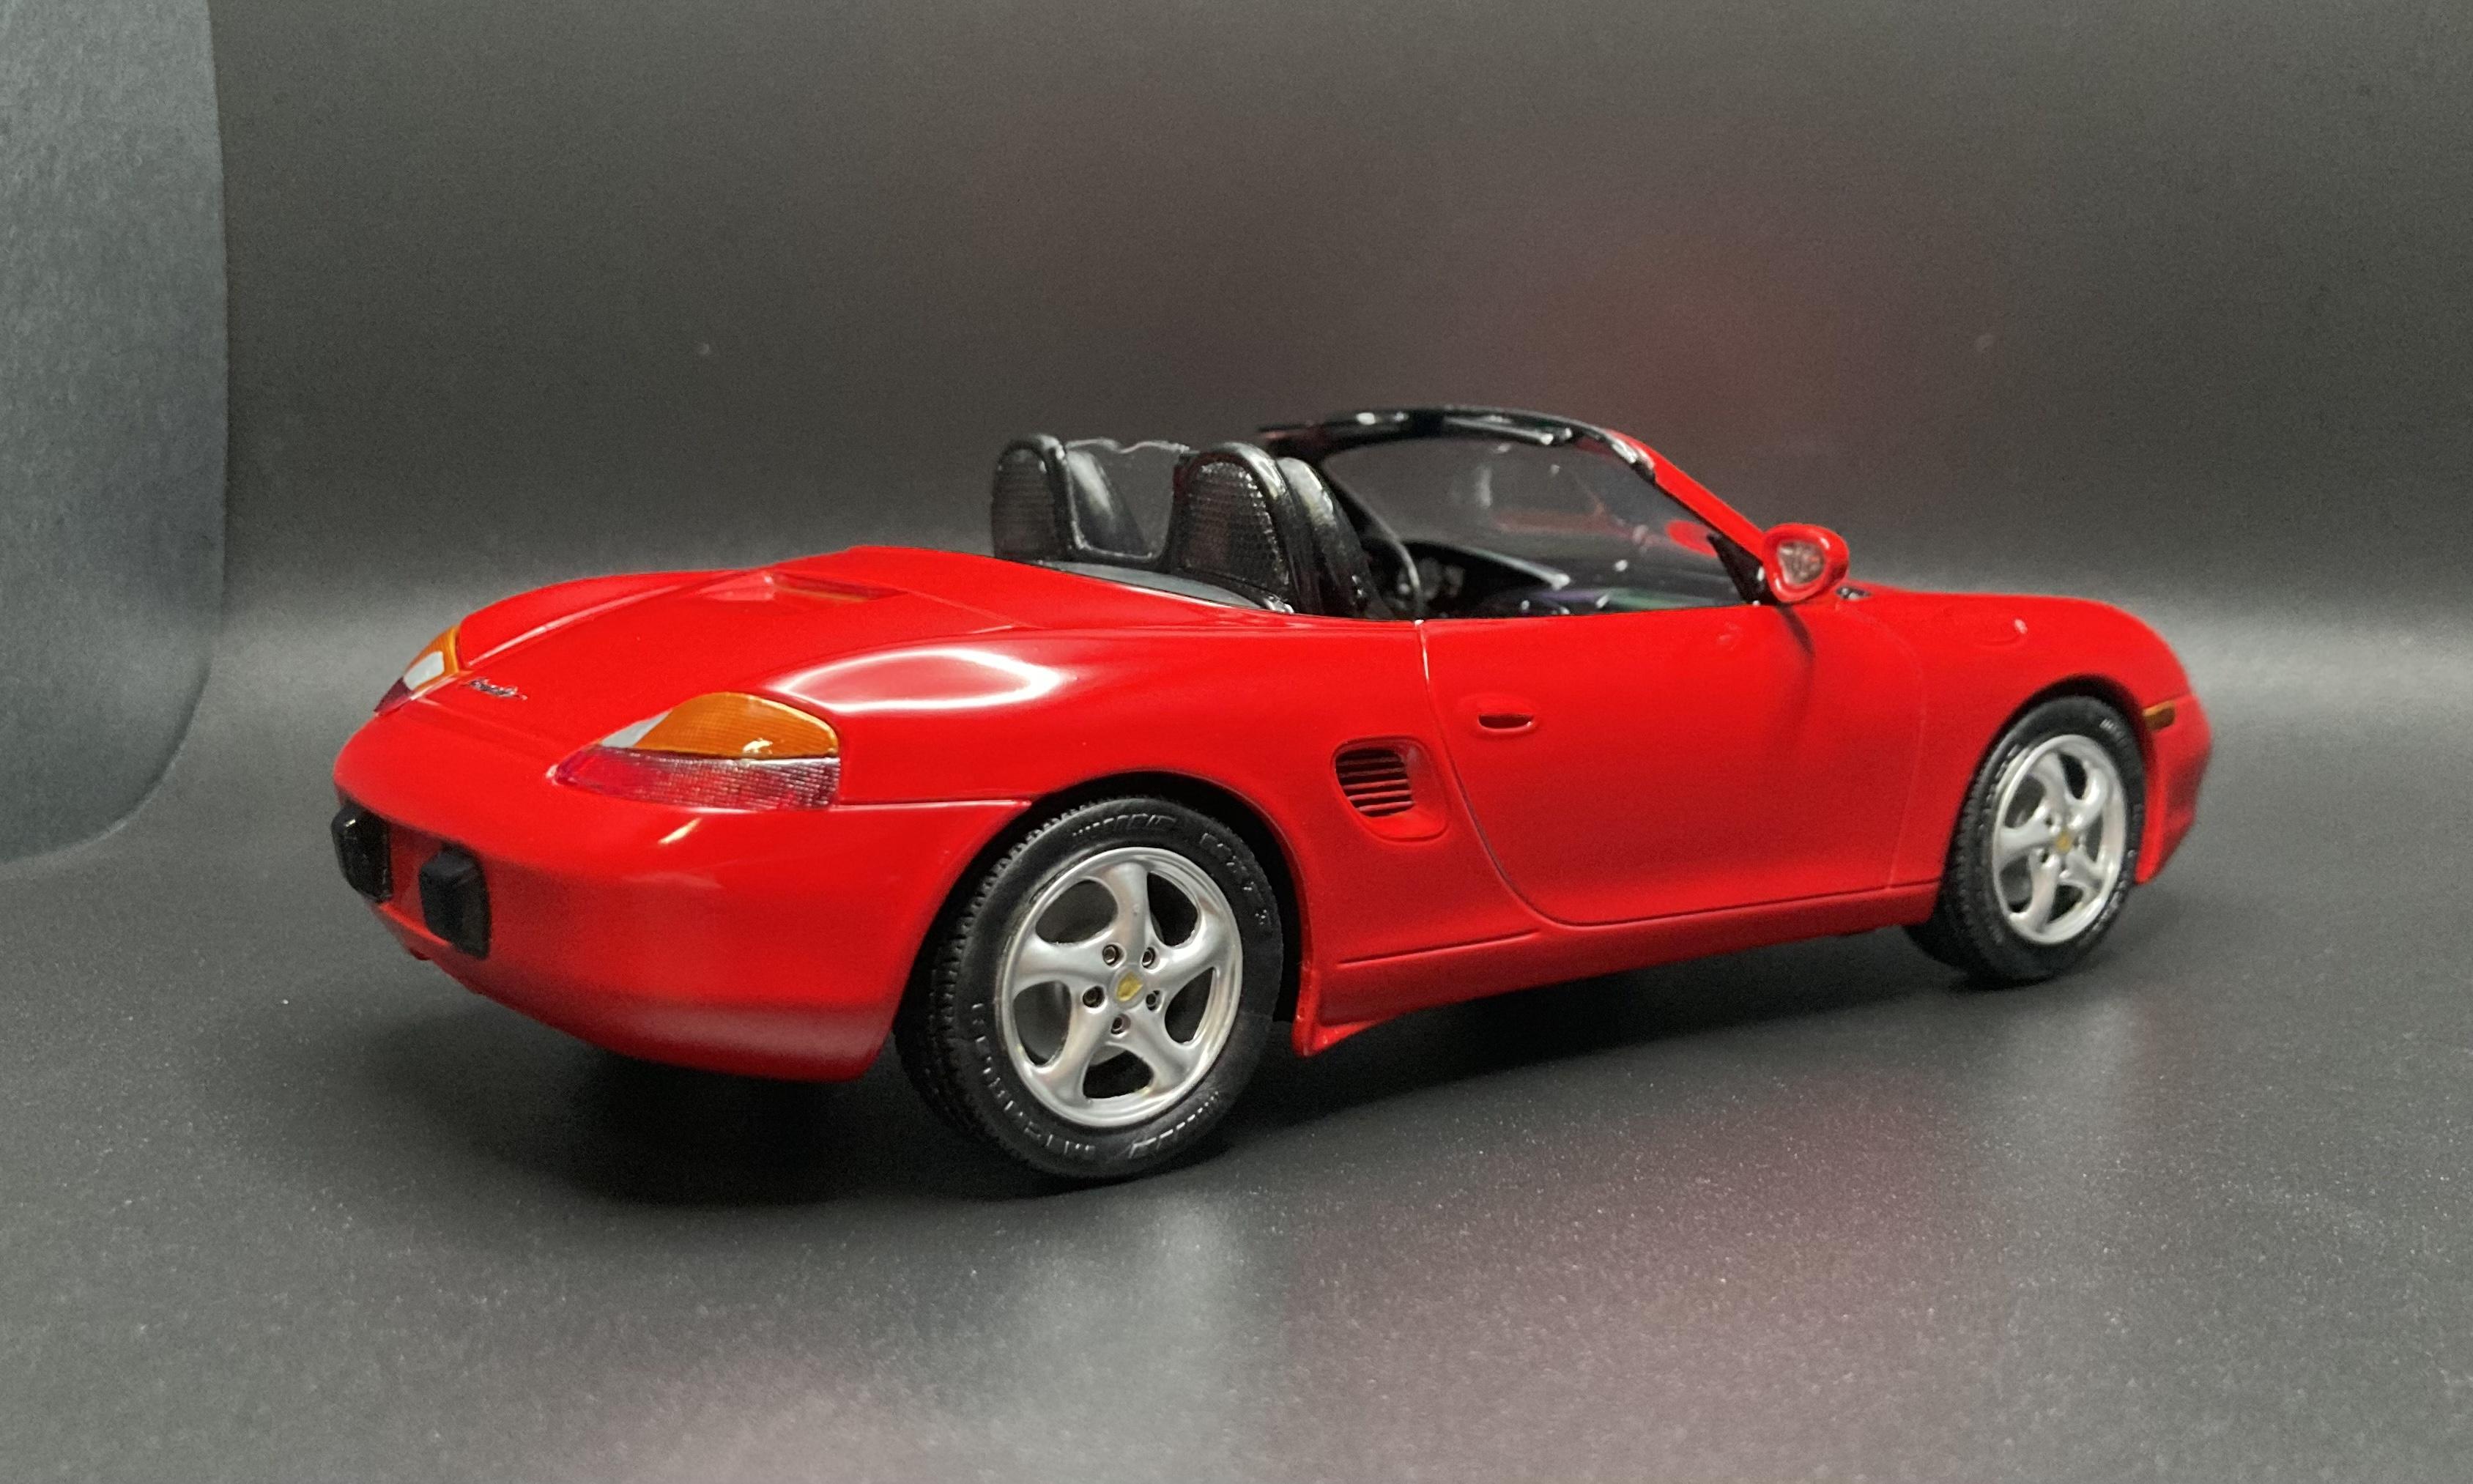
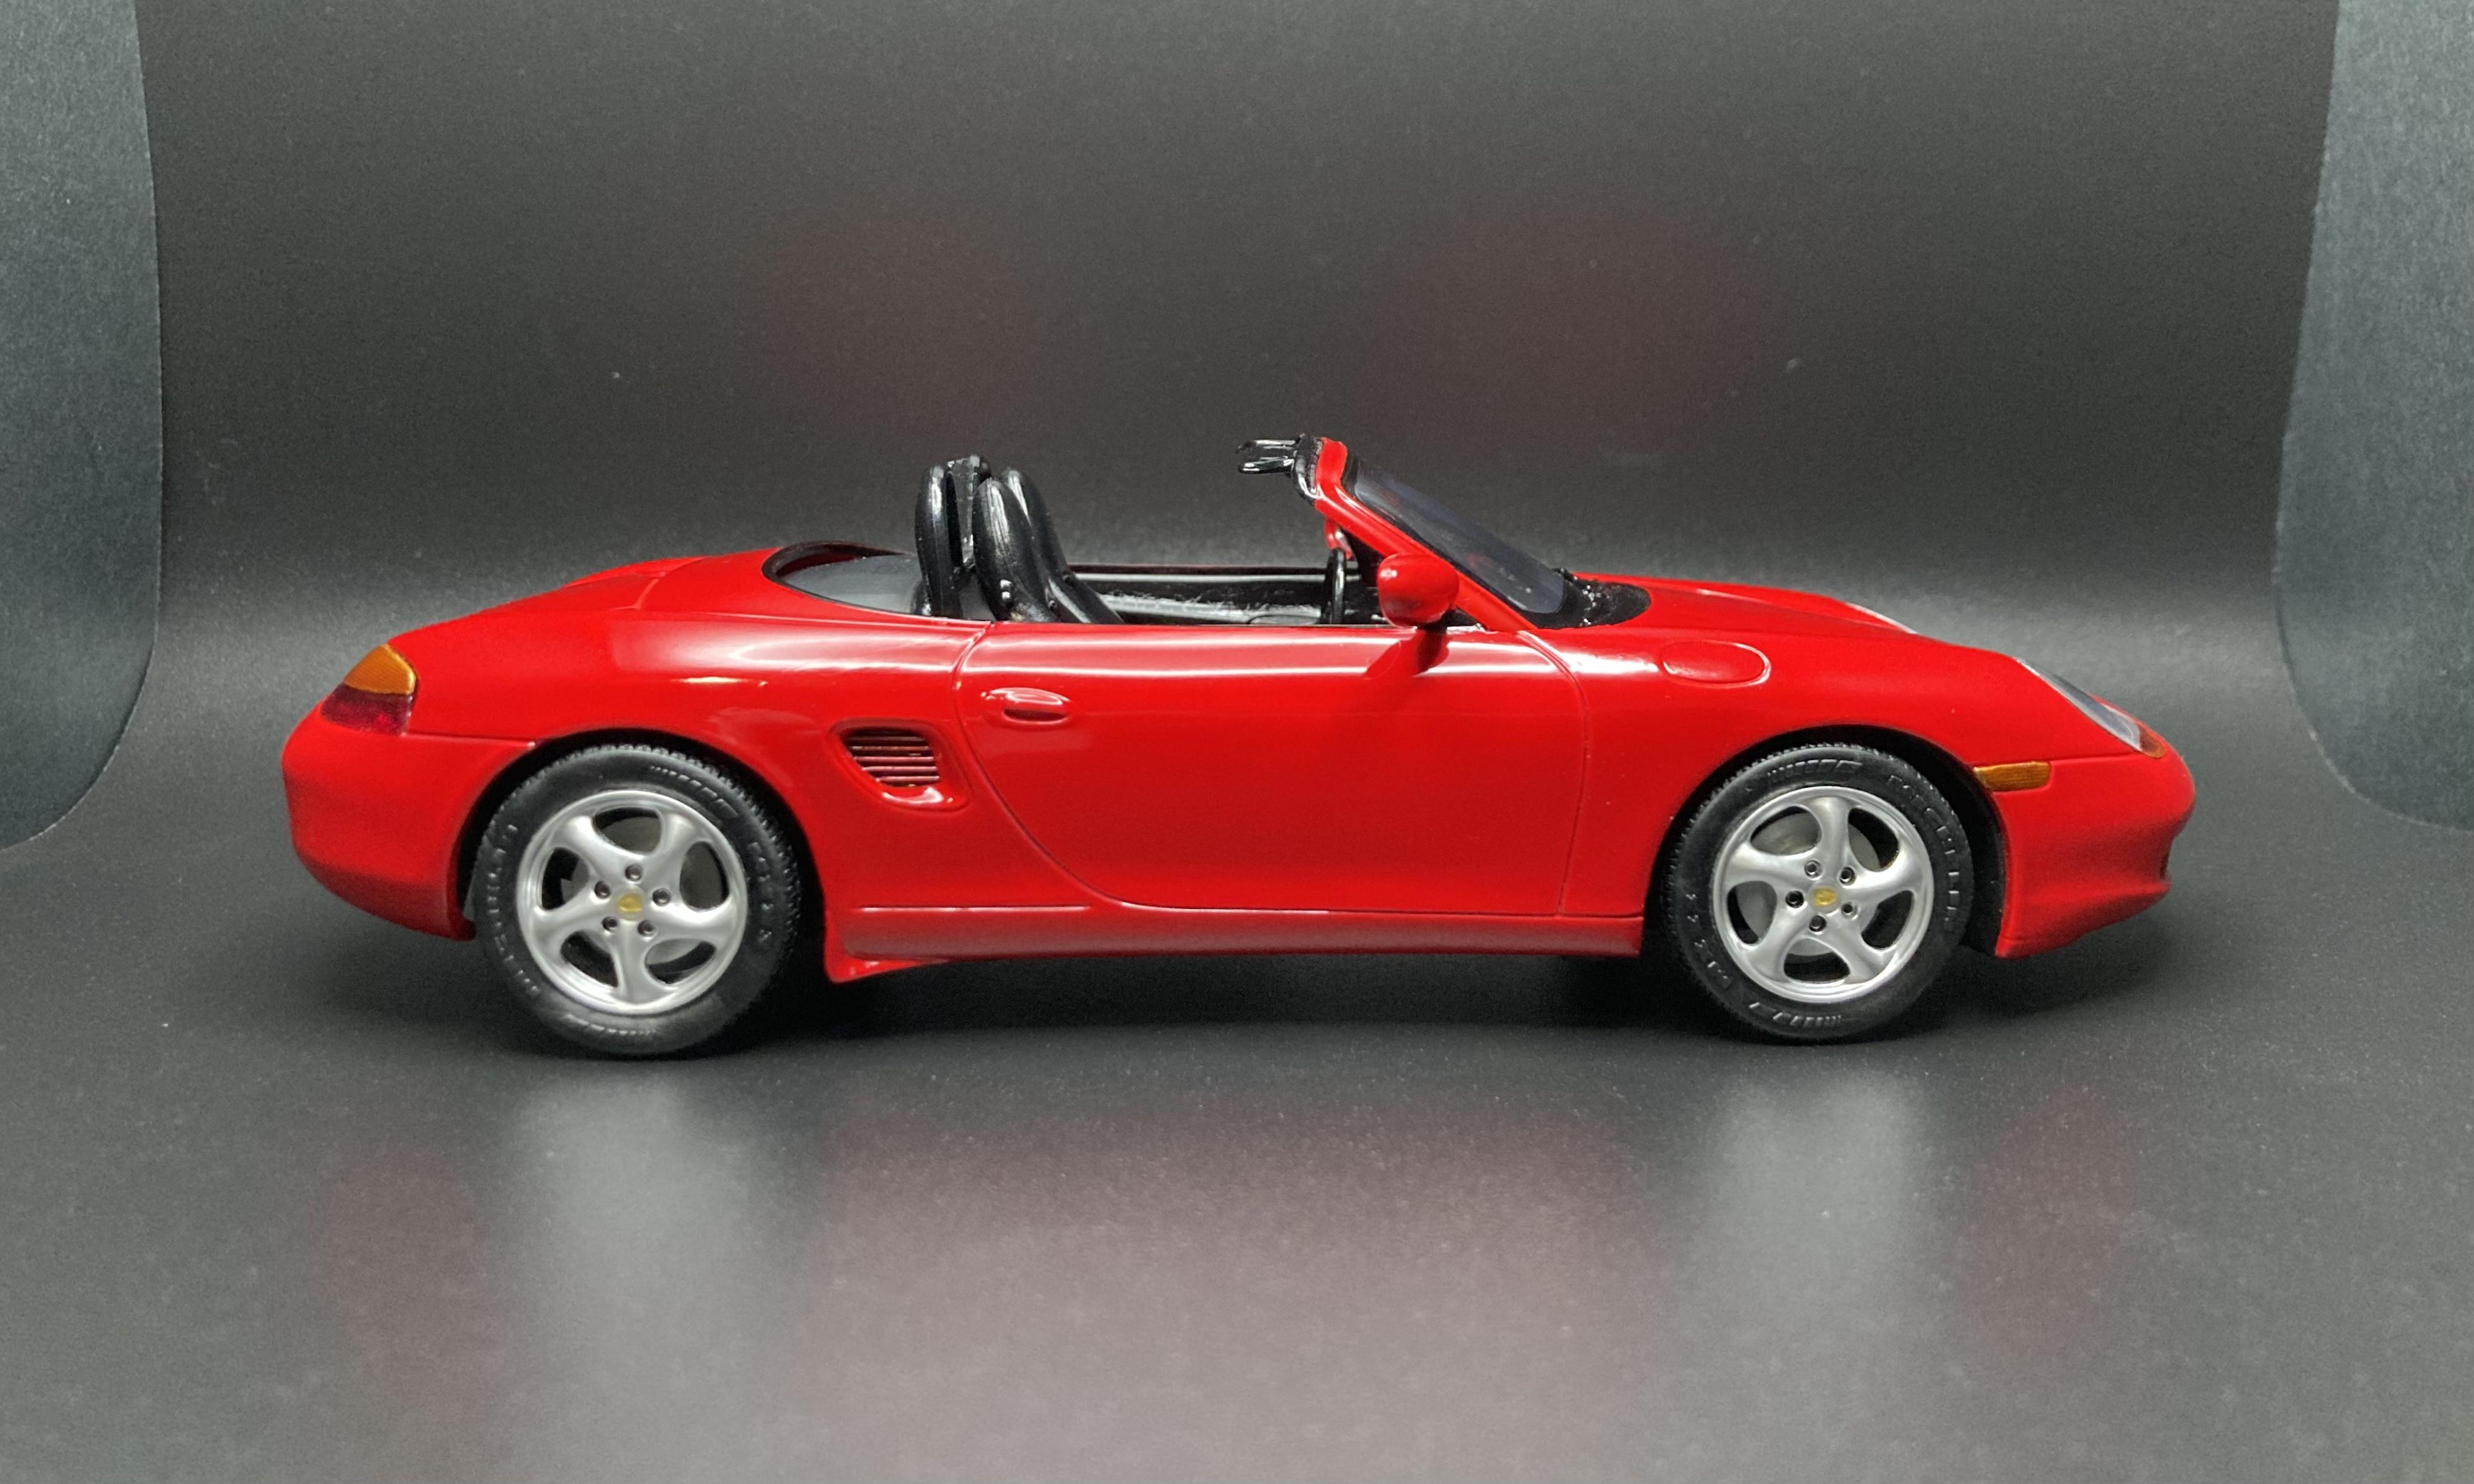
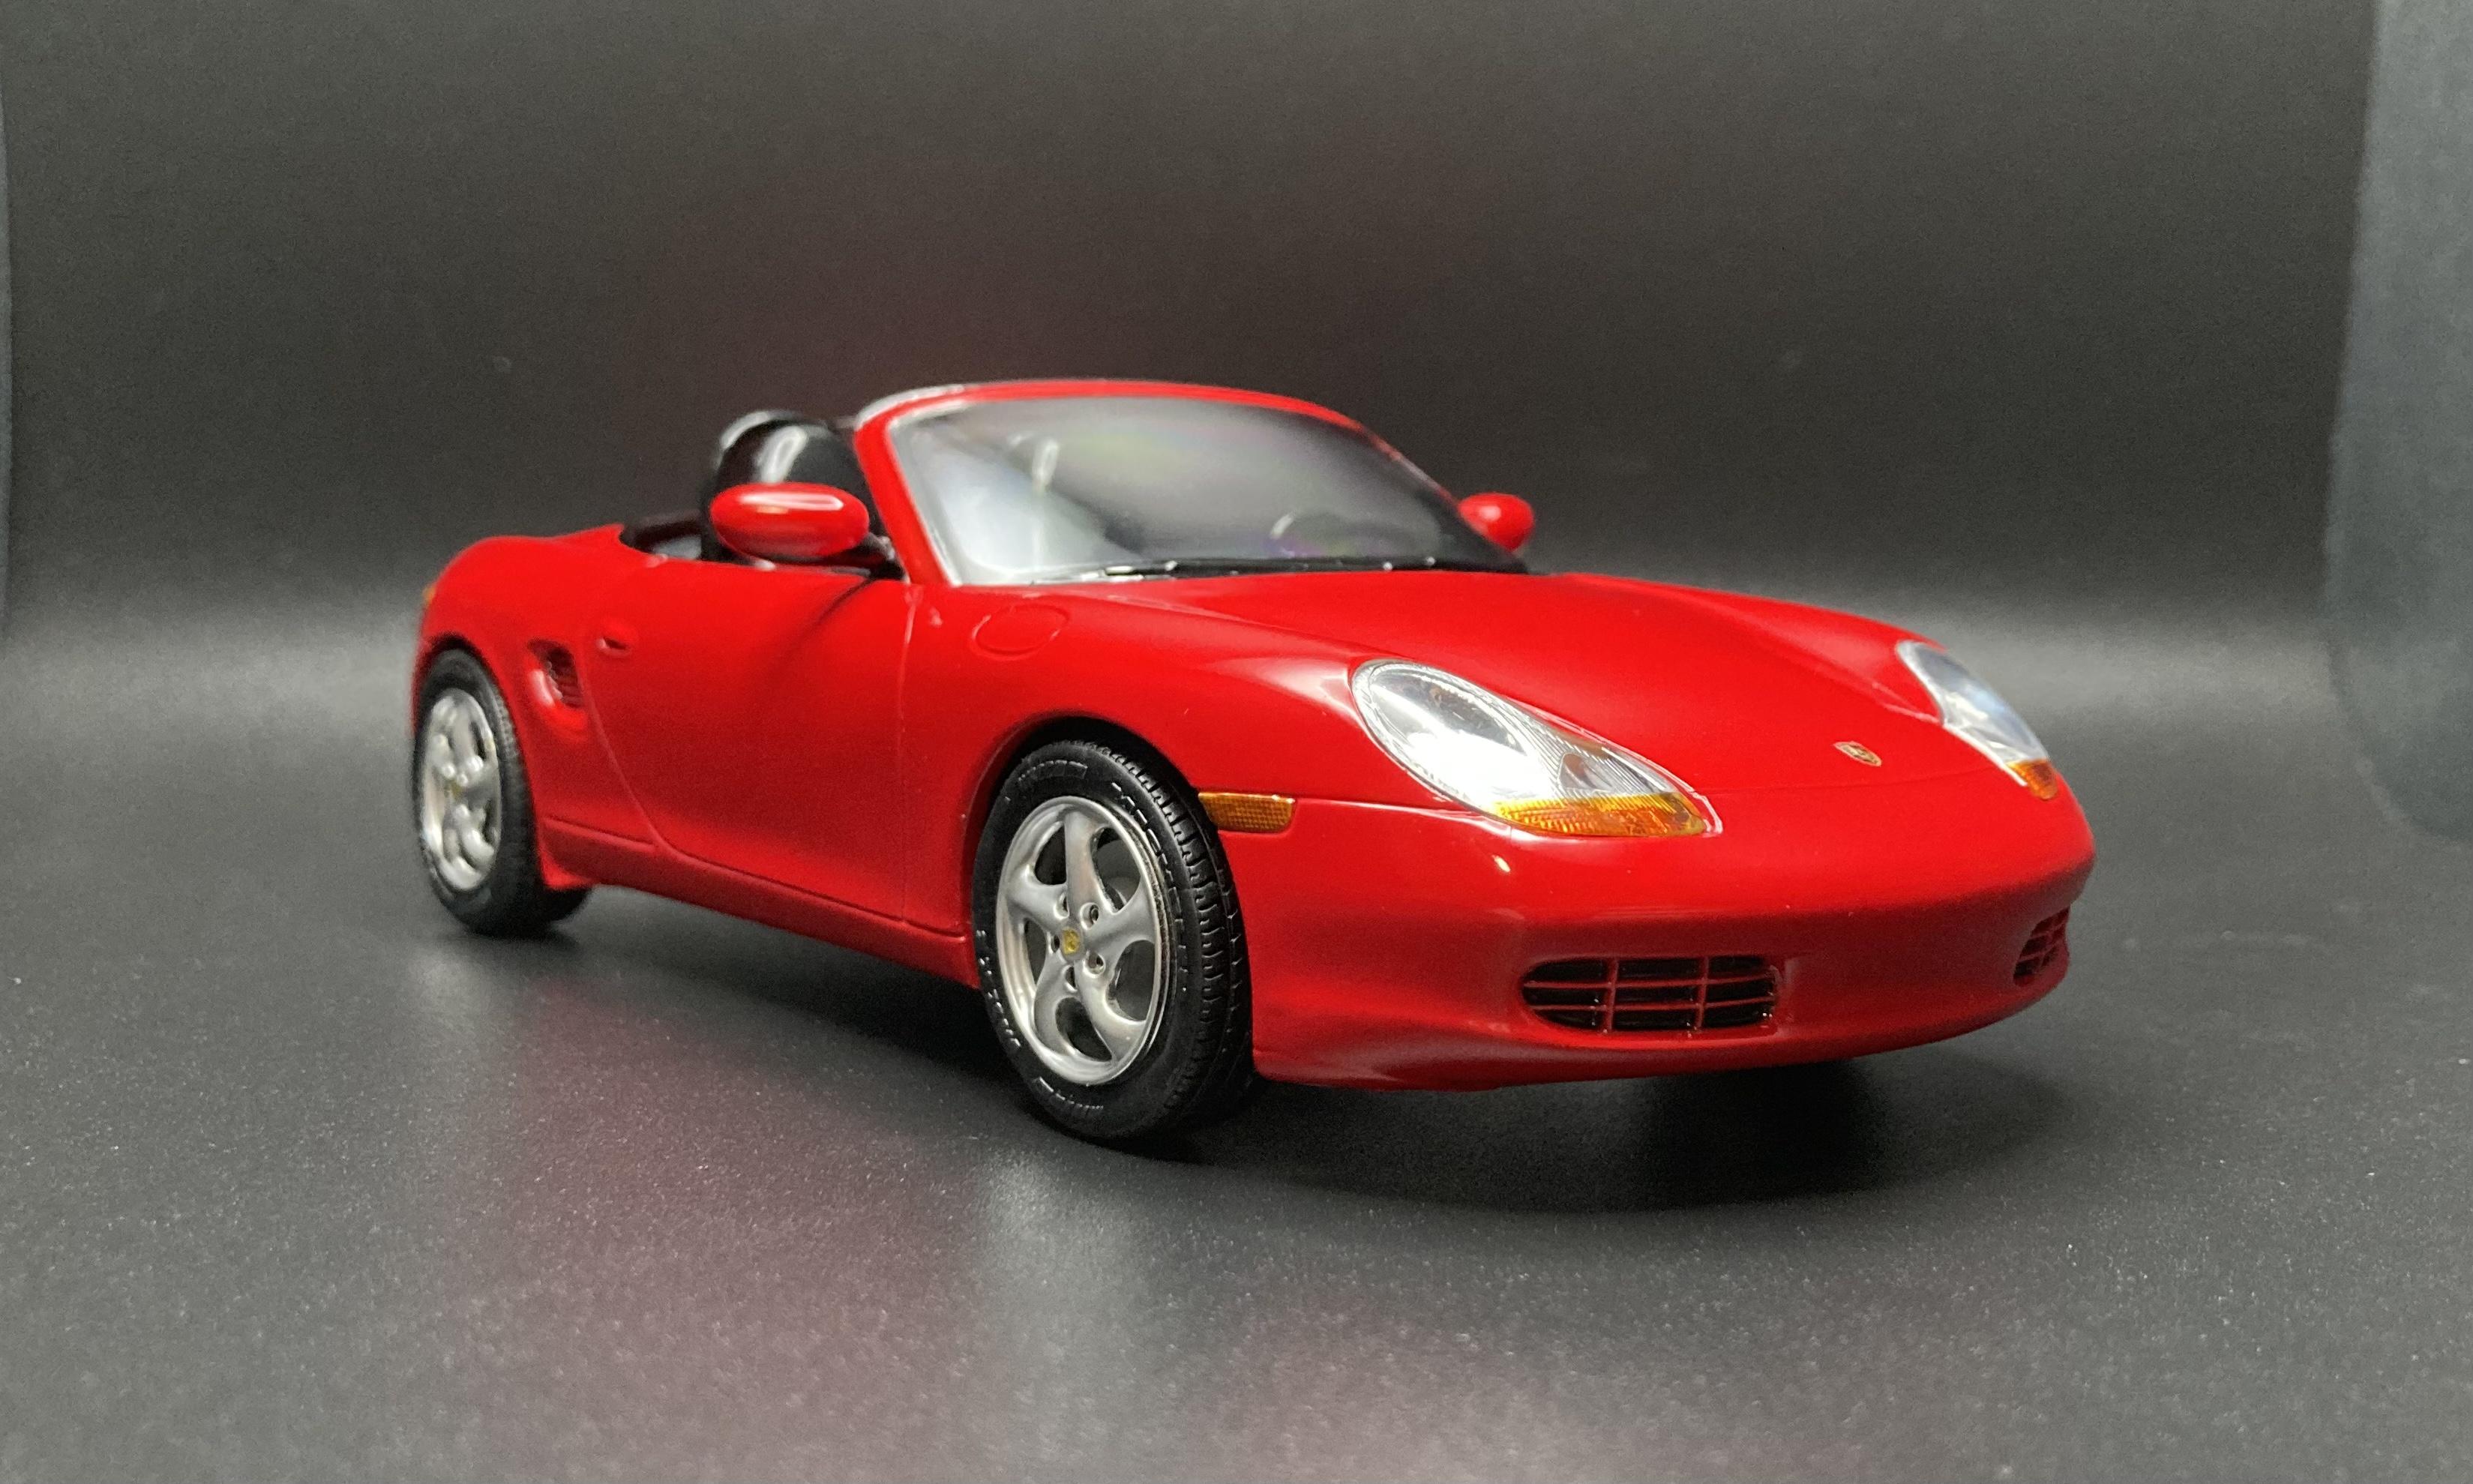
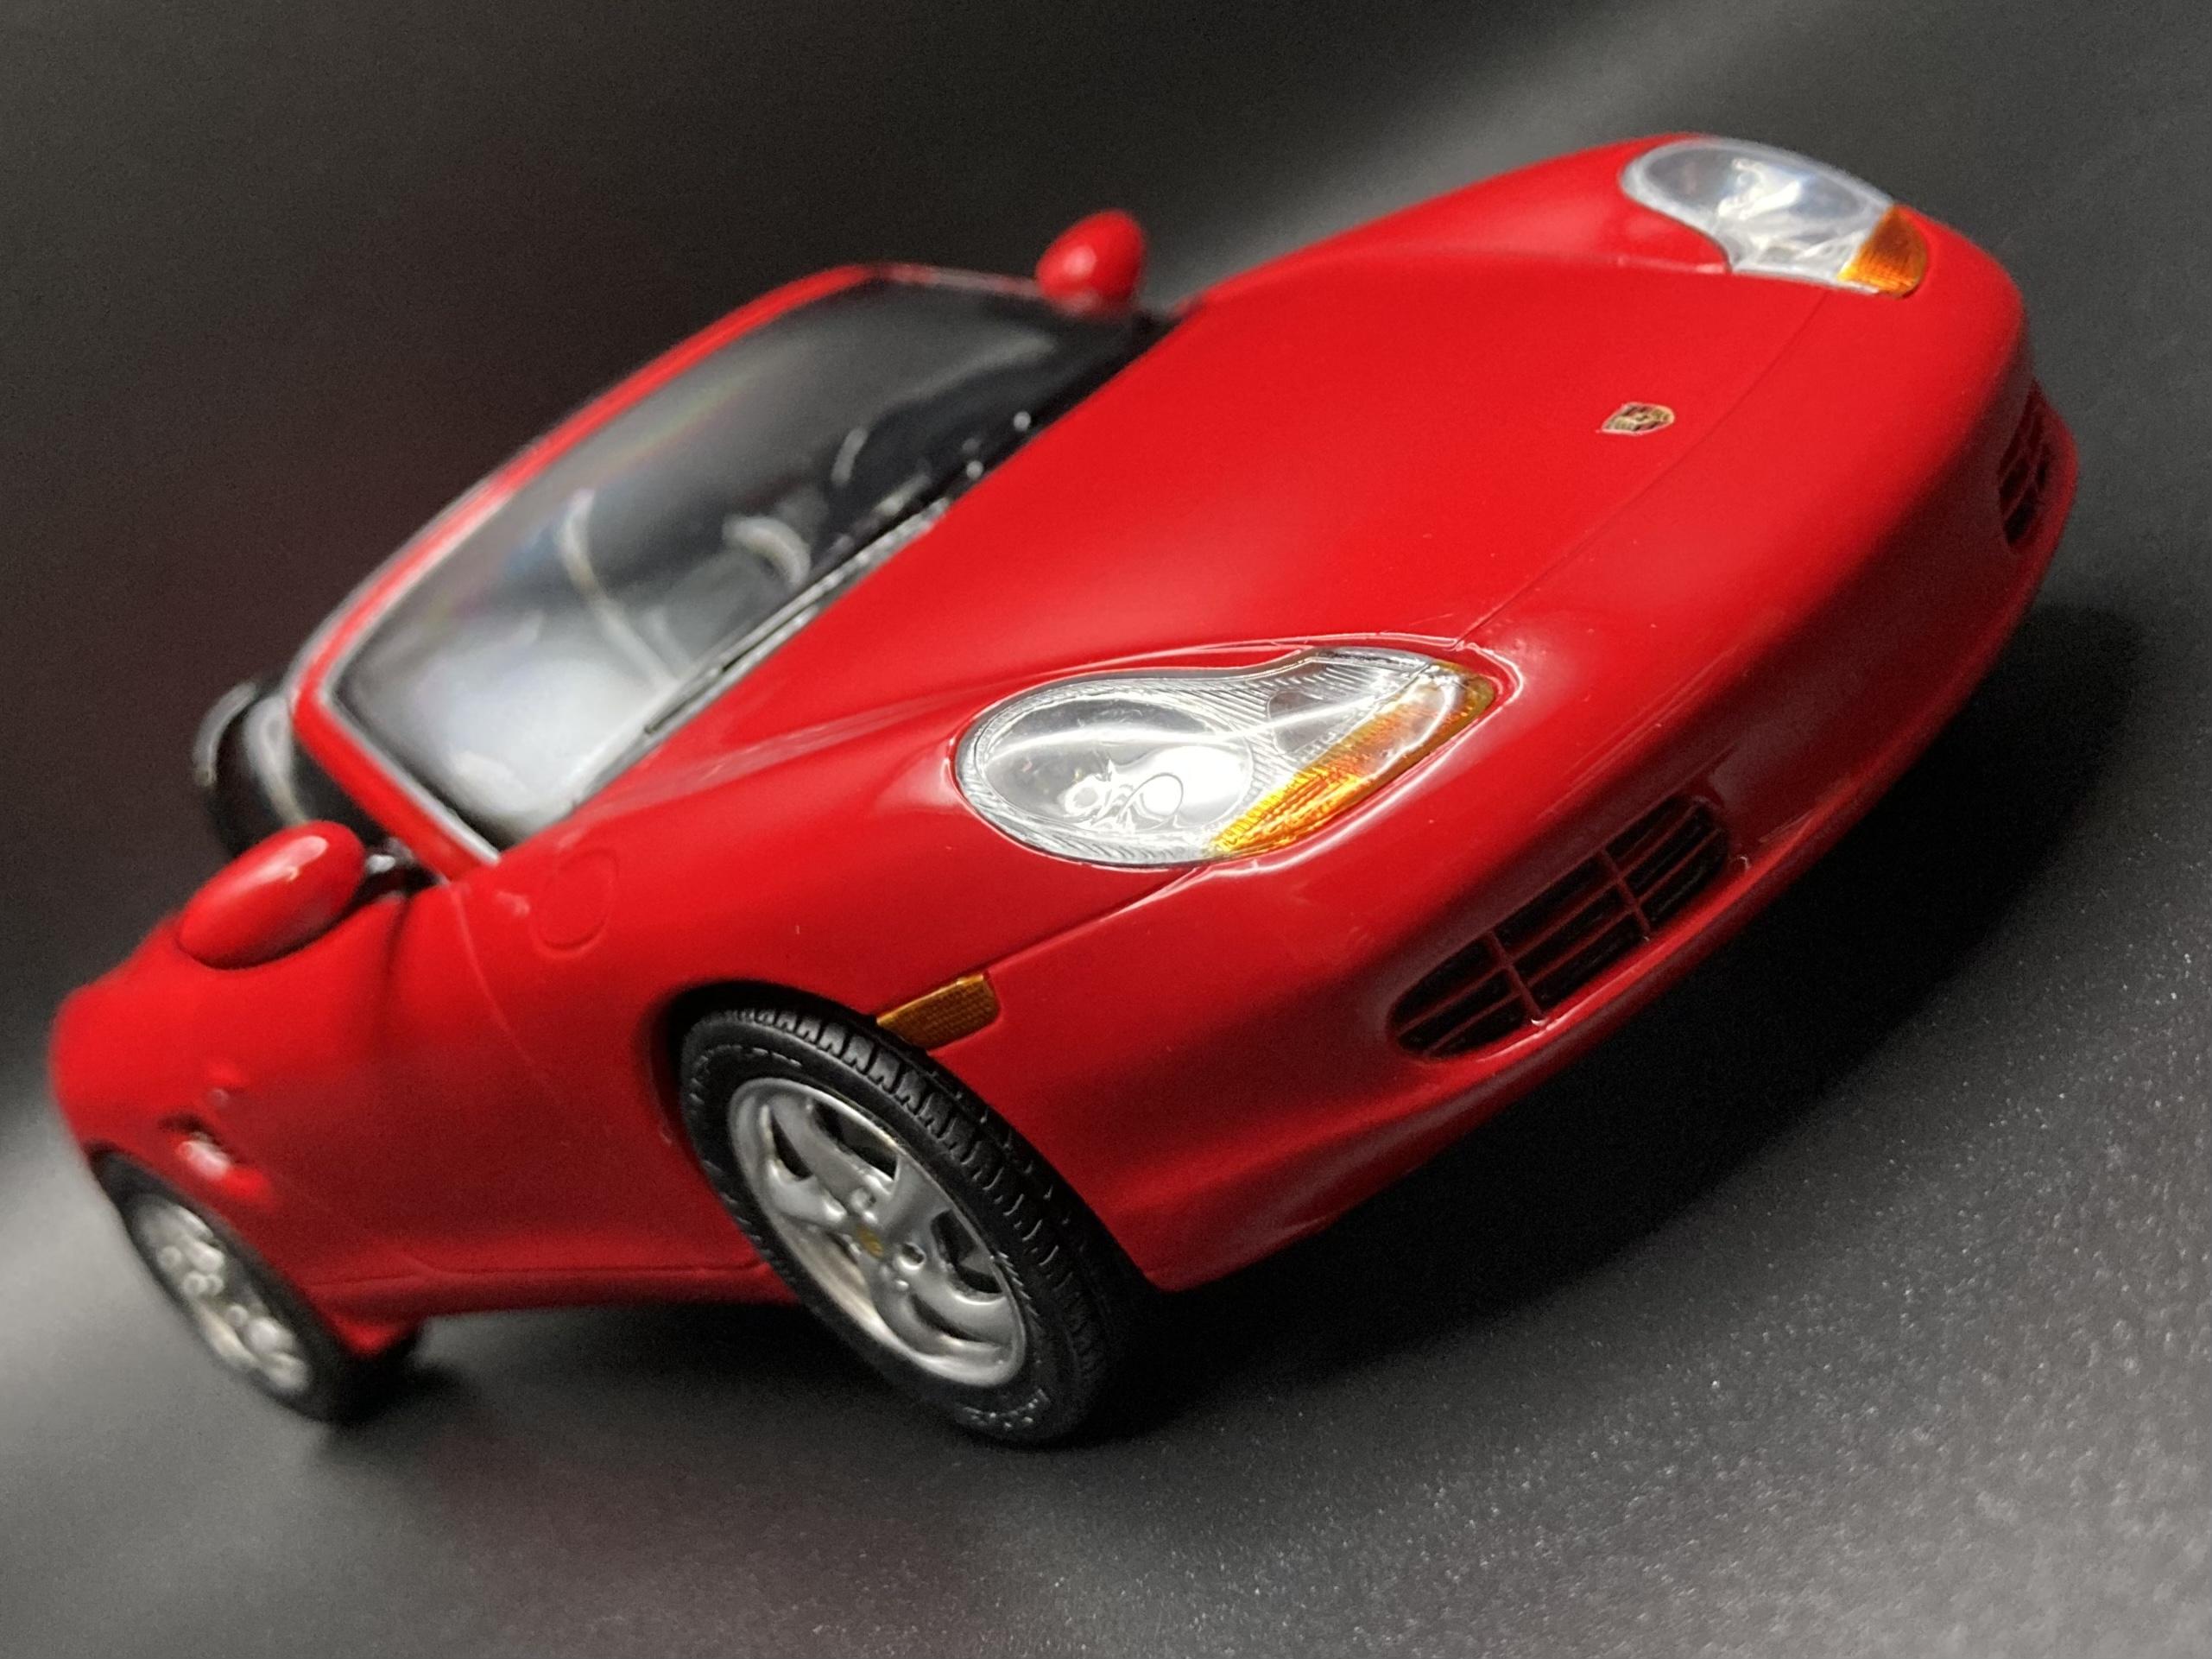
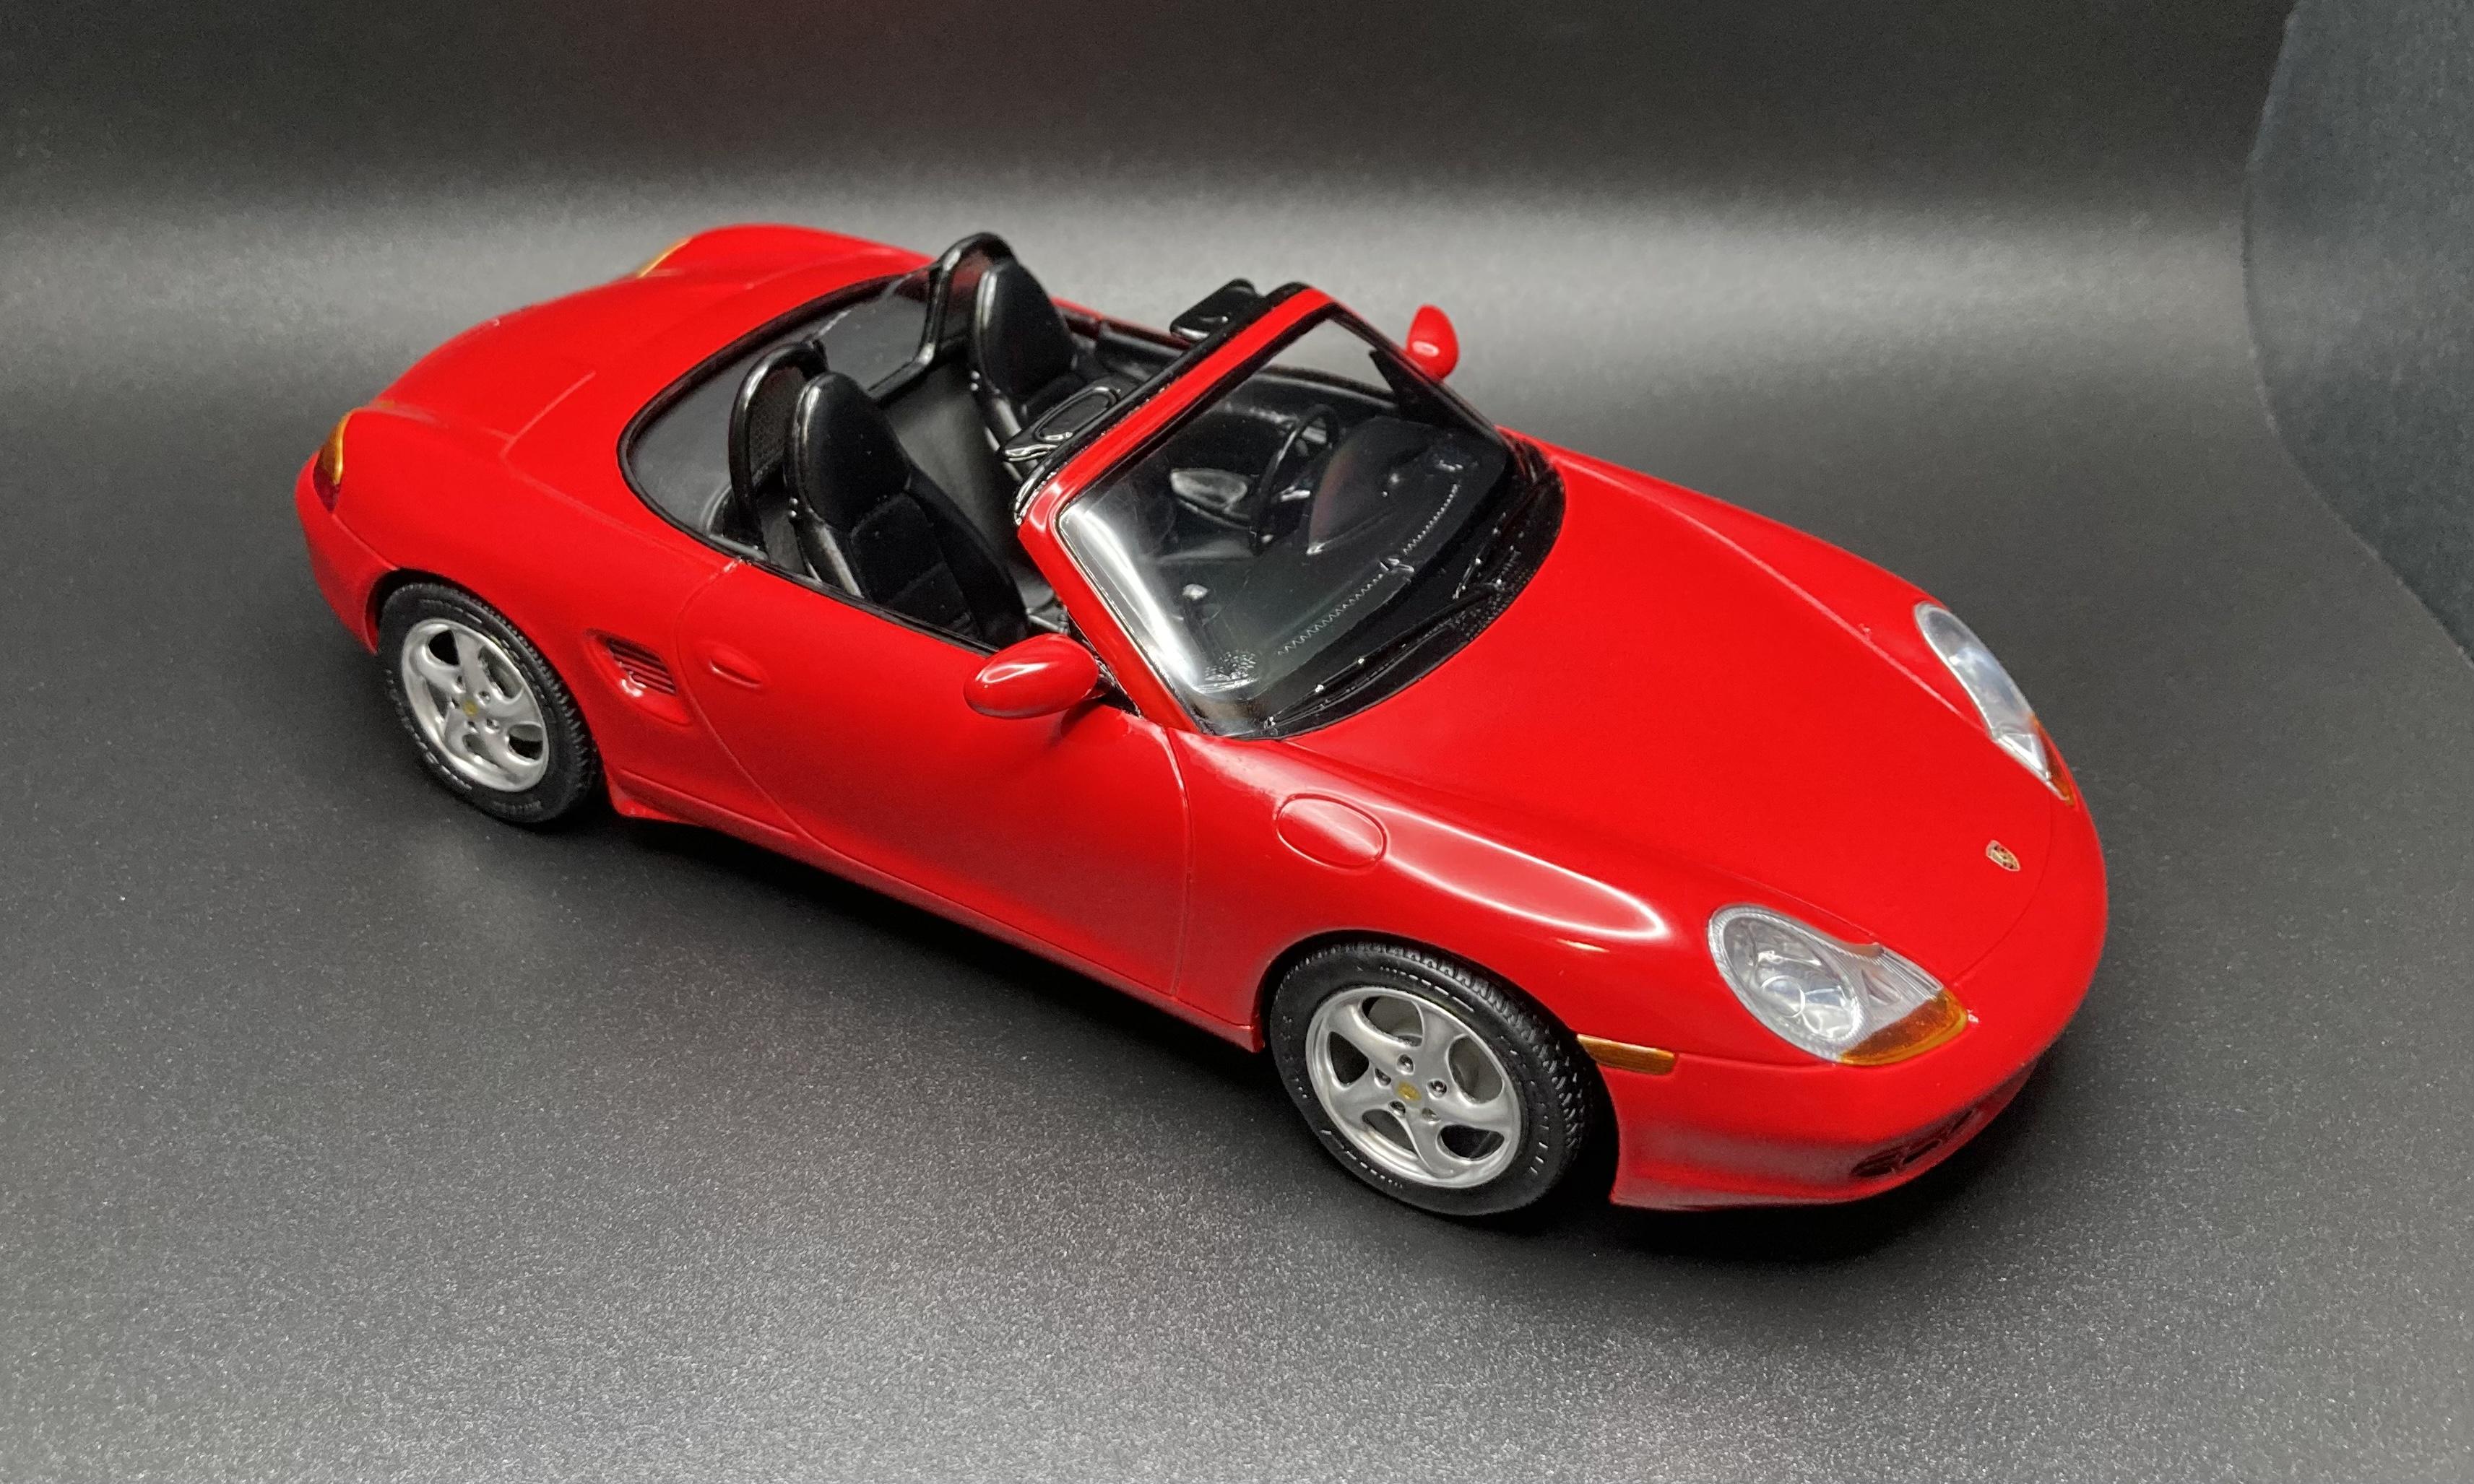
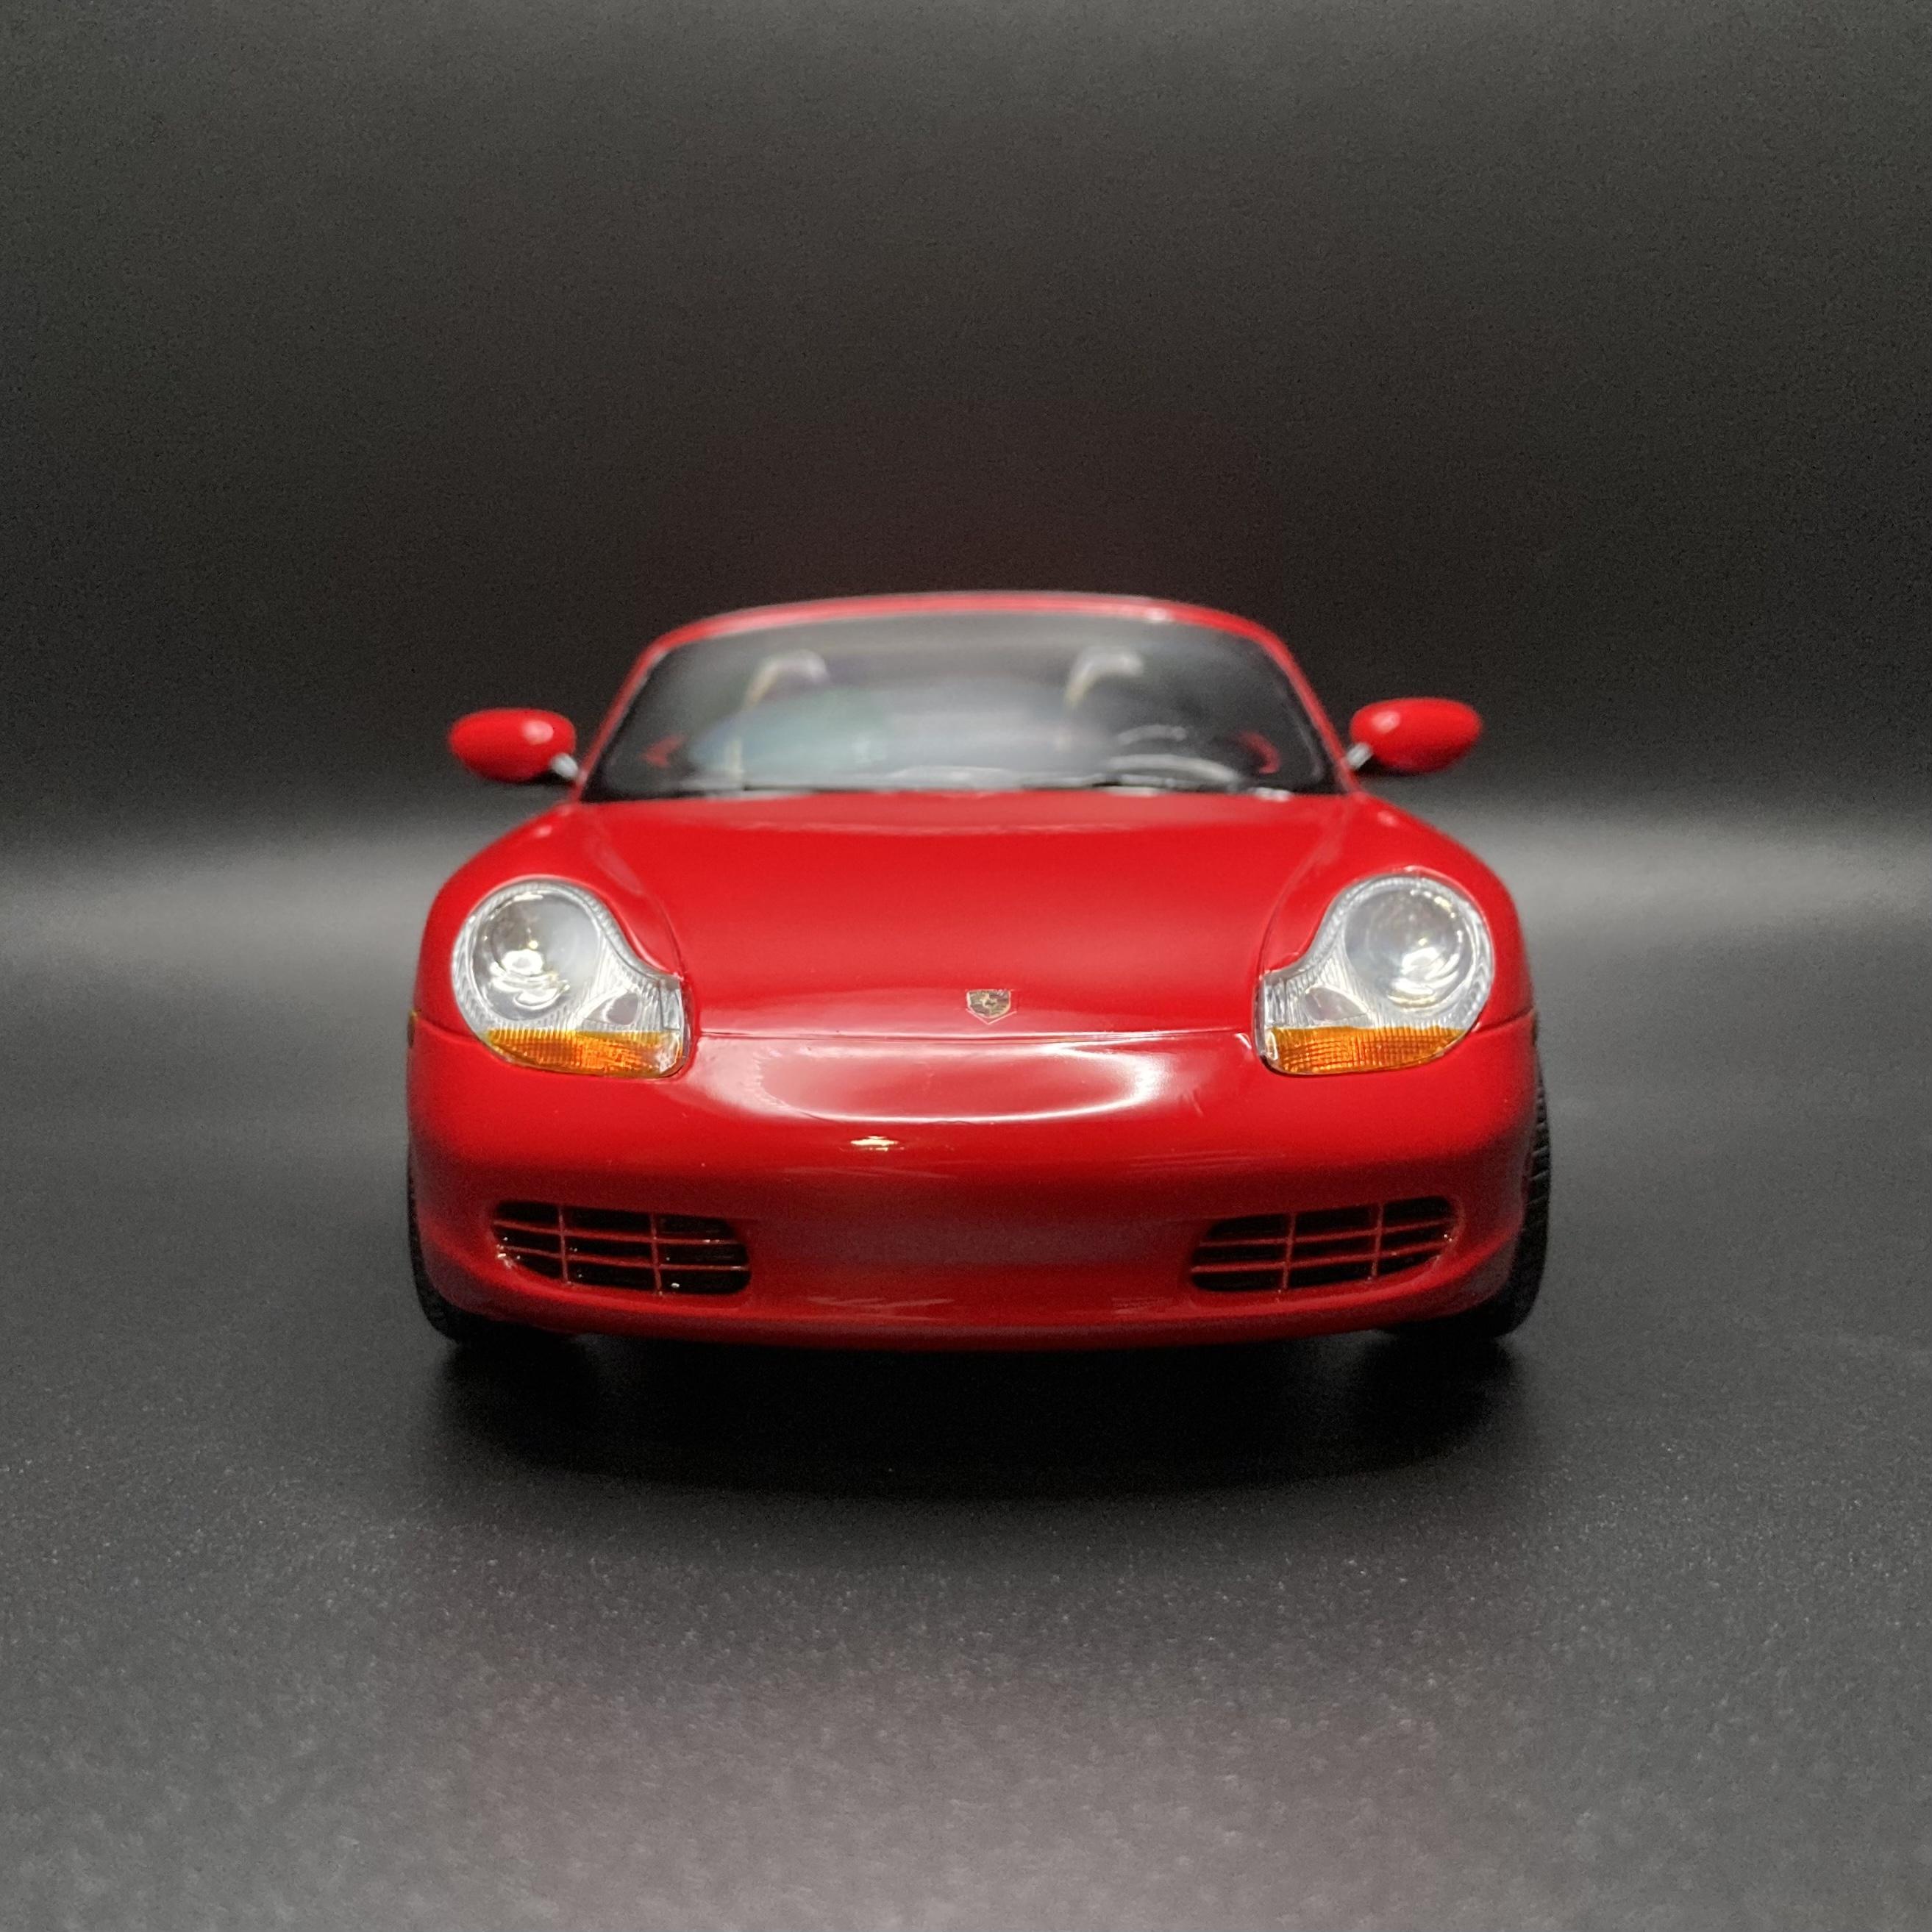
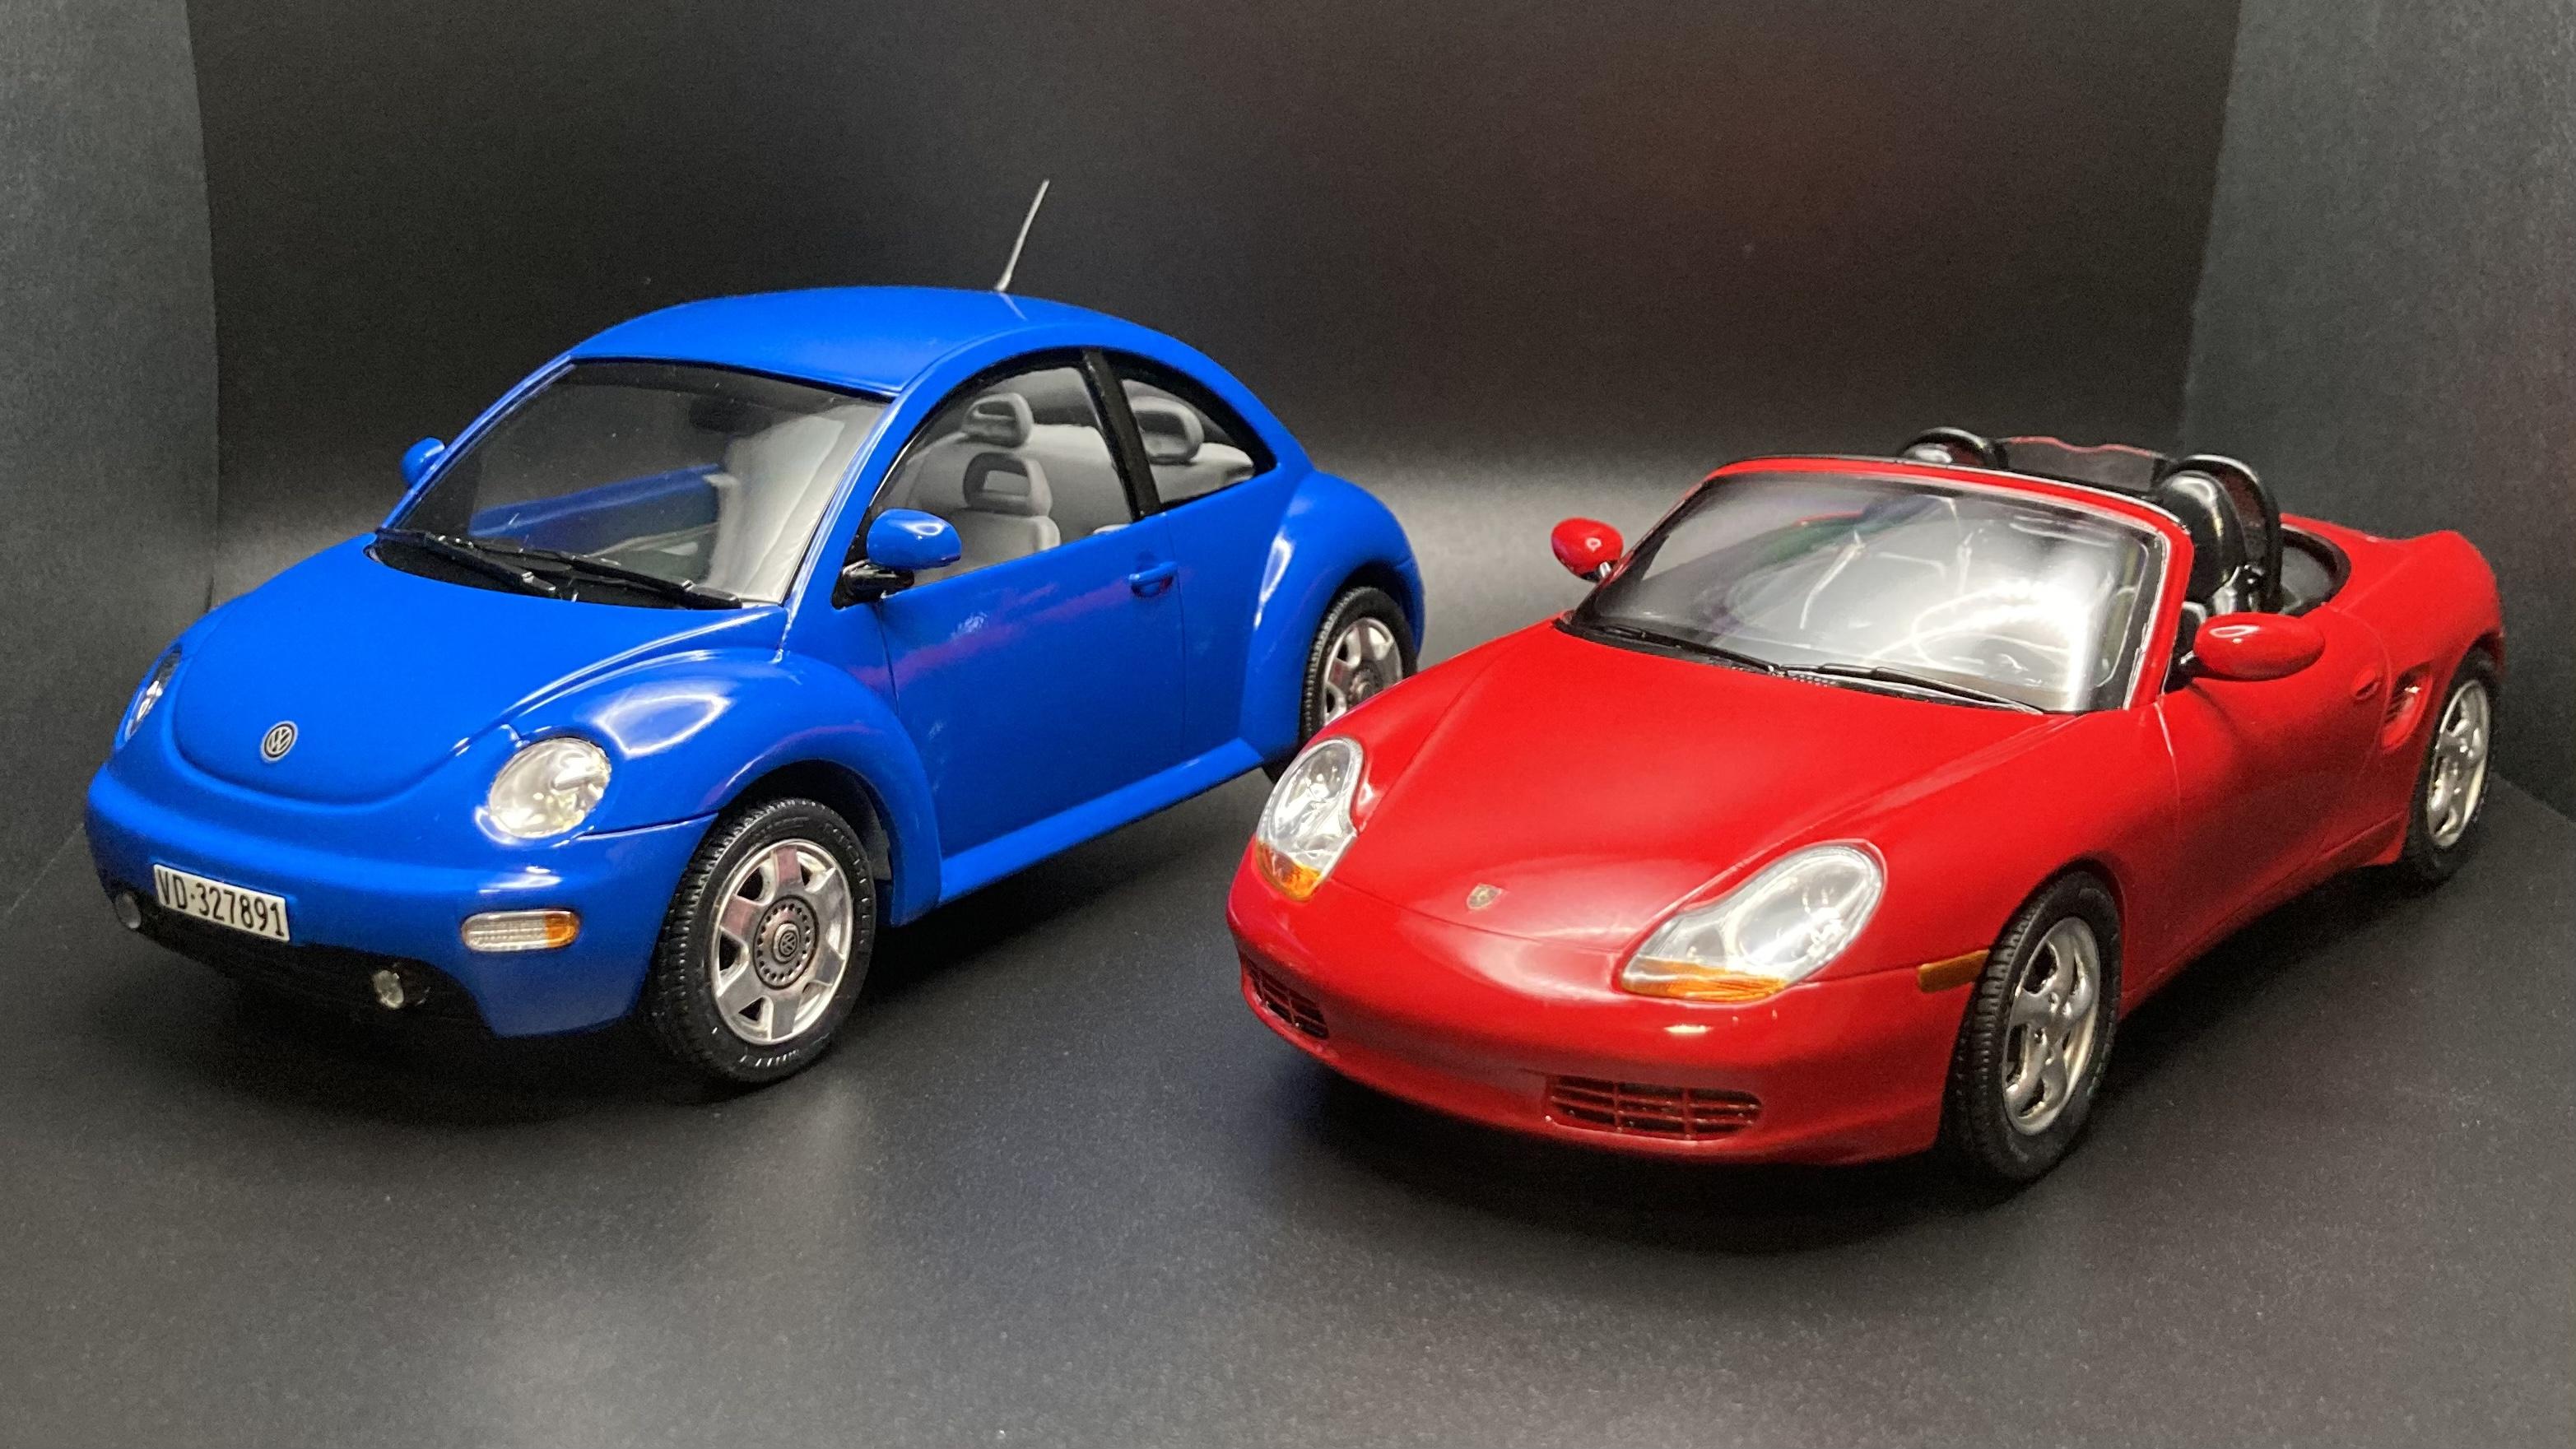
I recently bought one of my (many) childhood dream cars: a 2002 Porsche Boxster 2.7 manual. They say to never meet your heroes, but in this case it’s as amazing to drive as I’d hoped! Naturally, I had to build a model to match my real car. I started with the original issue Revell/Monogram SnapTite kit. For fun, I built it unpainted to see how it would look if I’d built it as a kid in the late ‘90s. It definitely looks like a toy and not realistic at all. It’s a very basic snap kit but the fit up is excellent and I think they captured the shape and proportions of the real car nicely. I painted the body Tamiya TS-8 Italian Red over their pink primer, which looks pretty close to classic Guards Red to me. The kit’s Turbo-Look wheels are different than my later car’s wheels but they’re close enough so I left them as is. It’s amazing how some paint and simple detail work can really set off a basic snap kit. Hood crest decal came from eBay. Kit only comes with a terrible set of stickers. Two late ‘90s Revell snap based kits of German subjects. Both come alive with a little detail work! The Boxster joins my builds of my former 1:1 fun cars. I wish I could have kept them all, but the sale of each one funds the next!
-
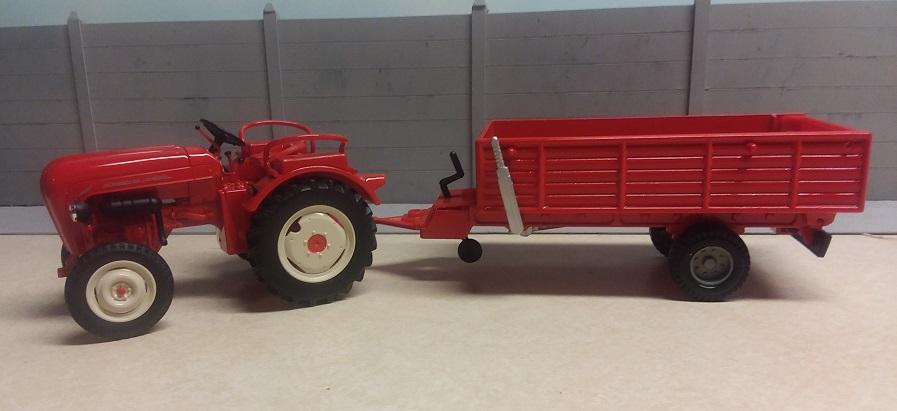
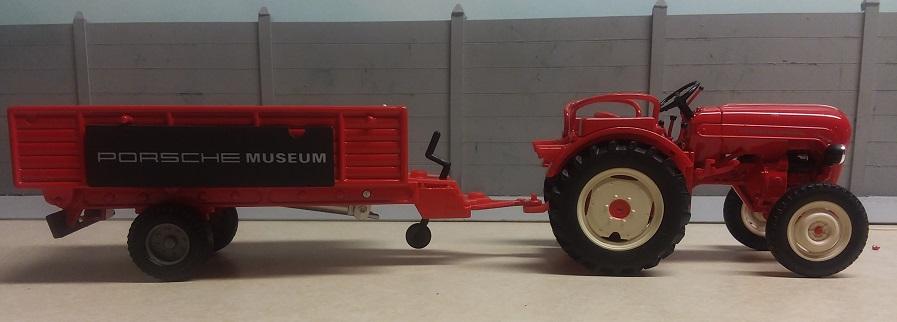
This is a 1/24 scale diecast Porsche Junior Diesel tractor and wagon. It was released by the Porsche Museum and I found it on the German eBay. My only comment is the wheels and tires on the wagon are not period correct in my opinion. Revell does offer the same model of tractor as a snap kit but there are minor differences between the two.
-

Need a model car made of a racing livery
Maya posted a topic in Model Building Questions and Answers
I’m new to model cars and this forum. My boyfriend is into cars and he drives this Porsche with his racing livery. I would like to figure out how to have this car reproduced as a 1:43 model as a gift. Anyone know how I can go about doing this ? I’m willing to pay someone to make it and I’m also happy to learn how to do it myself, just looking for some guidance
-
This is build #24. I didnt plan on adding another project, but a good friend of mine from England gave me this kit. No matter how many projects you have, its good form to build this kind of gift as soon as you can, to show appreciation, and to get it done before either one of you snuffs it. I got this kit at the right time...i've been feeling like doing something inspired by Singer, and Gambella...an upgraded, special car. Whilst i like the Avelanche Porsche(Gambella), i find it to have too many bodywork things going on for my taste, and it looks heavy. Singer does Porsches right!, and thats the style i like, but with a balanced splash of Gambella. Cant remember where, but i saw an earlier 80's 911 that was a twin turbo, 850+ HP beast, and thats another bit i want for mine! This is being built as the curbside kit that it is, BUT thanks to how it has a removable body like all other Fujimis, i can add a fully detailed EM chassis, and engine at any time. I dont wanna change the main design of what i already consider as a perfect design, i just wanna add a bit of "special" to it. Kinda like if you saw it in a dark room as a silhouette, you could tell immediately what is was, then -Suprise! when the lights are turned on! -Photo 1; The kit. -Photo 2; I didnt want to have pop-up headlamps this time, but i didnt want Ferrari F40 style either, so thats when i decided to split the difference, and have them be thin slits with LED's. -Photo 3; Whilst the scalloped side vents do work with the design, i've never liked them on cars -i DO like the wheels!! -Photo 4; I'm gonna be utilizing the look of the tailights a bit. -Photo 5; I love the simplicity of Singers, but with the tasteful splash of upgrading!
-
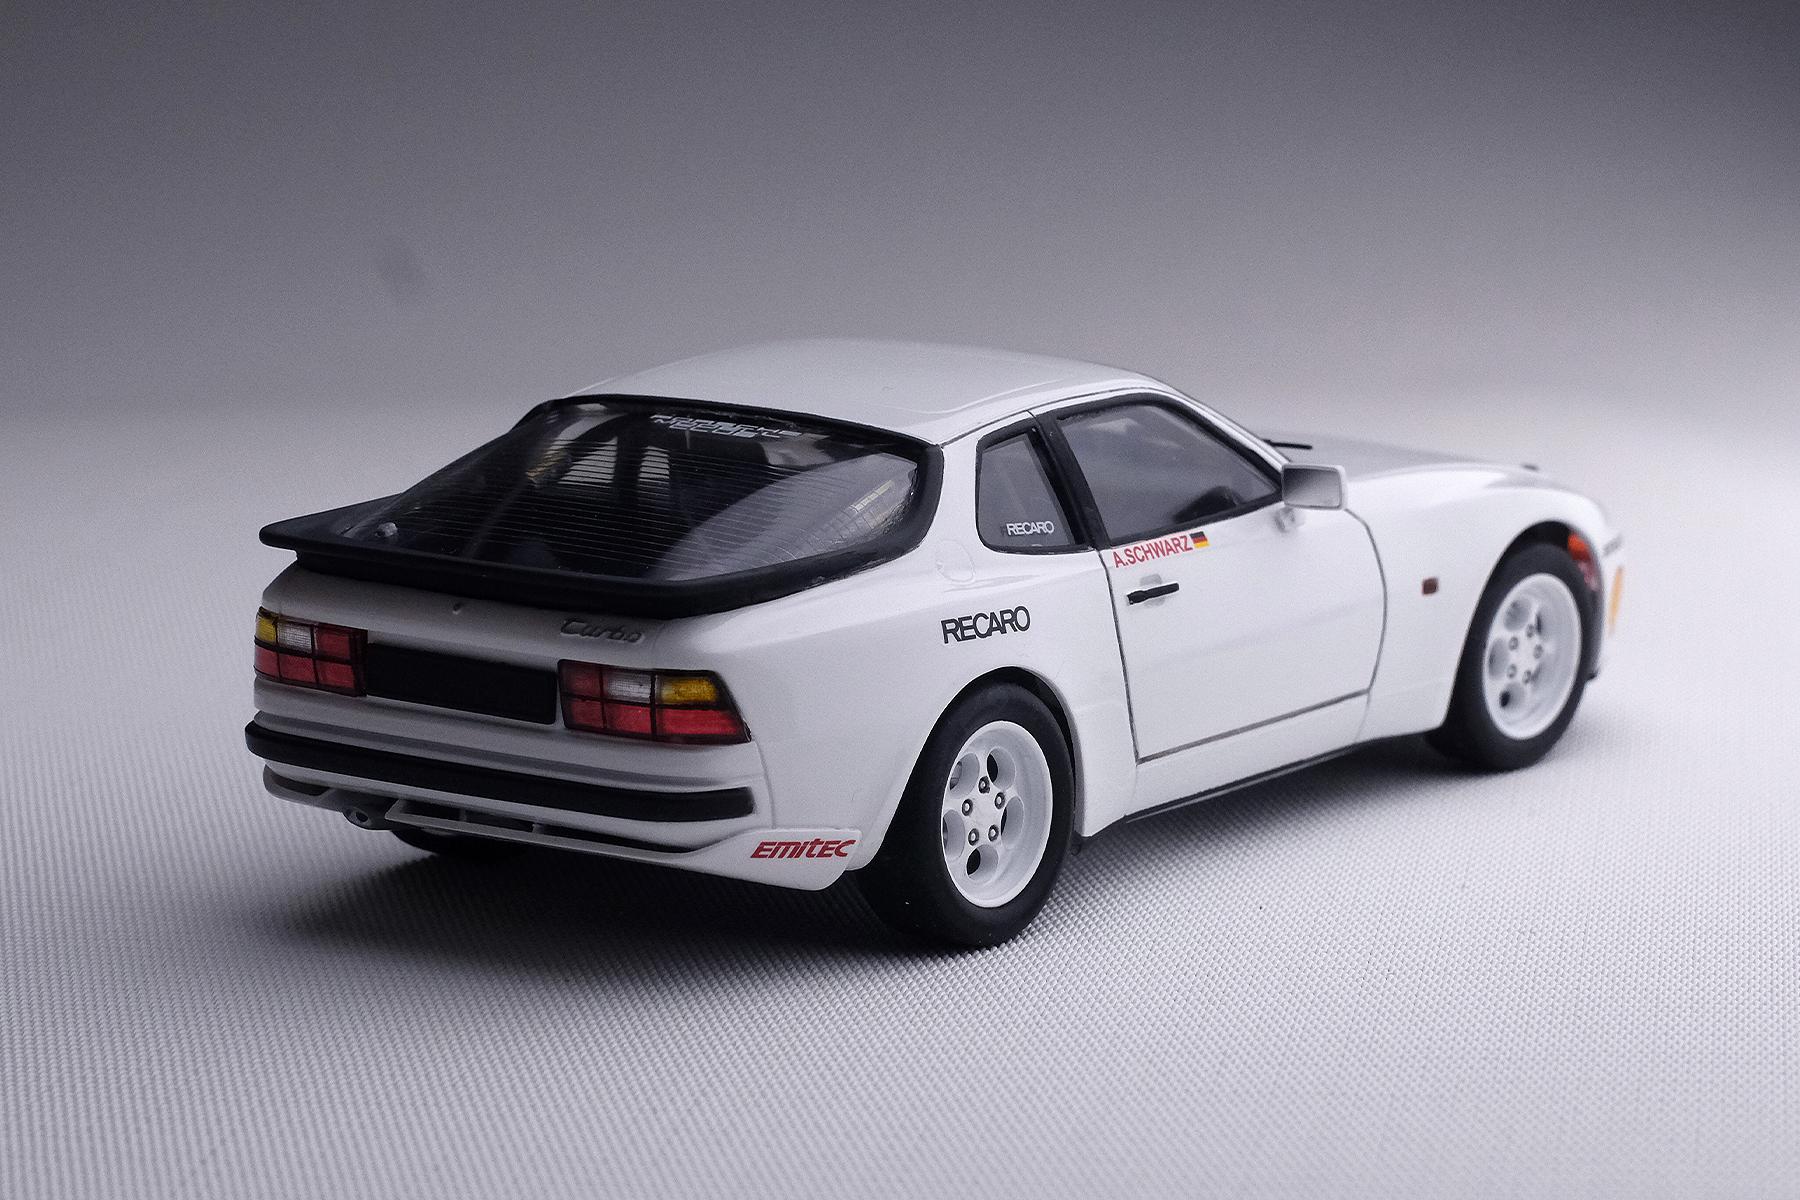
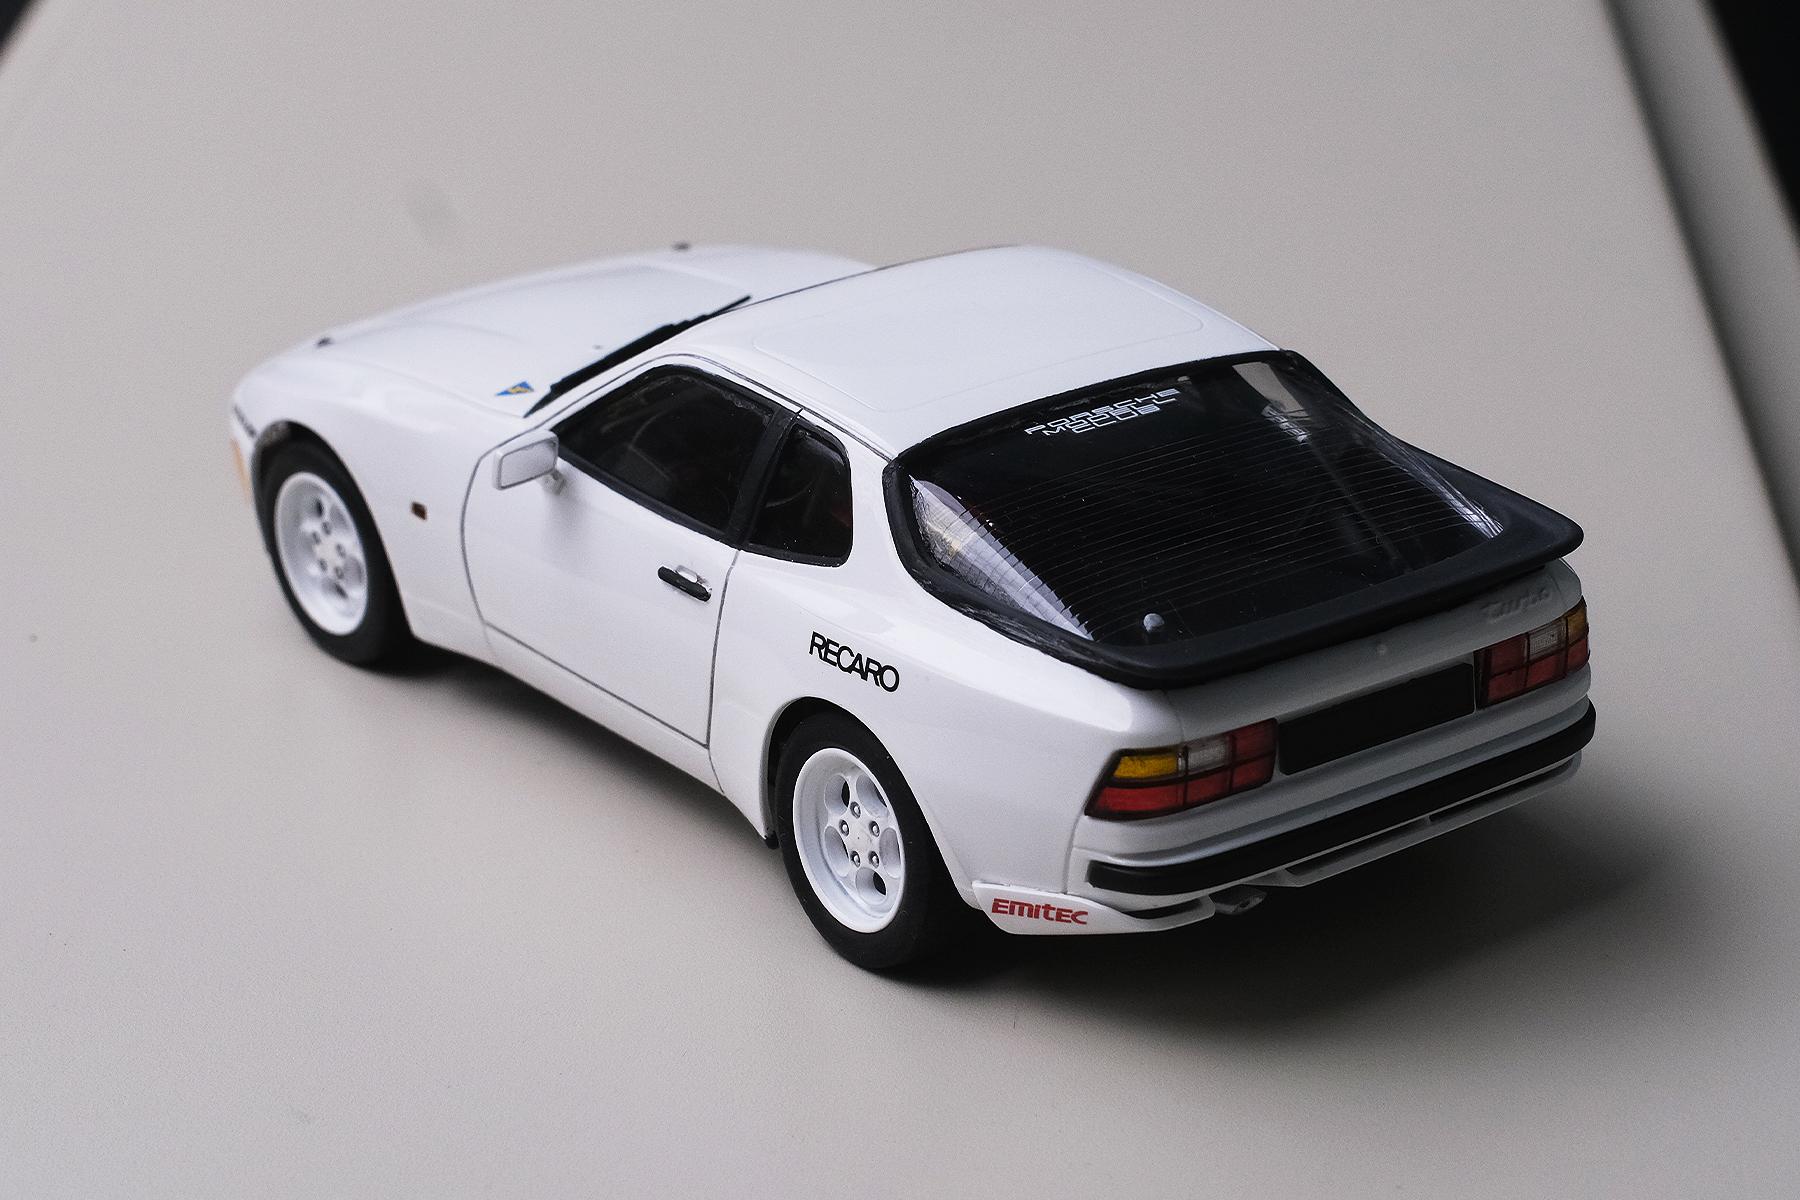
This is Hasegawa's recent re-release of their older 944 turbo kit. I didn't like the livery it came with, and I love how some Porsche cup cars often race in white lacking any sort of large livery and stay street legal with license plates. Turbo cup had numerous upgrades over stock 951 (extensive weight savings, larger turbo, updated suspension and brakes, etc) and I heard that 944 Turbo cup was also very popular in Canada and it even aired live on TV back then. Kit pros: - proportion of body is very accurate - realistic engine and suspension - photo etched seat belts included Kit cons: - sub par fit of front hood and clear window parts - trunk spoiler, emblem, and door handles are molded when so many other parts are separate - front suspension sits little too high Build detail - Tamiya white surfacer - wet sanded w/ 2000 grit - 2 mist coats and 1 wet coat of TS-26 pure white - 1 mist and 2 wet coat of TS-13 clear - wet sanded w 3000 grit, then polished with Tamiya three-stage compounds - added ignition wires, fuel rail to otherwise stock engine bay - added etched hood pins - replaced stock 4 spoke steering wheel with something more appropriate
-
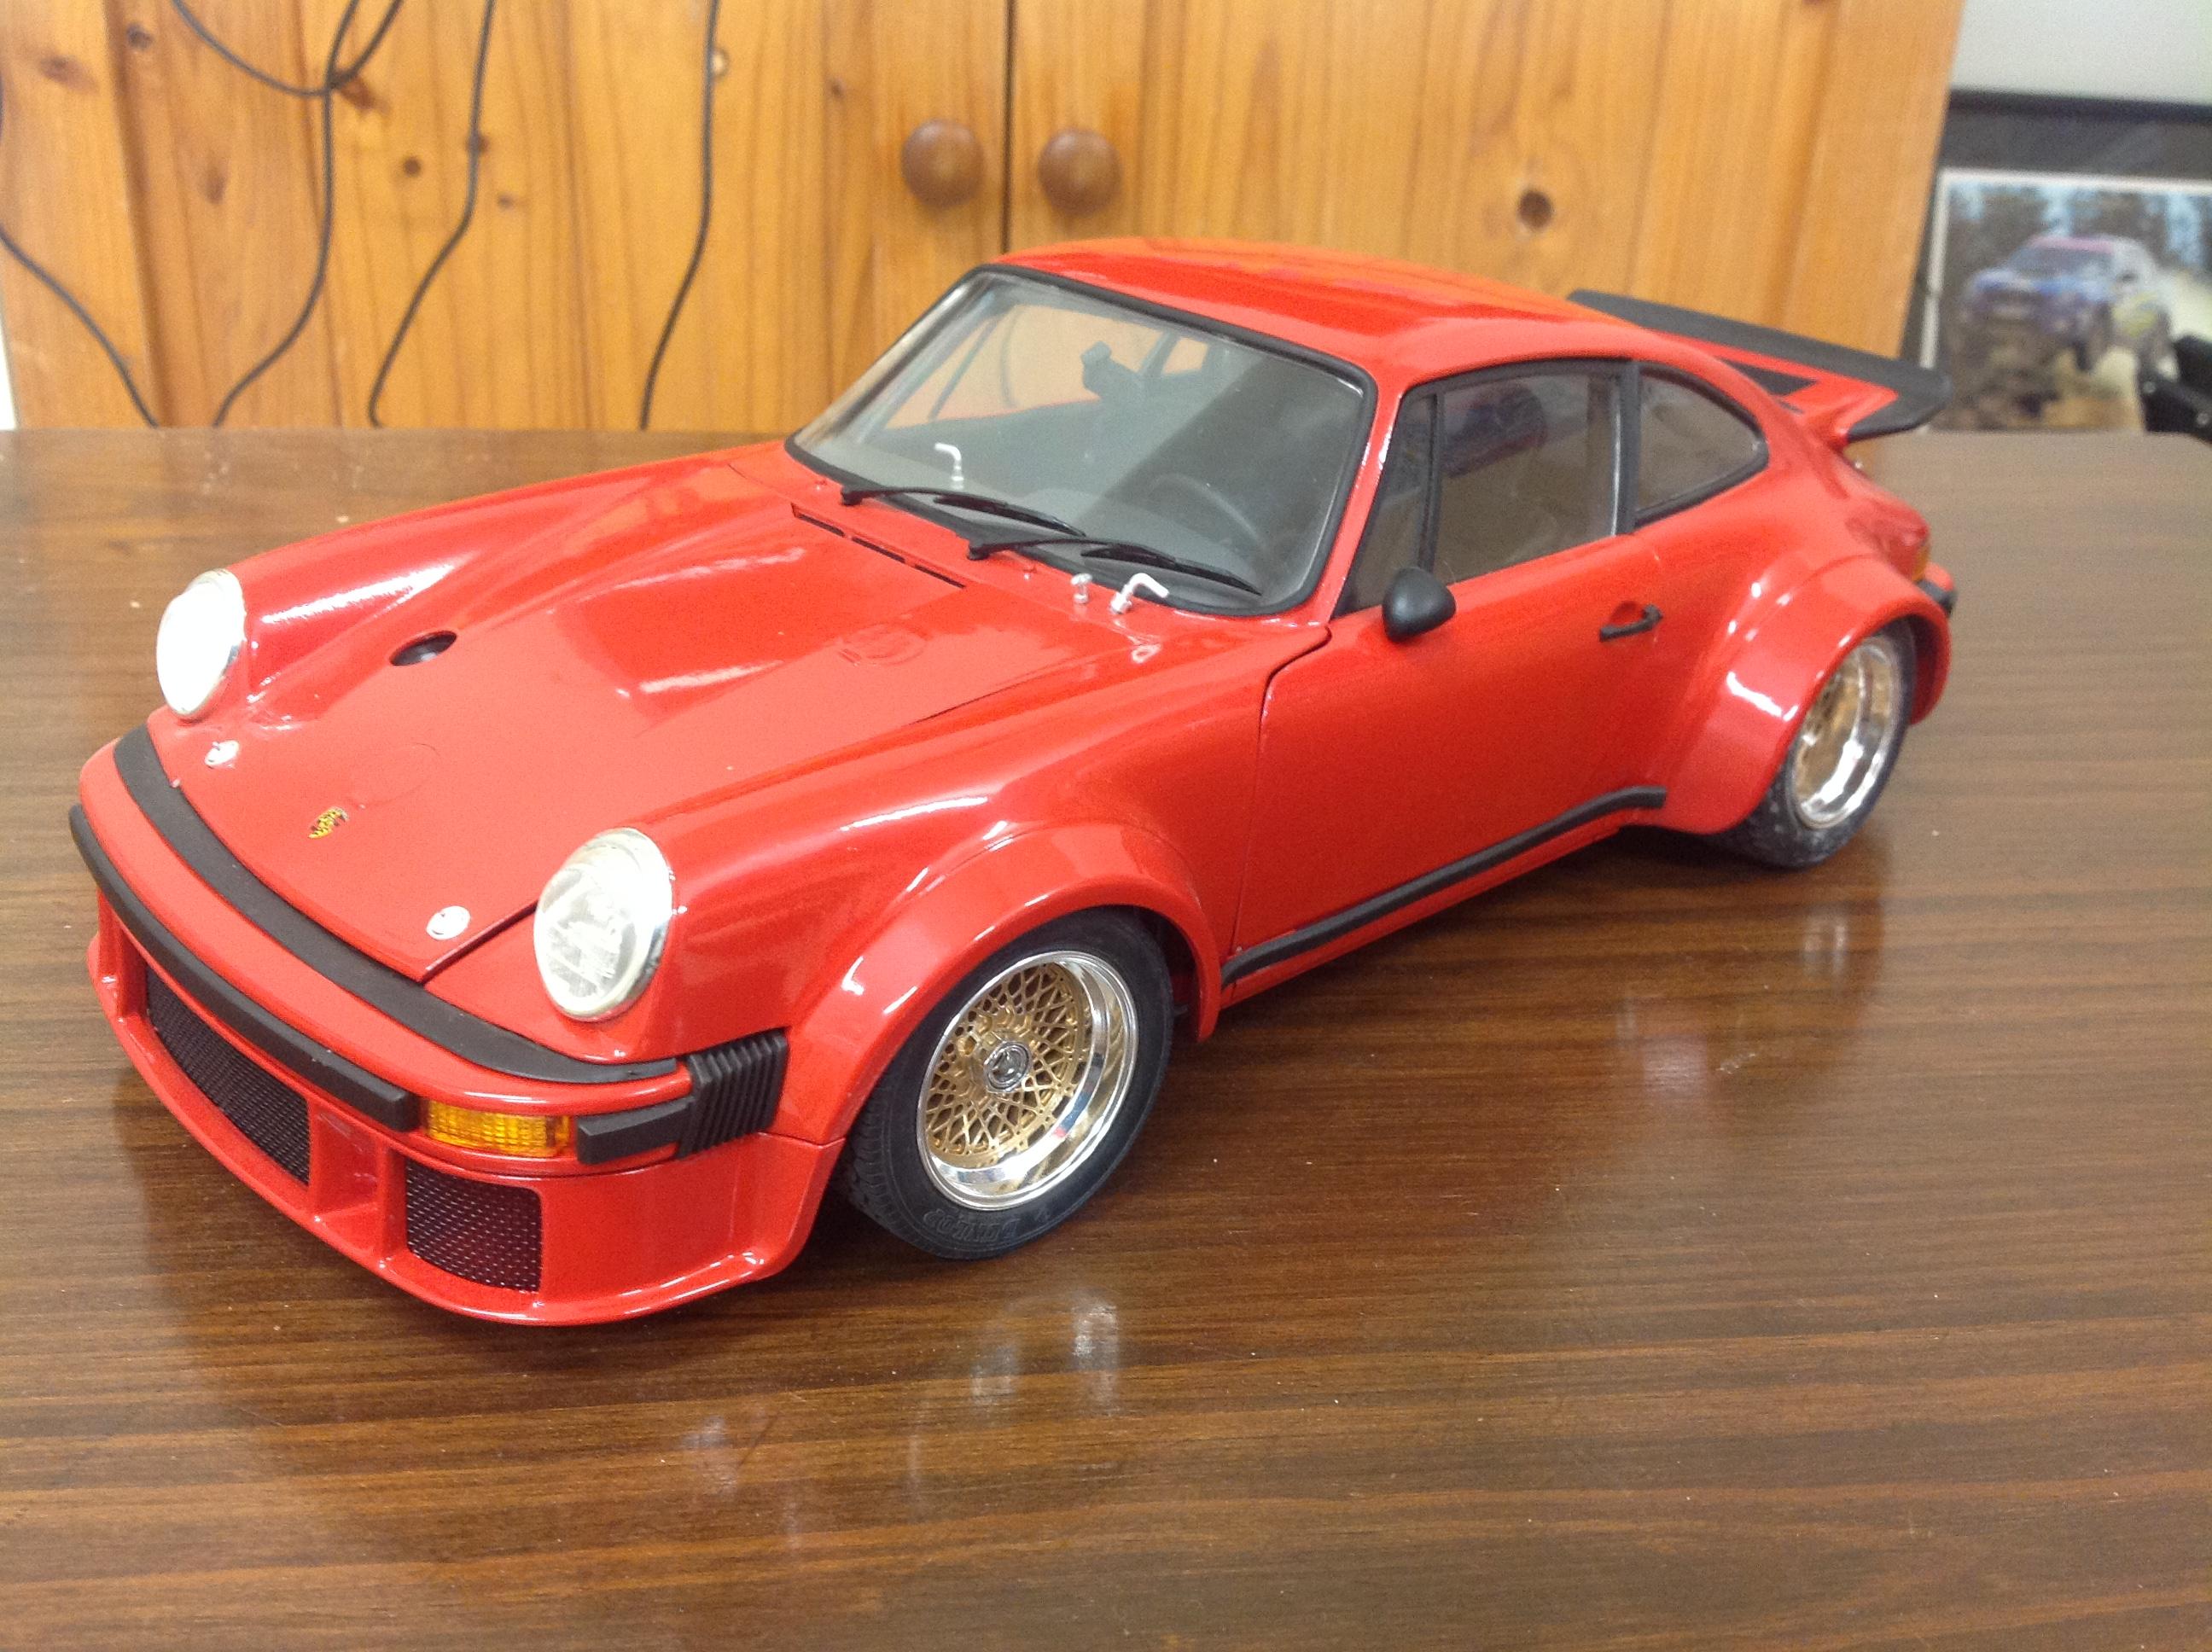
Built this one many, many years ago from the original release 1/12 scale kit by Tamiya. Built box stock with a Guards Red rattle can finish by Testors from memory (no clear coat). Enjoy! Cheers....Geoff
-
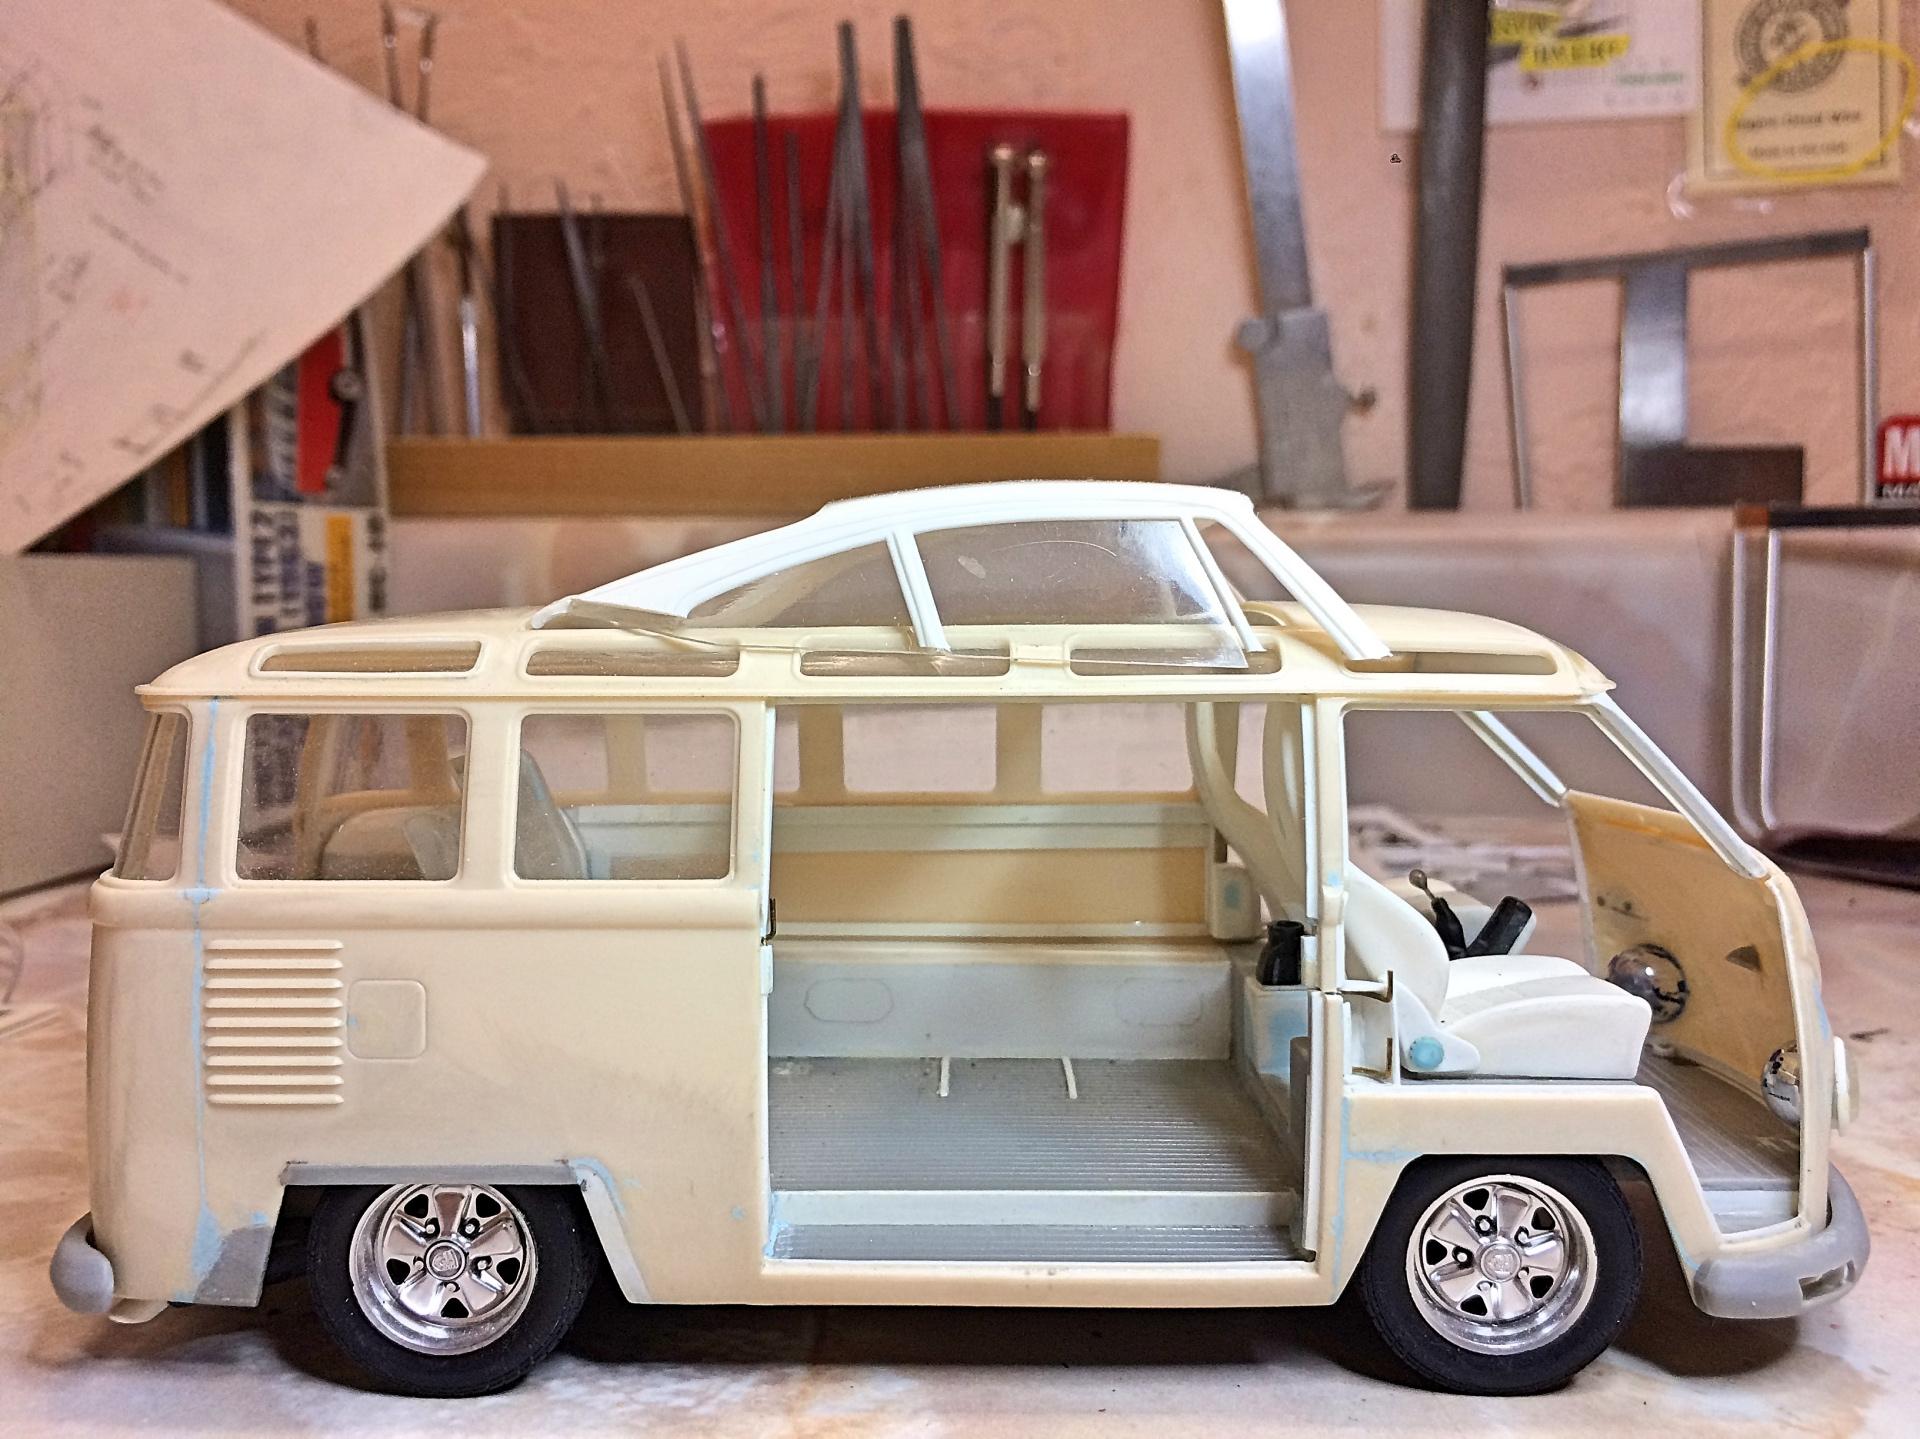
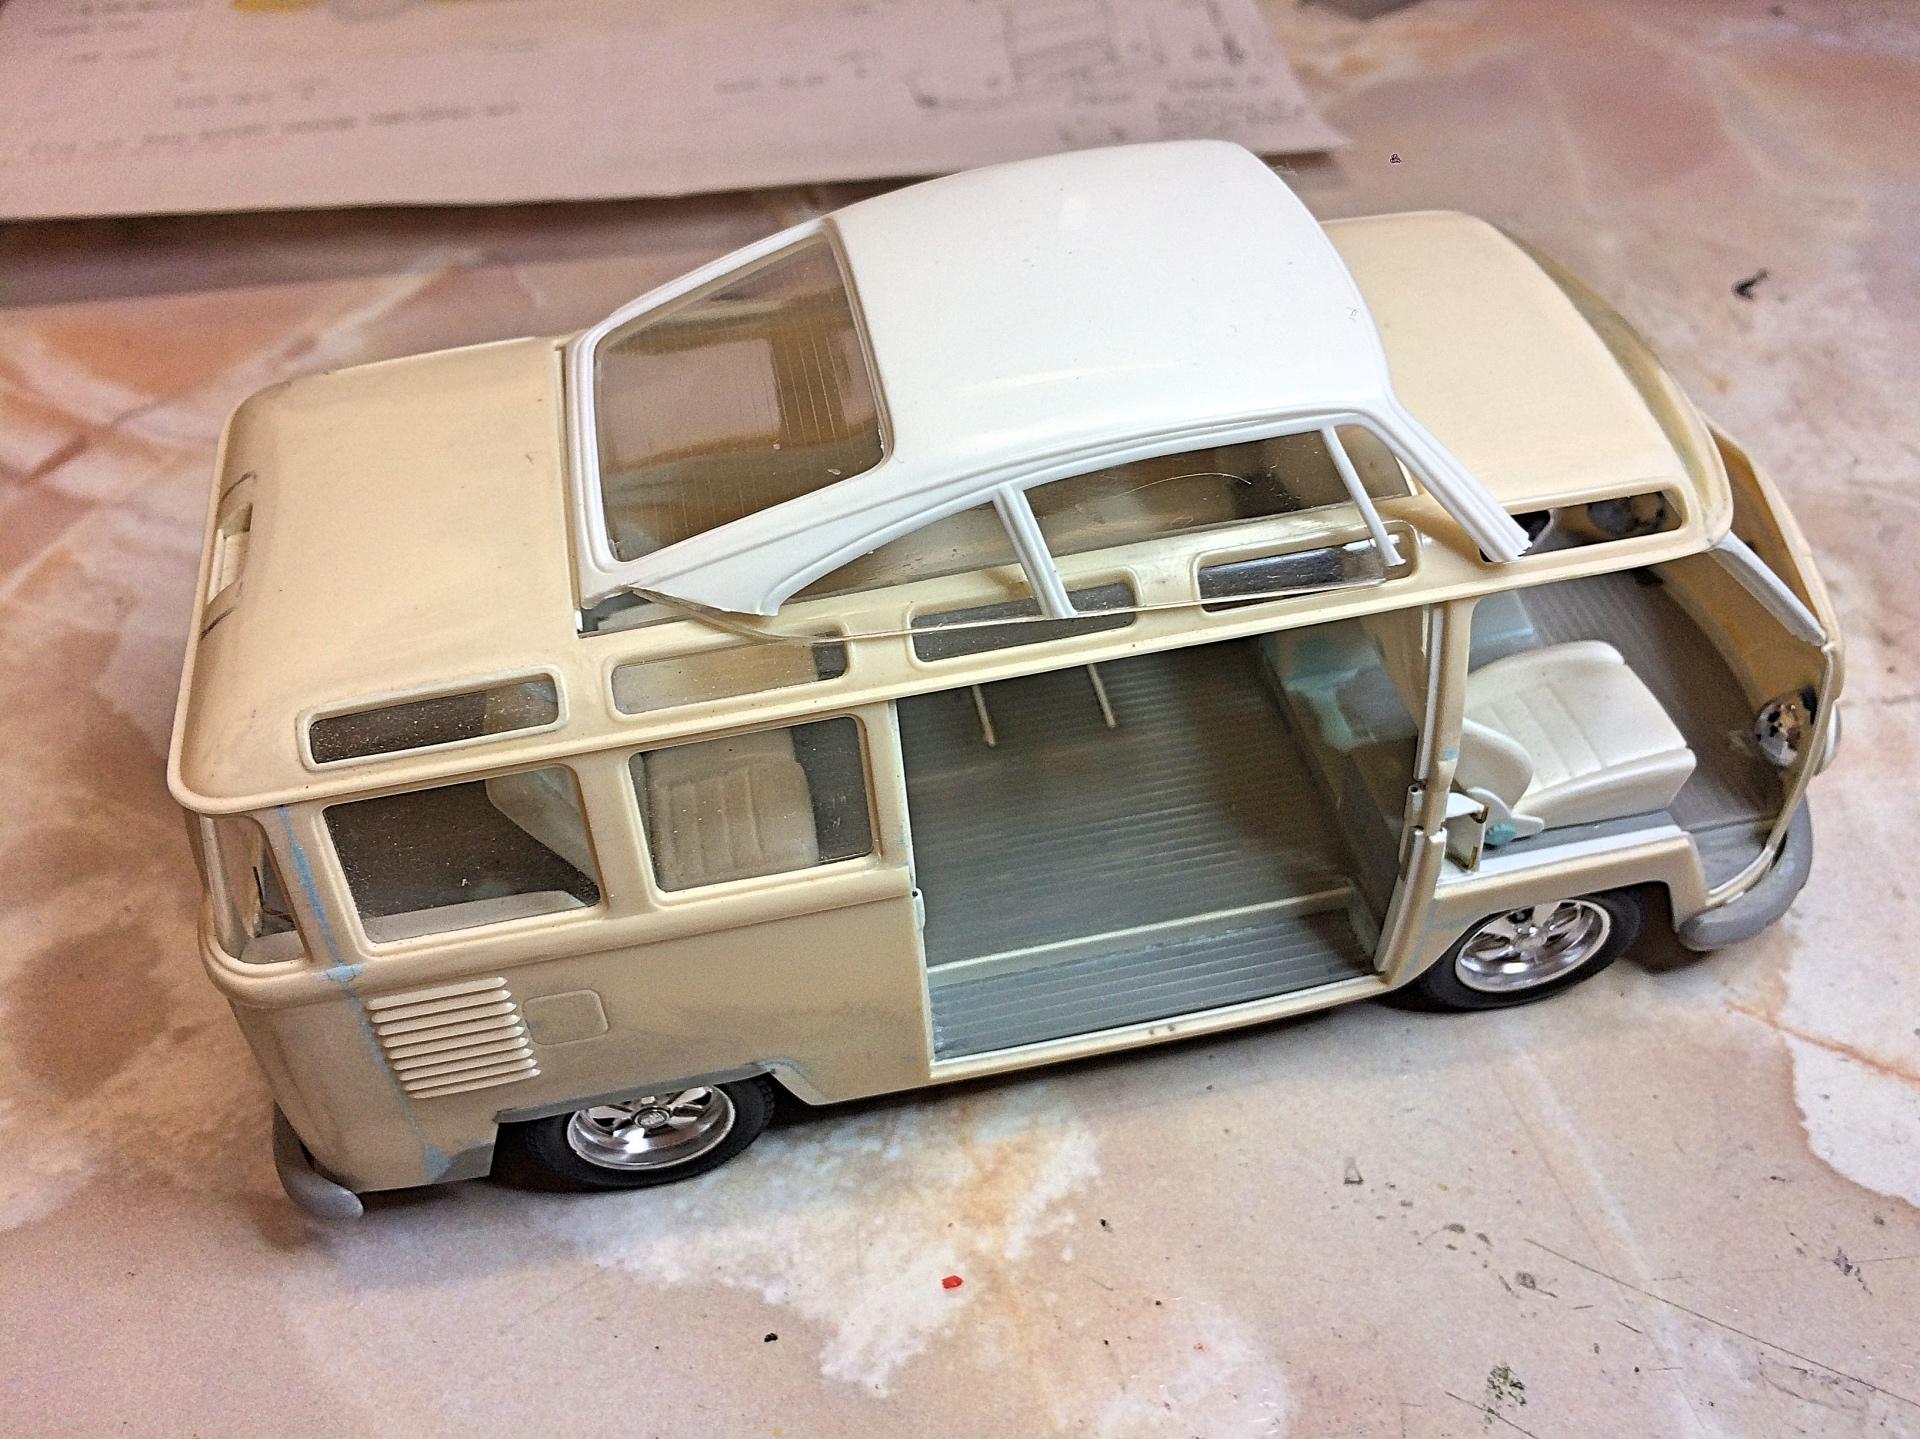
 Resurrecting a project started in January 2003, based on the very nice Hasegawa VW Microbus Type 2 kit. I had left over parts from building a Fujimi Porsche 911 Slantnose Turbo kit-bashed with the Tamiya 911 Speedster. Made it this far without taking digital pictures of the process, so the run-down of what was done: Bus: Opened all doors, front doors are suicide with doubled-acting wire hinges. Made new panels using epoxy putty, which warped the doors so need to fix that. Side doors are also double-acting wire hinges. I'm reconsidering the hinges since I have discovered fusee chain, used on the Ferrari N.A.R.T. The engine lid for the 911 grill replaces the original access, no engine detail inside. Slanted back the windshield, re-profiled the roof using epoxy putty. The spare tire cover that was inside, is now under the front. Adding the third brake light, like it was taken from a Ford Econoline van. Reason for changing the window number, added two more of the Safari windows at the back, thus 25 Window. Adding the Porsche roof should revise to a higher number, depending on what I do with the side glass. Porsche parts: Have used the headlights, turn signals in the bumper, door mirrors, dash, seats (back seat is modified with a similar cushion pattern), Fuches wheels and Pirelli tires, and engine bottom. The Speedster had 3 seats, one was laid back for under the cover, separated and hinged so it's adjustable, and Captain swivels, and can be taken out. The dash has been modified to fit, have 3 pedal arms ready for photo-etch pads. The exhaust is modified using copper wire, will redo the tips using stainless steel tubing. The shifter console has a second parking brake that is intended to lock the front wheels, for showing off with burn-outs. The roof is from the Fujimi Slantnose project, I had been debating what to do for the roof, didn't really want to do the canvas fold/sliding thing, so this will become a carbon-fiber unit similar to a Westfalia camper unit. First thing to do is fix the A-pillars and the one B-pillar that are broken, reinforced with wire (as I did for the Ferrari N.A.R.T. Spyder windshield frame). One thing that stopped me, was knowing the giant VW emblem was going to cause problems for painting, have made resin copies, will grind off, problem solved. Designing a cool looking interior cabinet along the side with an awesome sound system, I have no clue about that stuff so need to research, have speaker grills and mesh salvaged from electronic devices. The interior needs window framing, can't just stick the glass in, so that will be new pieces, thinking of covering with carbon-fiber decal, might hinge some of the side windows. The back windows have the cage protectors, the kit has decals which would look really cheesy, so will *have to* make from wire, the back seat has wire too. Needs a steering shaft/box added. Have the crazy idea to use LED lights that came in junk mail from car dealers, with fiber optic runs to lights, very ambitious and crazy. ? I have a Coke cooler to put in now. ? Since I finished three projects recently, I couldn't let the dust settle. ? Will be thinking of a nickname...... Pictures taken long ago: When I got inspired with the LED lighting idea: When I was casting RTV and resin, used up some rubber: After finishing the '69 Chevy pickup, cleaned up the bench (I know, hard to believe): The latest idea, the Westfalia camper style roof. The interior: This little monster is getting finished! ?
-
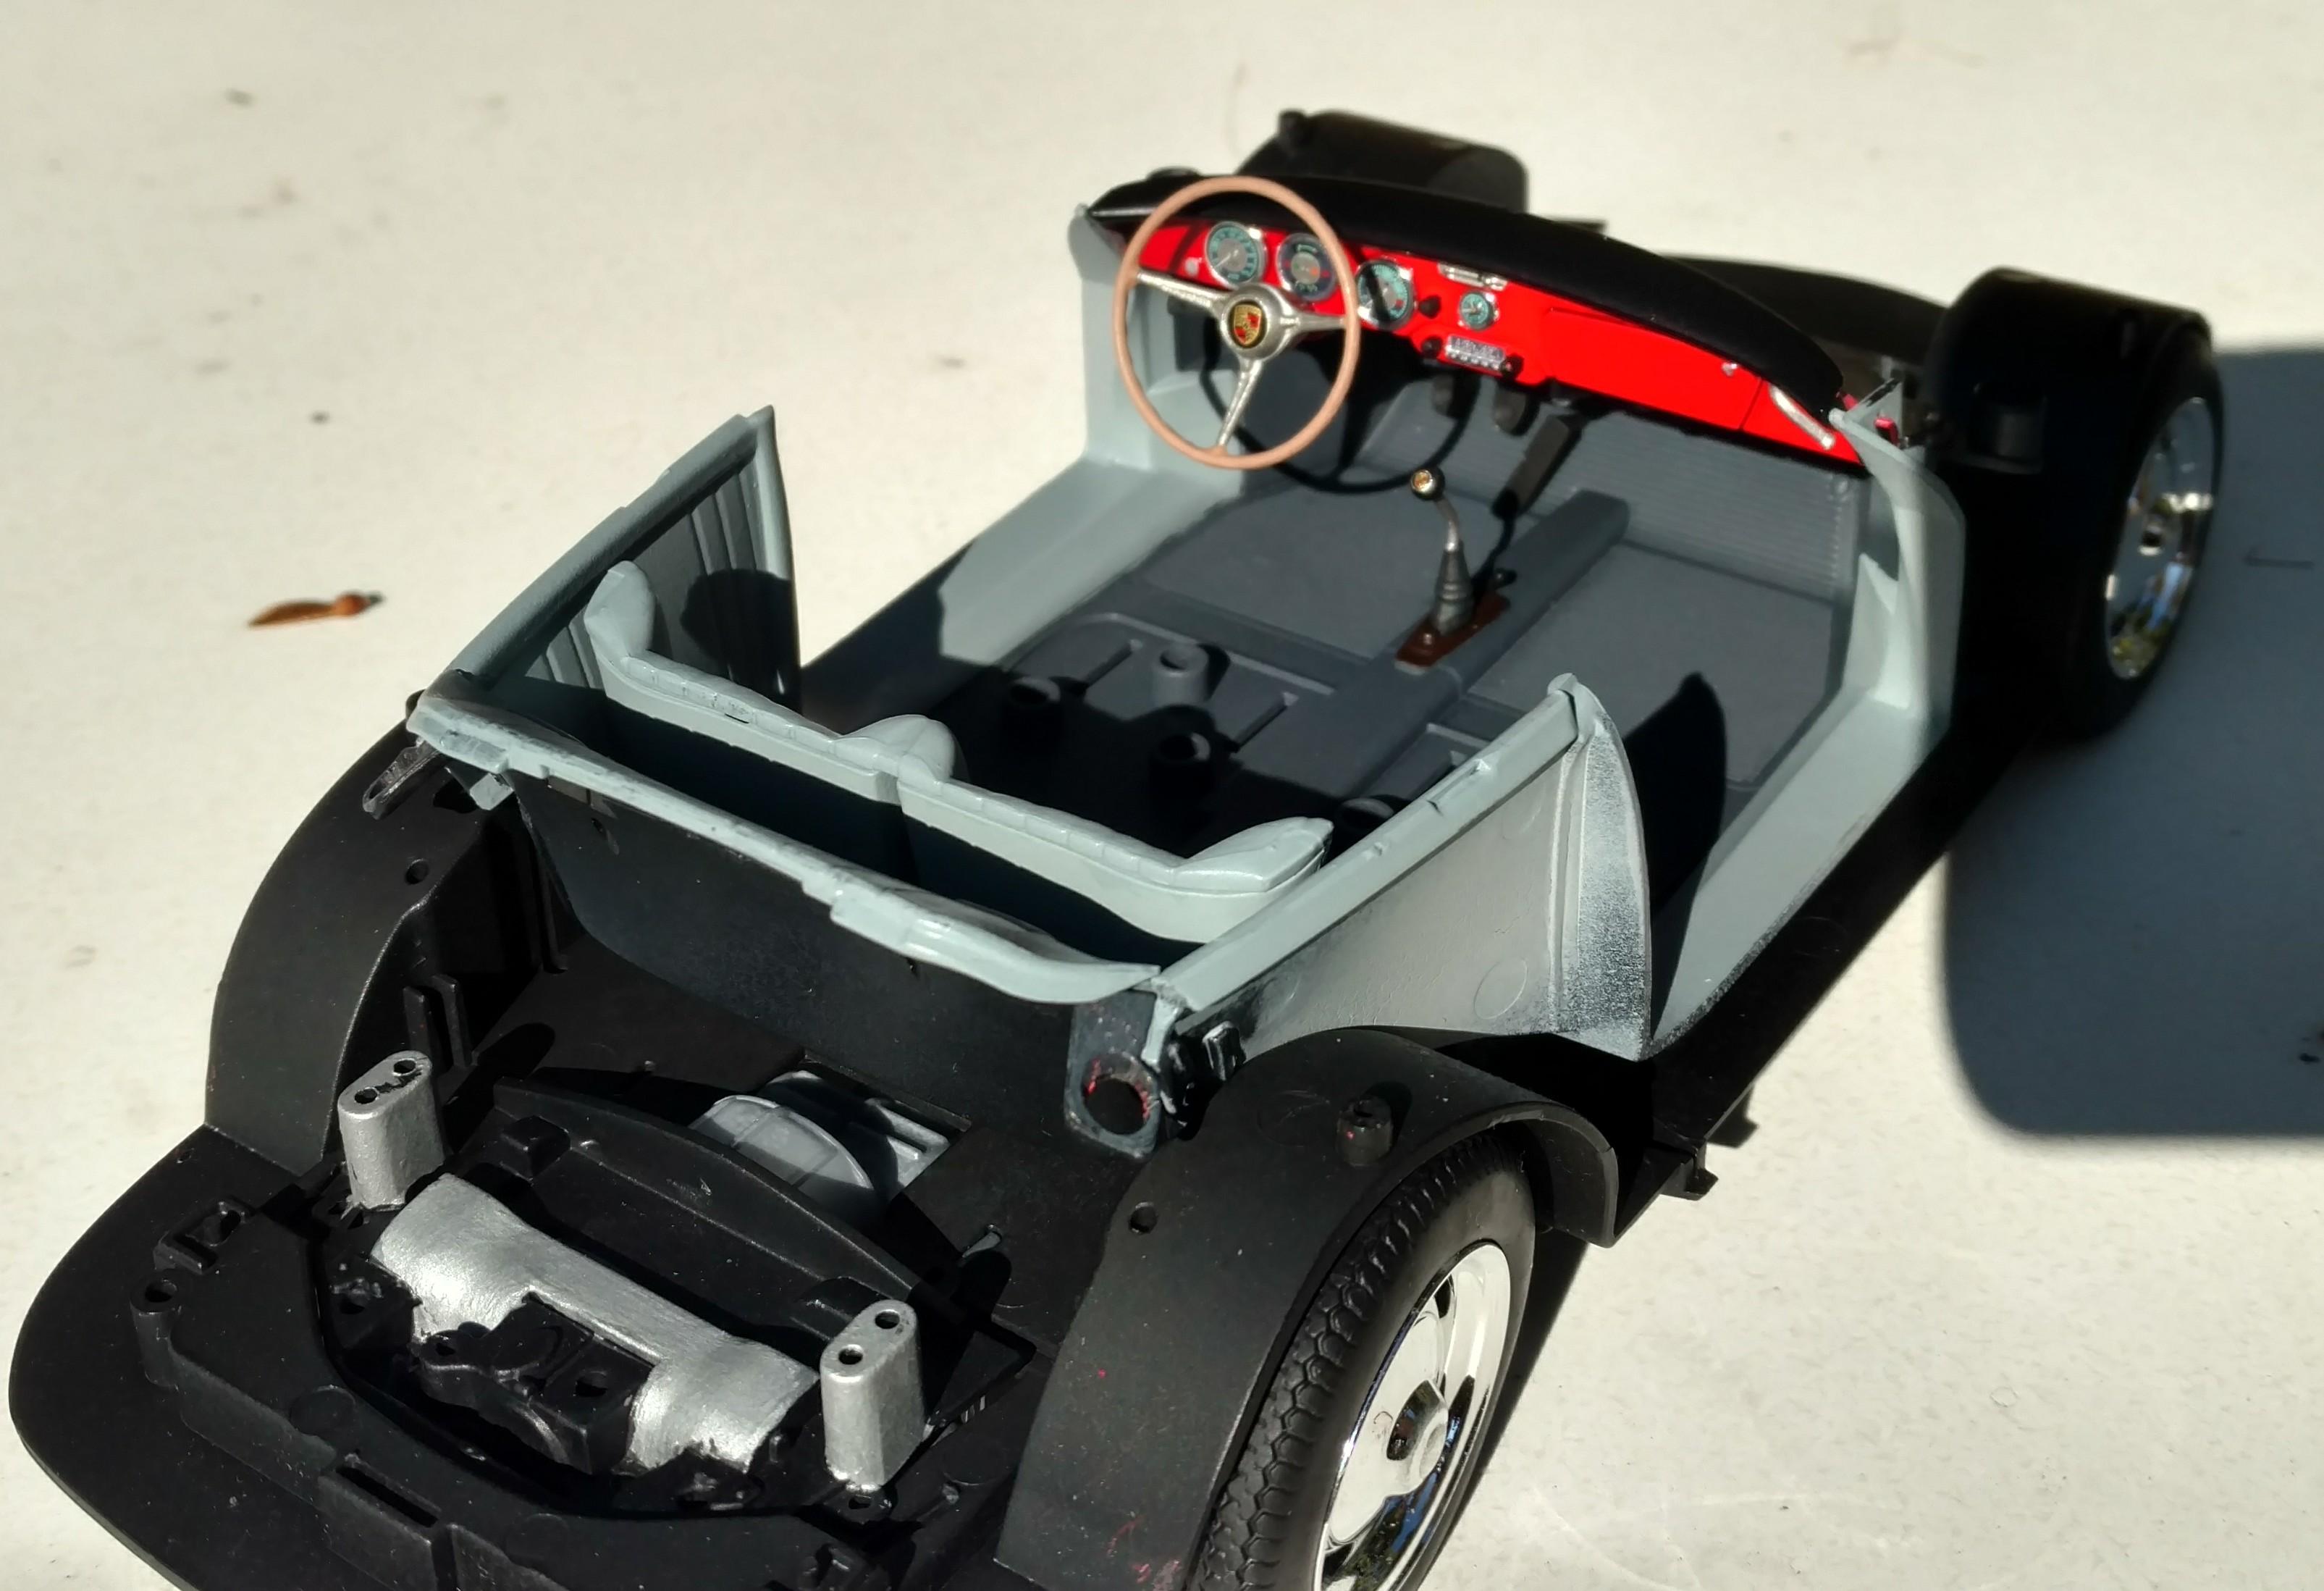
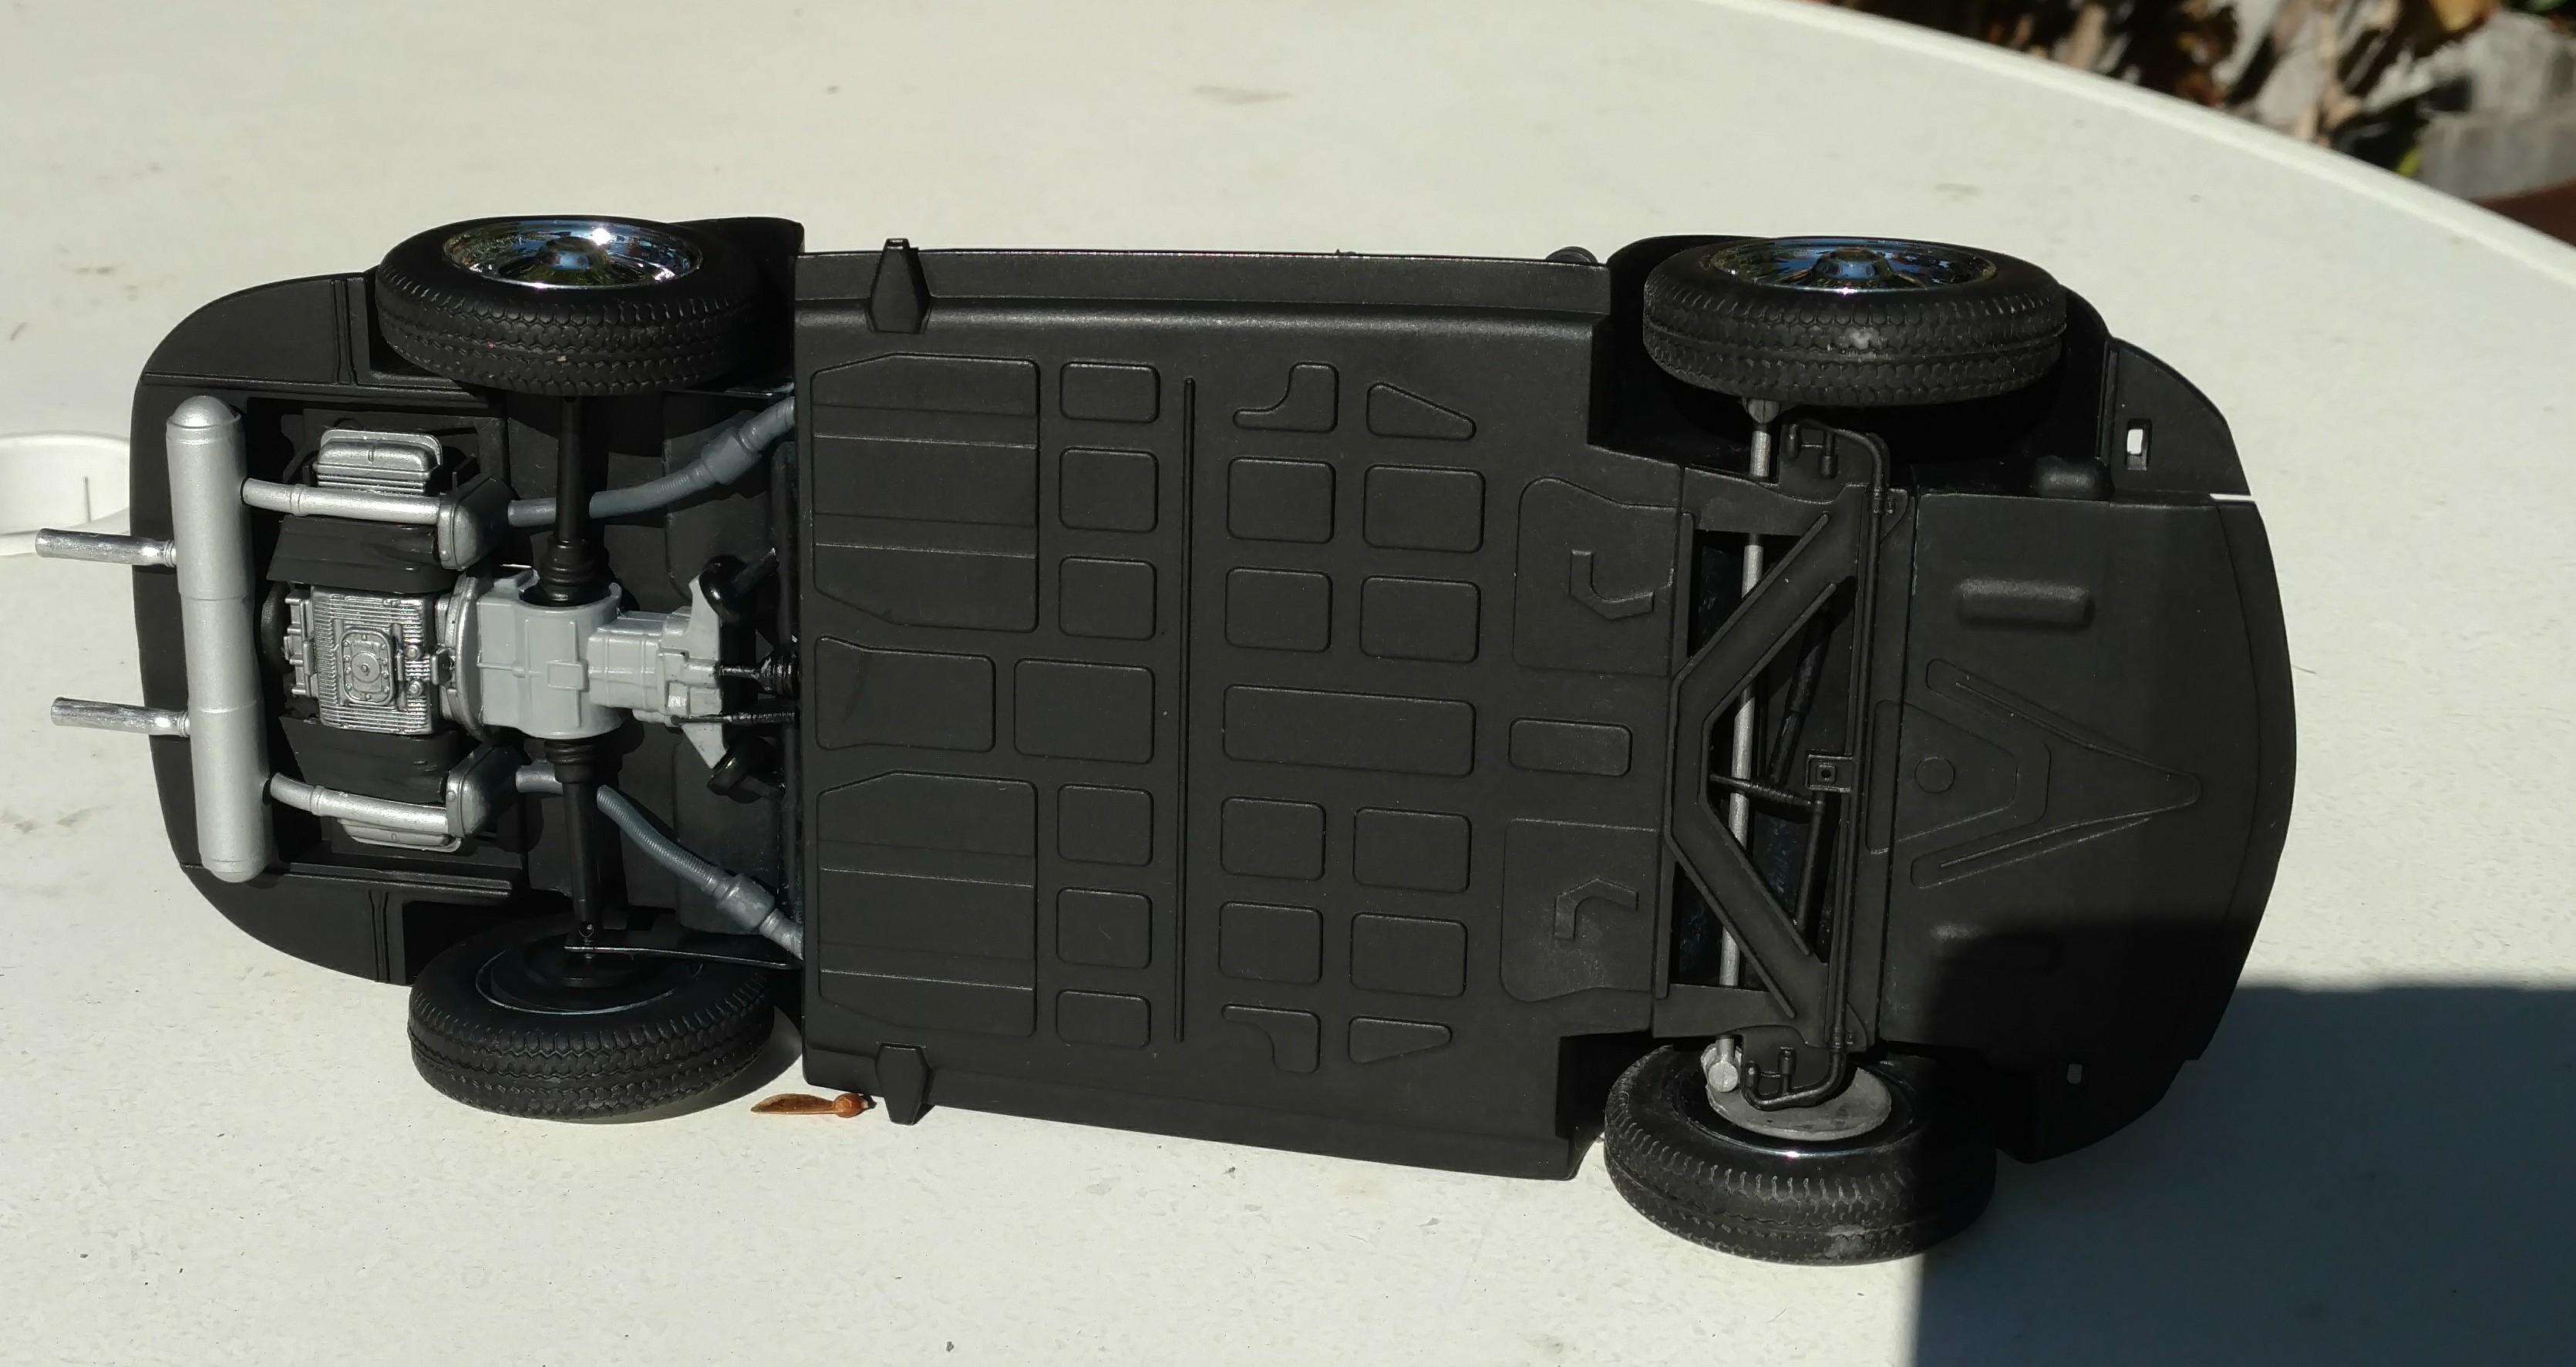
I too am working on the Revell of Germany 1/16 356B coupe. I haven't built a Porsche since the original Revell 914 in what, 1971? Also don't build larger scales, but I liked the way HPIGuy's build looked. My LHS didn't have it (now they do), and the mail order giants were out of stock as well. Got mine on eBay from Burbank's House of Hobbies in SoCal. Great seller BTW, and I like that I am supporting an LHS, even if they aren't my LHS. As drodg said, the engine is a bit blobular. I don't think I am going to go too far to change that. I still have to detail paint the engine tin and install it with the generator and air cleaners. The model sits a tiny bit low in the front which restricts the movement of the steerable wheels. The tires rub on the inner wheelhouses. Mine is all painted which causes issues with the snap together aspect, but it's easy enough to clean out the joining areas. A bit of mine is glued because it is more solid that way. Color is Testor's Italian Red over Tamiya pink primer with wet look clear. That is pretty much the same as the molded red color. I have been having trouble with roughness in the red and clear, and wound up stripping the bumpers. I need to do a little color sanding and polishing of the body. My research showed that the 356B coupe circa 1960 could have a red, black, or grey interior with red paint. Not 100% sure if that is true, but I decided to go with grey. Tamiya AS28 and TS48. Used different blacks and metallics on other parts. Was fairly happy with Metalizer aluminum on the transaxle, and Magnesium on the engine. After it dried, the engine got a wash of The Detailer to make the cooling fins stand out. Some sadistic person at R.O.G. though it was necessary to have a Porsche crest on the shift knob. I managed to get the decal in place fairly easily, but was sweating the whole time. Wish I had better pictures, but the sun is so low in the sky it makes long shadows any time of the day now. Someday I will make a photo booth.
-
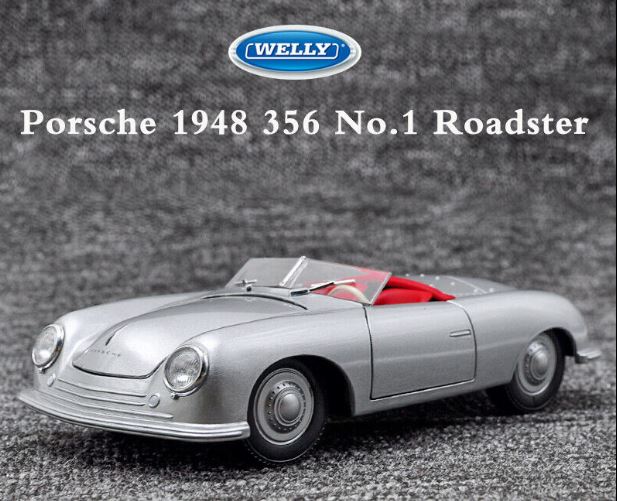
Maybe some one more familiar with diecasts than me can help me understand. A vendor in China has listed these 1/24 Porsches on eBay but yet they are not in the Welly 2019 catalog nor the USA Welly distributor's list. For me they are very welcome though. The 1964 911 (901) is definitely new, the only other one I know of is the Leo Models release. The 1948 no. 1 roadster looks very much like the Maisto no. 1 but the dash and the base are totally different, poseable steering and wheels etc. The 959 looks like the BBurago version but it has different body details and wheels. Now BBurago and Maisto are owned by the same company and operate from the same location in China but Welly is not part of that group though they operate in China too. Anyone have any ideas about what is going on?
-
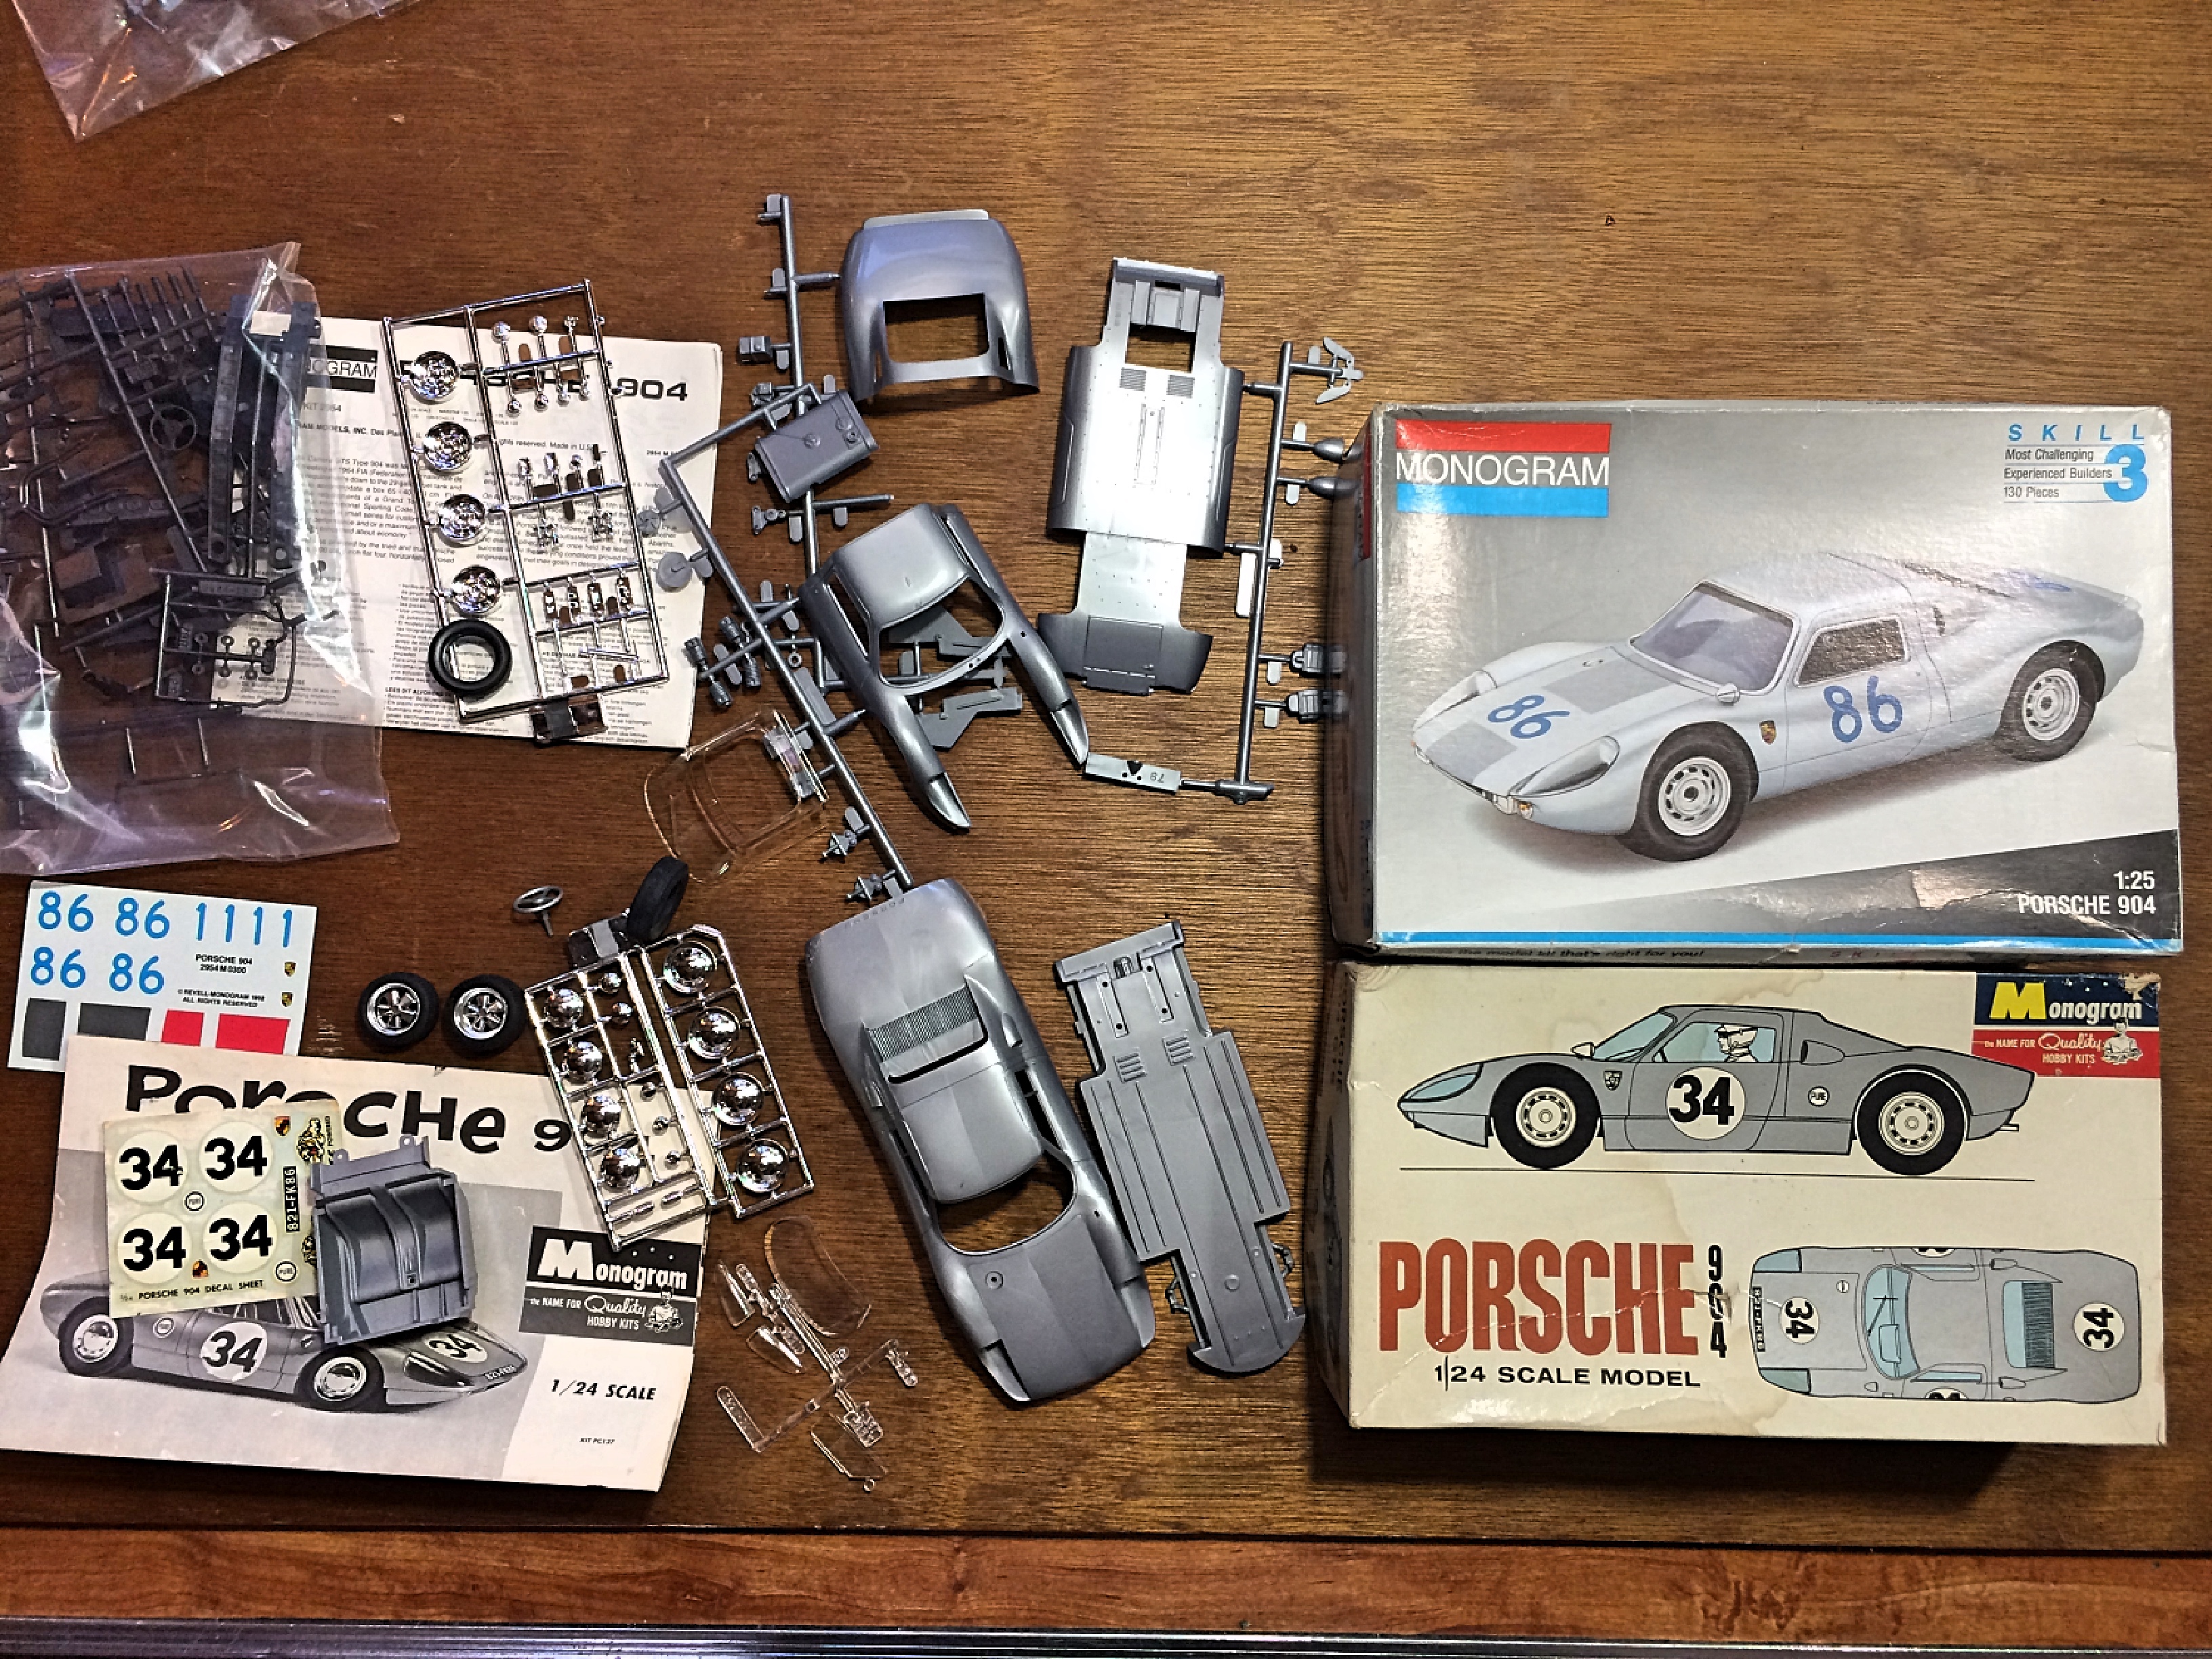
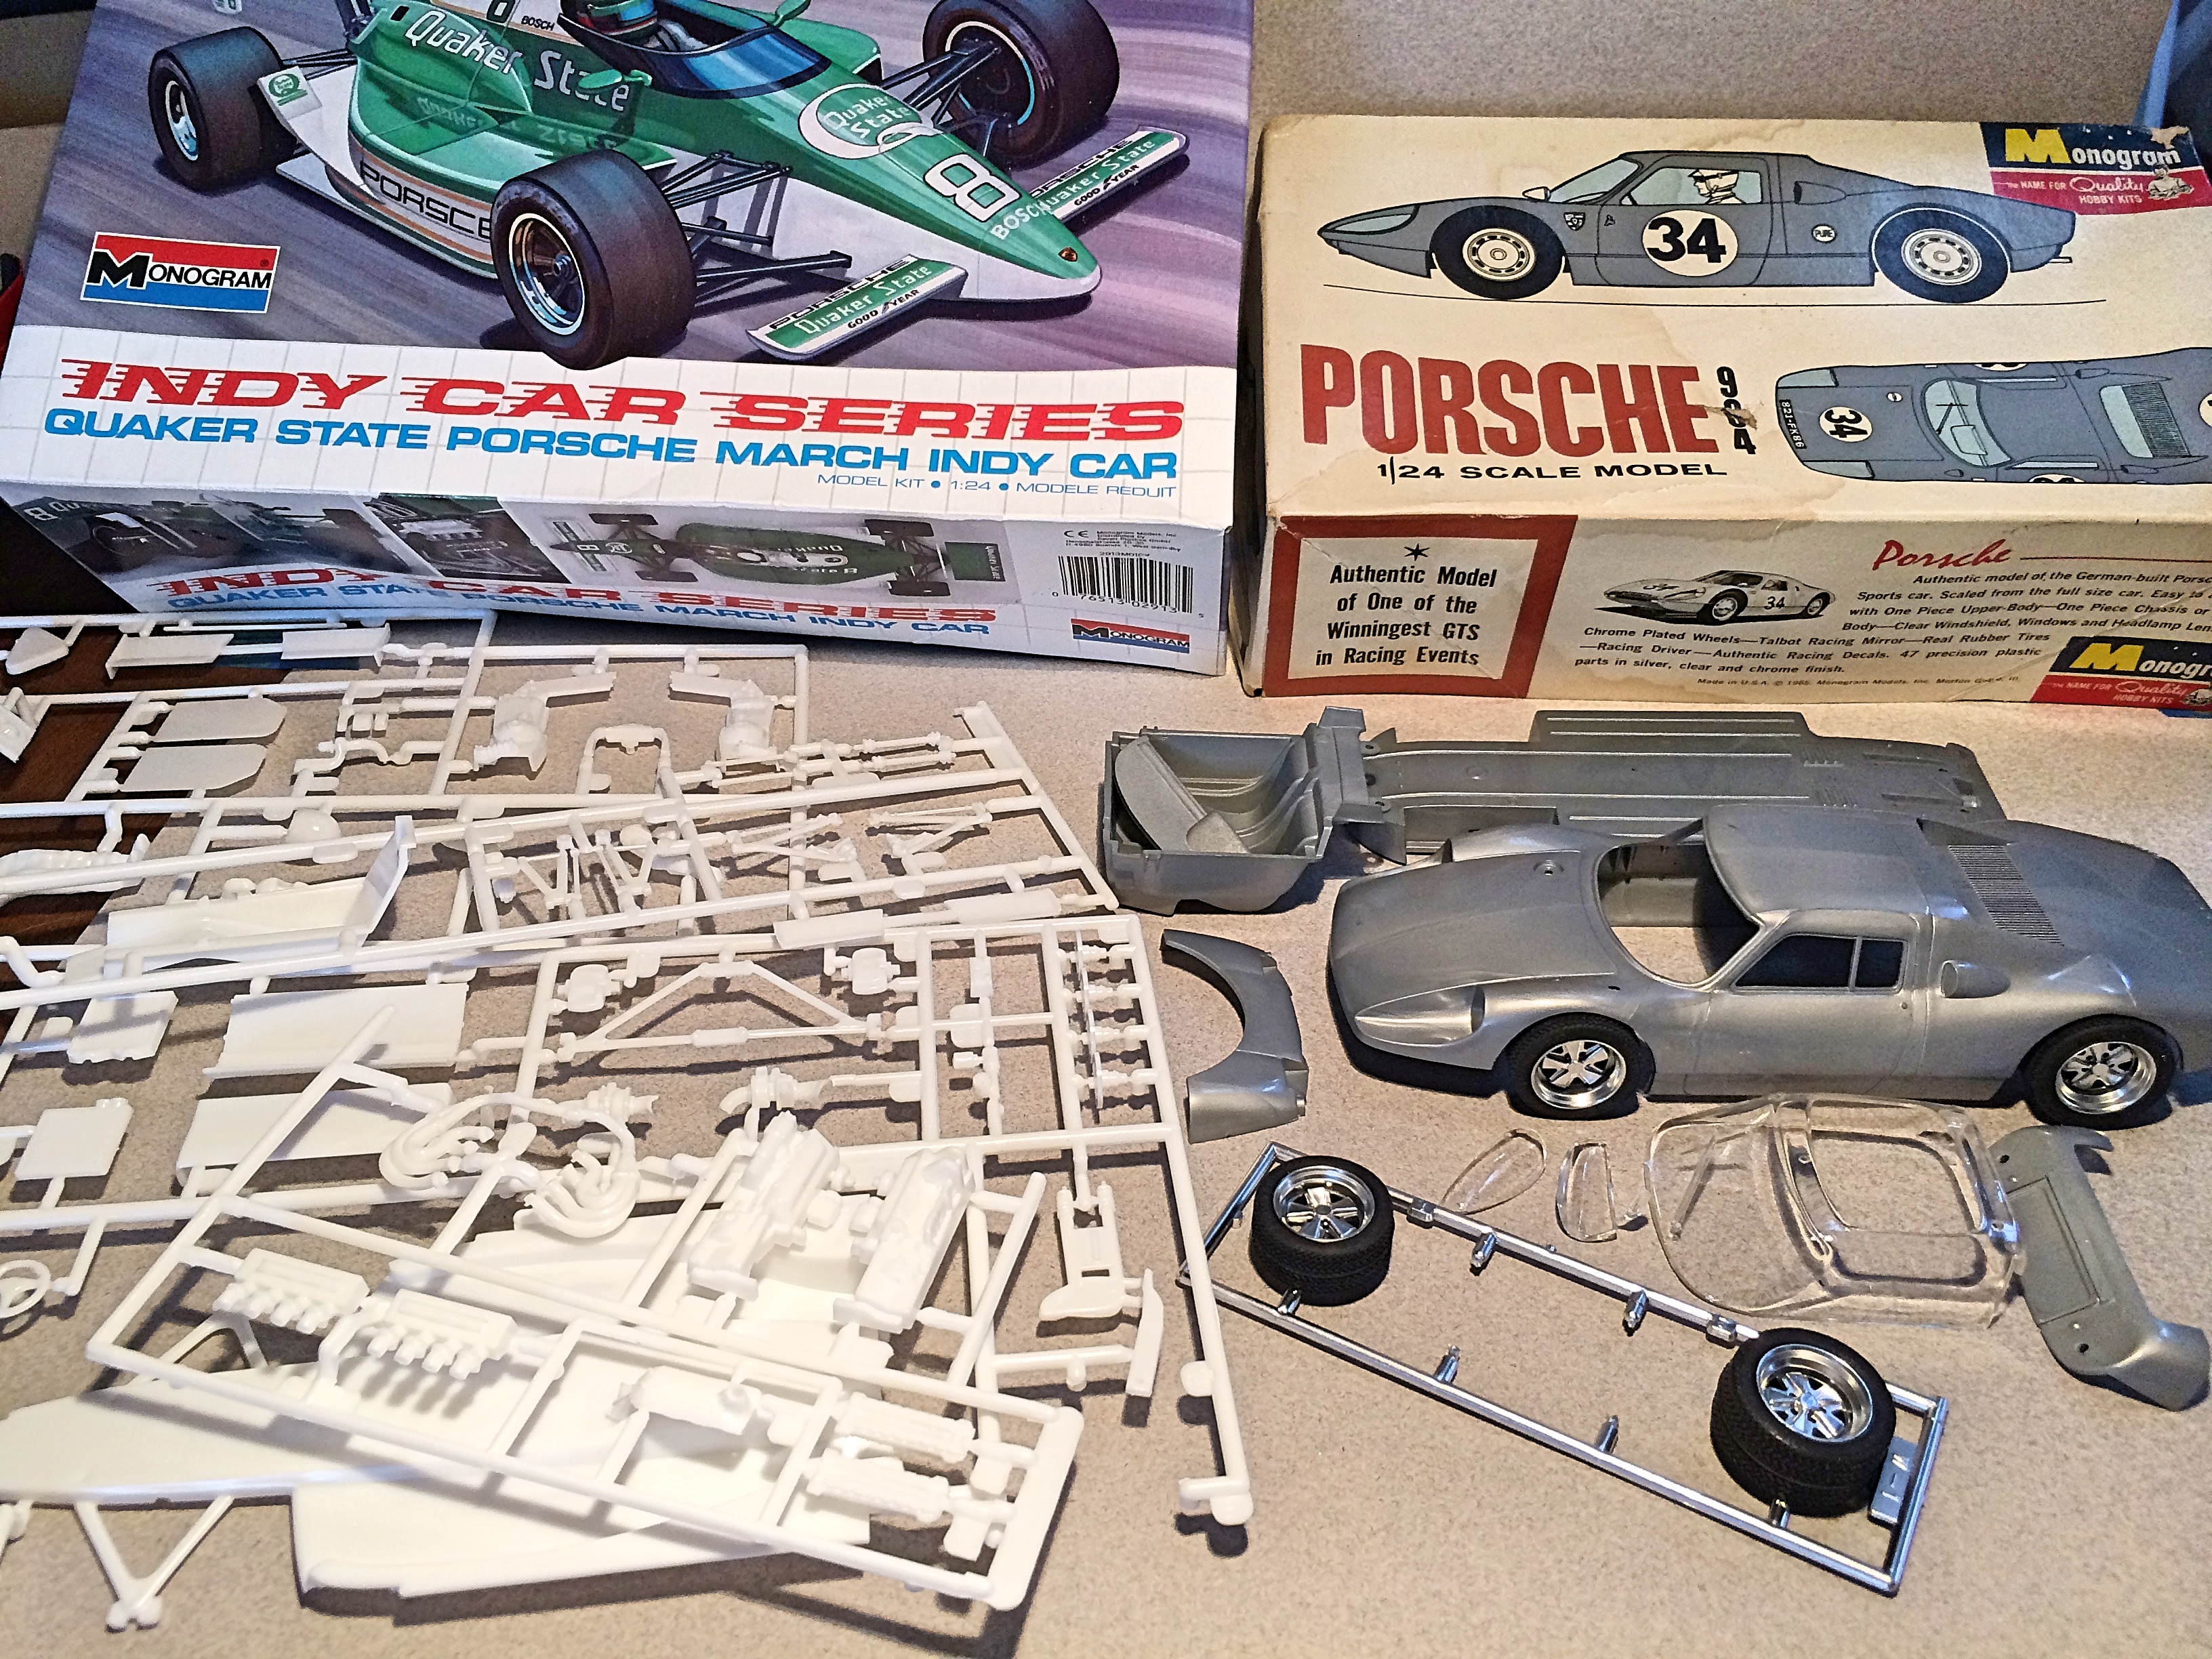
Next project idea, simply posting to have some sort of incentive to go for it. Got the vintage Monogram Porsche 904 slot-car version at GSL, which is completely different than the version with an engine. Friend had the Monogram Porsche March Indy car at the Phoenix model swap meet, I noticed "Porsche" when we started packing up so got it for $5. I never knew Porsche tried Indy, looked up the history and saw it was a dismal attempt, so no wonder. The kit isn't worth anything, and nobody seems to like Indy models, so why not hack it up? The 904 had the nice Fuches wheels and P7 tires, probably Fujimi. The Porsche Outlaws & Hot Rods topic inspired me. I have to catch up with other things before getting possessed and obsessed about this project.
-
For 'Mein Frau', who loves orange cars and was brought-up close to Stuttgart: Tamiya Orange with 'a few drops of' Tamiya 'Flesh, followed by a single coat of 'Pearl Clear' and two coats of TS13 'Clear', all cut & polished with Tamiya compounds. Thanks for taking the time to look, as ever all questions, comments and abuse welcomed. Cheers from NZ Ian.
-
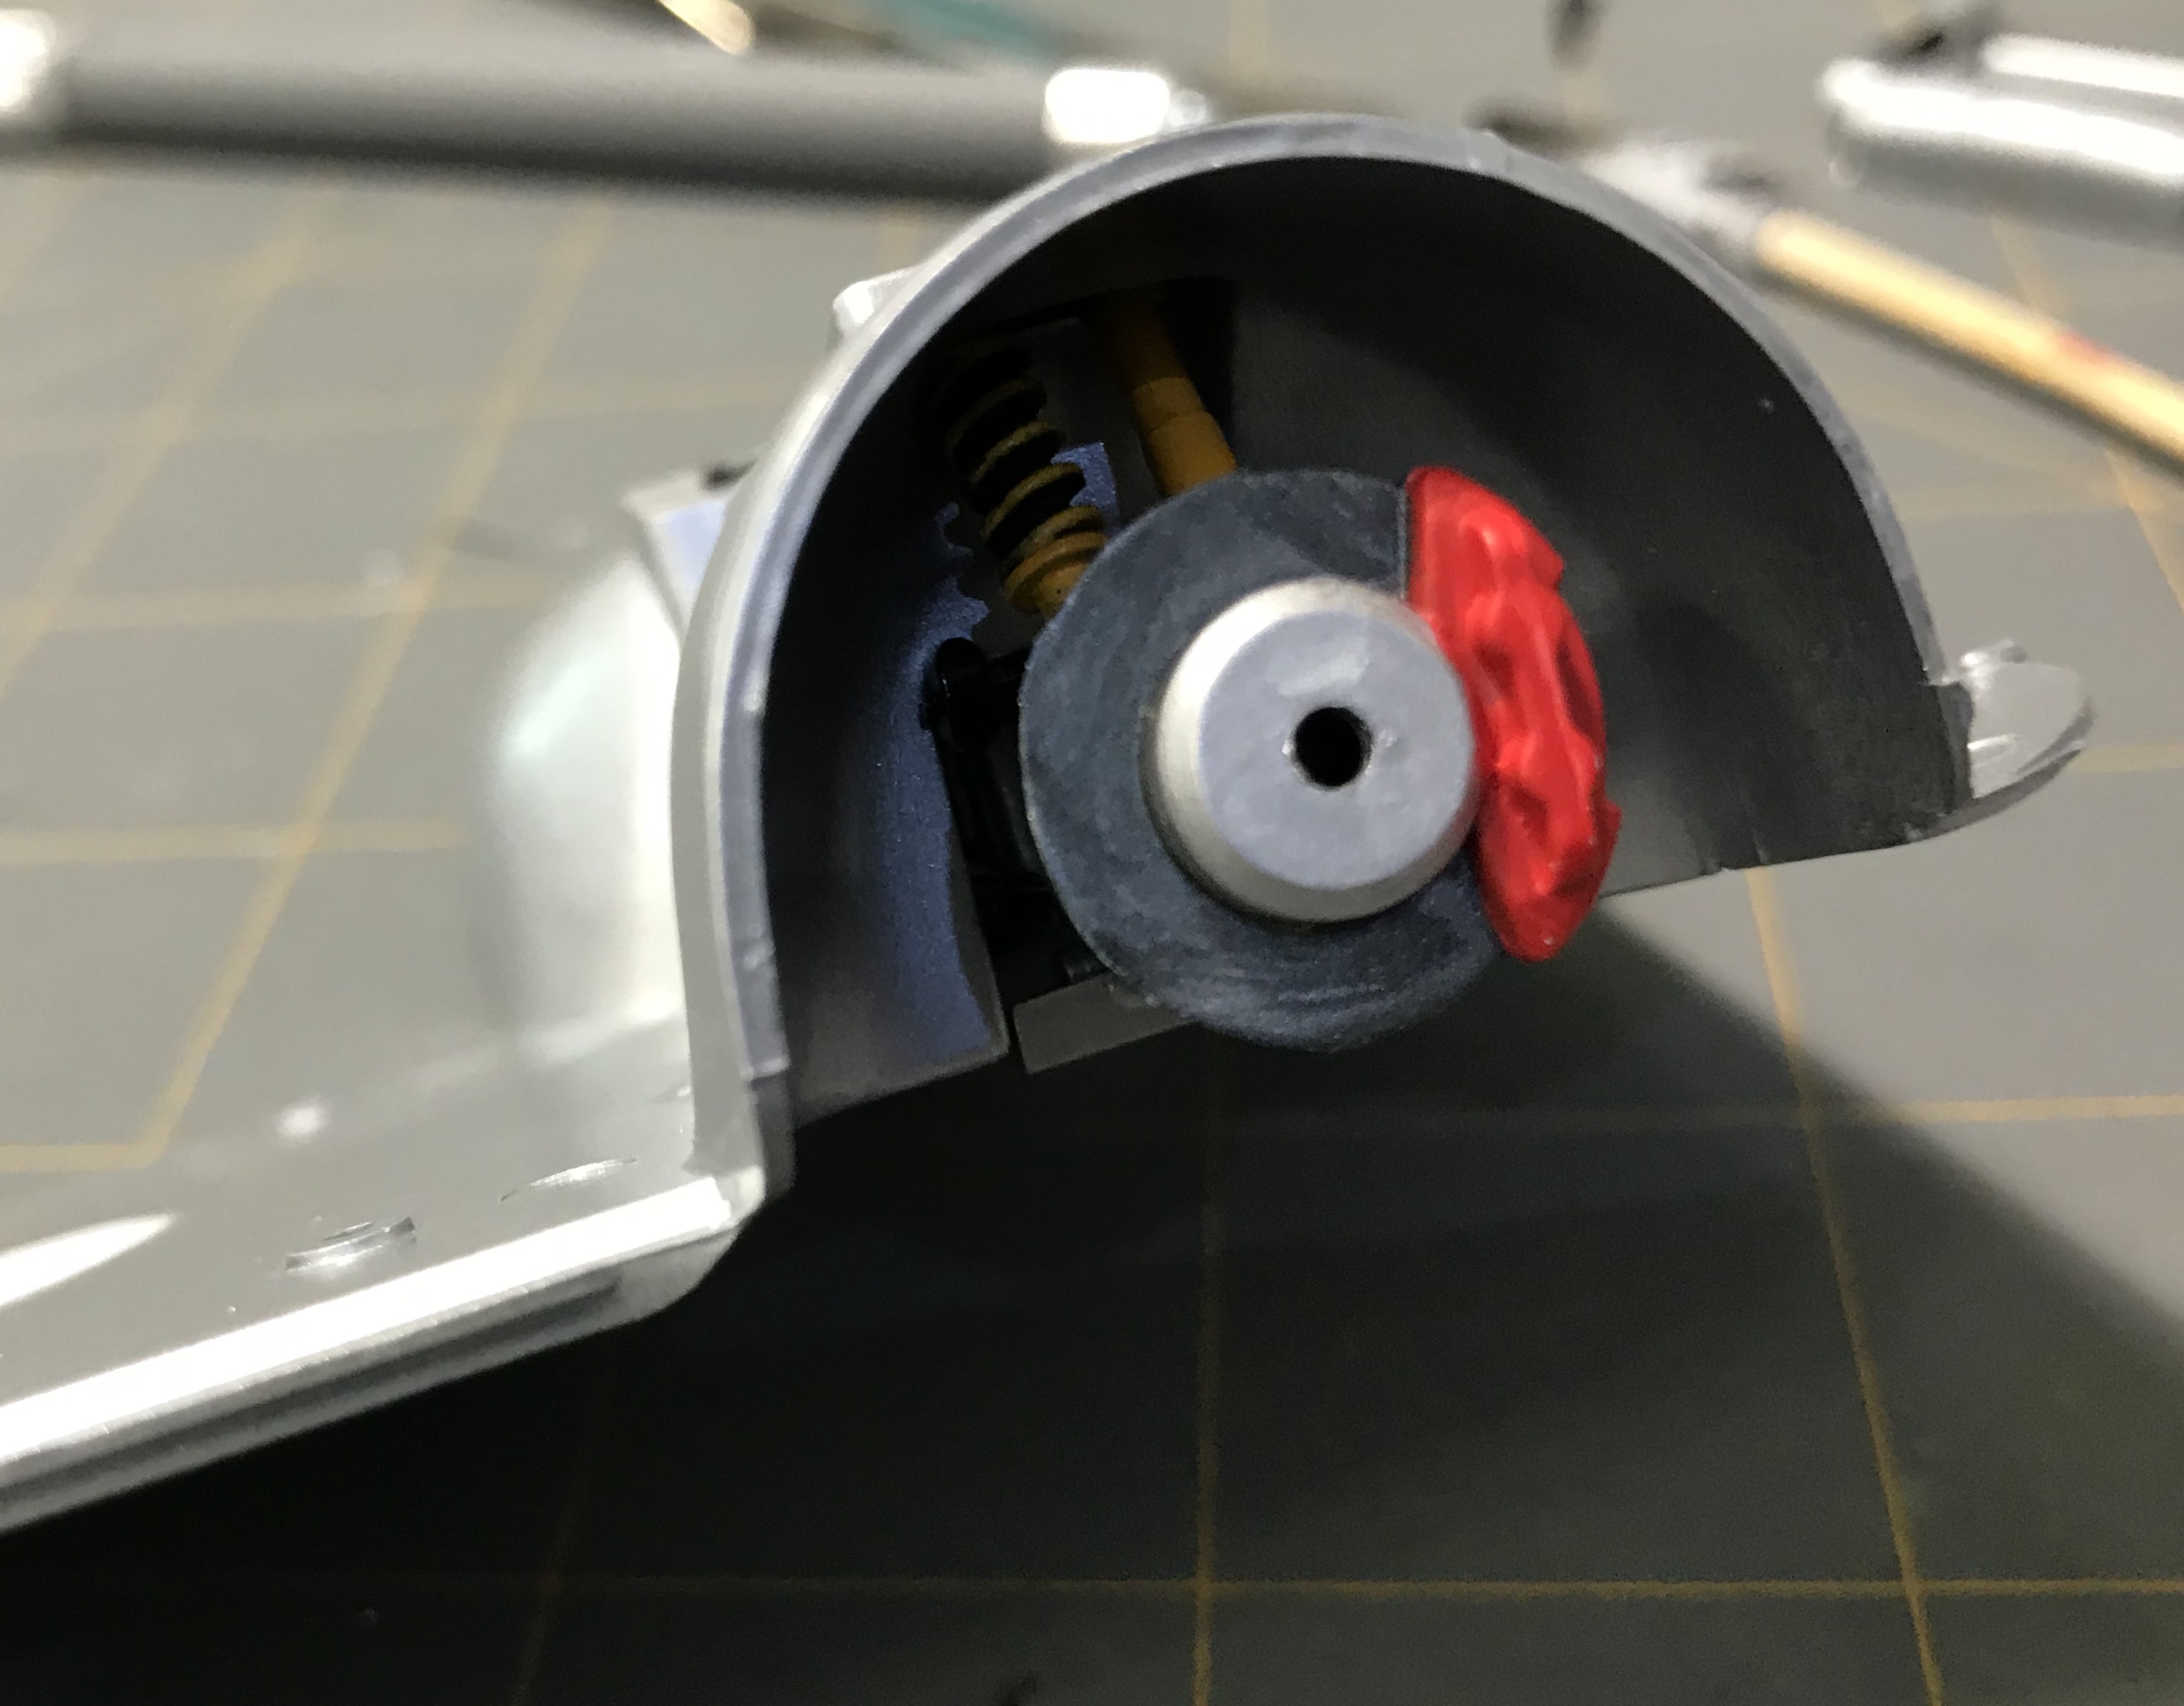
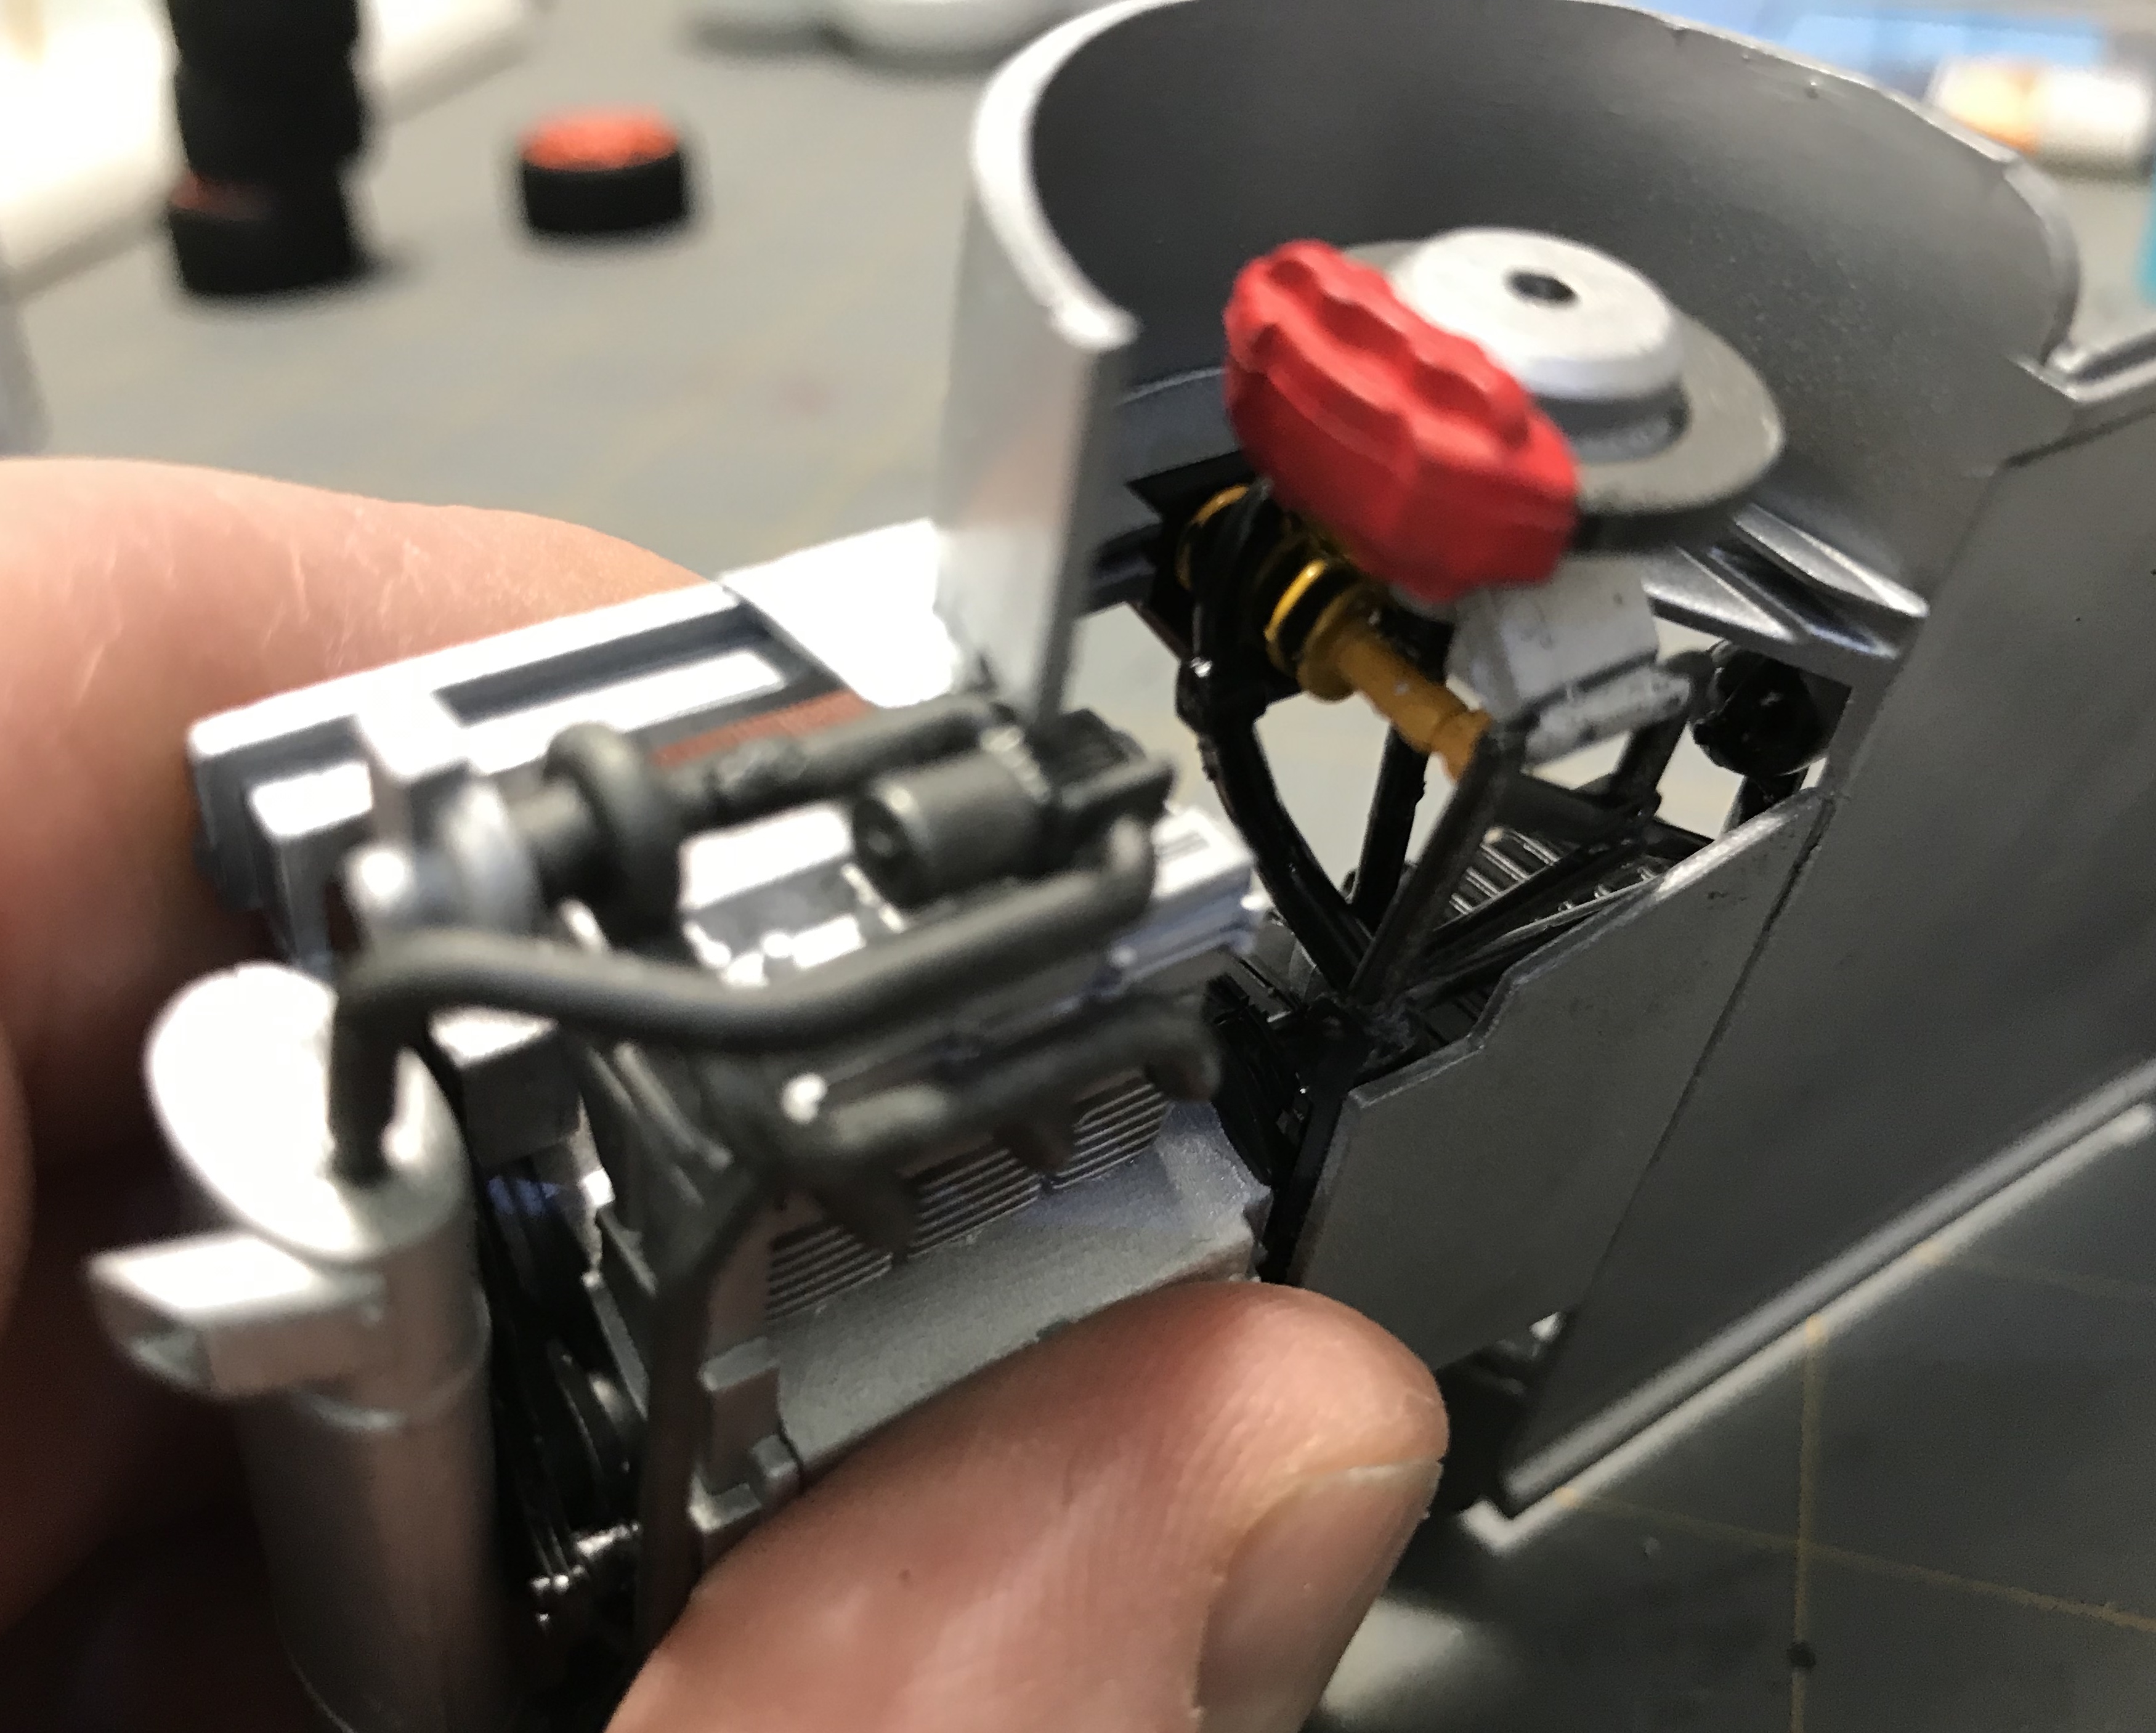
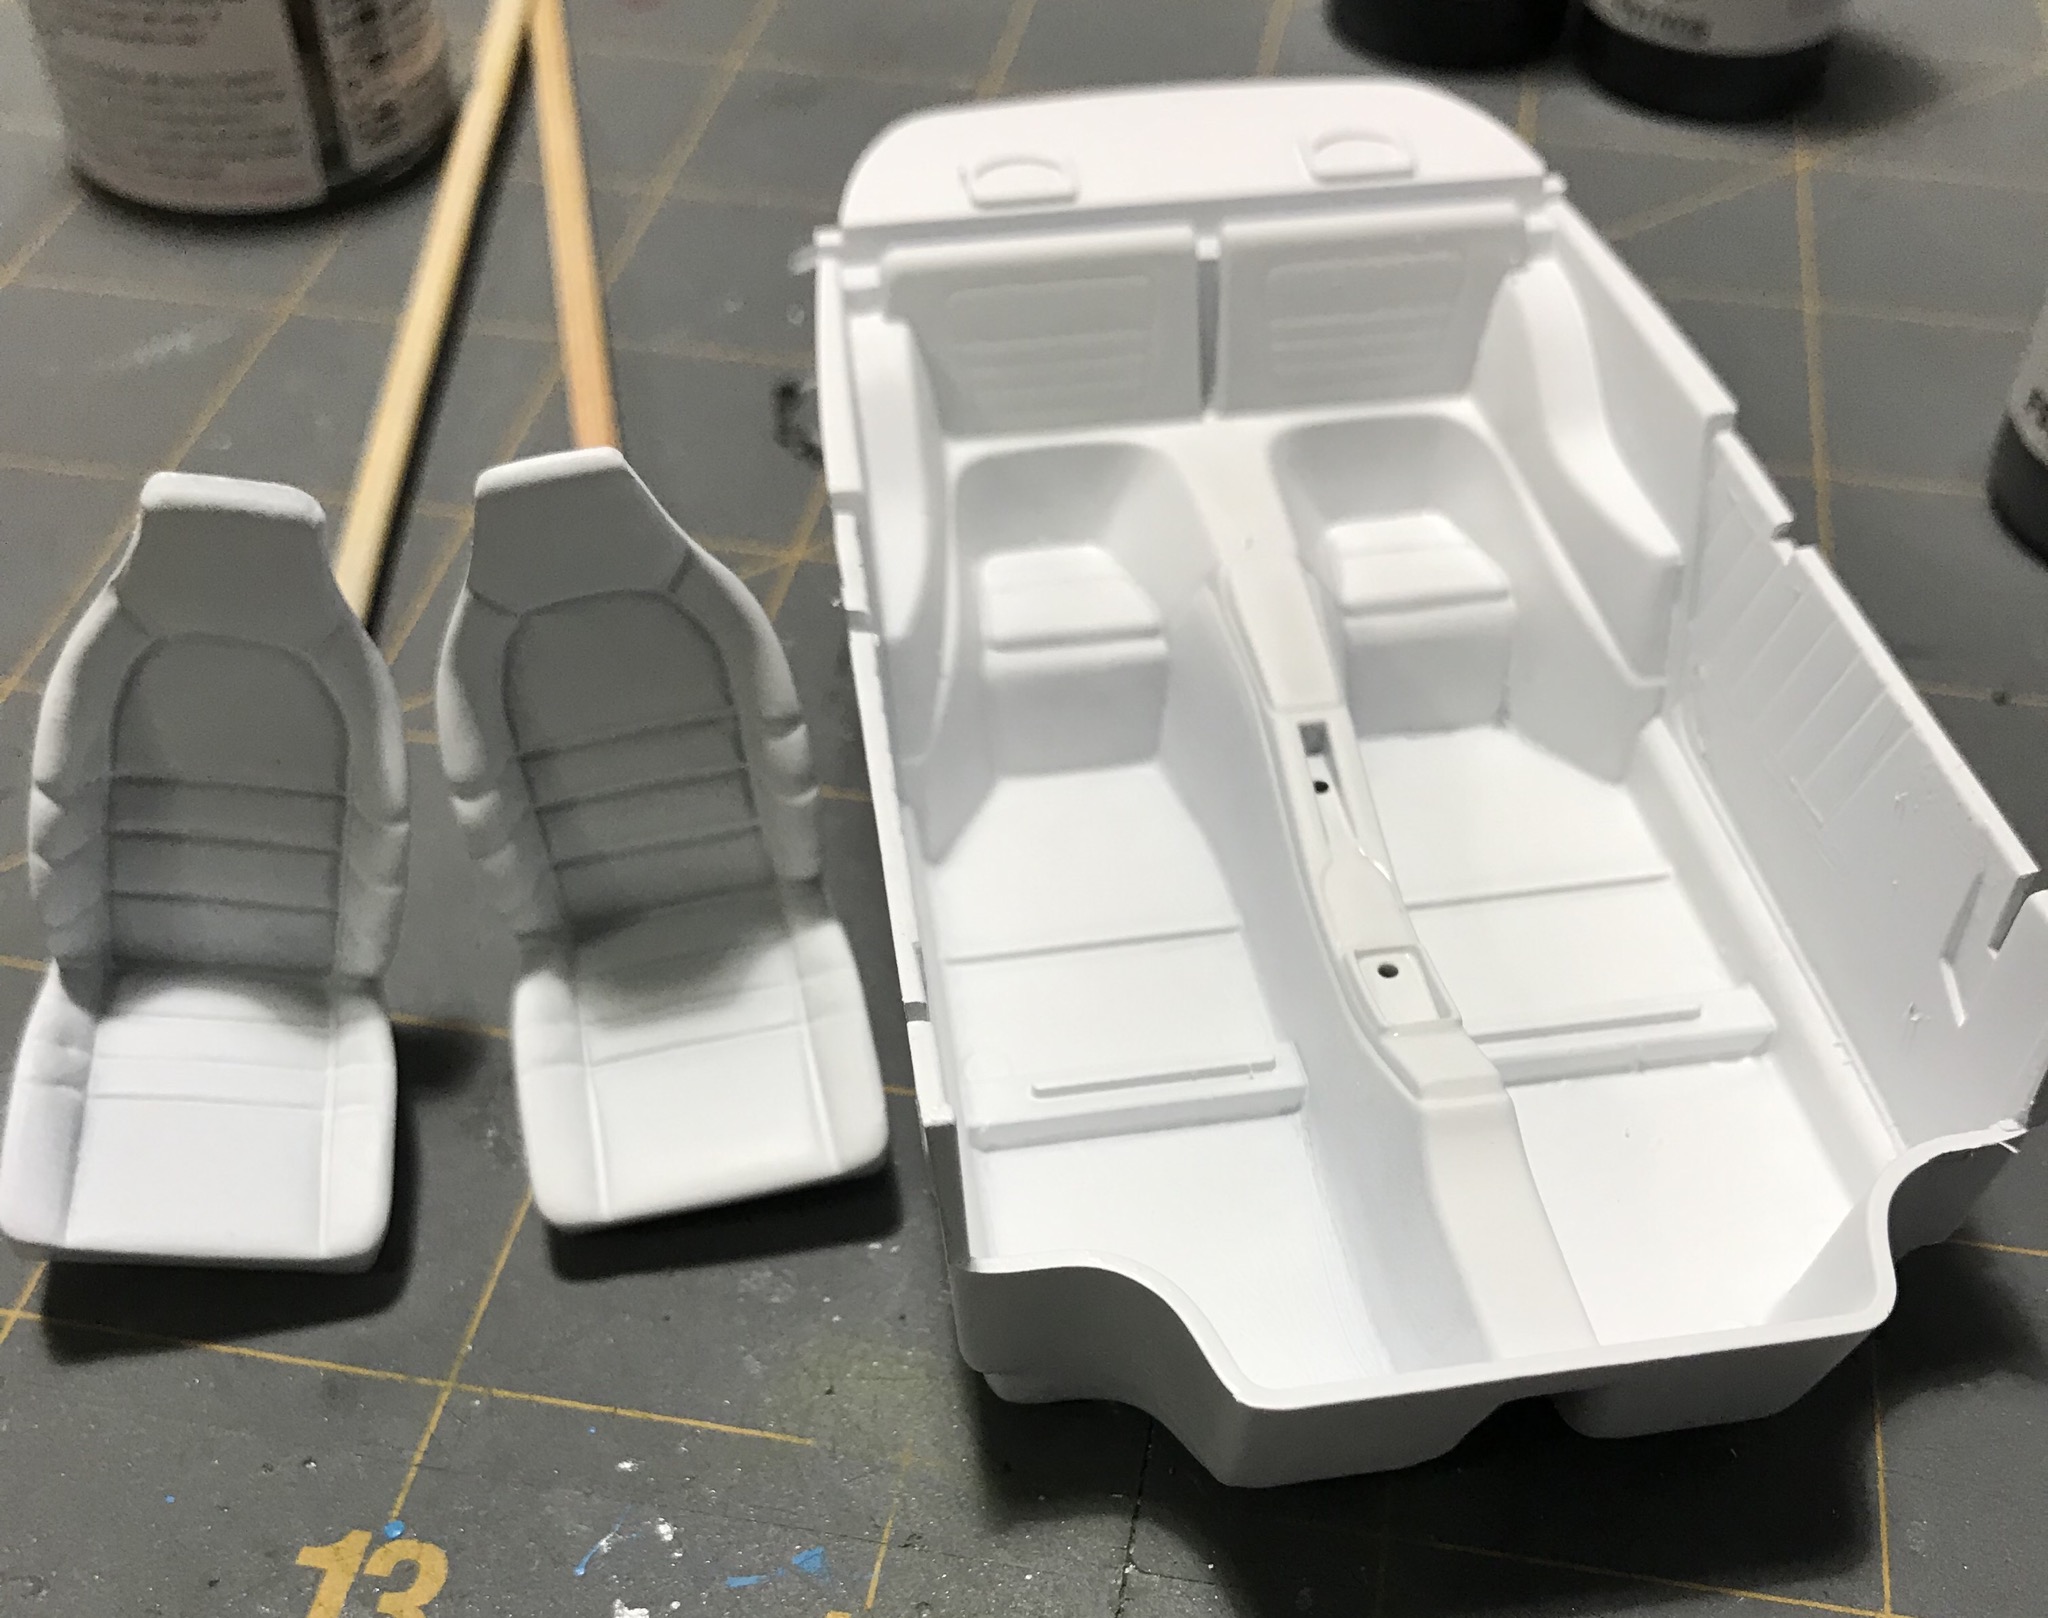
I started this a few weeks ago and finally got around to posting. It’s mostly done at this point except the interior. I had that painted and didn’t like it so it went for a soak. It’s now just primer white waiting for color.
-
I'm really keen to make a dent into my stash this year. I've spent soooo much of my time doing DIY in the house, or fixing mistakes in my builds that I don't get to finish a model too often. I am part way through a Rally car build that requires too much scratch building and additional details to make it half decent, so I thought I'd start another. This will be pretty much an out-of-the-box build with very little details. Maybe plugs and seat belts, and that's it. the joy for me in model building is engines and chassis, this has a full engine, so i'll start with that. I do want to get an F40 completed next too, as I think they will go well together. Wife is after a new House project, so i've got to move quickly.
-
 Does anyone know if these wheels were ever kitted in any of the Porsche kits or maybe some other kit? Anyone making them 3D or resin? I would ask Empinut,but seems he's been away from the forums for a while now. Thanks for any help.
-
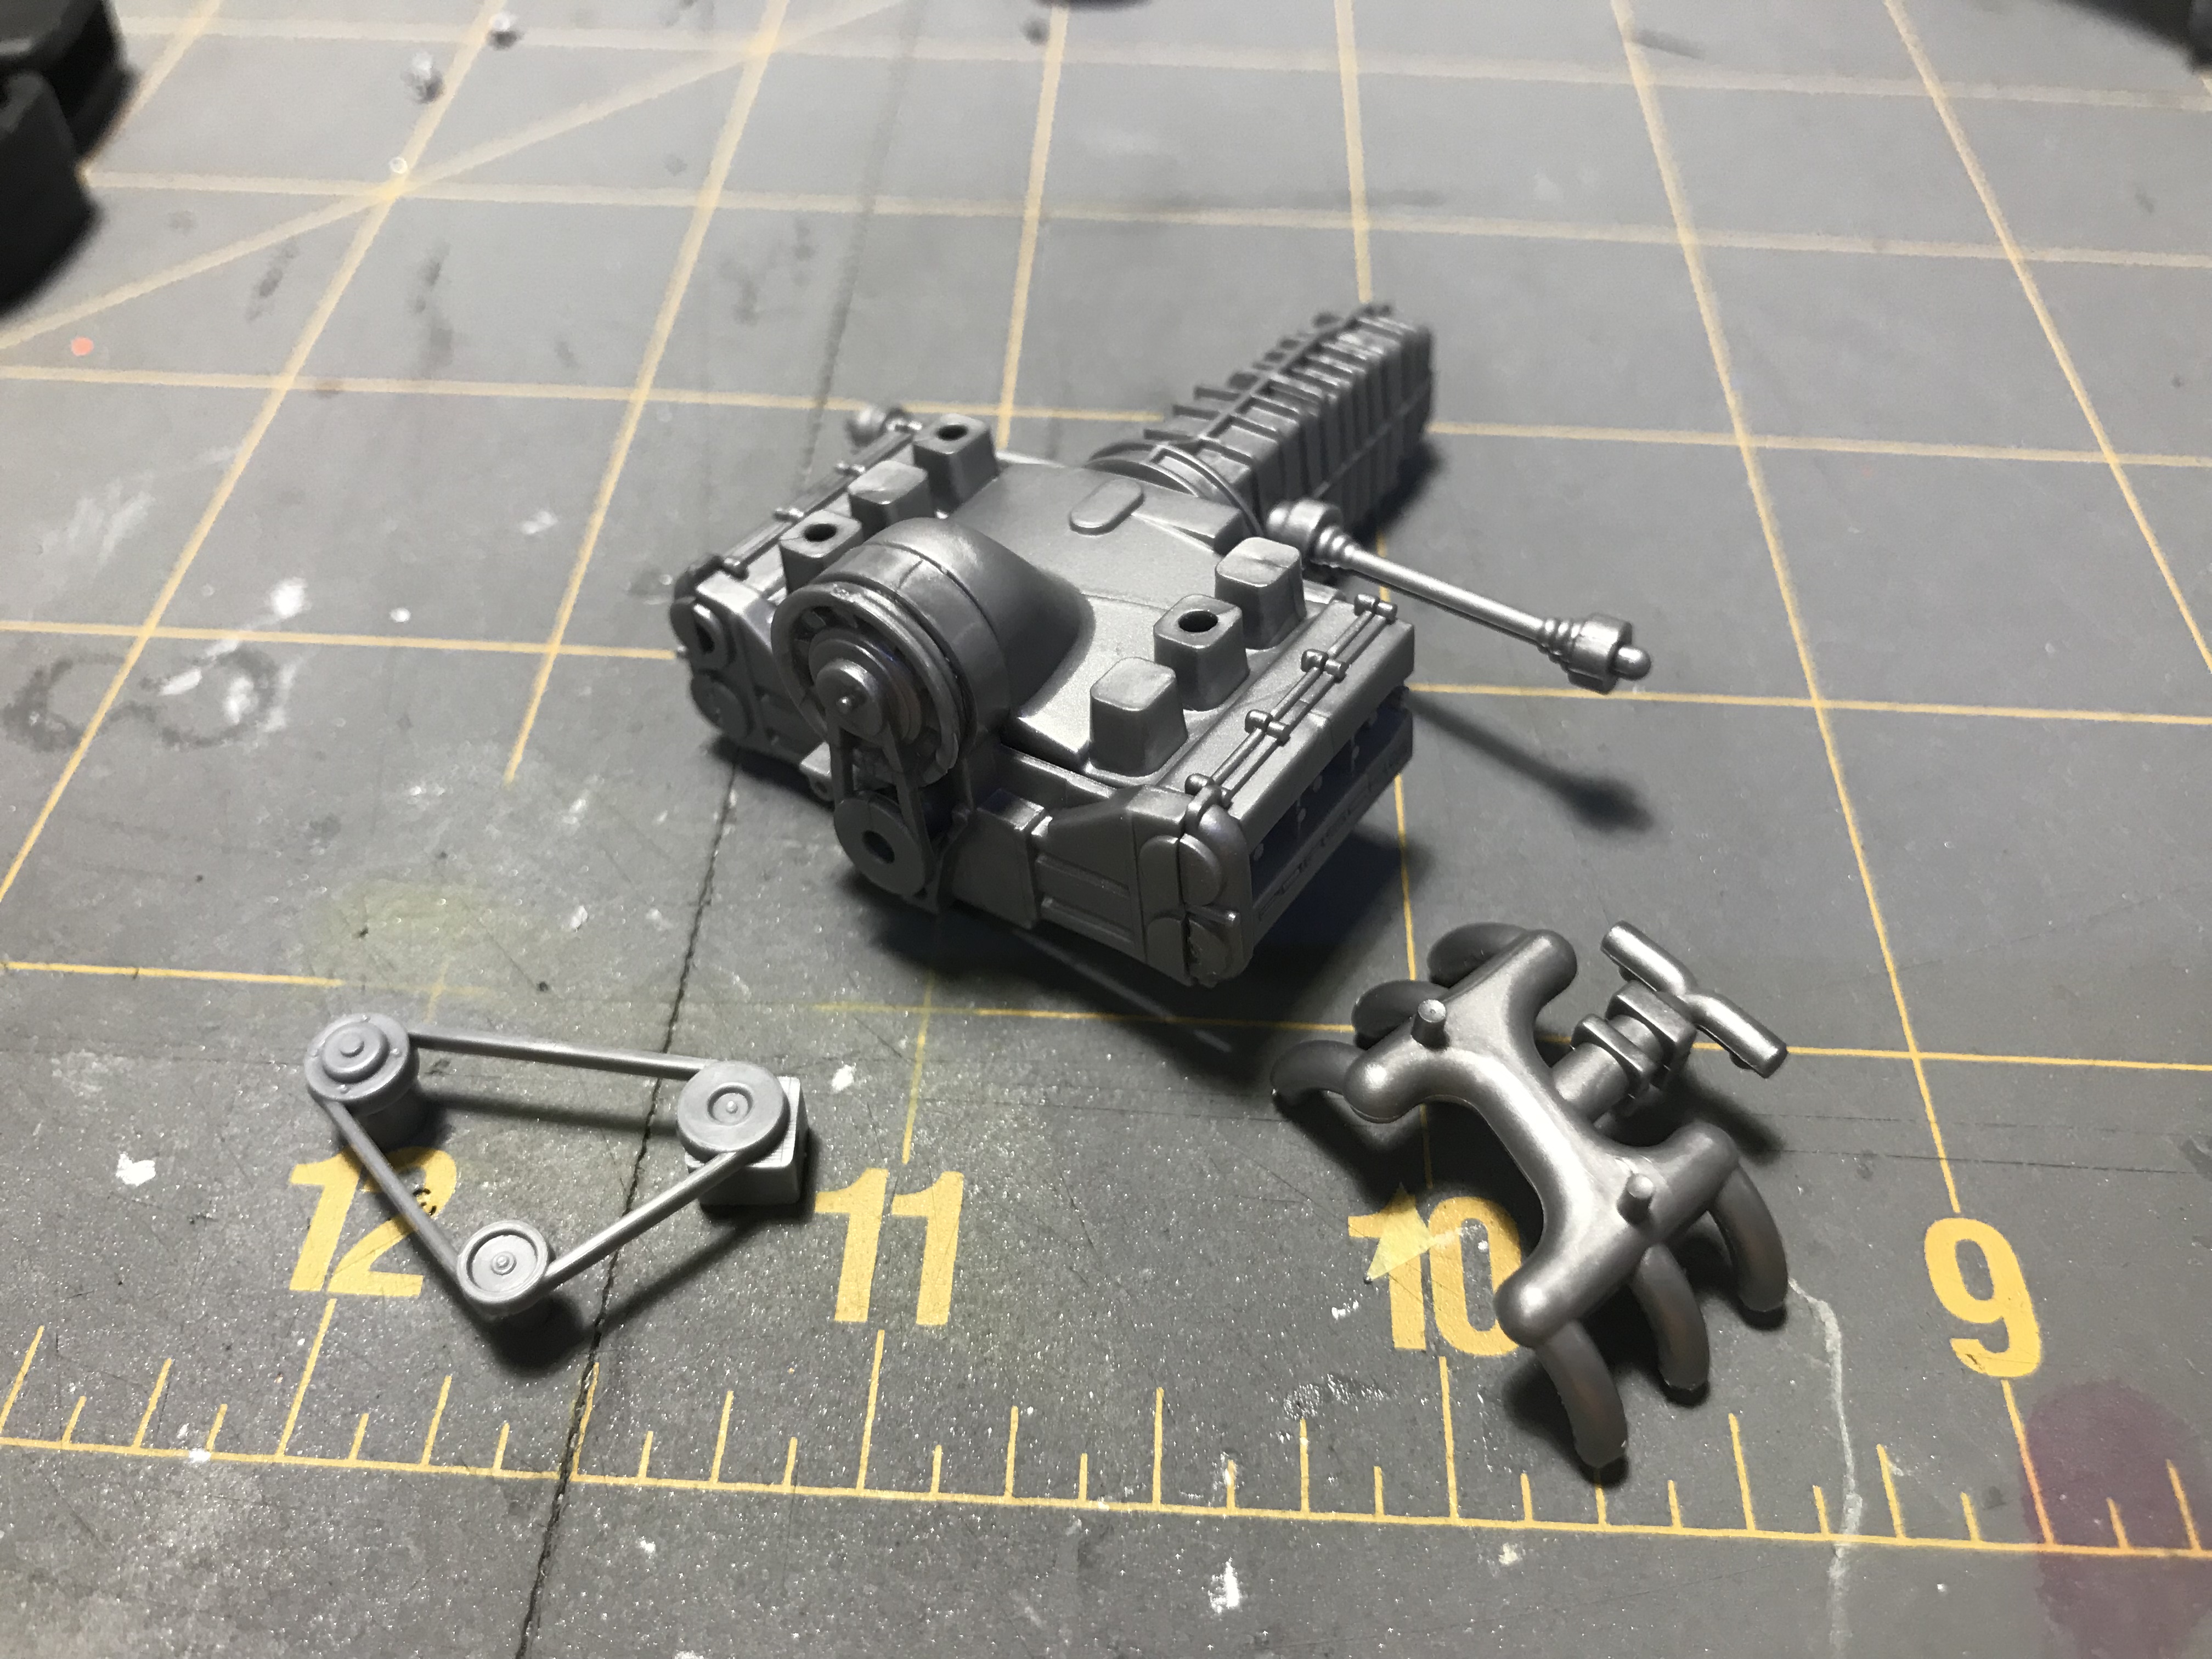
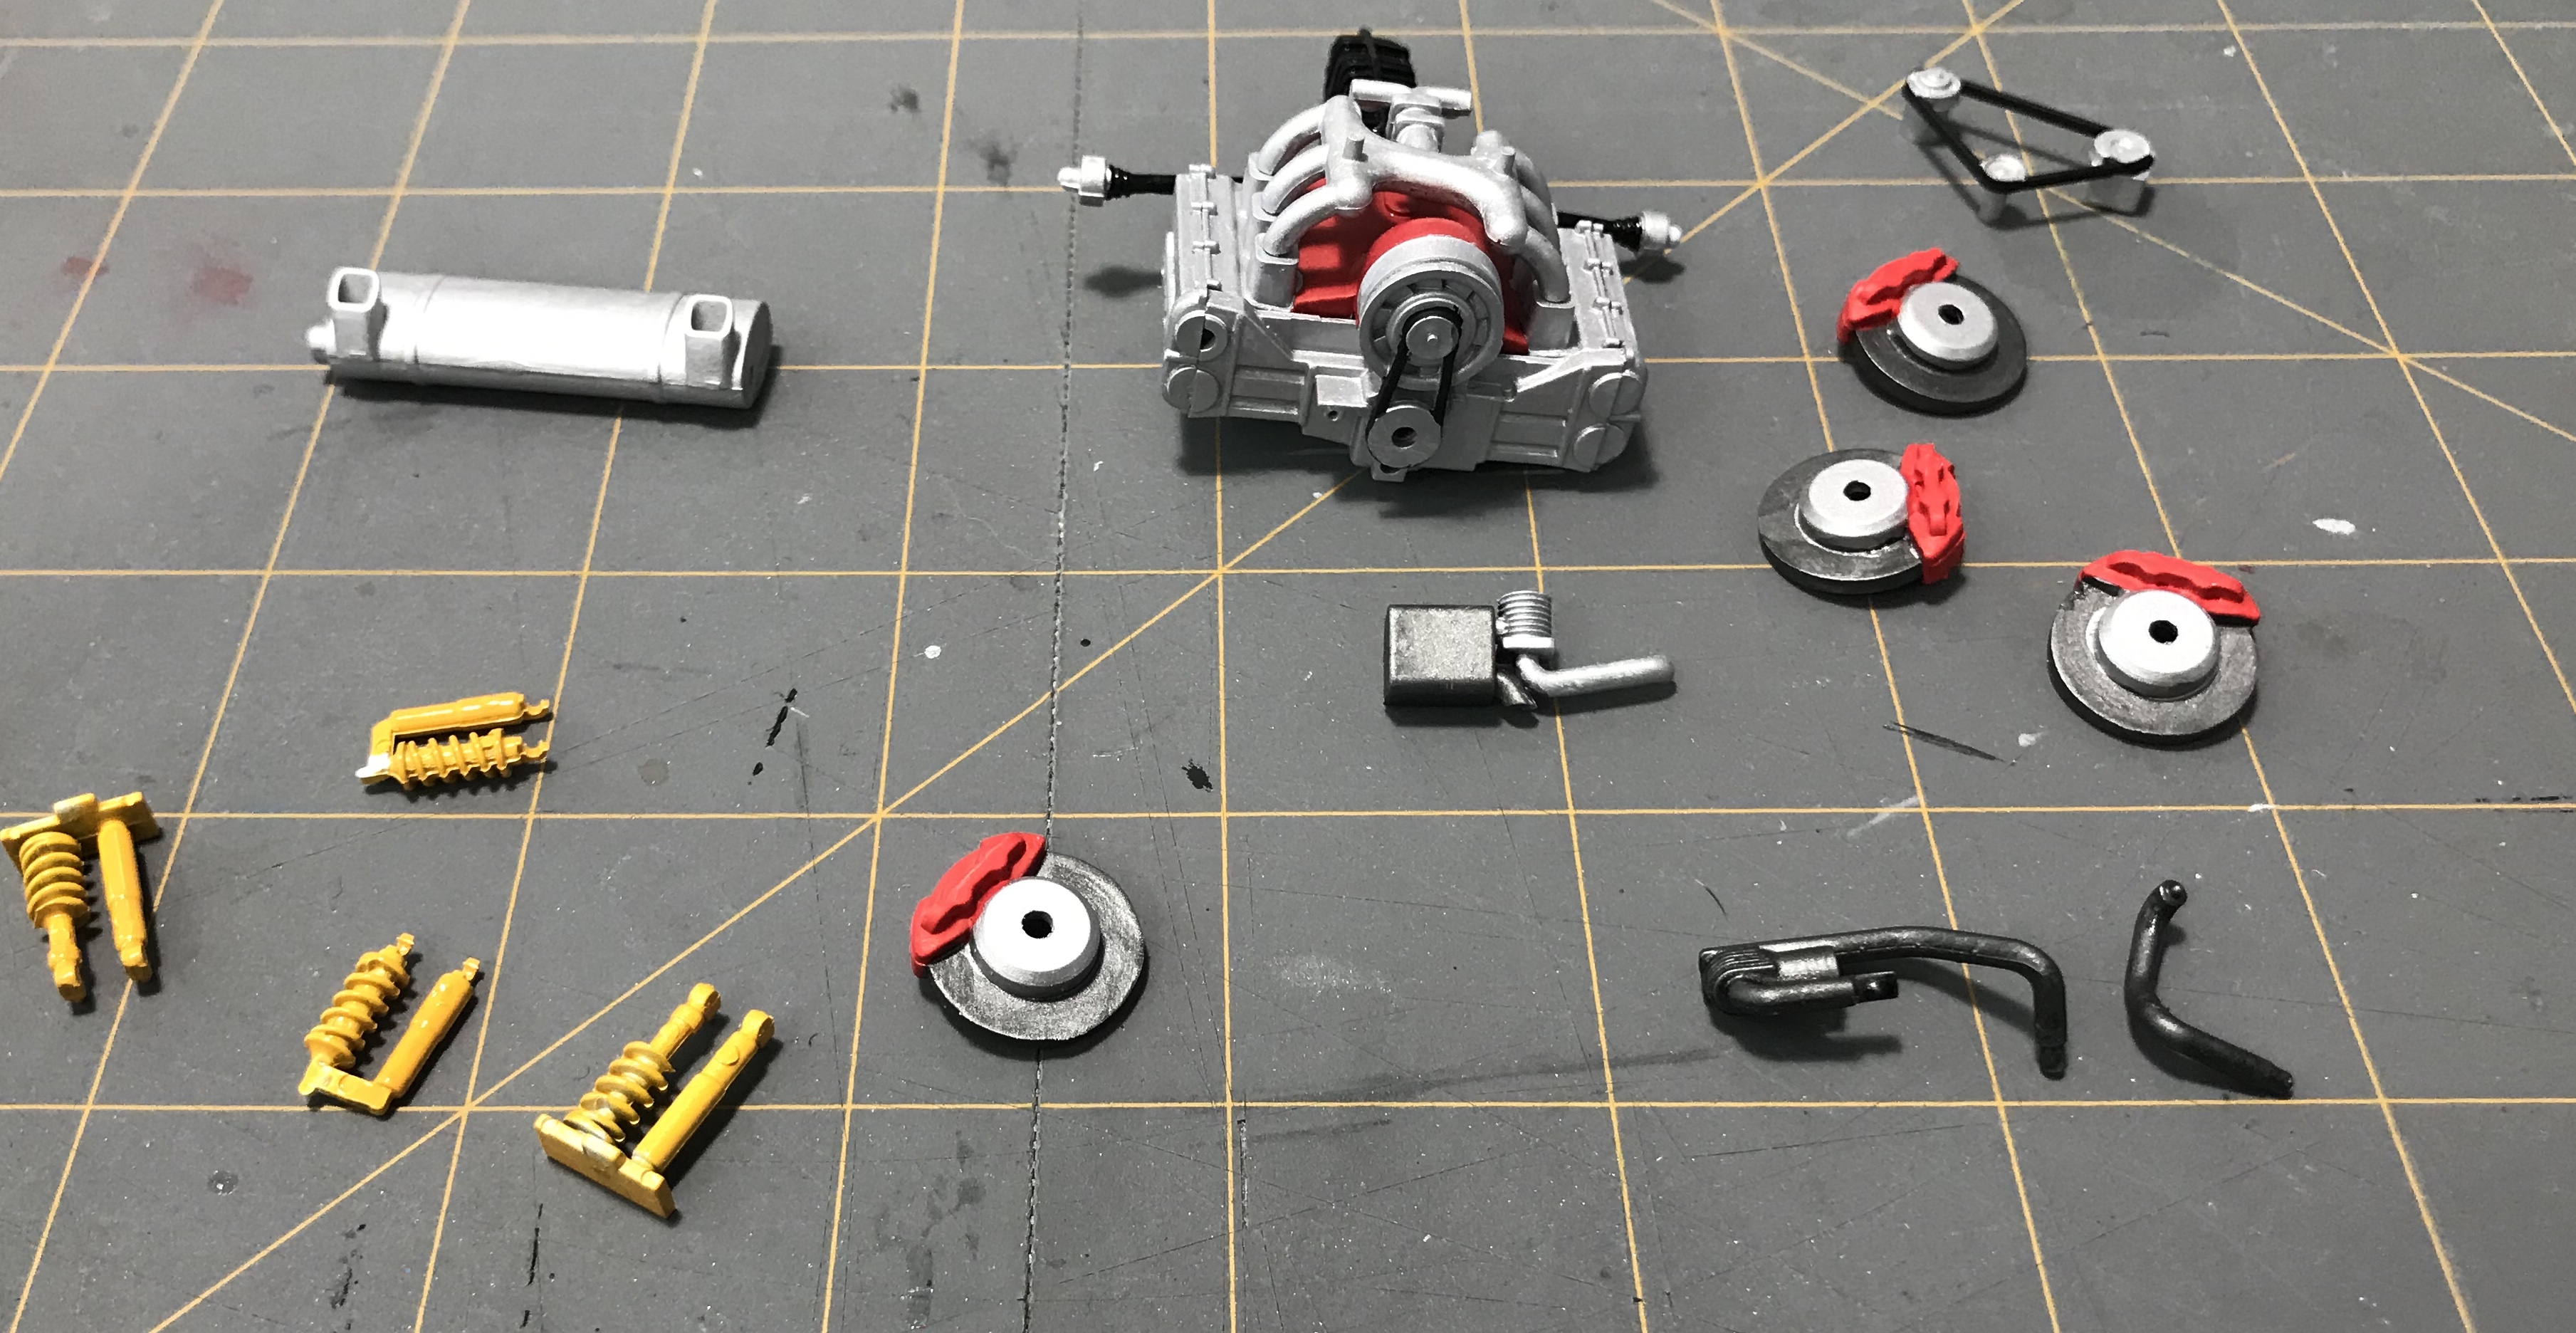
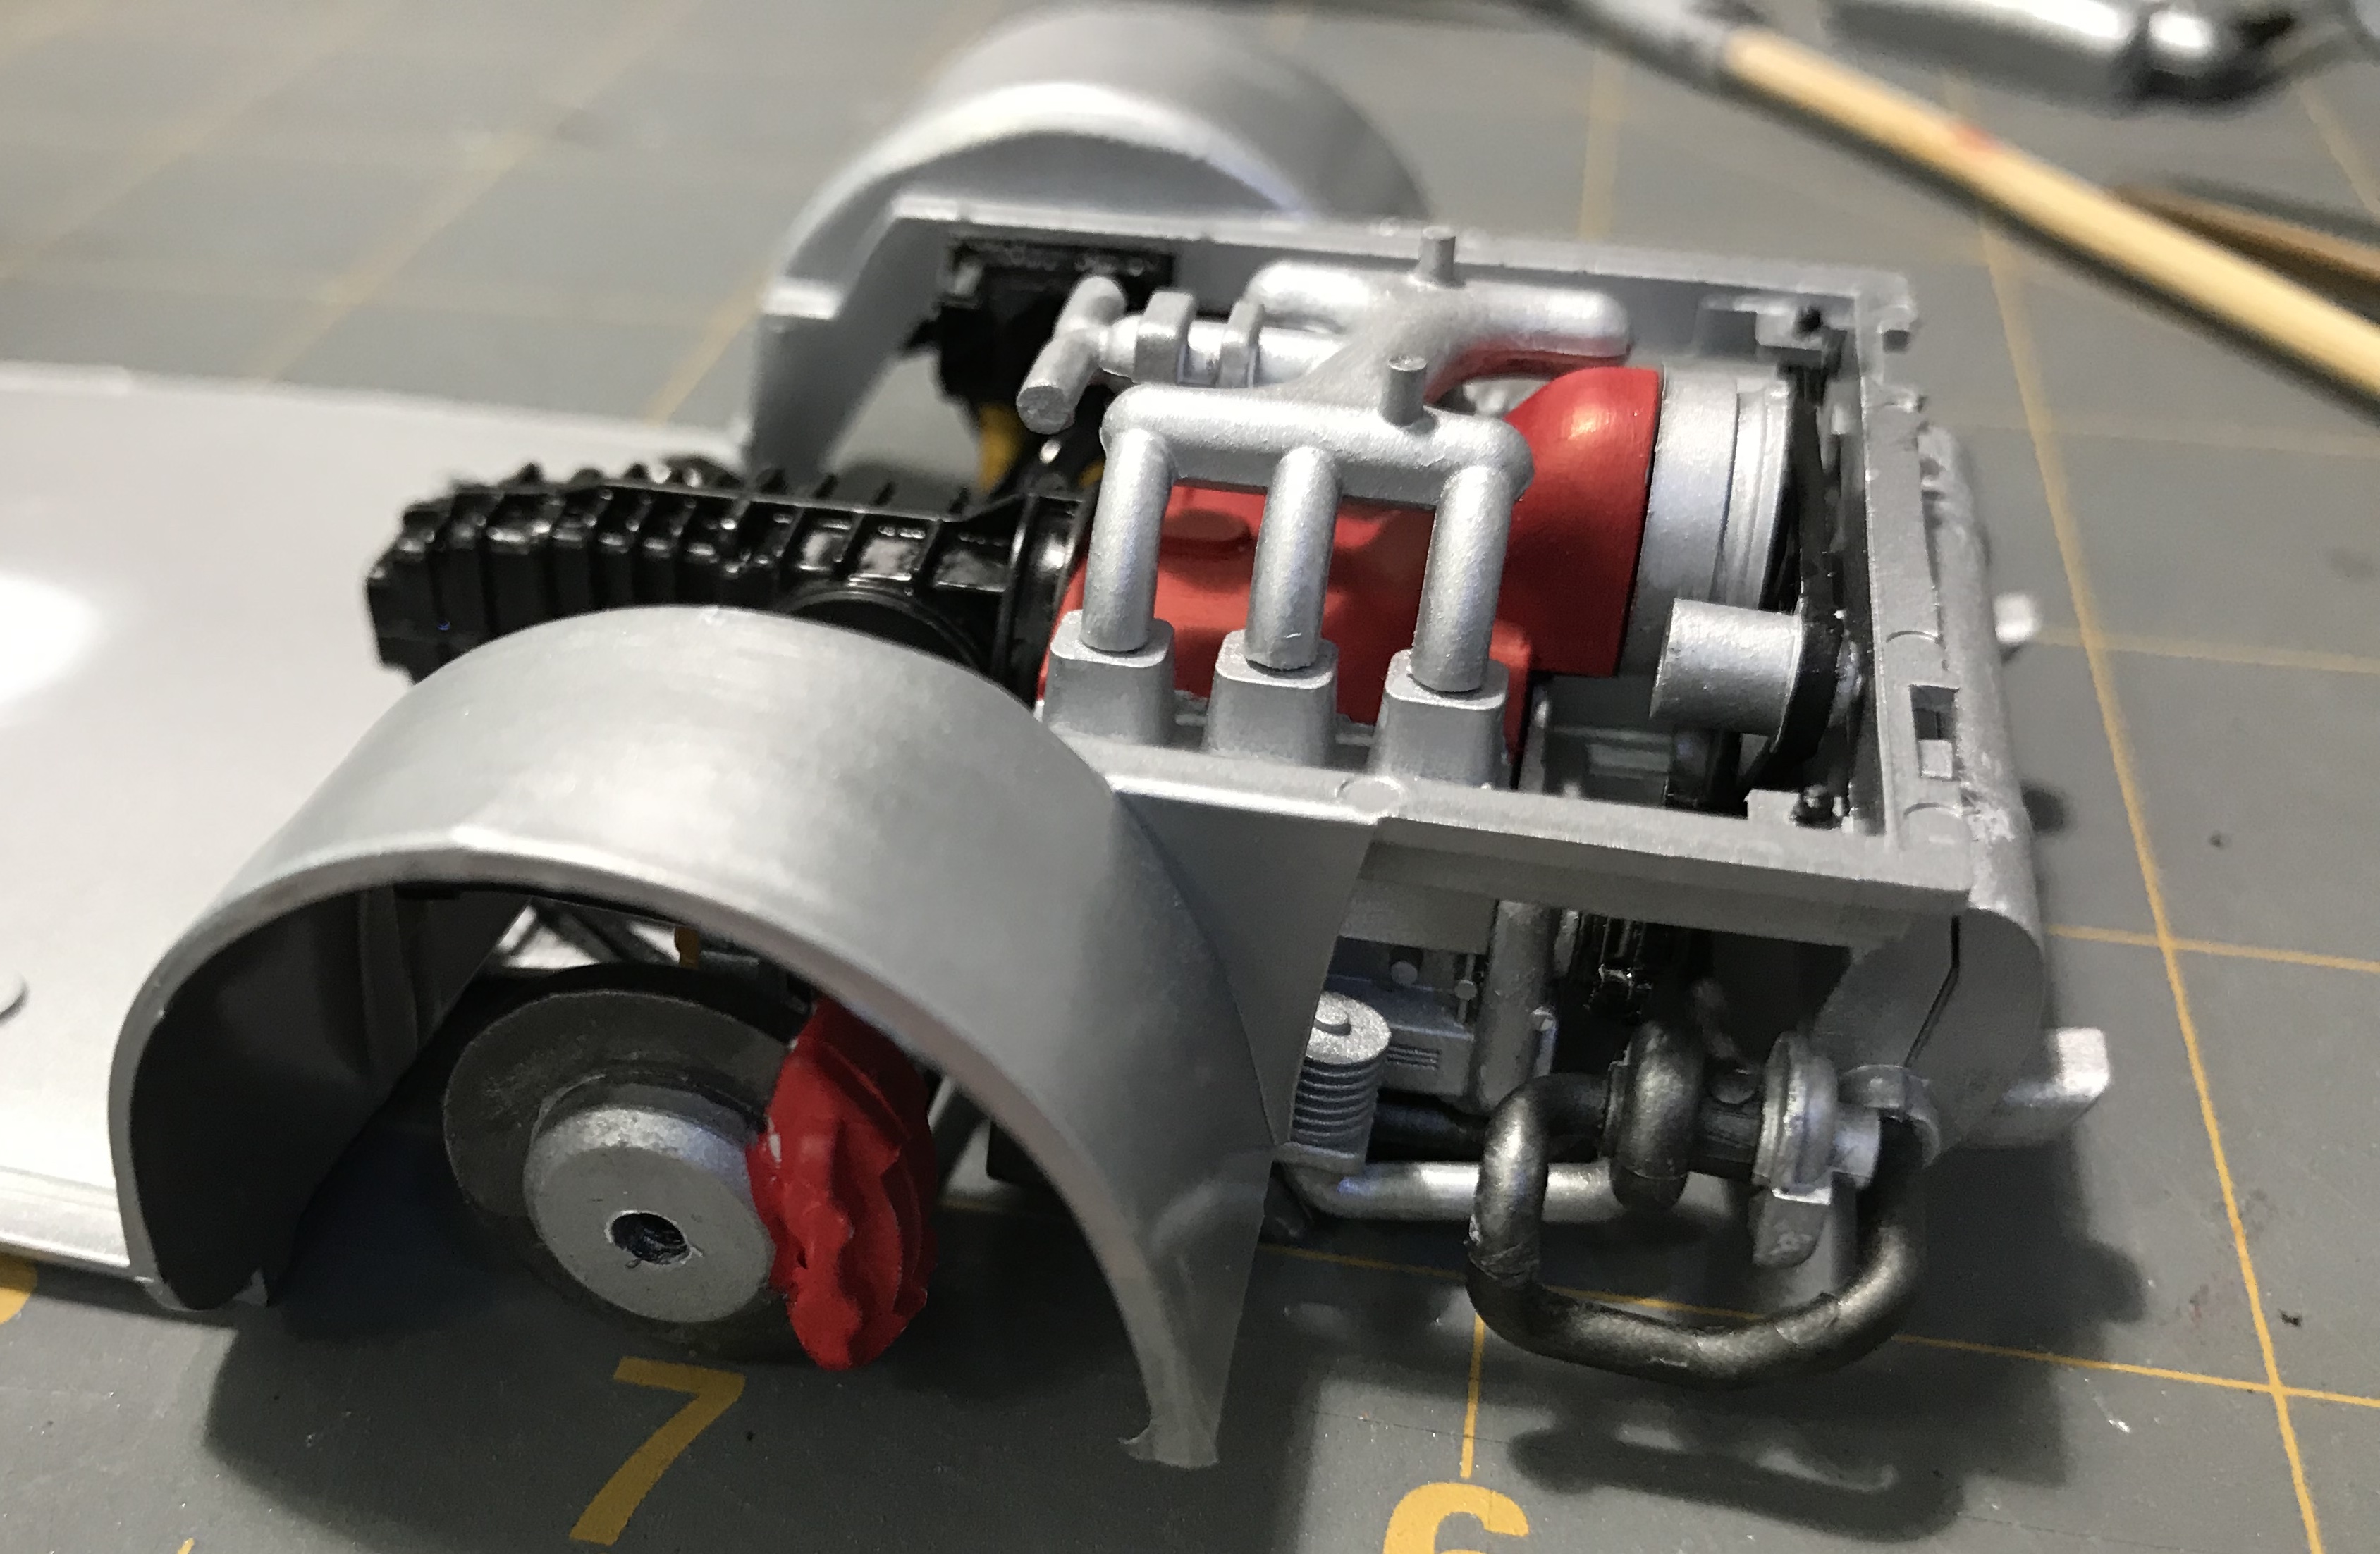
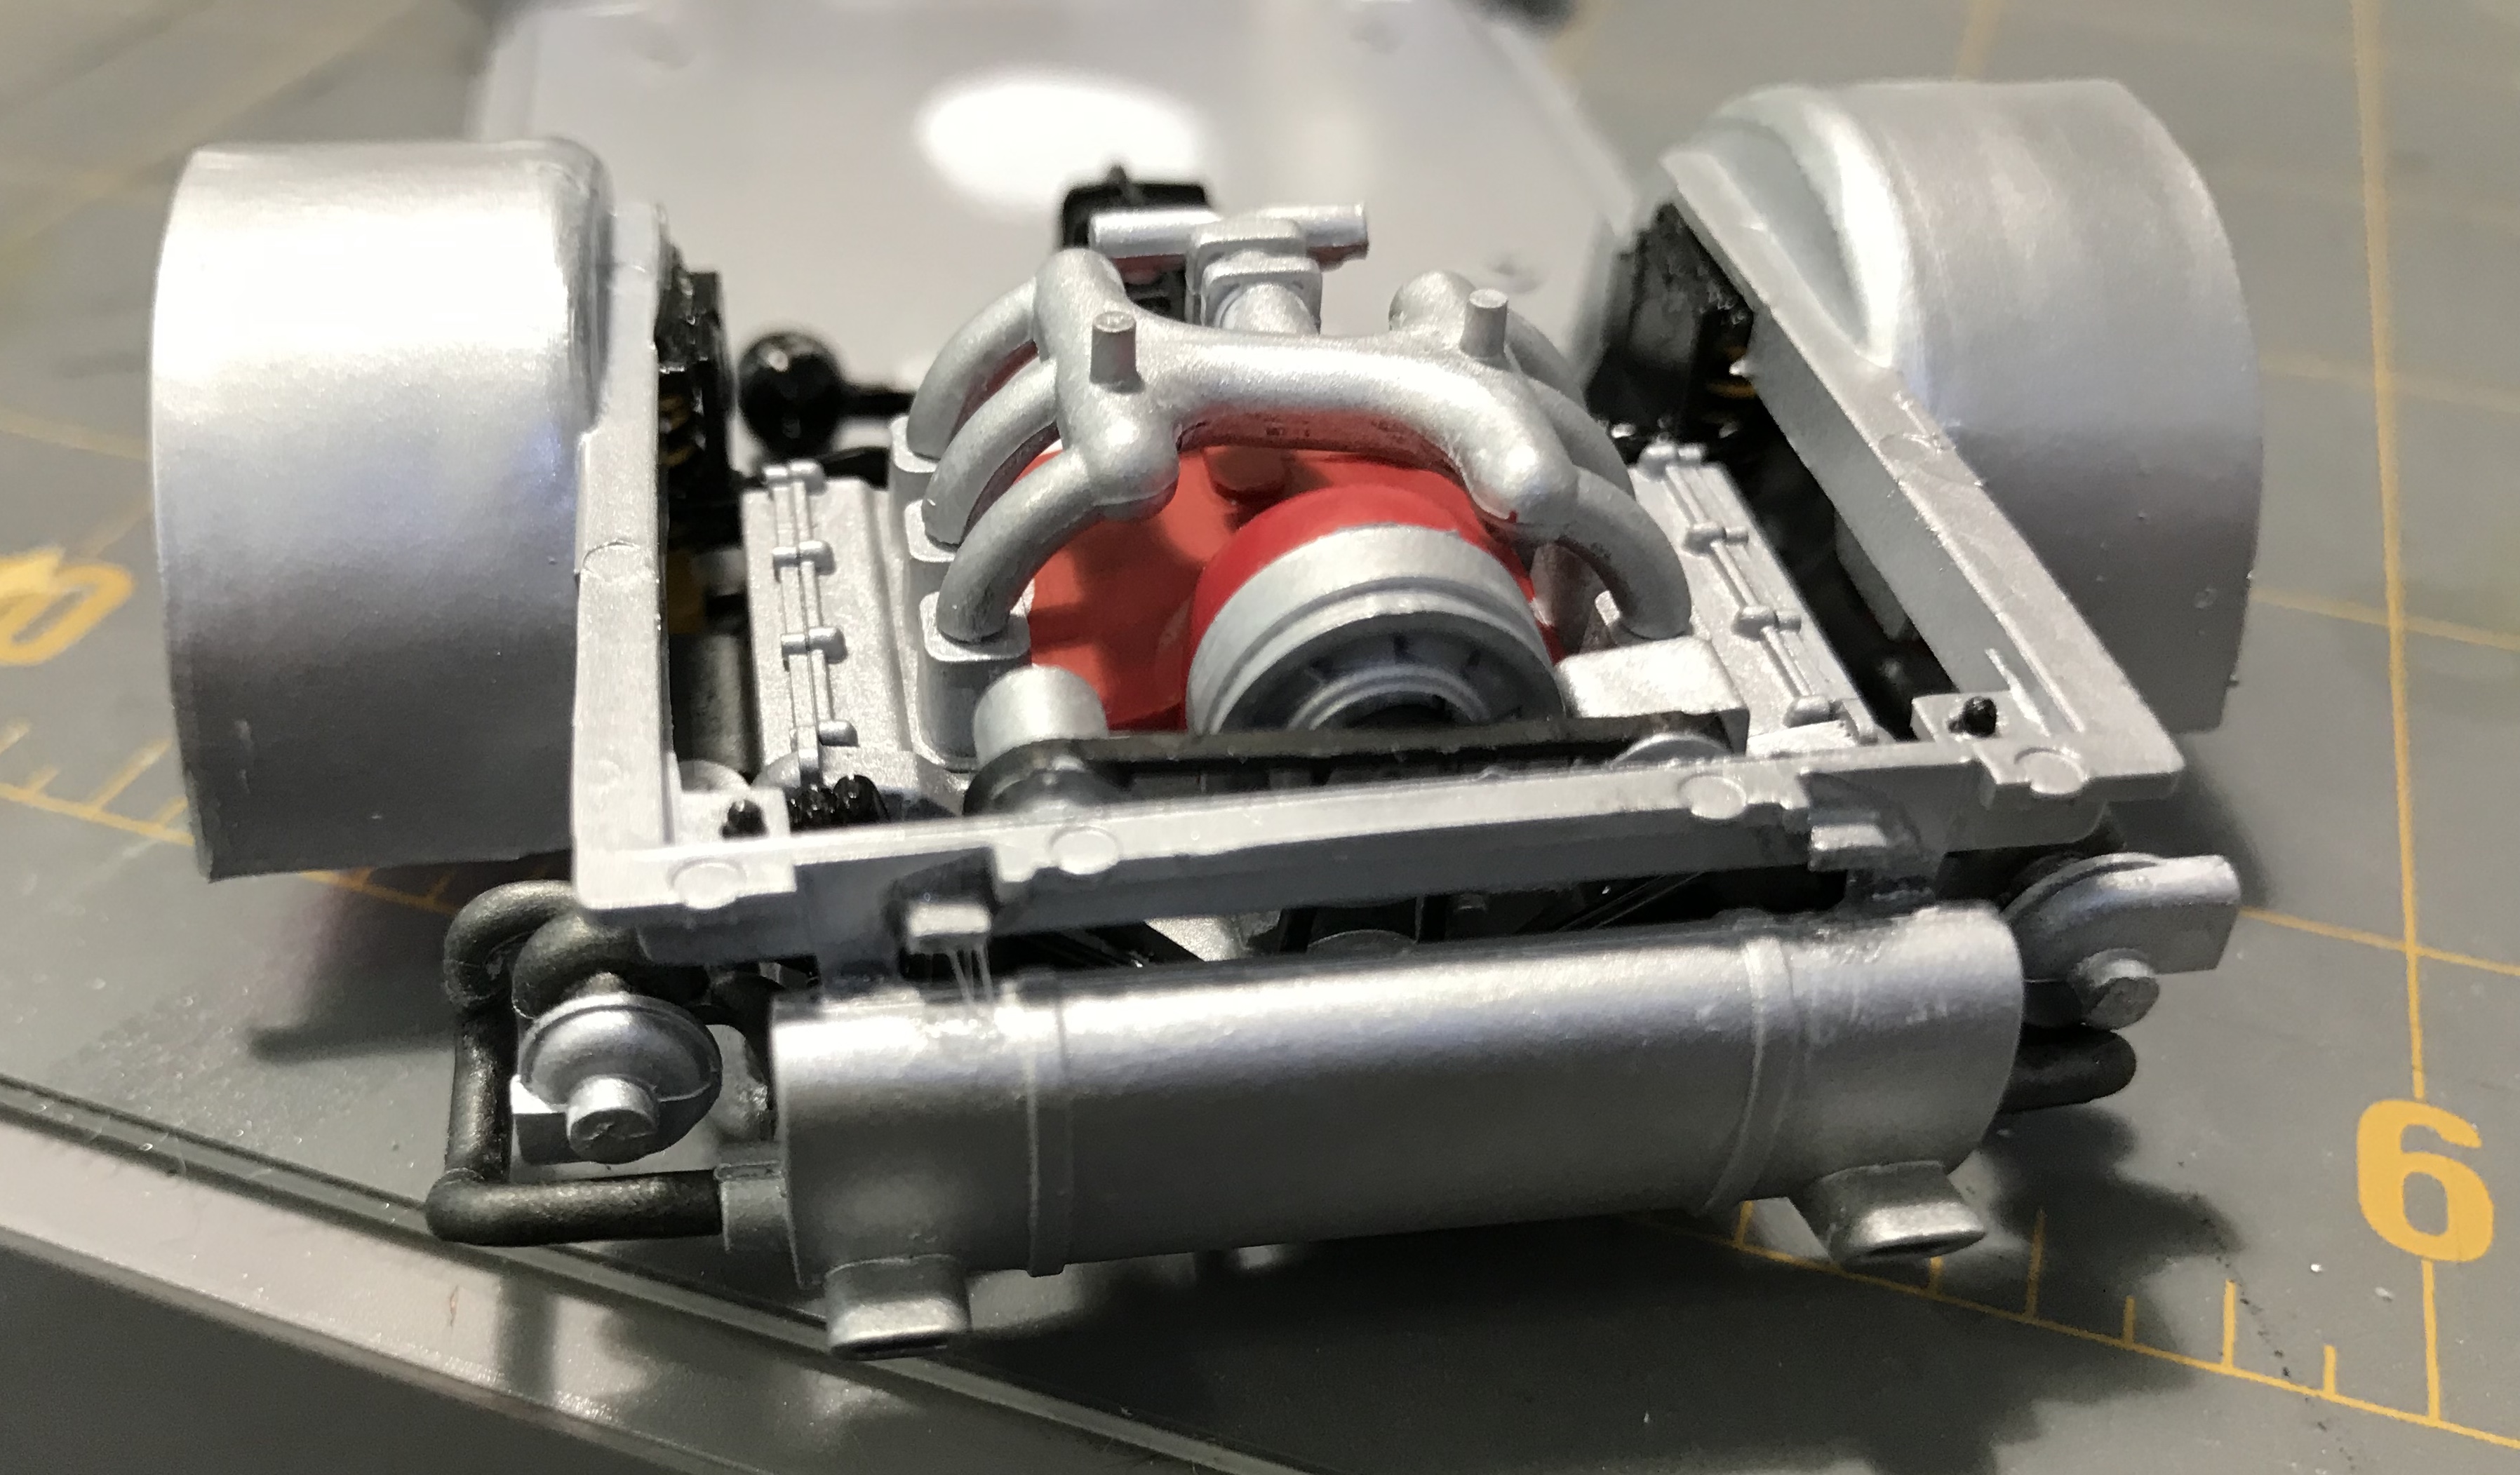
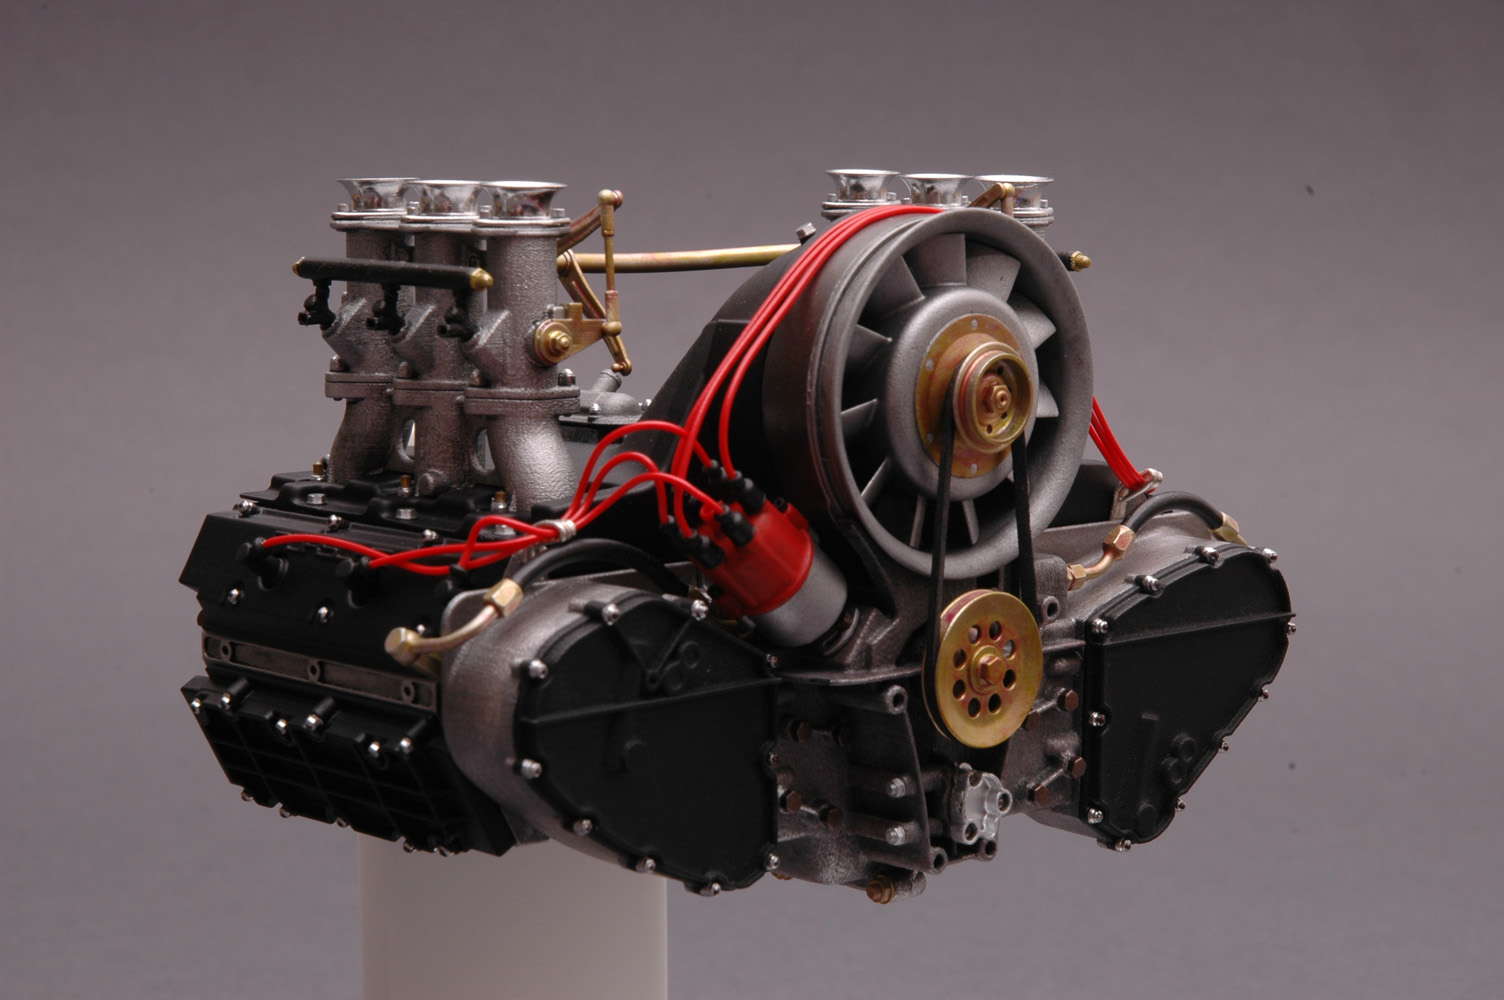
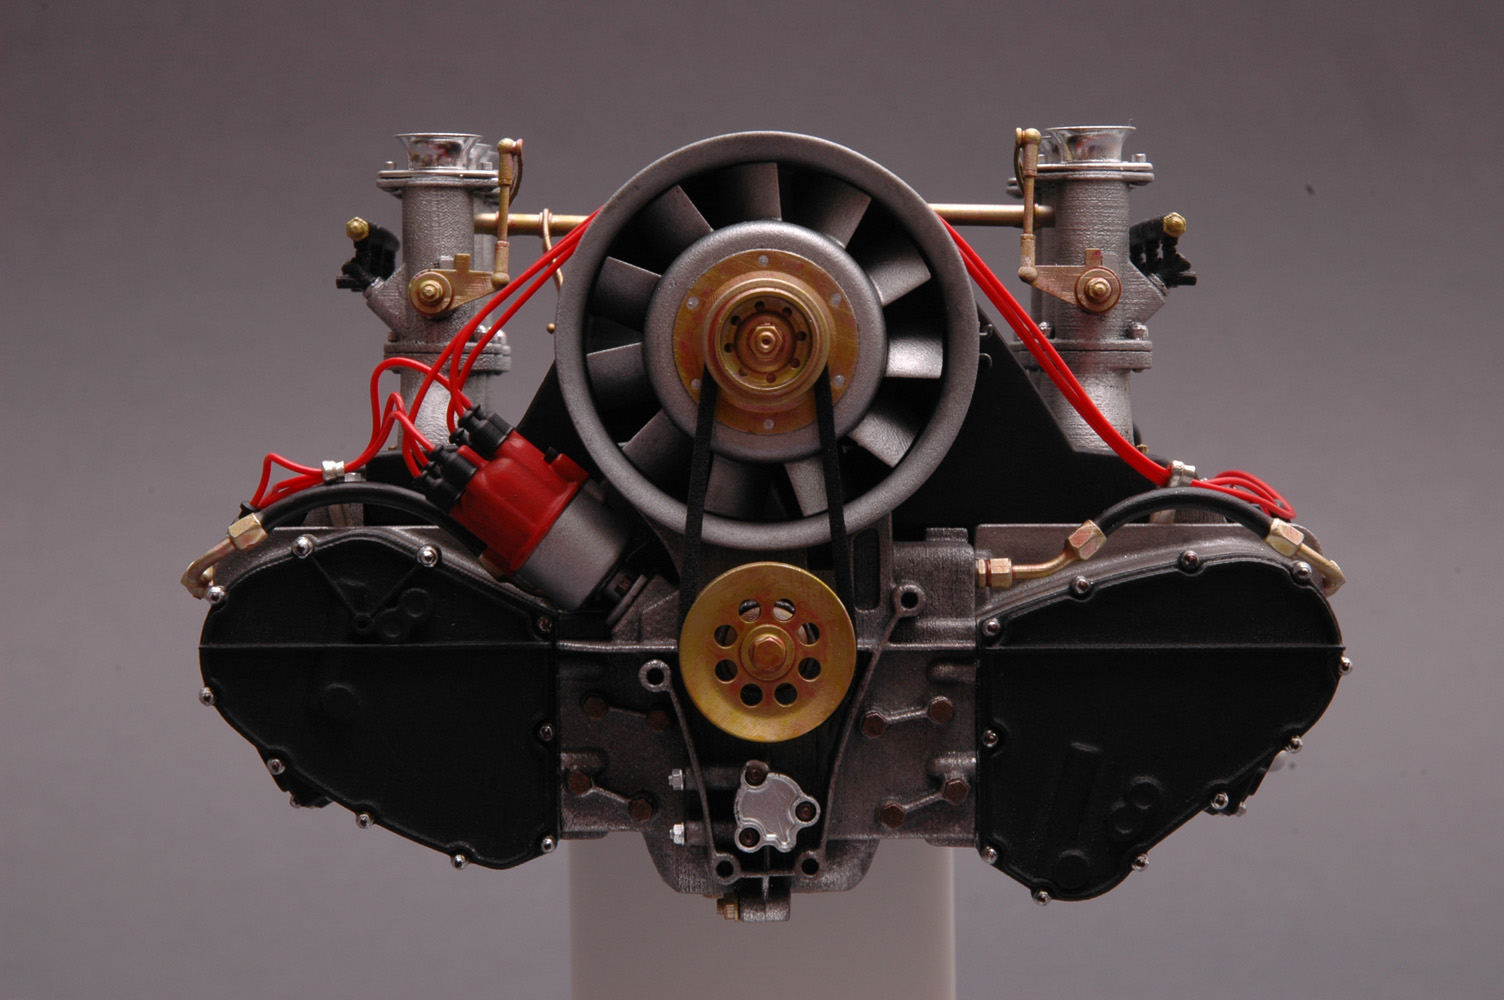
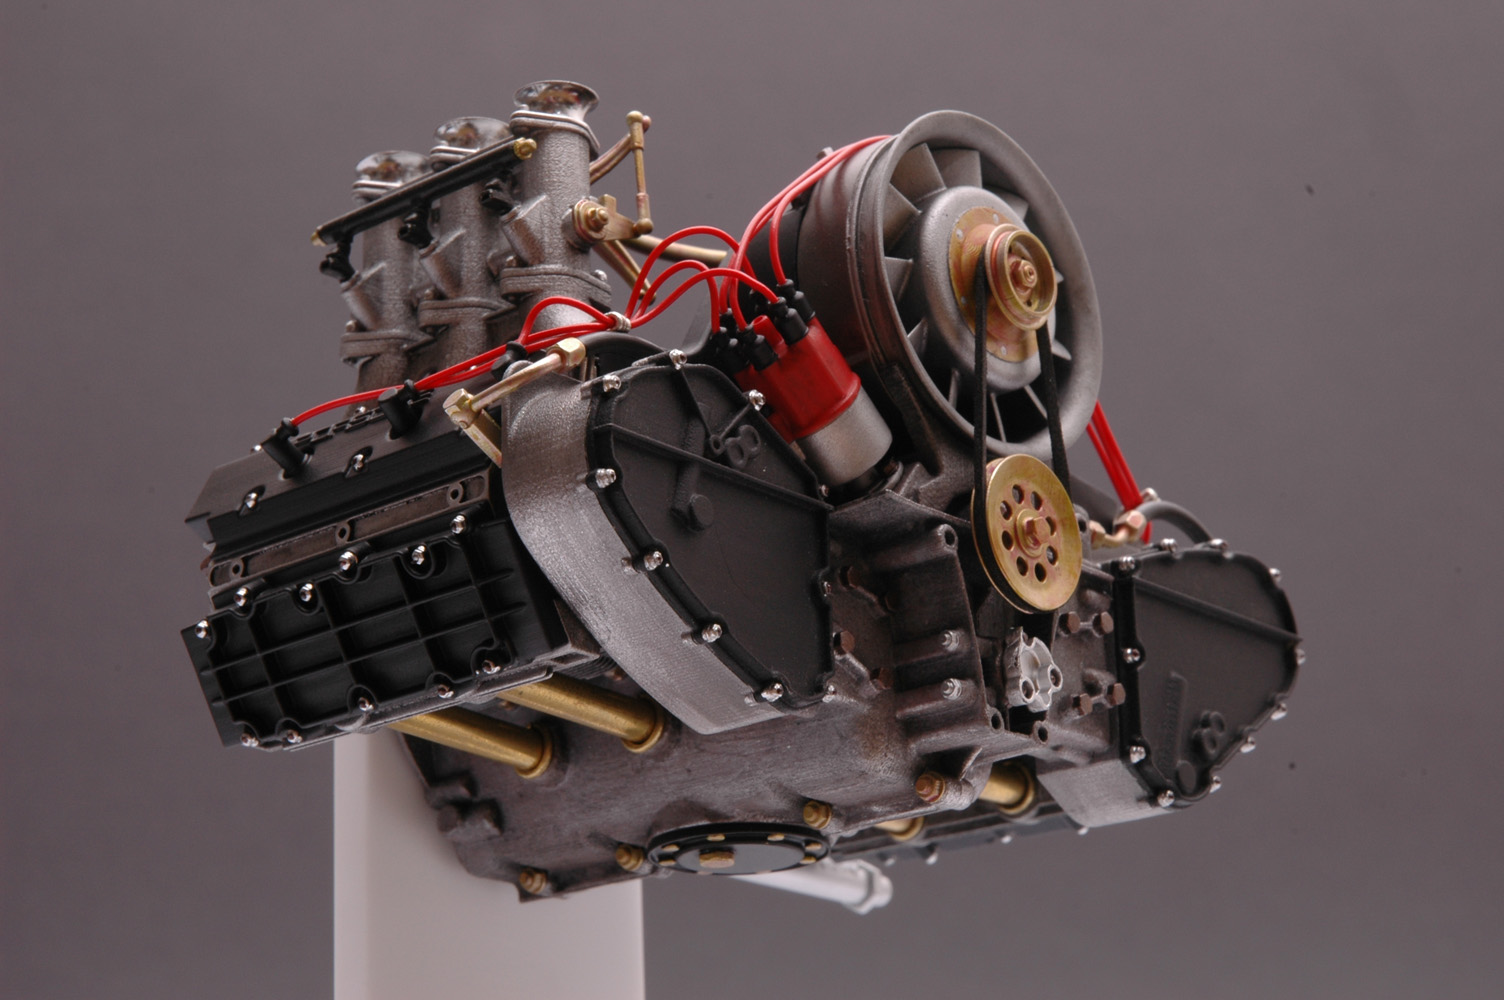
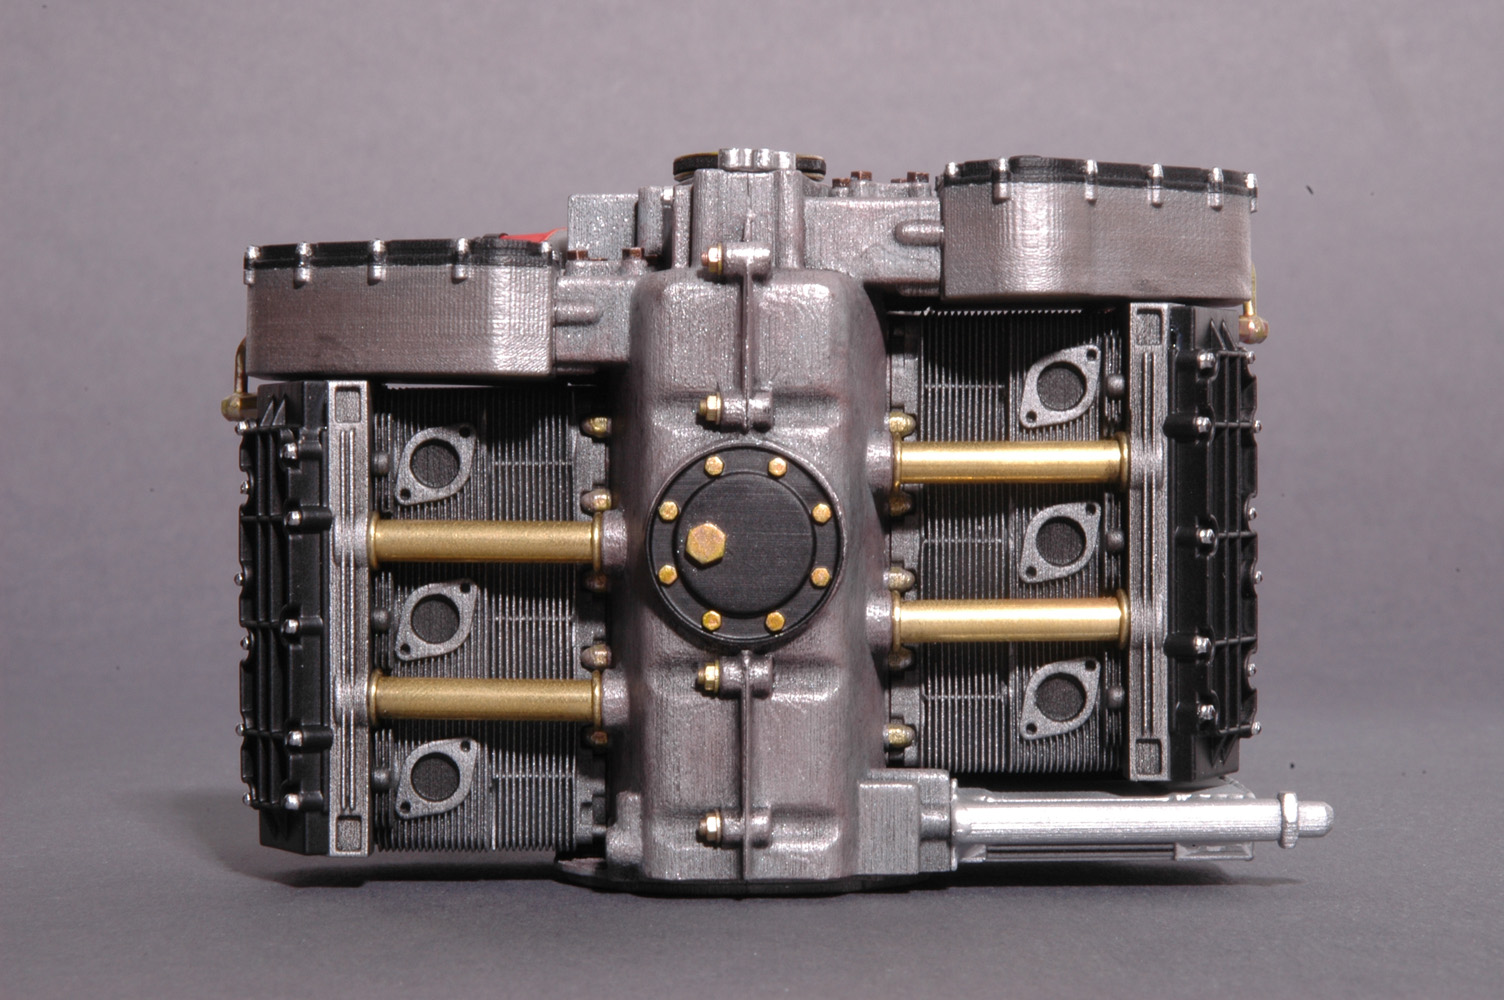
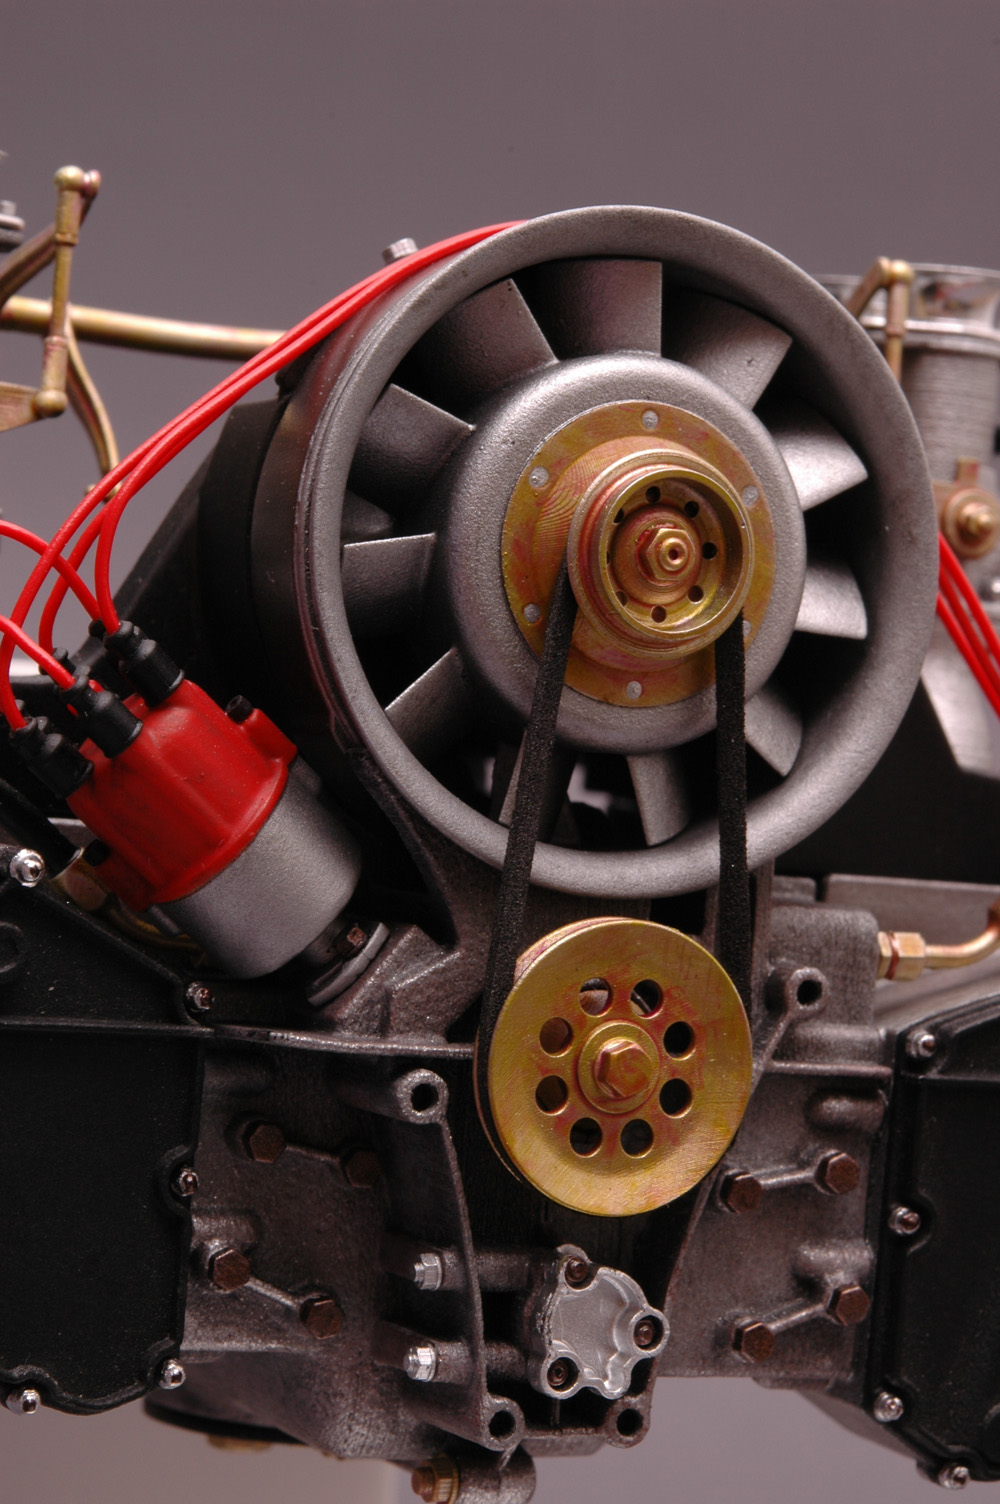
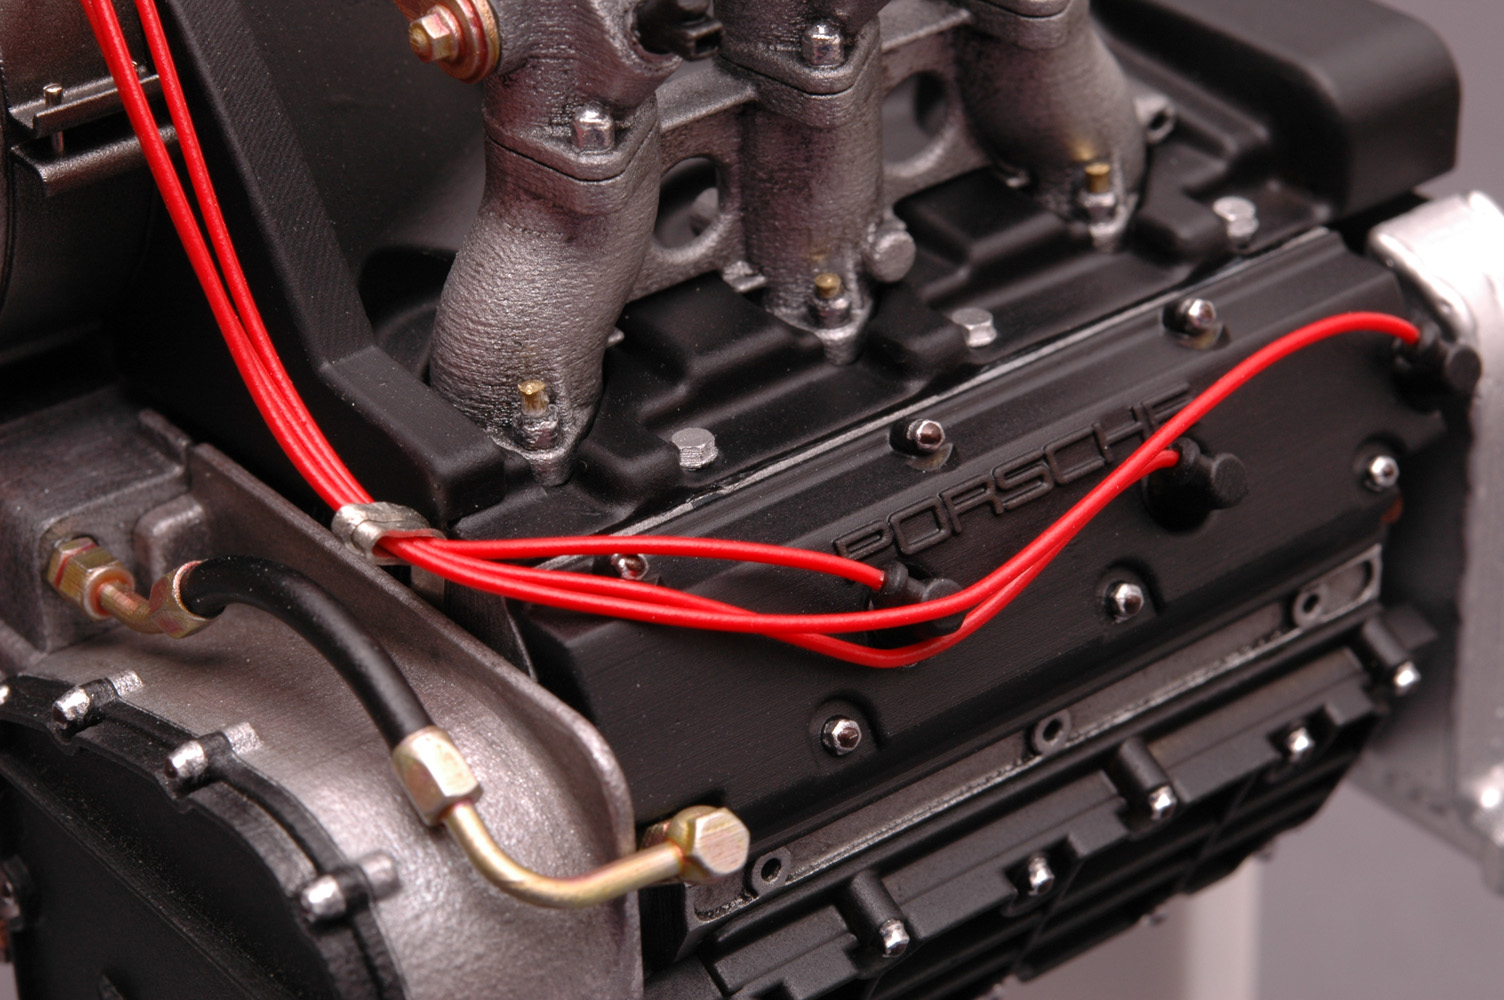
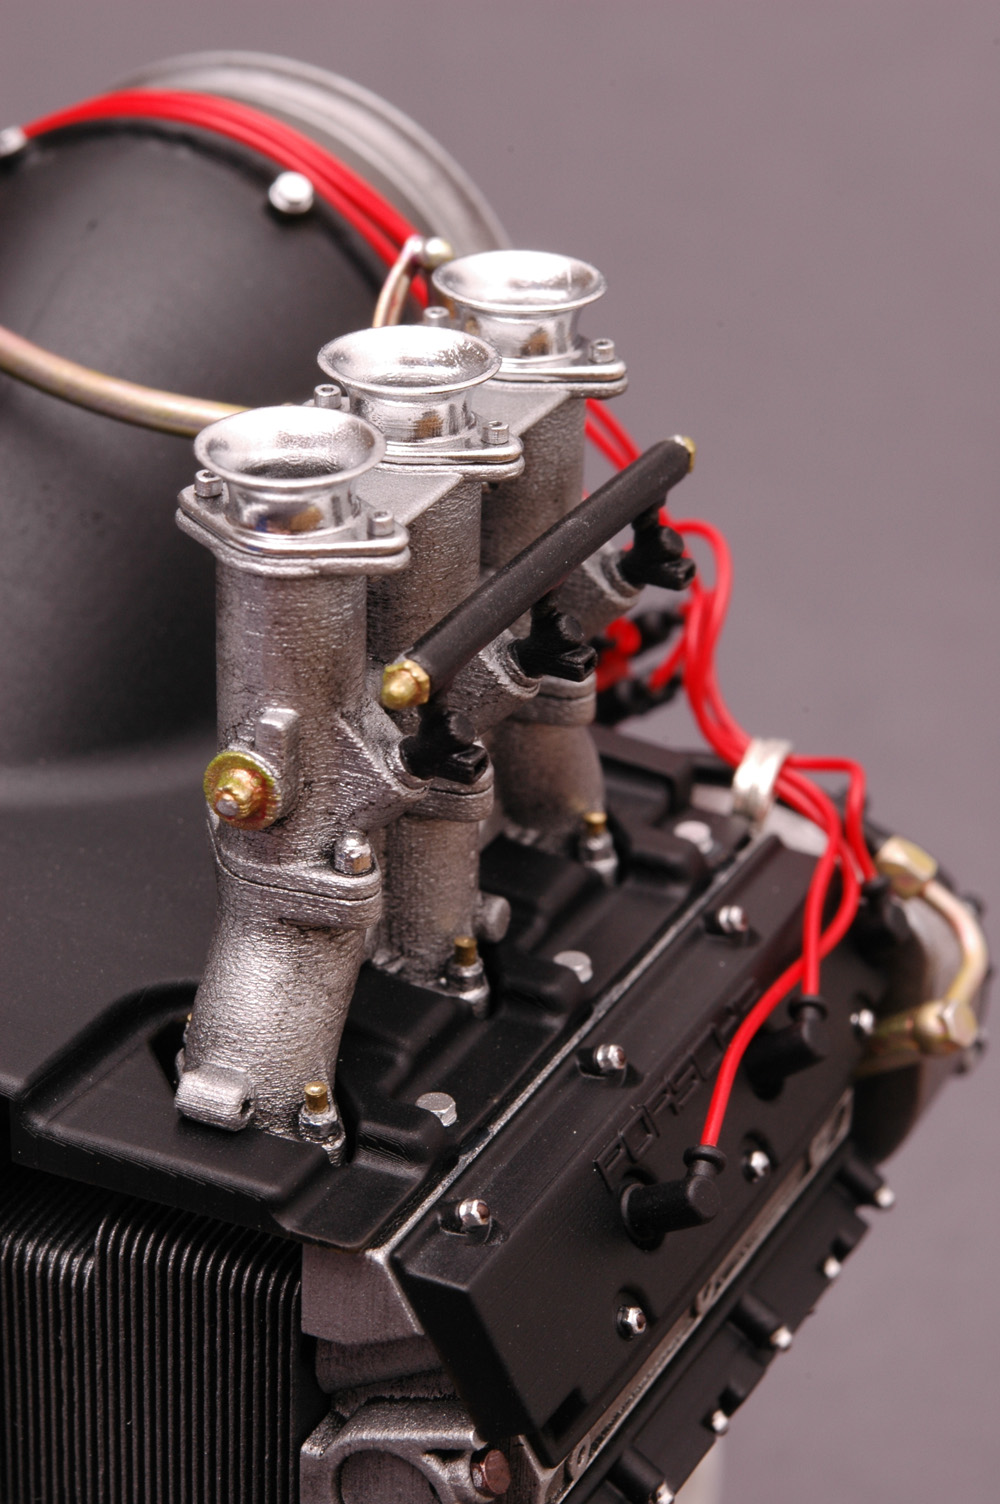
 Hello everyone and merry Christmas! I'm back with another engine model, some might say that this one is two cylinders short of being a real engine... It's from a Porsche 911 Carrera, around '70, and of course it's an air-cooled flat six. There were no Marushin parts involved (did you see what those cost now? WOW!), it's all scratchbuilt. The bigger parts were 3d printed on an Objet/Stratasys and the smaller ones on my Asiga, as you can see in the stepping. I sandblasted the Objet parts, their rough surface looks a bit like sandcast metal, and on the Asiga parts (like the linkage) I did no finish at all, just painting. Primer ist flat black AutoK spraycan (turns out semi-gloss, see the hood), paint is mostly Alclad (I love their dull alu) and some Citadel for details. I'm especially proud of the yellow anodized parts and the sandcast look on the fan! Thanks for looking, and have a nice holiday!
-
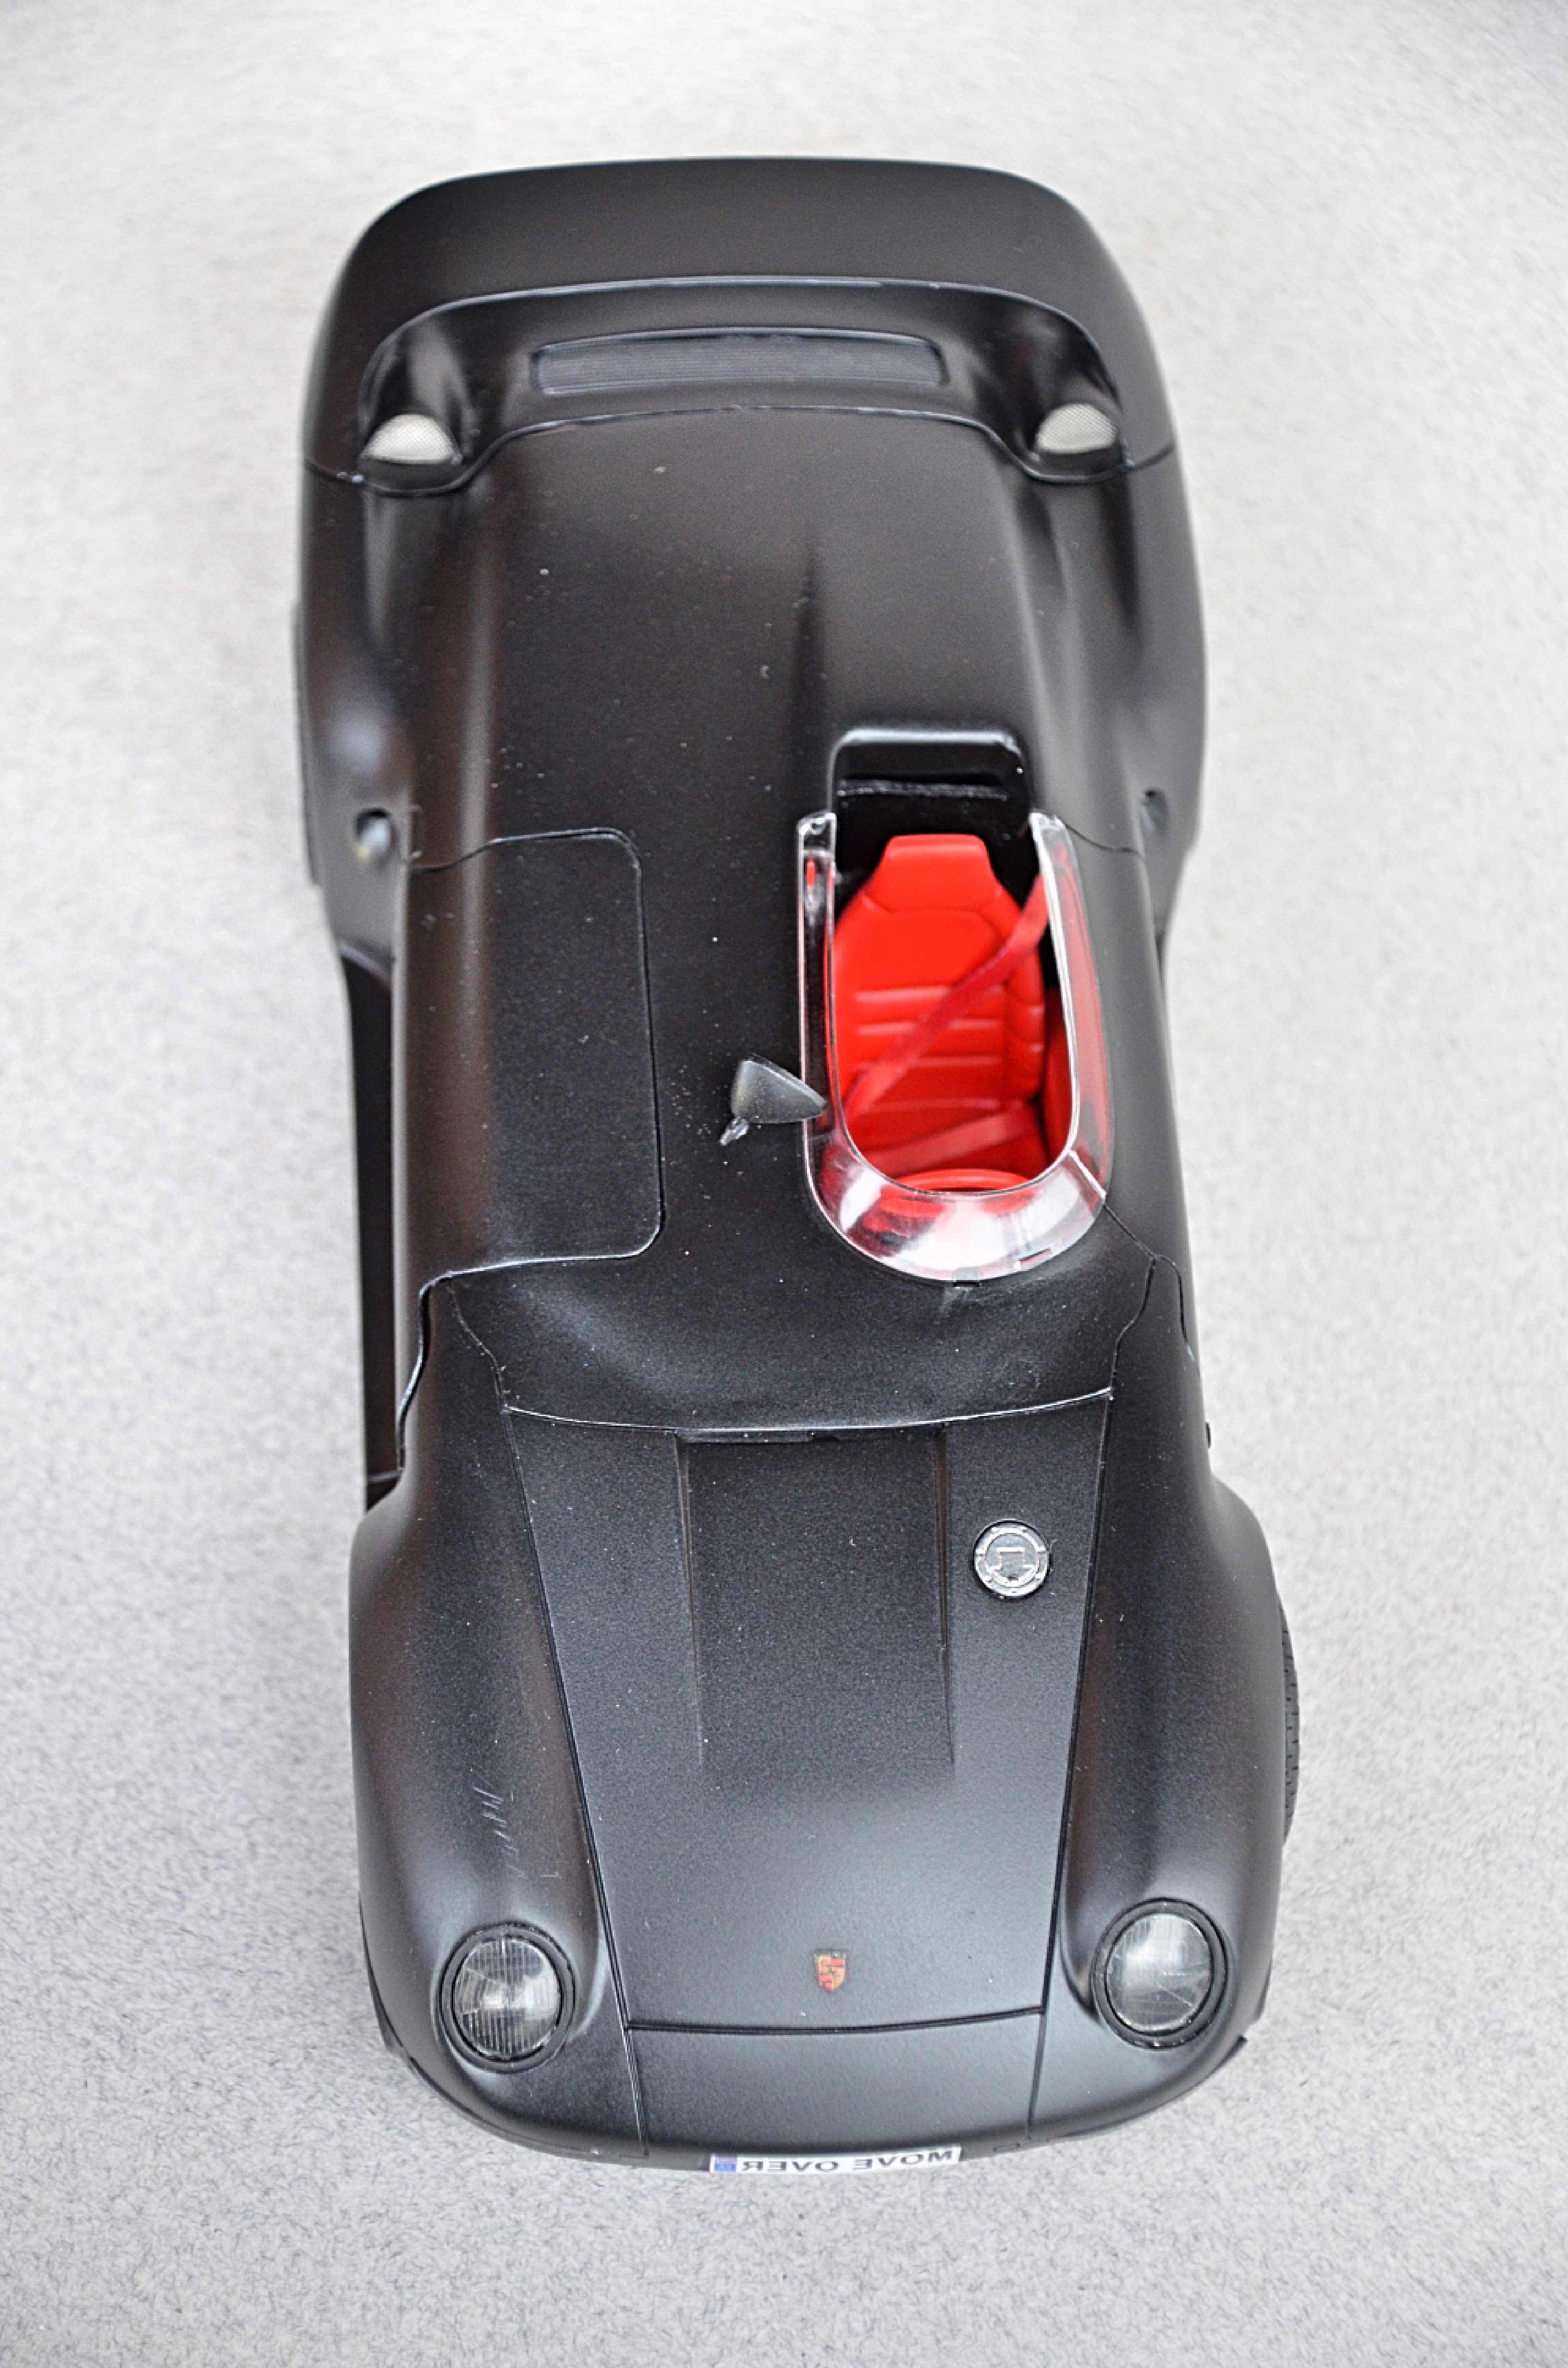
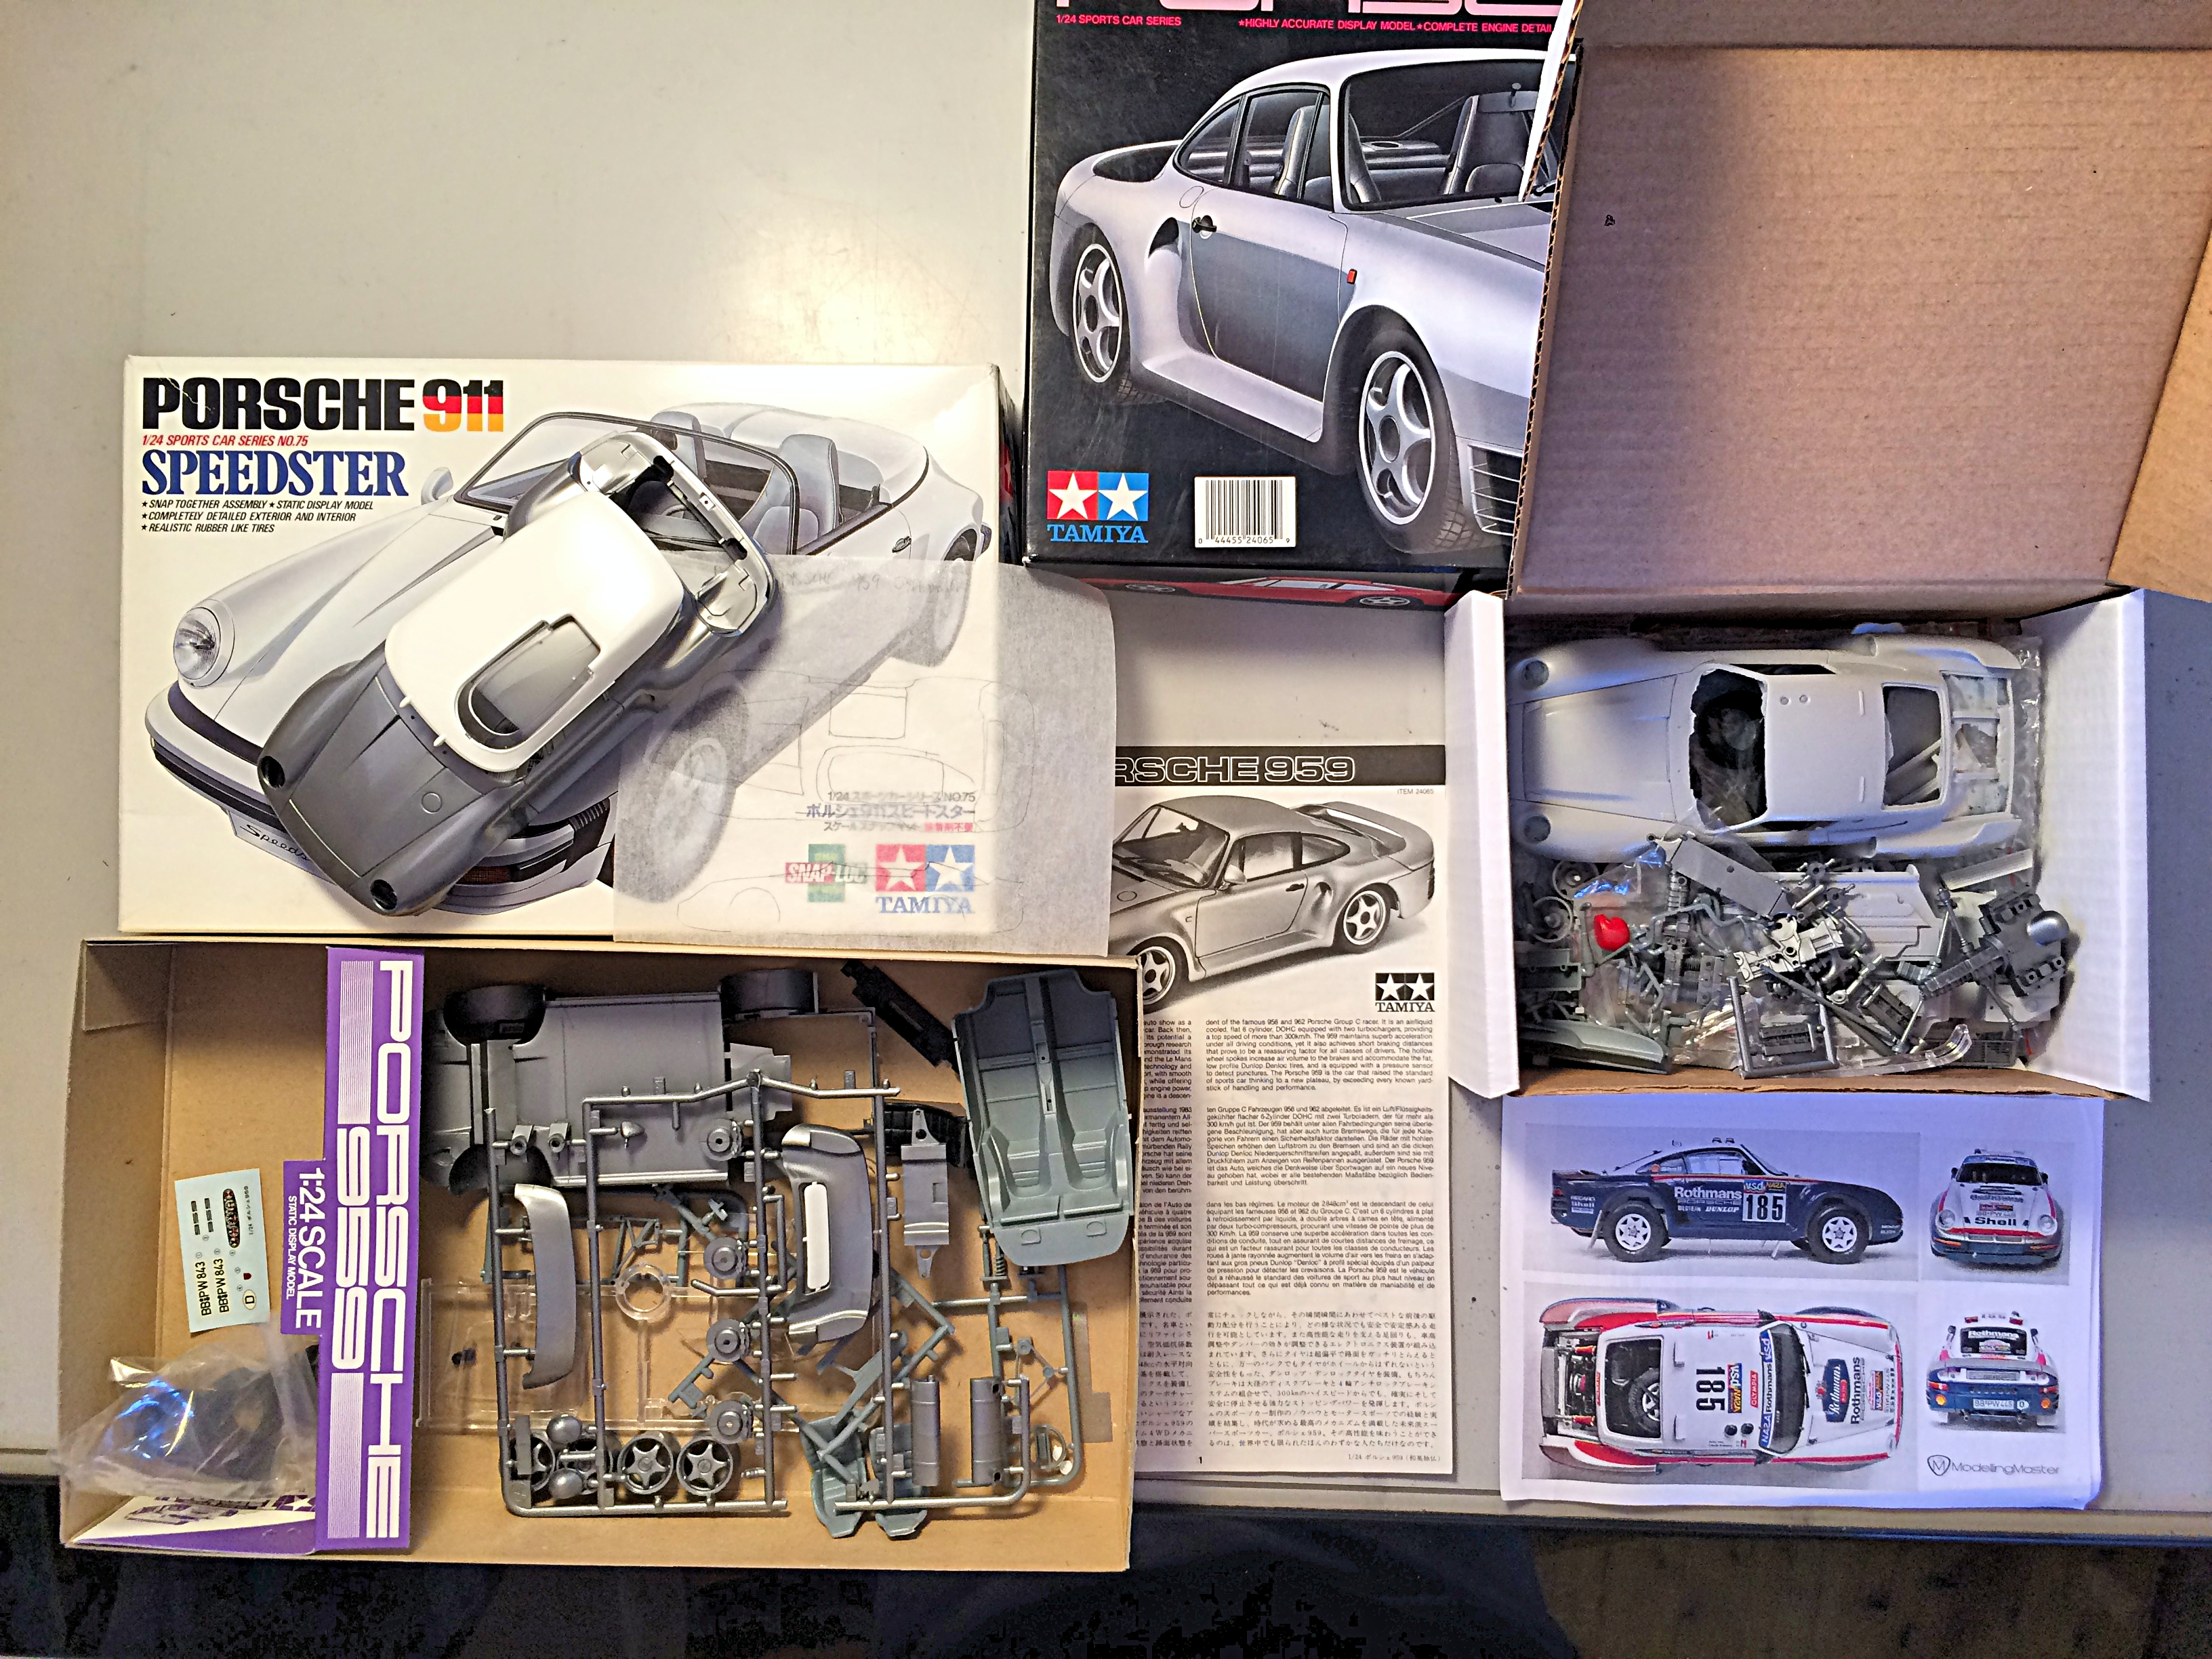
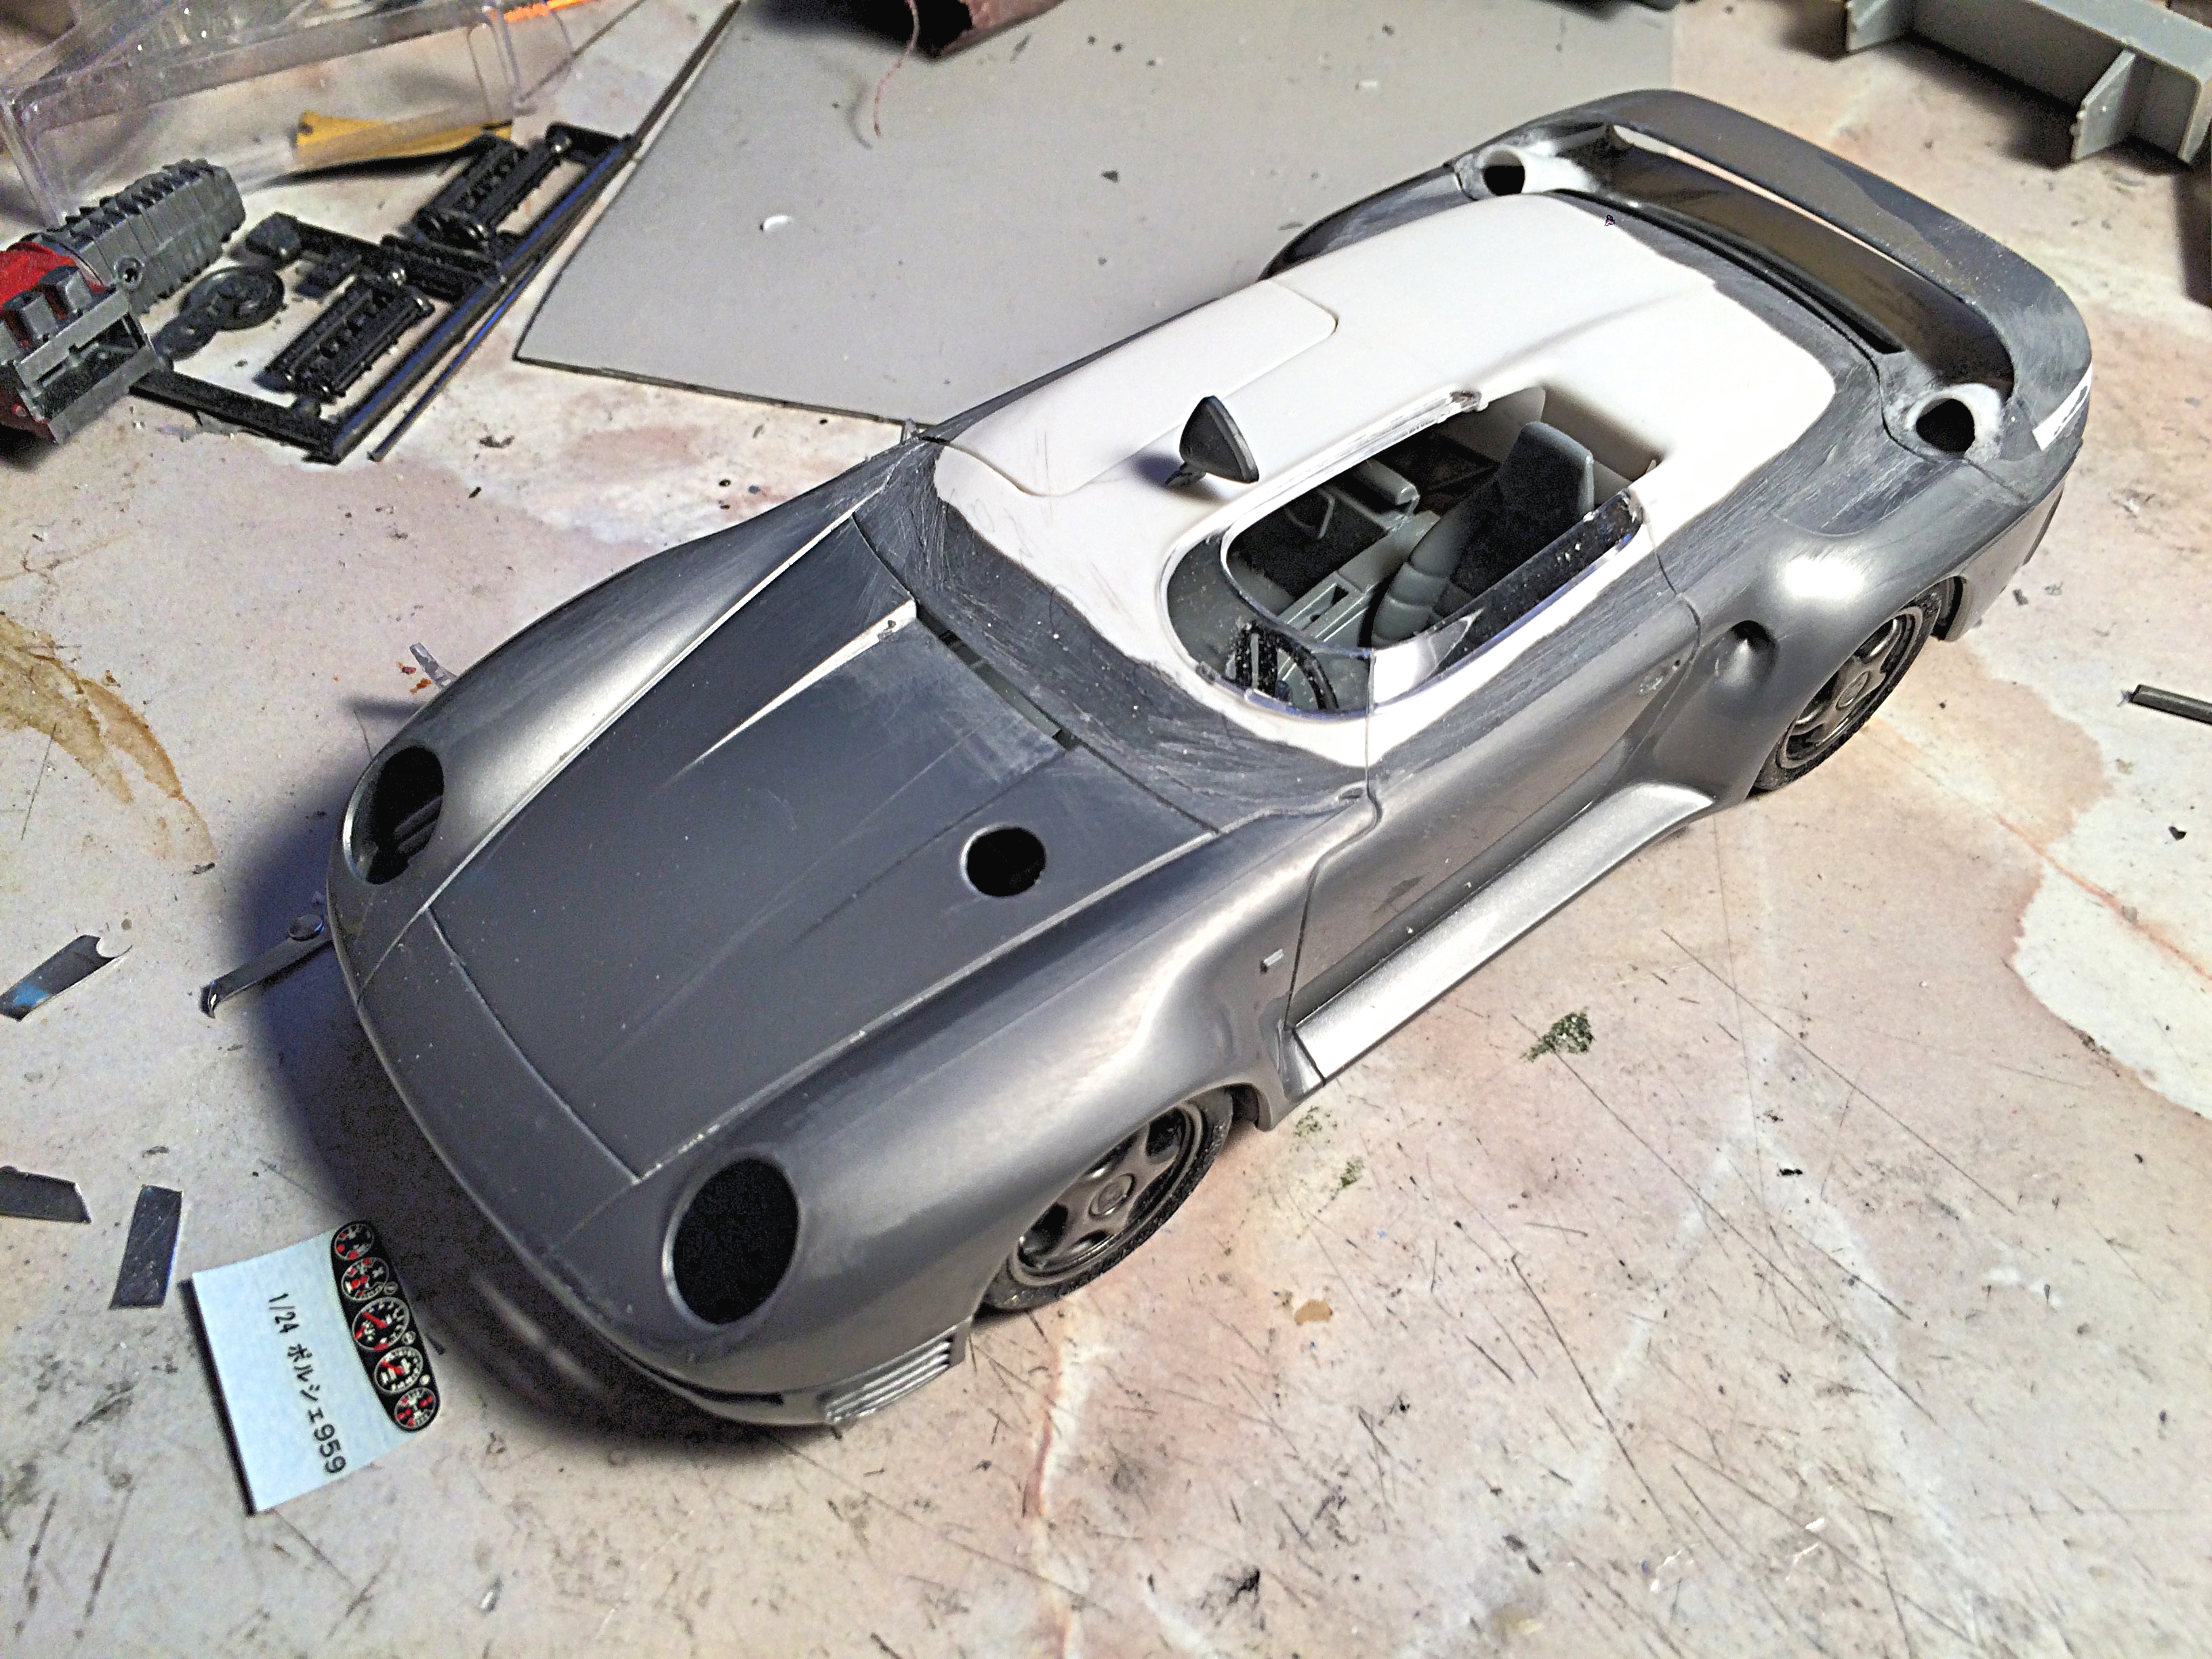
Kitbashed the Tamiya Porsche 959 with the Tamiya Speedster 'Club Sport', because the kit was the donor for the resin transkit of the 959 Paris-Dakar project. This was intended for fun, and to experiment with a different hinge, and doing Rhino Liner. It's a curbside because the engine and some of the suspension parts were used for the other project. The intended use is camera car, to be used on the race track or historic rally (but not WRC rally LOL). I managed to bugger it up in places. Salvaged parts are transistor radio speaker grill, guitar string (wire), aluminum newspaper printing plate, Fujimi steel screen, various parts box pieces, resin copy of Vehicross gas cap, baking soda can seal lid (not seen, should take bottom picture). I had also raised the wing with 0.1" plastic, and added scoops. I also tried out the new 18-300MM lens on the Nikon, not happy with the lack of depth of field. Gives new meaning to "let's roll!"
-
Started with getting the resin transkit of the Paris-Dakar, which requires the Tamiya Porsche 959 for the engine, windshield, and some other critical parts (posted both before as another topic). So that left a perfectly good body, and no engine. I also had the funky top from the Tamiya Speedster, which I have never seen as a popular option. So how much more sacrilegious can one get, to chop up a legendary 959 and a Speedster? The concept is to have a camera car for filming race cars on the track, or historic road rallies. I stopped working on both last May. So I'm documenting only this WIP here, now that I feel it's safe to say the construction phase is 95% complete. The Dremel is the essential tool used. I used JB Weld for massive gap filler and glue. I've been jonesing to use the foil from a baking soda can, for the belly pan (Lexus uses dimples under the body to make a quieter ride). The reason I halted, was the challenge of finishing the interior fillets done with epoxy putty, which I will disguise with a thick Rhino-liner texture, but the opening door mechanism had to be invented/engineered using seat-of-the-pants ancient pencil and paper drawing. I use aluminum newspaper printing plate because it's soft and does not break when bent, and it's easy to drill. My idea was the door is used as the platform for the camera and videographer, bolting plates are salvaged from an old transistor radio, and I will add tie-down loops so the guy doesn't fall out, it's sort of like a motorcycle sidecar. My plan is to paint semi gloss black, so it won't reflect on the cars being filmed. Will try black tinting the lights. Interior color I'm still thinking about, first choice is Africa Korp yellow, or red, maybe blue, something that pops should be cool.
-
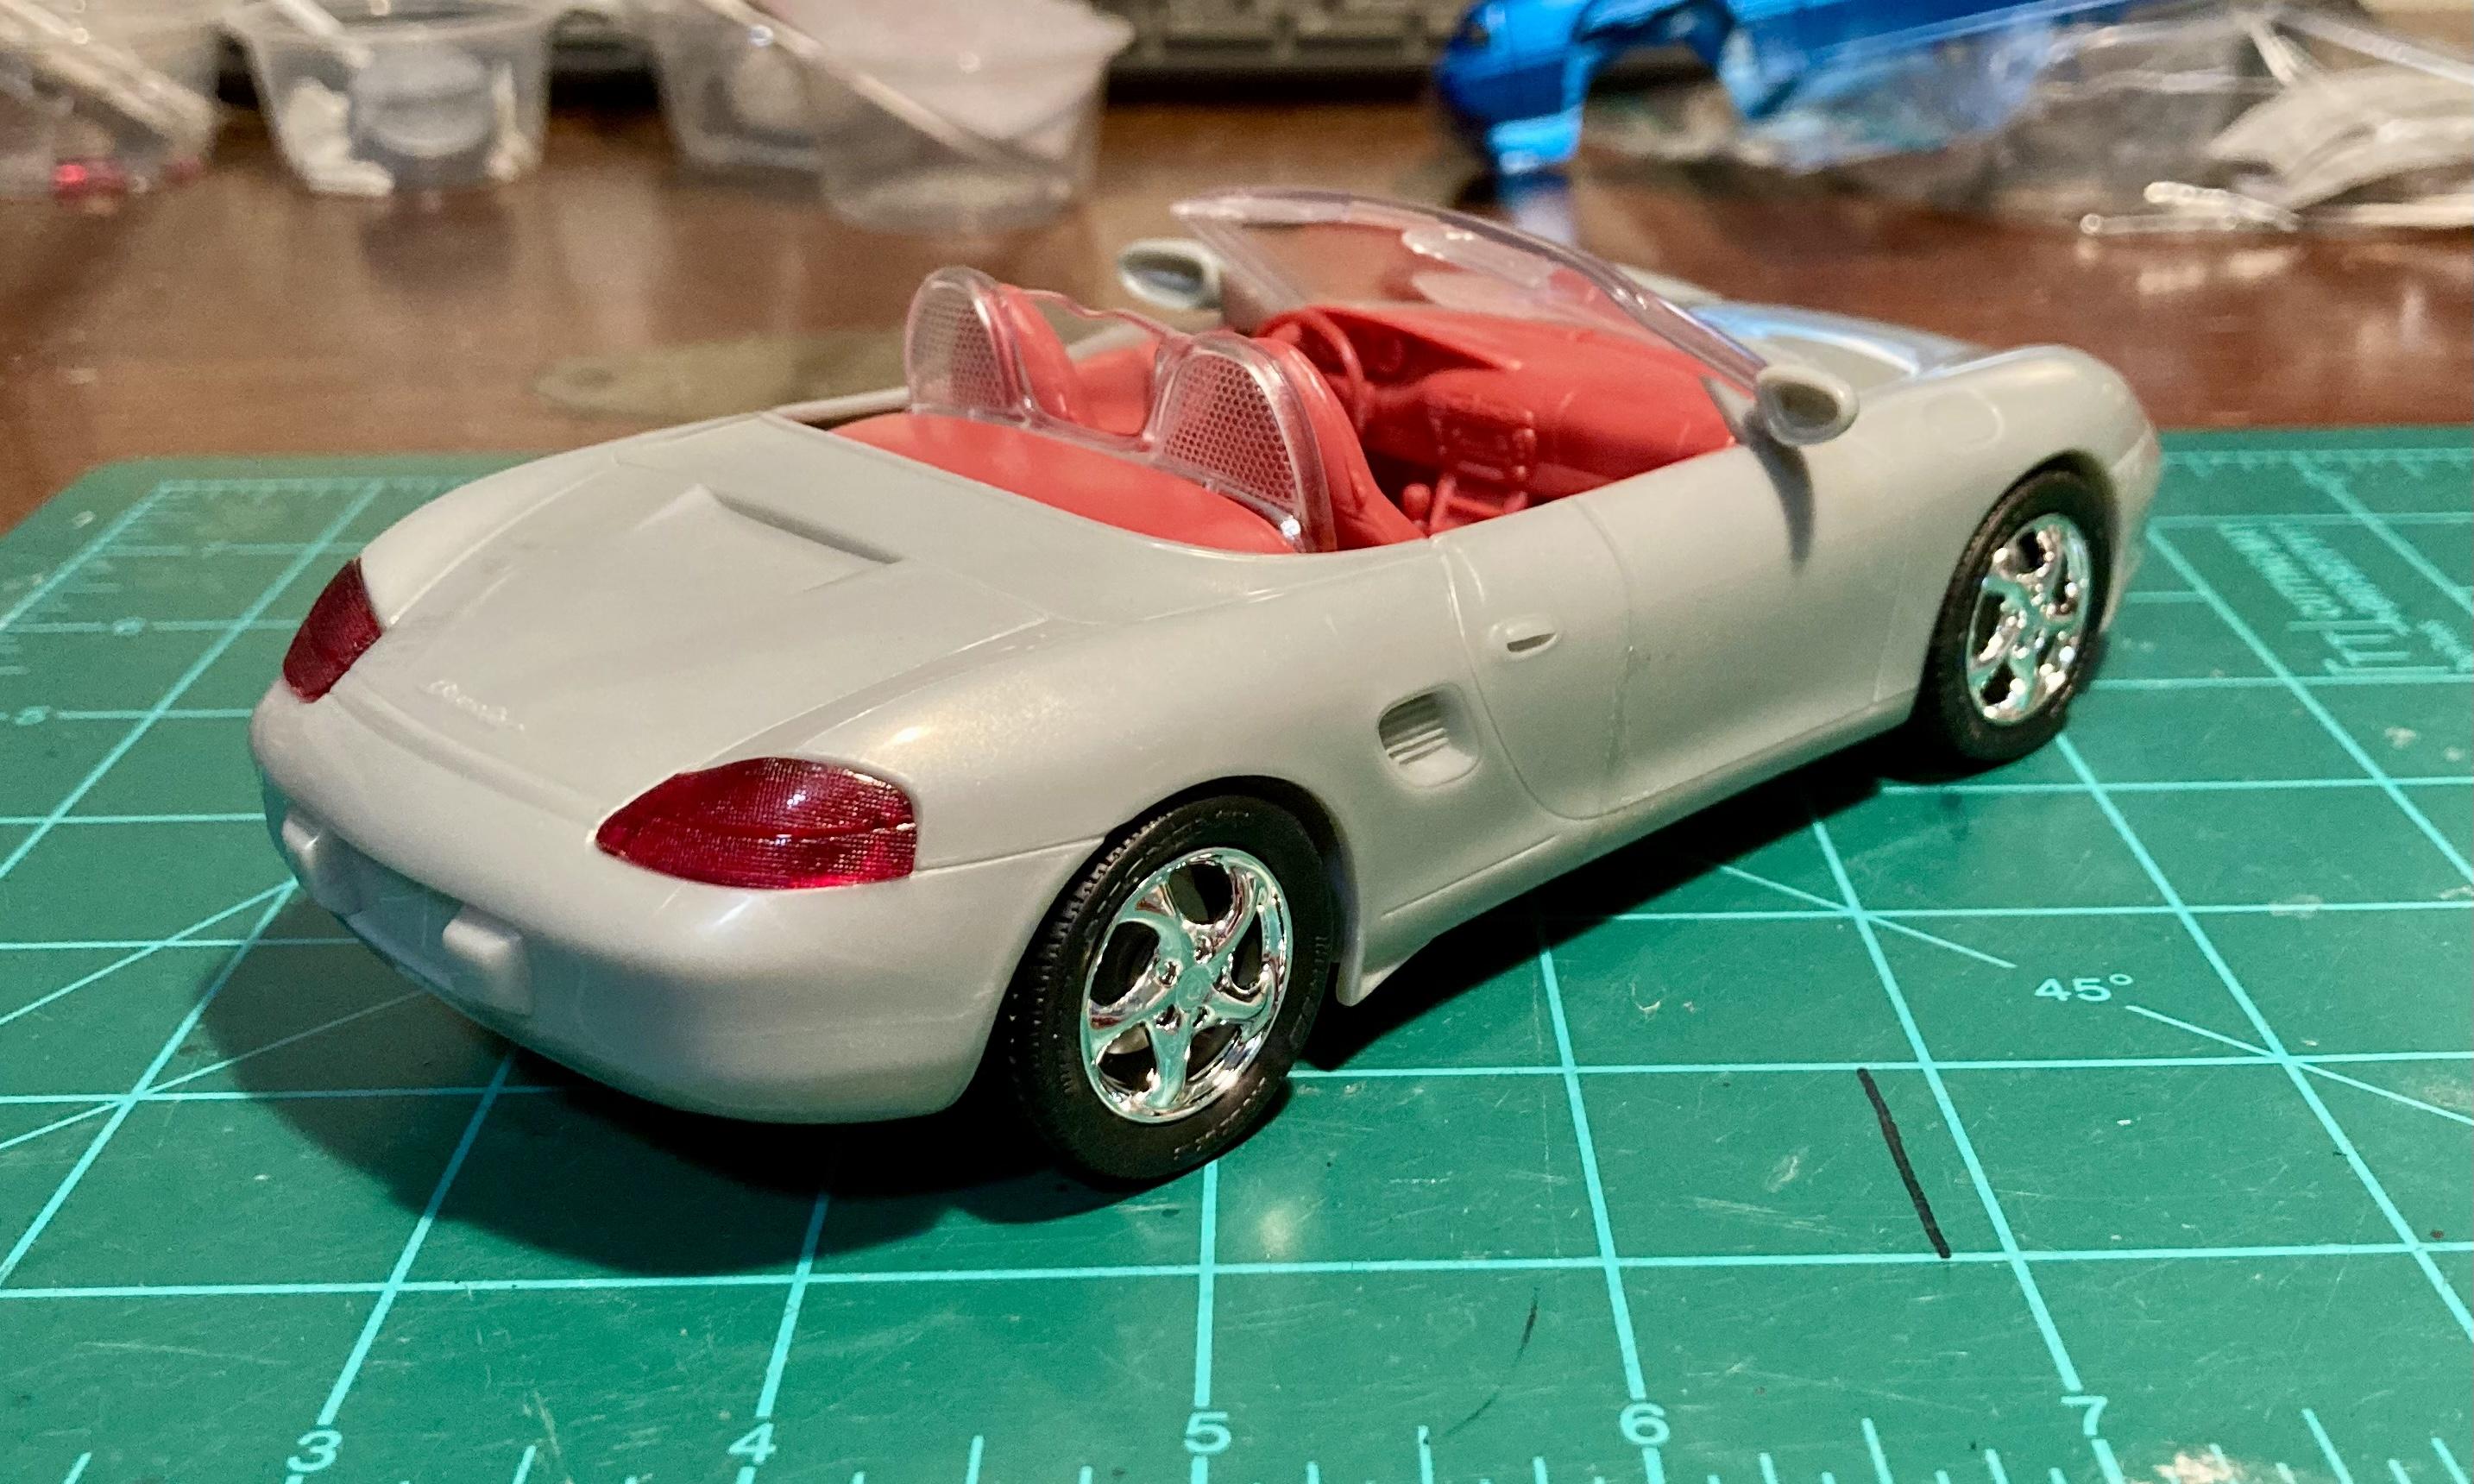
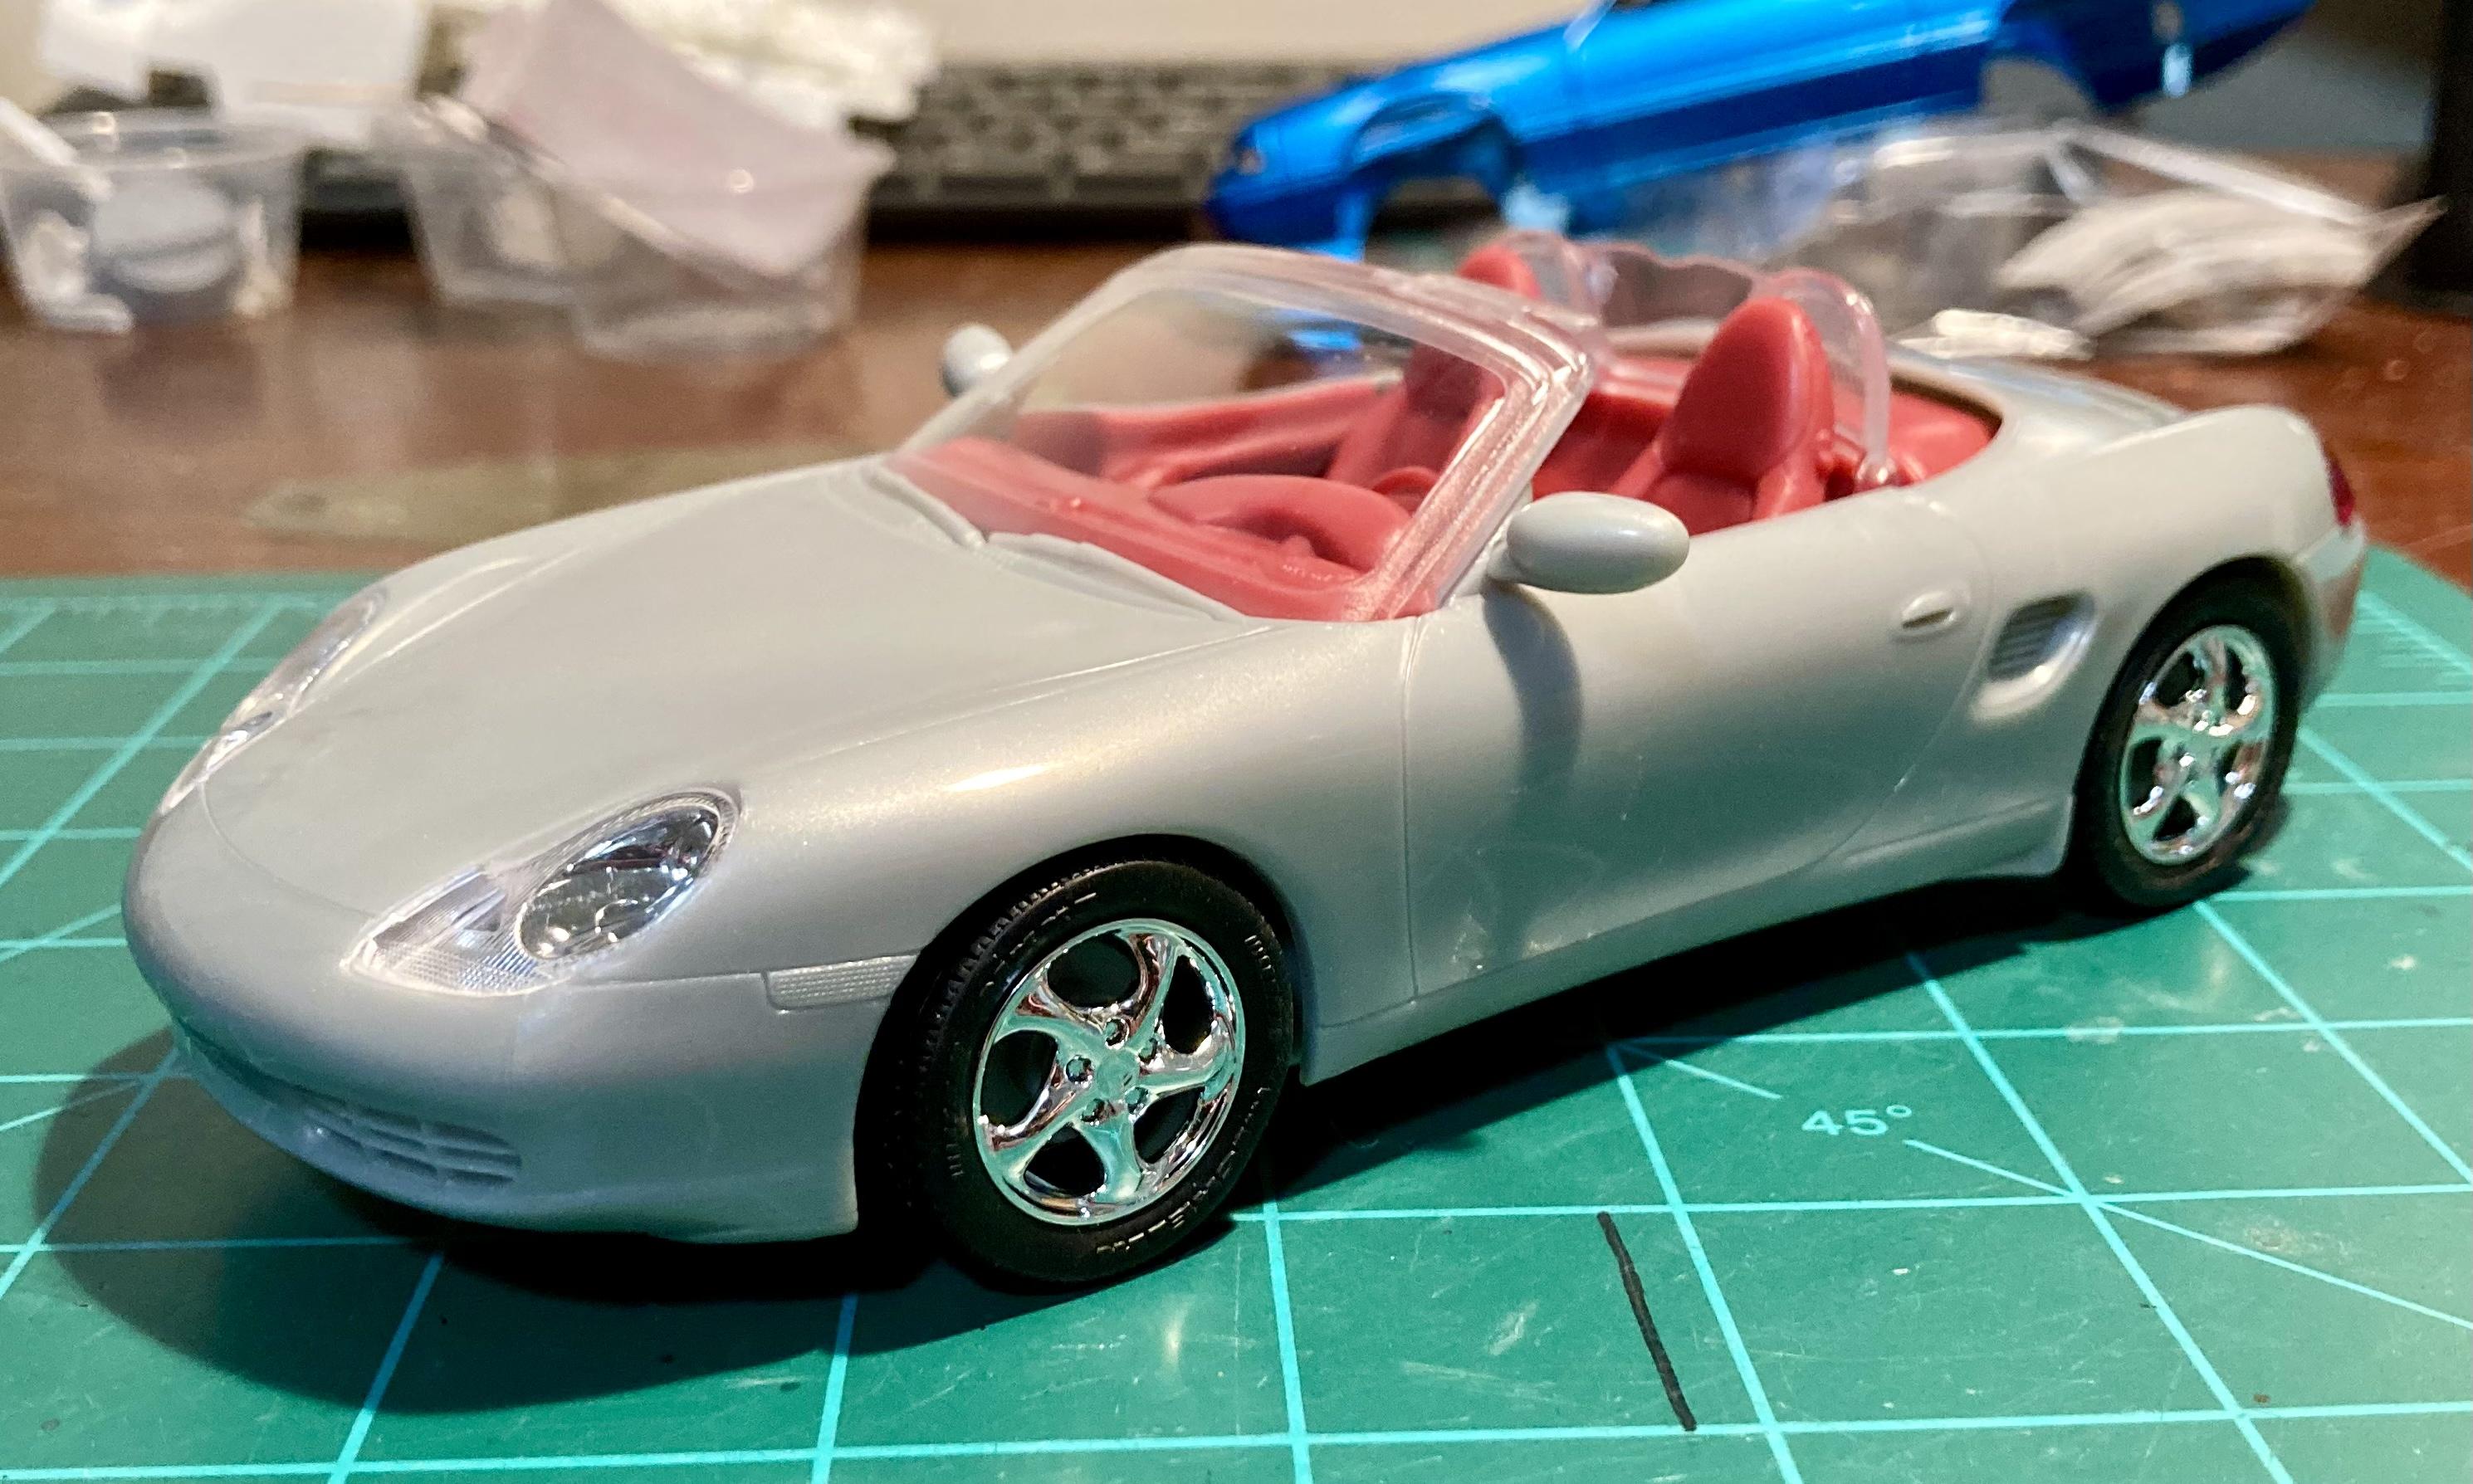
I saw these built up on the Revell stand at Scale Model World last weekend where they told me that they'd be available by "the end of the month" so I put in an order, and look what turned up today... It's a VERY big box, and could probably be 2/3 the size and still work fine... I went for the coupe because both build-ups looked very good, but I don't really like the clumsy hood on the convertible; for me the coupe has the classic lines. As it turns out, the couple is officially the new "Easy Click System" like the Porsche Tractor from earlier this year. Still many of the parts are exactly the same as the more conventional glue-together cabriolet. The price you pay for the easy click system is a few slight sink marks where the various pillars and sockets are found on the insides of parts. Quickly removed with dab of filler and some sanding sticks. The worst areas are the lower front corners, where the fenders turn round into the front valance. They aren't sink marks, I don't think, but actually some distortion when the body came out of the mould, leaving a wavy lower edge and a sunken depression. Despite the small size of the 356, it's going to be quite a sizeable model! So, now I need some advice. The plastic, as you can see, is red. I think I want to model a silver car with a red interior. I can use either Tamiya sprays or Zero 2K colours. If I use the Zero paint I'll probably want to put some sealer primer on first to be sure the red doesn't come out in to the clear coat. With Tamiya, and many light coats of paint and TS-13 clear, I think I don't need the primer. Because of the fact that this is a clip together kit, many of the tiny chrome details need to click into precisely cut slots and holes with a high precision fit. If I use the Zero paint and 2K clear, I'm worried that the thickness of the paint layer will mes up the fit of some of those details (the chrome hood center strip, for example). So what would you guys do? Tamiya or Zero? Any ideas about how best to get a silver car, clearcoat untainted by red dye, and still be able to fit the detail parts? best, M.
-
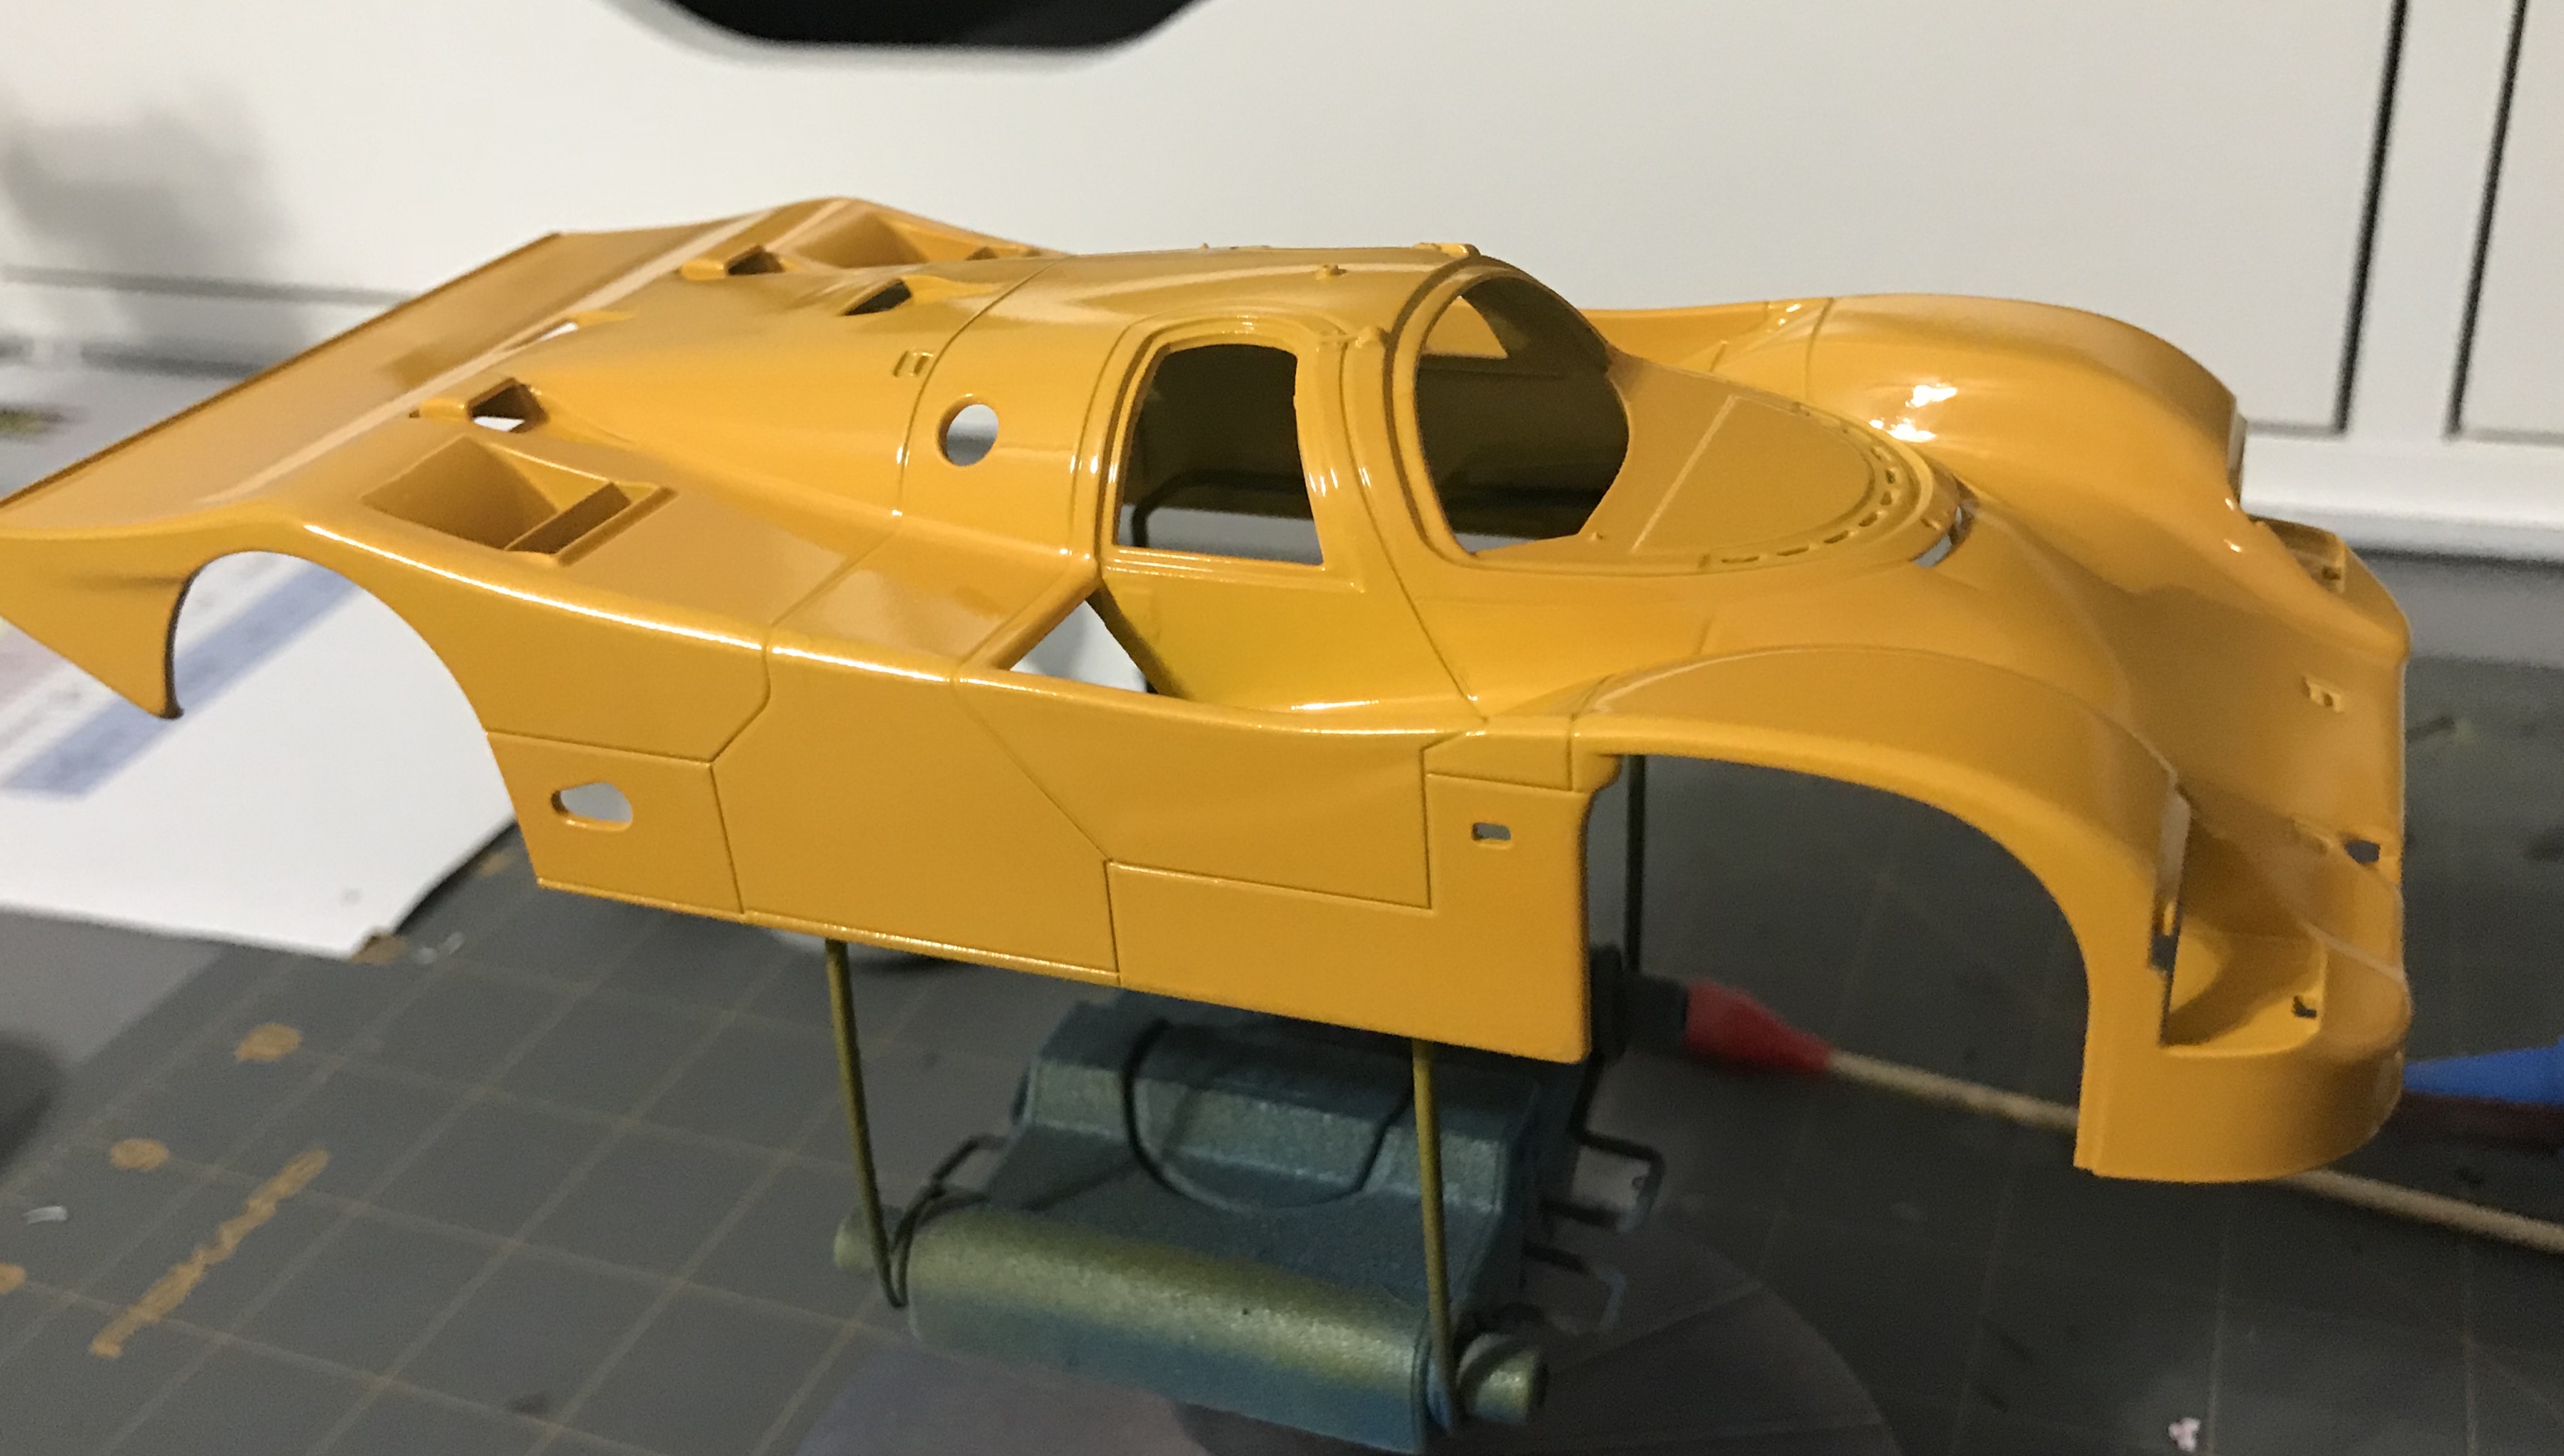
Submitted for your pleasure, another project I have on the bench. I’ve always loved the 956/962 so it was cool to snag this while on a business trip in upstate New York. I had originally painted it Tamiya Yellow but the coverage was poor and runny. I sanded and reshot it with Tamiya Camel Yellow. It’s better. Not perfect. Oh yellow, thou art a heartless color.
.jpg.260e08309cba026acf6ddc4bba2f1121.jpg)


.jpg.8b4fe5781ce3a62a7401ab02ddafcf3f.jpg)