89AKurt
-
Posts
8,429 -
Joined
-
Last visited
Content Type
Profiles
Forums
Events
Gallery
Everything posted by 89AKurt
-
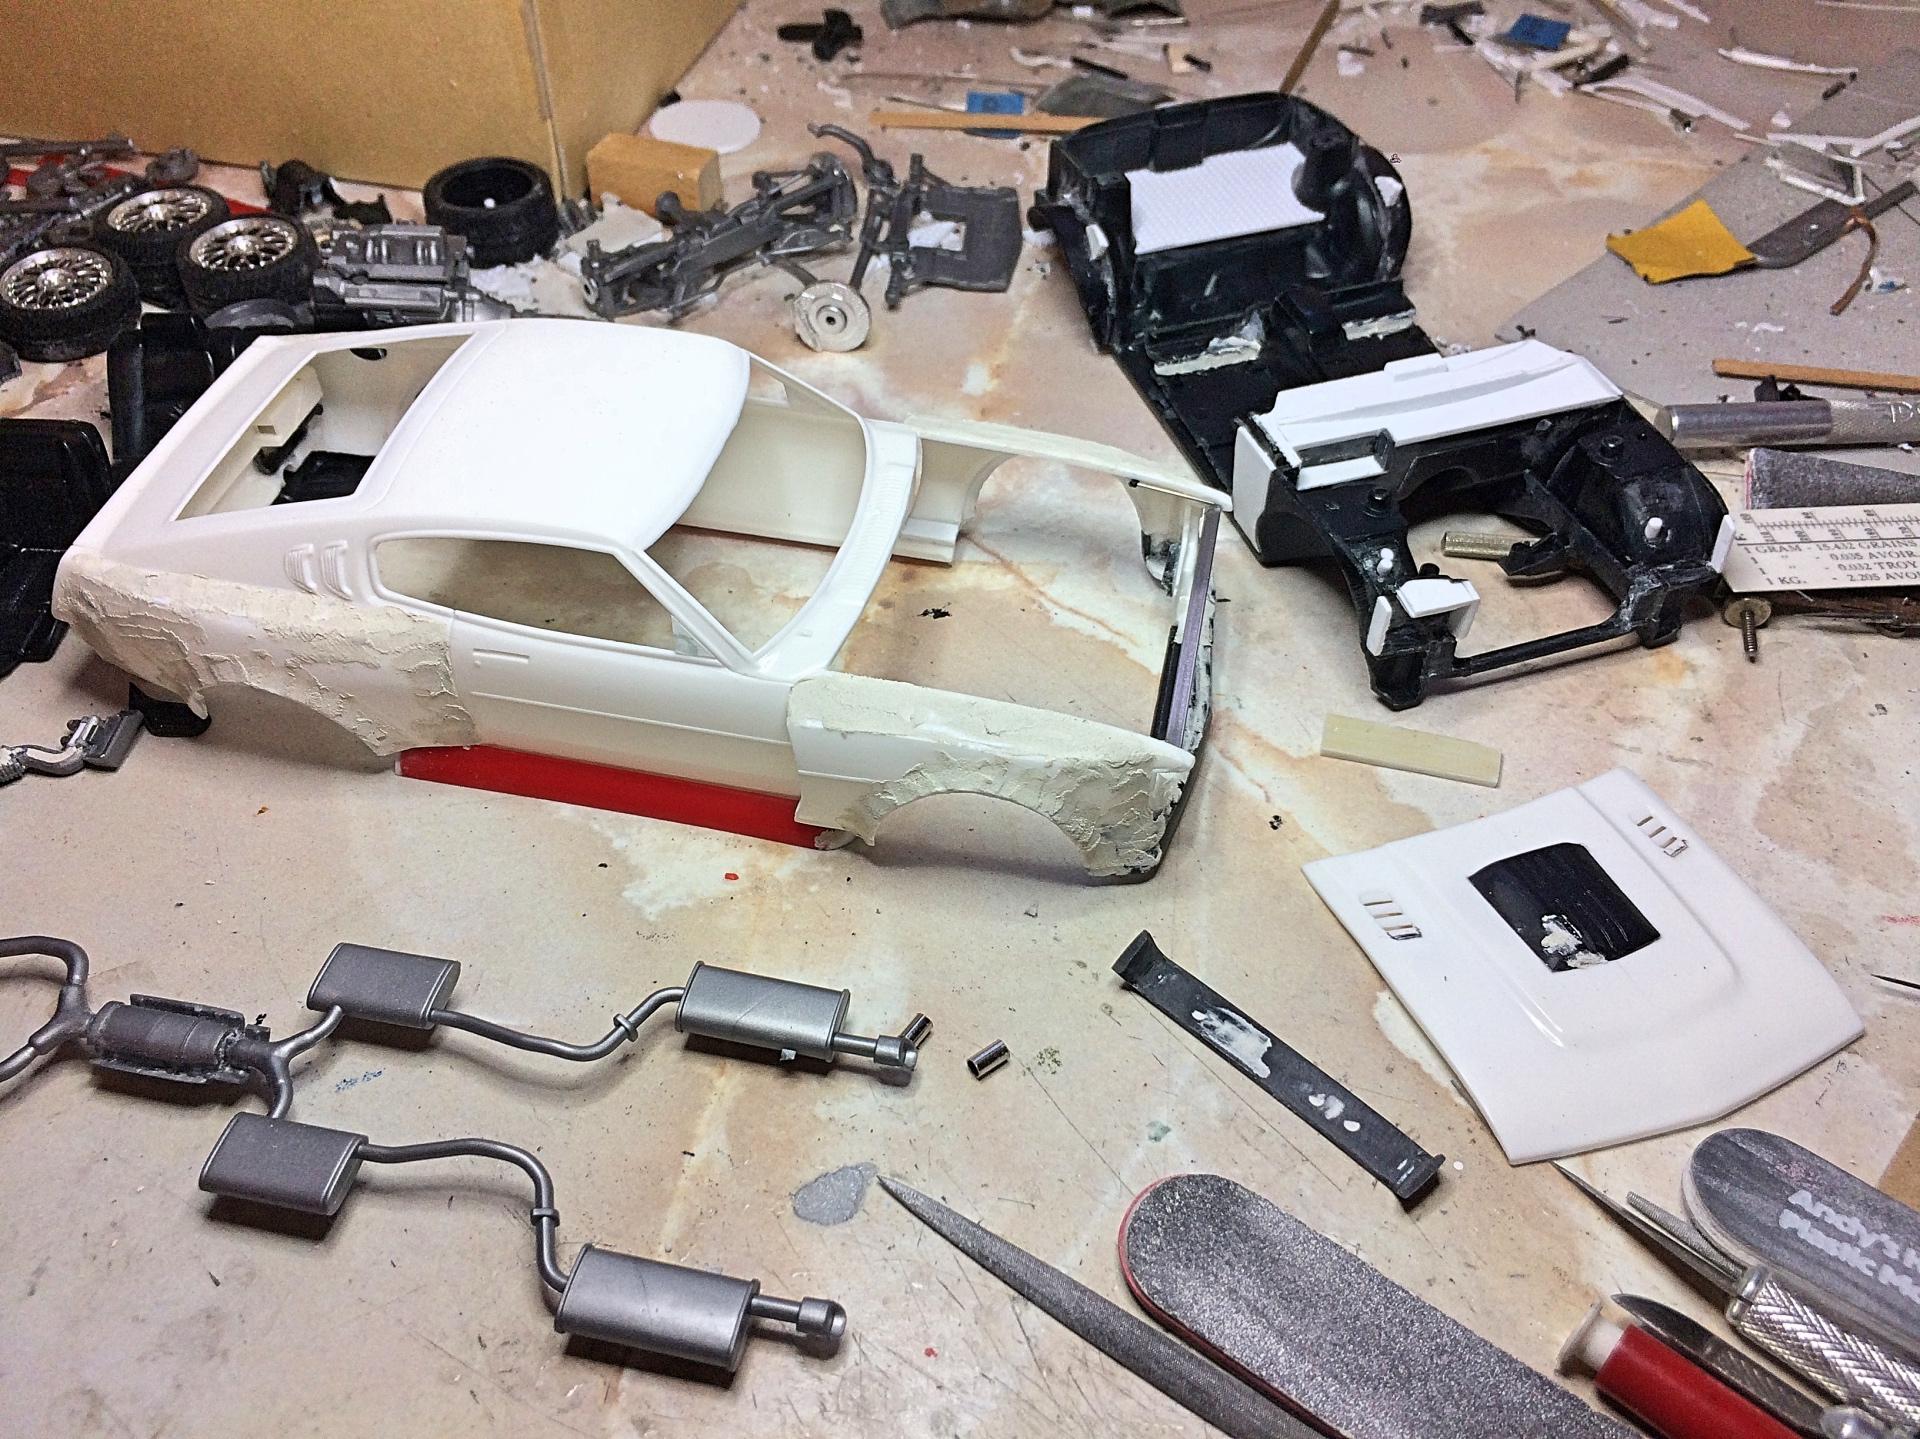
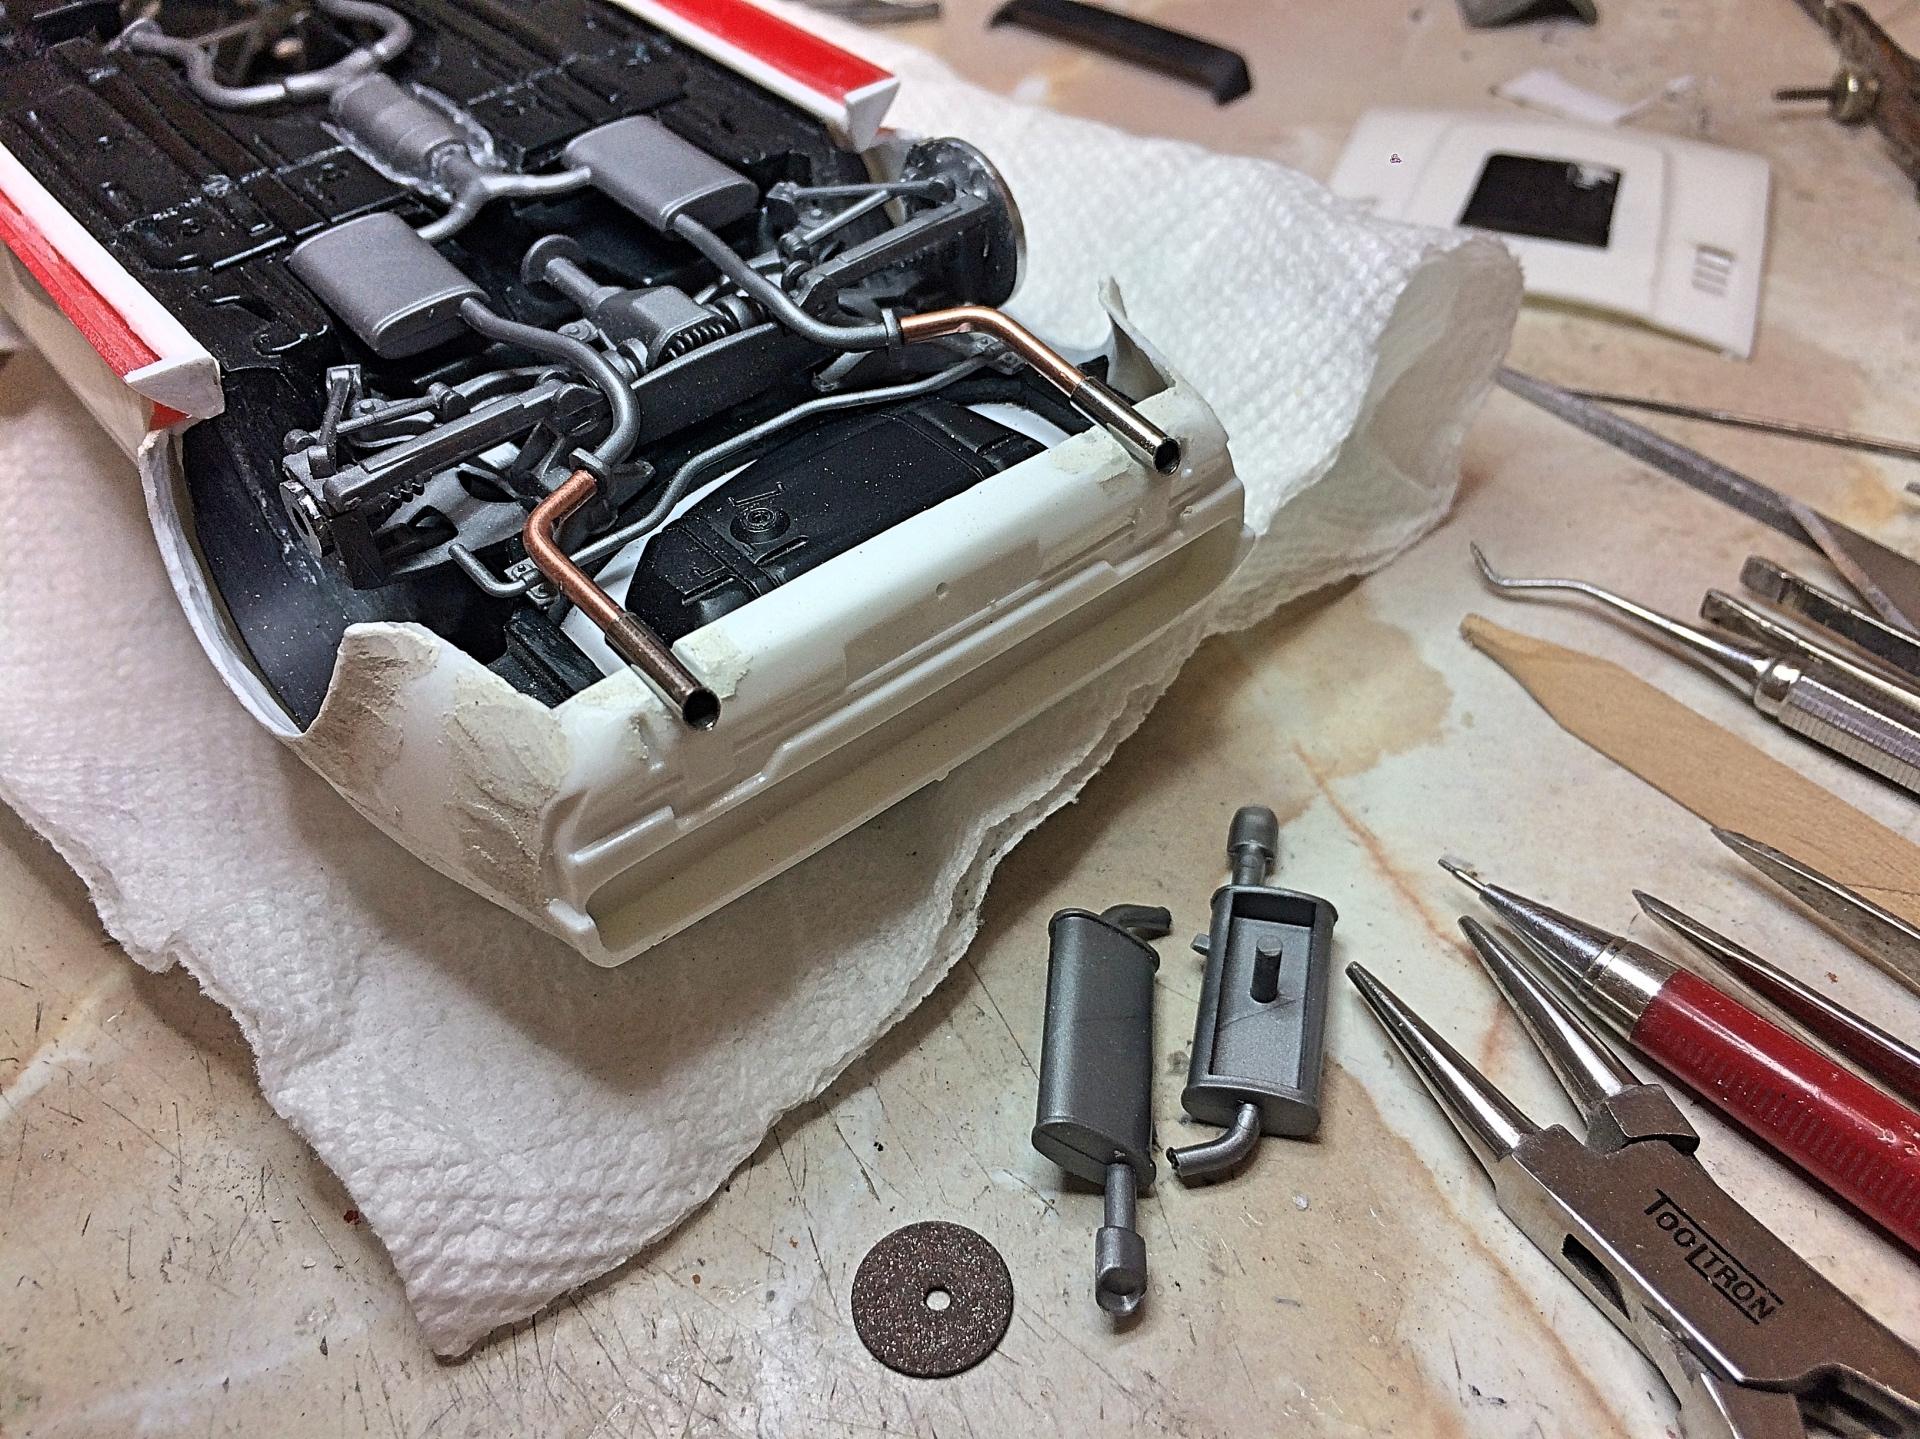
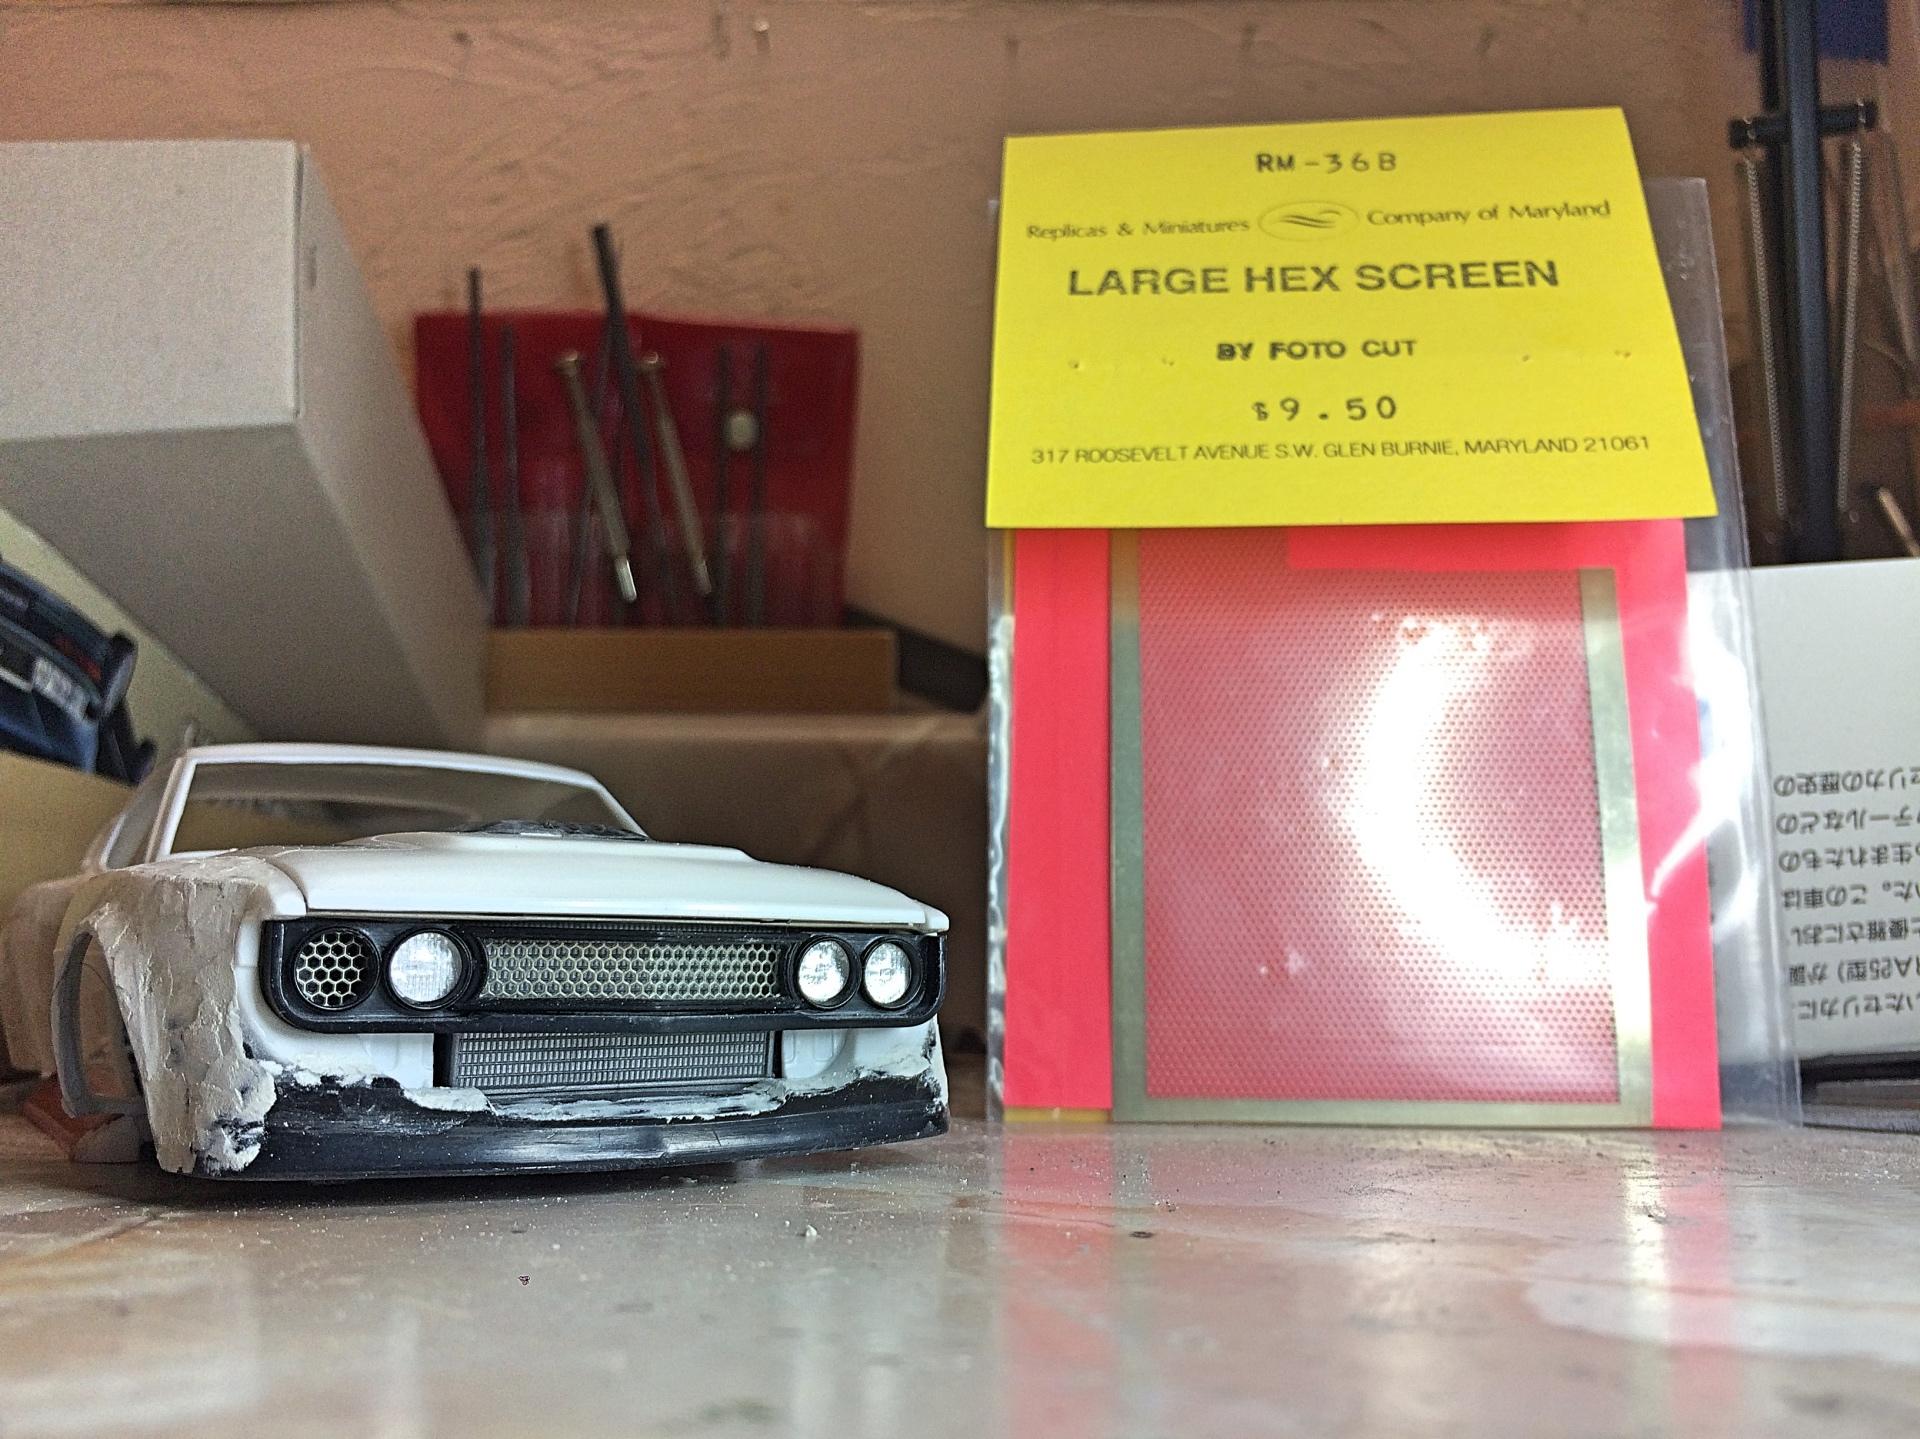
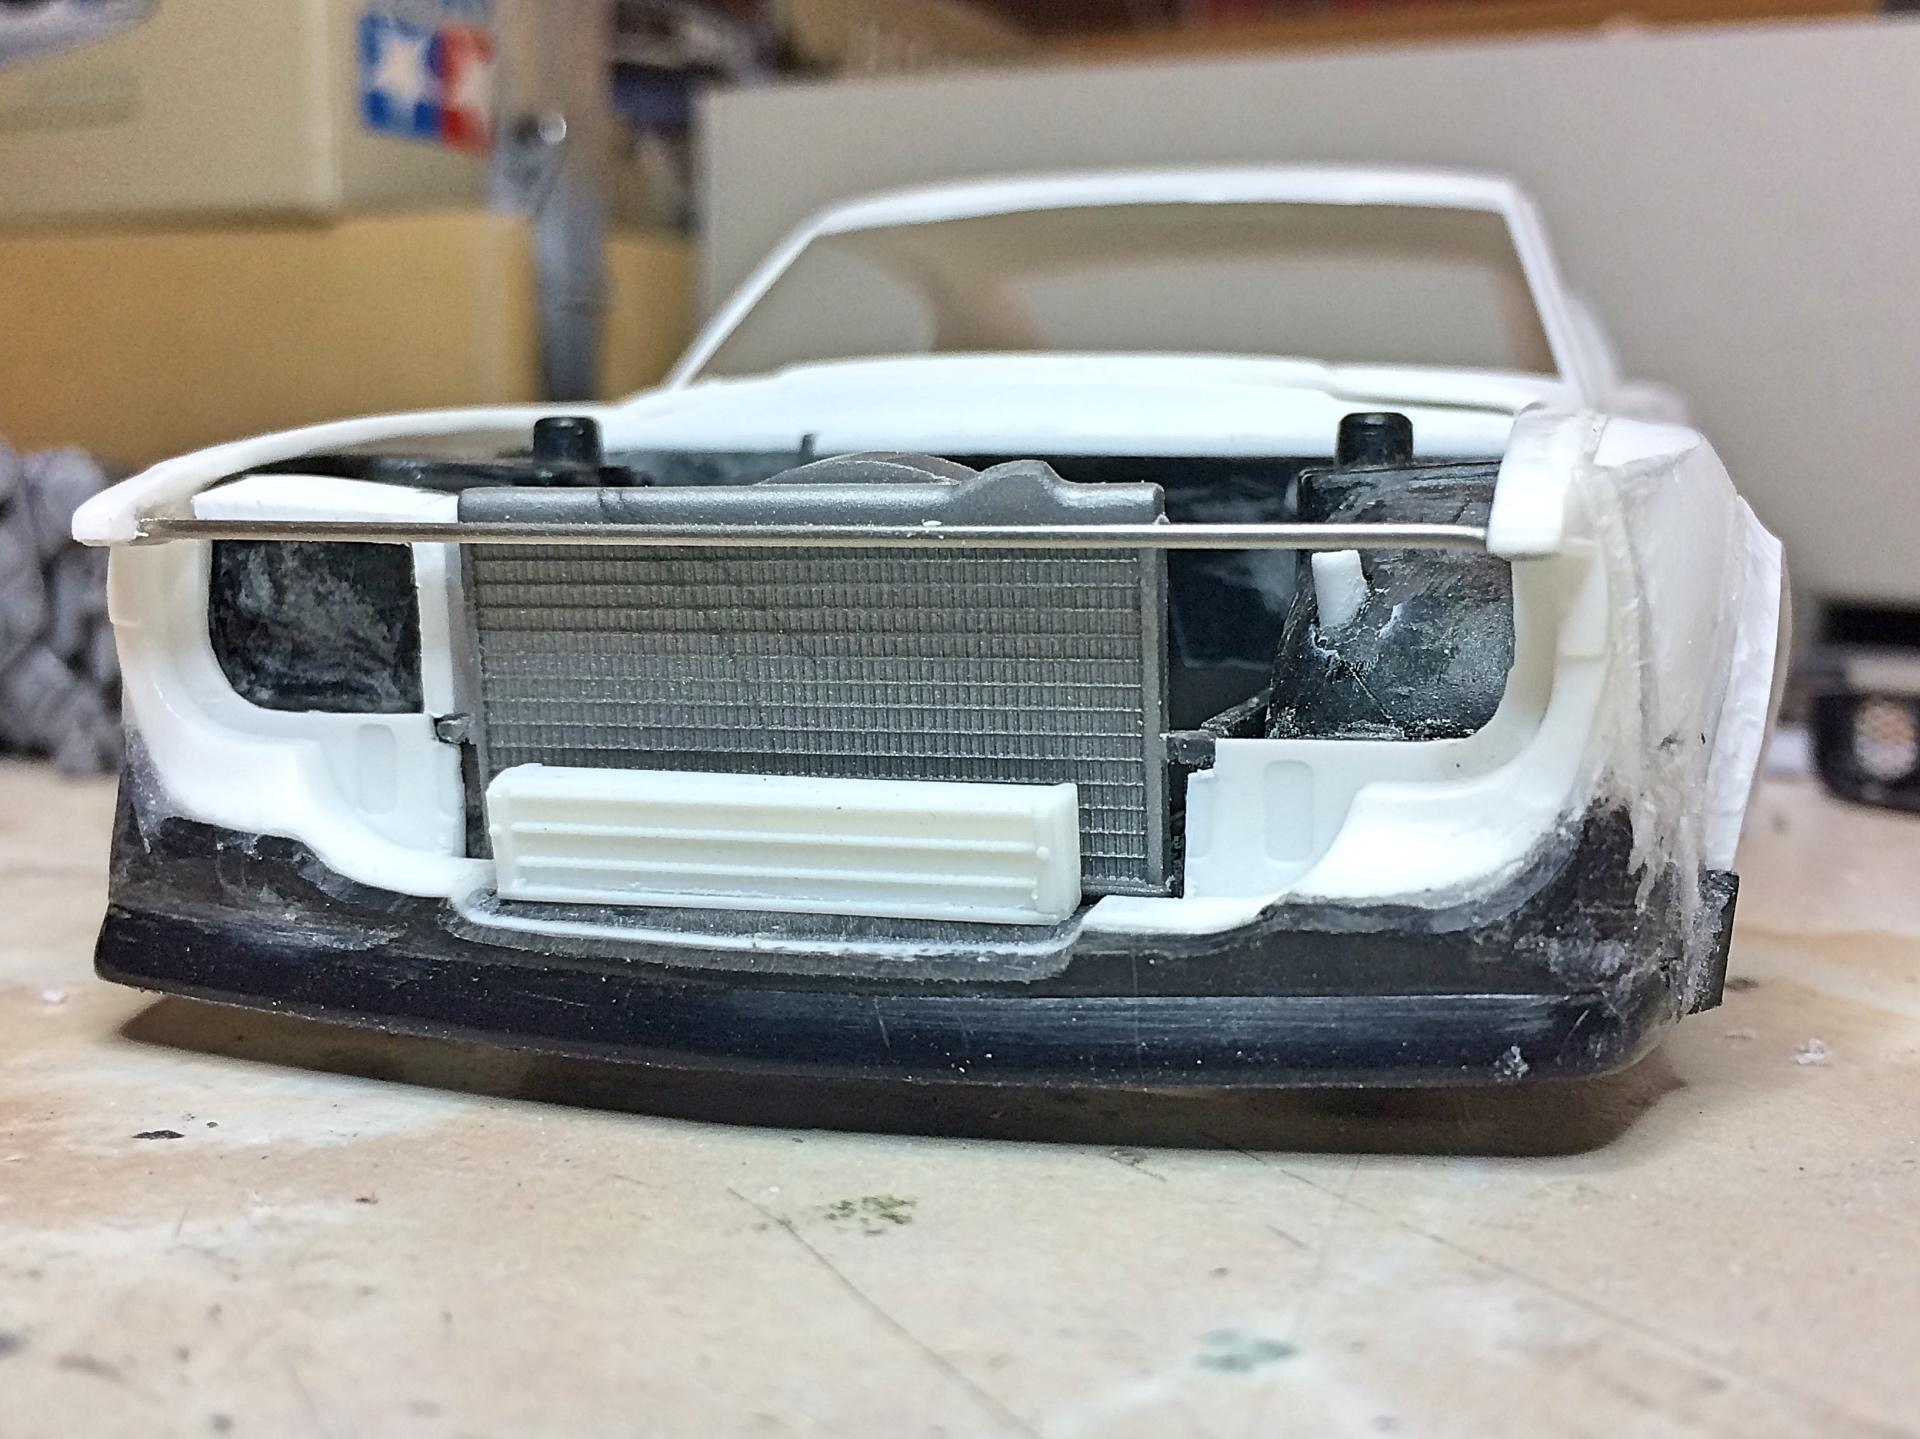
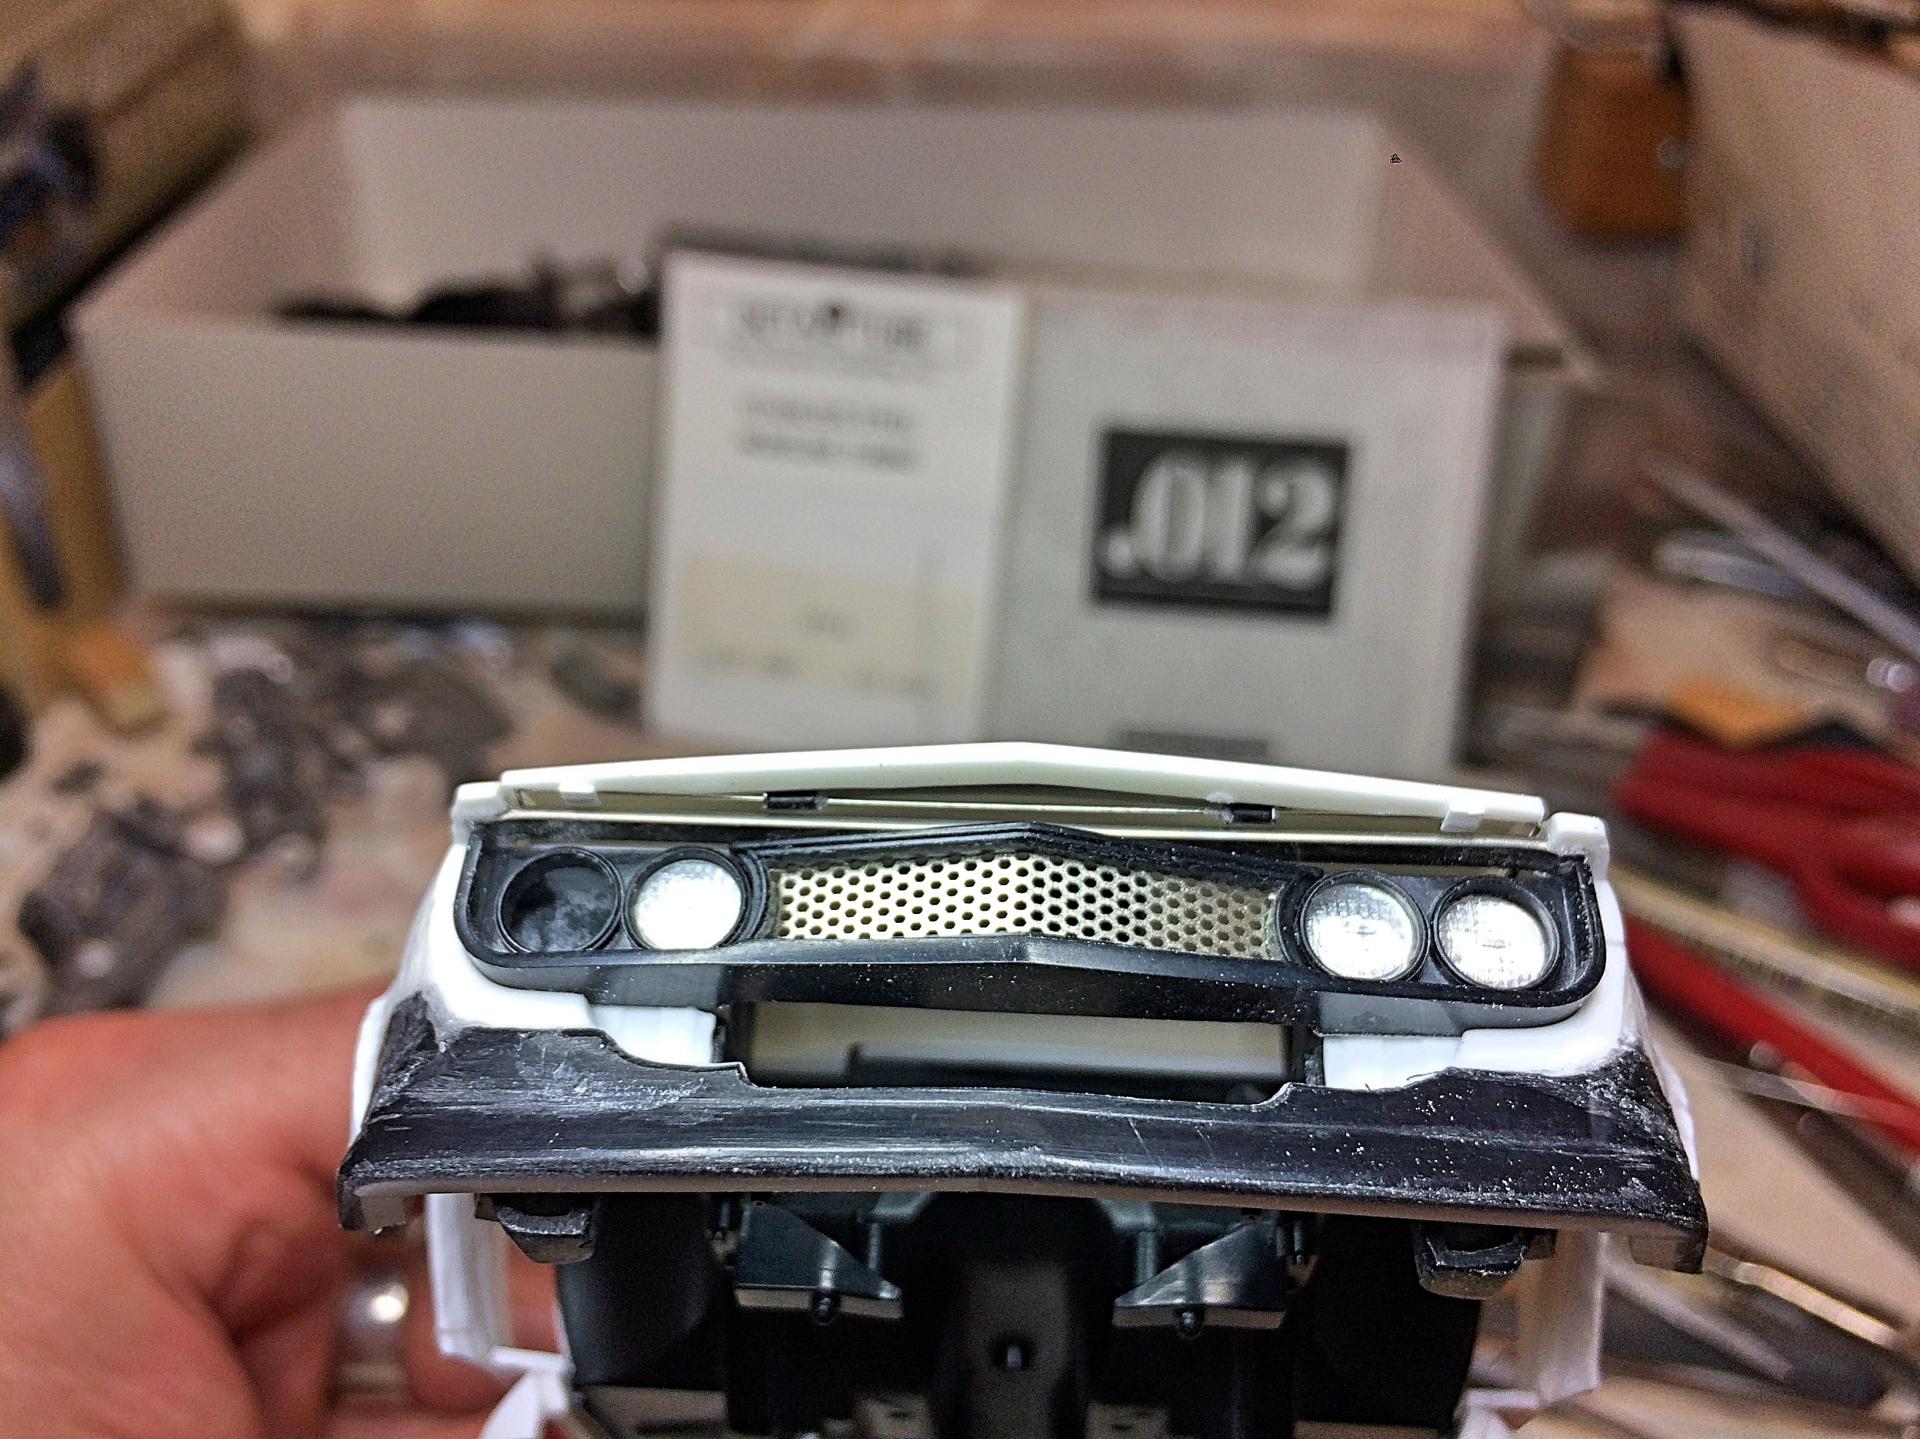
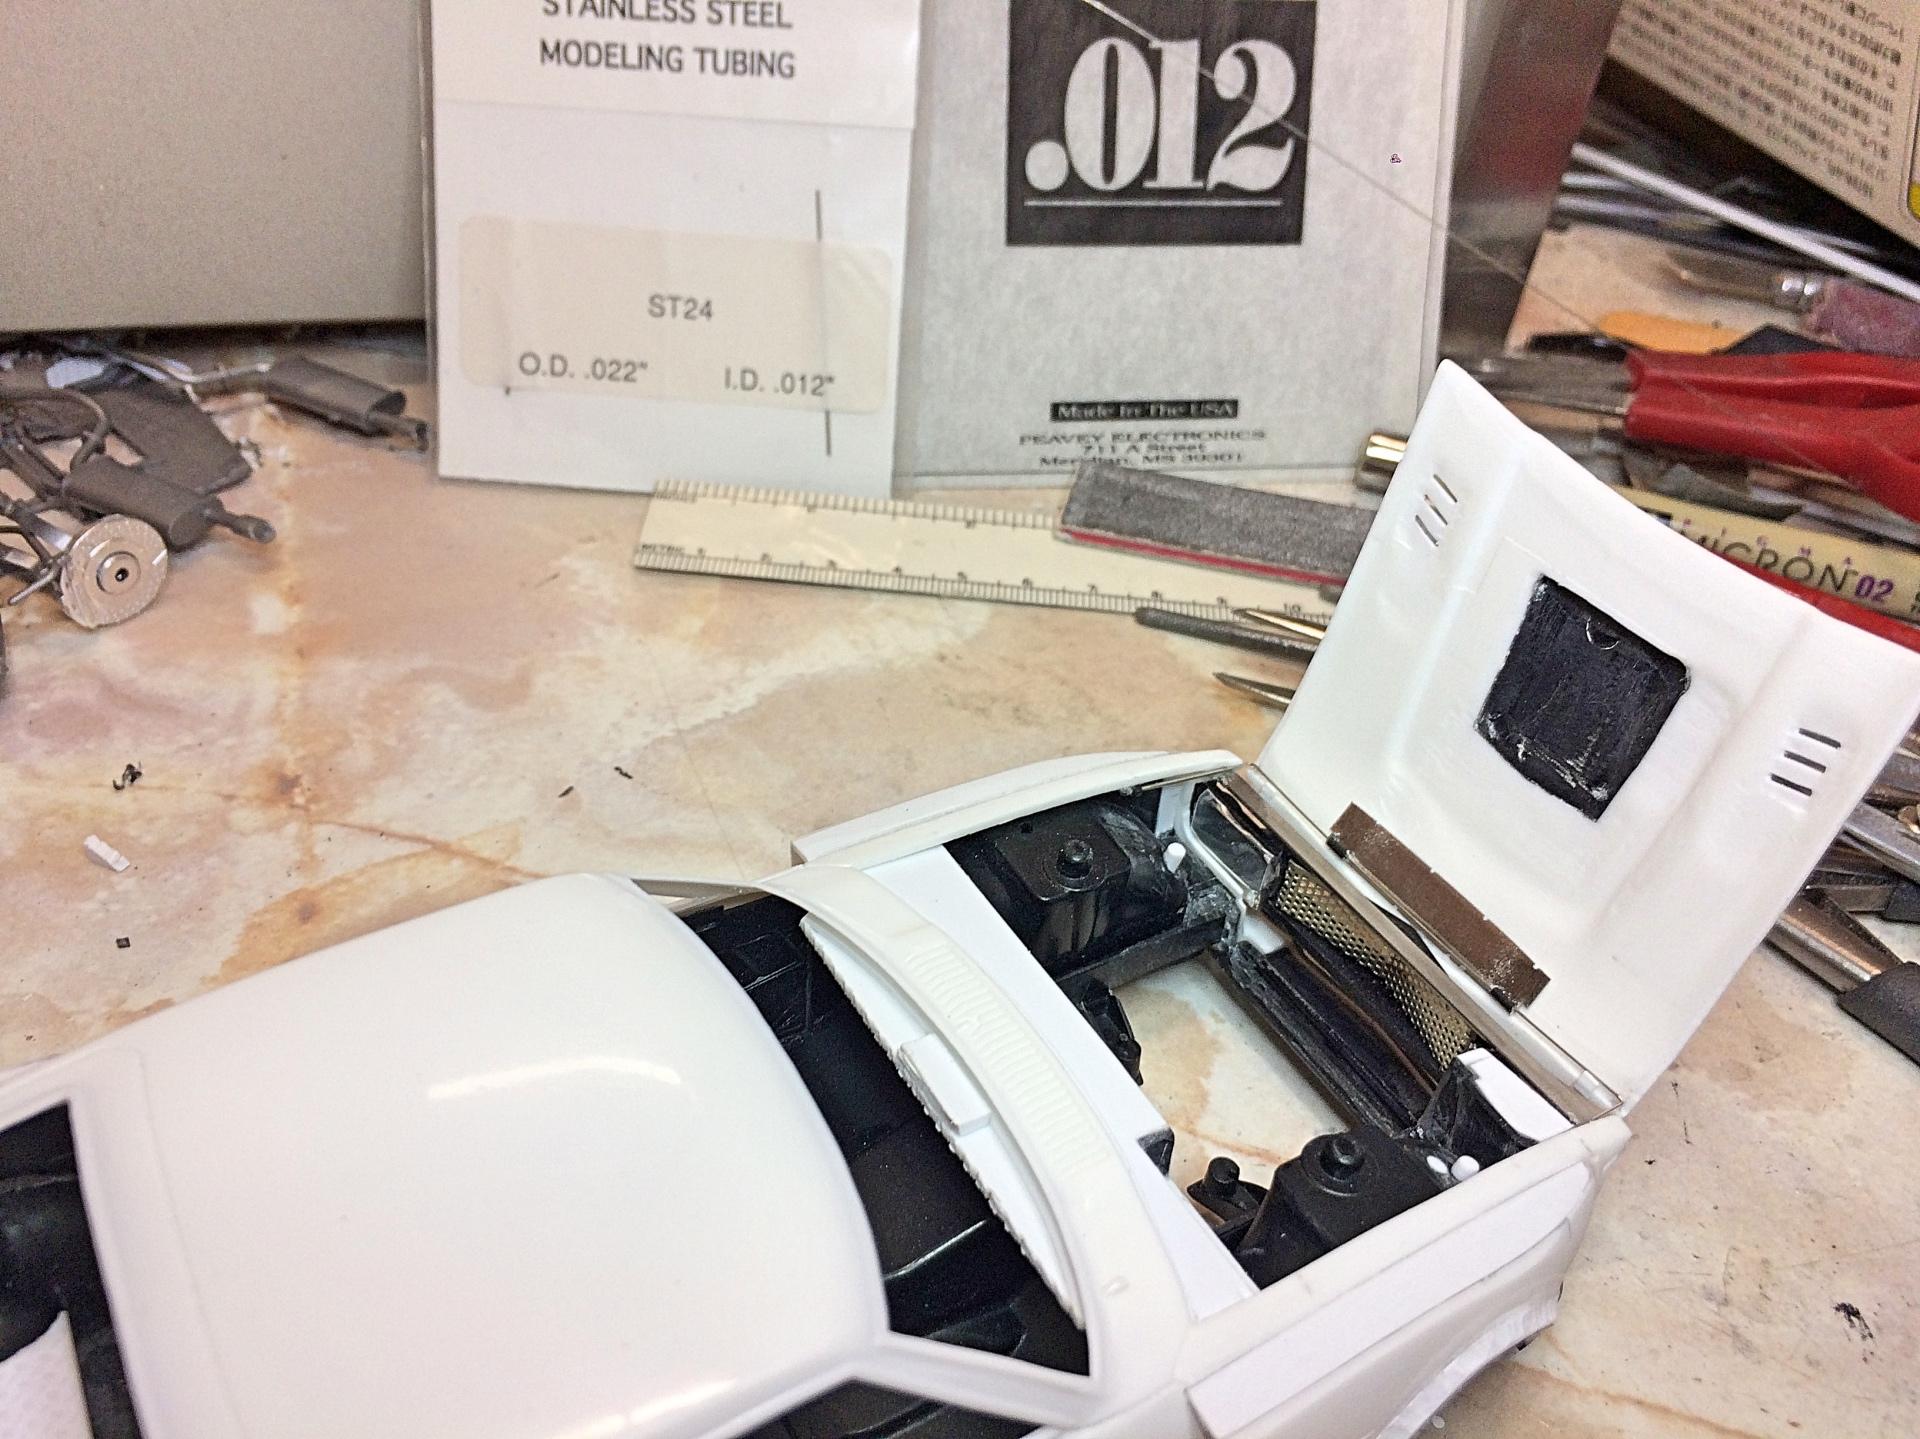
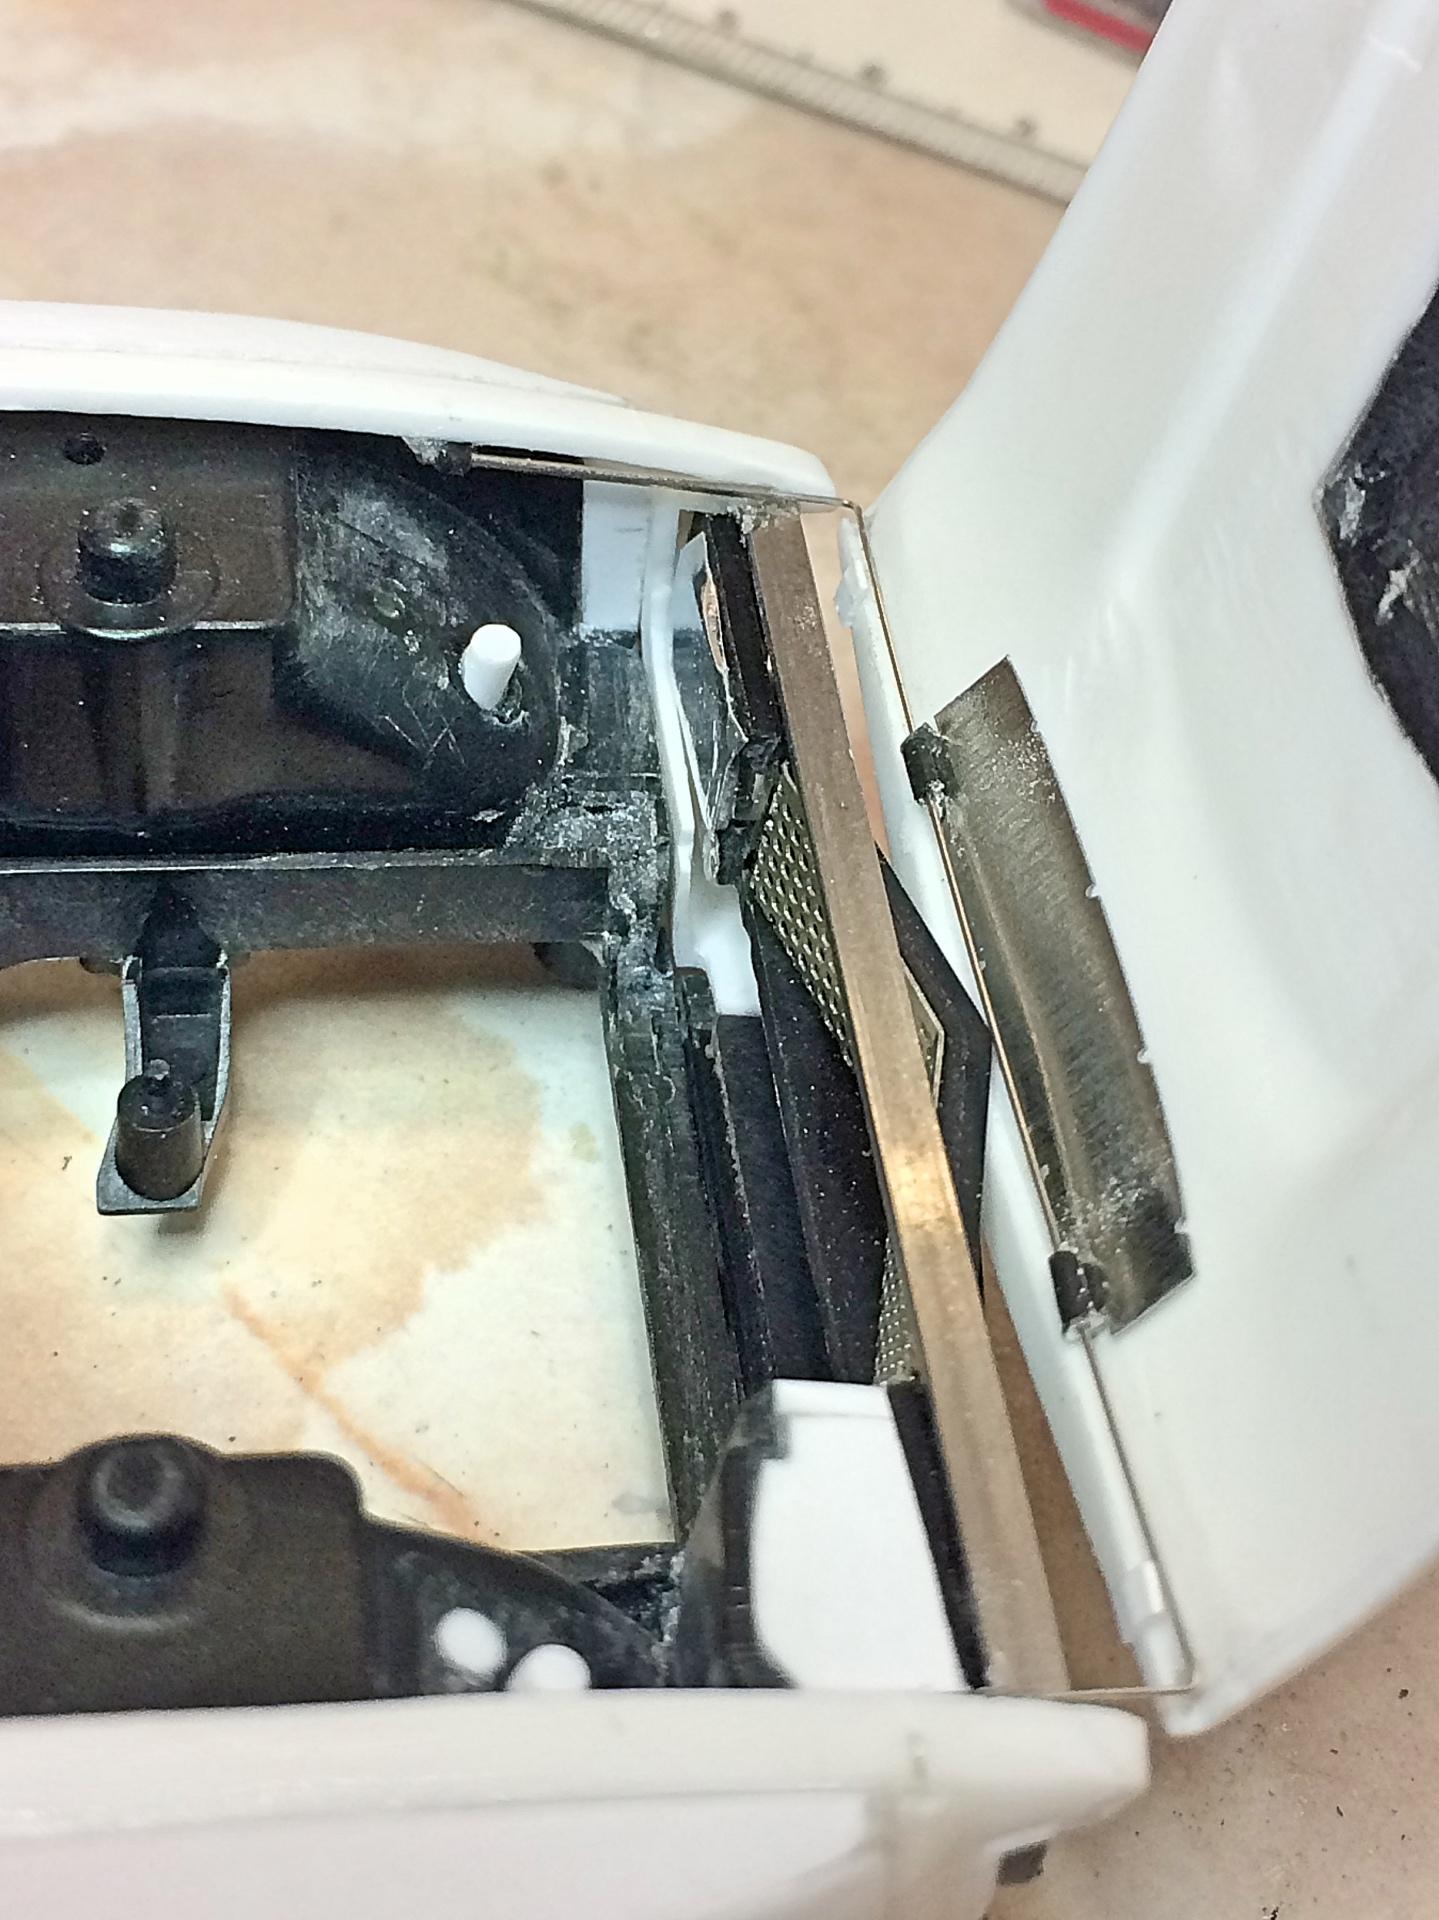
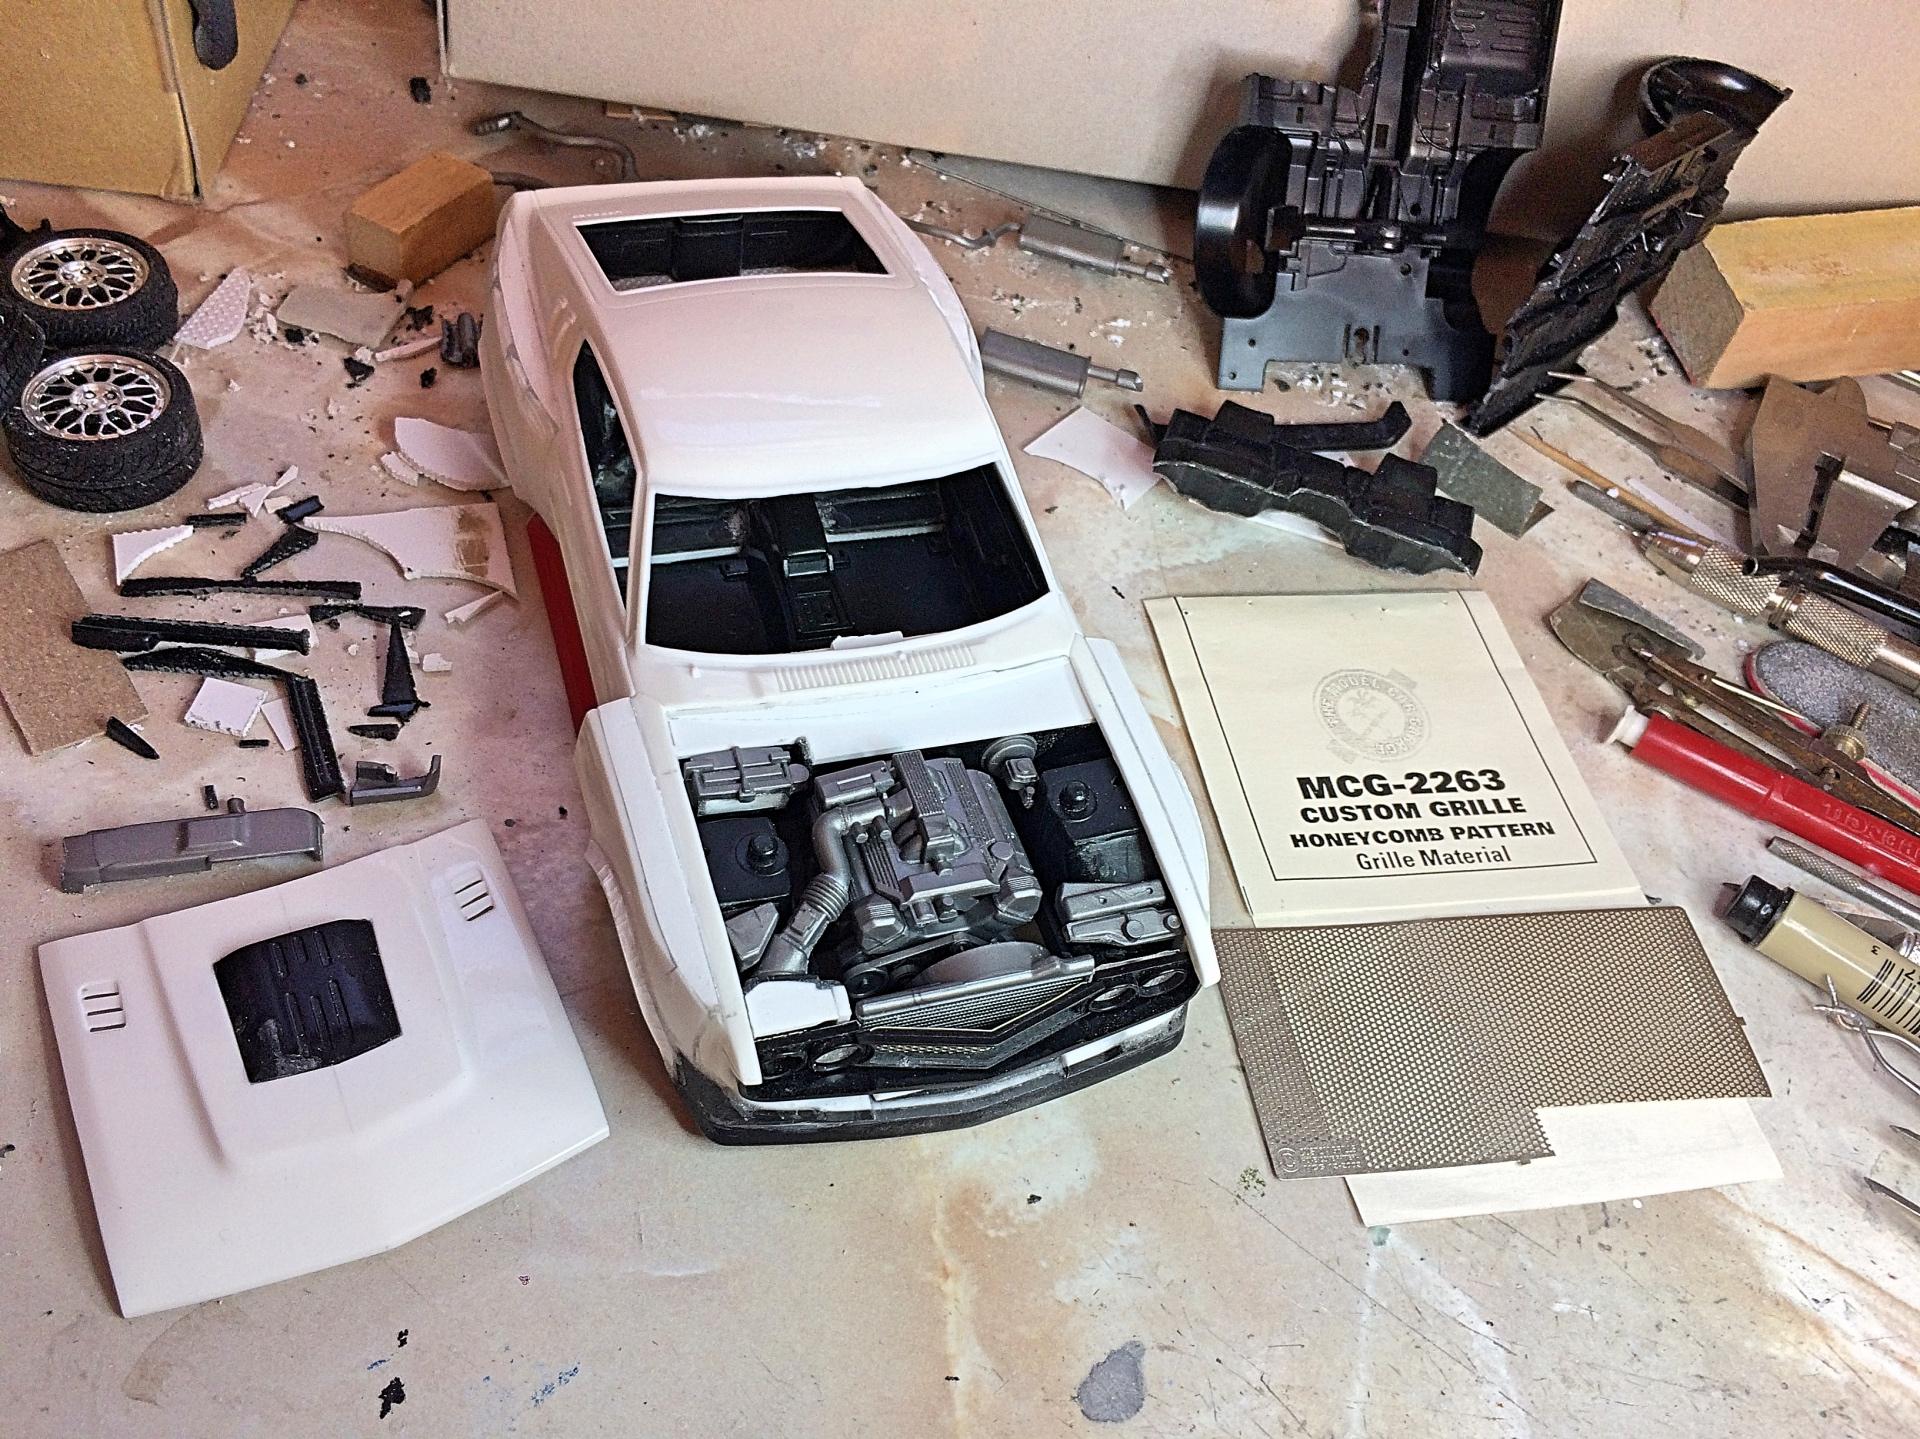
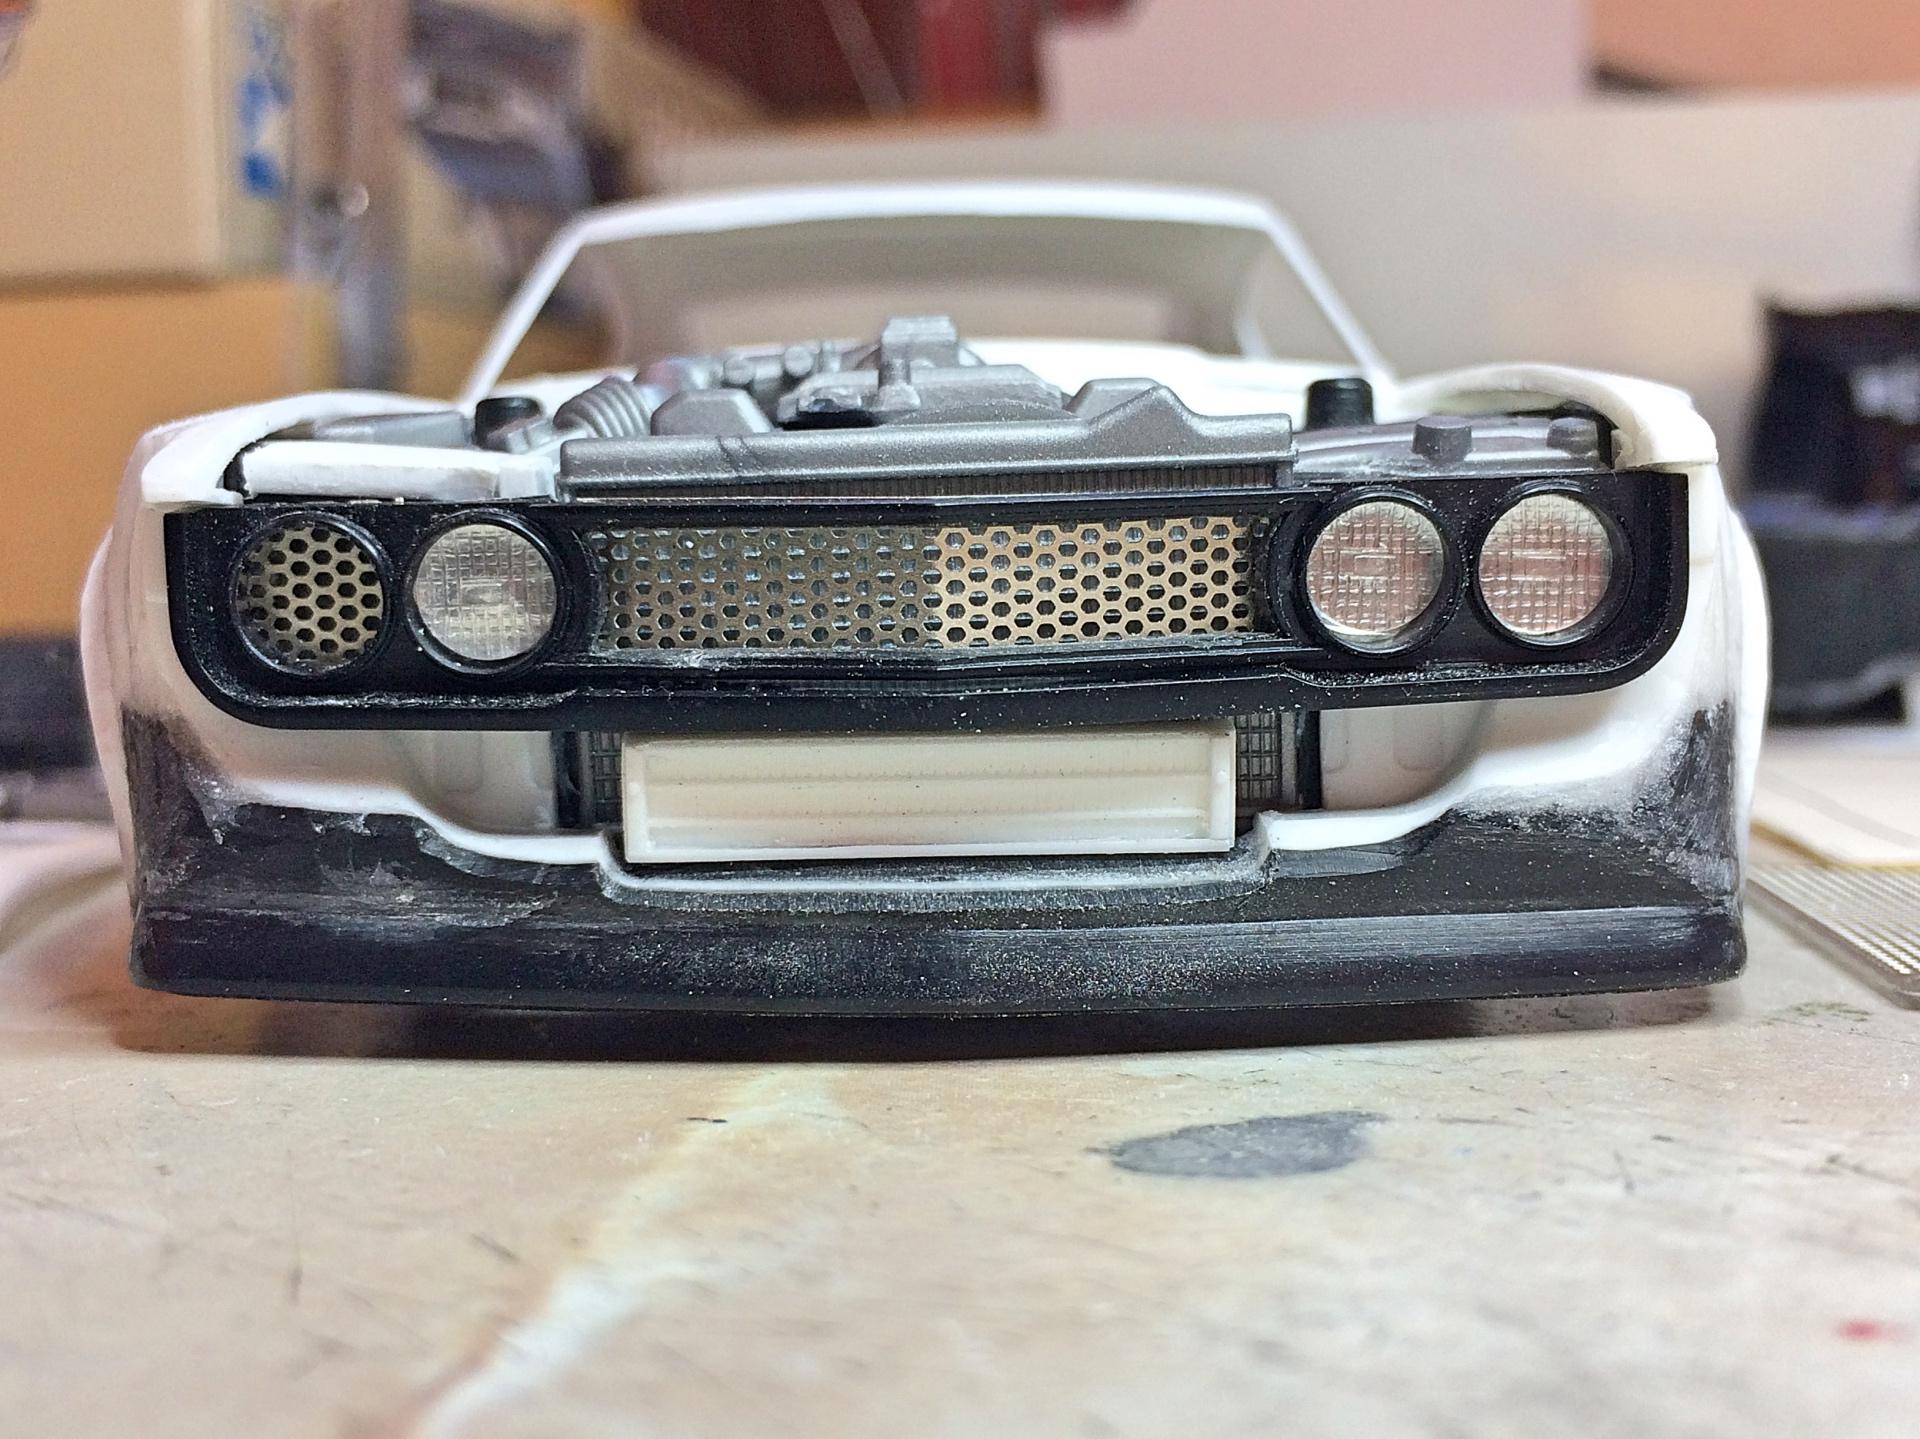
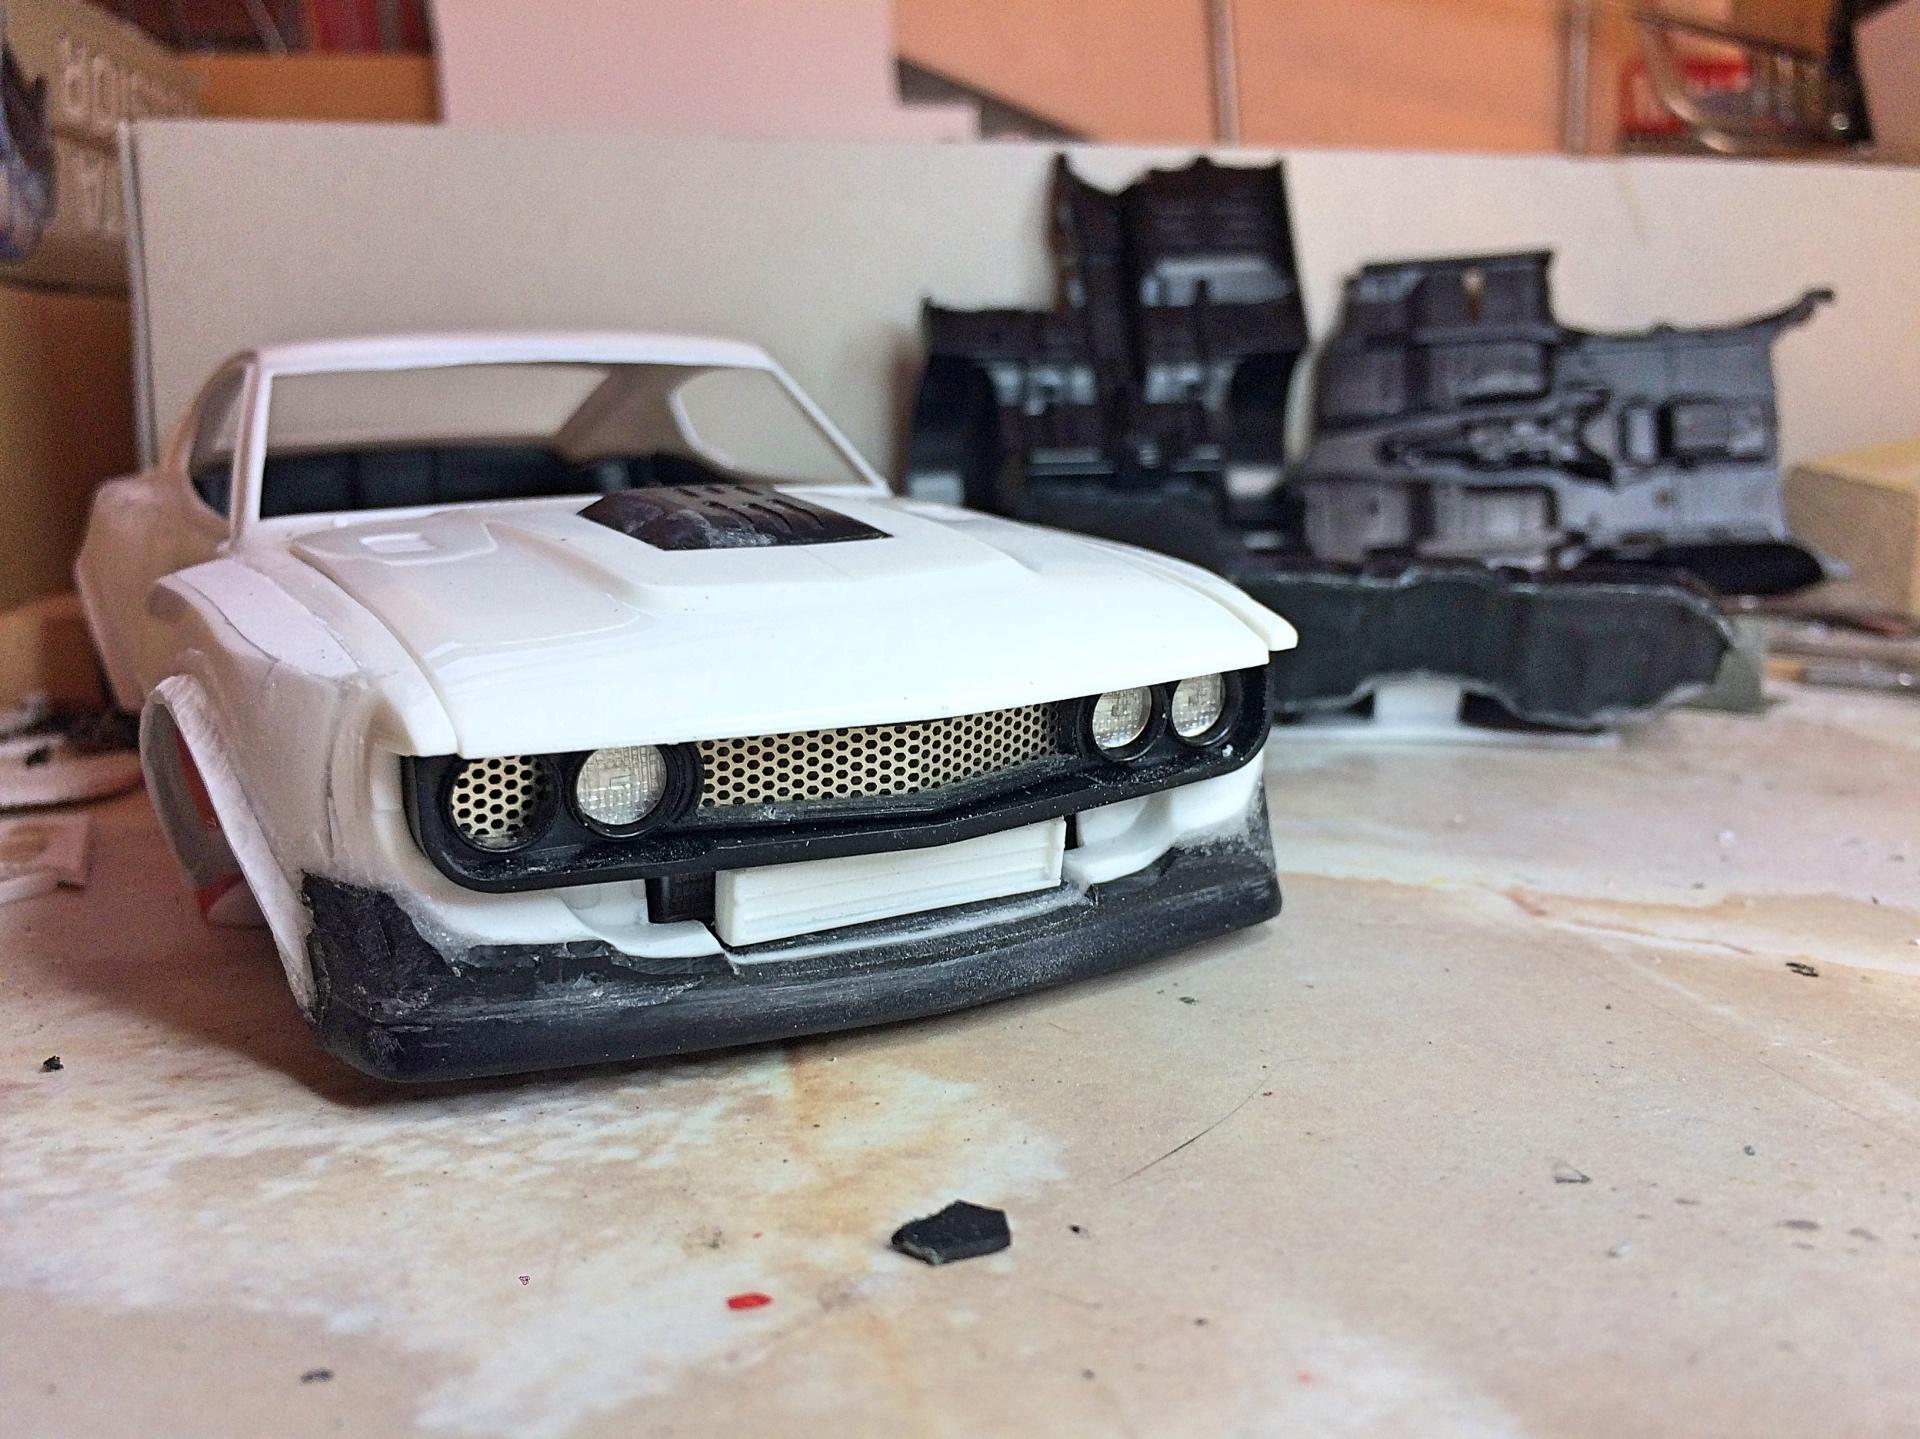
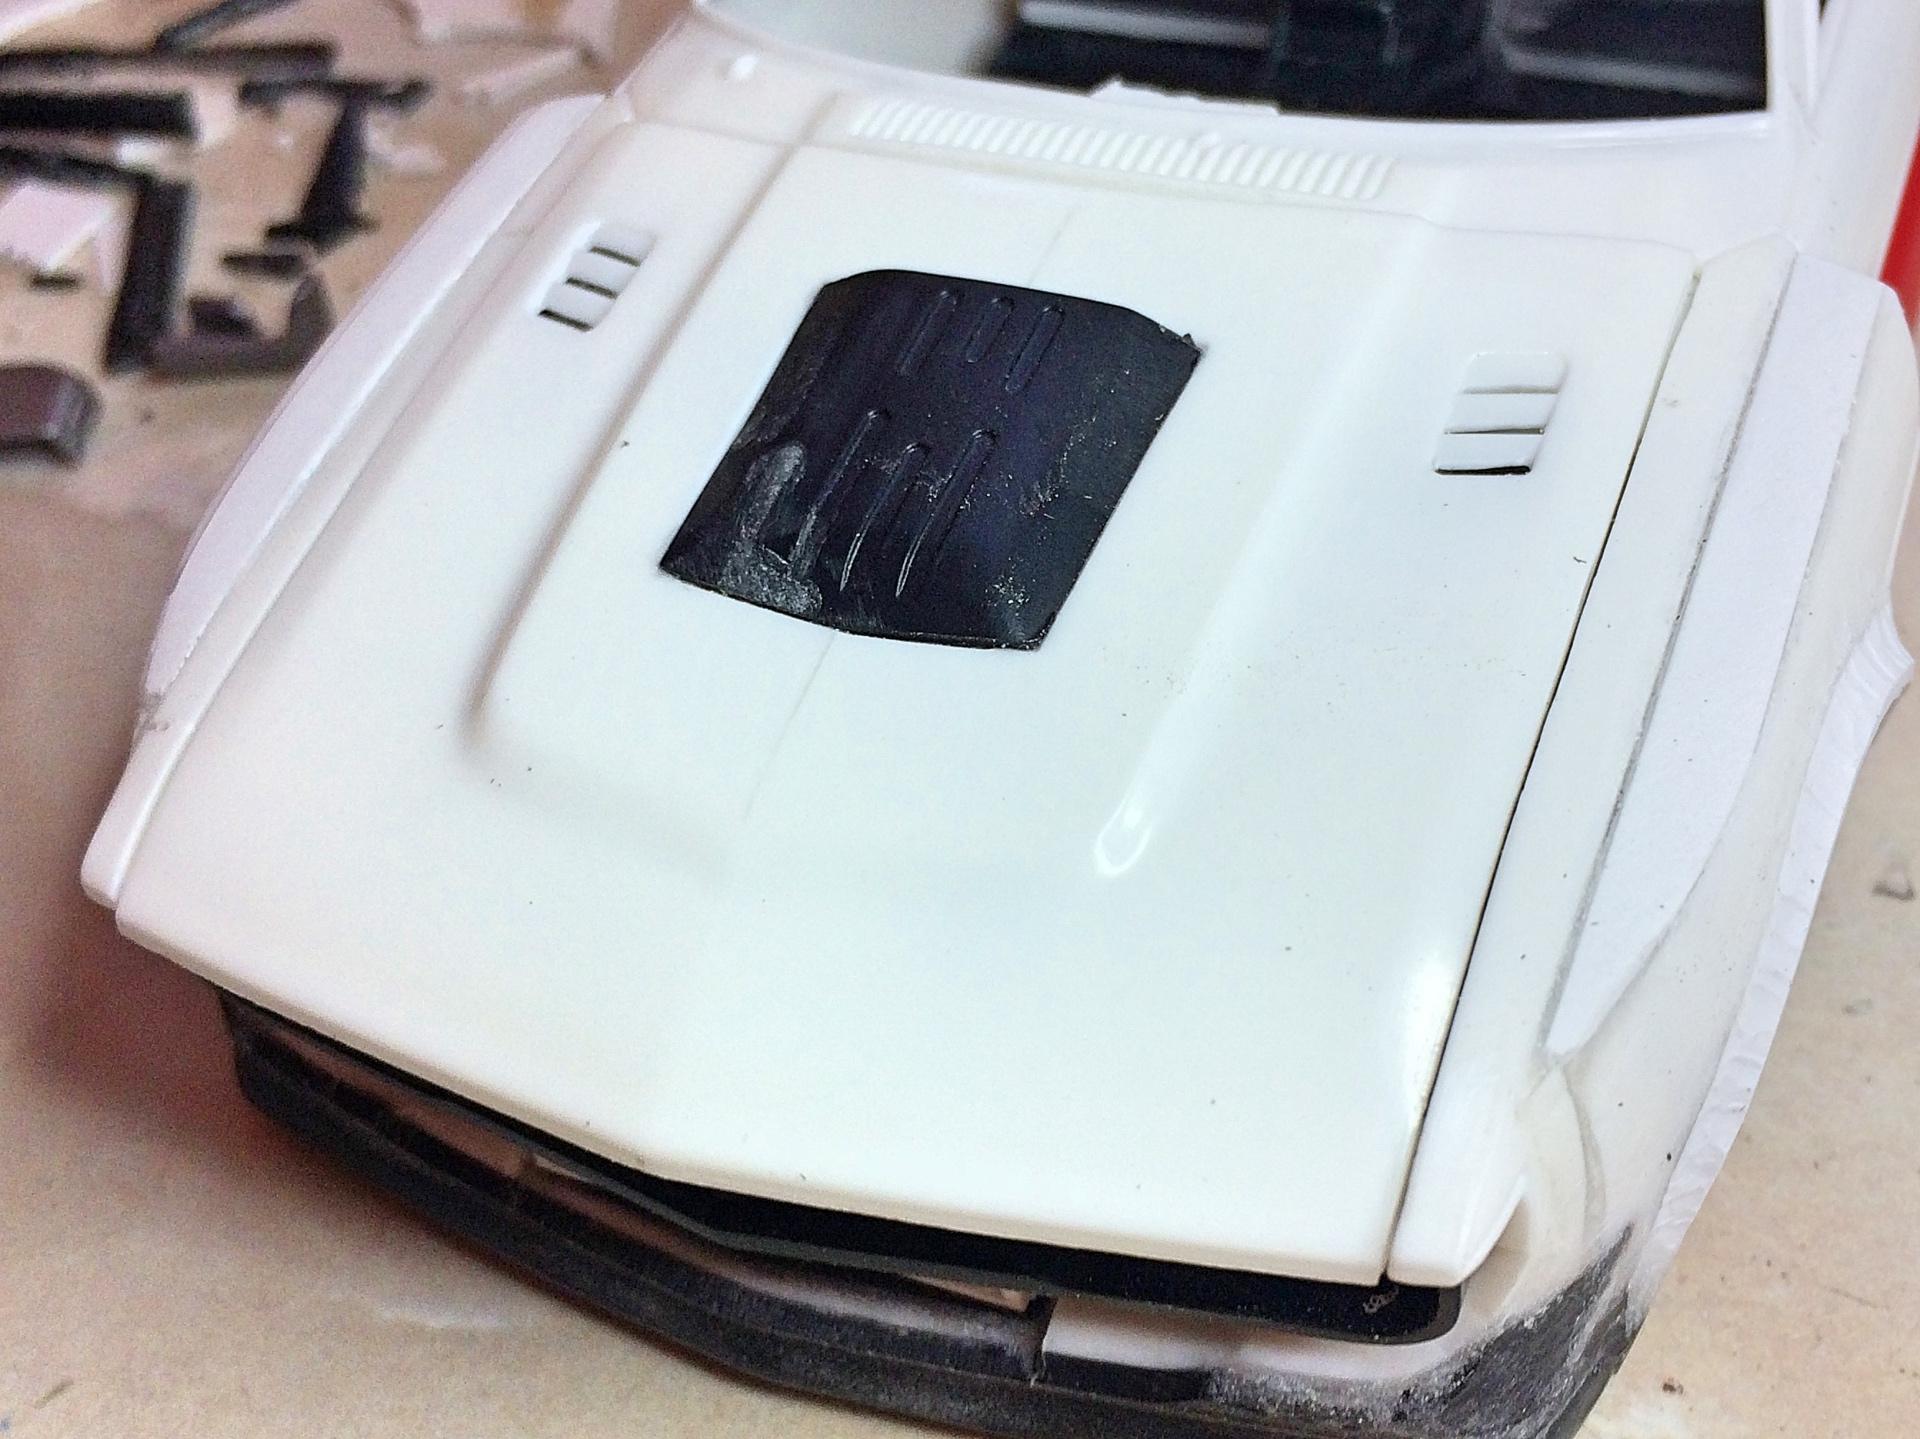
Thanks! It was one of the easiest working things I've done. Finally got to the putty stage, used Squadron. About done wrecking parts to change them too. Found the last bit of copper wire in my clutter collection, need to stop by a construction site that's at the wiring stage. Ditched the last mufflers, you know Lexus was proud of how quiet their cars were (still?), I'm sure it would sound much better without them. Used the Dremel to make pins at the end of the copper wire, drilled into the part, and superglued on. The stainless steel tubing is a little bigger than the wire, wrapped the end with aluminum tape for a tight fit. This is a case of "why didn't I do that the first time?" Wasn't happy with the photo-etch, so tried the bigger size hole of the fabulous Replicas & Miniatures of MD honeycomb, looks 100% better!

-
Thank you. You have both kit instructions ready? Now get scissors out, cut out step 2 from Celica and stick the upper half on the Celsior step 6, now go back to step 5 lower left, and stick on step 9 top and bottom, then go back ...... ? I only looked at the Celsior for assembling the chassis, and that's when I put them aside. I drew all over those instructions, but have changed my mind a few times. And thank you.
-
ending with "day".
-
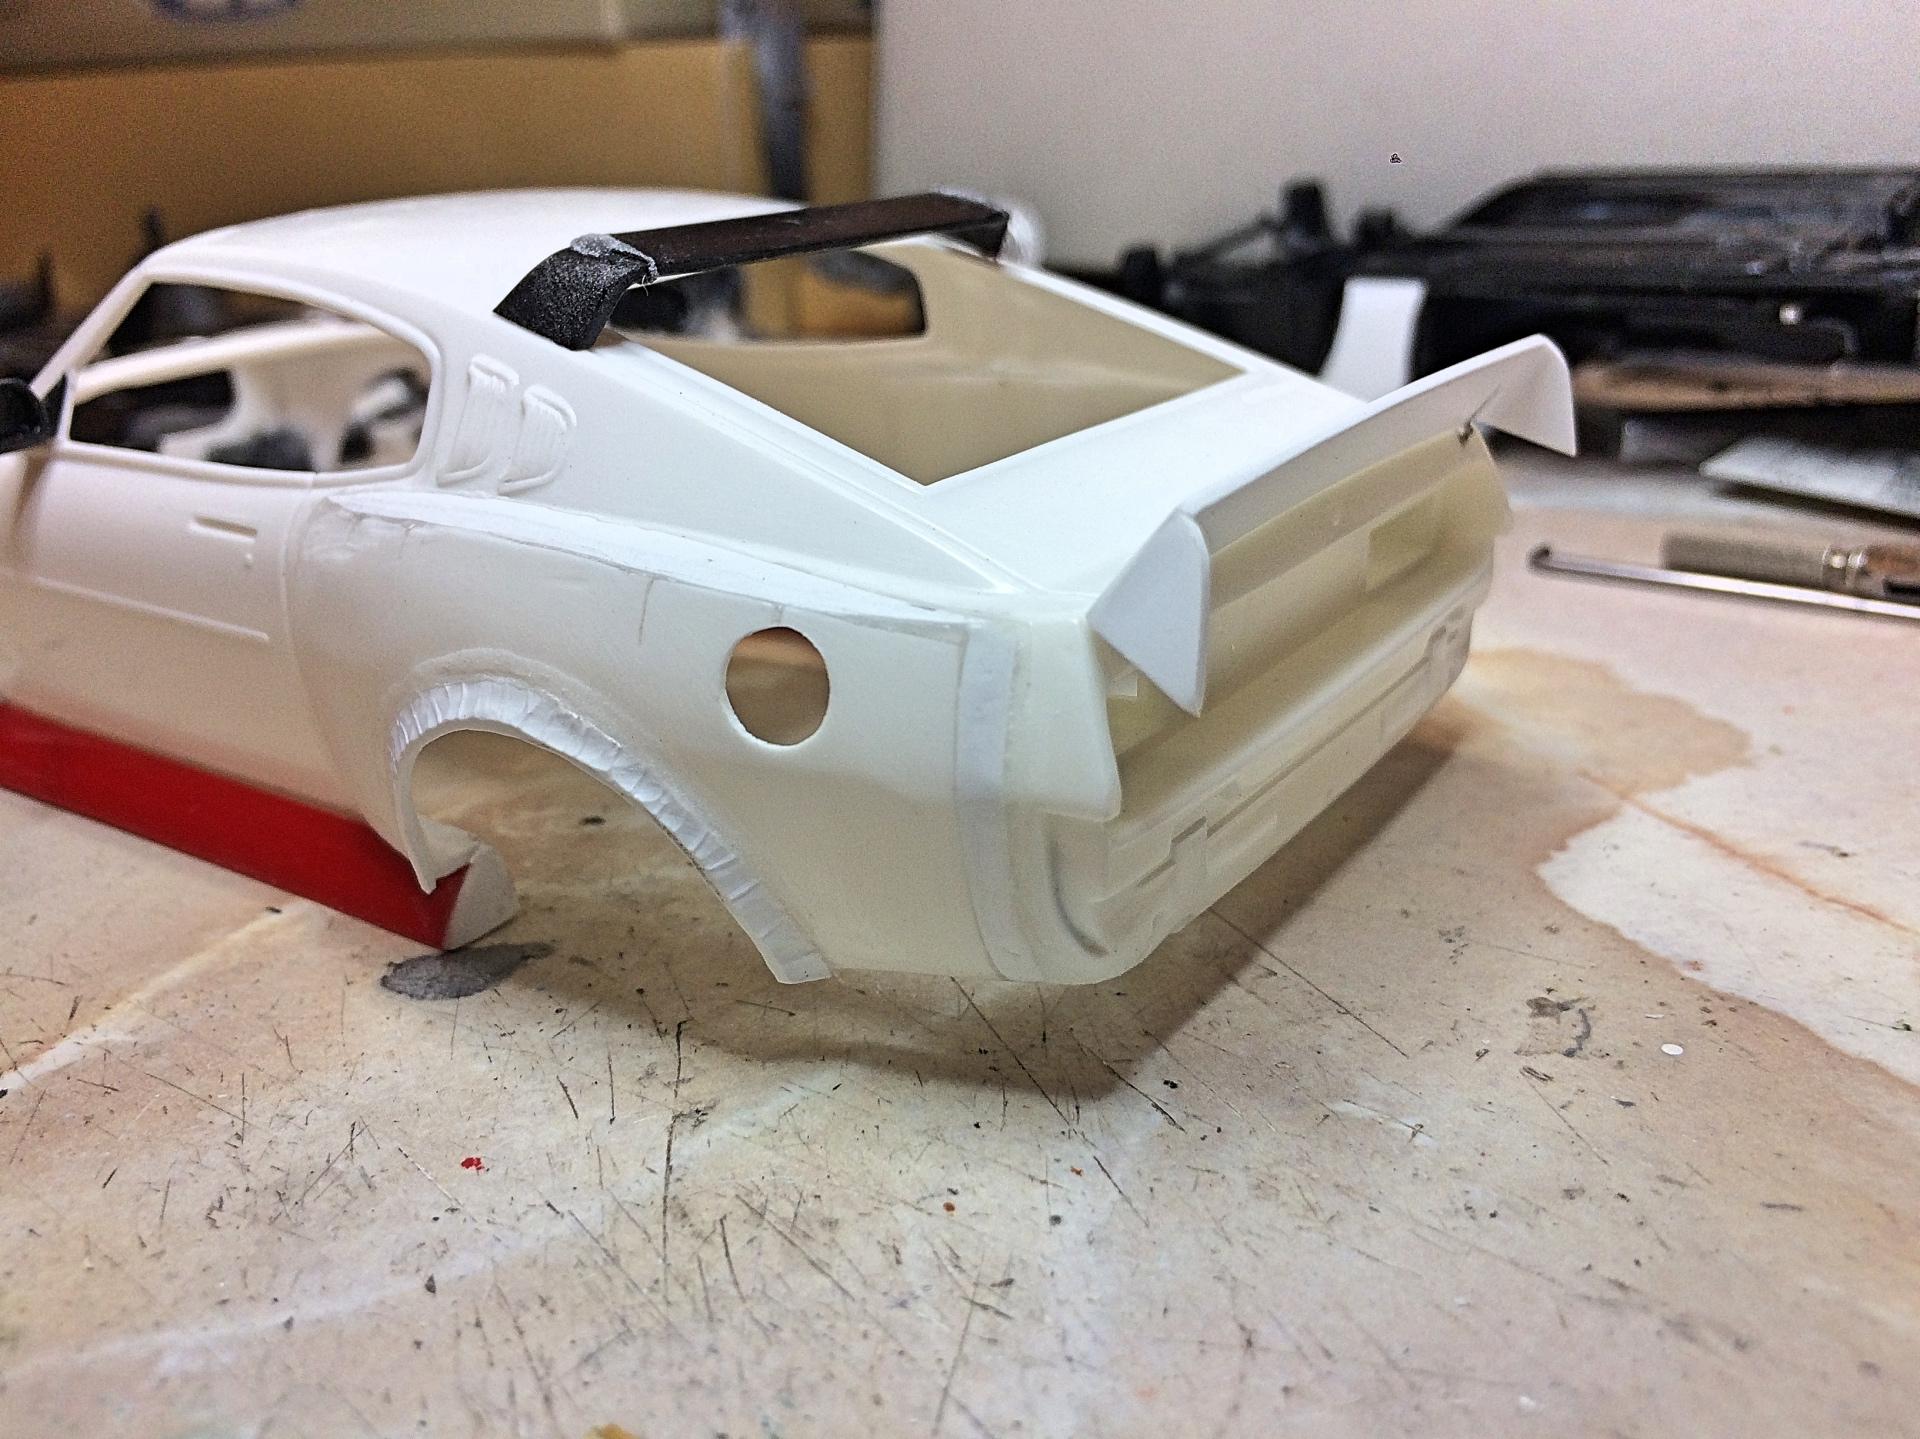
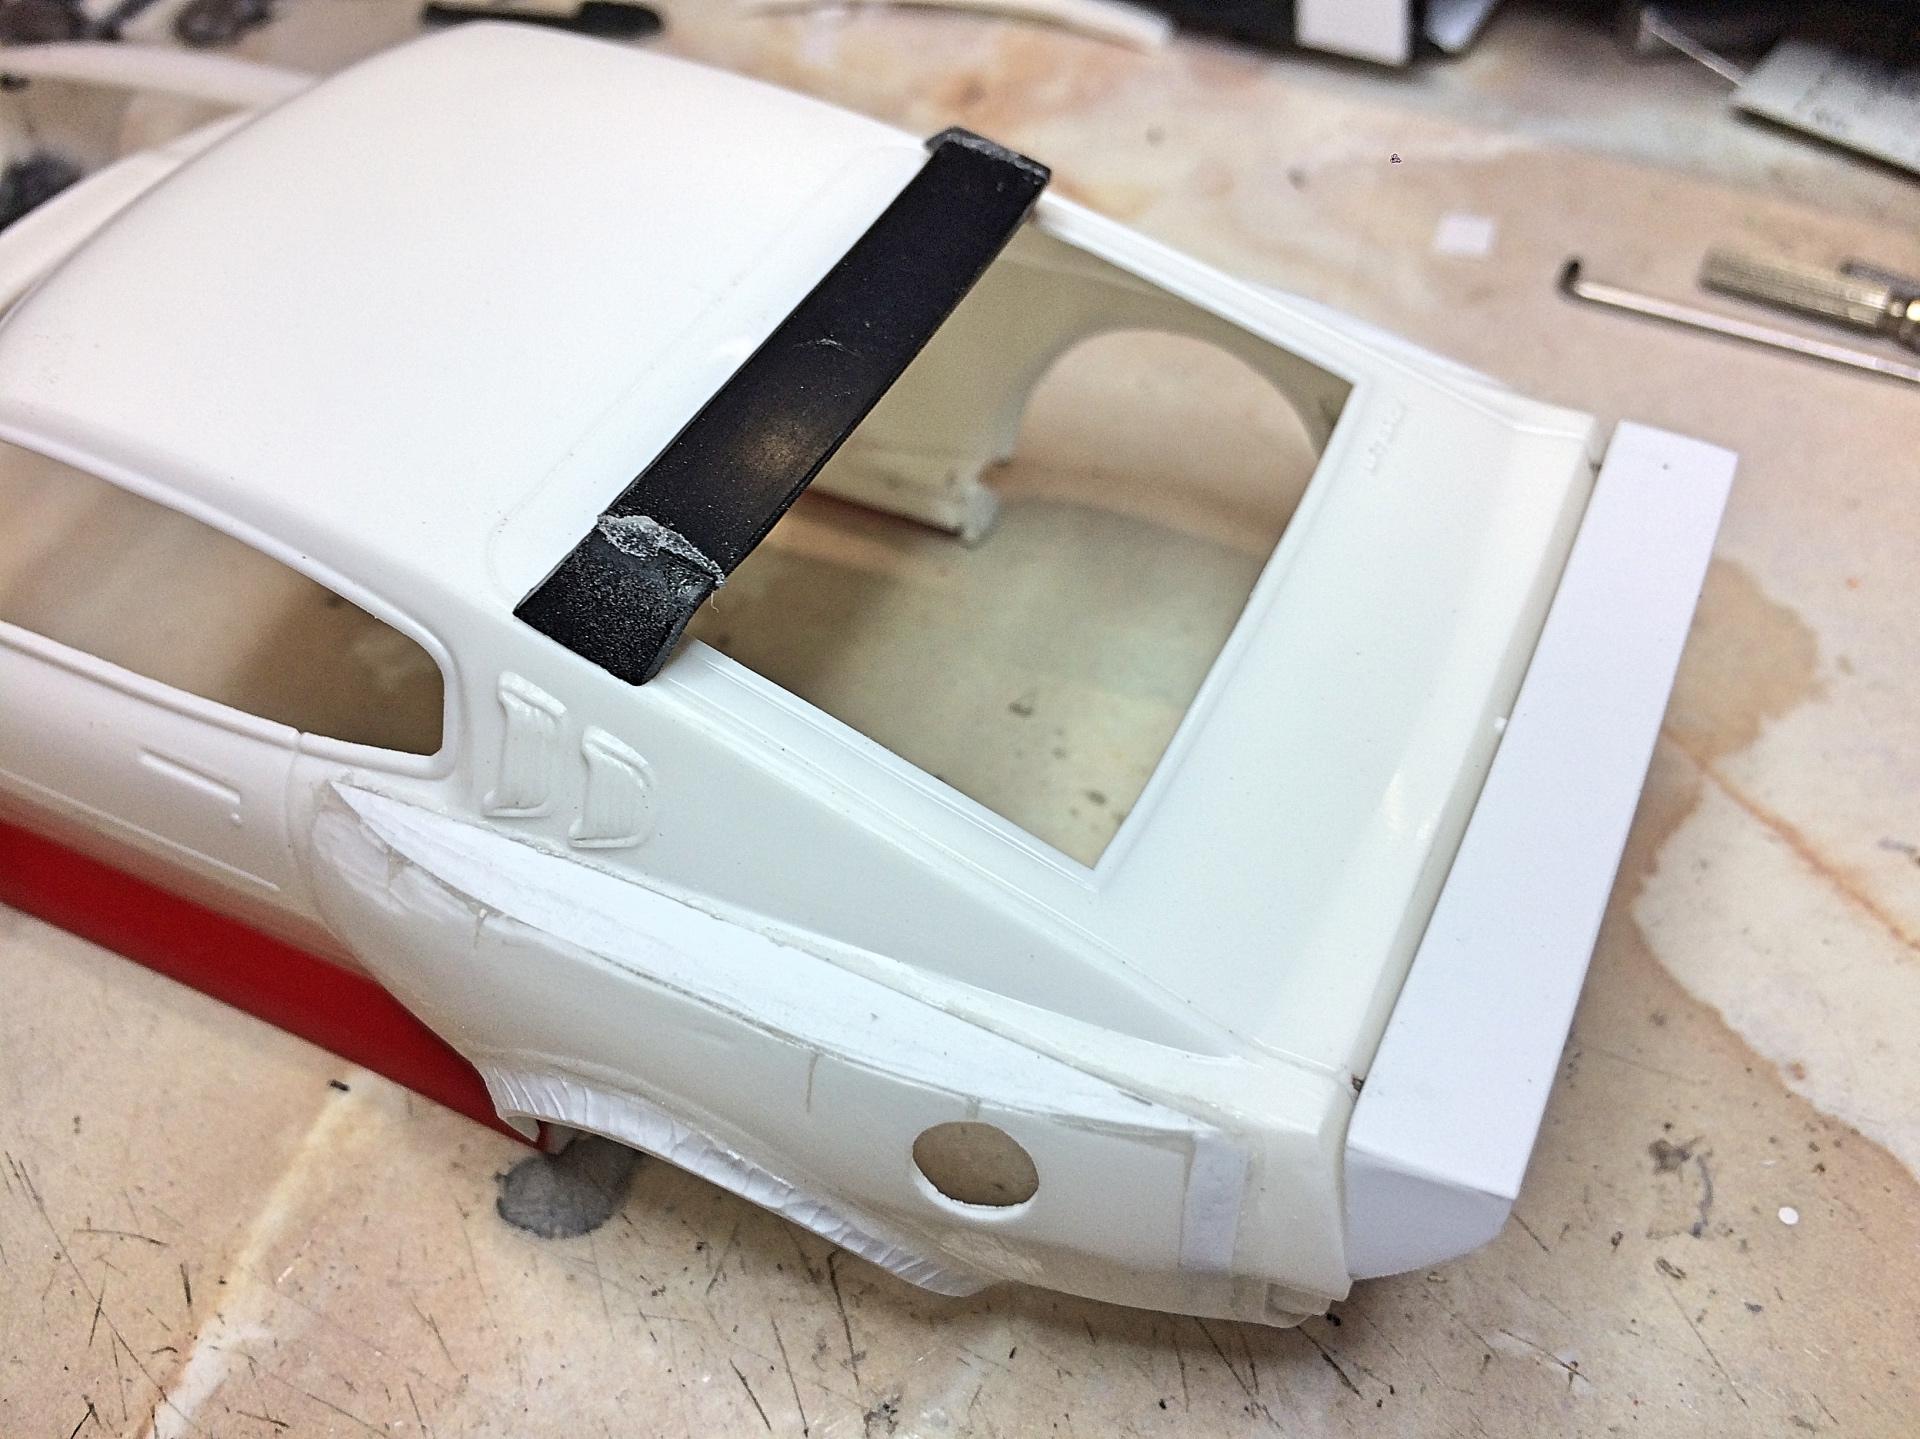
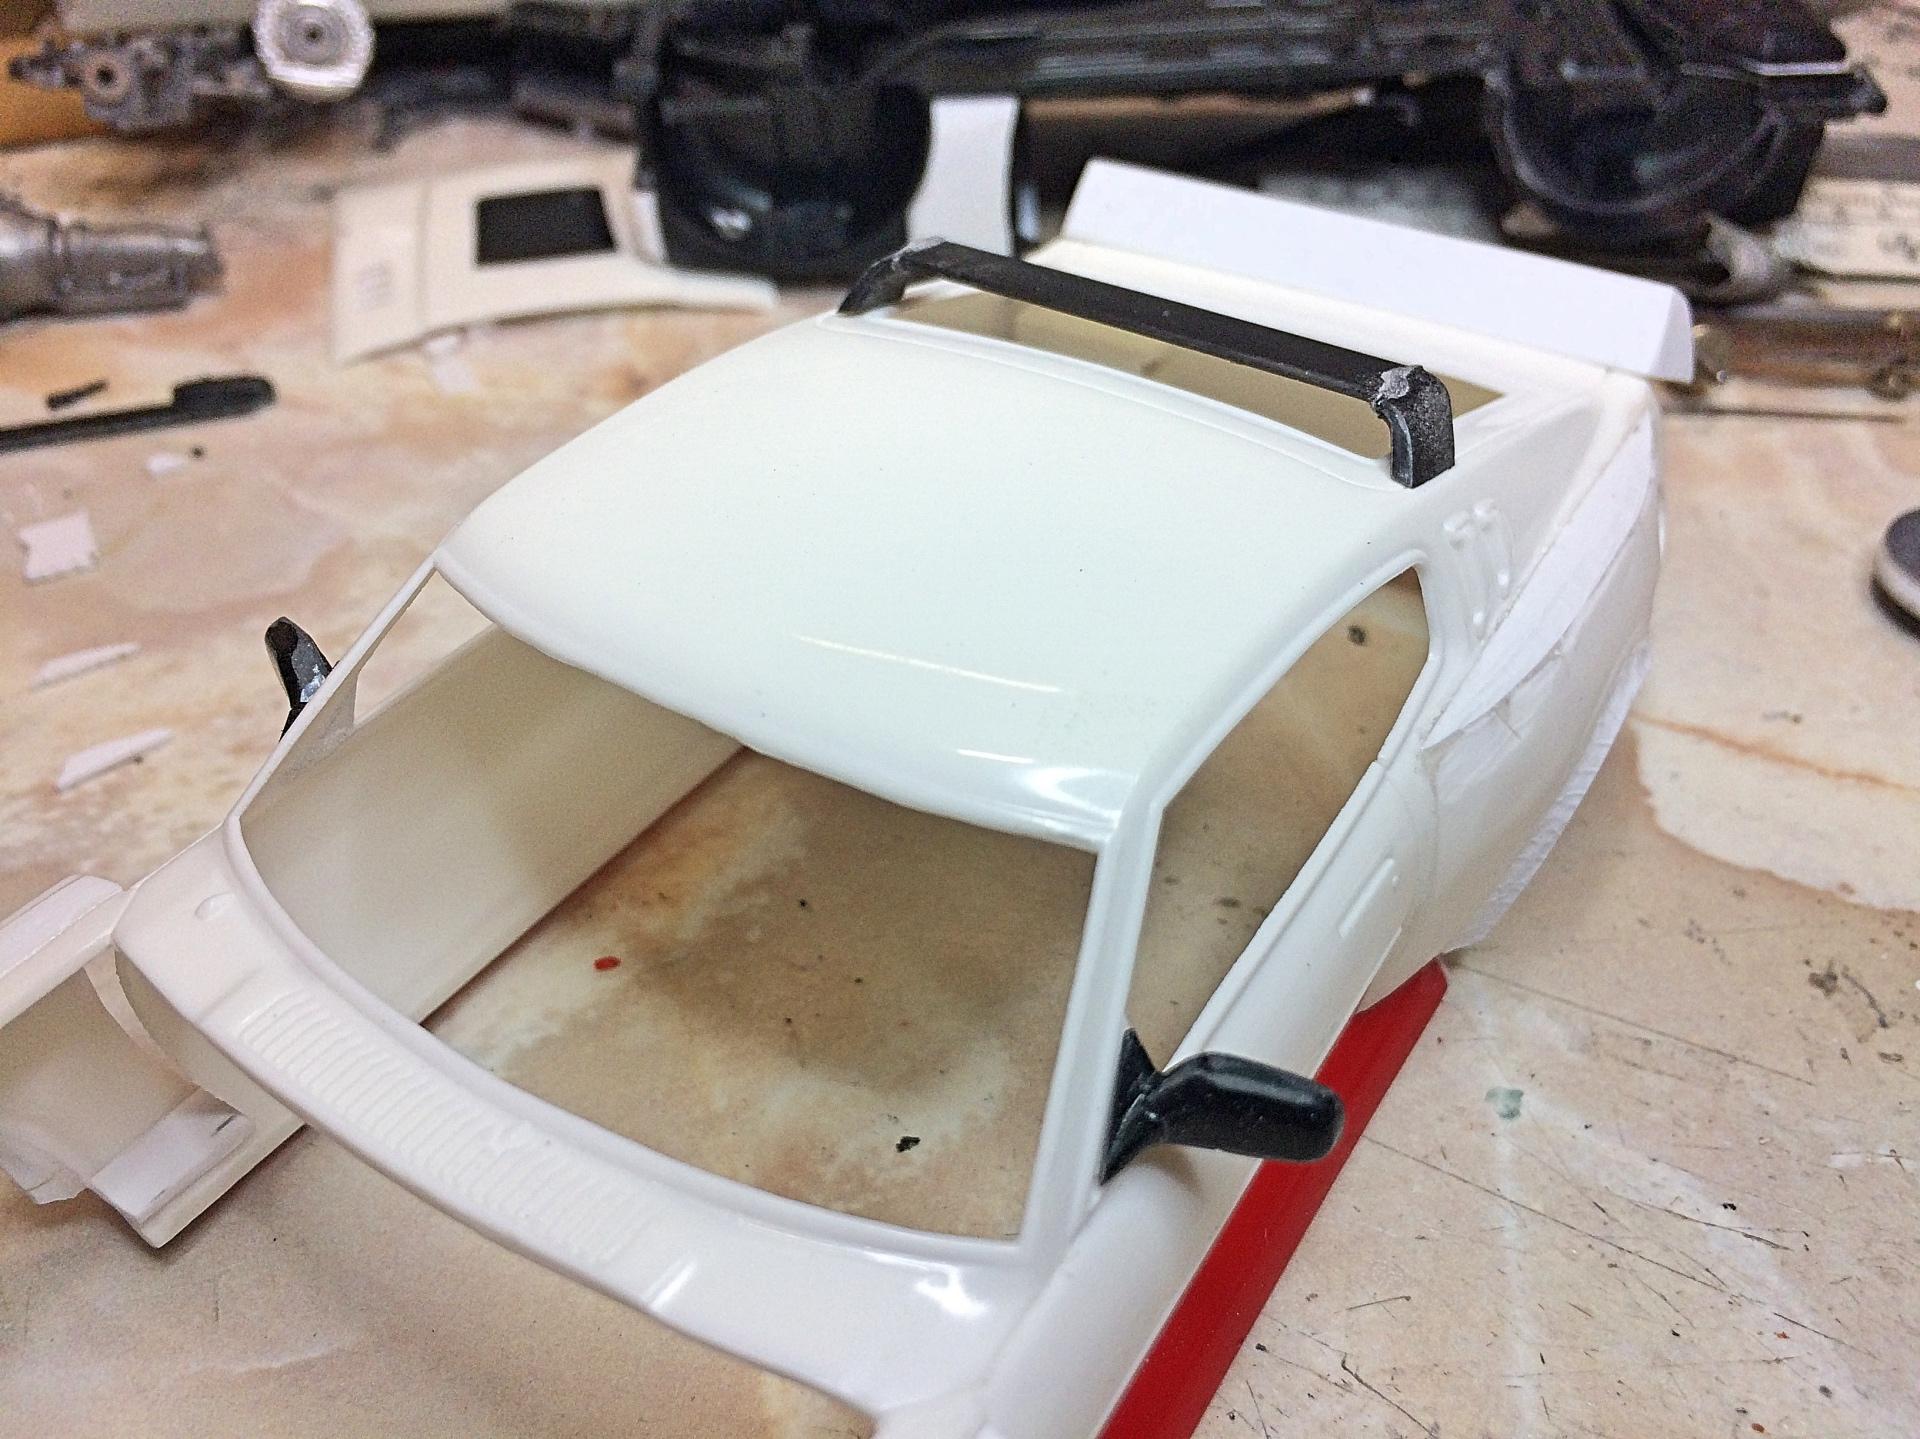
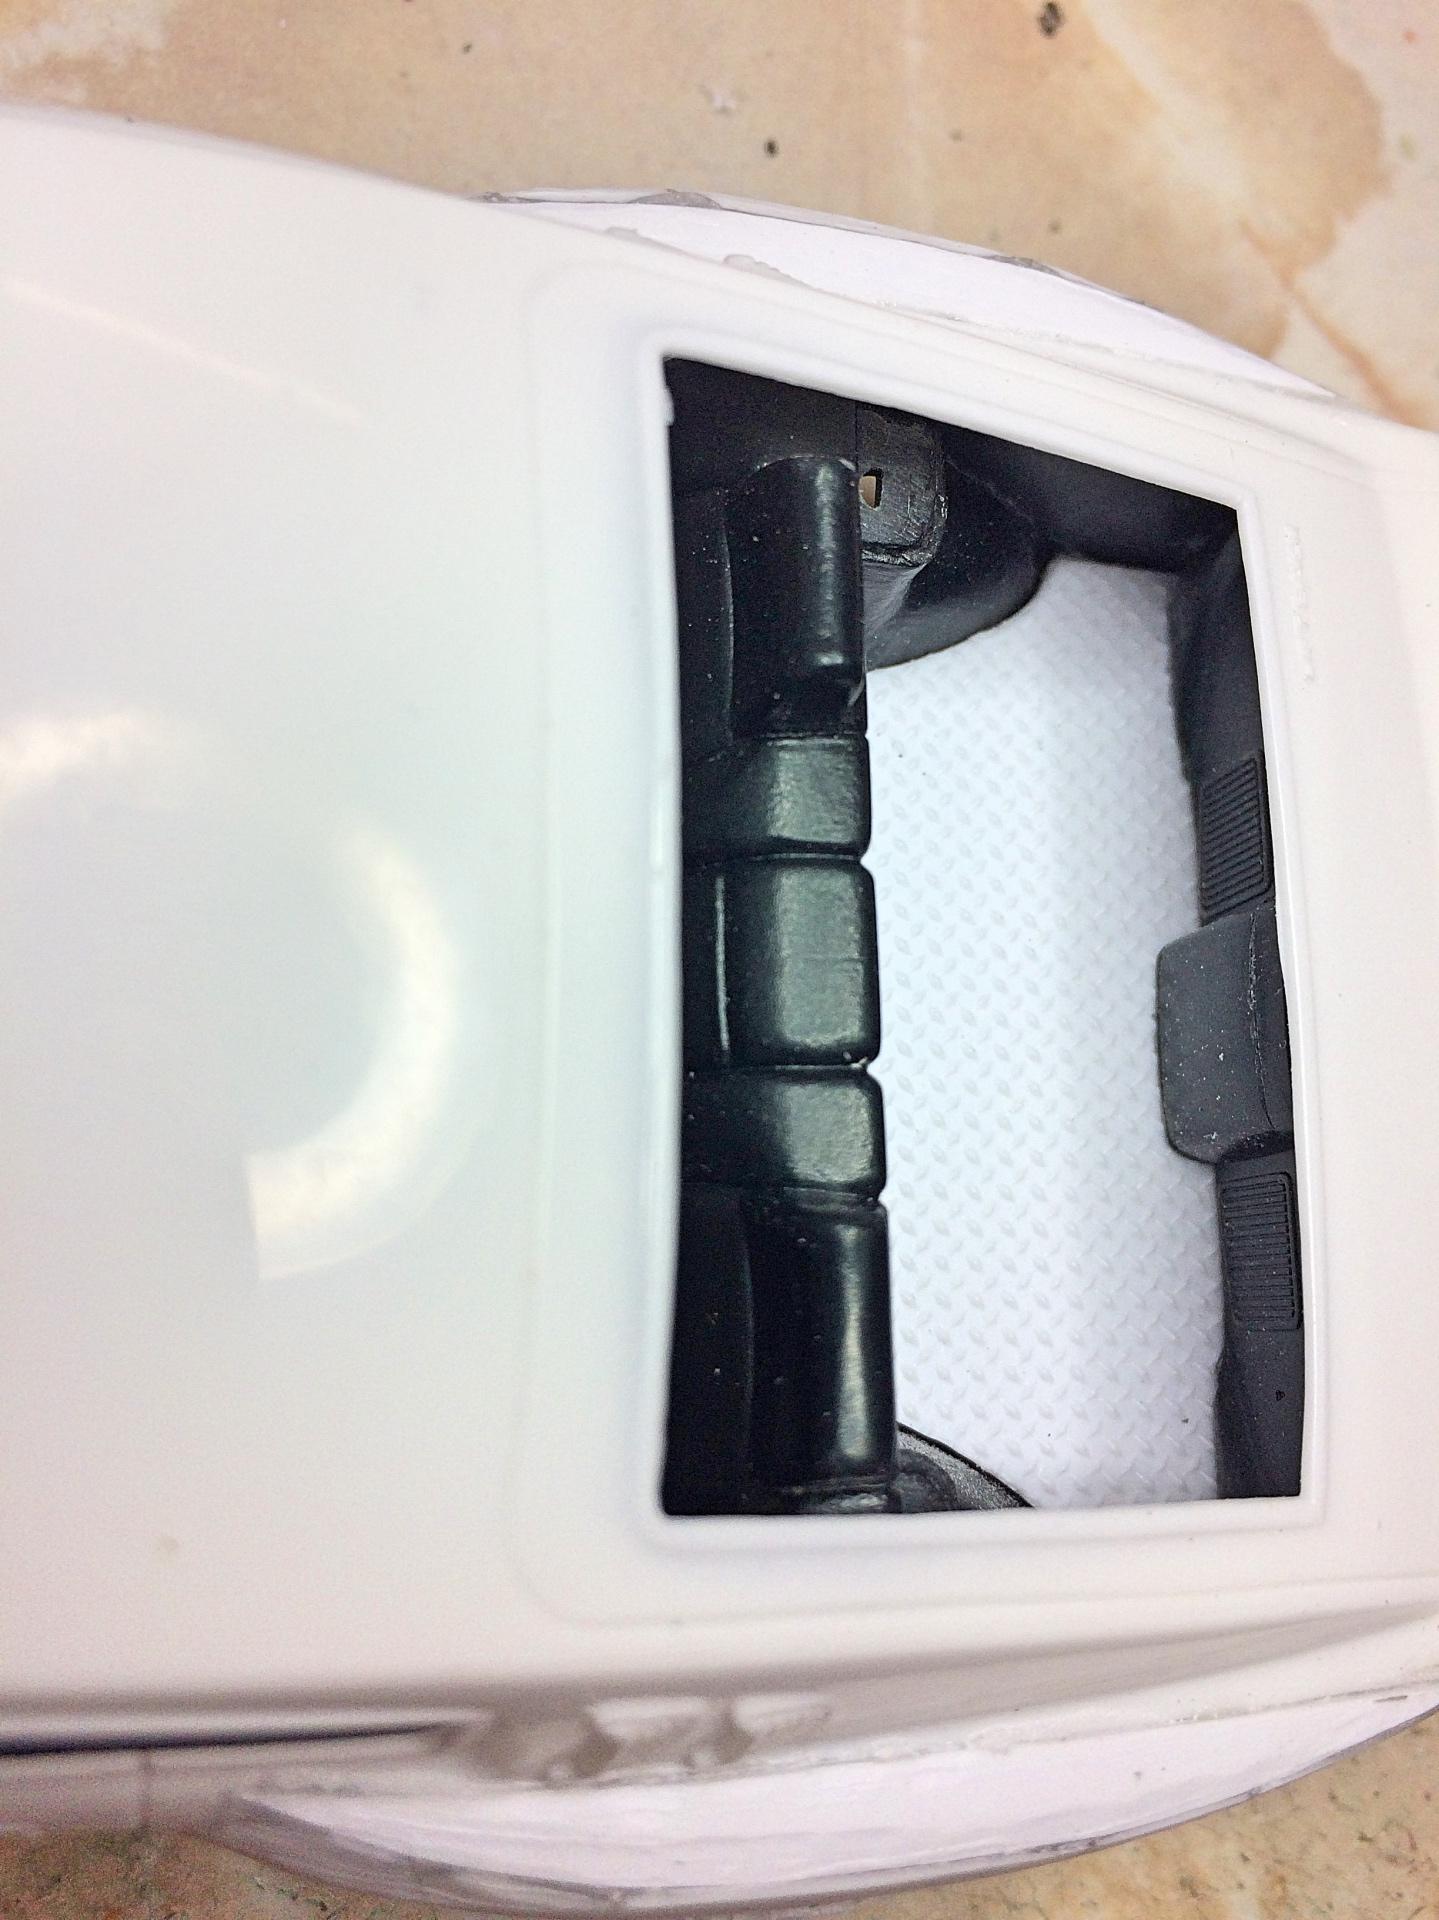
Thanks Dann the man! ? Custom, it ain't no Lead Sled. ? Worked on the rear end. The roof spoiler was in the parts box, cut the ends off (with the hot-wire), adjusted the angle and narrowed a bit; will refine the height. The adjustable spoiler is Evergreen (cut out with the hot-wire), superglued the ends on to match the body profile. The hinge is 100 year old fusee pocket watch chain. I scribed a groove on the bottom and glued, drilled holes in the body, don't need to glue in. I want to make a hydraulic strut, but can't figure out a good leverage angle and be able to realistically open the hatch, so just going to say the operating mechanism is inside. Also added the Lexus mirrors, not doing the JDM units on the fender.
-
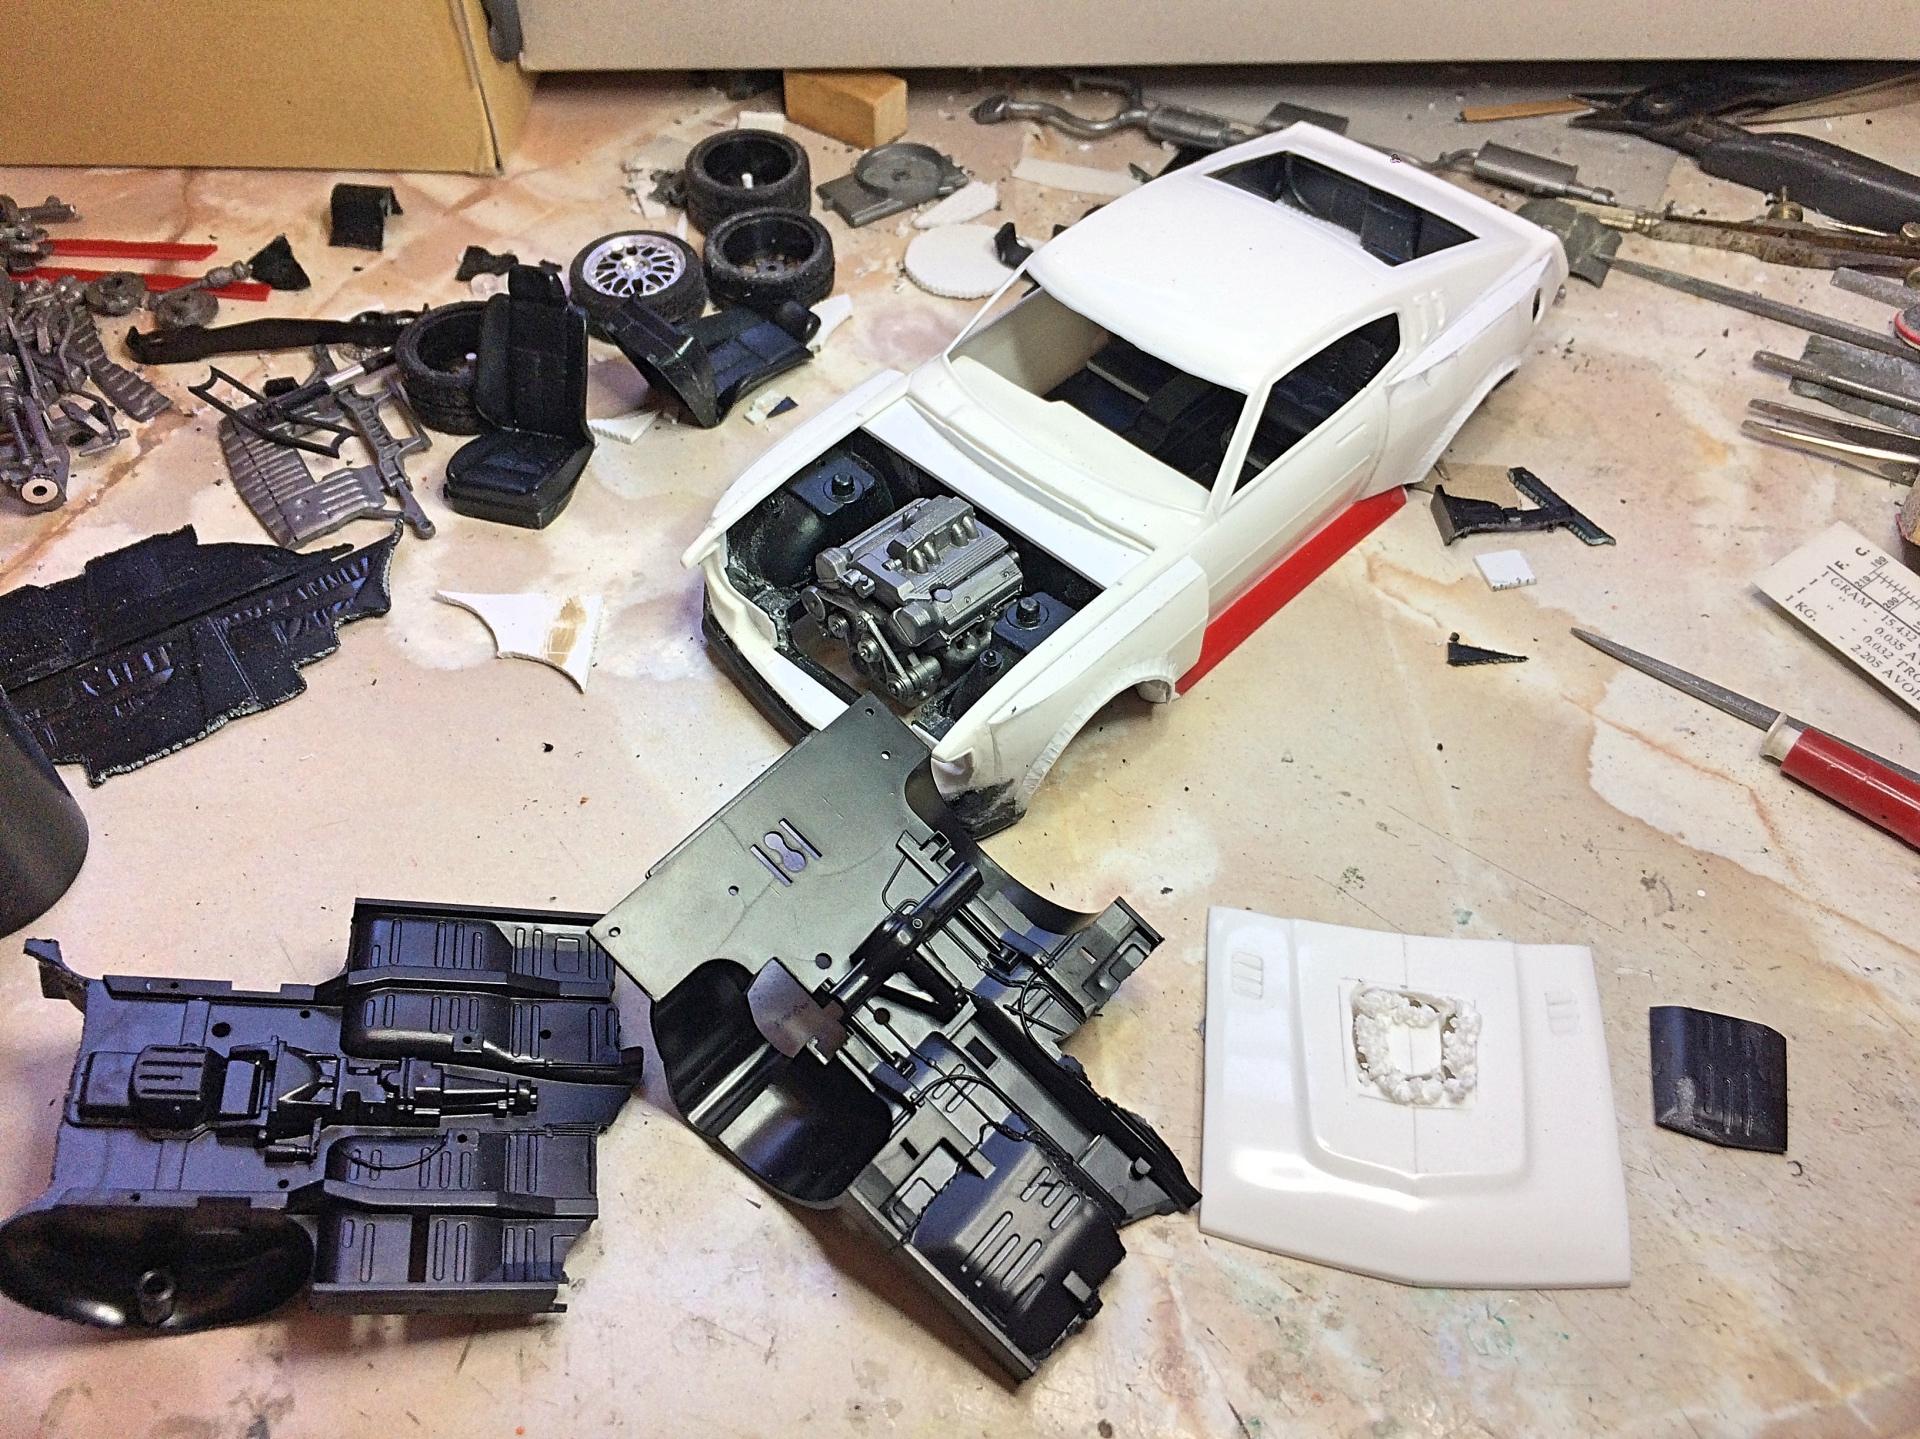
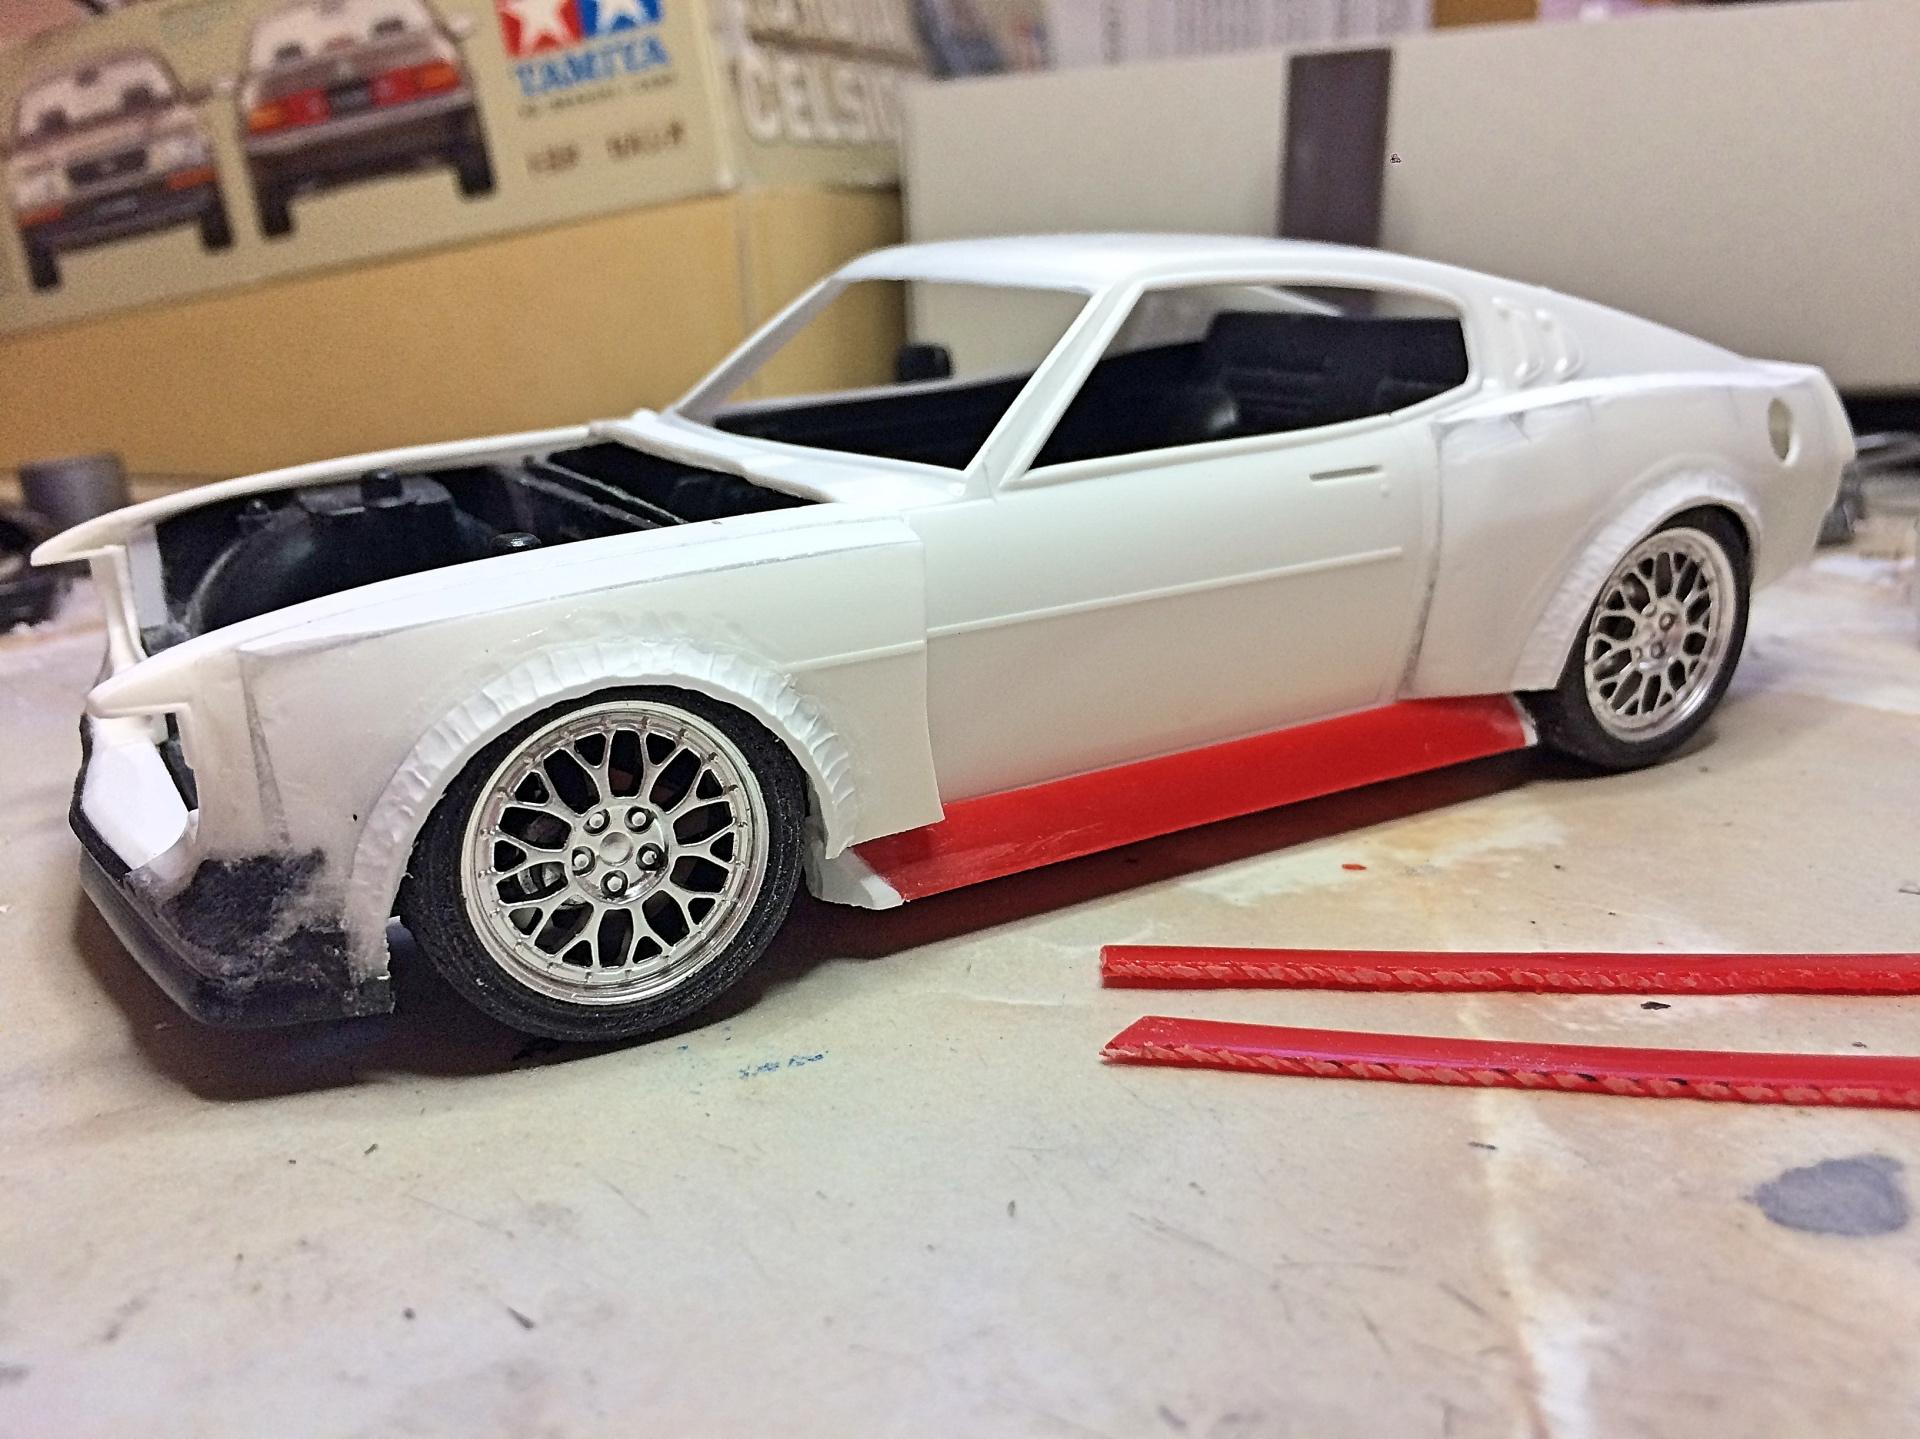
My OCD couldn't handle it, cut apart the driver side of the airdam, removed some material, glued up higher to match, think this looks much better. I scribed the door and hatchback lines. Then worked on a working hood hinge. It would have been simple, if the grill did not prow out. If I used the JDM grill, it is straight across, could have done simple pivots. Picked guitar string that fits inside the hypodermic needle tubing, fabricated the hinge out of coffee can steel. Wire insulation holds the wire in place. The hood slides back to close. Took only two tries on a tube, and three tries with the wire. To open, hood slides forward first.
-
numbing dive off
-
That moron's house if going to get burgled. ? Thanks to people like that, don't get me going..... Re: iPhone camera, my digital Nikon hasn't been used for ages, I have a real telephoto lens that is superior to my iPhone5 digital zoom, but that's about it.
-

"Bring Out Your Dead" Completion Build--ROUND 2 Is On!
89AKurt replied to Snake45's topic in WIP: Model Cars
My bad, didn't let you know, have not been an active participant in this thread, sort of busy, sorry. Started 17 years ago, it was 5 weeks ago that I resumed, and have completed in time for the Desert Scale Classic CV19 Special contest!
-
because no video
-
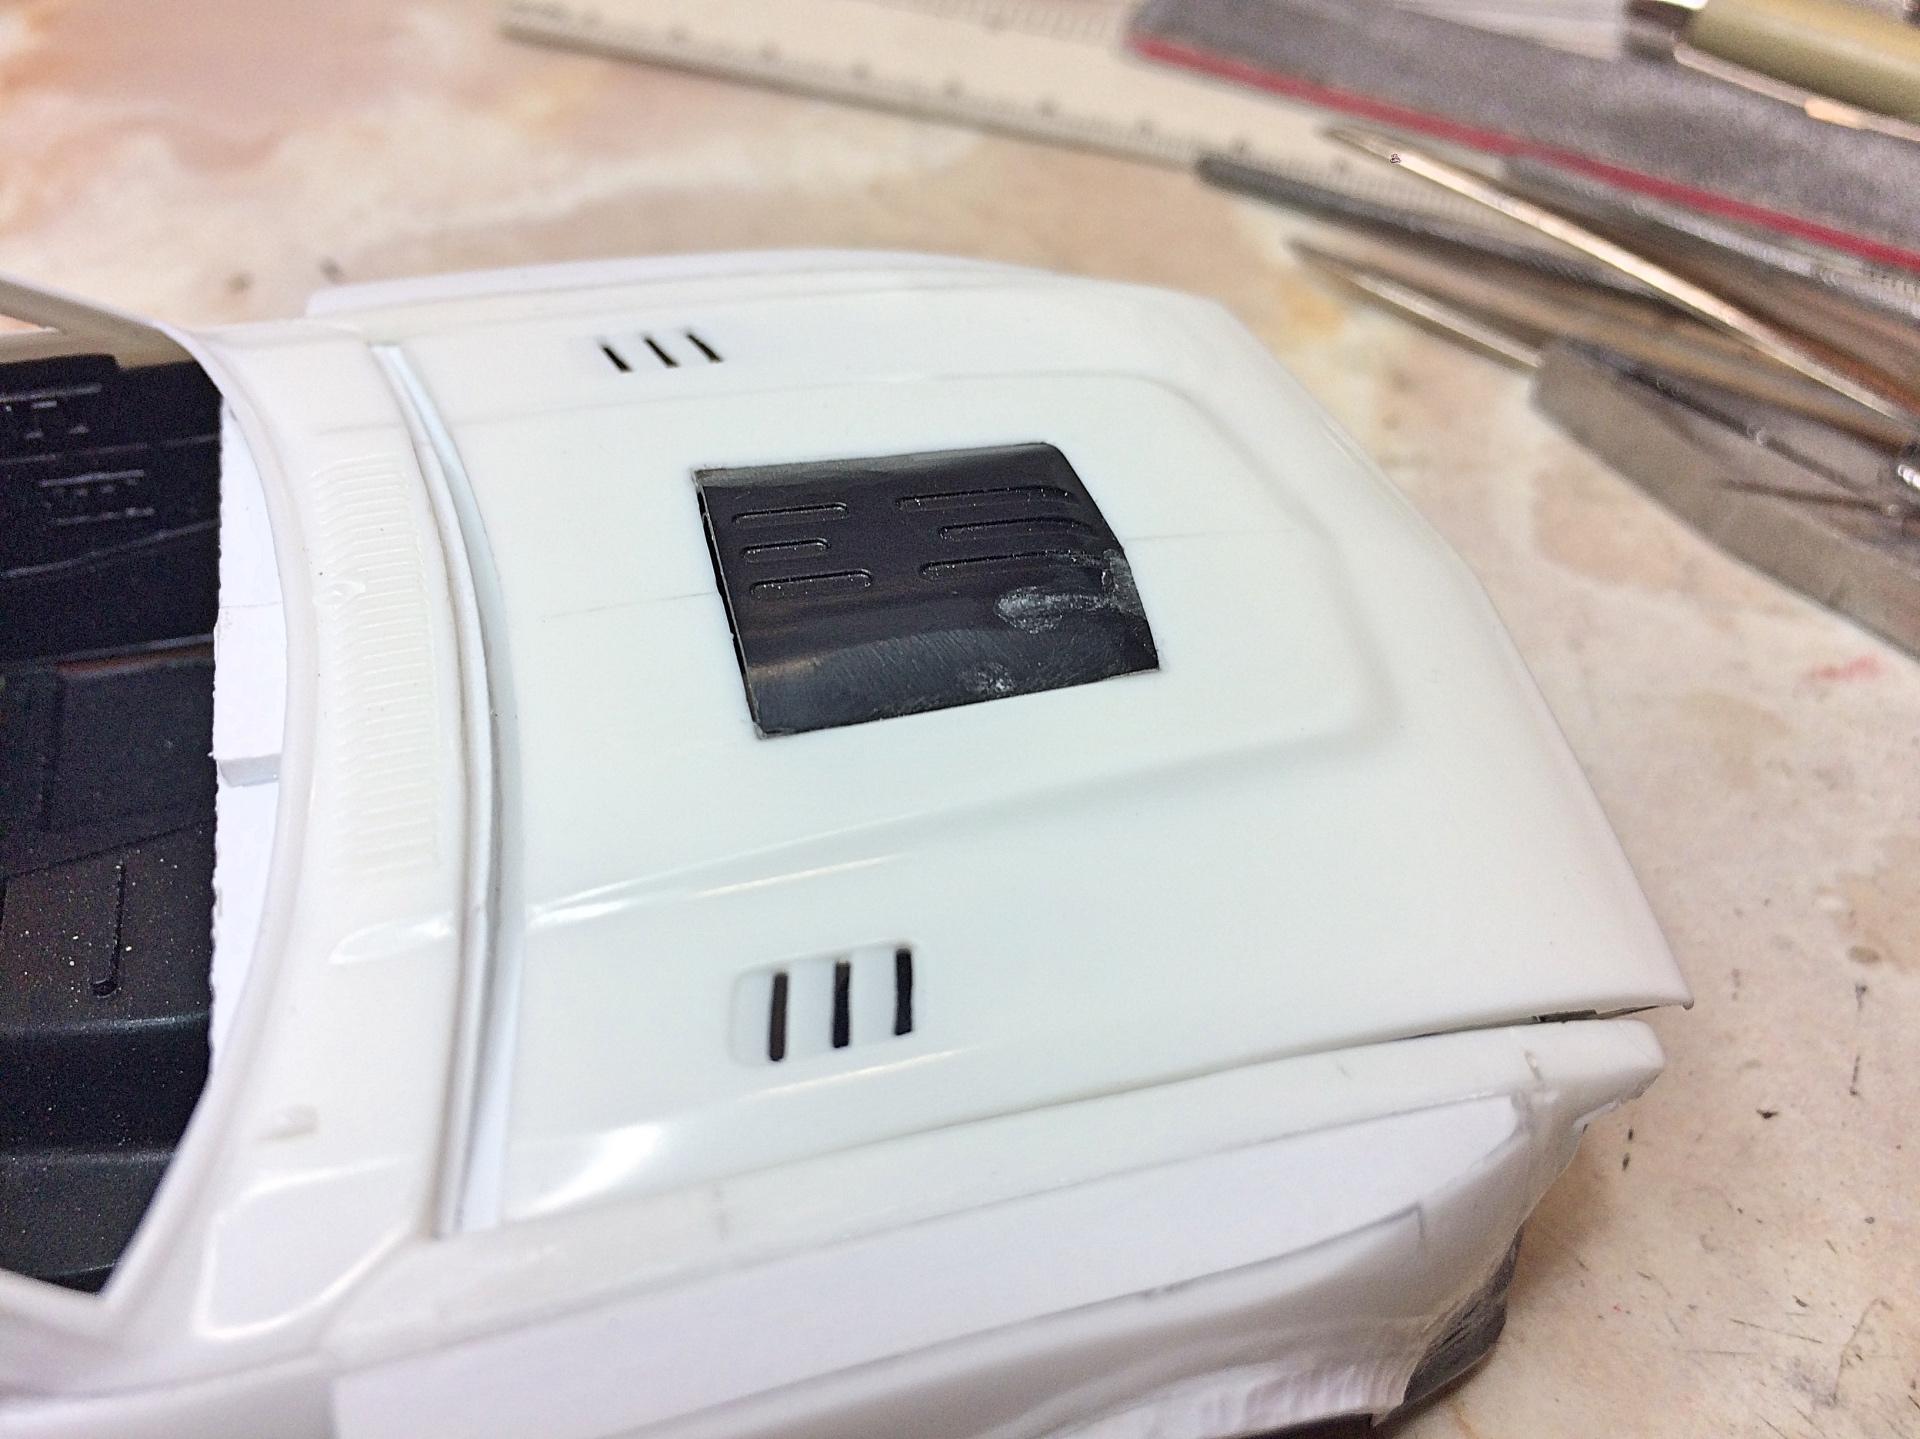
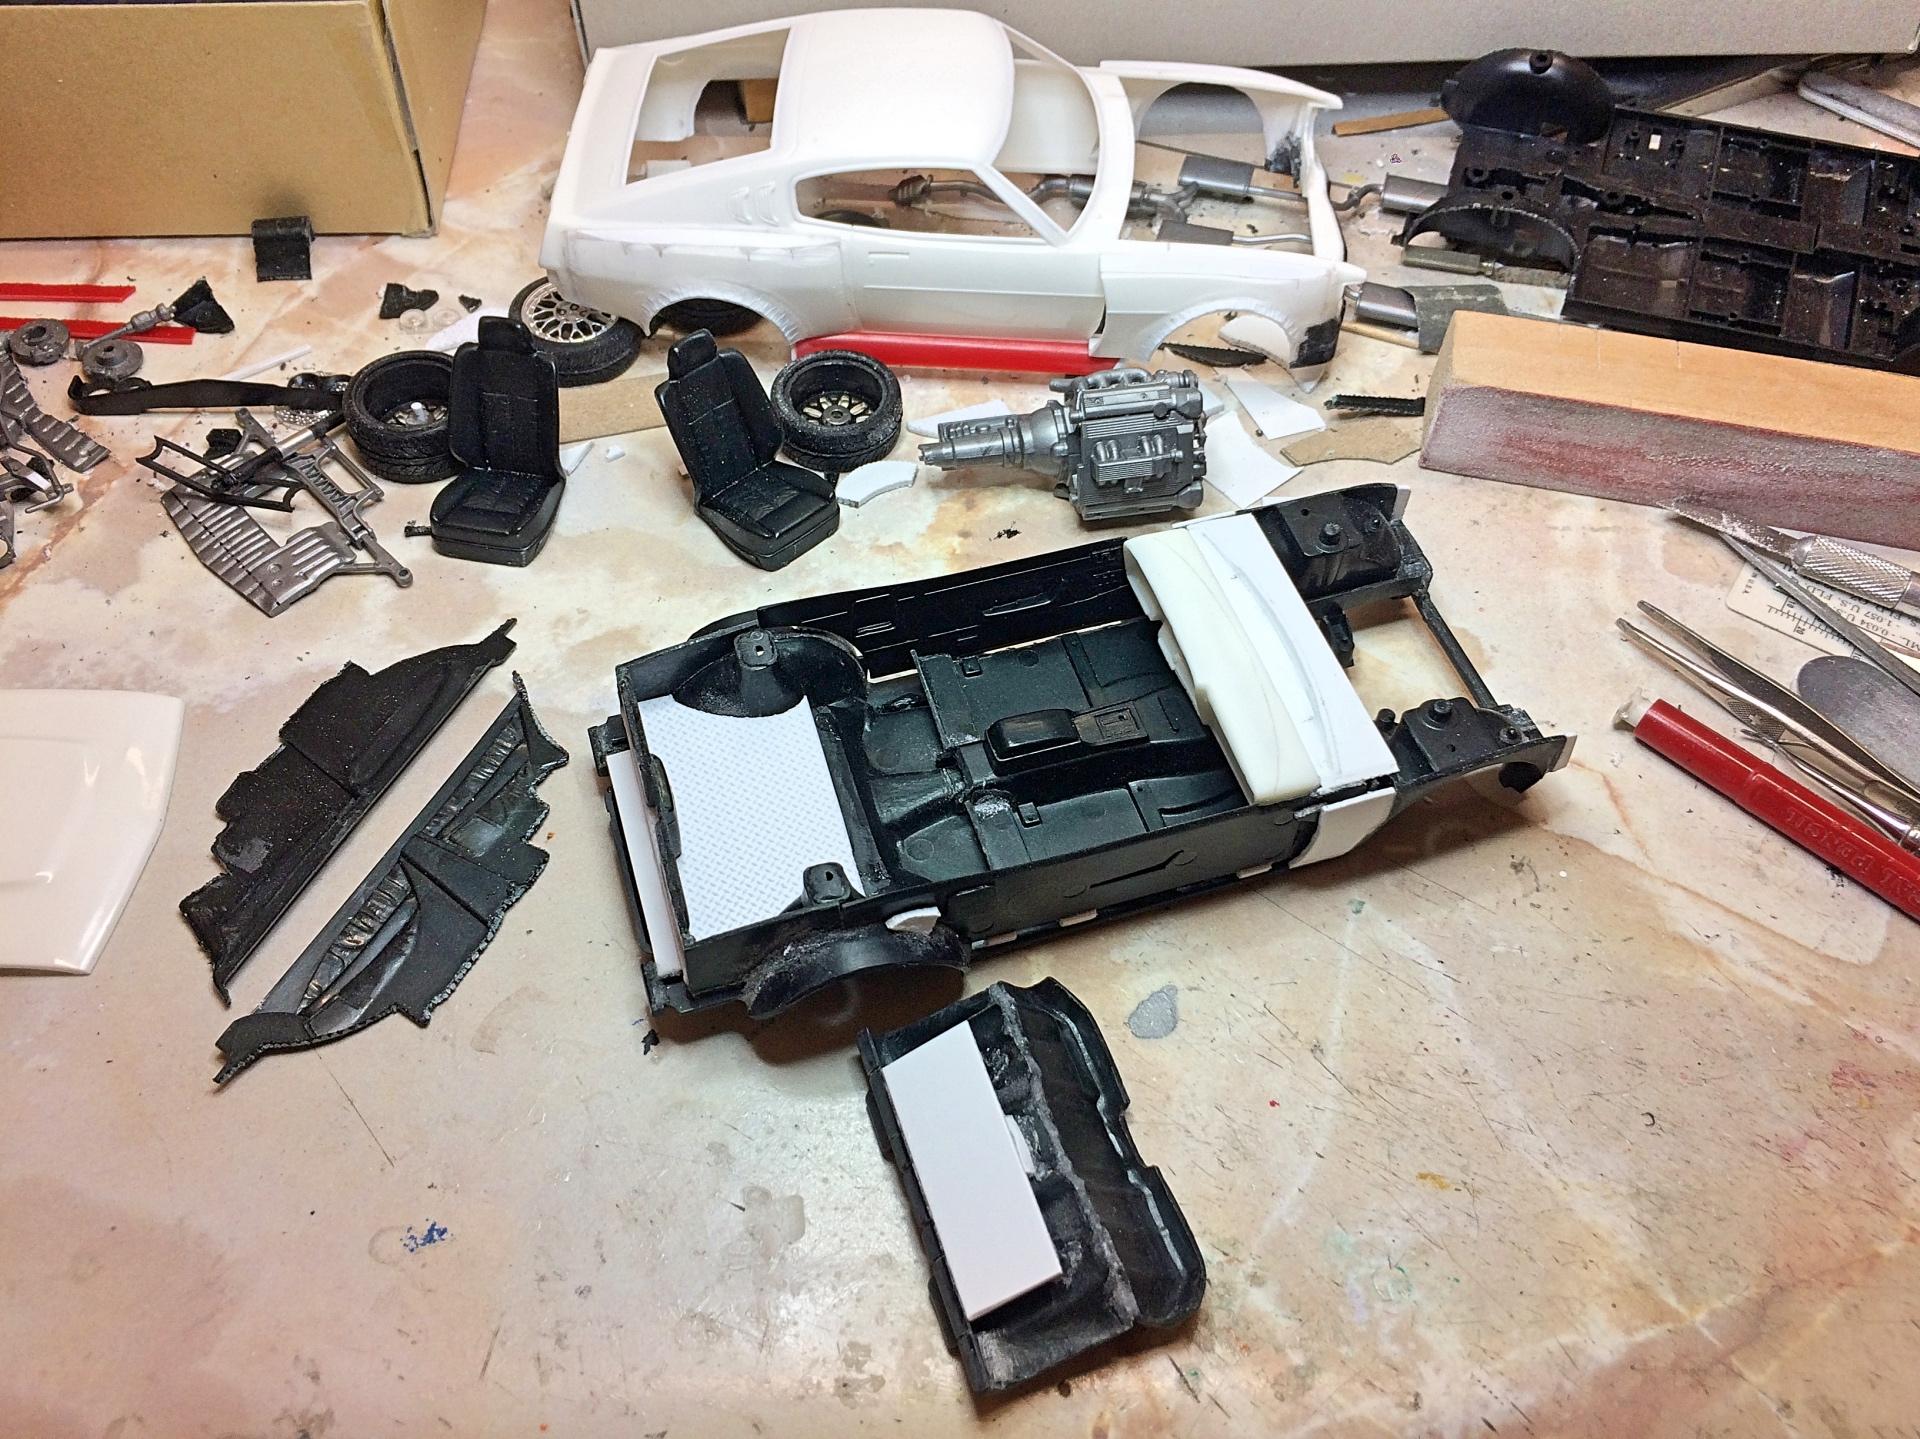
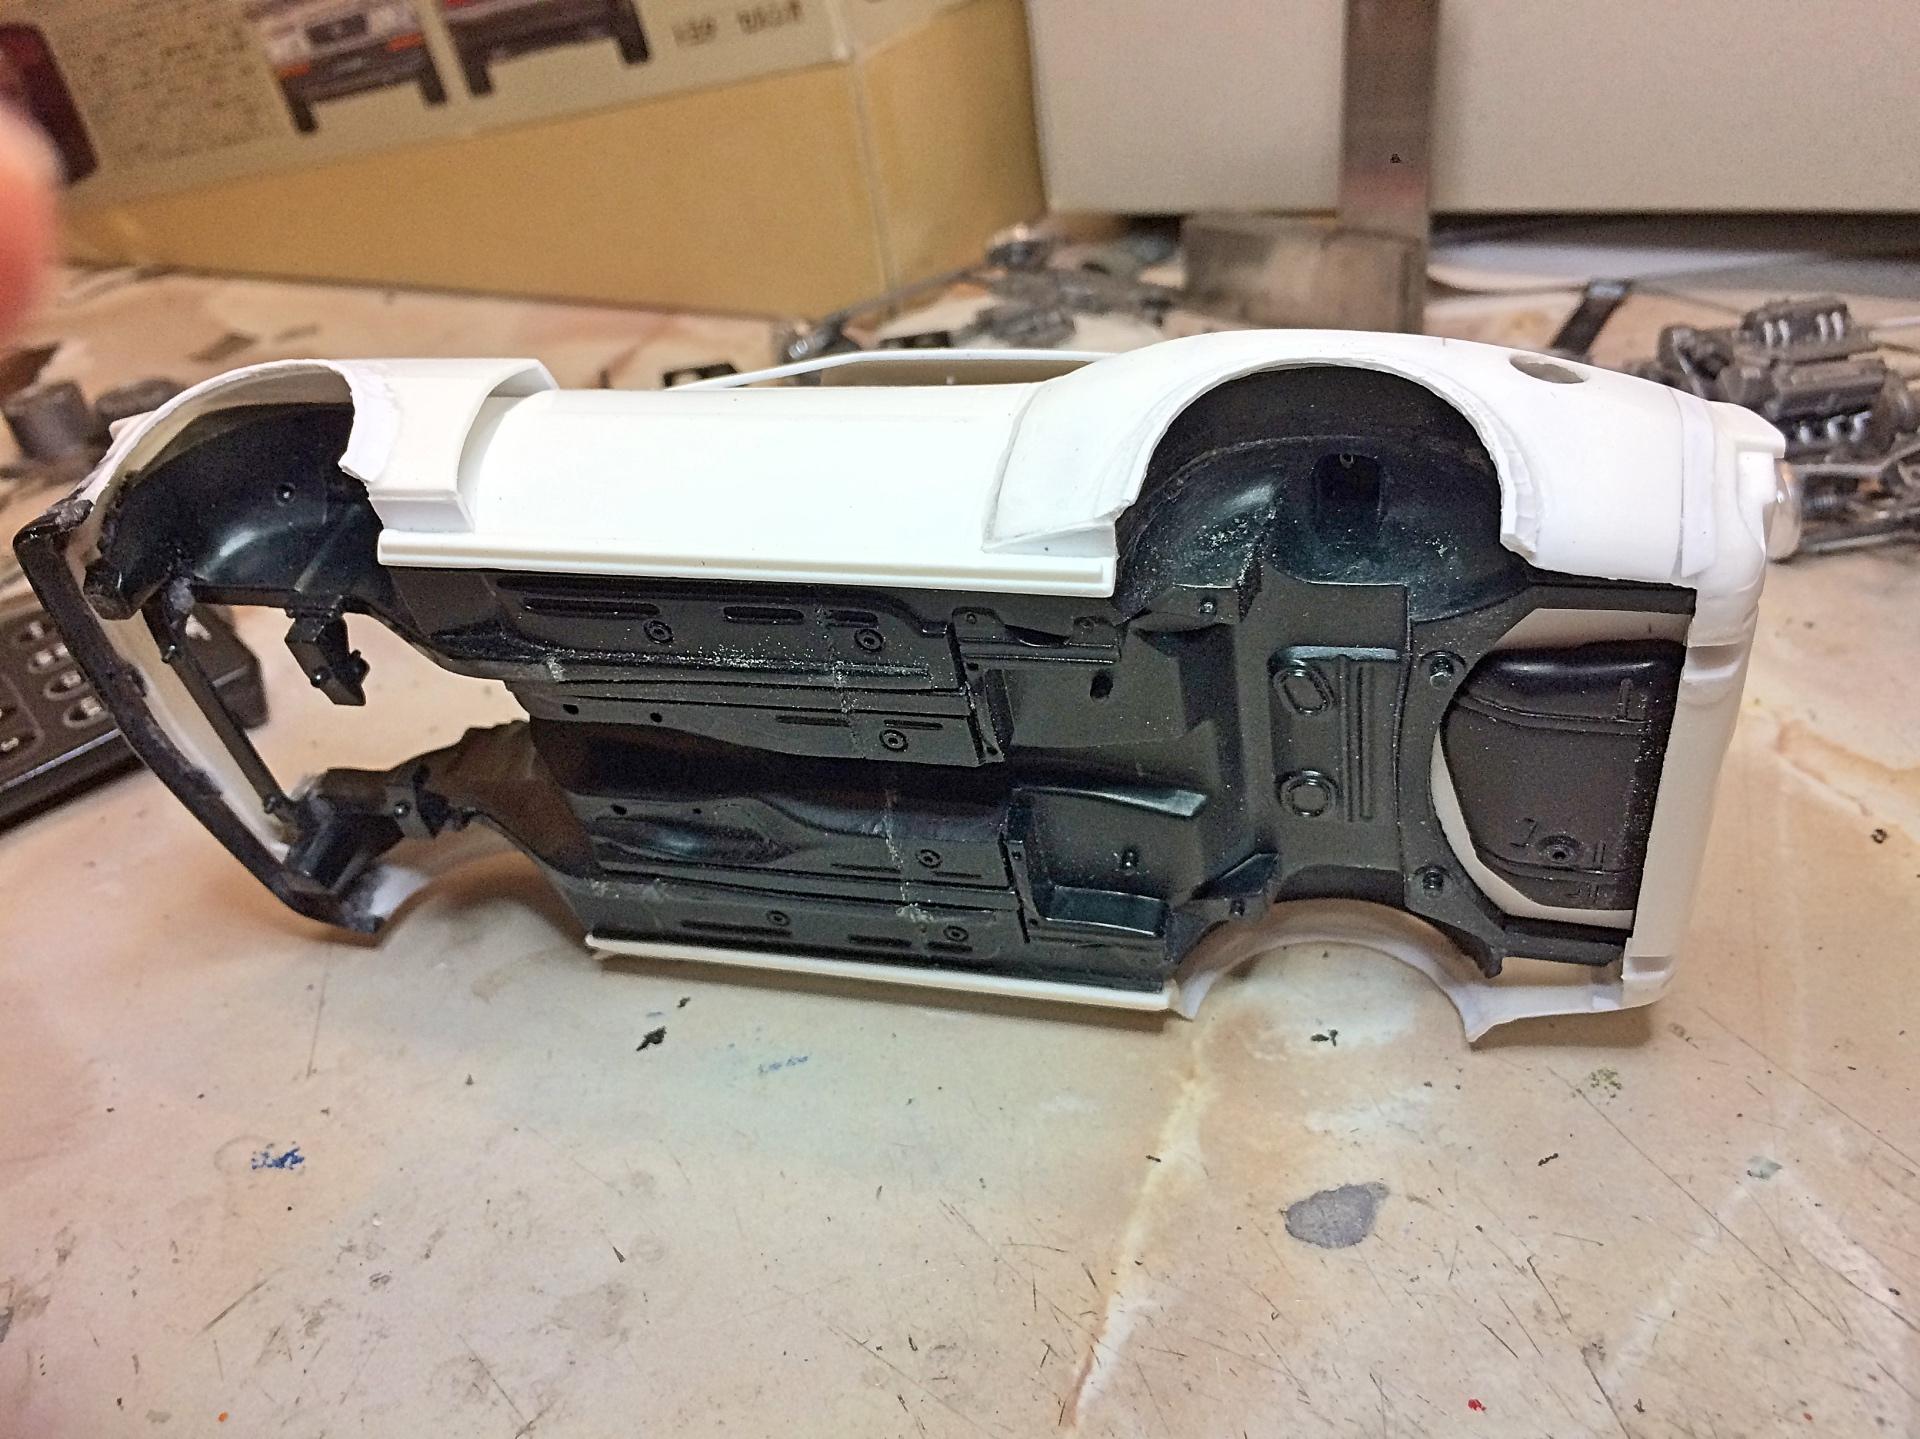
Glad you like it. It's different. ? Engine bay detailing. First of all, knew a hood bulge was needed, but had no plan. When I kit-bash, try to utilize as much of the two kits as possible, I like the detail on the chassis, Aoshima did more than the usual motorized variety, so studied general shapes and being able to capitalize on details. Cut out the part with the hot-wire. Used the Dremel to cut the hole in the hood. Needed to fill a random recess, and extend another just a little. Bulge is glued on the inside, debating whether to keep a seam, or blend in, and also body color or flat black, this sort of looks like American Muscle. Cut apart the Celsior intake part, it simply didn't fit, separated individual parts, the battery top, reservoir, and the plenum was ditched. The intake tube was cut in two spots so it would dive down, then made the cold air box, which led to deciding the removal of one headlight was better than cutting a hole in the fender. The battery was just the top, made the lower part, and relocated at the firewall. The Celica radiator was repurposed into an oil cooler, the chin had to be cut down so it fit under the grill; the hose/pipes could come up from below, much neater than the silly wild hose style the Japanese do. Putting the brake booster at the other side was a cinch! Picked the Model Car Garage photo-etch honeycomb grill because the original was honeycomb, also put in the missing headlight. I have something bugging me, the air dam is not level, debating about cutting out and fixing. Have an idea for the back spoiler, a morphing of door-slammer drag car and semi trailer aero extension, active for braking and high speed. Not doing the giant Rocketbunny wing.
-
All right, better late than never to the party! Welcome back. ?
-
Over the years I've built some strange stuff........
89AKurt replied to Pete J.'s topic in The Off-Topic Lounge
Tanks! (sic) Since you live in Scotland, have to ask, do boat drivers sit on the "wrong" side there too, or are they on the left? I have a WIP hidden deep in my stash, the Allison engine is a resin Replicas & Miniatures of MD of the AMT parts pack, and the Bugatti Royal, call it Bigatti.
-
not your pops tucker anymore, muthurs tucker now
89AKurt replied to damodelguy az's topic in Model Cars
Love it! -
Over the years I've built some strange stuff........
89AKurt replied to Pete J.'s topic in The Off-Topic Lounge
Fertile is such a tame adjective. Awesome execution too! The 6 wheel NSX just makes me want to do a Panther 6. I've had rare cases of being weird. Oldsboatbile inspired by the typical sagging springs look of certain GM cars. What to do with two horrid kits, the Tamiya 1/48 scale Swedish S-tank, and the 1/24 Nitto Countach.
-
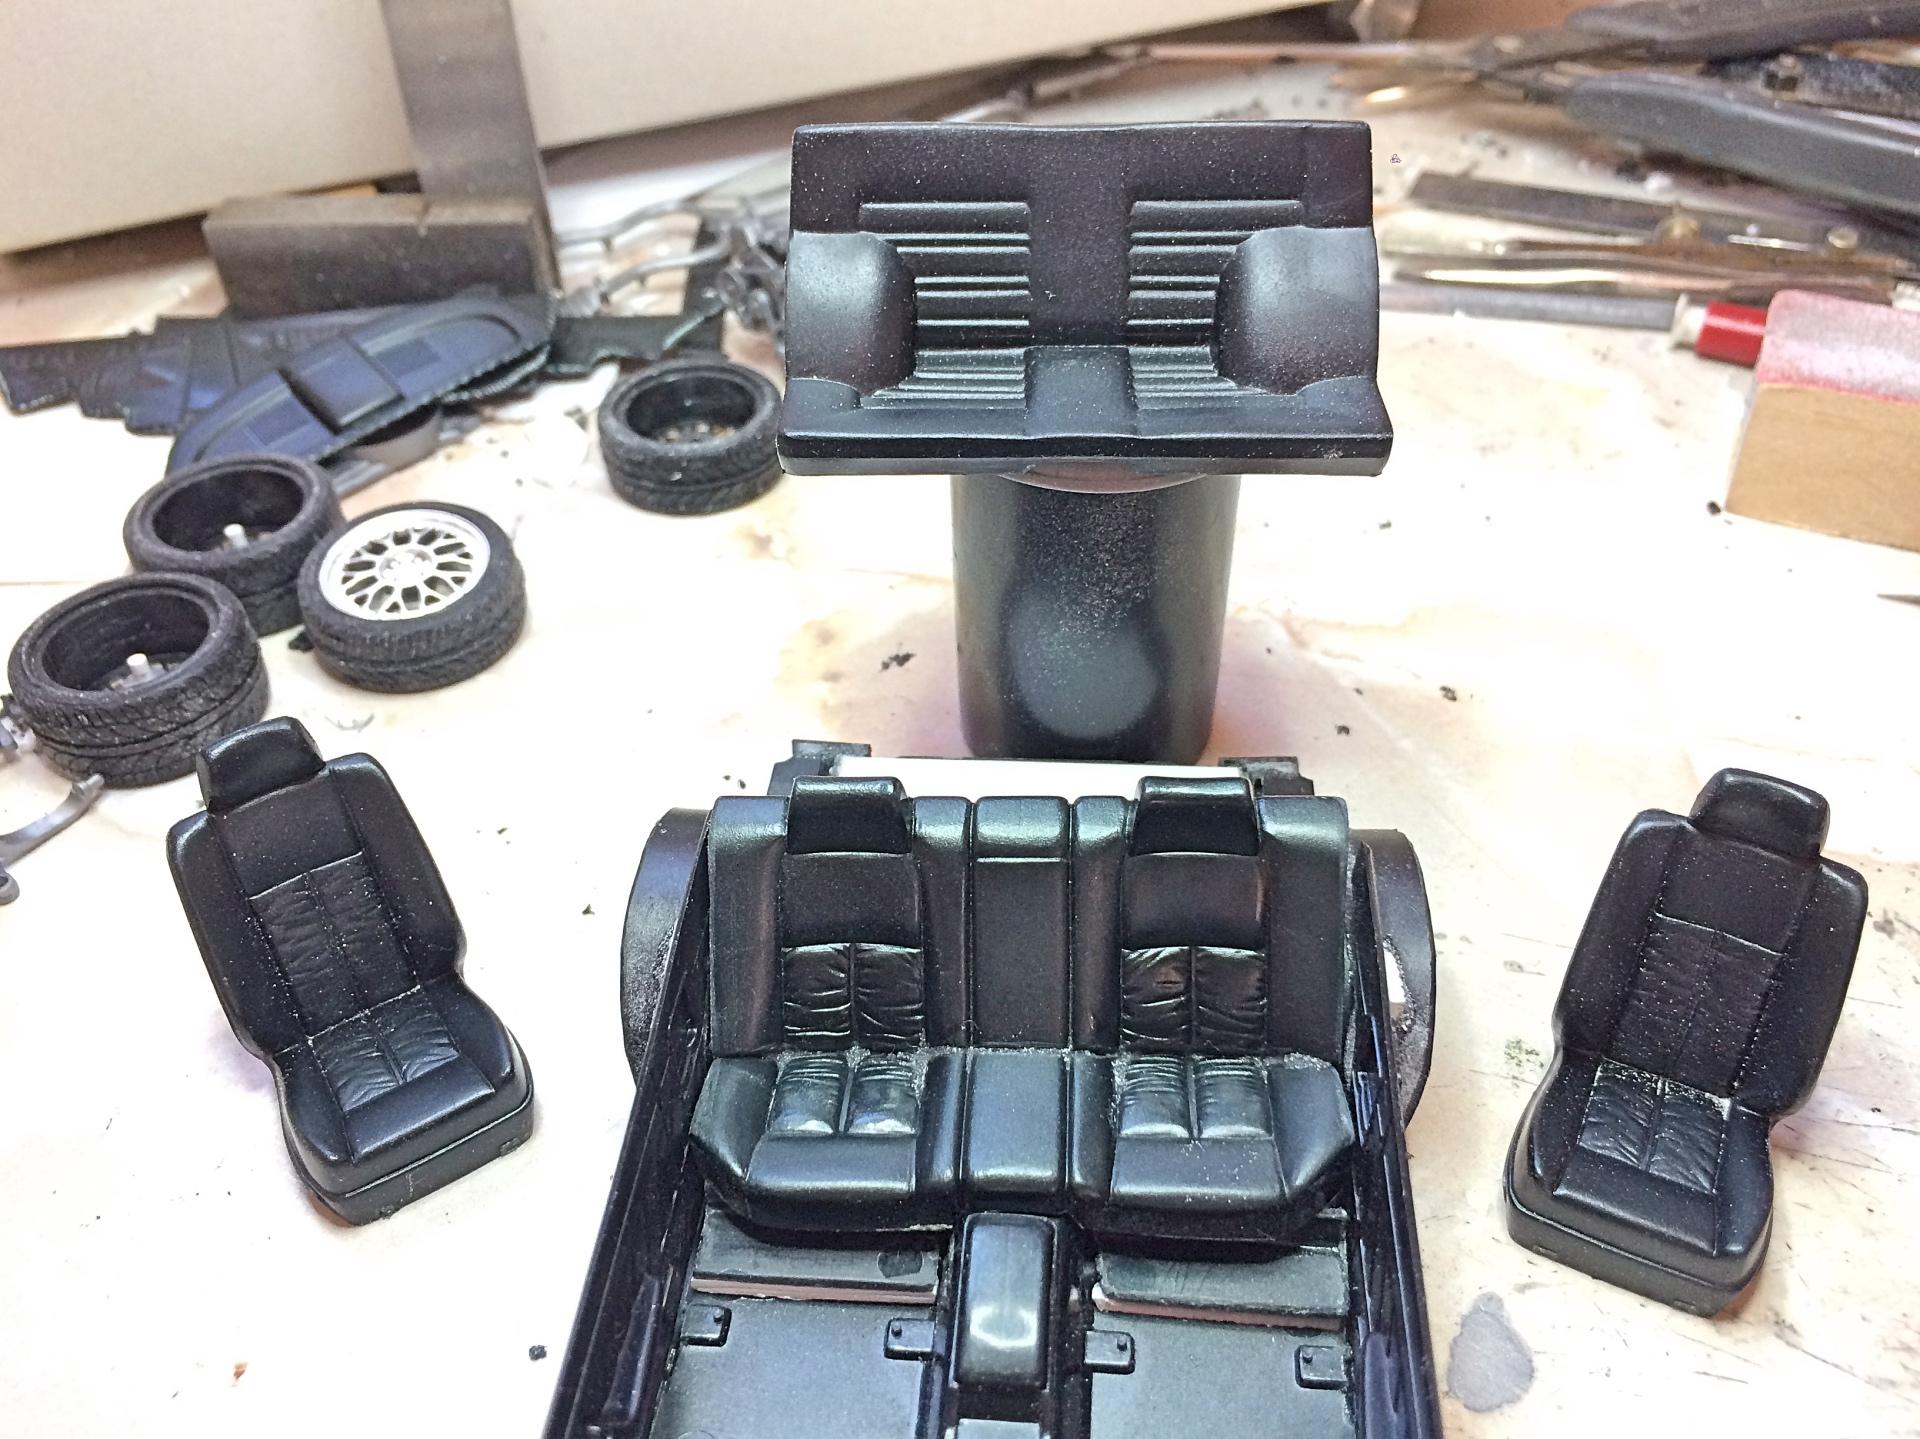
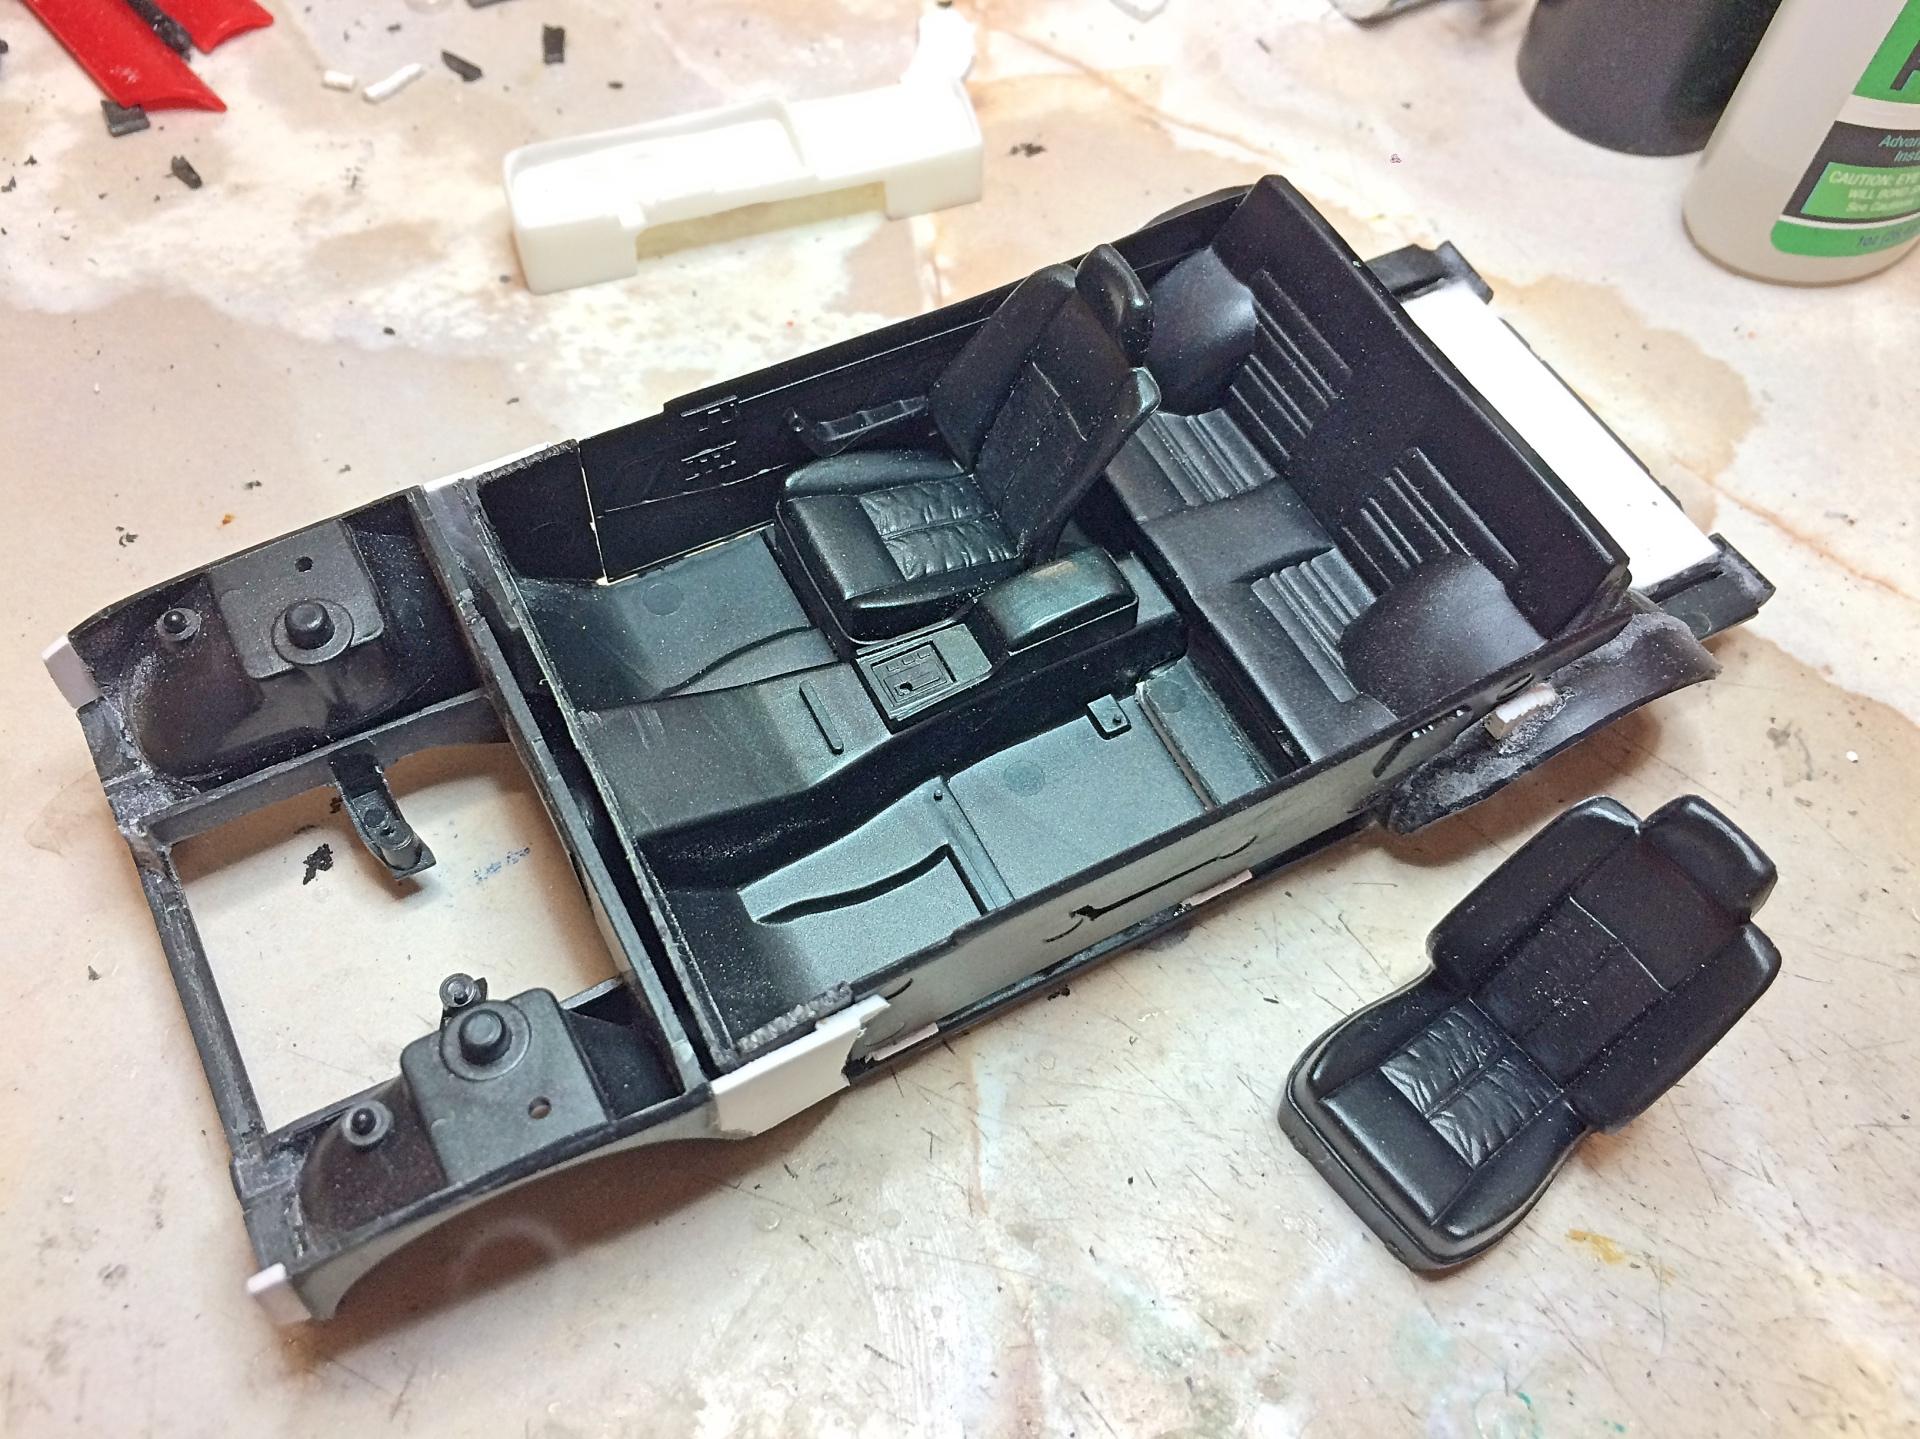
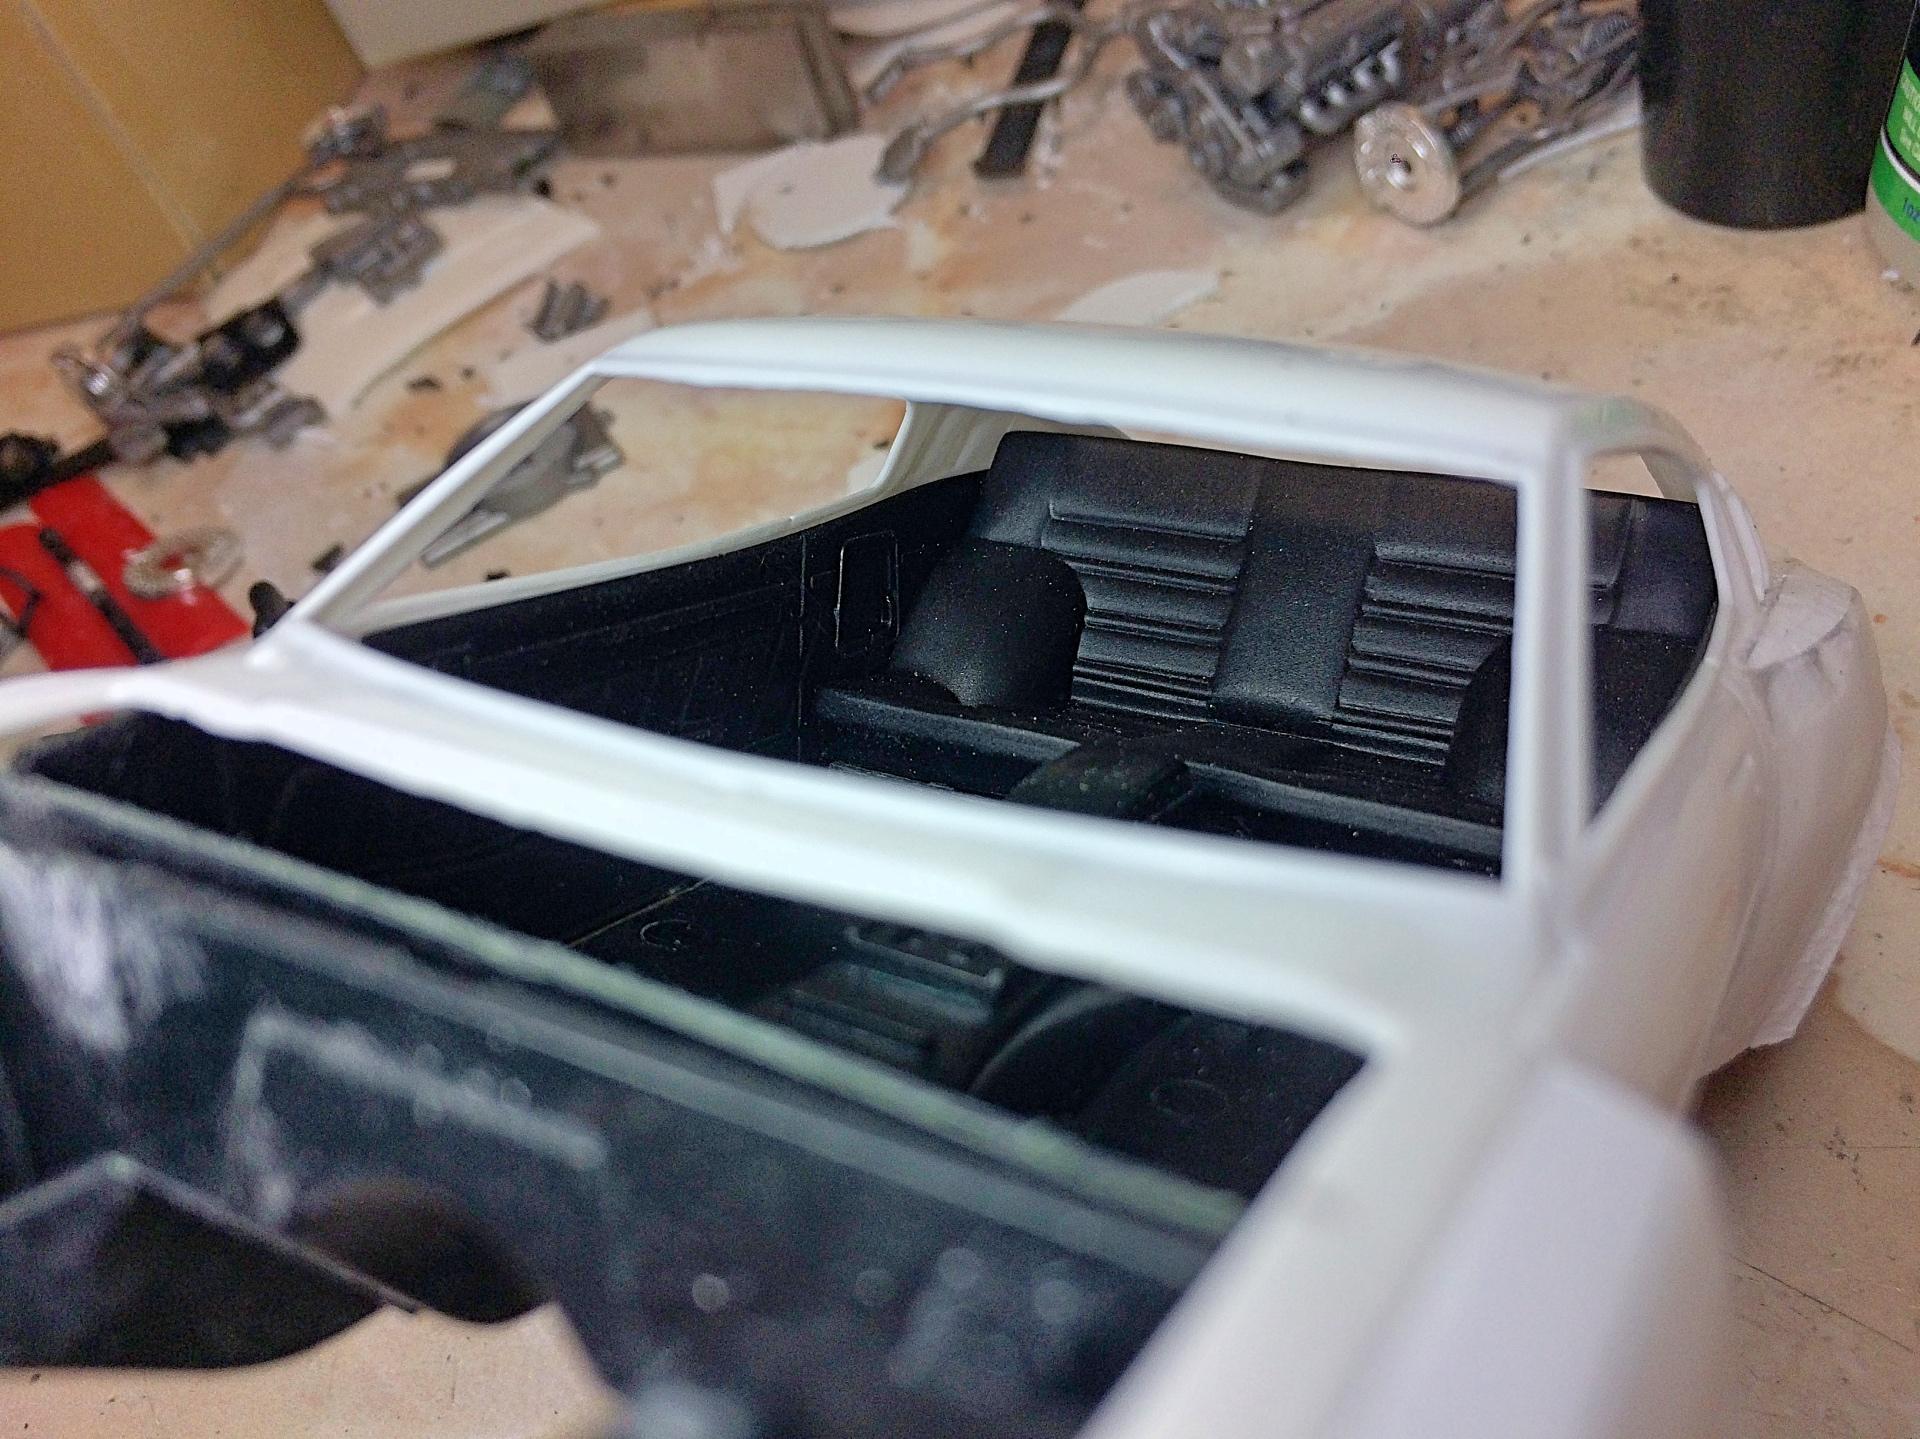
The rocker sills are fabricated. Hot-wire cut the width, added scrap pieces at the ends. I wasn't happy with the Celica back seat, the humps are too large, and one side is much more because of the motorized gear set. The Lexus seat was hot-wire cut out, removed a substantial amount of top and bottom cushions. Fabricated the cargo area, starting with the diamond plate floor. Harvested from the Lexus door panel for the side parts. The rear bulkhead was the Lexus window ledge, cut to size with the hot-wire. Back of the seat is plain styrene sheet. The firewall is more plain styrene, comes into the cabin enough to hold the resin LHD dashboard. A strip is run along the back of the hood to fill the gap. I should add a strut brace for the heck of it.
-
to falling models
-
out, concrete slab
-
I'm old school, in an Asian sort of way, with a mix of German. The Lexus brand was a copy of Mercedes, so think I'm on the right track. Started on the interior. First was "torching" apart the interior of the Lexus, and started harvesting off the Celica chassis, using the hot-wire. A pet peeve, is filling the wheel wells of some models that have a huge gap, I created it. The Lexus interior is about 8 MM wider than the Celica body, so all I needed was the floor and console. Filled the back hole with .1" sheet styrene. The Celica has decent door panels, and they will fit. Kept the back set, a little less cargo area to work on later. Added sheet behind the front wheel well, because of the flare having an exhaust vent you can see that. Now that I'm looking at the back seats, those humps can't be correct! The Celica gas tank needed minor reduction to fit under the sway bar. Changed the gas filler location to the left side, it will be what I use on almost all my projects, a copy of the Isuzu Vehicross gas cap. Made the exhaust exits from Plastruct tube. Interior fits just right. The back seat might be a little high, but the combination of using the Lexus chassis and channeling a little pushed it up. Maybe I should cut it so it can fold down. ?
-
Heard a rumor that Trump established a Strategic Toilet Paper Reserve, I just want to know if it's a load. Think the Olympics will introduce TP Hunting when they resume, but it's a c r a p shoot.
-
Thank you. ? ? Thanks! It's funny that it looks dated, from the era when every square inch was painted the same color. Glad to see chrome is cool again. I was really REALLY crazy back then. ?
-
1957 Reo Gold Comet
89AKurt replied to Chariots of Fire's topic in WIP: Model Trucks: Big Rigs and Heavy Equipment
Wow..... ? Will be following this one. This triggered my fading memory, took a picture of this in my town and posted 2008: [/url] -
Tamiya 1/24 Alfa Romeo GTV (1996) Twin Spark 16V
89AKurt replied to Italianhorses's topic in Model Cars
And BOOM ? you're done! Came out great! You build very clean and neat. -
1948 Chevrolet COE Cannonball
89AKurt replied to 89AKurt's topic in Model Trucks: Pickups, Vans, SUVs, Light Commercial
I forgot about this thread and it was always buried when I checked in....activity level is through the roof! ? Thank you. I was pleased to have come up with the shadow, easy to do. ? Too bad the resin body is not available. I got this 4 door off of Shapeways, but was disappointed. First it was described as a '54, the windshield yes, grill NO. Glad to sell at the Phoenix swap meet for what I paid for it. Thanks Russell! You saw it at GSL. ? ? ? ? ? Thanks. I've been seeing how popular they are lately, nice to know they are saved from the salvage yard. Thank you! That detail seems to be the most popular thing I've done. ? For anyone who has the money (not cheap) and skills, this Shapeways body is okay, but the grill and windshield are not correct match. If they had done a '54 grill, might have kept it.
-
1/12 Model Factory Hiro Ferrari 250GTO
89AKurt replied to BaldOldMan54's topic in Other Racing: Road Racing, Salt Flat Racers
Qualifies as KILLER! Really nice job on that classic. -
GMO-free leather