Tommy124
-
Posts
1,648 -
Joined
-
Last visited
Content Type
Profiles
Forums
Events
Gallery
Everything posted by Tommy124
-
Great build in every department! I have that kit in stock and I might be tempted to go for a similar direction...
-

Re-engineering Monograms Lotus Esprit...new update!
Tommy124 replied to Dann Tier's topic in WIP: Model Cars
WOW! Quite a bit of paint dust there... At first I thought it was light and shadows on the floor but then I got it... May I ask how you handle the preparation of your rattle cans before shooting? Do you warm them up in water? I do so until I can barely handle the warm can and I do a lot of shaking before and after that. Yet I find myself having trouble here and there, especially if the can is not that full anymore. It's probably also the case that I don't take care enough of cleaning the nozzle... -
1989 Nissan Skyline GT-R R32 - Bayside Blue Godzilla
Tommy124 replied to Italianhorses's topic in WIP: Model Cars
Nothing short of L-O-V-E-L-Y! -
Tamiya 1989 NISSAN Skyline GT-R R32 Bayside Blue
Tommy124 replied to Italianhorses's topic in Model Cars
A real beauty, Alex. Please keep ‘em coming! -
Looking forward!
-
Hi Dominik, nice you're following along too. I remember exactly what it was like "decades ago"... Back then and without the internet we wouldn't have found out about all the kit's flaws. So really everything was better then, right? Truth be told, I learned an awful lot on the WWW... Thanks Kurt, looking forward to you working on some Porsches too!
-
Coming along beautifully!
-
Hmm, if I were to have spare body parts from, let's say a Tamiya F40 "Autobahn Unfall", I might be tempted to transplant that missing naca duct section into the Fujimi hood. Unless you have a way of scratch-building that too...
-
Koenig Competition Ferrari Testarossa (1/24 scale by Fujimi)
Tommy124 replied to Tommy124's topic in Model Cars
Thanks for your feedback, Sonny. There have been several variations throughout the years. It all started with the 800hp Koenig Competition version - the one I built. The name Competition btw is referring to the fact that Koenig took part in an actual car tuner's competition with that car (and of course won!). That version was soon to be followed by the 1000hp Koenig Competition Evolution. That looked a bit less edgy with smoother body parts in the front. But there have been other changes in the course of the years, not least due to the fact that the basic car changed. The first Competition was based on the "classic" Testarossa, whereas later models were based on the 512TR and F512M. All Fujimi 1/24 scale kits are based on the very first Competition series. Having said that, there is also a 1/16 scale kit by Fujimi of the "regular" Koenig Testarossa (non-Competition), this one: https://www.scalemates.com/kits/129260-fujimi-rc-105-koenig-testarossa I'd like to see you get working on one of these! -
Hi Will, this is looking like a great start. Looking forward to your progress. @Dann Tier Yes, but what I really don't get about this kit is why Fujimi forgot/ refused to add the naca duct intake to the front part of the car. For the LM version, there HAS to be one in the center of the front hood above the Ferrari emblem. It's not that they did not change the hood anyways - as we know they made the big air outlet so they could have done the naca duct aswell. Fujimi logics...
-
Great Dann, looking forward to that!
-
Hasegawas Lamborghini Miura SV....new update!
Tommy124 replied to Dann Tier's topic in WIP: Model Cars
Indeed it does! Looks very good, Dann. The significance of ambitious and and thorough scribing is dawning on me more and more each day... -
HI JC, the 964 wasn't my favourite Porsche either back in the day, I was more of a "G-model man" then. But as you get older... Today I think it's design is pretty puristic and it made for a good stylistic transition between the G-model and the more modern 911's that were yet to come. About the Fujimi kits... Glad you follow, Justin. Most of these corrections cannot be avoided imho, once you noticed the kit's flaws. Thanks, Alex. We agree they really should do better than that. But not just them. These days I purchased an Italeri Porsche 944 S kit in order to have that car in another version than the Turbo, for a change. And what's inside the box - you guess it... 944 Turbo: Turbo engine, Turbo body, in fact, not even any other decals than those for the Turbo. What's the point...?? Thanks, Lloyd. Yes indeed. They better be, Dann!
-
Thanks Ron!
-
Koenig Competition Ferrari Testarossa (1/24 scale by Fujimi)
Tommy124 replied to Tommy124's topic in Model Cars
Thanks, Ken! Good idea about "adjusting" the looks of the Koenig by using slantnose parts. I'd like to see that! Have to disagree though on the taillights. They are Audi 200, not Porsche 944. See the images below...
-
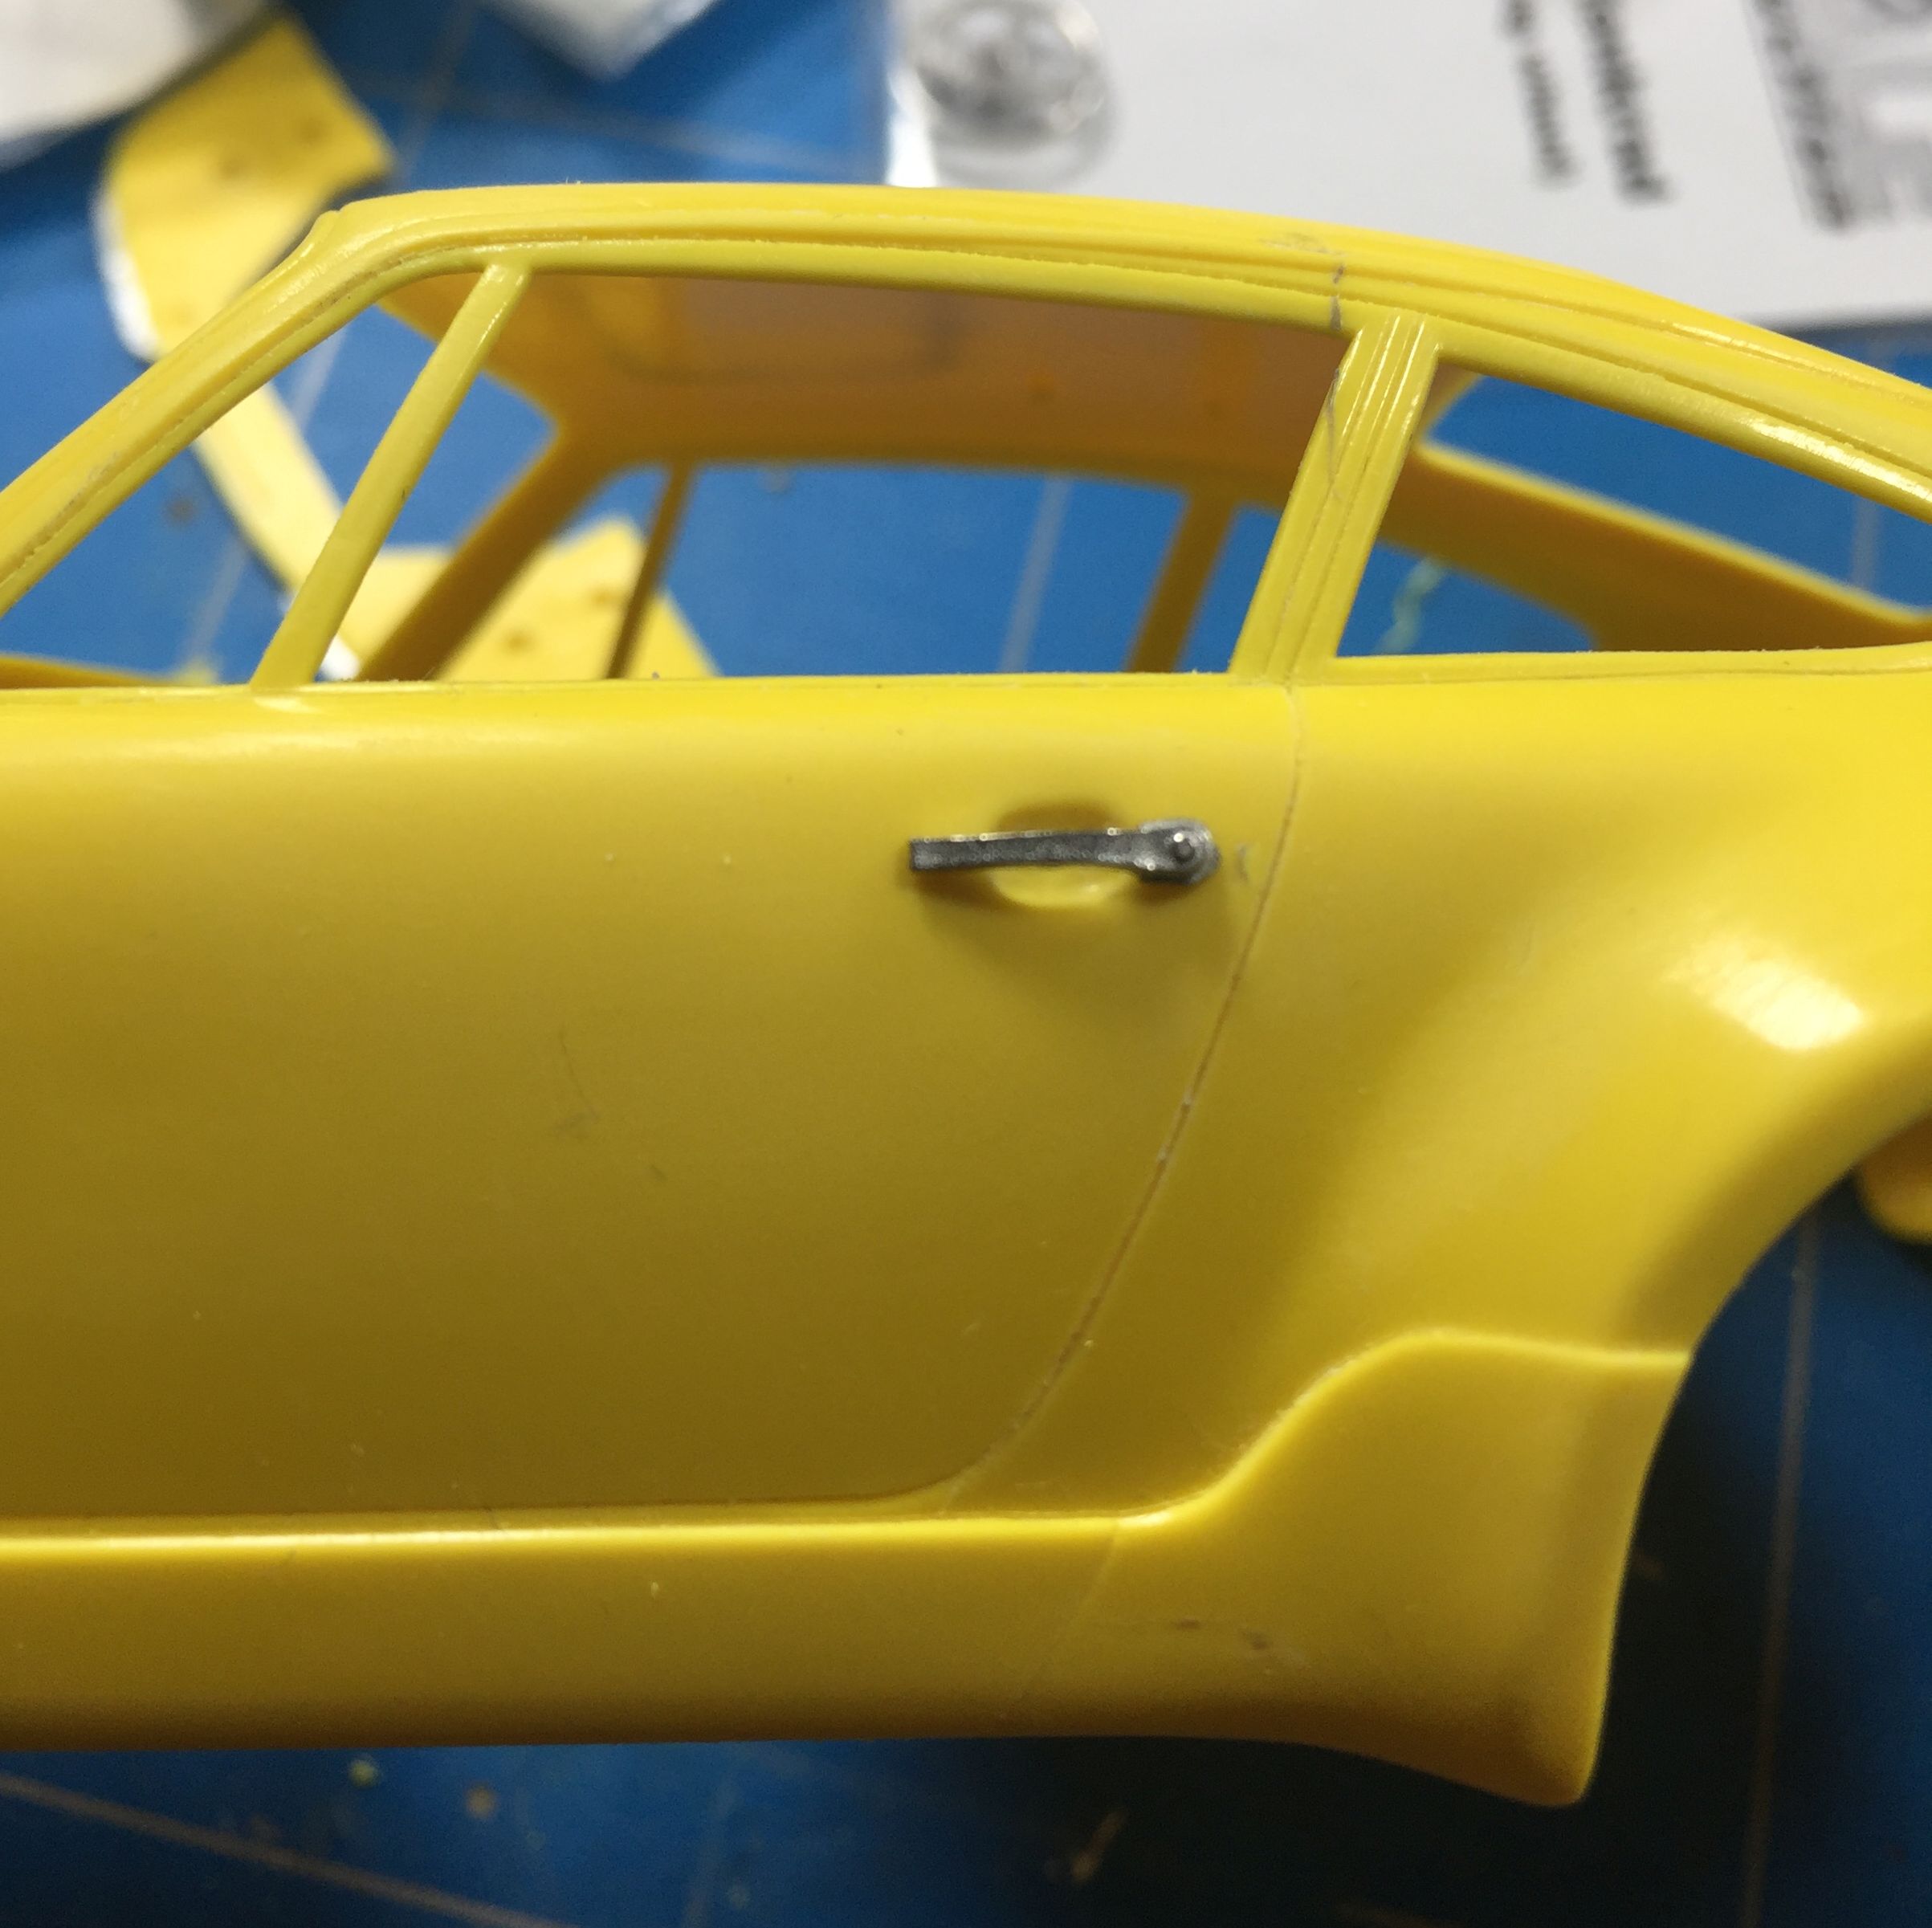
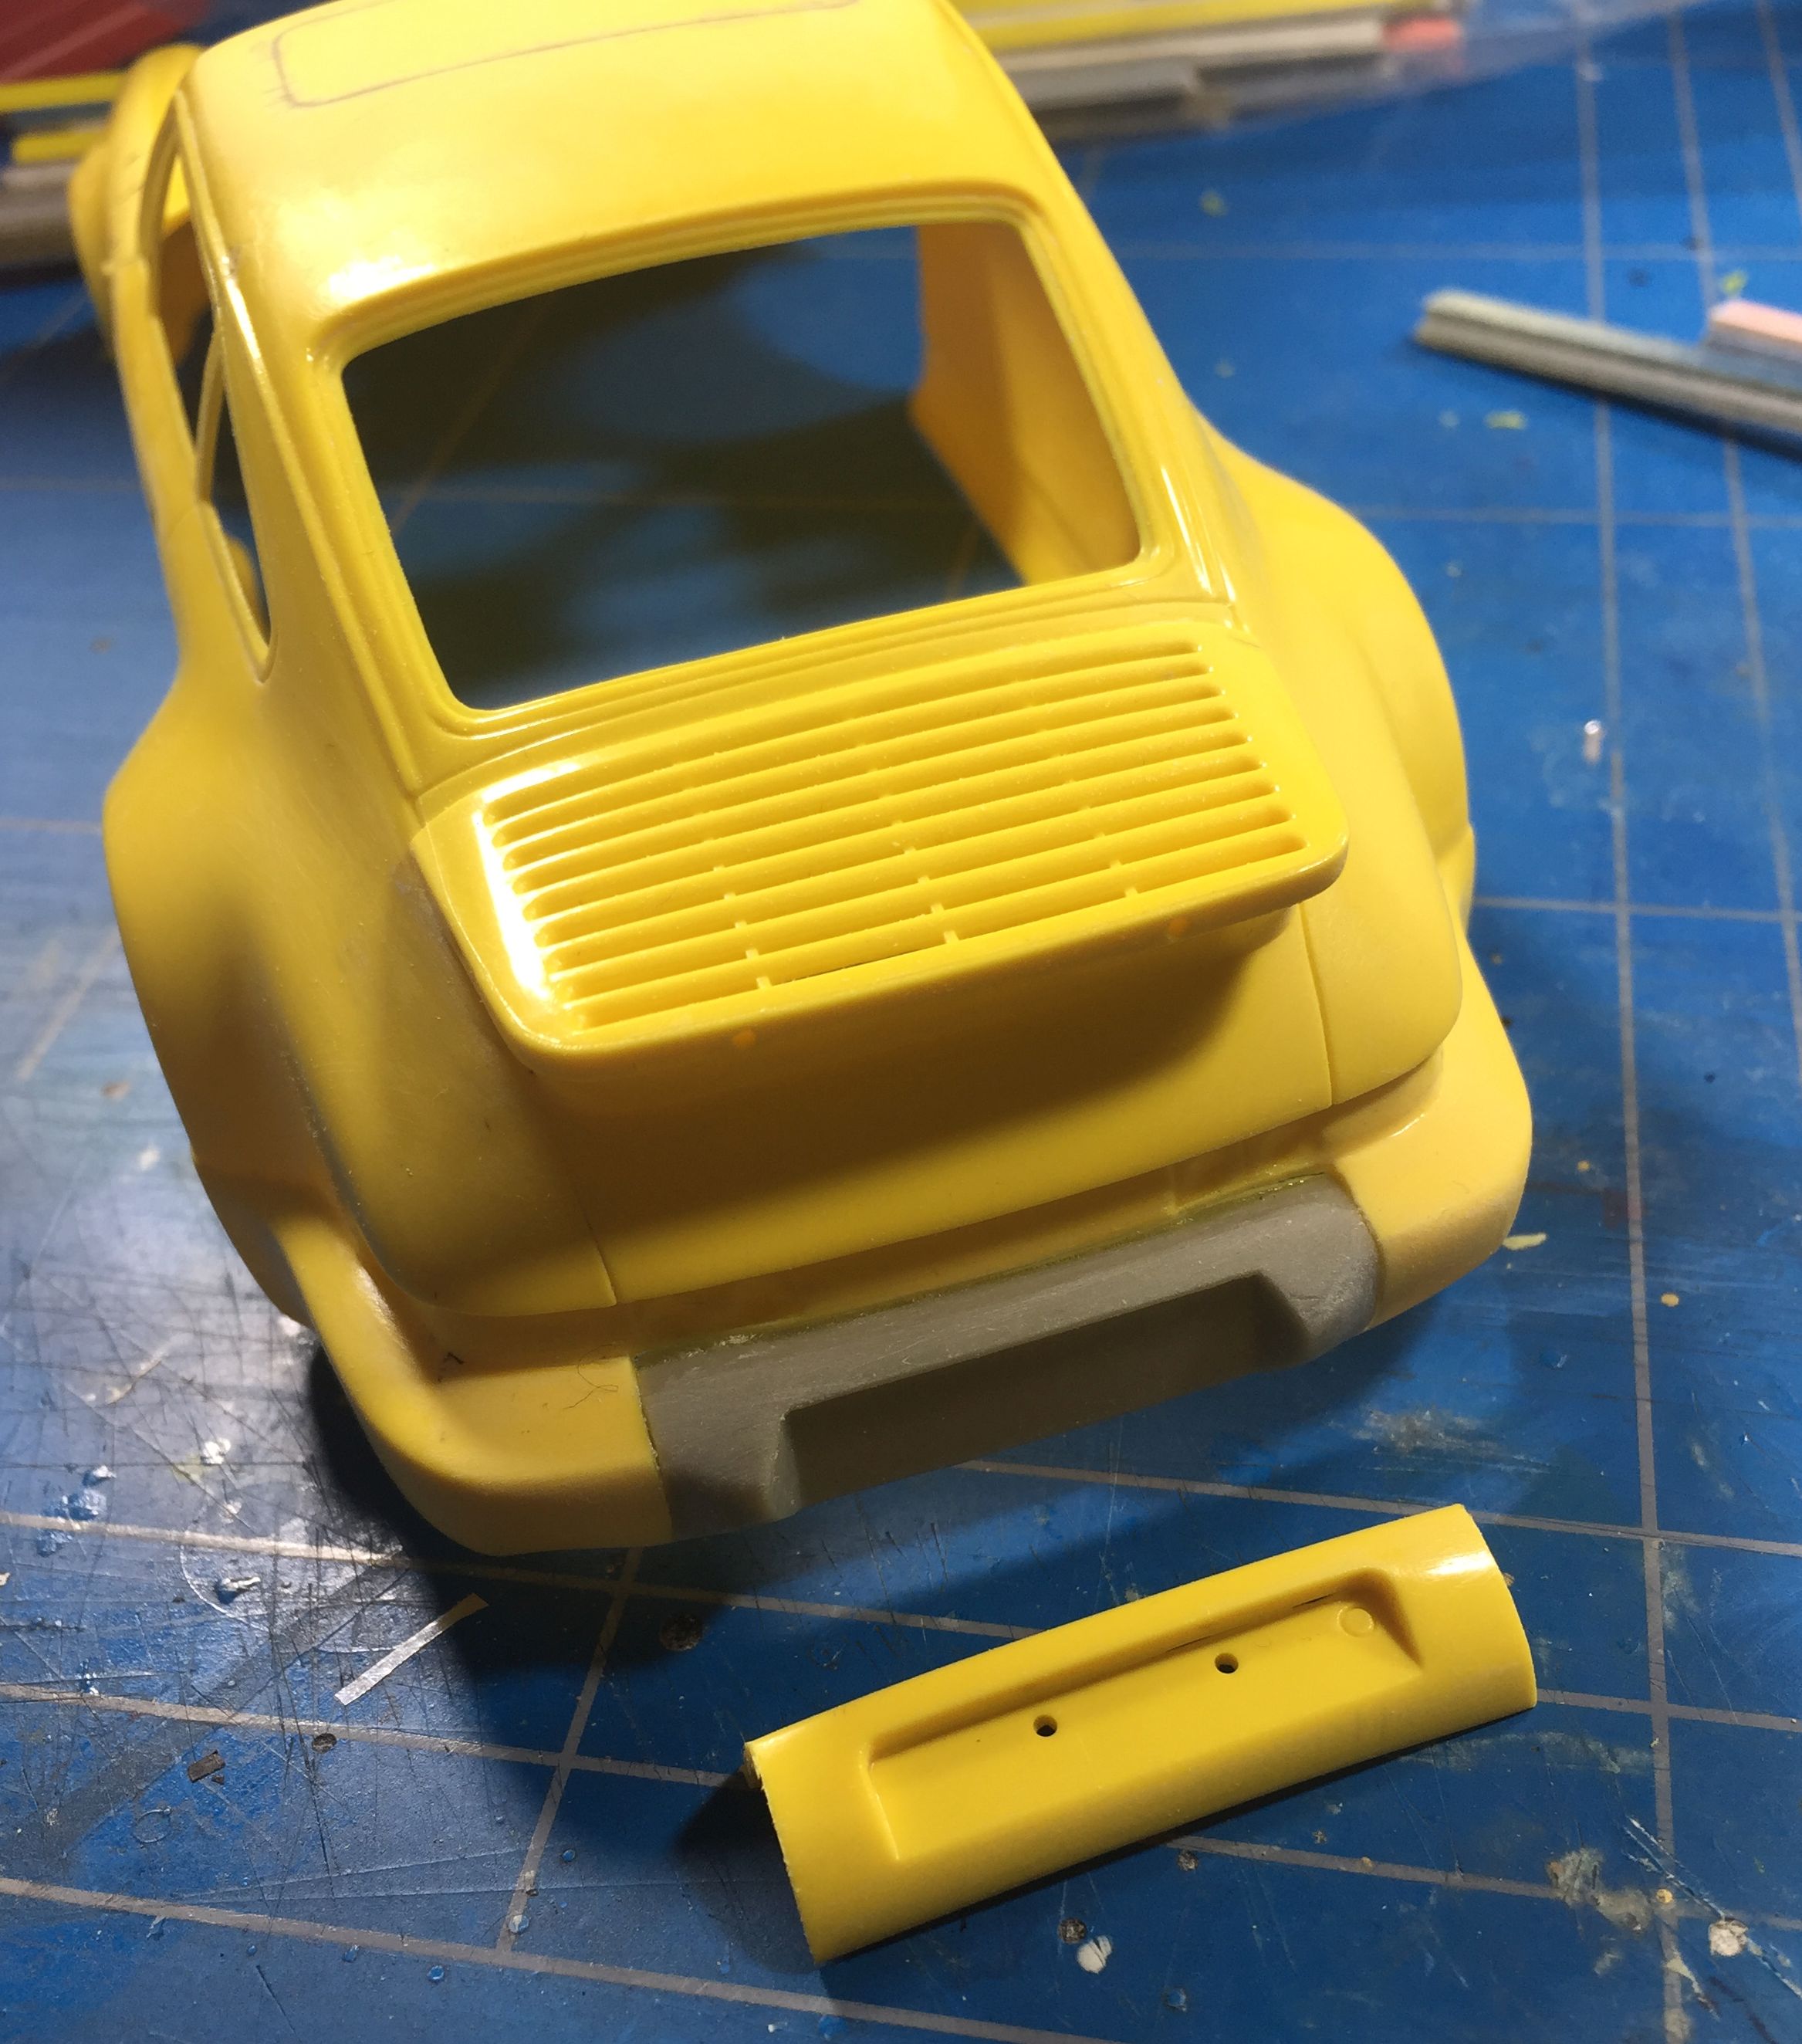
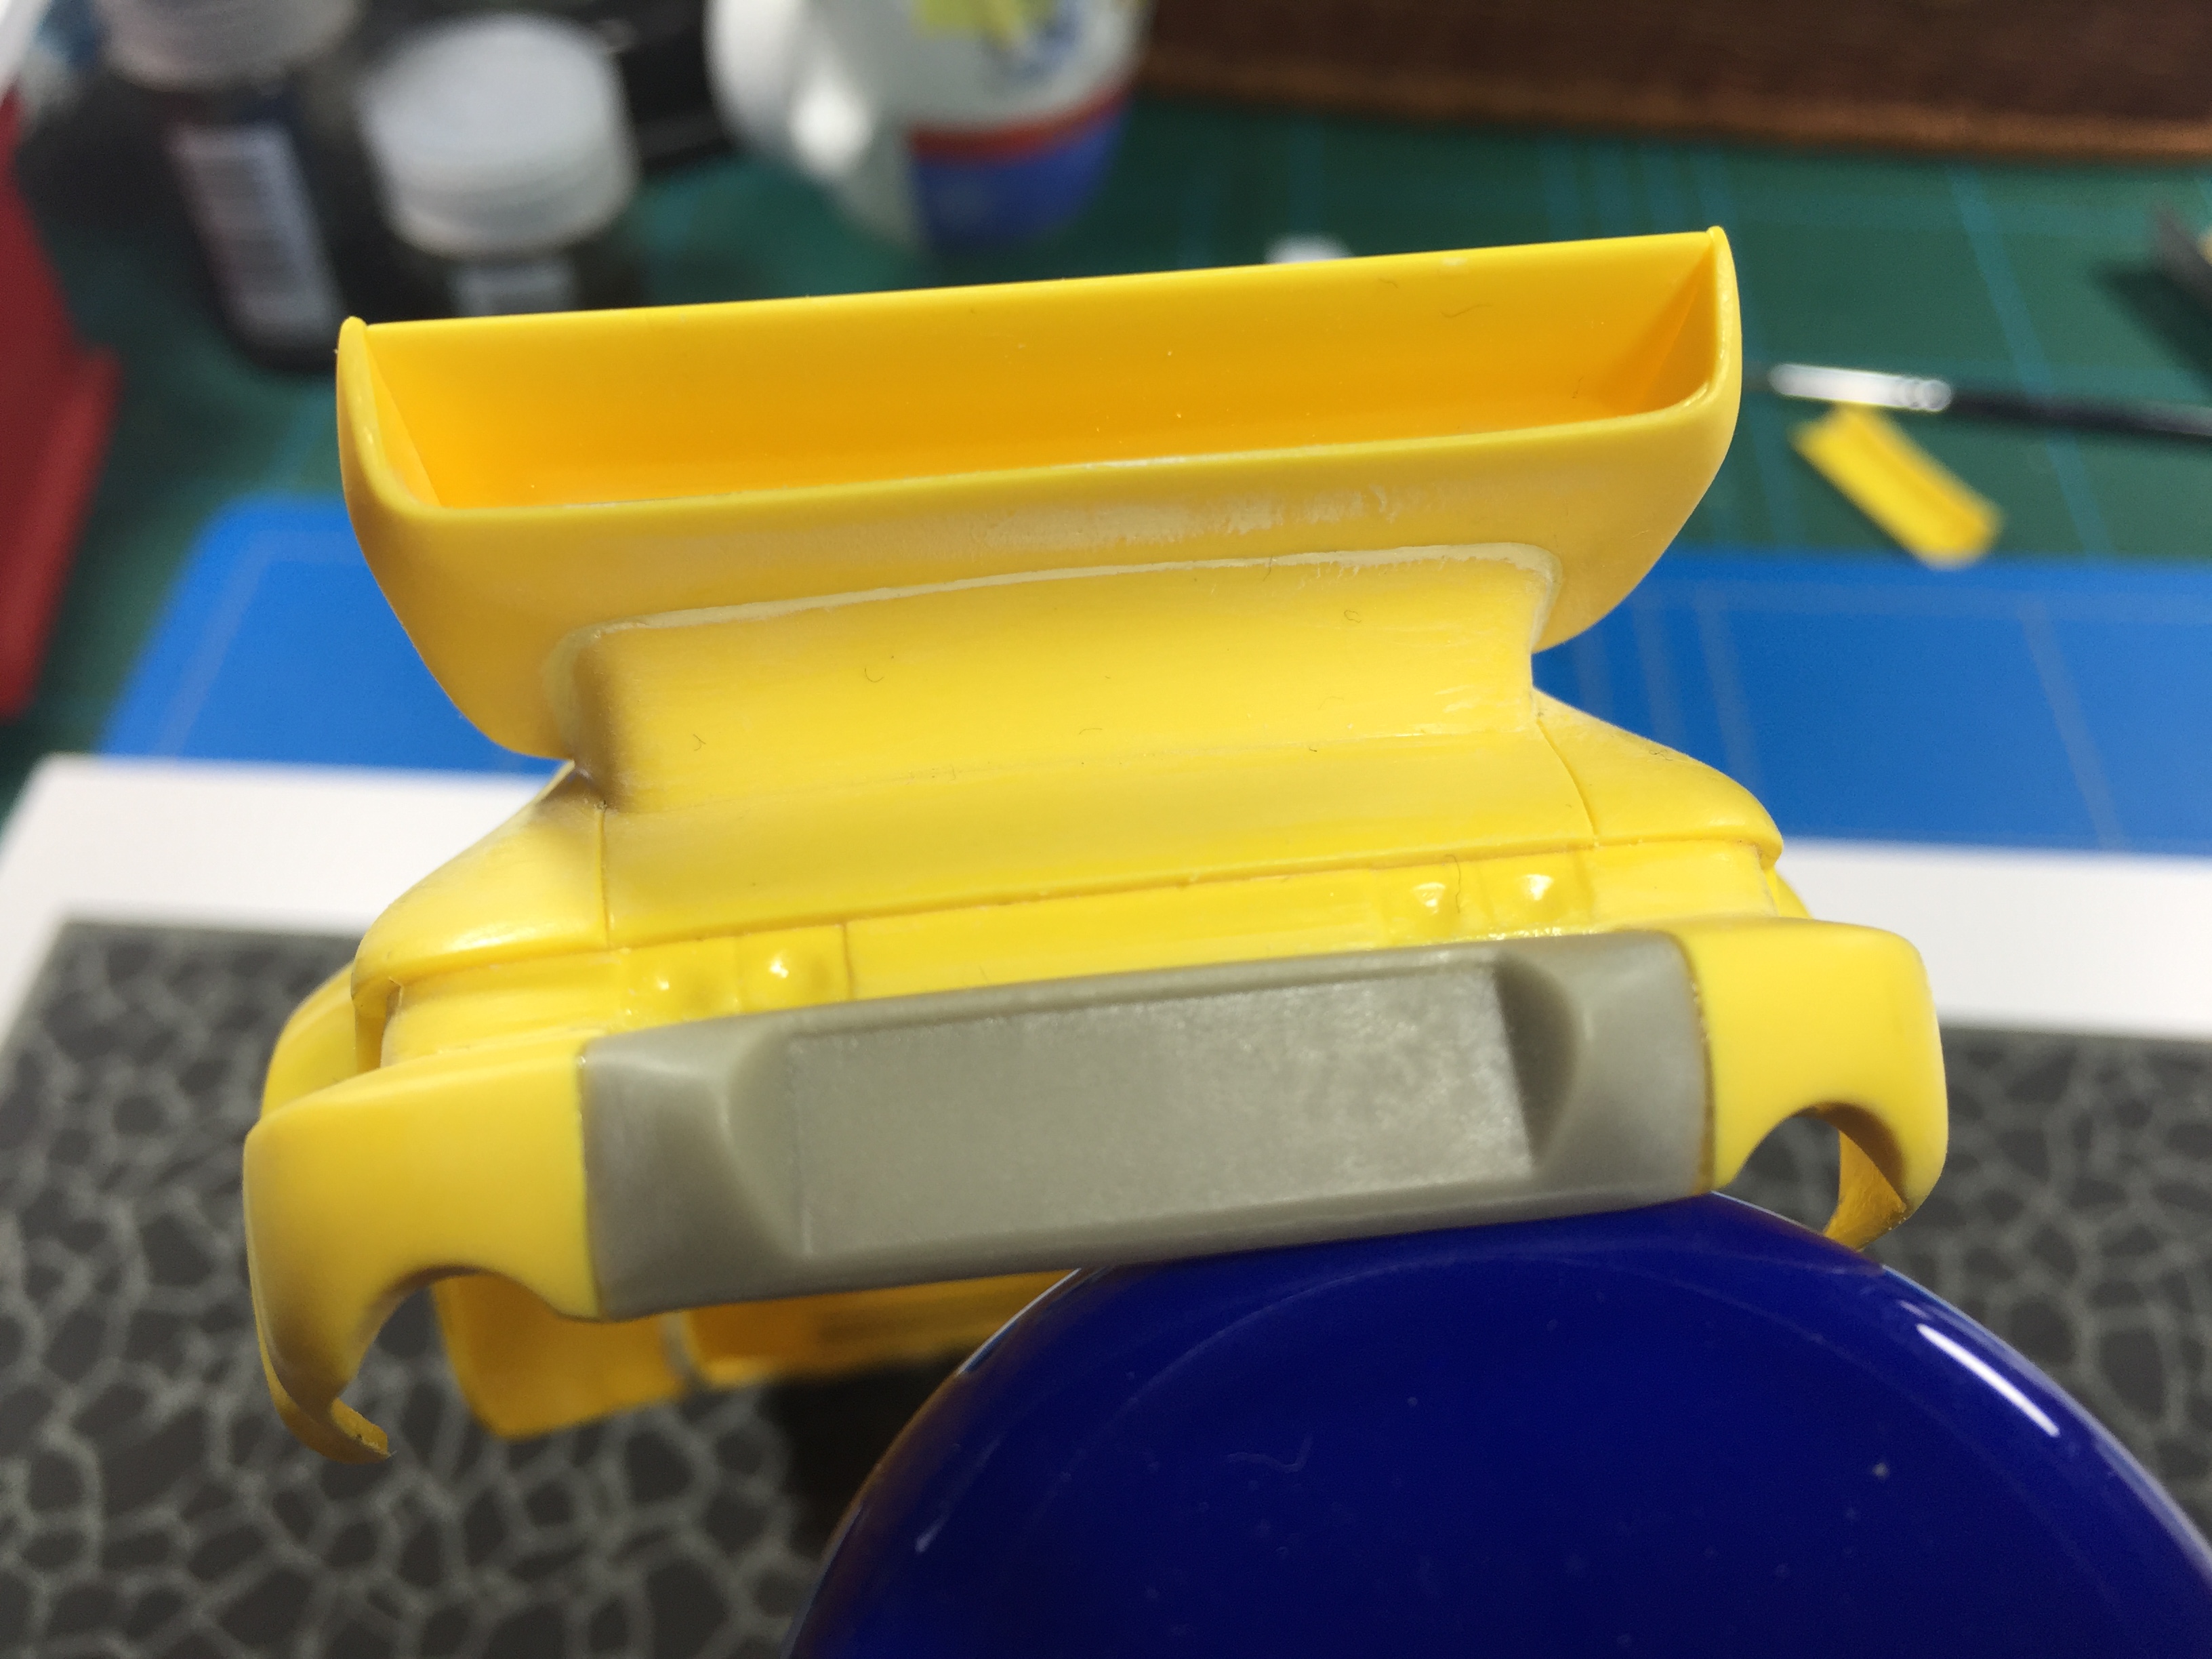
Hi folks, I'd like to start a WIP on this project. It's about this Fujimi kit: https://www.scalemates.com/kits/966180-fujimi-12450-porsche-911-carrera-3-8-rs Basically, I have started this kit already in May 2017. But gradually finding out about it's numerous shortcomings (more about that later), I put it aside for the time being. Some days ago, after finishing the Porsche 928 S, I opened the kit's box again and it clicked! So I decided to proceed with it. The first step I did last year already, is that I filled the panels of the sunroof. No Porsche RS ever came with a sunroof! I used styrene melted in glue for filling back then. I used this instead of regular filler because I heard that glue can help to prevent the appearance of ghostlines. Someday soon, we'll see if that's true... It does not look too nice but the surface is even and smooth as glass. There are quite a lot of aftermarket parts that I will use on this one. Nearly all of them are coming from Scale Production (SP), a German specialist exactly for these kind of things. Here are the parts: The 964 RS model comes with a different kind of rear bumper but the Fujimi kit has the regular Carrera one. So I cut that out and replaced it with a resin bumper part from SP: It took some sanding and filling with Plasti-Zap CA, but it worked out okay. The big rear wing has been fixed at this stage too: As can be seen, the wing needed filling as it's one part with the engine cover. On the lower side just aswell as the upper side: A little mock-up with the wing "board" fixed. I love that view! The Fujimi kit comes with molded-on door handles like this: Proxxon time! I also drilled 2 holes for the separate SP door handles to be fixed in later on: Like that: That's all for now. I hope you like my progress.
-
Re-engineering Monograms Lotus Esprit...new update!
Tommy124 replied to Dann Tier's topic in WIP: Model Cars
Visitor's day in the Duplicolor Arena... Batch processing about to start! -
I don't think so... That is one of the ZG versions (longer front part, glass covers on the headlights) and those kits have the fender flares molded to the body. See these images: https://www.1999.co.jp/eng/image/10243799
-
Lamborghini Countach Anniversary (1/24 scale by Italeri)
Tommy124 replied to Tommy124's topic in Model Cars
Thanks folks, for the kind words. Appreciate it! Thanks, John! I'll try to live up to that... Thanks, Dann! You're absolutely right about the exhaust tips, they look a bit thickish, especially on those rear view photos. Too kind about the compliment! One thing's for certain, I am learning a lot here, not least from you! Thanks, Lloyd. As I mentioned above, finding the right wheels and tyres was one of the great tasks about this kit. As I said I have eventually taken the rims from a Fujimi kit because they look nice. But as far as tires are concerned, there is not one single of them many, many Fujiimi Countach kits that has tire sizes somewhere near the way they should be. Thanks to you too, Dan! I think Italeri is really underrated. They do good kits with nice bodies and details, but as we all know, they can't do wheels and tires. So you need to make sure you got the right wheels in your spare parts box before you can properly complete an Italeri kit. That's a bit stupid, right? Then again I like the fact that Italeri reach a good level of detailing with significantly less parts than Fujimi EM kits. -
Lovely color, great chrome job, beautiful model!
-
It's this one: https://www.scalemates.com/kits/939397-fujimi-039299-nissan-fairlady-240zg But I would rather go for one of those kits with separate fender flares because this one has them molded to the body. And masking them (in case you want to go for a 2-color-scheme) is not as easy as one would think... which is why mine are painted in body color, too. Personally, I would rather go for this kit now: https://www.scalemates.com/kits/322912-fujimi-038421-nissan-fairlady-z-432 However, that is the short "Z" version and not the longer "ZG" one.
-
Beautiful, I love it!
-
Good job on this one! I'm regularly annoyed by those self-adhesive stickers in Snap kits too, but you found an acceptable solution to the problem. About the Molotov, did you seal those parts with Alclad Aqua Gloss or anything else?
-
Hi Dann, your wish is my command: http://www.modelcarsmag.com/forums/topic/136205-lamborghini-countach-anniversary-124-scale-by-italeri/
-
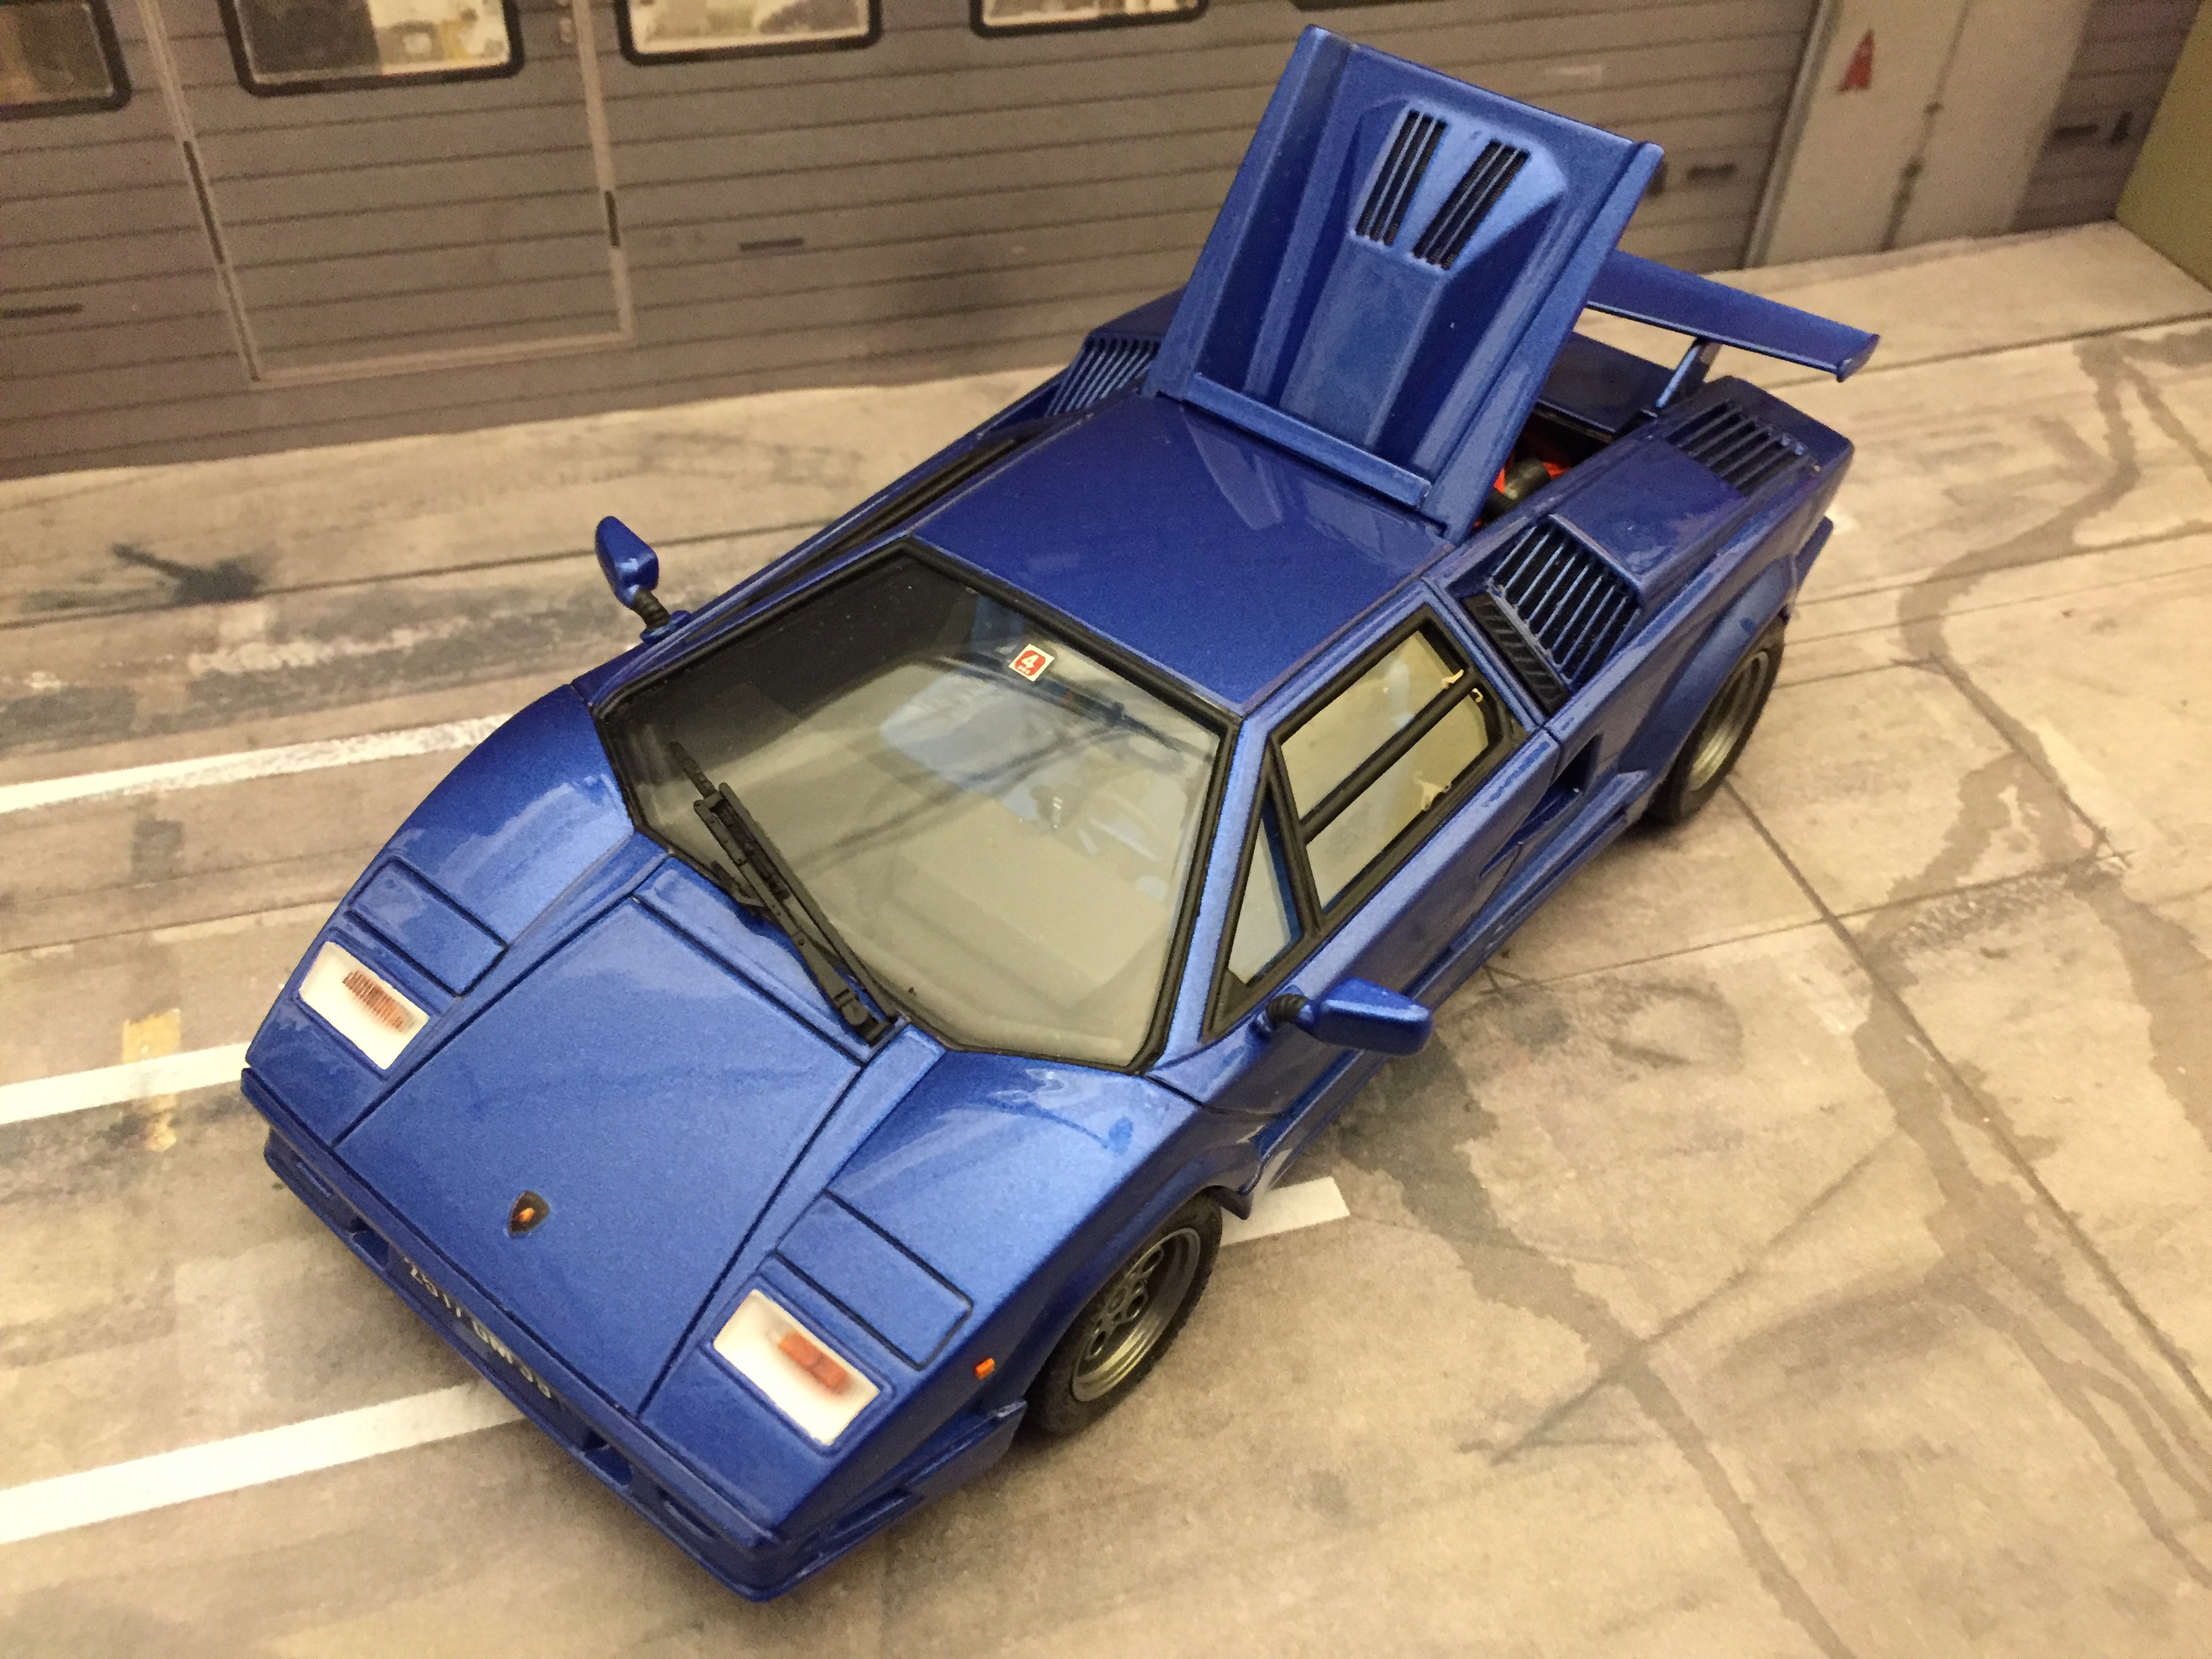
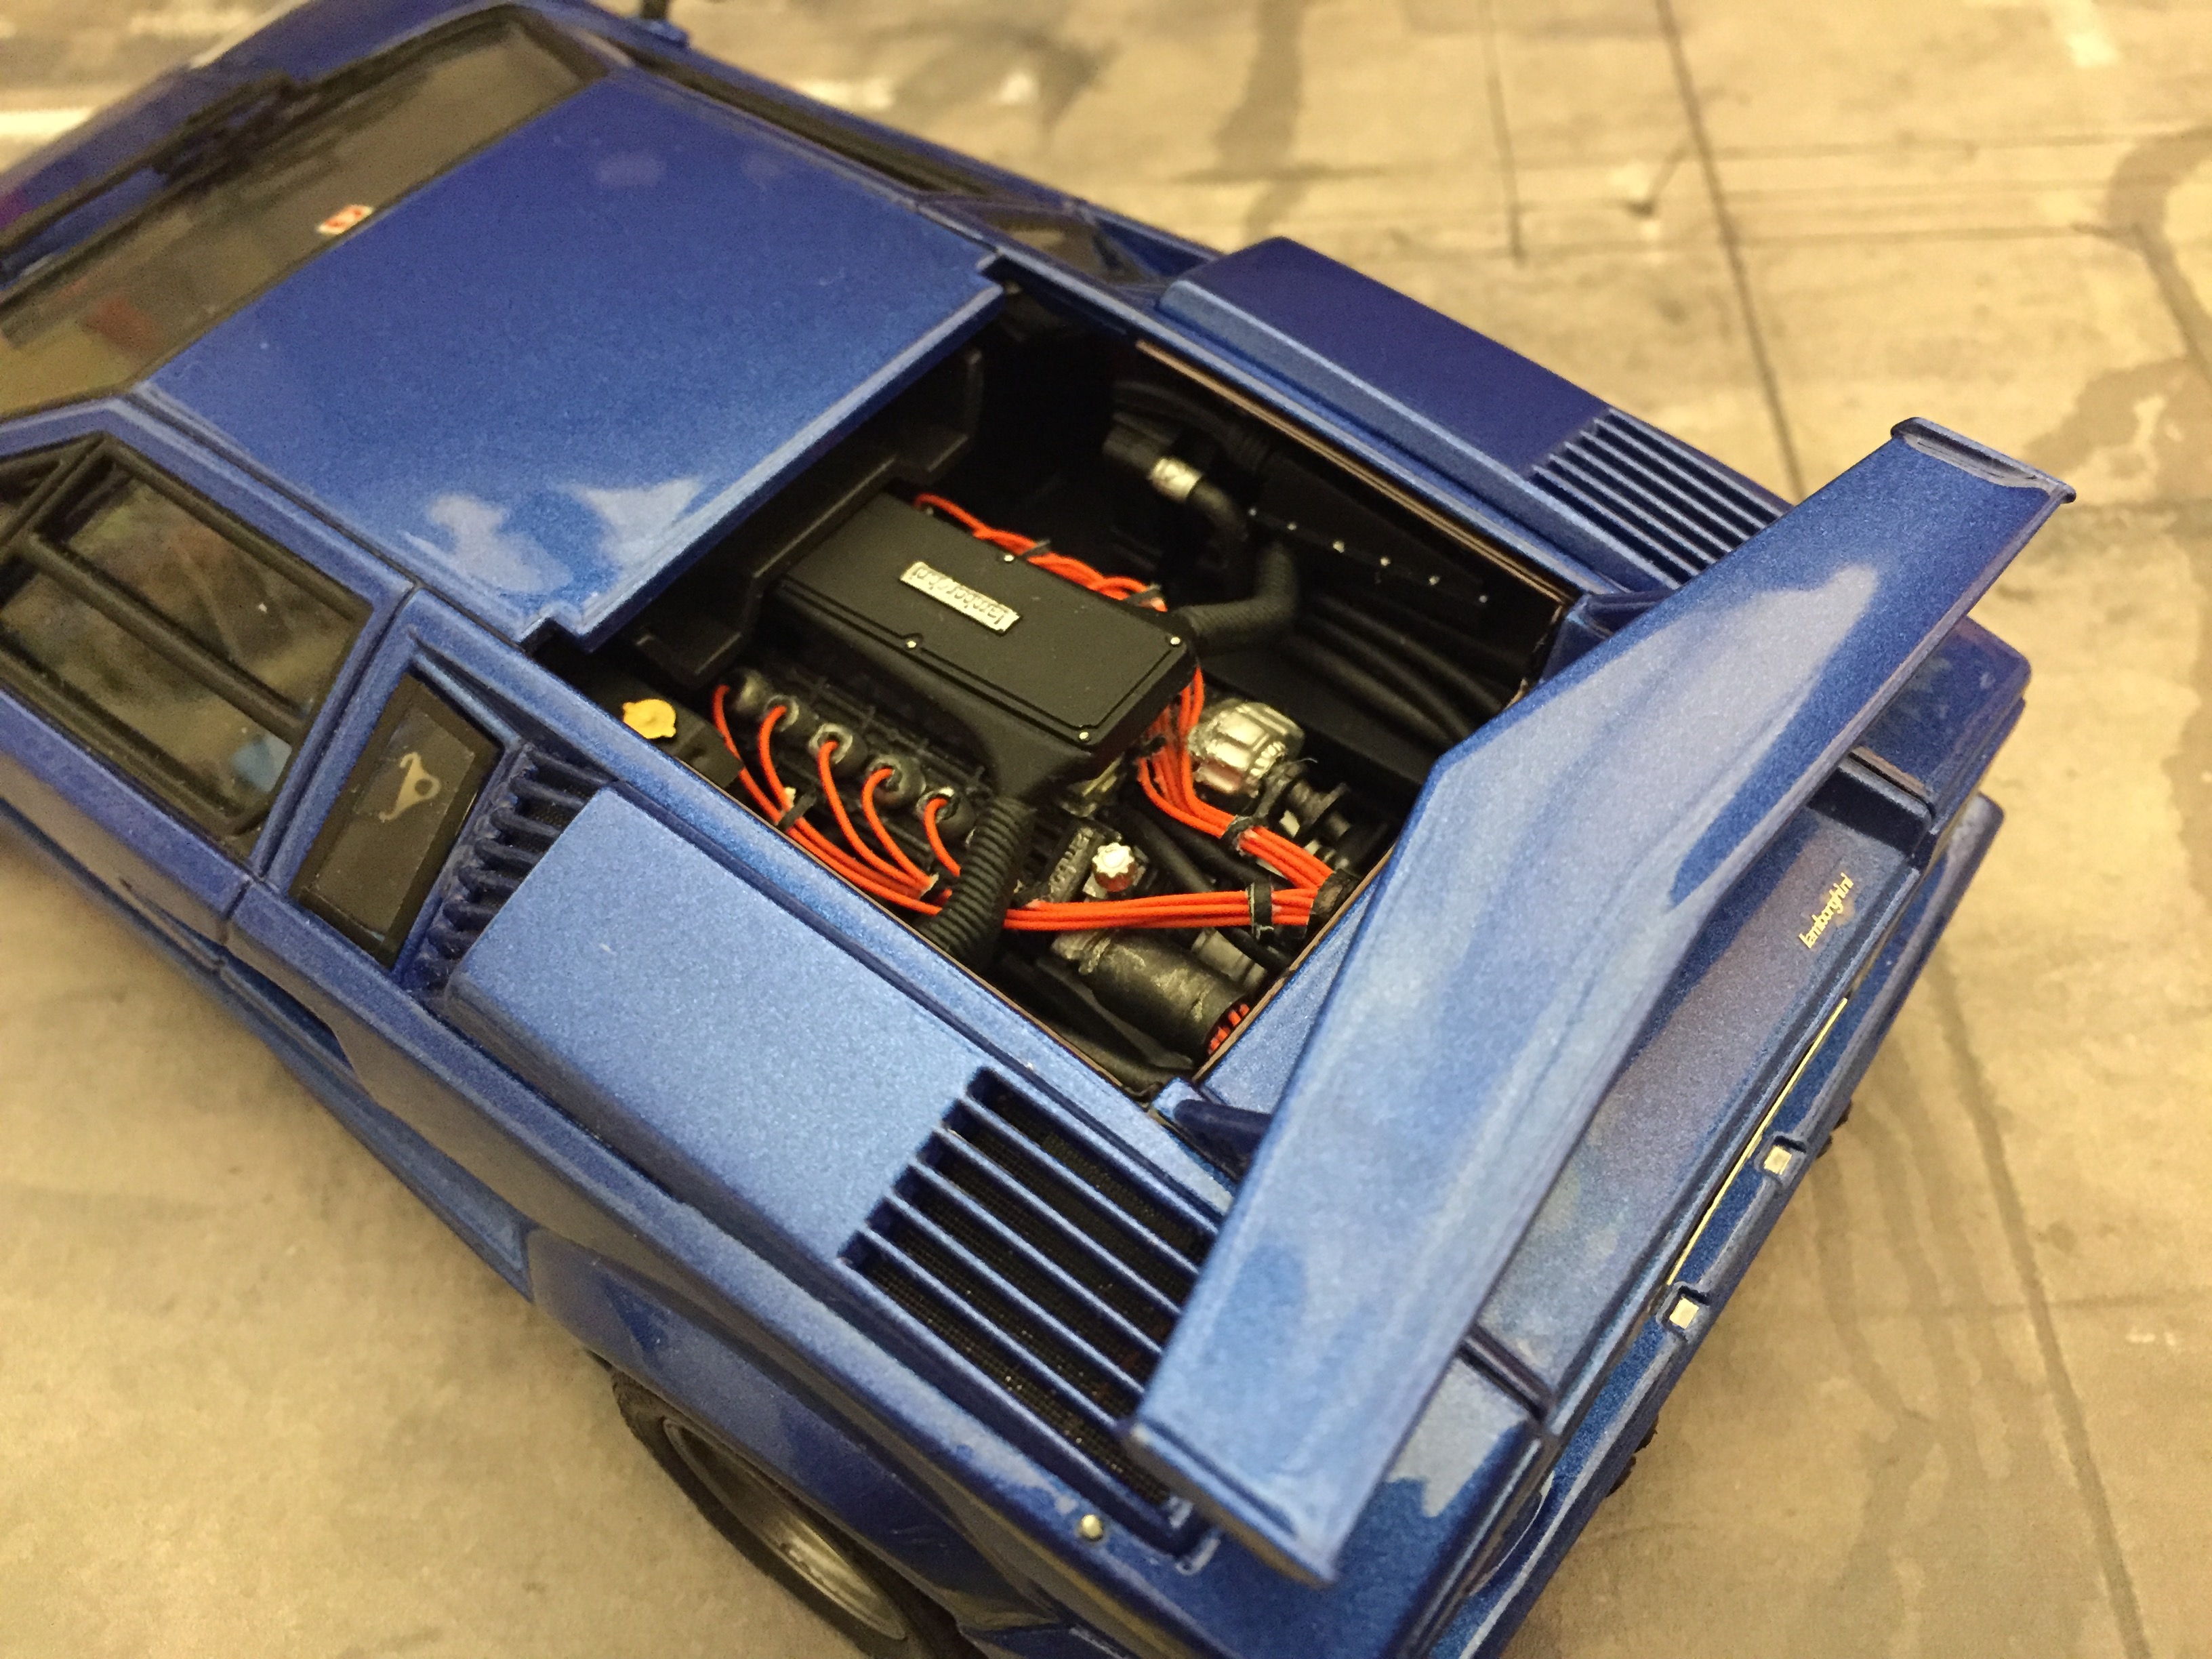
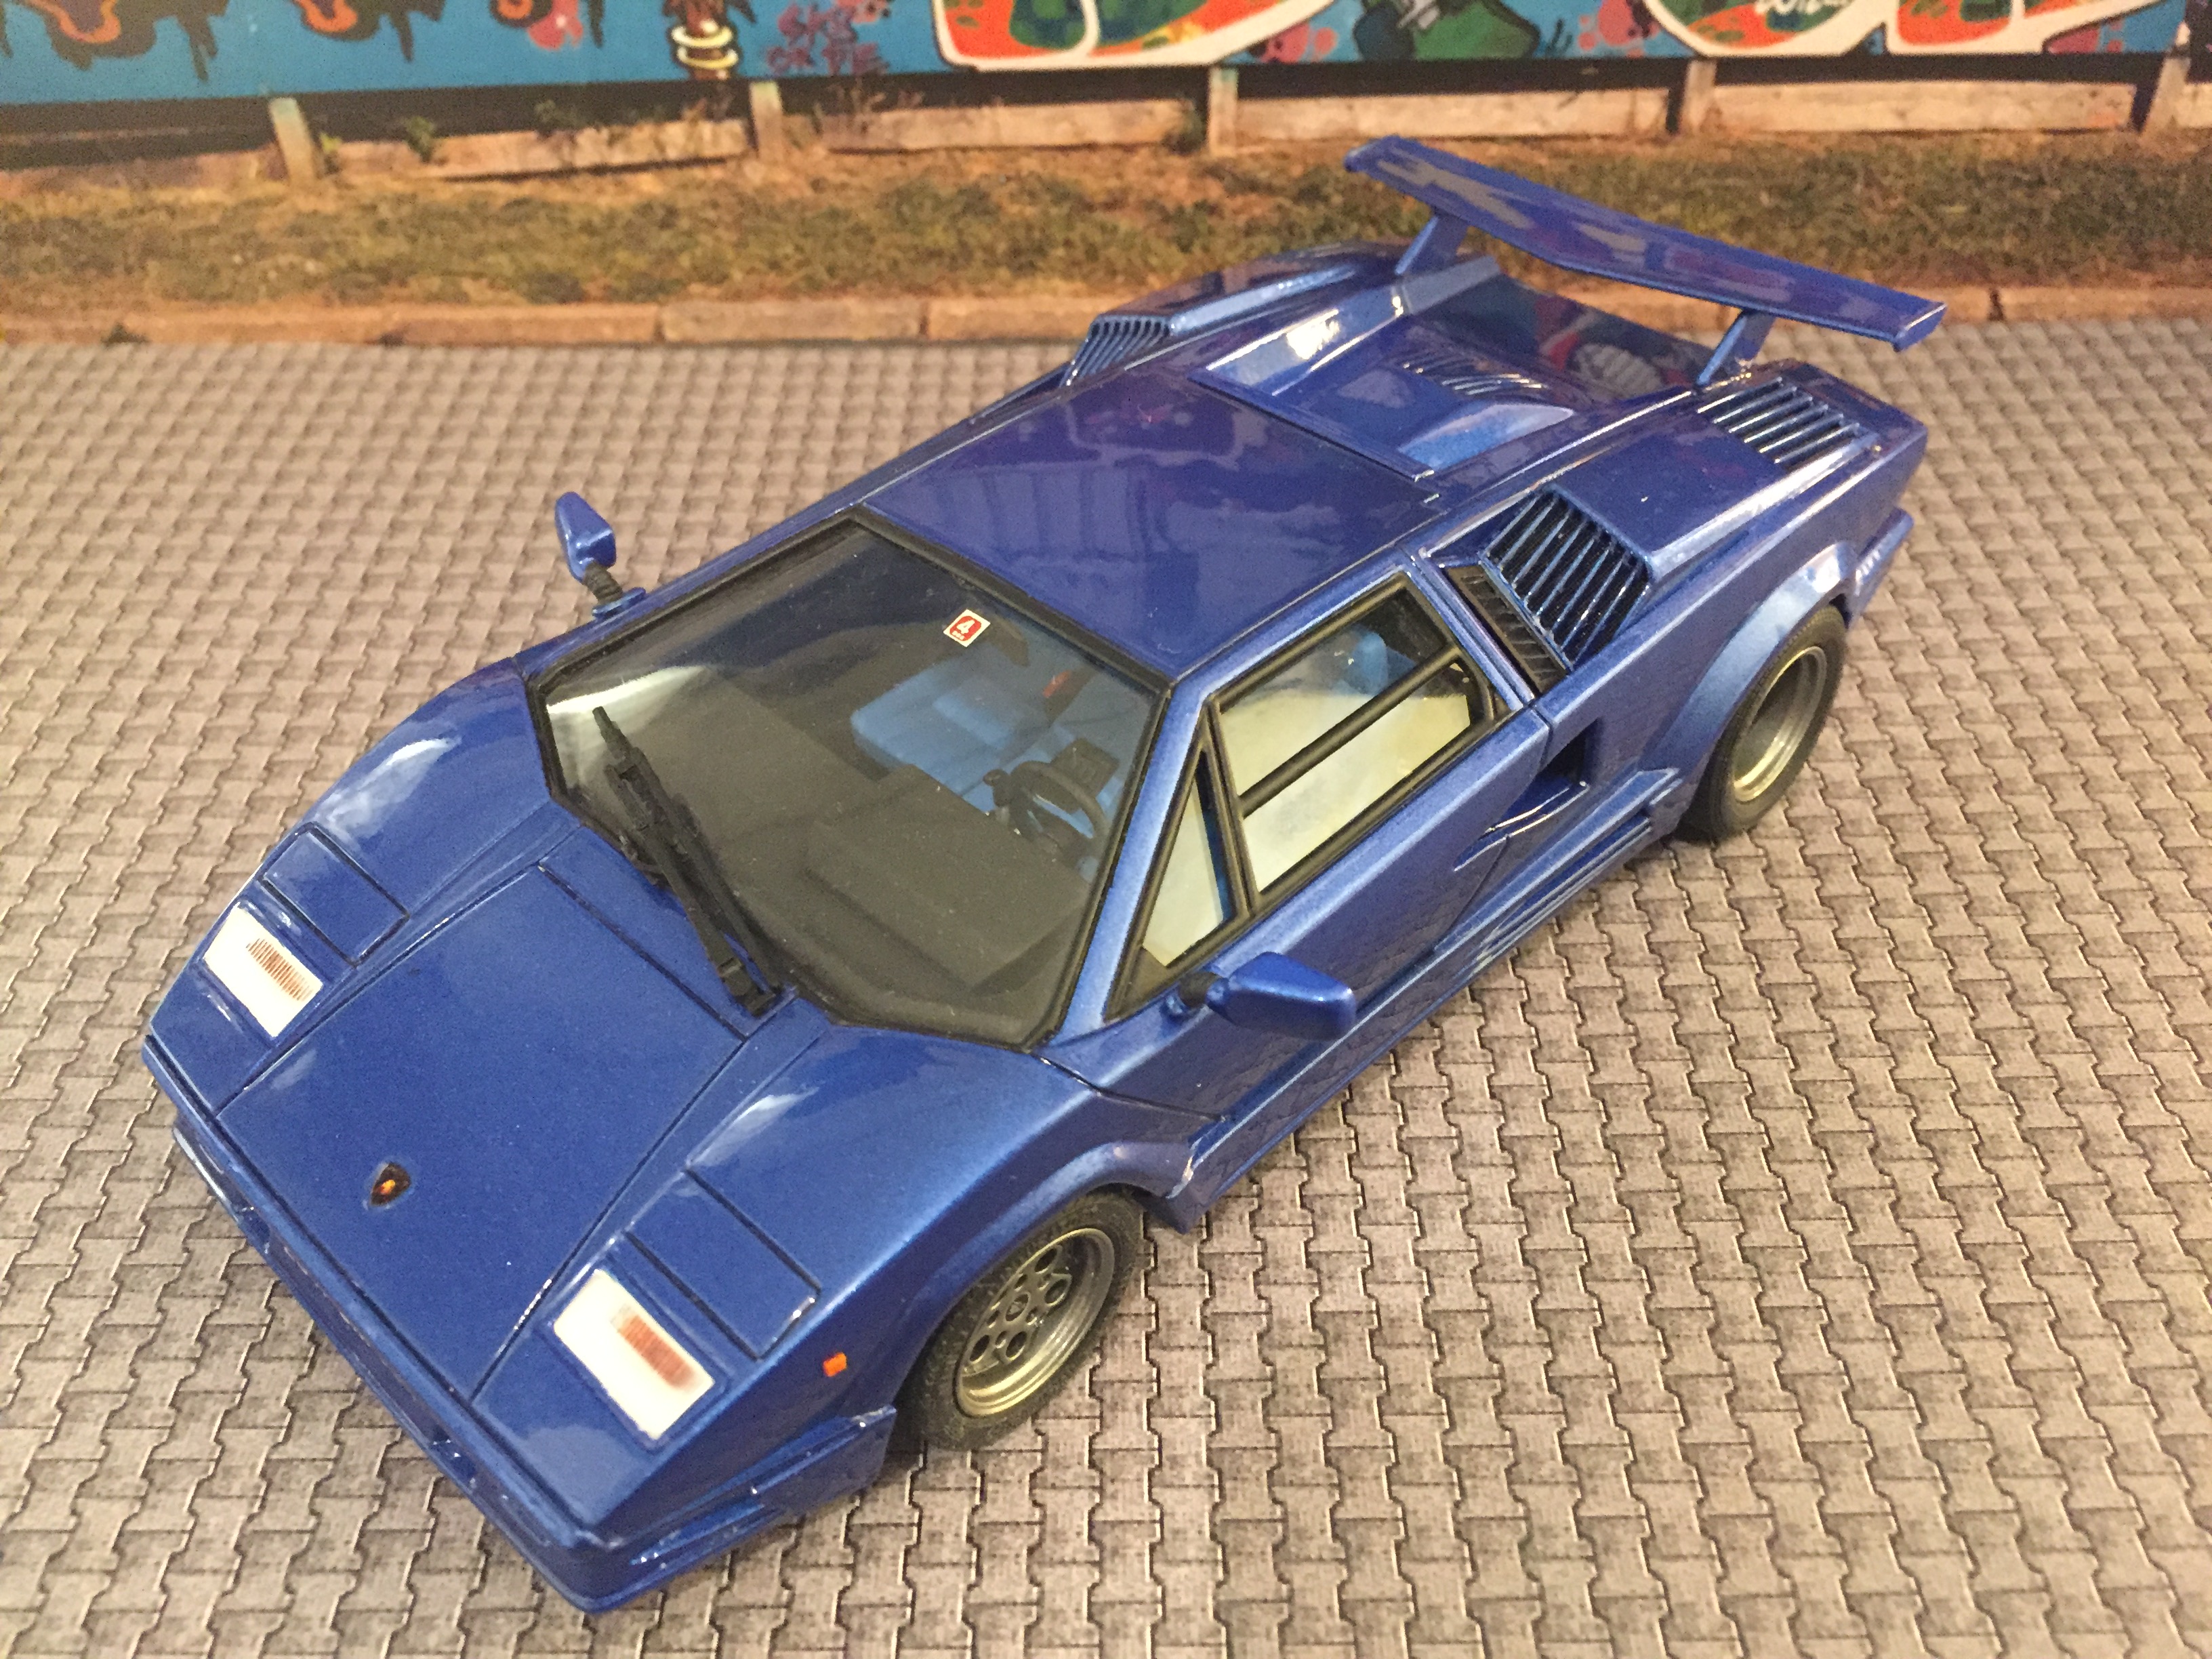
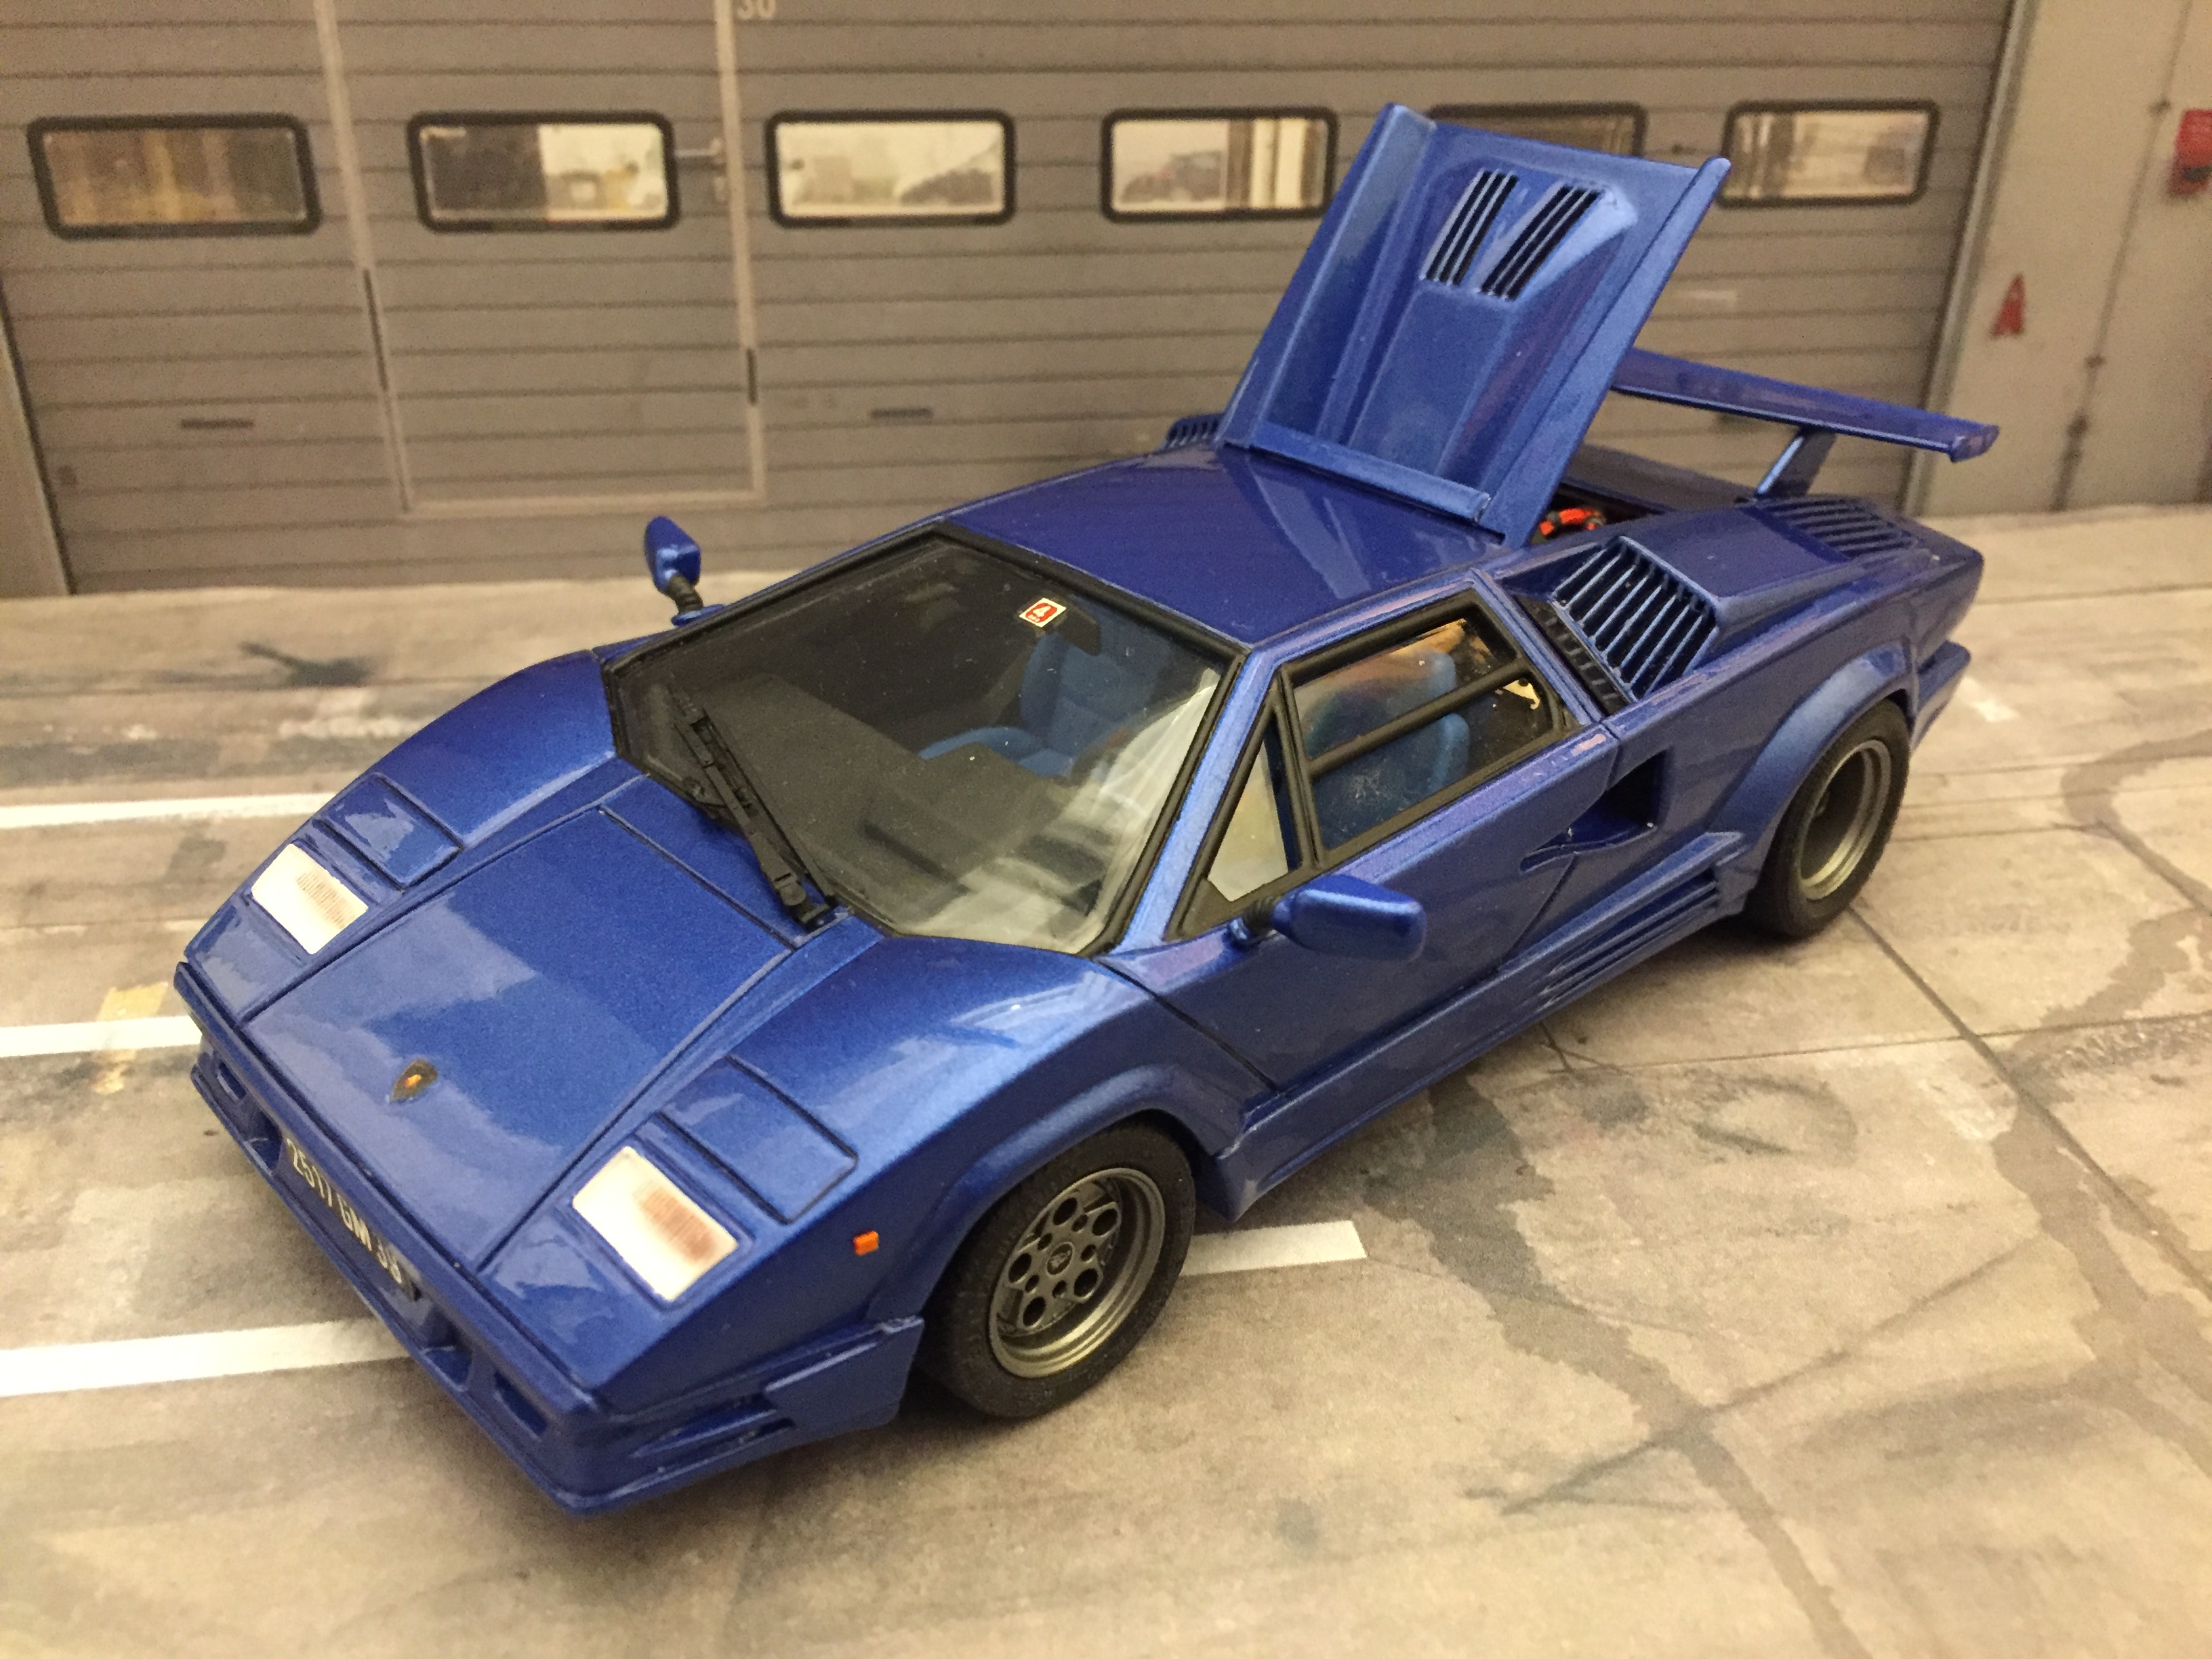
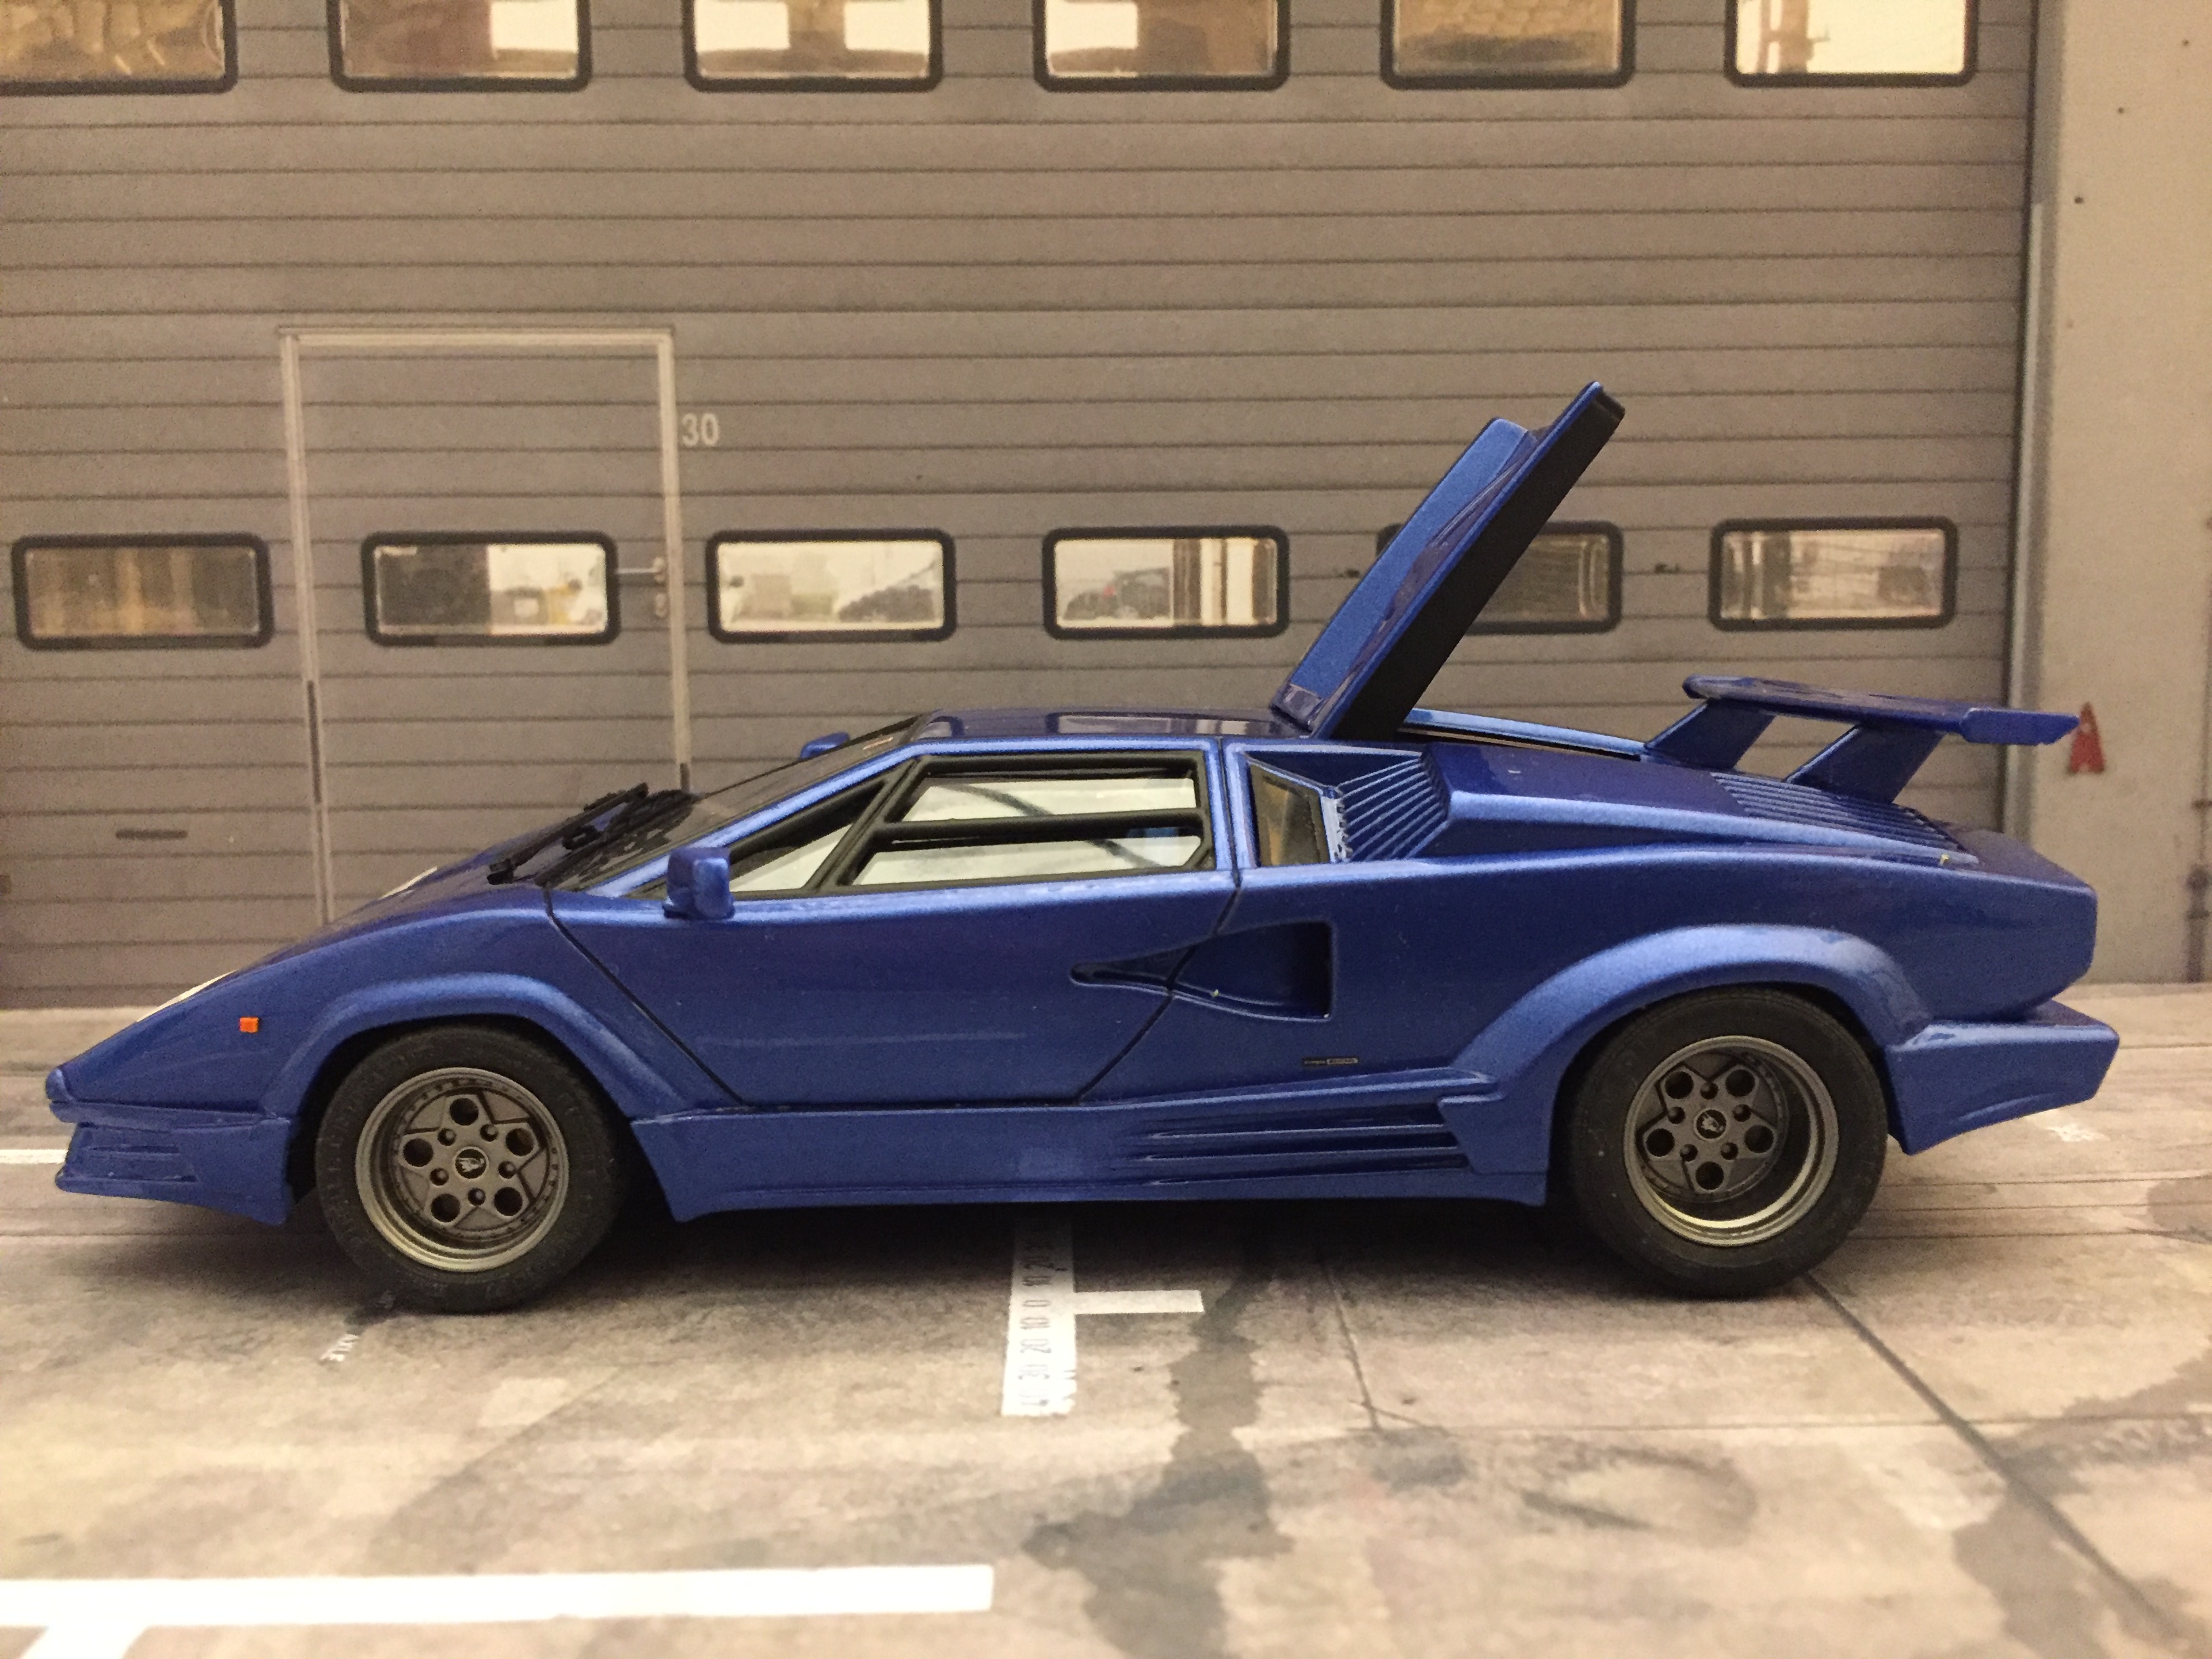
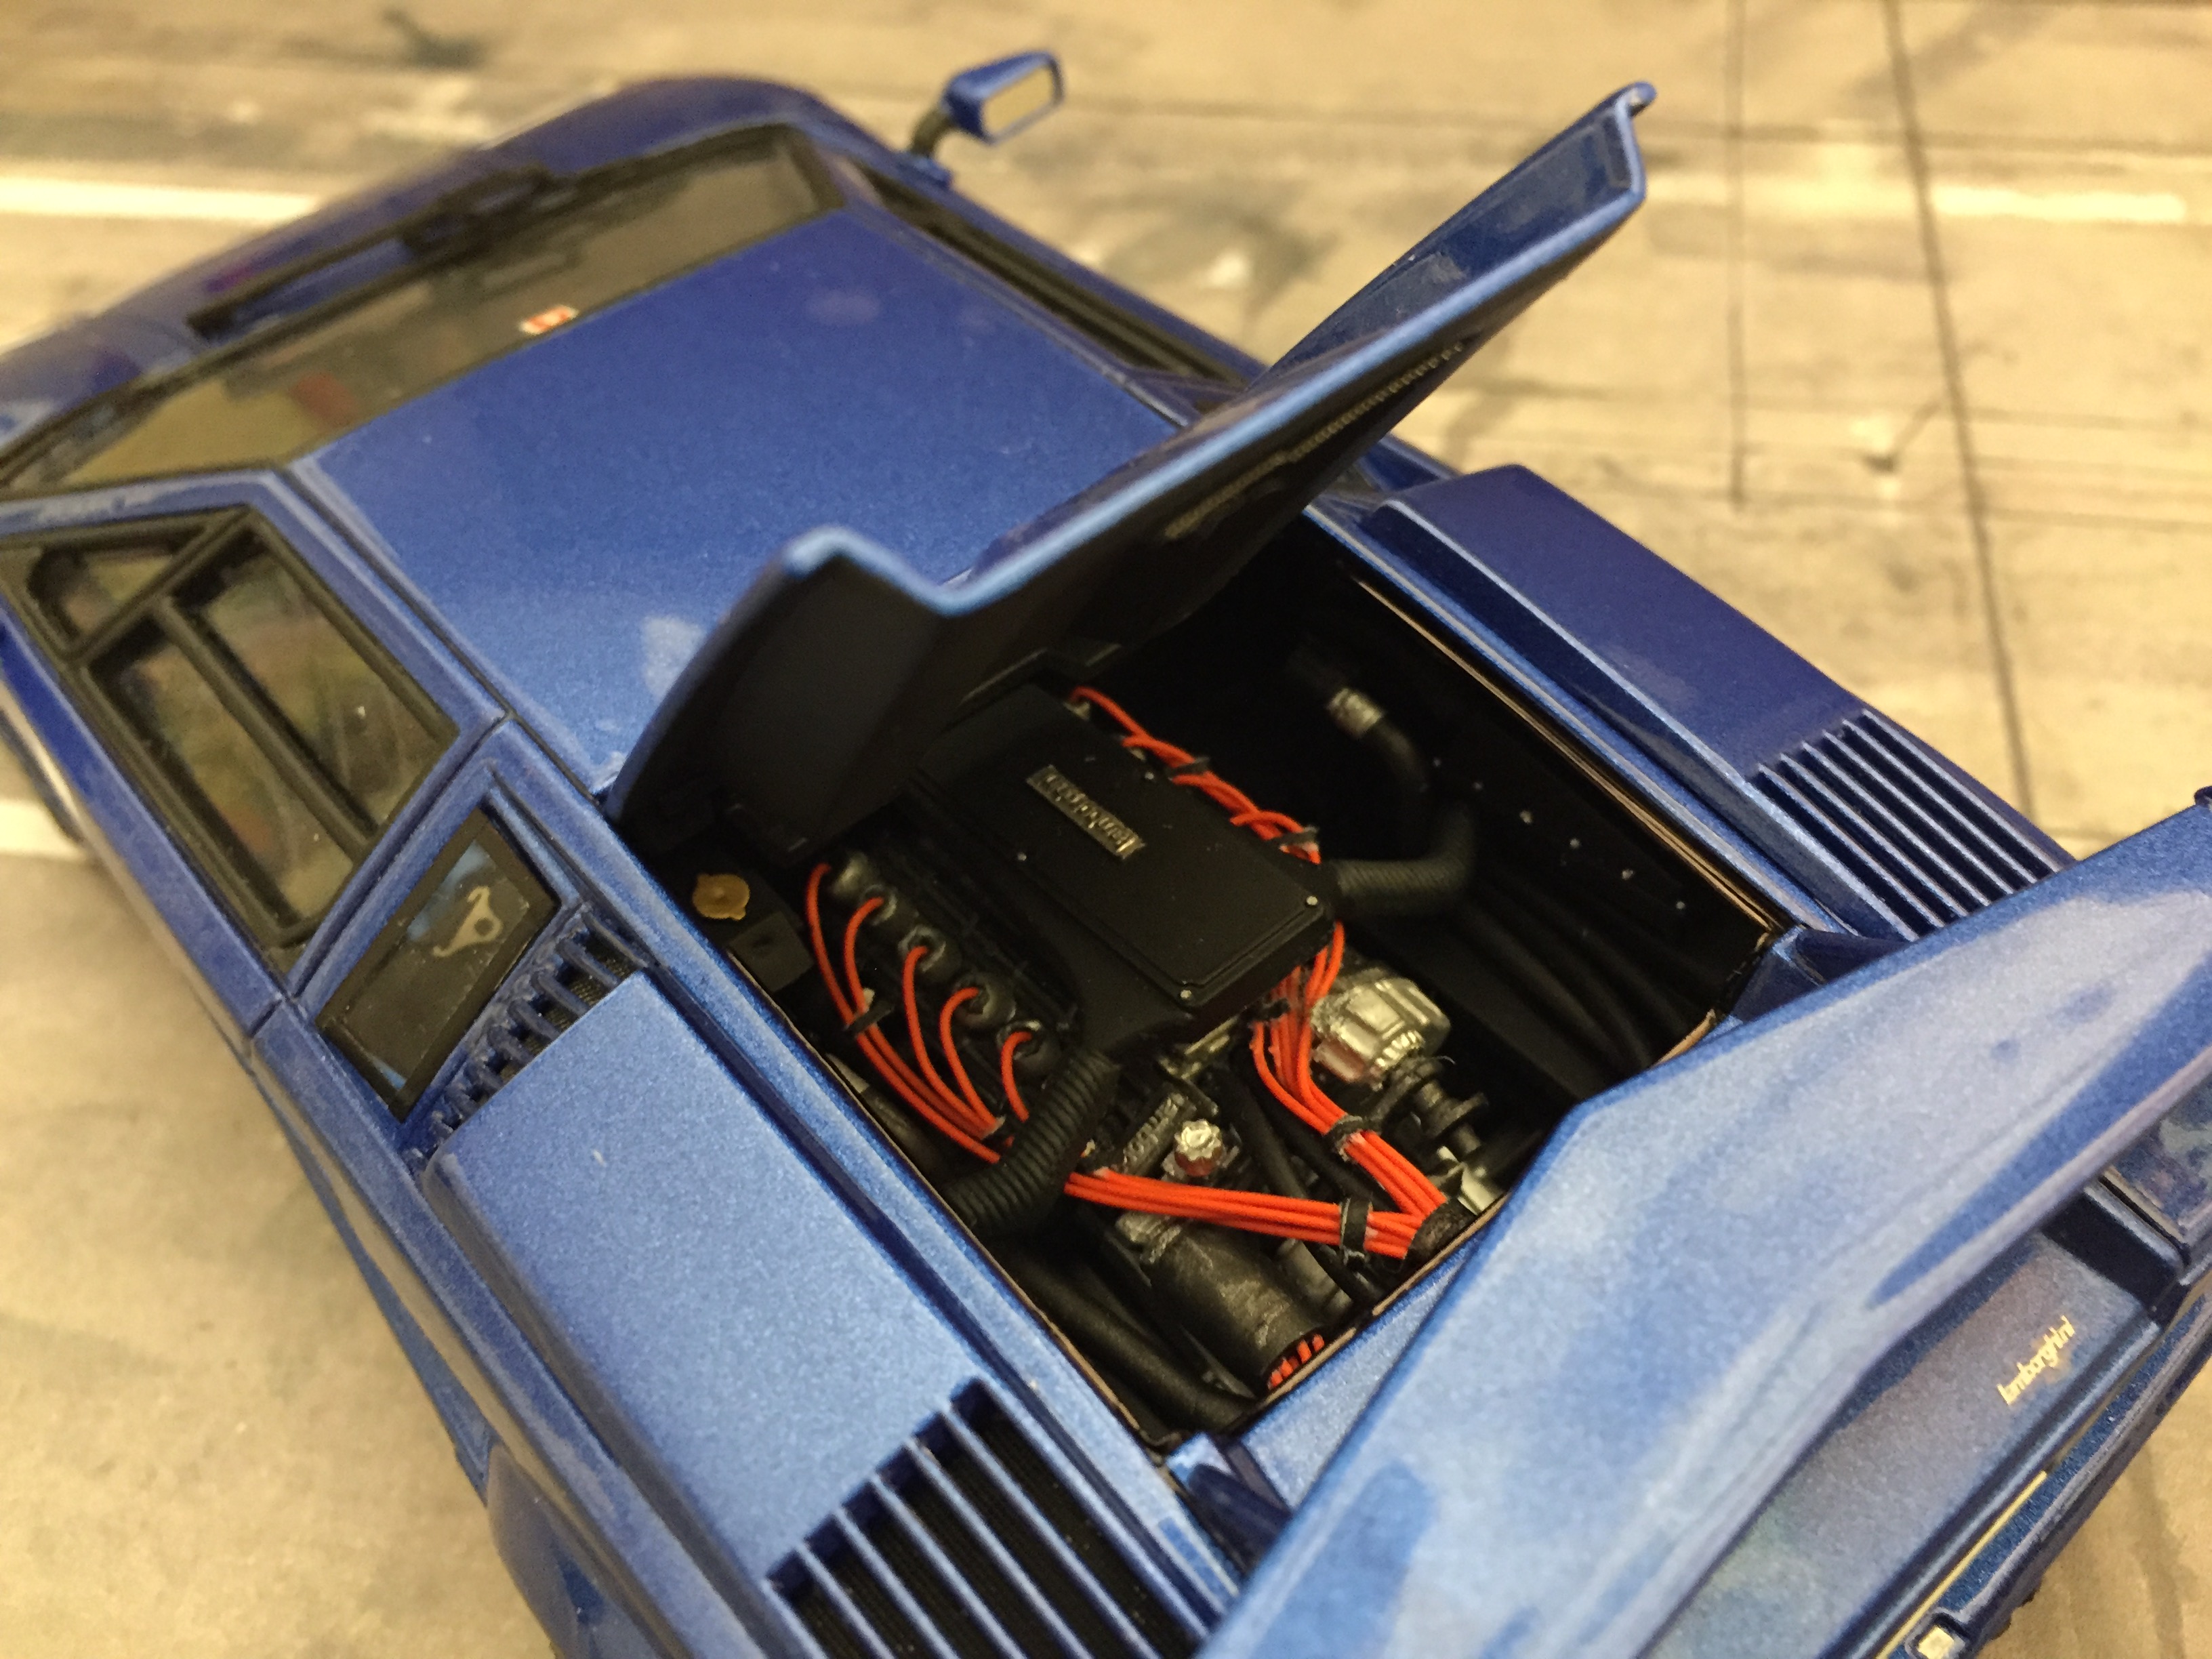
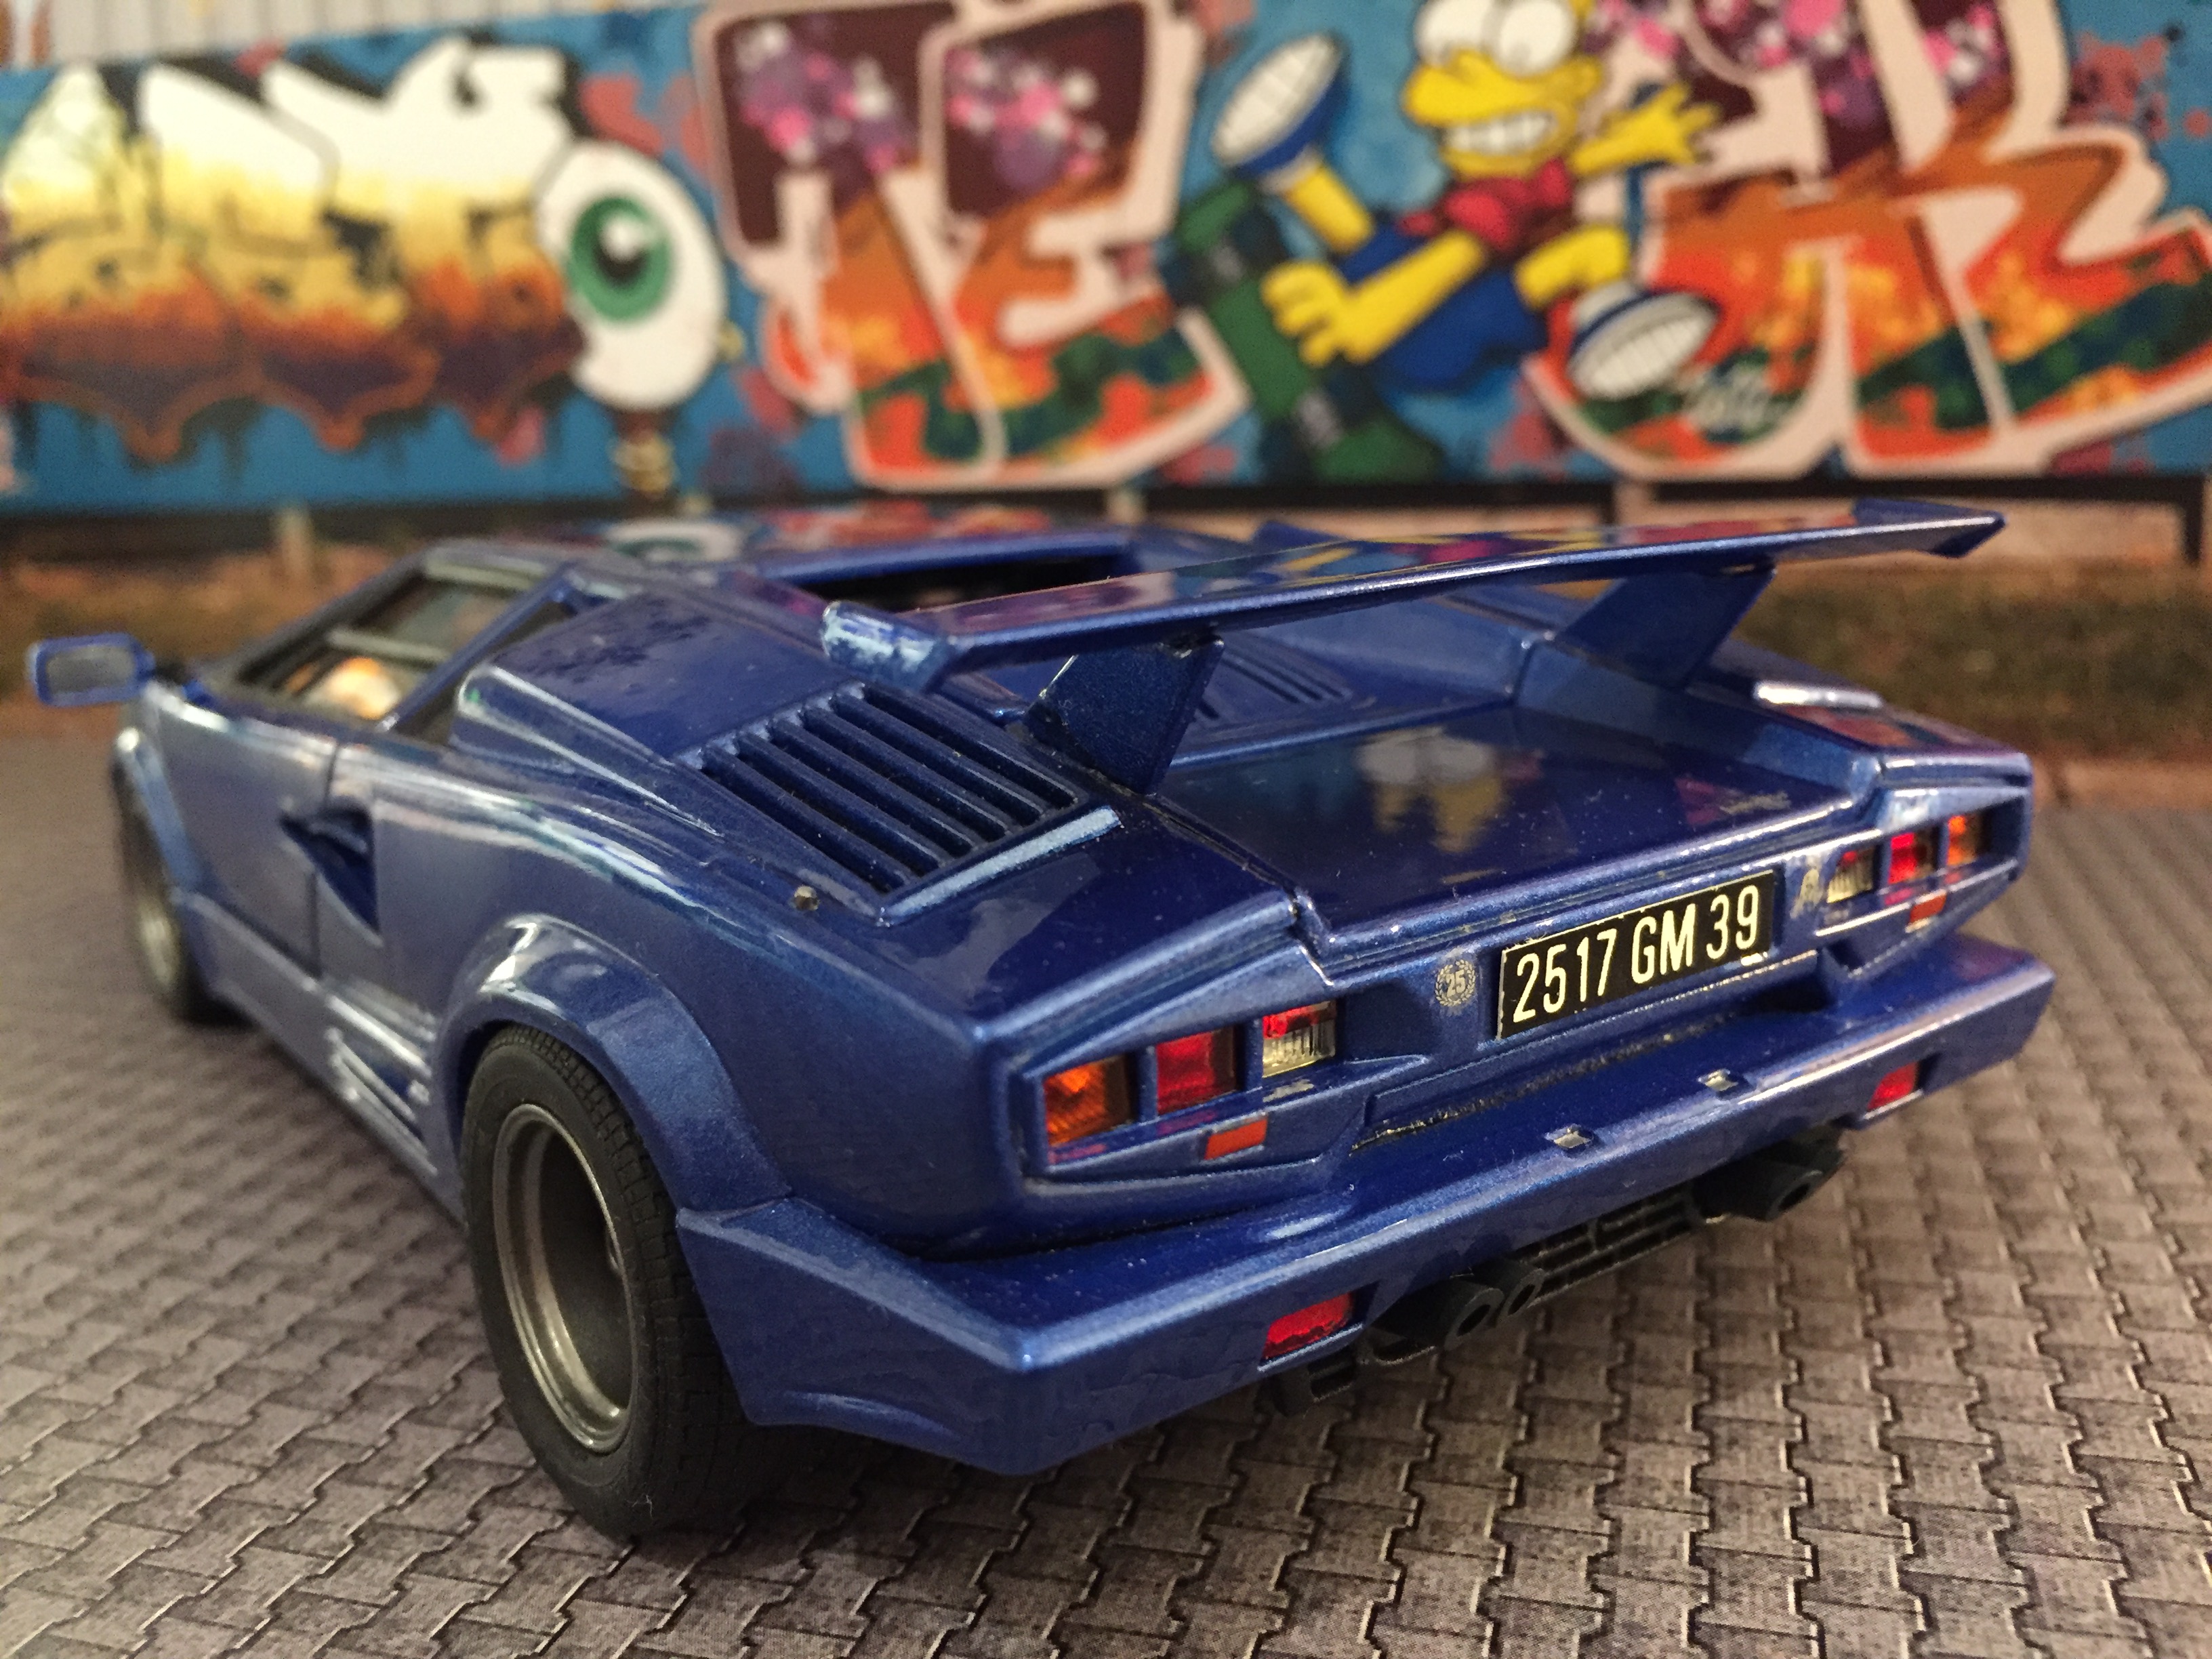
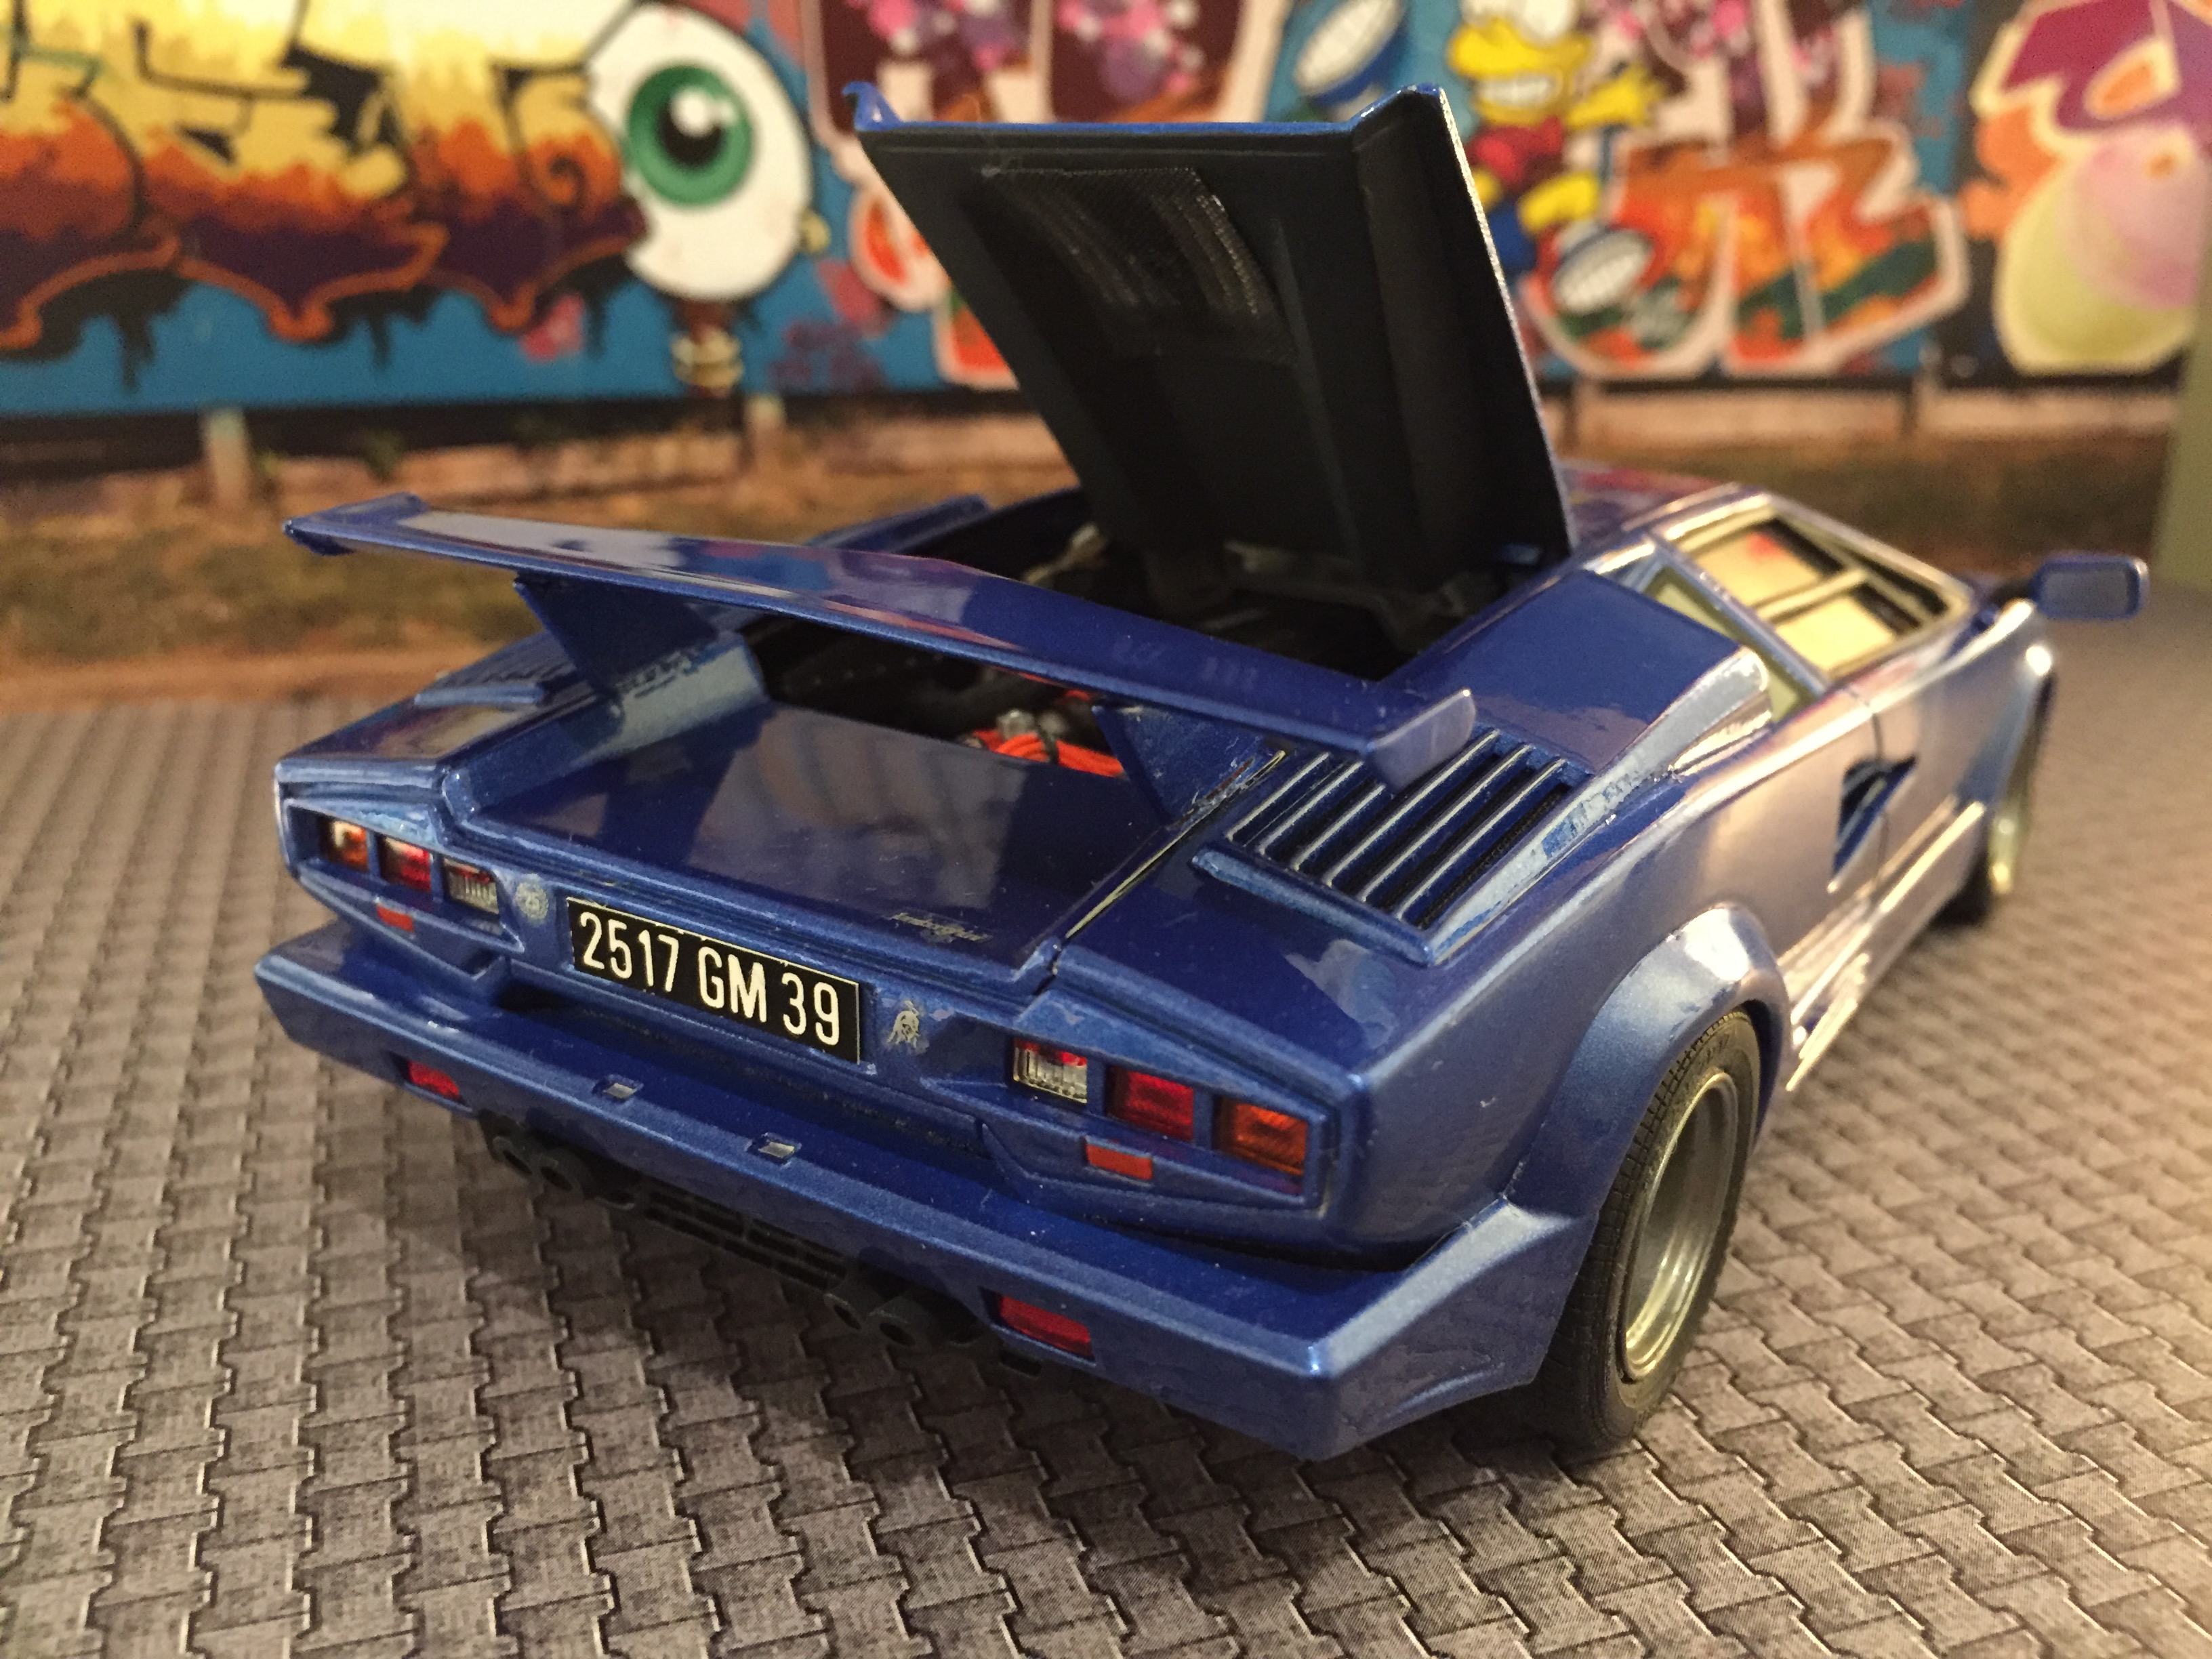
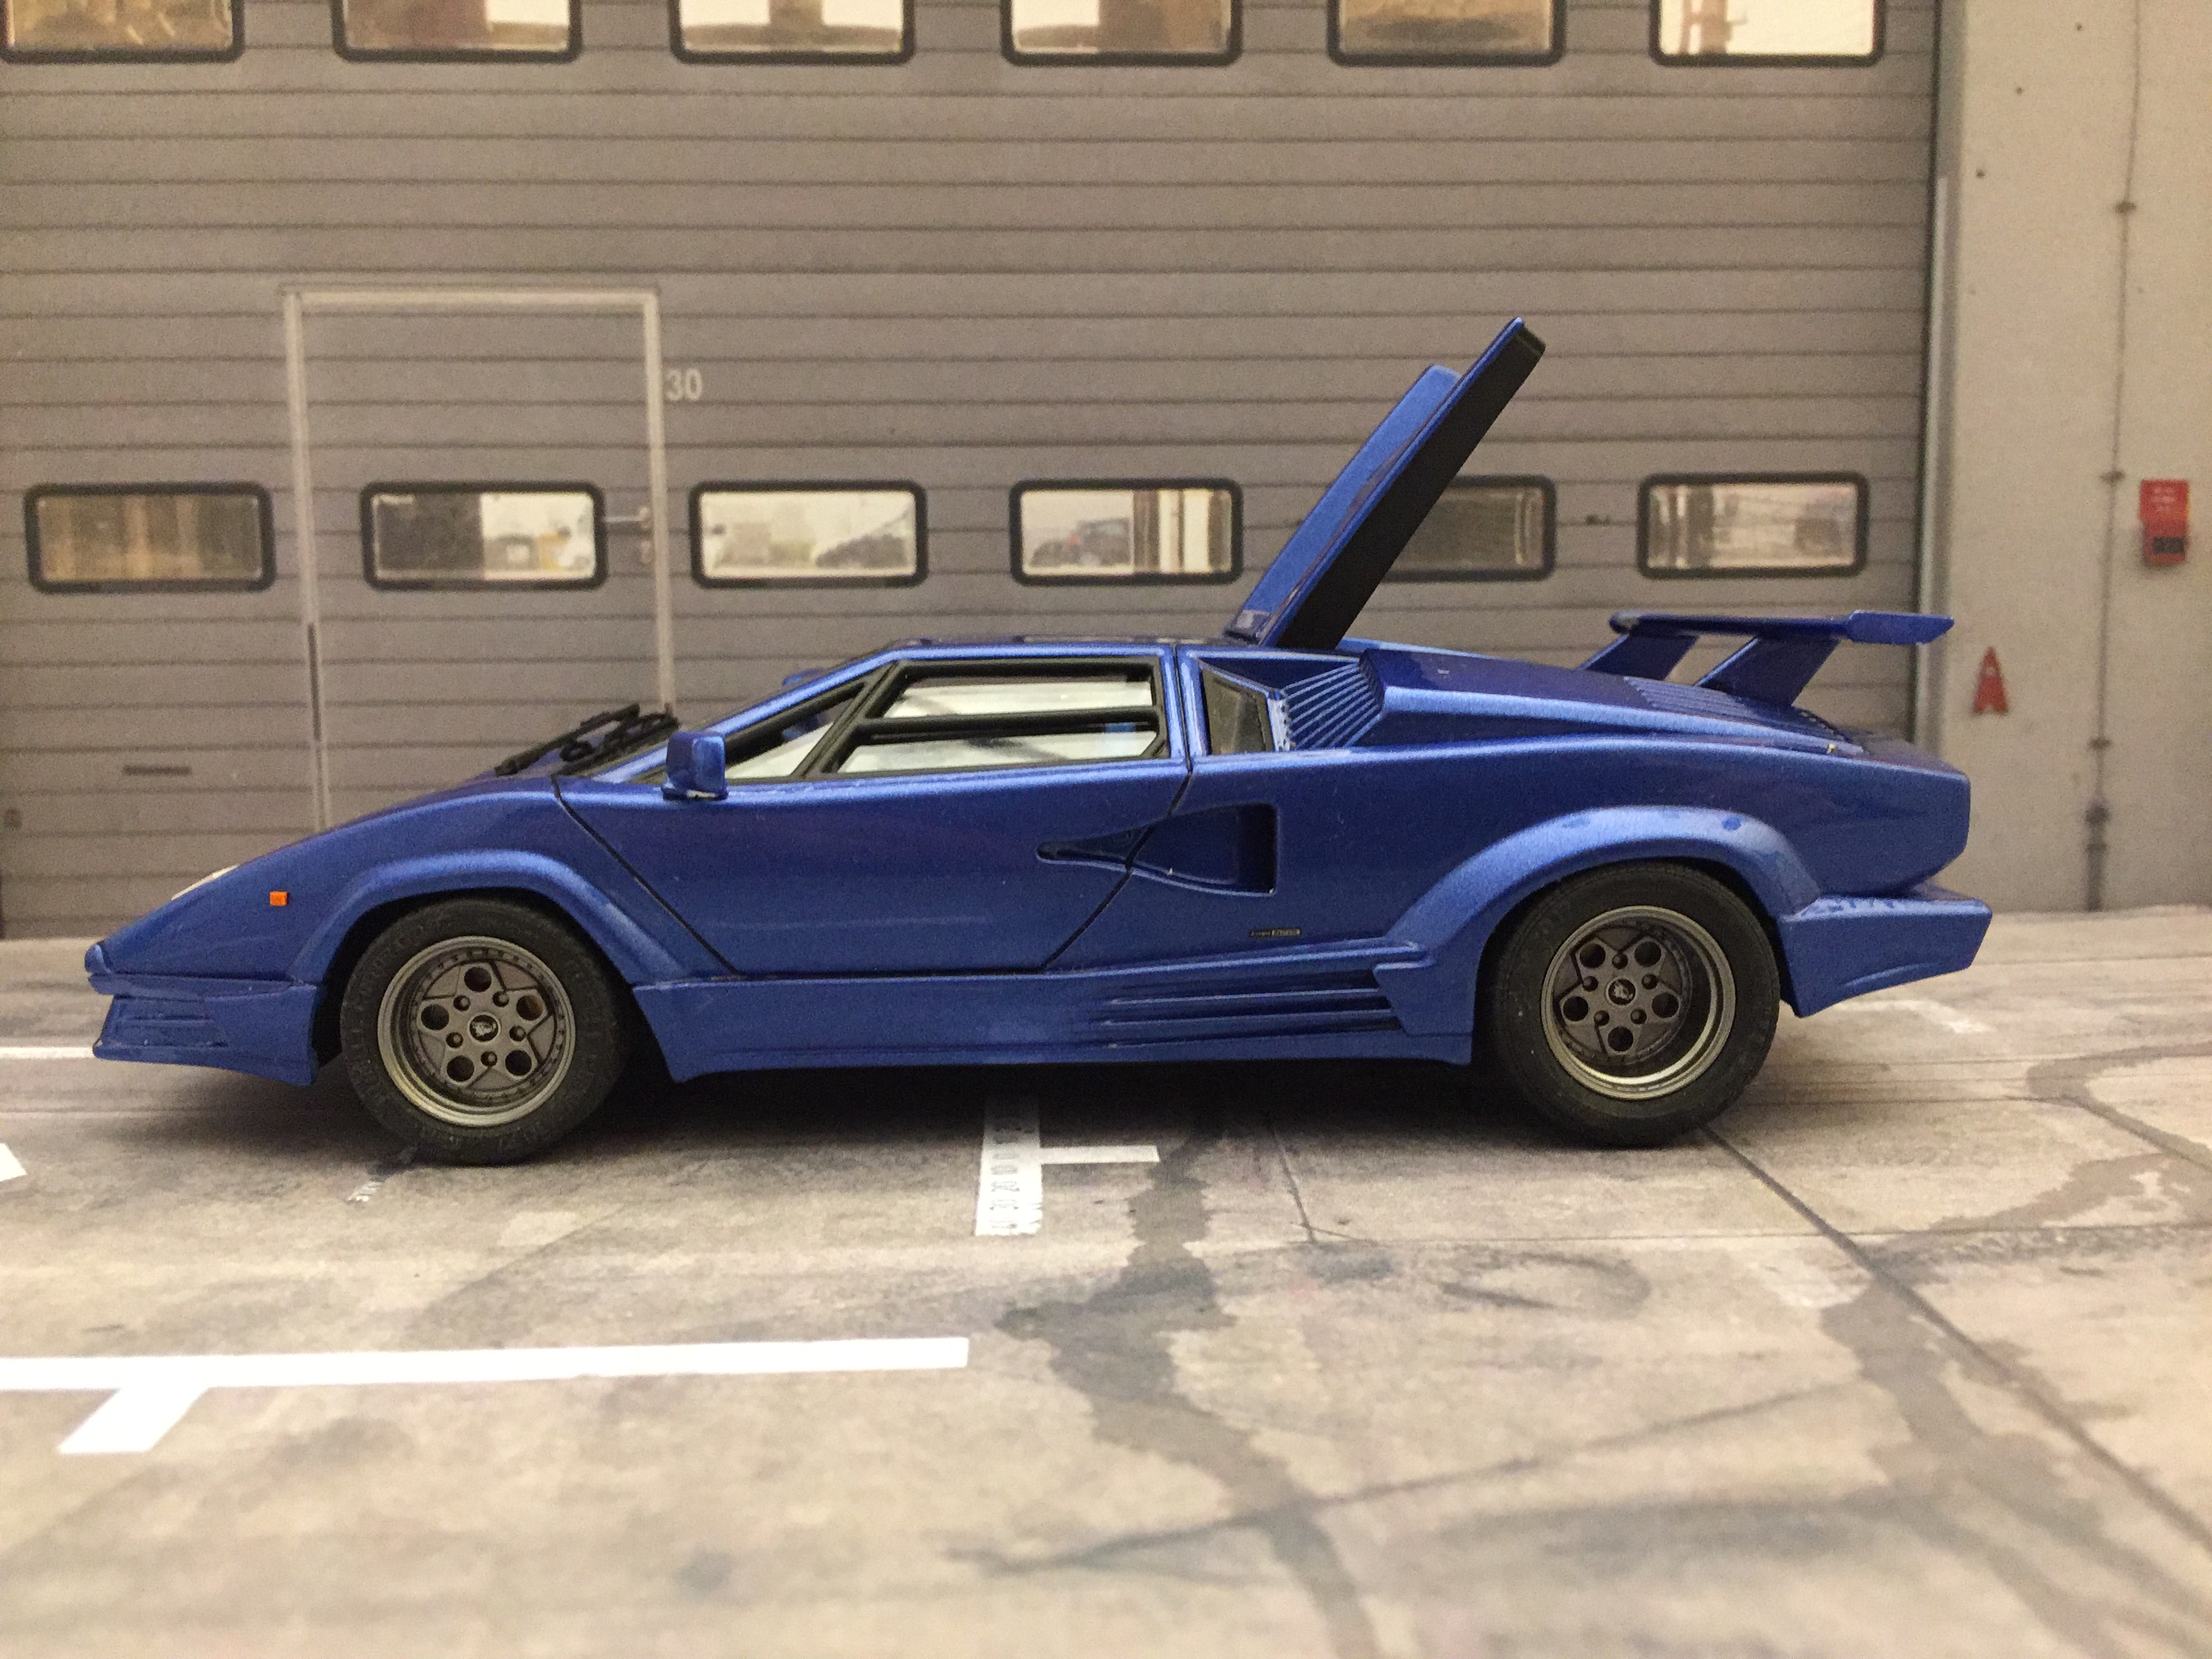
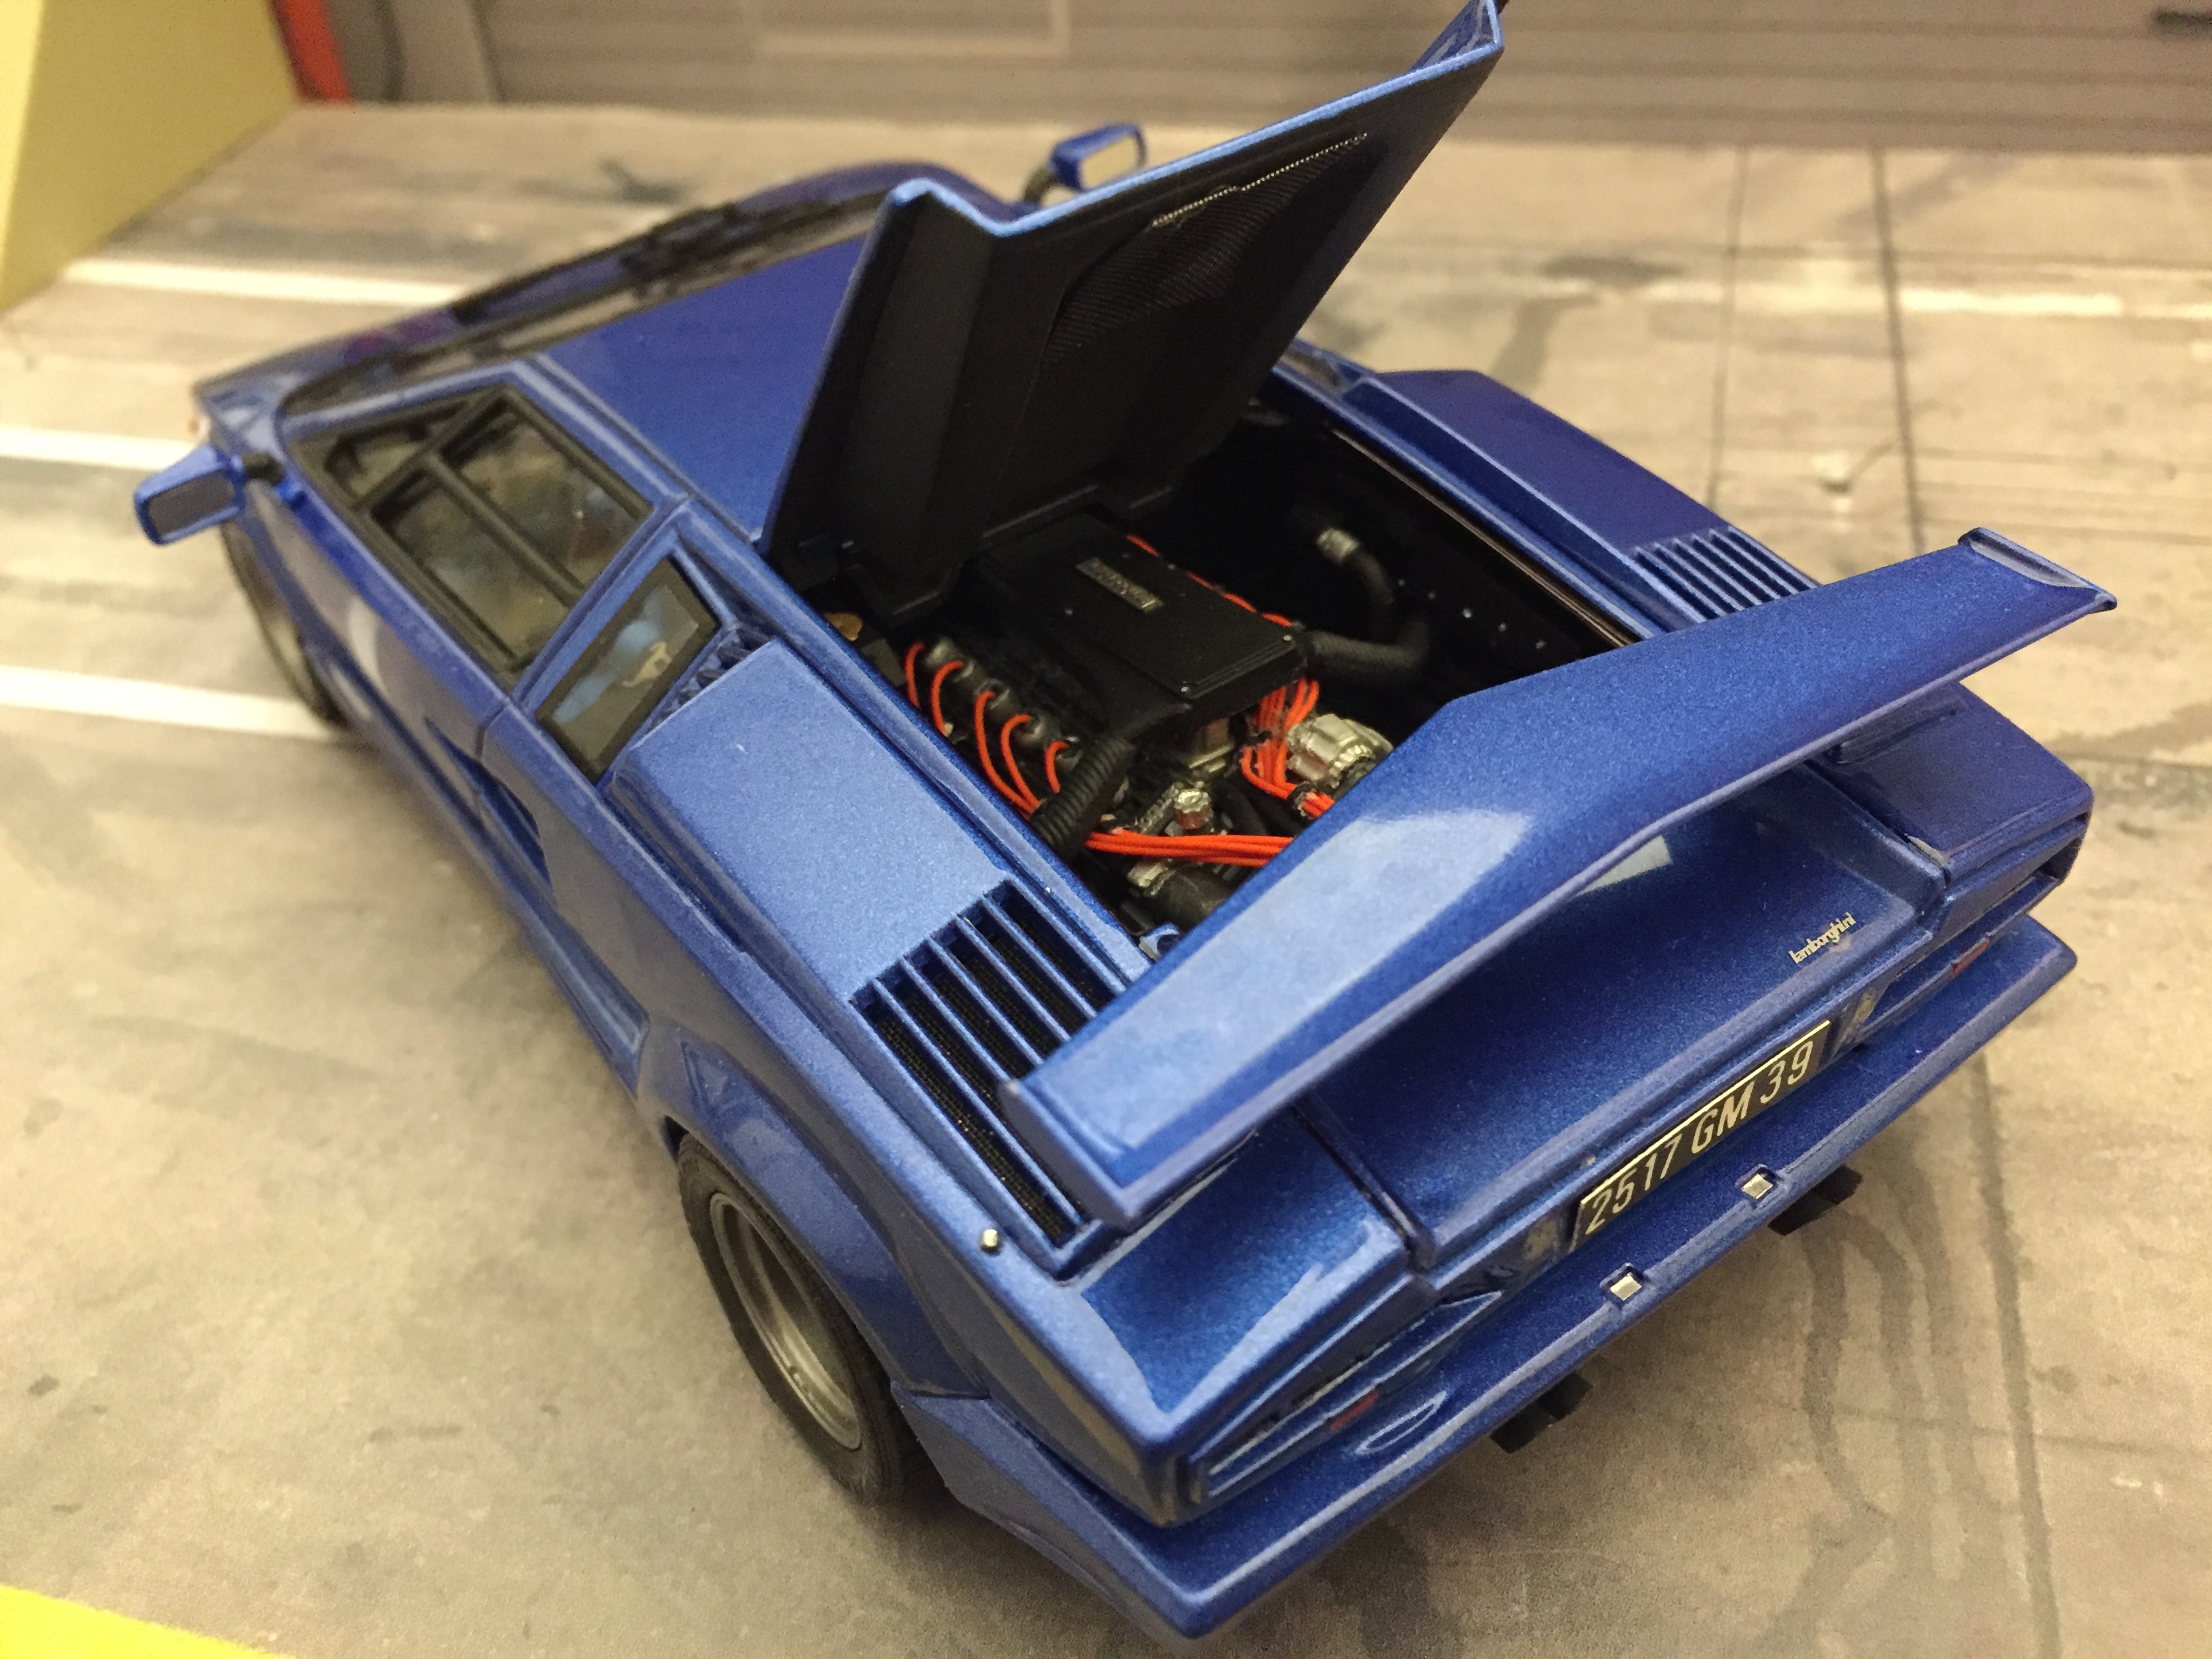
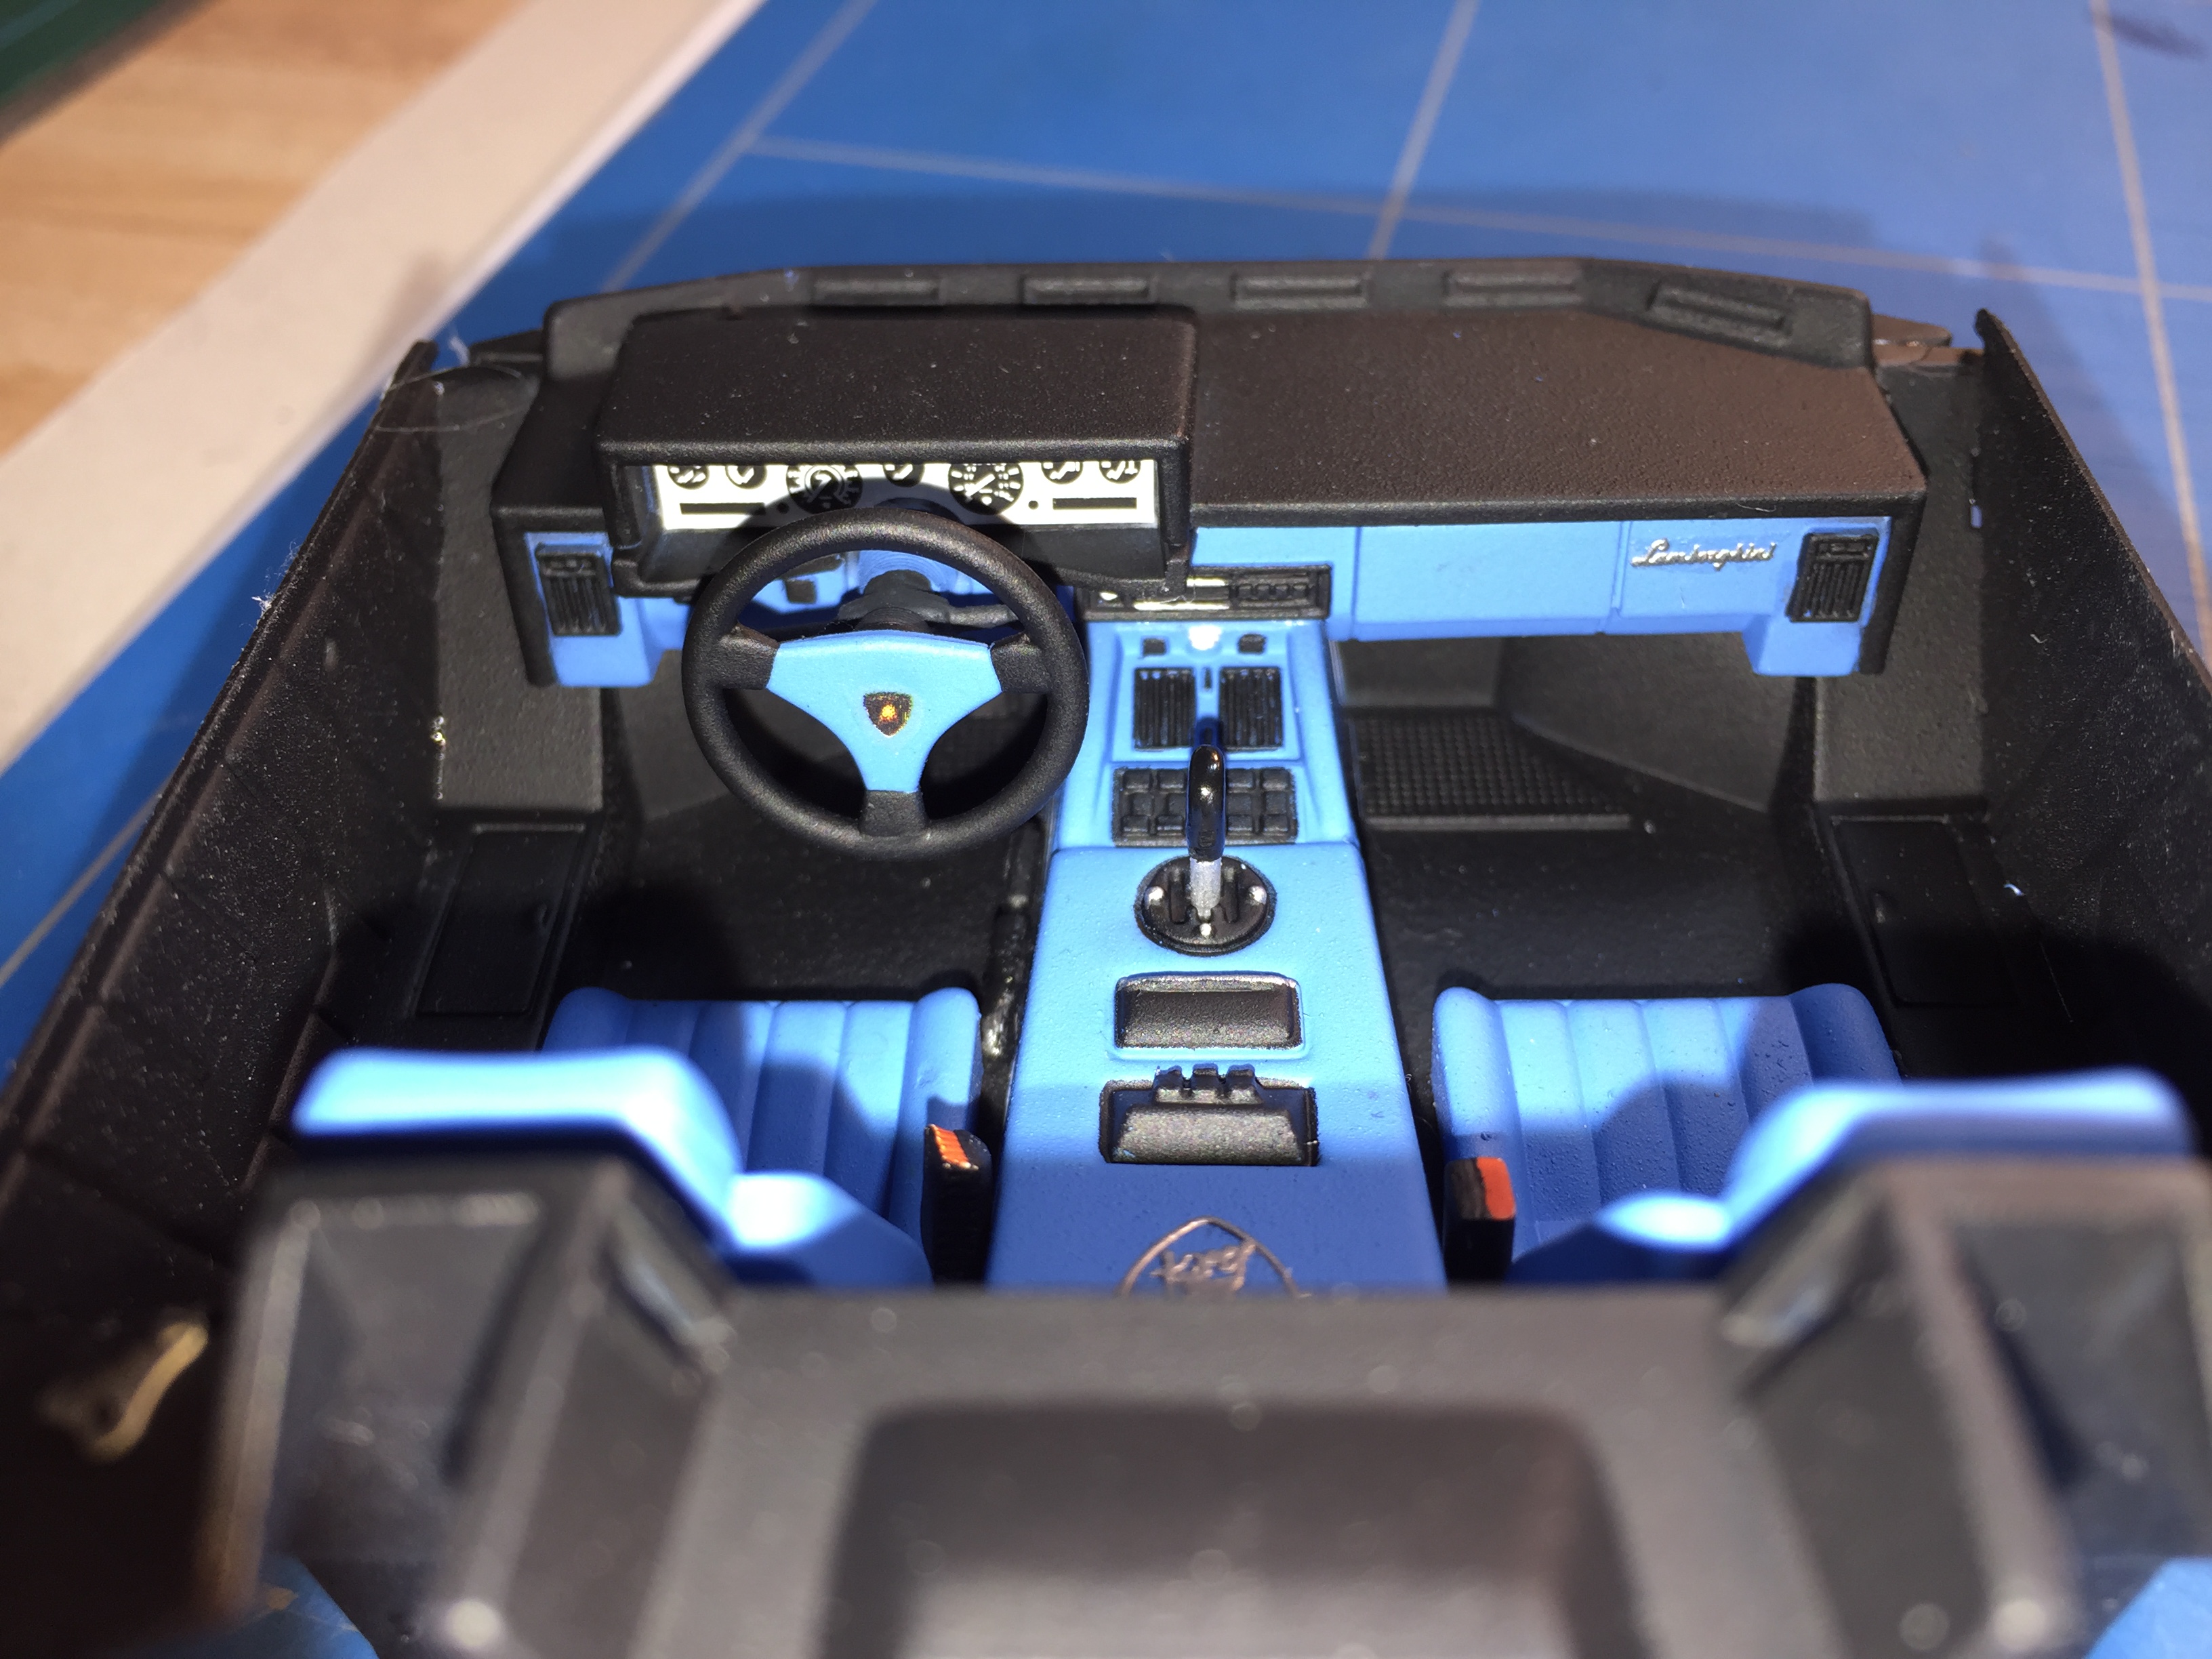
Hi folks, I would like to show you this one which I finished around 1 year ago. So right about that, Dann! The reason why I chose the Italeri over the Fujimi is... I don't know! In fact, I like the body shape of the Italeri a bit more, it's a bit wider in the front area, maybe more massive. The Fujimi probably is more true to scale, but I don't know. Anyways, I had bought the Italeri second-hand (some of the body parts were glued but that was all) so it was available. I have the Fujimi Anniversary Countach kit too, but only the non-EM kit without the engine. As I wanted to do one with an engine, this was the one to go for. As with most Italeri kits, the rims and tyres are a complete no-go. Even though the design of the rims itself is not that bad, they are all the same size and imho you just cannot do that on a Countach. As a result of my search on the internet I bought a set of Fujimi aftermarket rims + tyres with MUCH to wide rear tyres. Fortunately those were just right for Marcel_T4's massive Turbo Countach build, so he got them from me... As for my Anniversary Countach, I finally decided to use the rims from my Fujimi kit but as ALL Fujimi Countach tyres are too small in width, I had to add some wider ones from my spare parts box. Another modification that has been made is that I used the the "pointed" rear wing from the Aoshima QV 5000 kit. There are 2 wings included in that kit, the pointed one and the straight one. Back in the day, I always liked the Anniversary Countach without the rear wing but nowadays I think all Countach's except for the LP 400 HAVE to have one... The body color is ZP Lamborghini Blu Caelum, a very beautiful metallic blue which has been sealed with ZP 2k clear. Rims have been painted using AK Interactive's Gun Metal. Enough said, here come the images, hope you like them: