Codi
-
Posts
2,675 -
Joined
-
Last visited
Content Type
Profiles
Forums
Events
Gallery
Everything posted by Codi
-
I just can't enough of looking at the paint and decals on that body. And to think it's BEFORE the clear coat. Very very very well done. Oh, and I really like the webers and engine too! Can't wait to see your car under glass soon. cheers, tim
-
I got nothing to add to what others have said Steven. Just that I'm a fan too of your build. The engine & compartment detail are fantastic to say the least. cheers, tim
-
Just WOW on the paint, interior and engine Tom. I really like the effort you put into detailing the carbs and fuel lines. They're scale or the nearest thing to scale that one could replicate. That takes time/effort for sure just to pull that off. When I first looked at the carbs I had to do a double take they were that realistic looking. Truly sets off a great looking engine. Good luck on the rest. cheers, tim
-
I have to be honest Jim that I only looked at the first few pics and the subject and moved on to another thread. My loss. After going thru the thread from the start I must say there are many interesting things you're doing on this build that are very cool. I like the approach you have in how you're designing and fabricating things too. Cheers, tim
-
Thank you one and all that posted your interest in my next build. Should be this weekend when this gets going in earnest on the bench. Spent 3 1/2 hours today just detailing the Bantam firewall before install. The jig I made up to display the body and various body panels is assembled as well. Cheers, tim
-
Enjoying the build Rickard. Let me know what you think of working with small 3D print parts. I've gotten some for a 1/25th scale build and find them to be extremely fragile and I like to think I'm careful when building. Still broke off some bits and pieces. When I saw your wheels it grabbed my interest on how you'll prep/paint and assemble them. I've used them on the bantam but not on really small parts just yet. cheers, tim
-

Gasser 55´Chevy Bel Air (fiction) 1/24 Monogram
Codi replied to Fairfax's topic in WIP: Drag Racing Models
Great paint and build Michael. The pics of the car are fantastic and show the detail nicely. cheers, tim -
Dyno Don's Eliminator II - New Camera - New Photos
Codi replied to TooOld's topic in WIP: Drag Racing Models
Nice clean build Bob. Your background (and floor) in your pics really do justice to the car. Nice photography too! cheers, tim -
Thanks for posting the pics Tom. Great to see and some super sweet builds you captured. cheers
-
Pfalz DXII
Codi replied to Southern Fried's topic in WIP: All The Rest: Motorcycles, Aviation, Military, Sci-Fi, Figures
LOve the camo scheme. The cutting mat takes away a little bit from the build as it's too busy. I saw your bf-109 with the white background and would love to see this plane with a neutral background. As stunning as this plane is, it deserves that. nice job for sure. cheers, tim -
That looks great and I really applaud your stepping out and doing this from your other builds. The weathering & detail are fantastic. cheers, tim
-
Beautifully sculpted winglet's and rear spoiler extensions Mark. They really add to the perfect body work mod's you've made. Gorgeous car even in primer and can't wait to see this one in color. cheers, tim
-
Man that is nice. I'd love to call that mine for sure. cheers, tim
-
I always liked this particular car. Nice to see your build of it. Well done for sure! cheers, tim
-
Love this thread. Can't wait to see your next update. cheers, tim
-
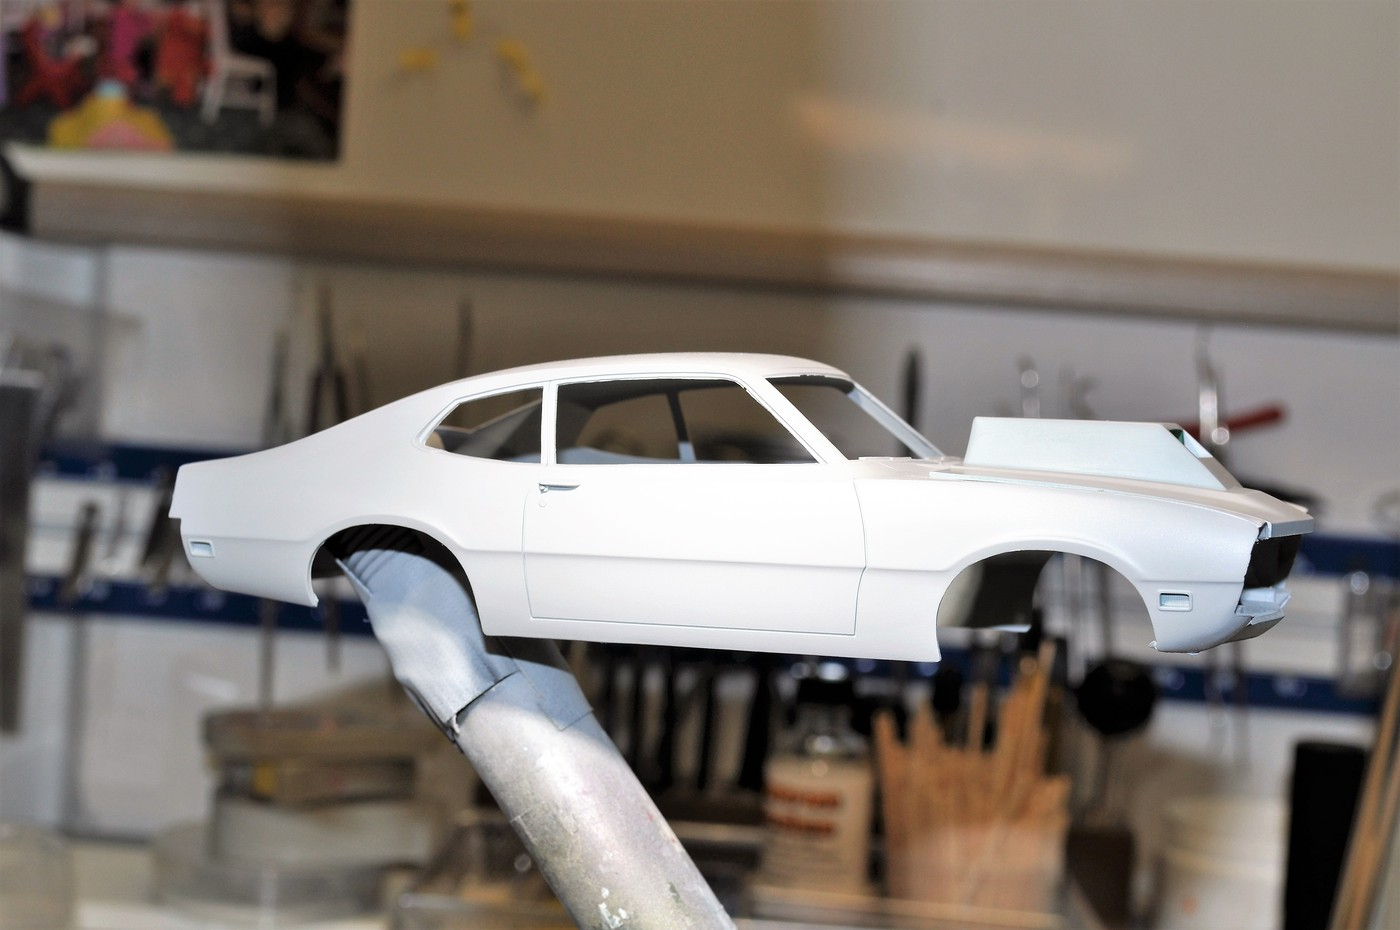
Hi everyone, this is a new thread centered around a JoHan Maverick Grabber I bought off ebay some months ago in the U.K. The car was in it's original box, no warpage, and even original shrink wrap. I thought they didn't exist to be honest. I'm doing a Pro Stock / match racer that is a "what if" type build. The what if centers around the leaps in car development made from 1970 with the introduction of the Pro Stock class in NHRA to the mid-70's when Hemi Colts were just one of the wild rides of the day. From the research I've done, many if not most Pro Stock racers spent a lot of time match racing as well. It was very lucrative for them and the factories (at least at the beginning) were happy to jump in and assist. My car will be a bit different as it will be a "Pro Stock" car set up for match racing of the day.......or what "could" have been. Wayne Gapp (check out Gapponline.com for great reference material btw) was part of the Ford team that created & developed the Boss 429. Even though Ford bailed by 72' from direct factory support, it seems that Wayne maintained a "pipeline" of parts and good will with Ford. Without going on about historical this or that, Ford had developed an all aluminum, 494 C.I. Boss (big by the standards at that time) for Mario Andretti's Can Am effort. Records mention anywhere from 12 to 18 alum. blocks were cast. Hubert Platt had one as did Gapp & Roush. Interestingly enough, Wayne also developed a set of twin plug Boss heads that were never introduced because of Ford's sudden pull back of factory support. The Gapp link I noted above gives great insights to the car(s) they were racing & developing. My "what if" match racer is a Maverick with the lowered stance of the red "Shotgun Express" Gapp & Roush car which was unique at the time but with a Can Am 494 & his twin plug Boss 429 heads. Holley dominators with a Weiand/fabricated manifold should set the engine off. Sorry, way too many words but this should give you and idea. Pic's are a general theme and I have a bunch of after market items (resin, PE and 3D printed parts) on the way to compliment the machined / fabricated parts I'll be making. The JoHan chassis will be a big hurdle as it's worthless in my estimation. I have "Minor" brass leaf springs coming among other oddities to hopefully achieve what I have in mind. Norm from Replicas and Miniatures has already shipped his Boss 429 (he is GREAT to do business with btw) as a reference and I'm sure I'll utilize some of his engine parts for my build. I just have the firewall & chute to install on the Bantam and this new car will be front and center. Cheers to all, Tim I'll fab a new scoop but I wanted to see how straight the body was in primer.............first coat.......my kit was made in an ugly green plastic btw a Boss 494 aluminum Can Am motor..........mine won't have the stack intake of course. Dominator's and a fabbed manifold for my car. The twin plug Boss 429 heads that Wayne was developing for the engine. Remember the twin plug Chrysler hemi heads of the day............I love this kind of stuff as if you couldn't tell. Wayne's early Maverick the "Shotgun Express" which is a great reference for my build. My car would have raced in 1972 if and only if factory support hadn't stopped. I like to think that Ford could have more than held their own if this had come to fruition.

-
Hey Mike, yup, Penna. I've not exhibited at a show since I was 15 or so. I've attended NNL East and was really impressed. No plans at this time but NNL East in the Spring would be the one and only I'd probably attend to exhibit at. Appreciate your asking. Bob, I was hoping to have some pics done by this weekend but I messed up my back a bit and have not bothered to sit at the bench this past week. Feeling a bit better and hope to get something posted before the very final glamour pics. Re: the Maverick, I'm pretty excited about what I have in mind for it. Once I get the Bantam pics up I'll post a new thread on the car and what I have in mind. I'm pretty sure you'll like it. AceGarageGuy (Bill) was kind enough to share some insights on a few things and I've checked AFX's (JC) threads as well. Of course, Comp1839 (Dave) has been helpful too in answering some of my questions before I ever get started. They know a lot about these kits and cars. Most helpful as I'm into the planning/research phase of the car. Thanks as well for your interest! cheers, tim
-
Dennis, thanks man! Mike, I'll do my best to answer your questions - I first drew up prints for the chassis with the specific dimensions and tube/rod sizes I would use. I used particle board (fine but cheap that I bought at Home Depot) that I set up on my mill. When you say "free hand" I'm not quite sure what you mean but to clarify I don't have or use a CNC machine. Old school. I did adjust for the various tube diameters so that the smallest bars would be centered properly. I couldn't have done this nearly as accurately if I hadn't done it this way IMO. I then used 1/16 ball mill to make the main frame rails and then a 3/64" ball mill for the next size and for the smallest bars (they're 1/32") I just laid them flat as needed in between the main rails/bars and soldered it all up. I spent quite a bit of time prepping it all to get it ready but the actual soldering was done in mere minutes and both sides turned out identical and solid. As an aside, a benefit was the very minimal clean-up doing it this way. Just a few minutes and they were done. The small piece of particle board (burnt) above the chassis piece was my experiment to validate that my method would work. Once it proofed out, I then machined the template piece for the chassis itself which is pictured right below it. Not everyone has the tools available to do it this way but if you do, it's a very effective way of making extremely accurate frame rails such as this. If I missed something please let me know and I'll try to answer them as best I can! Thanks too for the compliment.
-
Thanks so much Bill and it is the Maverick. Still trying to decide upon either a 427SOHC or Boss 429. Your thread on the Best 427SOHC has been insightful too. This next car will not be over the top like the Bantam, no wires etc. at all but I"m going to attempt some key components for machining that should really add to the car. A clean, simpler build is what I'm striving for that I can complete in less than a year. cheers! Peter, thanks sir, I've taken my inspiration from various accomplished builders on this forum, made some new friends and learned a bunch along the way. win-win-win I think you could say. cheers as well! tim
-
Wonderful subject. Count me as well as a fan and follower. That's a lotta photo etch...............that'll surely make it pop. cheers, tim
-
It's just a giggle to see you doing this. Can't wait to see what's next. cheers
-
Car looks fantastic in the color you selected Rooster. Very sharp indeed. cheers, tim
-
Nice build and an awesome collection of cars you have. cheers, tim
-
Dave, what a blast that was. More fun than Hershey Park. As close to a DRIVEABLE race car on the street as one could find. I'd only share with others that the craftsmanship that Dave put into his ride is unreal. He isn't a perfectionist, but he seems to achieve it nonetheless. cheers !! Dave & Bill (Ace) , a sincere thank you your thoughts on the build. It reflects what I've learned over the last 7 years since I've returned to the hobby. I should have some final pics soon or at the very least a few with the body/ wheels & wing on it. The body tin install will take a few days . As an aside, I'm onto the next build...........I'll post something in the near future. cheers to one and all! tim
-
Under glass #1: Tamiya 1/18 scale Lola T160-TS
Codi replied to mitchy's topic in Other Racing: Road Racing, Salt Flat Racers
Love the finished pics Mitchy. Any chance of shooting some pics in daylight outside? I bet the light dances off the body. cheers