
fseva
-
Posts
1,547 -
Joined
-
Last visited
Content Type
Profiles
Forums
Events
Gallery
Everything posted by fseva
-
Refreshing Old Kit Chrome
fseva replied to StevenGuthmiller's topic in Model Building Questions and Answers
I've tried shining up old chrome and it was a disaster - the chrome was so thin, the polish just literally ate right through to the bare plastic. -
That's excellent!
-
I would not have known it was a snapper!
-
I received my bottle and am disappointed. If you use it for windows, you would definitely have to tape the window in place before applying the glue, because it's real easy to skid the window around, even when you think it's set, and then you get glue all over the visible surface. I just don't see any real advantage, when I've had such good success with Gold CA - No fogging and it's fast, because it can be accelerated (Insta-Set) without harm to the glass.
-
Beautiful!
-
Yes! I noticed that their yellows look orange inside the unshaken bottle! Obviously, it must have a use for all that orange, but I can't imagine what...
-
The OLD enamels smell bad, but have you smelled the new acrylic enamels with low-voc? You can hardly smell them, and whatever smell is there rapidly dissipates. I love the new acrylic enamels and lacquers. To me, there is no reason NOT to use them. In regard to acrylics, your tip is the same one that got me started trying acrylics! I settled on Liquitex Airbrush Medium, and you do not have to add water - the water is already in the medium, and it has none of the harmful chemicals like in washer solution, etc., that can drastically affect the quality of your paints. Btw, some of these mediums are named "flow" mediums, because like you stated, they improve the flow and minimize tip-dry!
-
identifying the problem / paint question
fseva replied to ERIK88's topic in Model Building Questions and Answers
I was just wondering, Erik, why you expend so much energy in the primer phase? From what I have read here, you have 7 coats of primer on this model! You would normally have that many primers when you found areas that needed more sanding, and you were using the primer to point out those areas. If you've prepared your model before priming by removing the mold lines, etc., and you give it one coat of primer... if you don't see any small scratches, or any unlevel areas... it's ready for finish paint! Btw, are you sure 3-5" is the "recommended" distance from your object? Usually, these big cans recommend getting further back than that... Check the can and let us know... This could be why you're getting too much paint on the model at one time... -
OK - I didn't know it was Vallejo CS that suggested it... they obviously know more about it than I... Sorry...
-
Gorgeous! Gonna hafta find 1 of dem!
-
I like it as well!
-
Beautiful! You'd never know it was a snapper! Those flowing horse decals are perfect for this car!
-
It would still crack when you applied it... would you want that?
-
All you guys who use/want to use Vallejo paint... I would definitely consider trying to find a hobby shop that can tell you how old their inventory is... if the Vallejo color you want to use is not all that popular, who knows... the bottles could have been sitting there for months, or longer...
-
Can you get the top off? If you can, you could use a battery-operated stirring device to really wisk the paint together. I use one all the time, and it leaves the cover and top of the container pristine, so that you're not wasting paint. With Vallejo, you waste an awful lot of paint with the tip getting loaded full of paint and no way to get it back into the bottle.
-
Exactly! I can't imagine anyone recommending such a thing... That'd be like saying you can repair a broken window by throwing a hammer at it!
-
identifying the problem / paint question
fseva replied to ERIK88's topic in Model Building Questions and Answers
Is there any way you can check the temp inside the dehumidifier? The reason for this is to see if it ever goes above 105 degrees, which, according to what I've read, is the high-end for a plastic model... And I know for a fact that some paints (particularly automotive paints) were not made to be heat-dried - I have had some projects where the outer layer seems dry, but it's so soft, it still shows fingerprints. In regard to "hazing", that could be a temporary effect from getting too much paint in that area. I've had that happen, and it has always cleared up after a while. Just don't spray any more if you see it. Let it dry, instead. You may have some runs or sags at that area that you will want to sand out before painting again. "Bubbling" sounds like "fisheyes", and this again can happen when too much material is applied. -
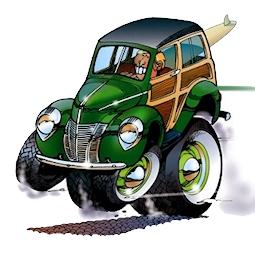
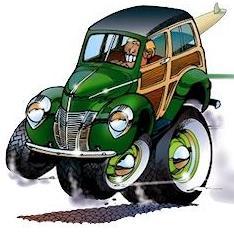
Very cute cartoon! And a beautiful build!
-
I have found how much clearcoat can help out in an instance where I've made a flub... I use 3M Trizact 3000 to gently persuade the bad spot, and then bring the shine back with Tamiya Fine Compound.
-
Camera-breakdown-or not, this is one very pretty car! I would love to know what the 3 base coats were, and if they were mixed together or applied separately...
-
I'm not crazy about cars that came after 1971, but yours looks really cool!
-
Gorgeous! I noticed one of your photos makes the car color look green... or is that just my monitor?
-
Beautiful! It's a Lindberg, right? But you did something to the rear half, including removing the rear decorative spear, and adding what look to be large fender skirts where it used to be... correct?
-
I can't say that this is the best way, but it's sure one I would consider if I wanted black chrome... Testors makes Transparent Black Window Tint (in spray cans only, I believe)...
-
Both white and yellow are relatively poor in the coverage department, probably due to a lesser amount of pigment that helps other colors do better in coverage (your black). I would not expect either of these colors to cover in one coat, and brush strokes would be inherent until the color becomes opaque. Oh and btw, this stuff dries like latex because latex is also an acrylic. Are you thinning your paint before brushing it on? If you're using water as a thinner, that may be why it's giving you problems. Never thin unless you're airbrushing...