peteski
-
Posts
9,209 -
Joined
-
Last visited
Content Type
Profiles
Forums
Events
Gallery
Everything posted by peteski
-
That confirms what I thought by looking at that car: it has a flavor of automotive design from the "down under".
-
NICE! Looks like a commuter train. I also like the roundabout, and you are also nearby to what I think your Brits call "motorway".
-
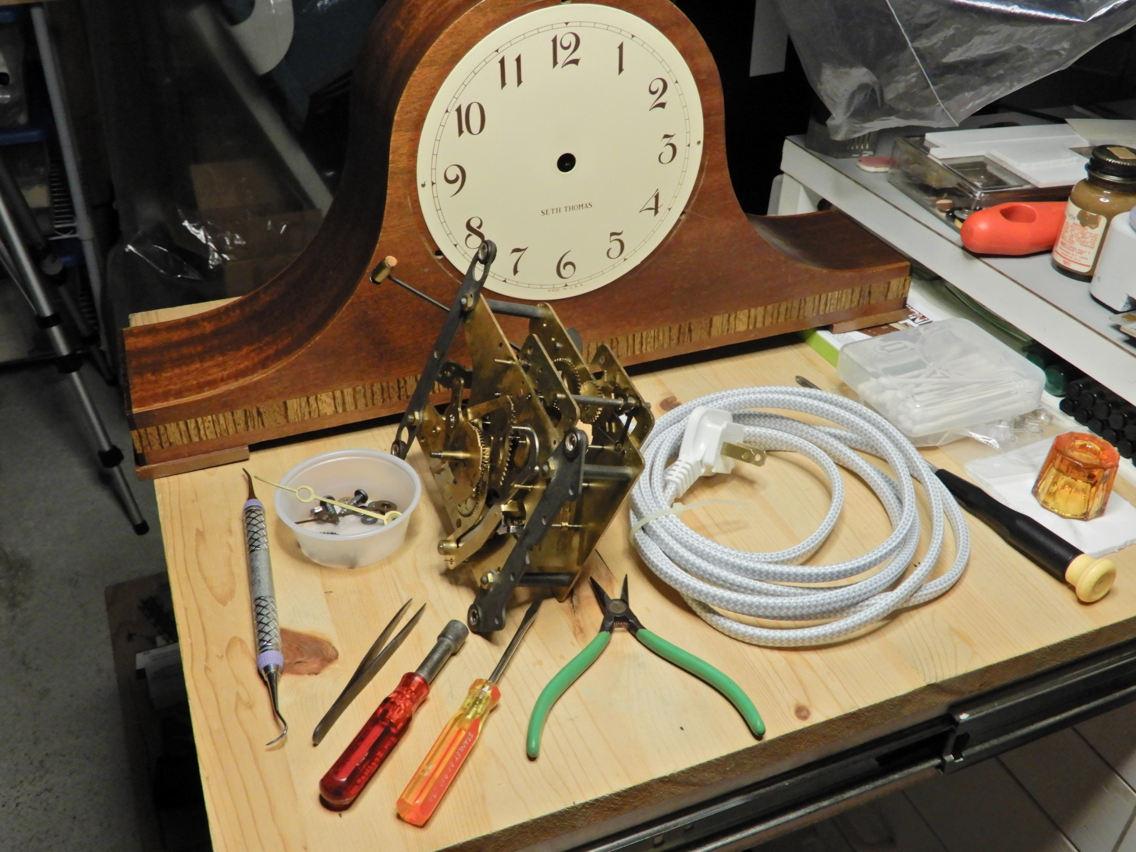
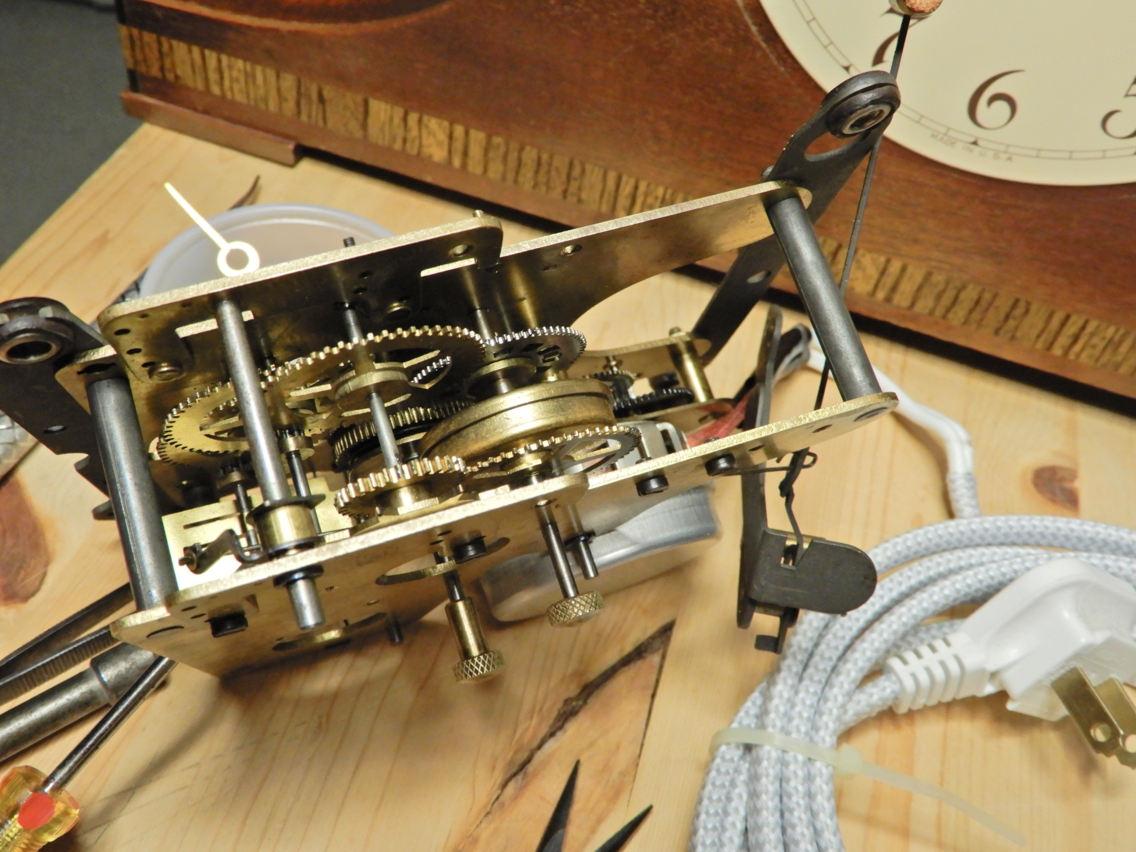
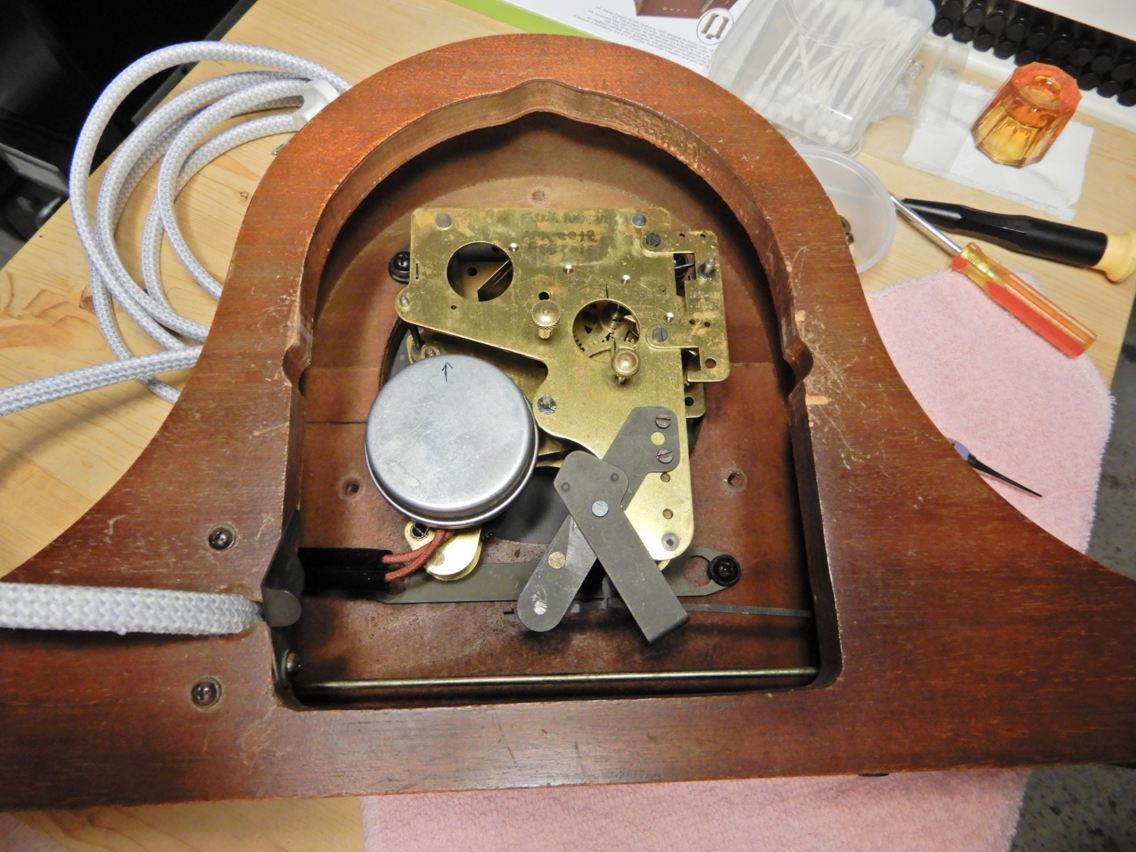
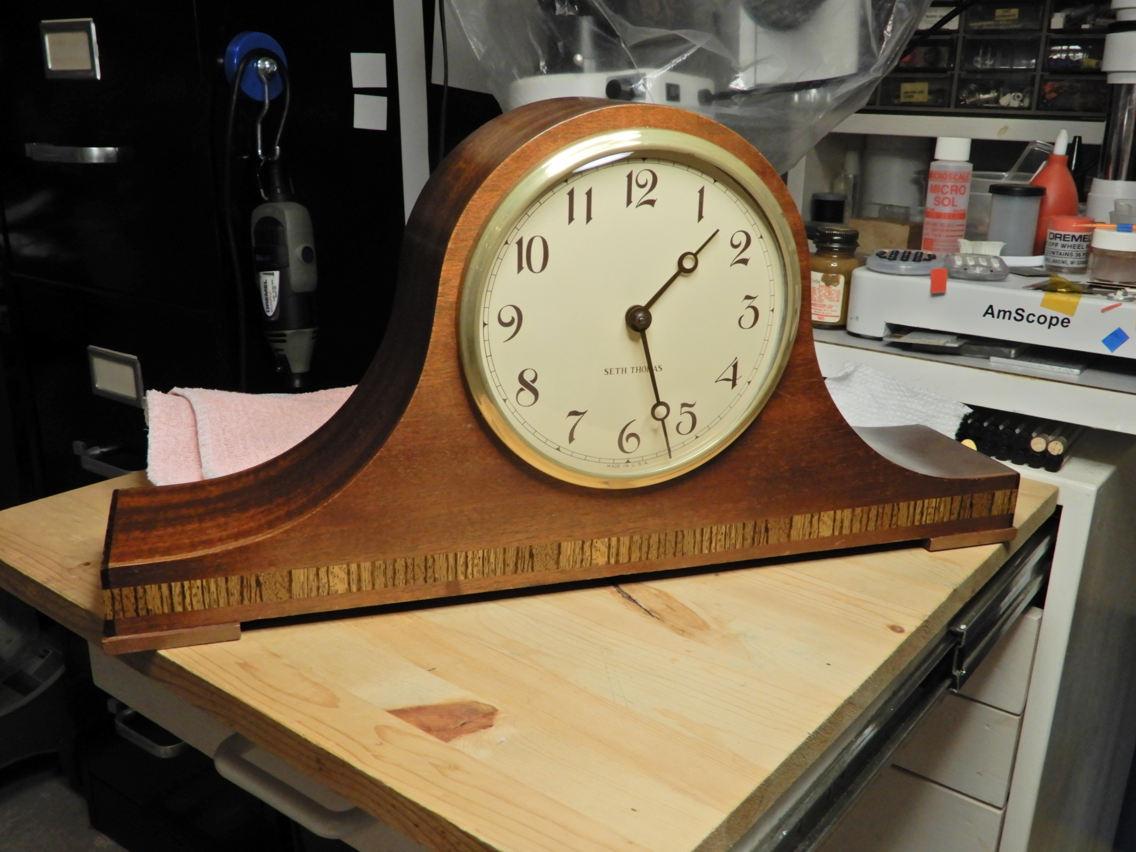
Not really a "build", but I do all sorts of things besides building models. My most recent project was to service my GF's Mantle clock. It is a Seth Thomas Linton 1E clock made in December of 1950. It has a nice chime. Not something one hears in people's homes anymore. It was a flea market find back in 2012. It did not work. I took it apart and found a broken gear. I fixed it and my GF has been using it ever since. Power cord was also replaced. Every couple of years I remove the movement and lubricate it. This time I did a complete disassembly, cleaning and lubrication. Here are some photos. I wish I took photos of when I had the movement totally disassembled.

-
How about a Laundromat? I have washer/dryer but use a Laundromat for some really bulky items which won't fit in my washer.
-
Nice! The view seems to be better than at your last place. You're also close to what looks like a busy railroad line. As model railroader and a rail-fan, for me that would be a nice place to live.
-

What is your favorite sports car?
peteski replied to WillyBilly's topic in General Automotive Talk (Trucks and Cars)
Just FYI, here is a quote from that Road&Track magazine article Greg linked to in an earlier post (and with which I agree). "What is a sports car?" In the postwar era, a "sports car" was any car that seated two, had a soft top, and could be used for competition. Thus, the Sports Car Club of America. An MG-TC was a sports car, as was an XK-120 or a Jowett Jupiter. That same car with a permanent hardtop was considered a "Grand Tourer", meaning it would be appropriate for a young man to drive around Europe in varying weather conditions. Thus, the MGB-GT is an MGB sports car upgraded to Grand Tourer configuration. The definition of "GT car" has always been more flexible than the definition of "Sports Car" because it is based around prospective usage. In the modern era, virtually anything from a Scion FR-S to a Mustang to an Aston Vanquish would serve the would-be Grand Tourer well and so we can call them all "GT cars." I recommend reading that article - it has some mind-provoking info and possible explanations why the "sports car" moniker is used so indiscriminately. https://www.roadandtrack.com/car-culture/a28225/sports-car-definition/ -
Wow David, you sure are taking this Dime Store toy to a whole new level! Impressive!
-
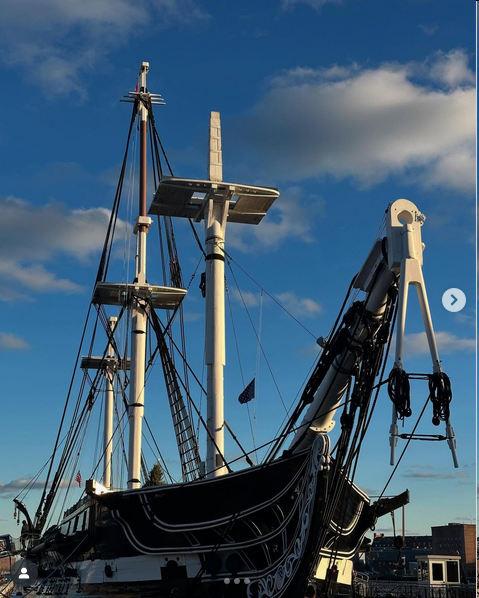
USS Constitution
peteski replied to OldTrucker's topic in WIP: All The Rest: Motorcycles, Aviation, Military, Sci-Fi, Figures
Lookign good Johnny! Yes, USS Constitution is still around and often open for tours. I lived in Boston for several years on the '80s and saw it on my daily drive to work over the elevated Expressway (aka. I93 which is buried underground now). I often thought of visiting it and the museum but I never did. I have moved away but not too far for a visit. I should visit one these days. It was recently out in the Boston Harbor for the July 4th celebration for the 17 gun salute, but its masts and rigging are being work on, so it doesn't look as impressive as it would normally look. This is how it currently looks like. 40 years ago or so I've built the larger Revell model (I think it is around 1:87 scale) but had to leave it behind when I moved few years later. I have started a duplicate mode after I moved but I never finished it (got busy with other projects). I still have it in my basement, gathering lots of dust and cobwebs.
-
Looks good! Nice to see modelers leave their comfort zone and built another kind of a model. And this one even includes real sailing instructions! Also it warms my heart to see someone else's workbench surface looking similar to mine. Just enough space to squeeze the model we're working on.
-
So everything new is mo better, huh?
peteski replied to Ace-Garageguy's topic in General Automotive Talk (Trucks and Cars)
Deal is the same as with all the colored (other than white and amber) lights on the front of the cars, like purple, green, blue, red, etc. halos on many Jeeps aftermarket headlights and other cars. I remember when just installing tiny "blue dots" in the taillights would get you stopped by the law enforcement. Same with dark tinted windows. Why do we have so many crazy drivers totally ignoring traffic rules? Because law enforcement seems pretty much non-existent on the roads and in inspection stations. -
Since the resin is transparent, the thickness (up to a point) should not matter much. The chances of skin damage by long-wave UV light (in the high 300nm range) from a low-power light source should be minimal. Still, nothing wrong with being ultra-cautious. And I agree that looking at the light source is not a smart thing to do. Using common sense is highly recommended. Is someone is interested, here are the FAQs for the resin I use, covering some of the questions asked here. https://bluemoon-studio.com/products/uv-resincraft-resin (select FAQs on the right side of the page).
-
The liquid UV resin does not appear to be hazardous (other than the usual precautions like don't drink it or immerse your hands in it). The UV light used to cure is very low power LED lamp. Flashlight curing lamps use 3 AAA batteries, so that itself indicates that it has a low power and is not hazardous (of course I would not shine it directly into my eyes, but should be safe otherwise). Light emitted by UV LEDs is long-wave (350nm or longer), so it is UV-B. At the wavelength and relatively low power it should not cause skin damage (especially with the exposure usually limited to few minutes). Kind of like trying to boil a pot of coffee using a cigarette lighter.
-
What is your favorite sports car?
peteski replied to WillyBilly's topic in General Automotive Talk (Trucks and Cars)
Kidding or not, you're correct - I'm happily single. -
Now, this is scary...
peteski replied to Matt Bacon's topic in General Automotive Talk (Trucks and Cars)
We're getting close to what's depicted in the Space Odyssey movies, but it's going to be over 20 years later than predicted. -
What is your favorite sports car?
peteski replied to WillyBilly's topic in General Automotive Talk (Trucks and Cars)
None of the '80s Vettes to me fit the definition of a "sports car". To me sports cares are more esoteric vehicles like Ferraris or Lambos or similar. I like them all - I don't have one specific favorite. I really don't have a single specific anything I would call "my favorite". I like too many things to narrow it down to a single item. When I see all then "what's my favorite" threads I always wonder how can anyone narrow anything down to a one specific item. -
Never heard of it, but I guess I'm not curious too. But what exactly is it? The name is ambiguous. Is this a company making/selling resin cast or 3D printer items? Is it the resin material (liquid) used to cast/3D print resin parts?
-
. . . or have 20 computers on-board.
-
95 deg. Celsius or Fahrenheit? If Celsius, that is way too hot for drying paint on plastic parts, if Fahrenheit, that is an acceptable temperature (as I said, mine is aroudn 110-120 deg. F)
-
You need a source of strong UV light to cure this type of resins. If you don't have a curing LED lamp which the resin manufacturers usually sell along with the resin, Sun on a clear day will set the resin hard in about 10-20 minutes (probably depending on your latitude which determines how strong the Sunlight is). Craft stores often sell UV resins (Michaels has it in the jewelry section) along with the curing lamps. Dentists have used this type of resin (non-transparent) for years for tooth fillings. Bondic (notaglue.com) was one of the earliest consumer-grade transparent resin of this type. I have tried multiple brands and many of them never fully cure (they harden but the surface remains sticky). My research showed that this is due to oxygen inhibition effect ( https://www.google.com/search?q=uv+cured+resin+oxygen+inhibition ). I have found that the Blue Moon Studios UV Resin Craft Hard Type Resin from Michaels does not suffer from that effect and cures without the sticky surface. That is what I use now.
-
Parafilm-M is what I first learned about in an article in FineScale Modeler magazine over 30 years ago, and that is what I use for various modeling tasks (like masking). There was a bad batch around the start of the COVID pandemic and I suspect some of it is still around. I still have some small amounts left on my first BMF chrome sheet and its adhesive is still good after 30+ years. I have some newer BMF and it has good adhesive.
-
Revell (Monogram) 1/24th scale, 1985 Pontiac Fiero
peteski replied to Luc Janssens's topic in Car Kit News & Reviews
I'll take an exception to this. First of all, I'm an "accuracy" modeler. Second, I don't understand why some models think that chrome finish has a scale, and supposed to look duller than on 1:1 vehicles, so they strip perfectly good metallic layer from plastic part and use less shiny metallic "chrome" paints. That is strictly personal view, not a fact. Chrome does not scale. Just like transparent "glass" items on a model should to be just as as smooth and transparent as they are on 1:1. You don't make scale "glass" duller because it is smaller than the original modeled object. You don't use semigloss paint on the model of car which in 1:1 scale is glossy. Also, the whole "vote with your wallet" thing is also silly, especially if the desired model is the only game in town. It is unfortunate that manufacturers are cheapening their model offerings (as I don't think they do this to cater to the "duller chrome" crowd). -
Revell (Monogram) 1/24th scale, 1985 Pontiac Fiero
peteski replied to Luc Janssens's topic in Car Kit News & Reviews
Maybe so, but I suspect that most modelers aren't hardcore (like me) and prefer plated parts. Stripping parts is easy, but getting that super shiny chrome-like metalized finish is much more difficult and expensive. I much prefer the kit's old-school vacu-plated "chrome" than any currently available spray-on paint chrome finish. Too bad it seems the manufacturers are eliminating that option. In this specific case there is no real need for the shiny chrome finish for those parts, but as I mentioned, it would make painting the wheels easier (at least using the method I like). -
That is an enamel (in the same family as the old Testors PLA enamels), so yes, I'm not surprised that it dries to a very glossy surface. Hardener makes it even better. Unfortunately (according to my local sign and pinstriping guy), probably due to environmental regulations, it is getting harder to find, especially in smallest size cans. With all the computer printed vinyl signs, sign painting and pin-striping is a dying trade.
-
Revell (Monogram) 1/24th scale, 1985 Pontiac Fiero
peteski replied to Luc Janssens's topic in Car Kit News & Reviews
Open recessed areas was what I was describing. Anything below the wheel's surface. As for the color (black, gray, blue, red, etc.), my painting technique applies to any color used for the recessed areas (even if they are open). I just used a generic description for the technique. Yes, I know I can paint the wheels shiny aluminum using organic solvent paint, then use water-based paints for my technique, but having the wheels plated makes my technique easier (and I like plated parts). Judging by all the parts located on that tree (like the door mirror faces, etc), it was designed to be plated and Revell for some reason decided not to do it. -
The car in that last photo seems to have flat tires. Good luck with the move!