peteski
-
Posts
9,226 -
Joined
-
Last visited
Content Type
Profiles
Forums
Events
Gallery
Everything posted by peteski
-

Please Re-Chrome this part!!!
peteski replied to Lorne's topic in General Automotive Talk (Trucks and Cars)
No secret Lorne - the most often used process for "chroming" plastic parts (like model parts or plastic spoons) is vacuum metal deposition (or vacuum metalizing). It isn't actually chromium, but a very thin layer of aluminum. You can do it yourself - all you need is the equipment. Here is some info - you are more than welcome to start your own business catering to model builders - we sure could use another facilitator. https://www.vacuum-metalizing.com/what-is-vacuum-metalizing/ https://en.wikipedia.org/wiki/Vacuum_Metal_Deposition There are many companies out there which perform vacuum metalizing, but they usually do not want to deal with small orders (they do this on a large scale for model kit companies or plastic spoon manufacturers), I believe that ChromeTech USA was only a middle-man - he would gather bunch of orders then hire one of those industrial metalizing companies to do the work for him. -
CHROME plating, plater, outsource company (2020)
peteski replied to 89AKurt's topic in Model Building Questions and Answers
Congratulations Kurt! Your package was handles gingerly, and the parts look great! Take that Alclad and Molotow! EDIT: While it was staring me in the face, I don't know why I didn't realize that there was an "Oops". Oh well, live and learn. . . . I never use silicone caulking when I mount my parts on the rack. I drill and pin, and use CA glue. Here is one of my racks. Some parts and parts of the reck have been already cut out. The rack is made of Evergreen square styrene.
-
How to be competitive at contests.
peteski replied to Jantrix's topic in Tips, Tricks, and Tutorials
And that to me is even better than winning a trophy. -
The High Cost of the Hobby
peteski replied to Nitrobarry's topic in General Automotive Talk (Trucks and Cars)
Kind of makes you step back, and think about just how fuzzy those moons might have looked like viewed through Gallileo's original telescope. -
How to be competitive at contests.
peteski replied to Jantrix's topic in Tips, Tricks, and Tutorials
I look for the same thing at the 1:1 scale car shows. I turn my nose at all the '57 Chevys, or '60s Corvettes or Novas, but I'll be all over some rare vintage Porsche, Goggomobile, Amphicar, or even a Pacer or Gremlin. Hopefully factory stock (I prefer those). Heck, I would drool over even some mid '70s Merc Monarch, or Ford Granada. When was the last time you seen one of those preserved? Then of course the brass-era cars are always a treat too. Even my own 1985 Caddy Eldorado Biarritz, is often the only one like that at a car show. I agree that the same might apply to model car shows/contests. -
Concerned about Tire Burn....
peteski replied to JollySipper's topic in Model Building Questions and Answers
Ok, but I'm also hoping that few years from now it doesn't come through the paint to burn you. -
Monkey 125
peteski replied to Scale-Master's topic in WIP: All The Rest: Motorcycles, Aviation, Military, Sci-Fi, Figures
You know Mark, I can't recall. -
The model is very impressive, and so is the selling price! Unique model, worth every penny! Good job Paul! I'm still hoping that a kit will be offered for sale, and that I will be able to get it for a reasonable (to me) sum of money.
-
More interesting tidbits - thanks guys!
-
Aren't you just a ray of sunshine? Rainbows and unicorns too! Come on Brian, let the old guys grumble a bit. What fun would it be if we were happy about everything? Oh, in case anybody is not sure, this was a tongue-in-cheek remark.
-
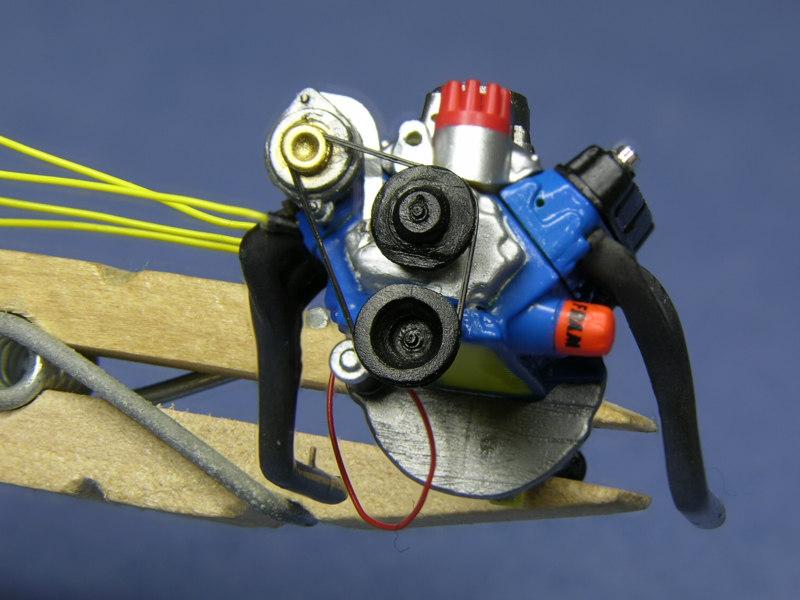
Like Roger, I have thinned the molded "belt" to make it more in-scale. But then creating a groove in the part of the pulley that does not have the belt on it is a pain. I have also removed the molded belts and grooved the pulleys. For belt material I have a black antistatic bag that was used to hold an electronic circuit board. It is fairly heavy vinyl-like black-color material . I slice thin (belt-width) strips of it using a steel ruler and a fresh single-edge razor blade. When all the pulleys are assembled on the engine, I then wrap the thin black strip around them few times (to build up the thickness) In smaller scales (1:43) I use a single or 2 turns. Larger scales might need 3 or 4 turns to build up the right thickness. I use CA glue to hold the belt material on the pulley (both at the beginning and end of the wrapping process). Here is a (magnified) example of a 1:43 scale engine with such a belt. If you look carefully, you can see that the belt is made up of 2 layers. I suppose that making a belt by slicing strips of electrical tape would work too (it is probably similar thickness to that antistatic bag I use). But I would first strip off the adhesive, and just use the vinyl itself. I don't trust the sticky adhesive. It might start getting gooey after few years and ooze out from between the layers. Naphtha (Ronsonol lighter fluid) does a good job removing this type of adhesive. 91% isopropyl alcohol might work too.
-
Monkey 125
peteski replied to Scale-Master's topic in WIP: All The Rest: Motorcycles, Aviation, Military, Sci-Fi, Figures
Completely understandable, plus I really enjoy those more complex builds you share on this forum. -
With all the distracted drivers out there today (so many more than back then), and greater number of cars on the roads, kids need to be thought to expect the unexpected and be vigilant when going to school (regardless if it is daylight or dark). Kids are thought from a young age that the world stops around then while they are on the way to school. But unfortunately things often do not work out that way. But that is a subject for a different thread.
-
The High Cost of the Hobby
peteski replied to Nitrobarry's topic in General Automotive Talk (Trucks and Cars)
But, but, but . . . I intend on building all the models I collected! Seriously. -
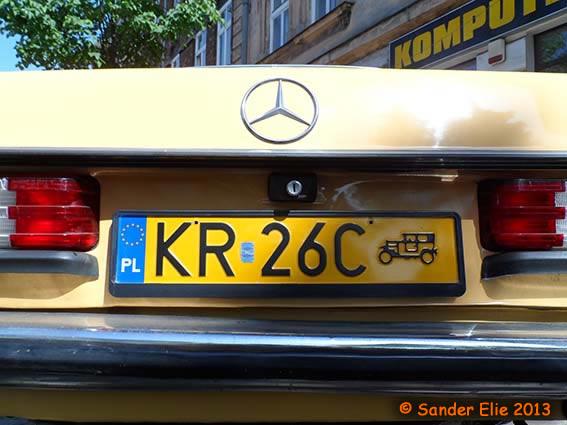
That makes sense - thanks for the explanation. So the only difference from a standard license plate is the H. In other European countries, the entire license plate looks different. For example Poland has yellow plates with a picture of a vintage automobile. in USA, each state also has similar "classic" or "antique" plates with similar restrictions as in Germany. Here are couple of examples. I hope Raul doesn't mind this OT diversion in his thread.
-
Monkey 125
peteski replied to Scale-Master's topic in WIP: All The Rest: Motorcycles, Aviation, Military, Sci-Fi, Figures
I see. I did not know that. I have not read SA for many years. -
Cool idea! I sometimes see a 1:1 truck build in this style in my neck of the woods. It is 2 cabs back-to-back. And just like what you want to do, it has red taillight lenses in the red "headlight" buckets. When I first saw it on the highway I had a double-take!
-
Nice clean build Raul. Those are usually contest winners. Photos are nice too. Is that a Revell Germany kit? Oliver, for those of us not living in Germany, what is the significance of the H?
-
The High Cost of the Hobby
peteski replied to Nitrobarry's topic in General Automotive Talk (Trucks and Cars)
I have chuckle at people who compare today's prices of the hobby to the "good old days" 40 or 50 years ago. Sure when you compare the price of a model kit now, to the '60s prices (when a kit cost $2 or less, little bottle of Testors paint was 20 cents, and a spray can was probably around a dollar), then yes, the price is really high. But back then you could also buy a new car for just few thousands of dollars, and average house cost probably around $20k. Those days are long gone and never to return. But if you compare the cost of this hobby to other contemporary hobbies, then it is not very high cost at all. -
Concerned about Tire Burn....
peteski replied to JollySipper's topic in Model Building Questions and Answers
Worth a try -- you have nothing to lose, and it would be easier than carving out the soft plastic, then filling the depression. But super glue will also build up some thickness. If you then sand it smooth, won't that expose the soft plastic again? How about carving out the soft plastic, then filling the void with super glue (with some styrene shavings mixed in), then sanding it smooth? -
Replicating modern LEDs in headlights?
peteski replied to Fat Brian's topic in Model Building Questions and Answers
Then light them up using small white LEDs (just like the 1:1 cars use). Most white LEDs used in cars are "cool white", which means their light is white with slightly bluish tint. I hate when cars around me have them while I drive at night - they are blinding! As far as simulating the appearance of the light itself (without having them actually glow) I think will not be easy, or even possible. But that's just me. -
Revell Ferrari Enzo, how does it build?
peteski replied to Roadrunner's topic in General Automotive Talk (Trucks and Cars)
Then you will end up spending more than what the Tamiya kit costs. Why not just go for the best (unless you enjoy building model of the same car twice). One thing is for sure - with this type of thinking we sure can't call you "cheap modeler". Actually, go ahead buy and build them both. Then you can give everybody an honest opinion about which is better. -
Concerned about Tire Burn....
peteski replied to JollySipper's topic in Model Building Questions and Answers
The tire burn is caused by the vinyl plasticizer (thick clear liquid) leaching out of the vinyl tire and getting absorbed into plastic (making it soft). I suspect that this plasticizer is now leaching from the plastic into the paint. You might have to dig out the softened plastic, then patch it up with some new piece of styrene and smoothgin it before painting. Kind of like dentists do when filling a cavity - they first remove all the decayed material before installing the filling. -
Best built-right-from-the-box kits?
peteski replied to Jantrix's topic in Model Building Questions and Answers
Not only the tires are packages separately, but most Japanese kits have real rubber tires (just smell them). They smell like 1:1 tires. It is vinyl (and its leaching plasticizer that causes tire burn). And yes, after many years, the rubber tires might harden up a bit, and even crumble when flexed. Just like old 1:1 rubber tires. How's that for realism?! But I have some Japanese kits with those rubber tires that are around 30 years old, and they are still holding up well. But I don't push the cars around making engine noises. -
Replicating modern LEDs in headlights?
peteski replied to Fat Brian's topic in Model Building Questions and Answers
In my observation when the lights are turned off, white LEDs look clear (no visible color).