David G.
-
Posts
11,326 -
Joined
-
Last visited
Content Type
Profiles
Forums
Events
Gallery
Everything posted by David G.
-
Nicely Done! Love the Eldorado. David G.
-

Forklift
David G. replied to tiking's topic in All The Rest: Motorcycles, Aviation, Military, Sci-Fi, Figures
Convincing weathering. David G. -
I don't think I've seen that many Caddies in one place outside of a dealership! ? All of them look very well finished too. David G.
-
Excellent work on all of them but I especially enjoy the Oh Henry! candy truck.
-
Thanks Carl, glad to know you like them. I have a couple of wild and/or unusual projects planned for 2021. David G.
-
Very cool!. Welcome back, I've missed seeing your wild and imaginative builds. David G.
-
Fantastic work on this one! The amount of detail you added to this in mind blowing and very well executed. I especially like the suspension mods and the addition of the skid plate. Well Done Sir! David G.
-
You have a great set there! I'm partial to the Thunderbird with its tribute paint job, well done! I don't know much about professional wrestling either Mexican or American but it seems to me that the Mexican wrestlers are way more over-the-top and flamboyant than their counterparts here in the States. In any case, it's a very unique and cool source of inspiration for a paint scheme. It's great that you have the mask as a companion to the model. David G.
-
Glad to help, and thanks again. David G.
-
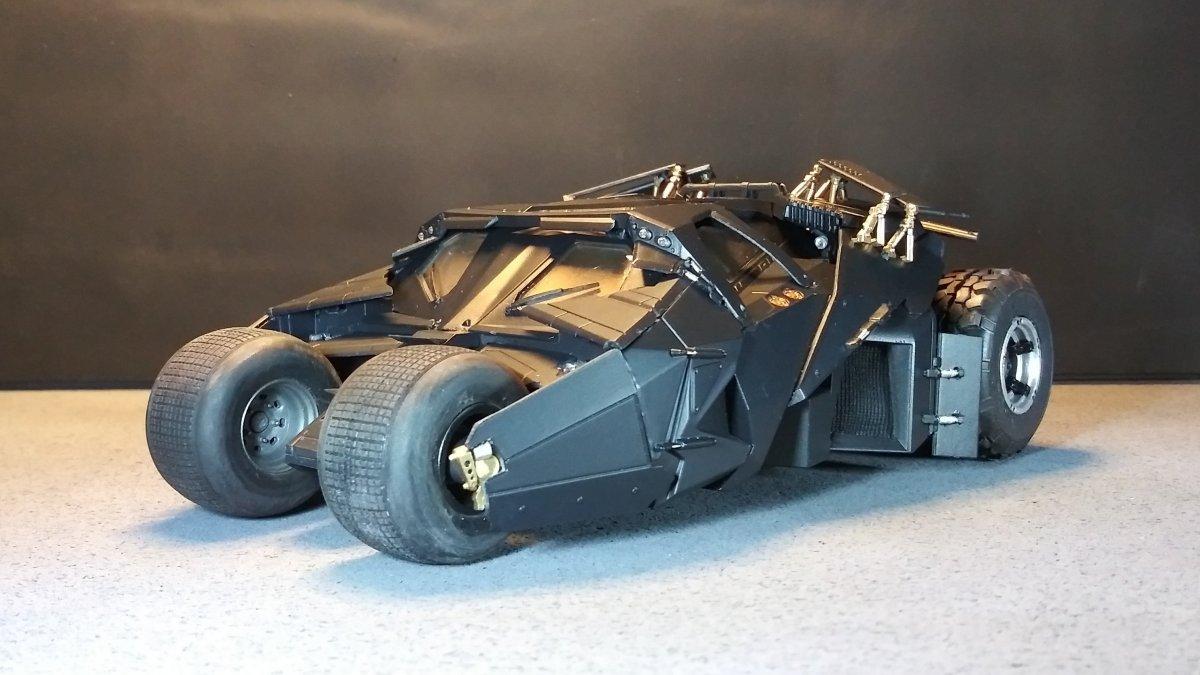
Thank you Donald. I was a little worried that the Bat Theme was starting to get a little out of hand but I guess it all worked out. GTW I have two or three more Bat vehicles planned for 2021. Thanks Bruce, I'm glad you like them. Thanks Bob. I like the name too but I was concerned that I may have had trouble with that one as a topic heading. I think most folks would have been cool with it but it may have offended some and offending people is not one of my goals here. That's what Facebook is for! Yes. I also remember your kind comments and encouragement, thank you David. Thanks Pete. Although a bit pricy for what it is, it is a sweet little kit, very fragile too. Whenever I have to move it, I feel like I'm picking up a soap bubble. Thank you Gareth, I do remember following your WIP on that one. I like what you did with yours. The color scheme you selected gave it an elegance befitting the Thunderbird's image as a "personal luxury" vehicle as they were called back then. Thank you Tom, I do too. But sometimes when the project takes on a life of its own, it can demand more than my skills can provide. There were a couple of times when this one came close. Thanks Walter. Thank you for the compliment Craig. The Tumbler's engineering is certainly unusual, it builds more like a tank than a car. Which is appropriate when you think about it. I admit that I did find it intimidating when I started with it. There were times that I found myself frustrated and had to dismantle and reassemble a couple of sub assemblies because of mistakes that I made. But it is a good, well engineered kit and with care and diligence you should have little trouble building one. My build thread is fairly detailed and it may help to inform your decision on it. Here is a link. Thanks Chris, I'm glad you like 'em. Kind regards to you all, thanks for taking the time to comment. David G.
-
Excellent work on each one but the trailer is the topper. Especially in combination with the Raptor and race car. David G.
-
Each one looks great but as a career funeral director, I'll have to say that the hearse is my favorite. David G.
-
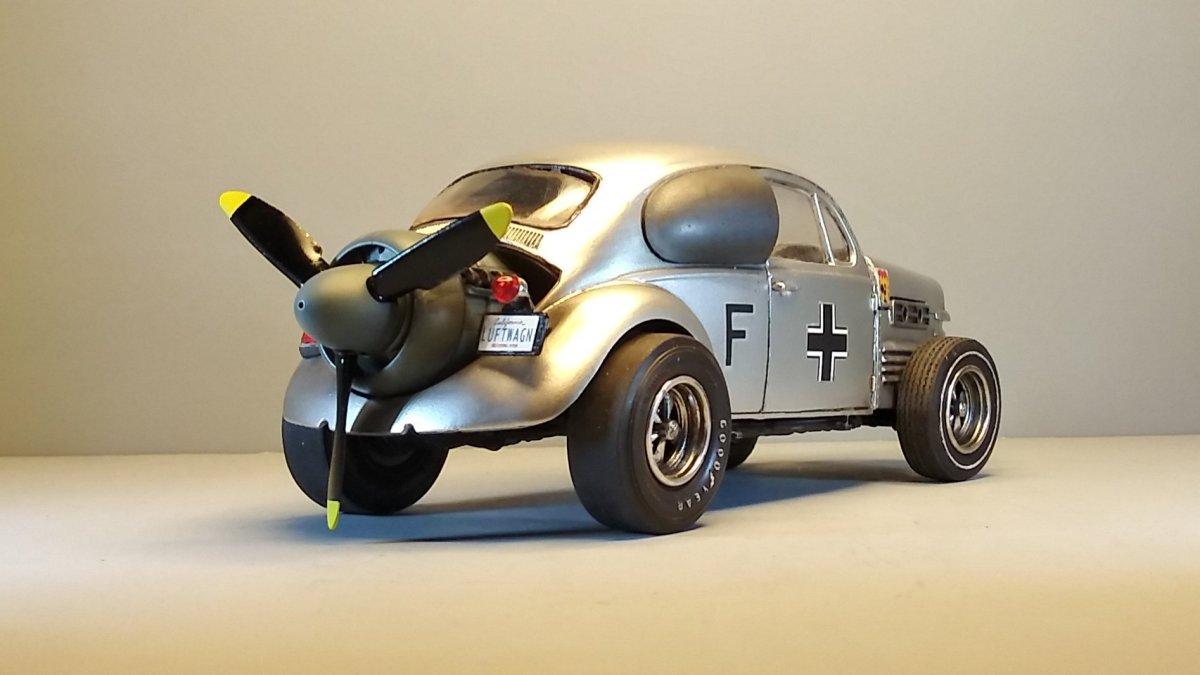
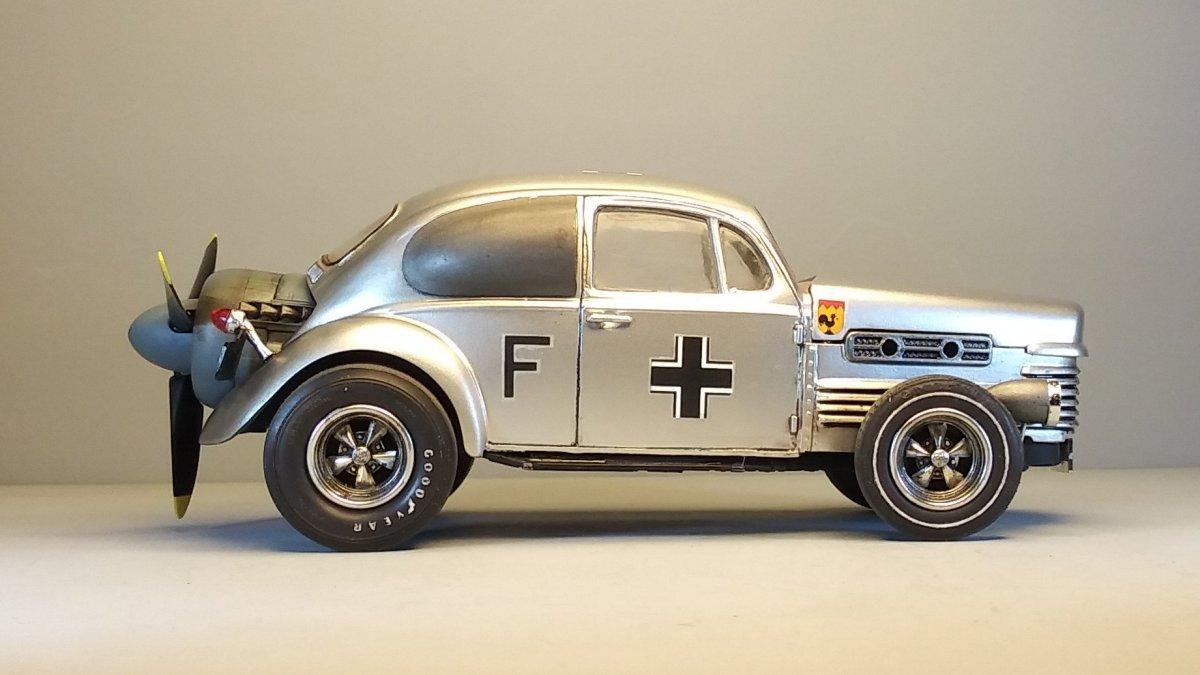
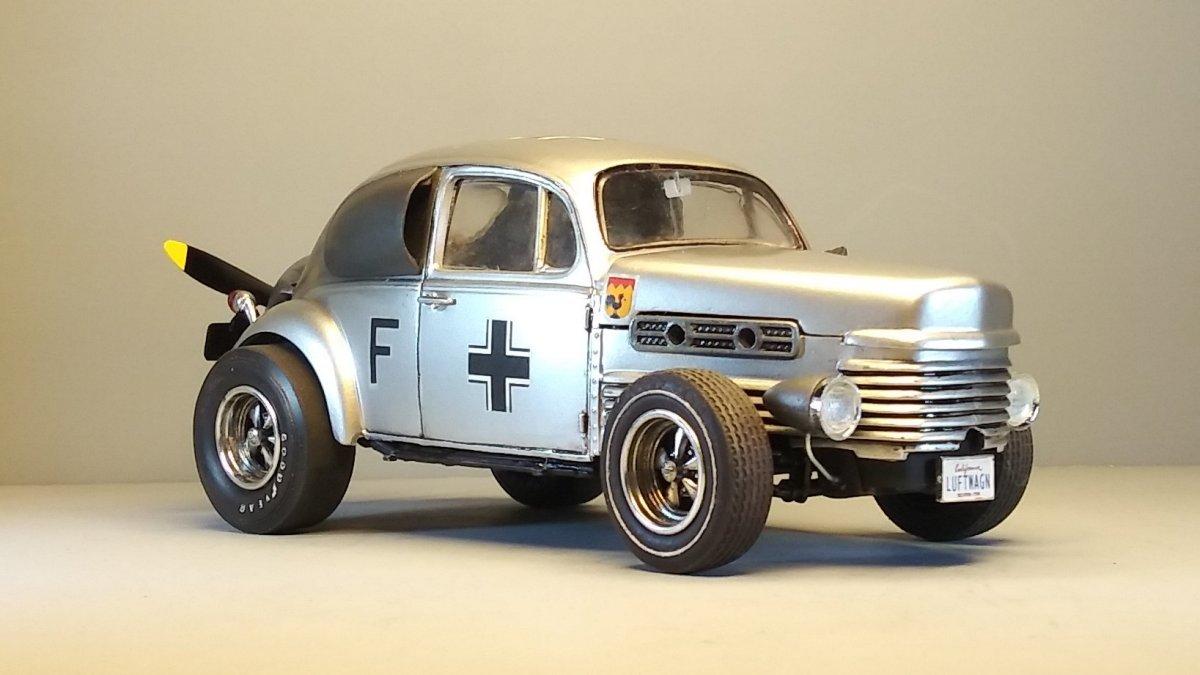
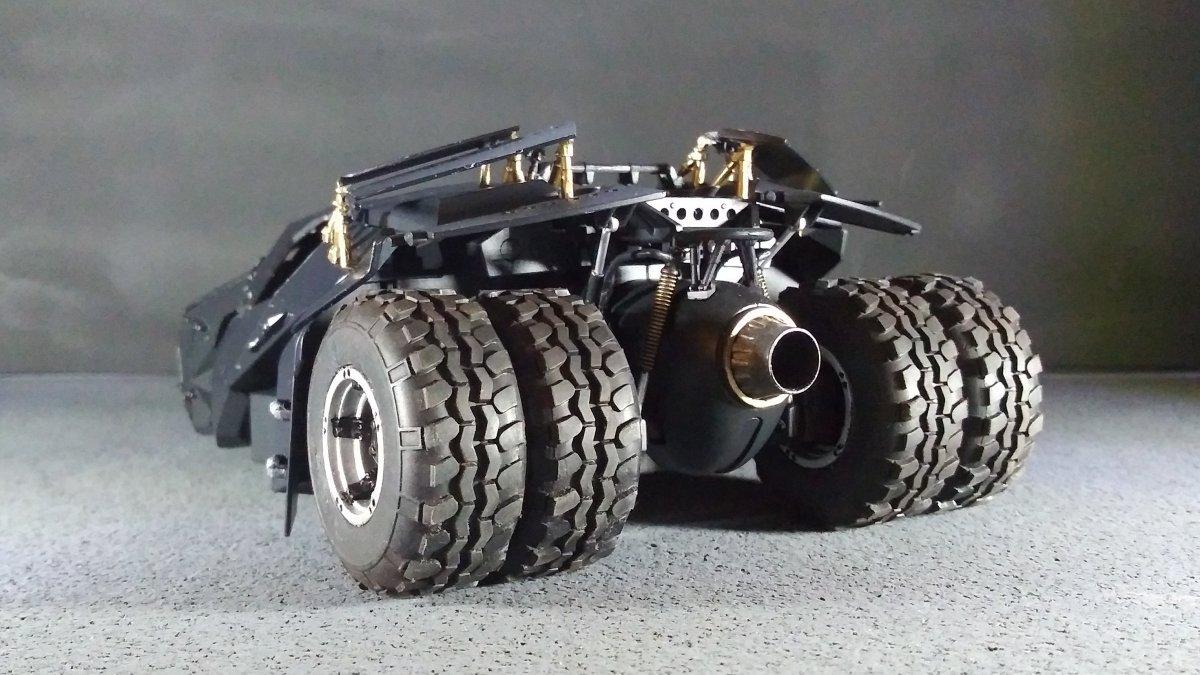
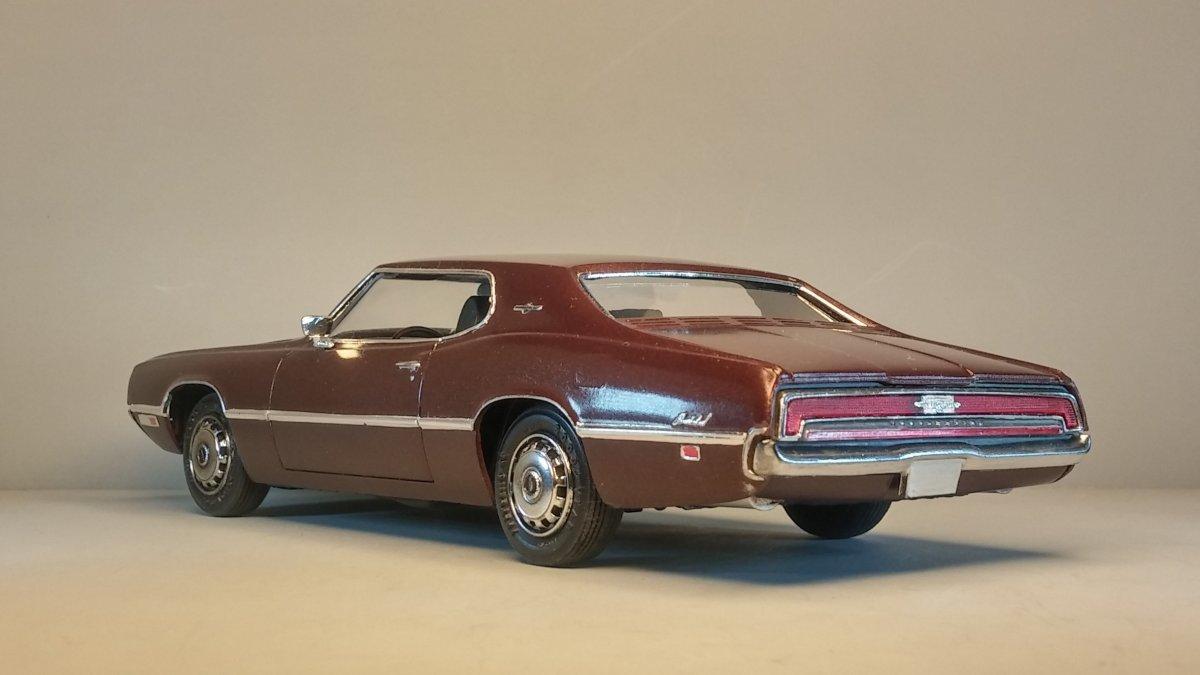
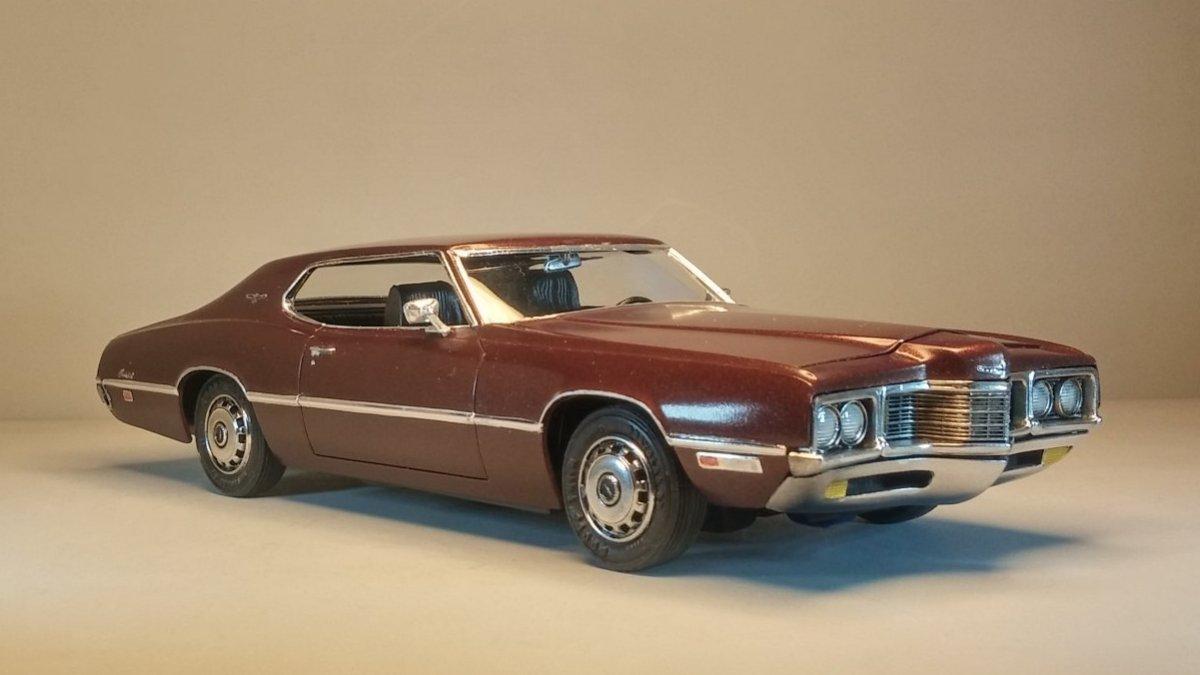
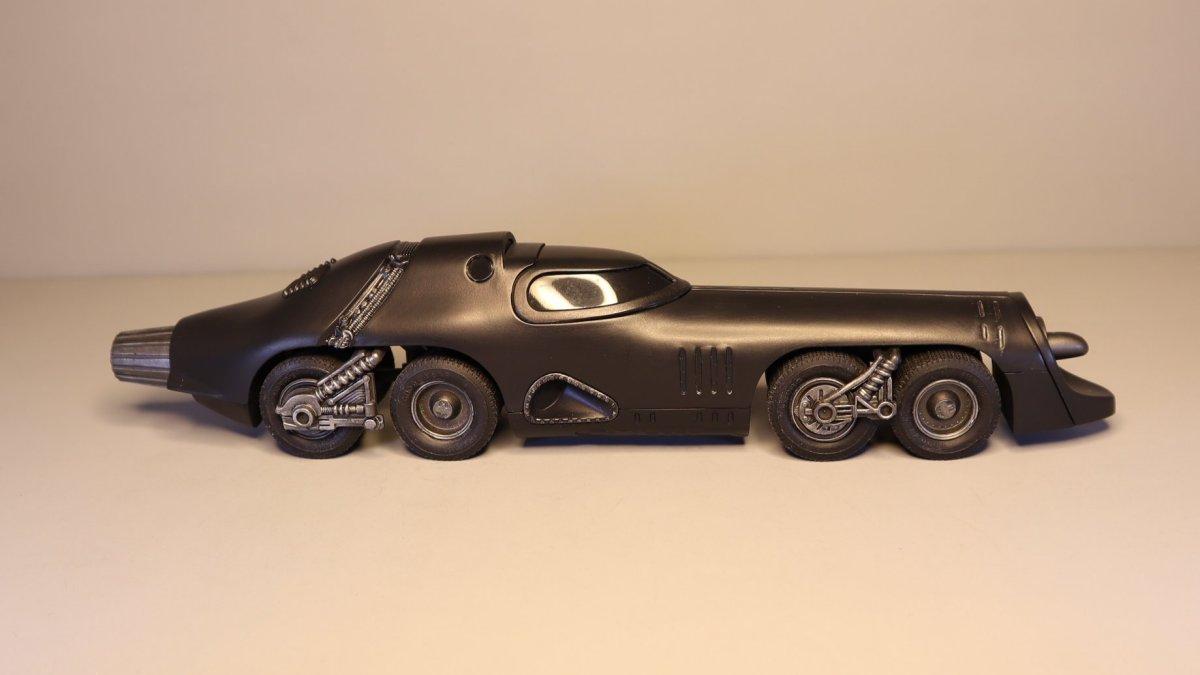
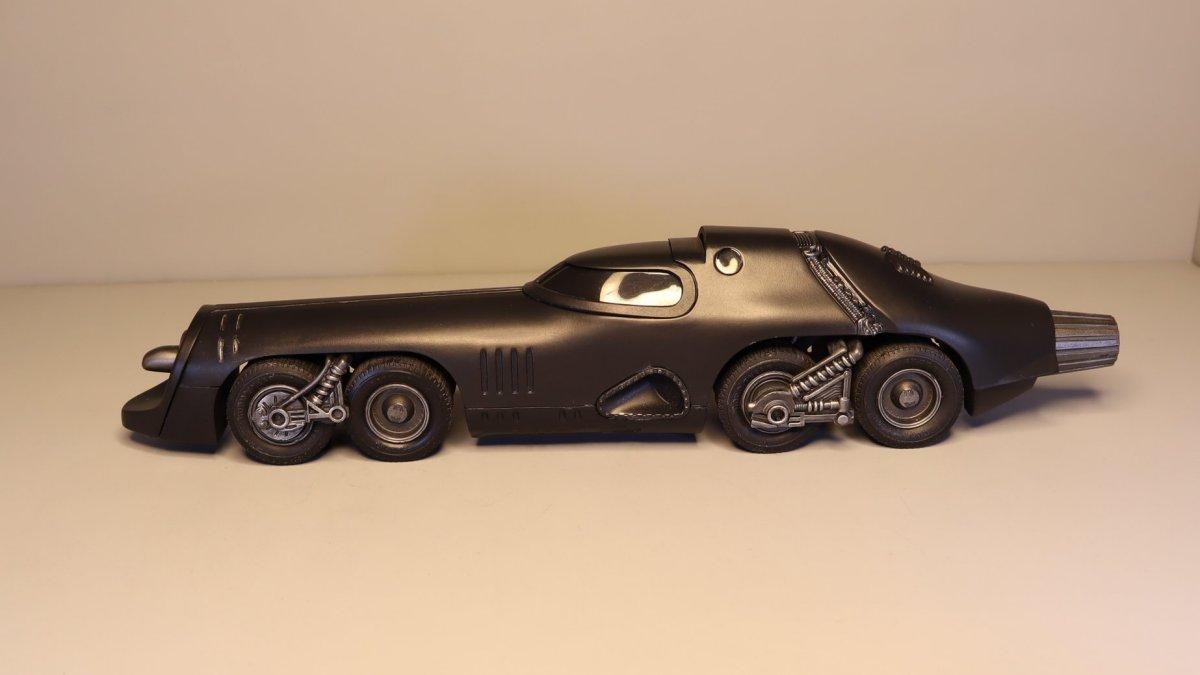
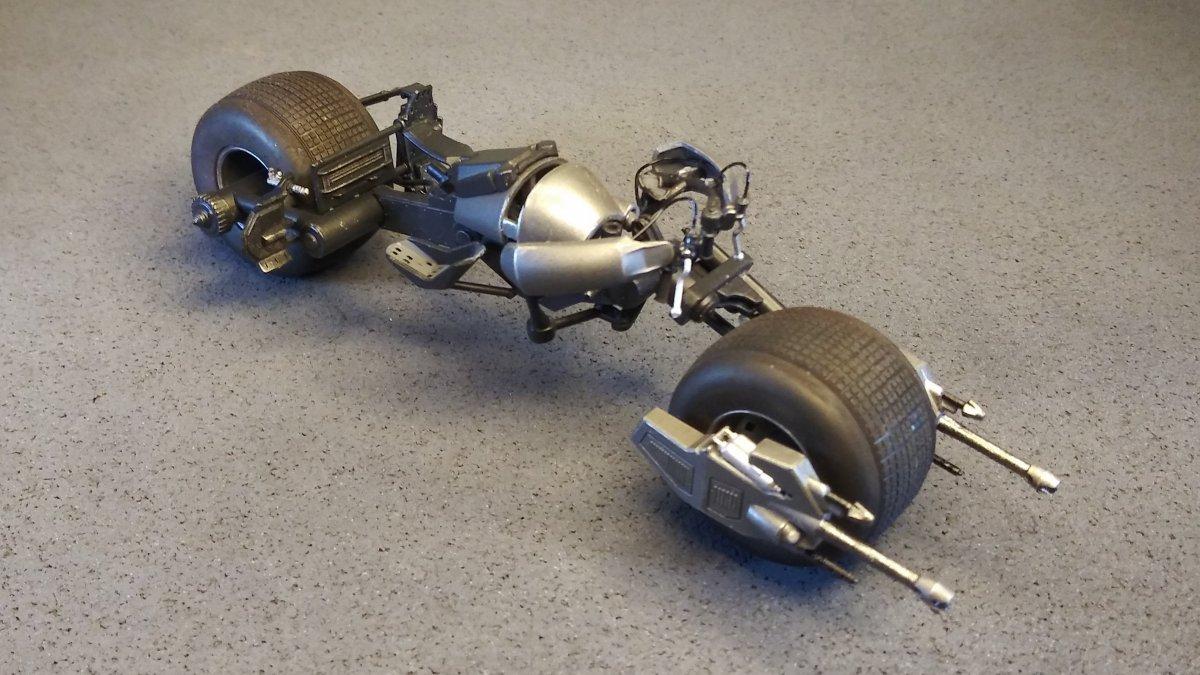
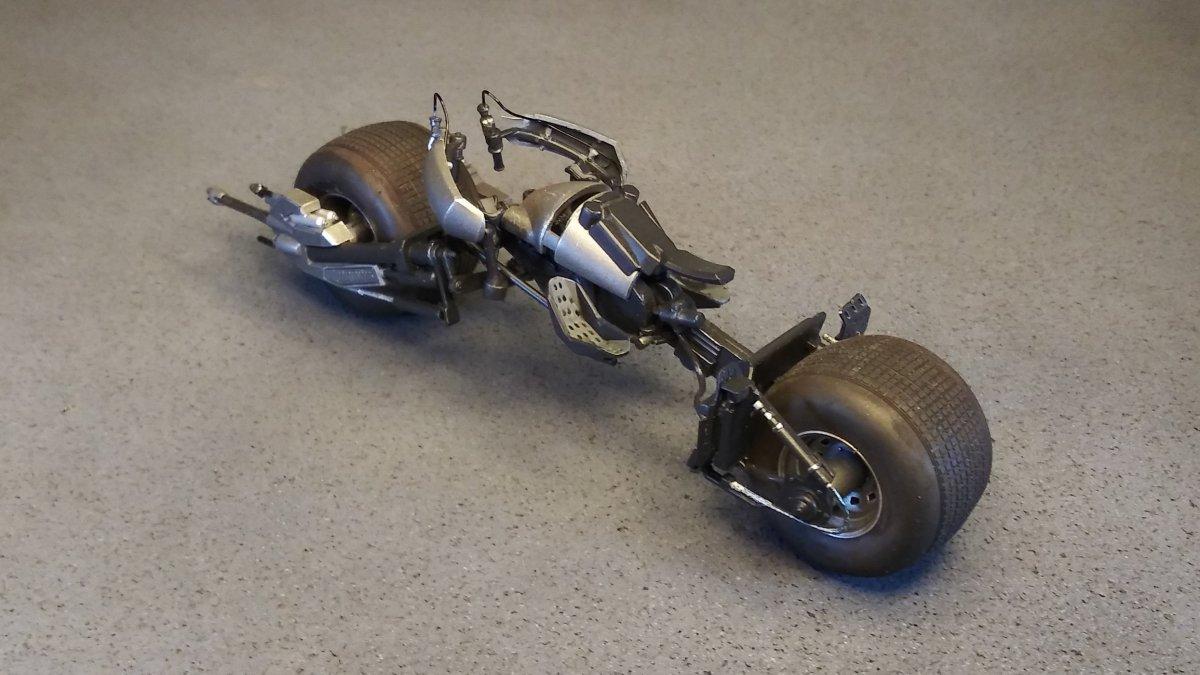
I only finished five builds in 2020 and three of those are Batmobile related, hence "The Year of the Bat" My first completion for 2020 was the Luftwagen. (Yes, I honestly did think about calling it "The F-Bomber") I started it in November of 2019 and finished it in March of 2020 with about 84 hours invested. This project is based on the Revell Street Machine Beetle kit from the Eighties... cast in pink. It was a bagged kit that I picked up years ago at a swap meet for a couple of dollars. I bought it more as a VW parts source than anything else. There was one body and chassis but there seemed to be two of almost everything else. A previous owner had started some work on it putting some subassemblies together and cutting the nose off at the doors. My intent when I started the Luftwagen was to use it as a quick and crazy build to finish out 2019, something a little "over the top" that I could just slap together. I think we all know how that usually plays out. Anyway, the decals are from a WWII era Junkers Ju 87 and the engine is from a Focke_Wulf Ta 154 Moskito, also WWII era, and the nose is from a 1937 Cord. These are some of the more prominent mods. For more details, here's a link to the build thread. ***** This is my version of AMT's 1971 Ford Thunderbird. It's one of the cars I remember fondly from my childhood. My Aunt and Uncle owned one and I had occasion to ride in it many times. It was fast and powerful. The body styling was almost as cool as any Batmobile and the interior followed suit. The high-back bucket seats and center console gave the interior a feeling of performance, rather like the cockpit of a fighter jet, while wrap-around rear seat gave the car a custom feel. Overall a very cool car and if I had my own "Jay Leno Garage", I would definitely have one of these in it. I started this one on New Year's Day of 2020 and finished up in April burning about 34 hours in the process. Though this one came with a complete engine, there was also an engine plate provided. Since the detail in the engine bay was rather sparse, I decided to use the engine plate and save the motor for some future project. So it's also my first curbside build. For those who may be interested in the gritty details, here is a link to the build thread. ***** This is my version of the Moebius Models Tumbler from the 2005 movie "Batman Begins". I bought this kit about seven years ago and I just now got around to building it. I started it in May and wrapped it up in June with about 44 hours into it. Due to the nature of the vehicle the kit has some unusual assembly engineering. The interior is rather well detailed but unless you plan to modify the model to allow for an opening canopy or light the interior in some way, most of the interior won't be visible after the model is completed. Had I known this, I would not have put as much effort into detailing the interior as I did. For those who may be interested, here is a link to the build thread. ***** This is the Bat-Pod by Moebius Models from the 2008 film "The Dark Knight". It's nicely detailed and well engineered but at about $25 retail, I feel that it's a little overpriced given that it's a rather simple kit with a low parts count and not much more complicated than a detailed model car engine. I started building and finished this in June using up about 14 hours. For those who may be interested, here is a link to the build thread. ***** Here's the Bat-Missile from the 1992 movie "Batman Returns" it's a revealed escape vehicle based on the Batmobile from that movie. Although very cool, this has to be one of the most improbable Bat Vehicles to date. It would seem that the huge jet turbine engine in the center of the car wouldn't leave adequate space for the retractable wheels or their operating mechanisms. I started this one in July and finished it up in August with about 12.5 hours of working time. Here is a link to the build thread if you're interested. That's all for this year. I wish everyone a safe, healthy and prosperous 2021! Thanks for taking the time to look and please feel free to comment. David G.

-
Each one is very well done and a knock-out in its own right but the Cutlass is the one that really catches my eye. I think your choice of color in combination with the very well finished brightwork give it just a bit of a nudge over the others. David G.
-
All of them are very well done. The paint on the panel truck is especially nice but for an overall favorite, I'd have to go with the Bob Glidden Ford. Aside from being very well finished, that one just has a solid and weighty feel to it. David G.
-
You have a great eye for rusted metal distressed material, very well done! If I had to pick a favorite, I'd have to go with the '29 Ford tow truck. Your weathering and damage work are very convincing and the heavy-duty rear wheels with solid tires really complete the whole build. Impressive work! David G.
-
The rigs are great and the diorama is a knockout, I remember your WIP on that one. I also like the pic with all the shop equipment loaded on the drop deck. Well done! David G.
-
2020 builds, first year back
David G. replied to 2doors3pedals's topic in Model Trucks: Pickups, Vans, SUVs, Light Commercial
Great Work! I especially like the patina on the old Ford, very convincing. David G. -
Nicely done! David G.
-
Nicely done! Great detail work and excellent color choice. I built one of these back in 2010 when I was just getting back into the hobby and what a joy it was to build. It's nicely detailed and well engineered making for good assembly work. The only bit I remember having trouble with was the shift linkage on the transmission. I just couldn't get it to fit properly so I left it out. I built that one in black. I wanted to do it in Ford's 1960 Orchid Gray but I couldn't find a comparable color in a spray can and I didn't have an airbrush at the time. I really enjoyed seeing your version, thanks for taking the time to post it. David G.
-
My first official post and some completes for 2020
David G. replied to Bullybeef's topic in Model Cars
I'm sorry to learn of your health issues, I have a few new ones of my own so I can empathize. You have some great looking classic hot rods there, I especially like the blue T-Bucket. Welcome back to the hobby~ David G. -
Nicely Done! Love the blue Deuce. David G.
-
Excellent work on all of them! I especially like the diorama and the International you have set up in it. David G.
-
That's an impressive number of models completed, all of them very well finished! Having only ever lived in the USA, I see a lot of cars that I don't recognize which I assume are Russian or European. I'll have to do some research on availability of some of those in the US as I'd like to expand my collection. Among those I do recognize, I particularly like the Jager Porsche, simply beautiful. David G.
-
Great work on all of them, but I especially love the bomber. David G.