majel
-
Posts
862 -
Joined
-
Last visited
Content Type
Profiles
Forums
Events
Gallery
Everything posted by majel
-

Scrap Metal Truck - Update MCM Award!
majel replied to Brizio's topic in Model Trucks: Pickups, Vans, SUVs, Light Commercial
Wow!! The level of detail and your weathering skills are very impressive. That is a fantastic model. -
Sunbeam Tiger vs. Shelby Cobra Duel
majel replied to Pierre Rivard's topic in Other Racing: Road Racing, Salt Flat Racers
These are both beautiful builds Pierre! I really like the Sunbeam because it's a car you don't see modeled very often, especially with the cool fender flares. -
Thank you guys! This is the most detail i have attempted in a model. I learned an awful lot with this build, I'm happy with the results and i really appreciate everyone who followed along for the ride.
-
Porsche 917 Lemans 1970 Winner
majel replied to Rich Chernosky's topic in Other Racing: Road Racing, Salt Flat Racers
That is a great build of a beautiful car, well done! -
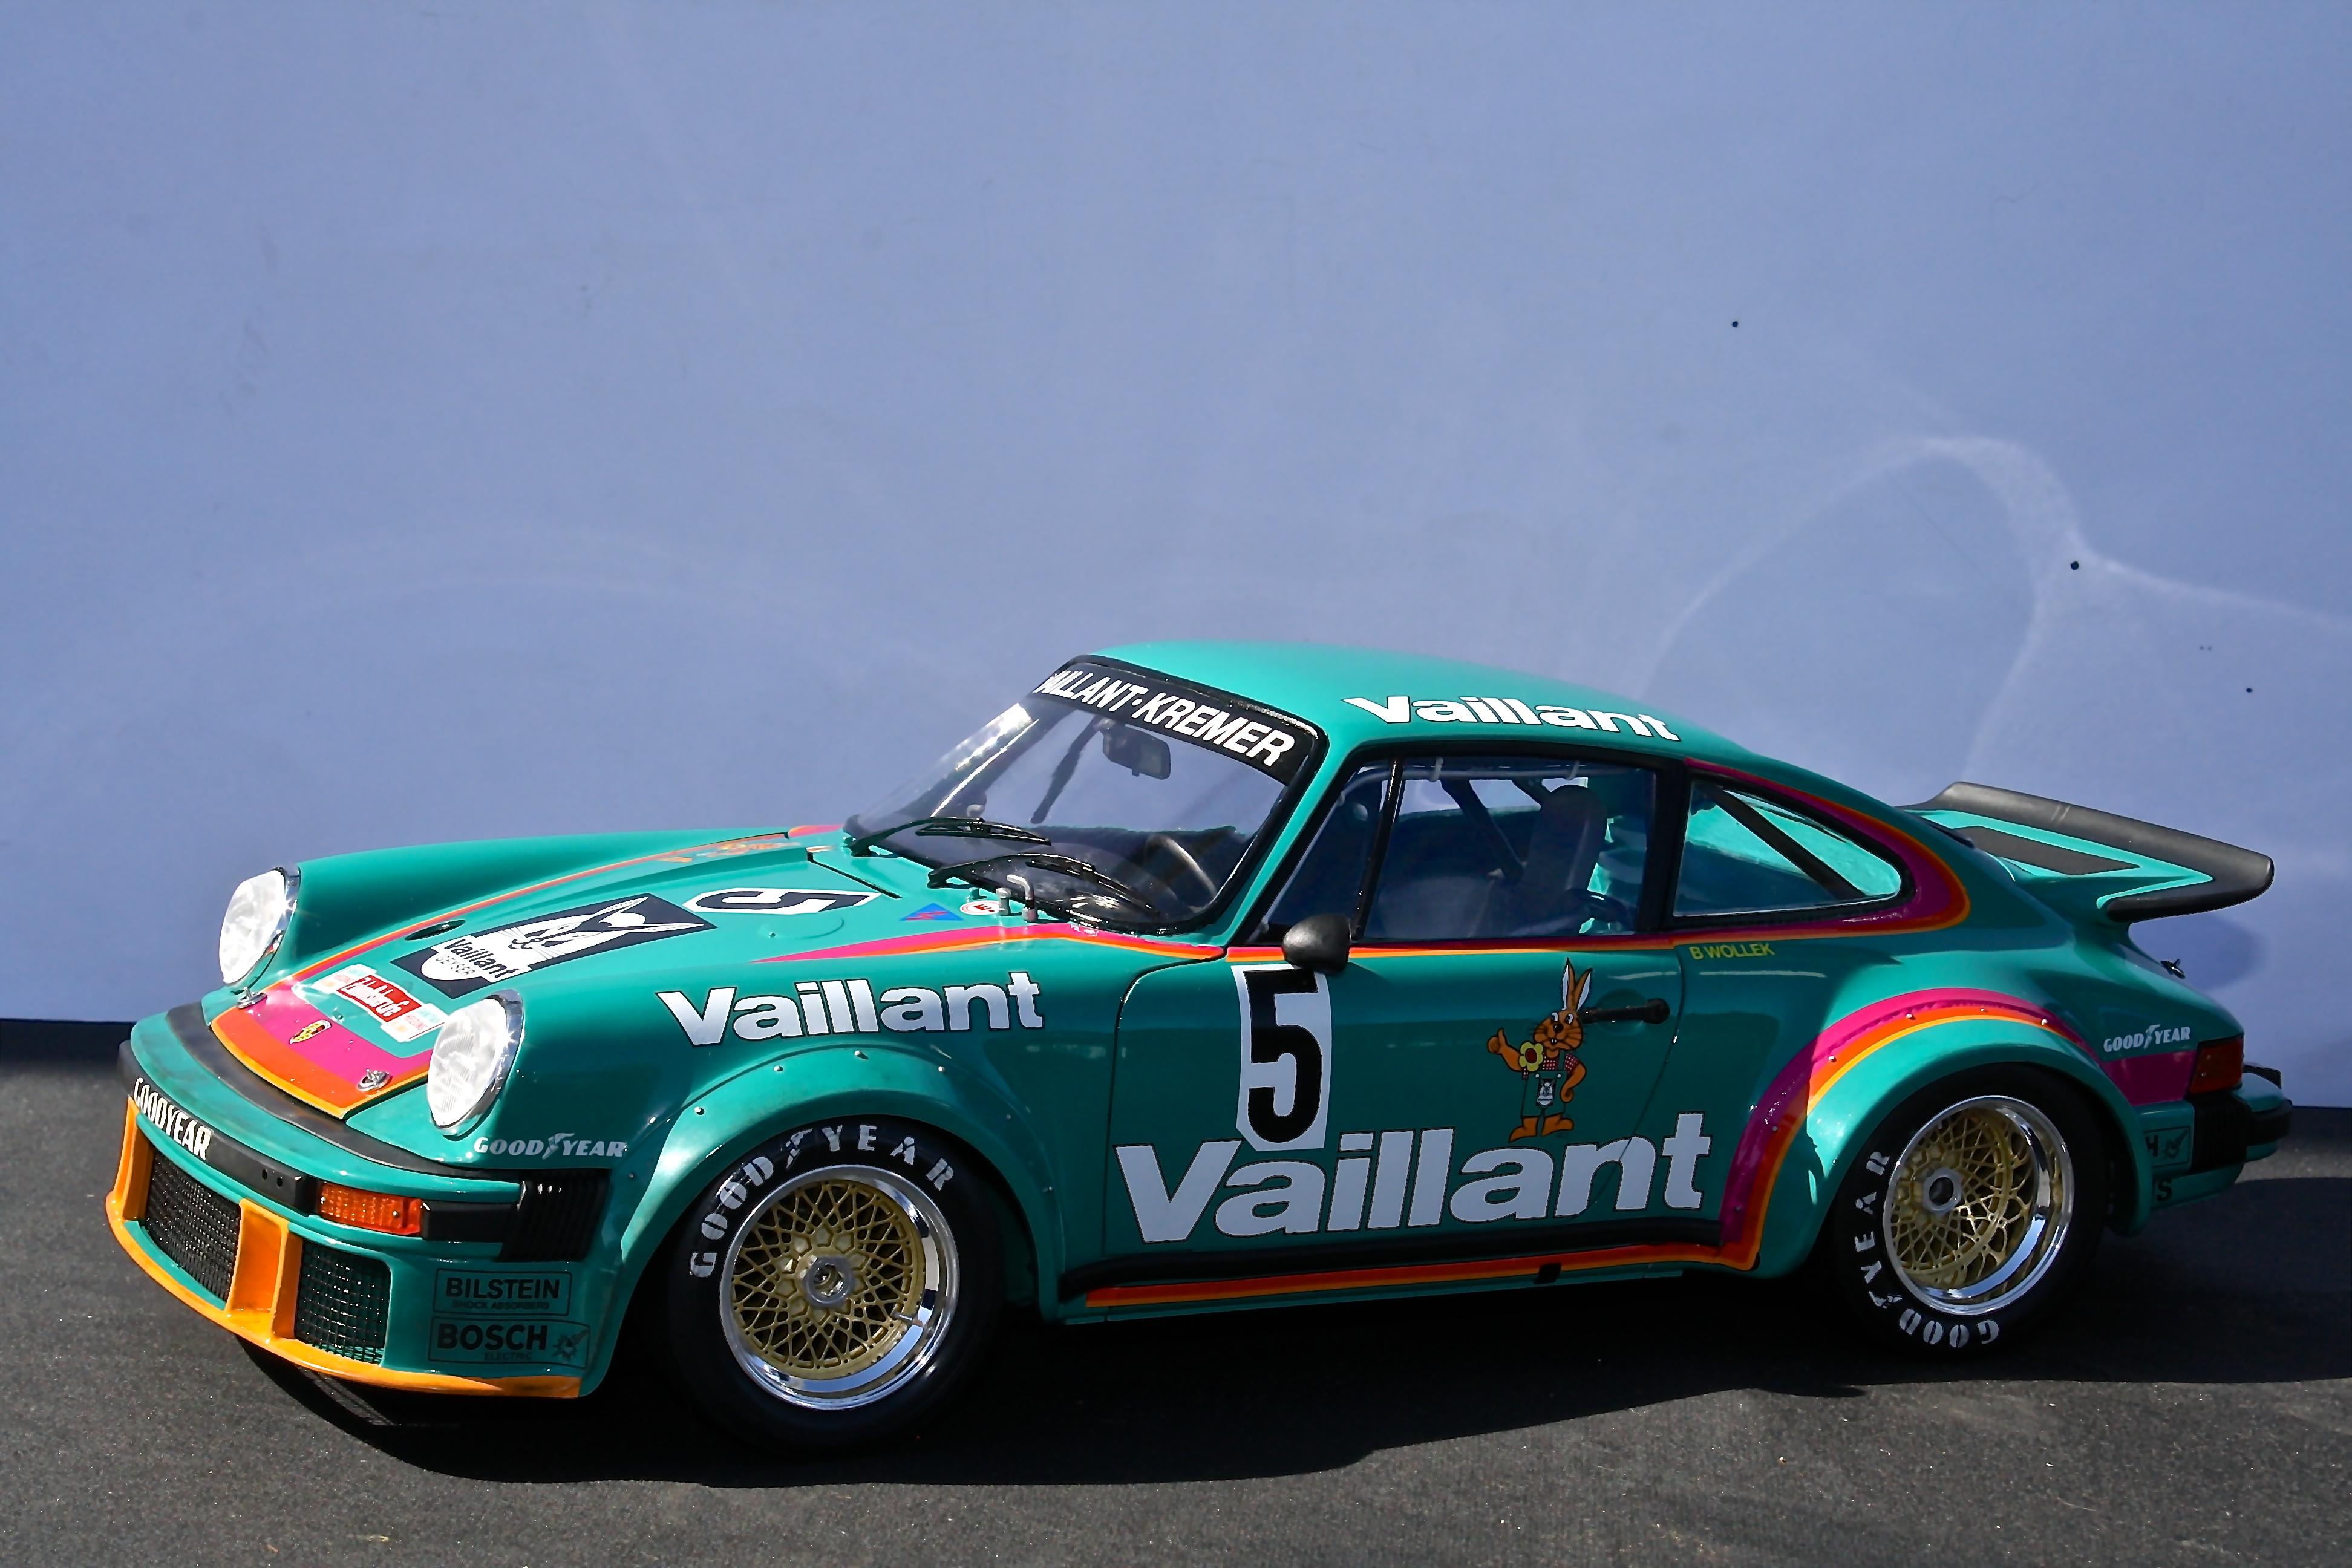
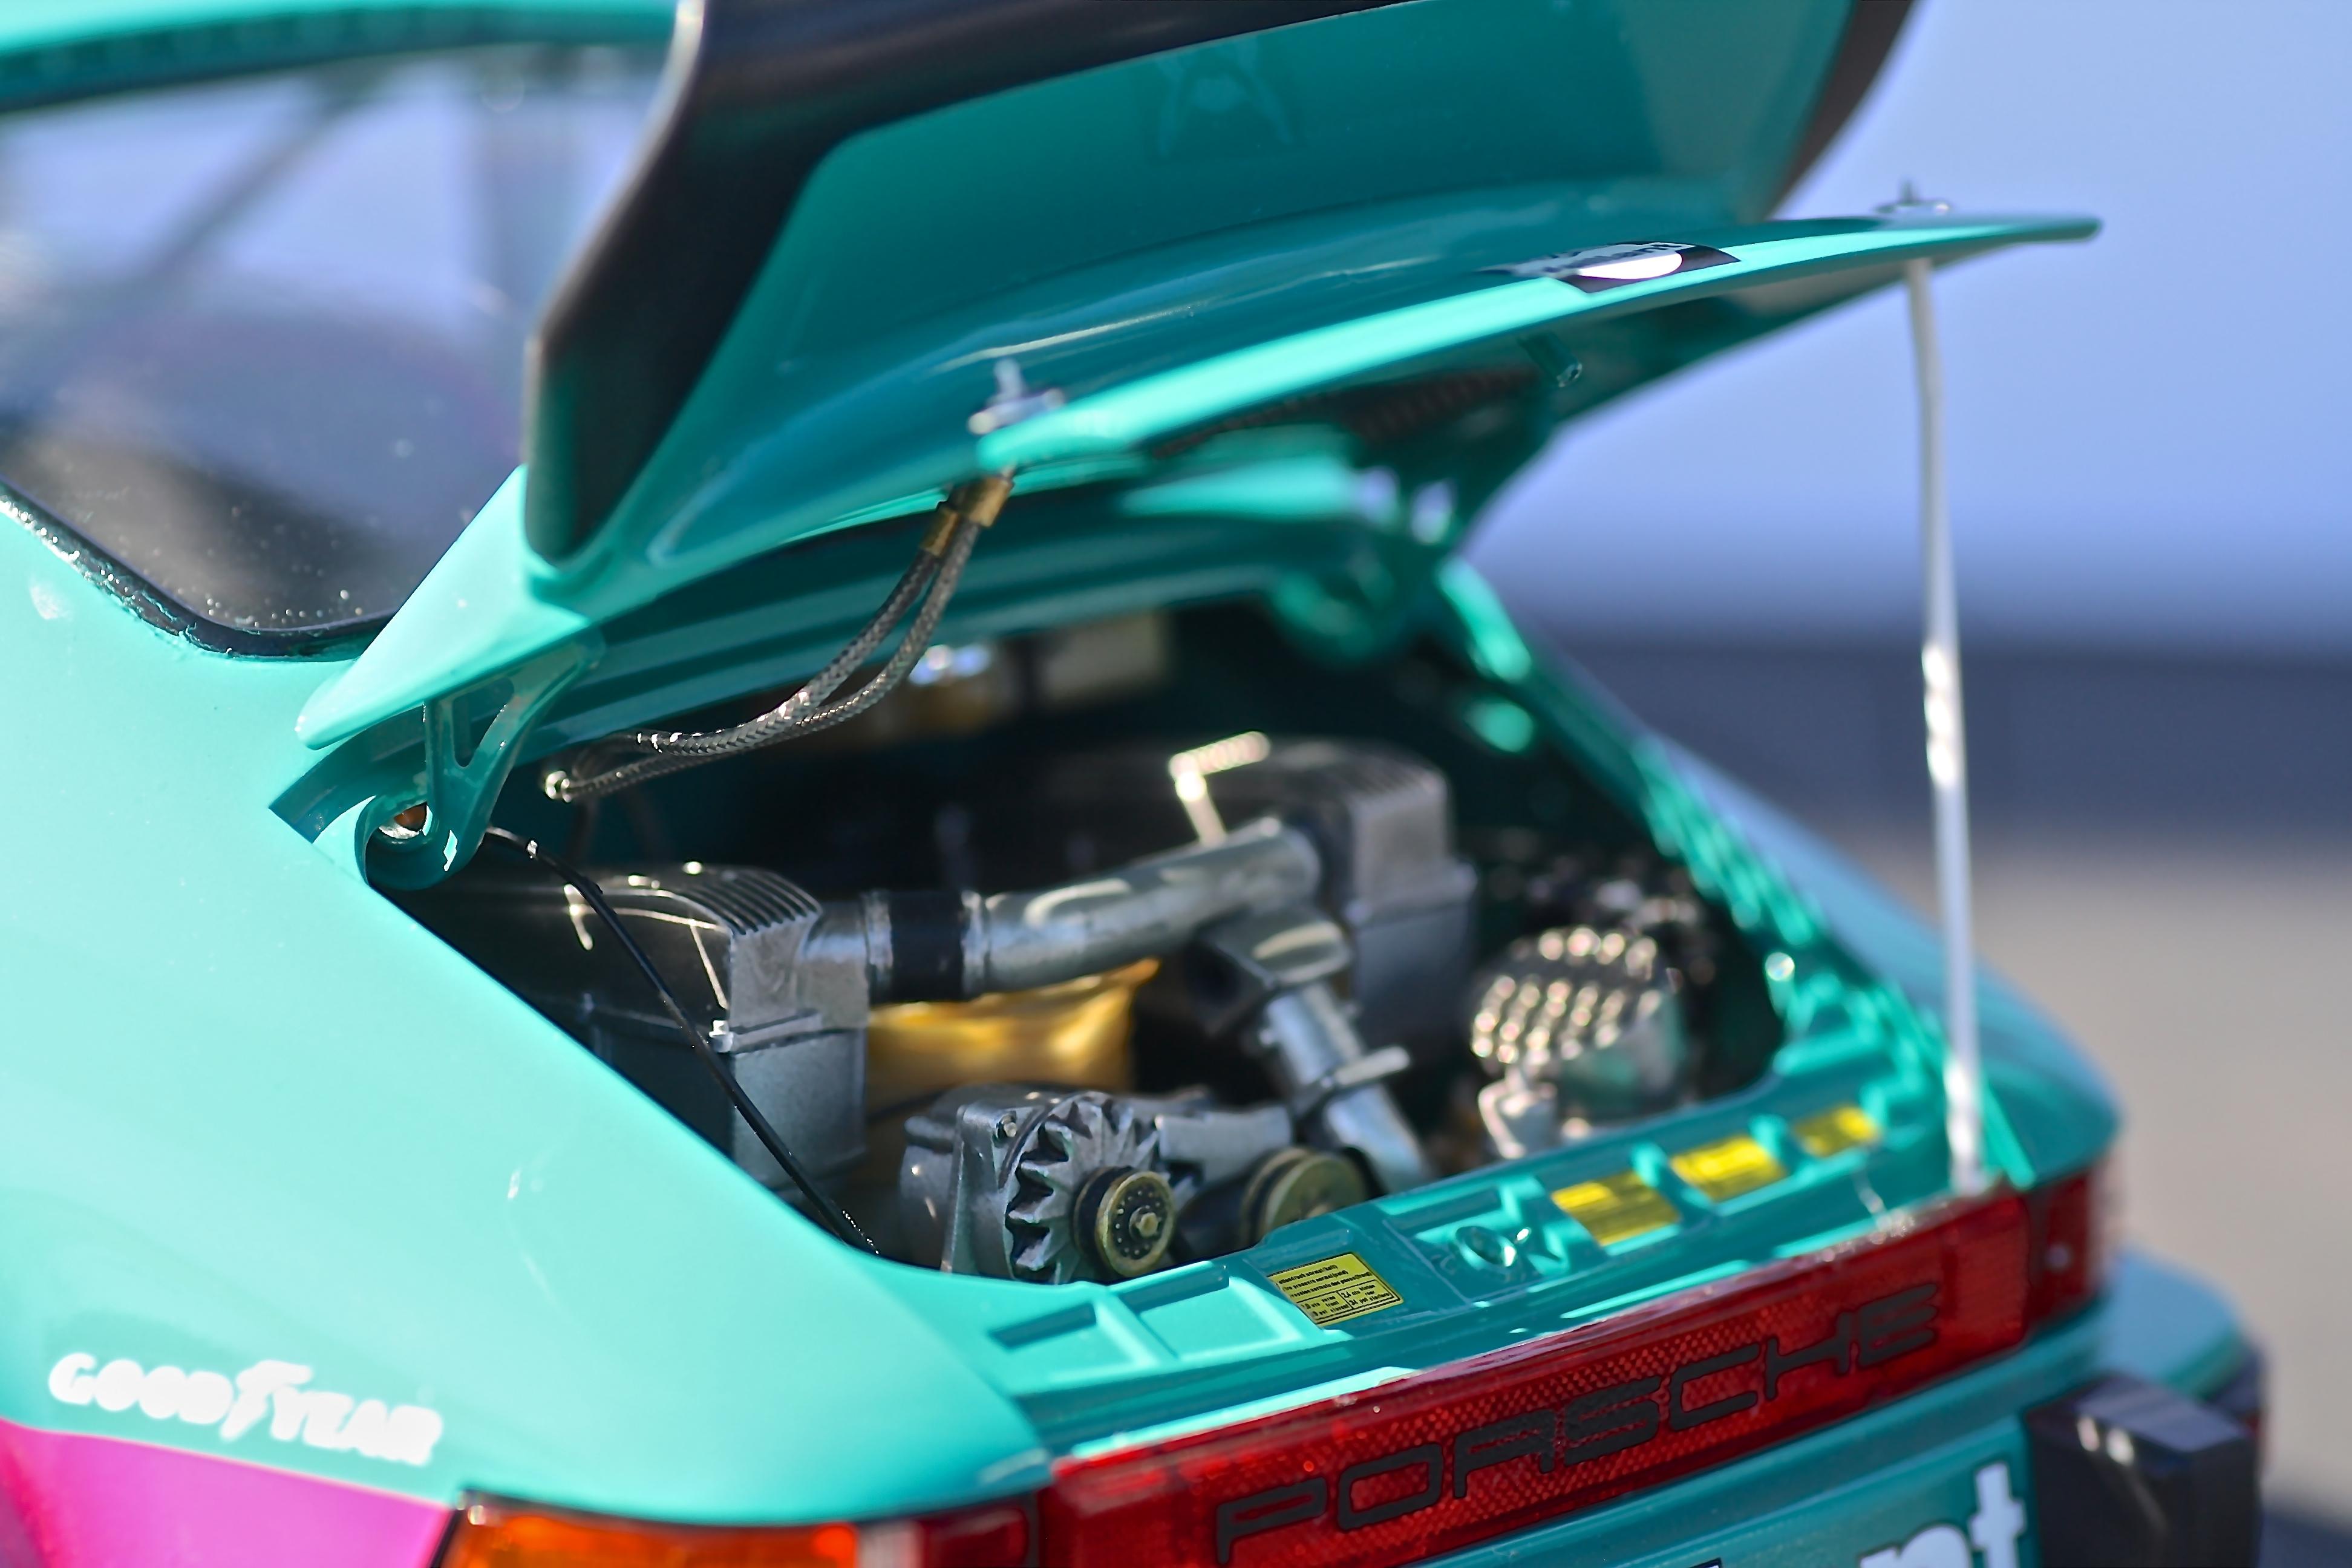
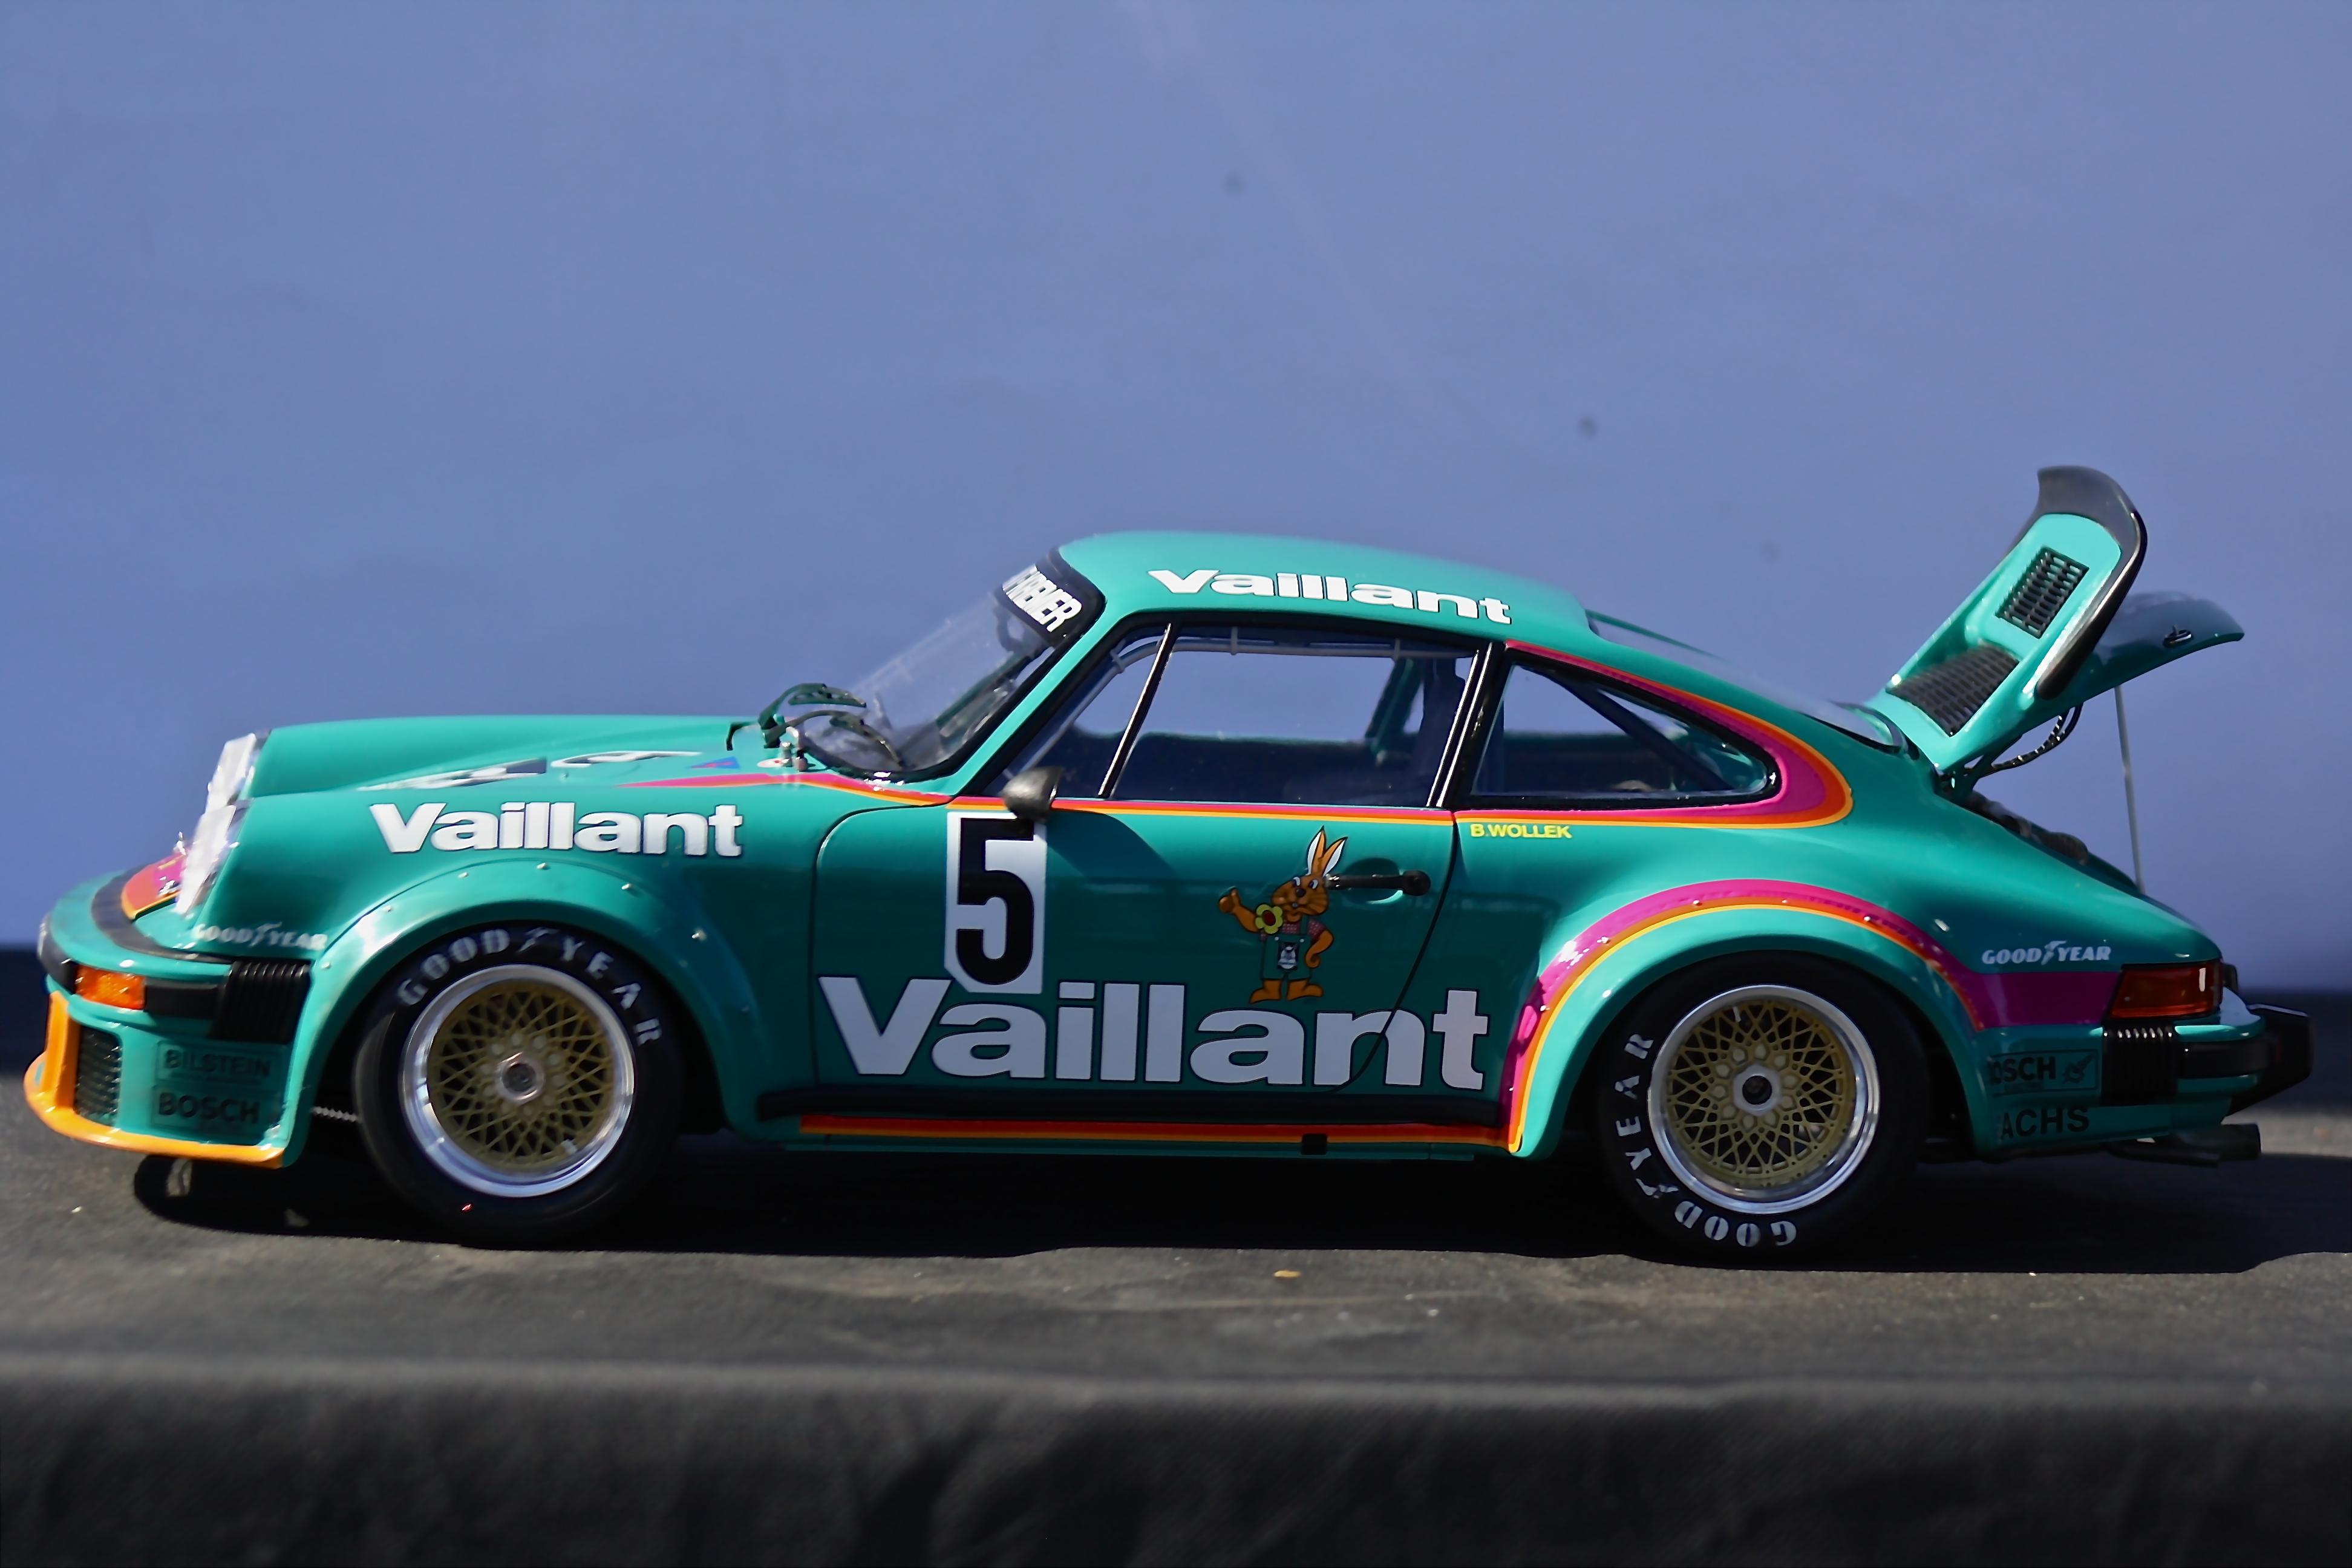
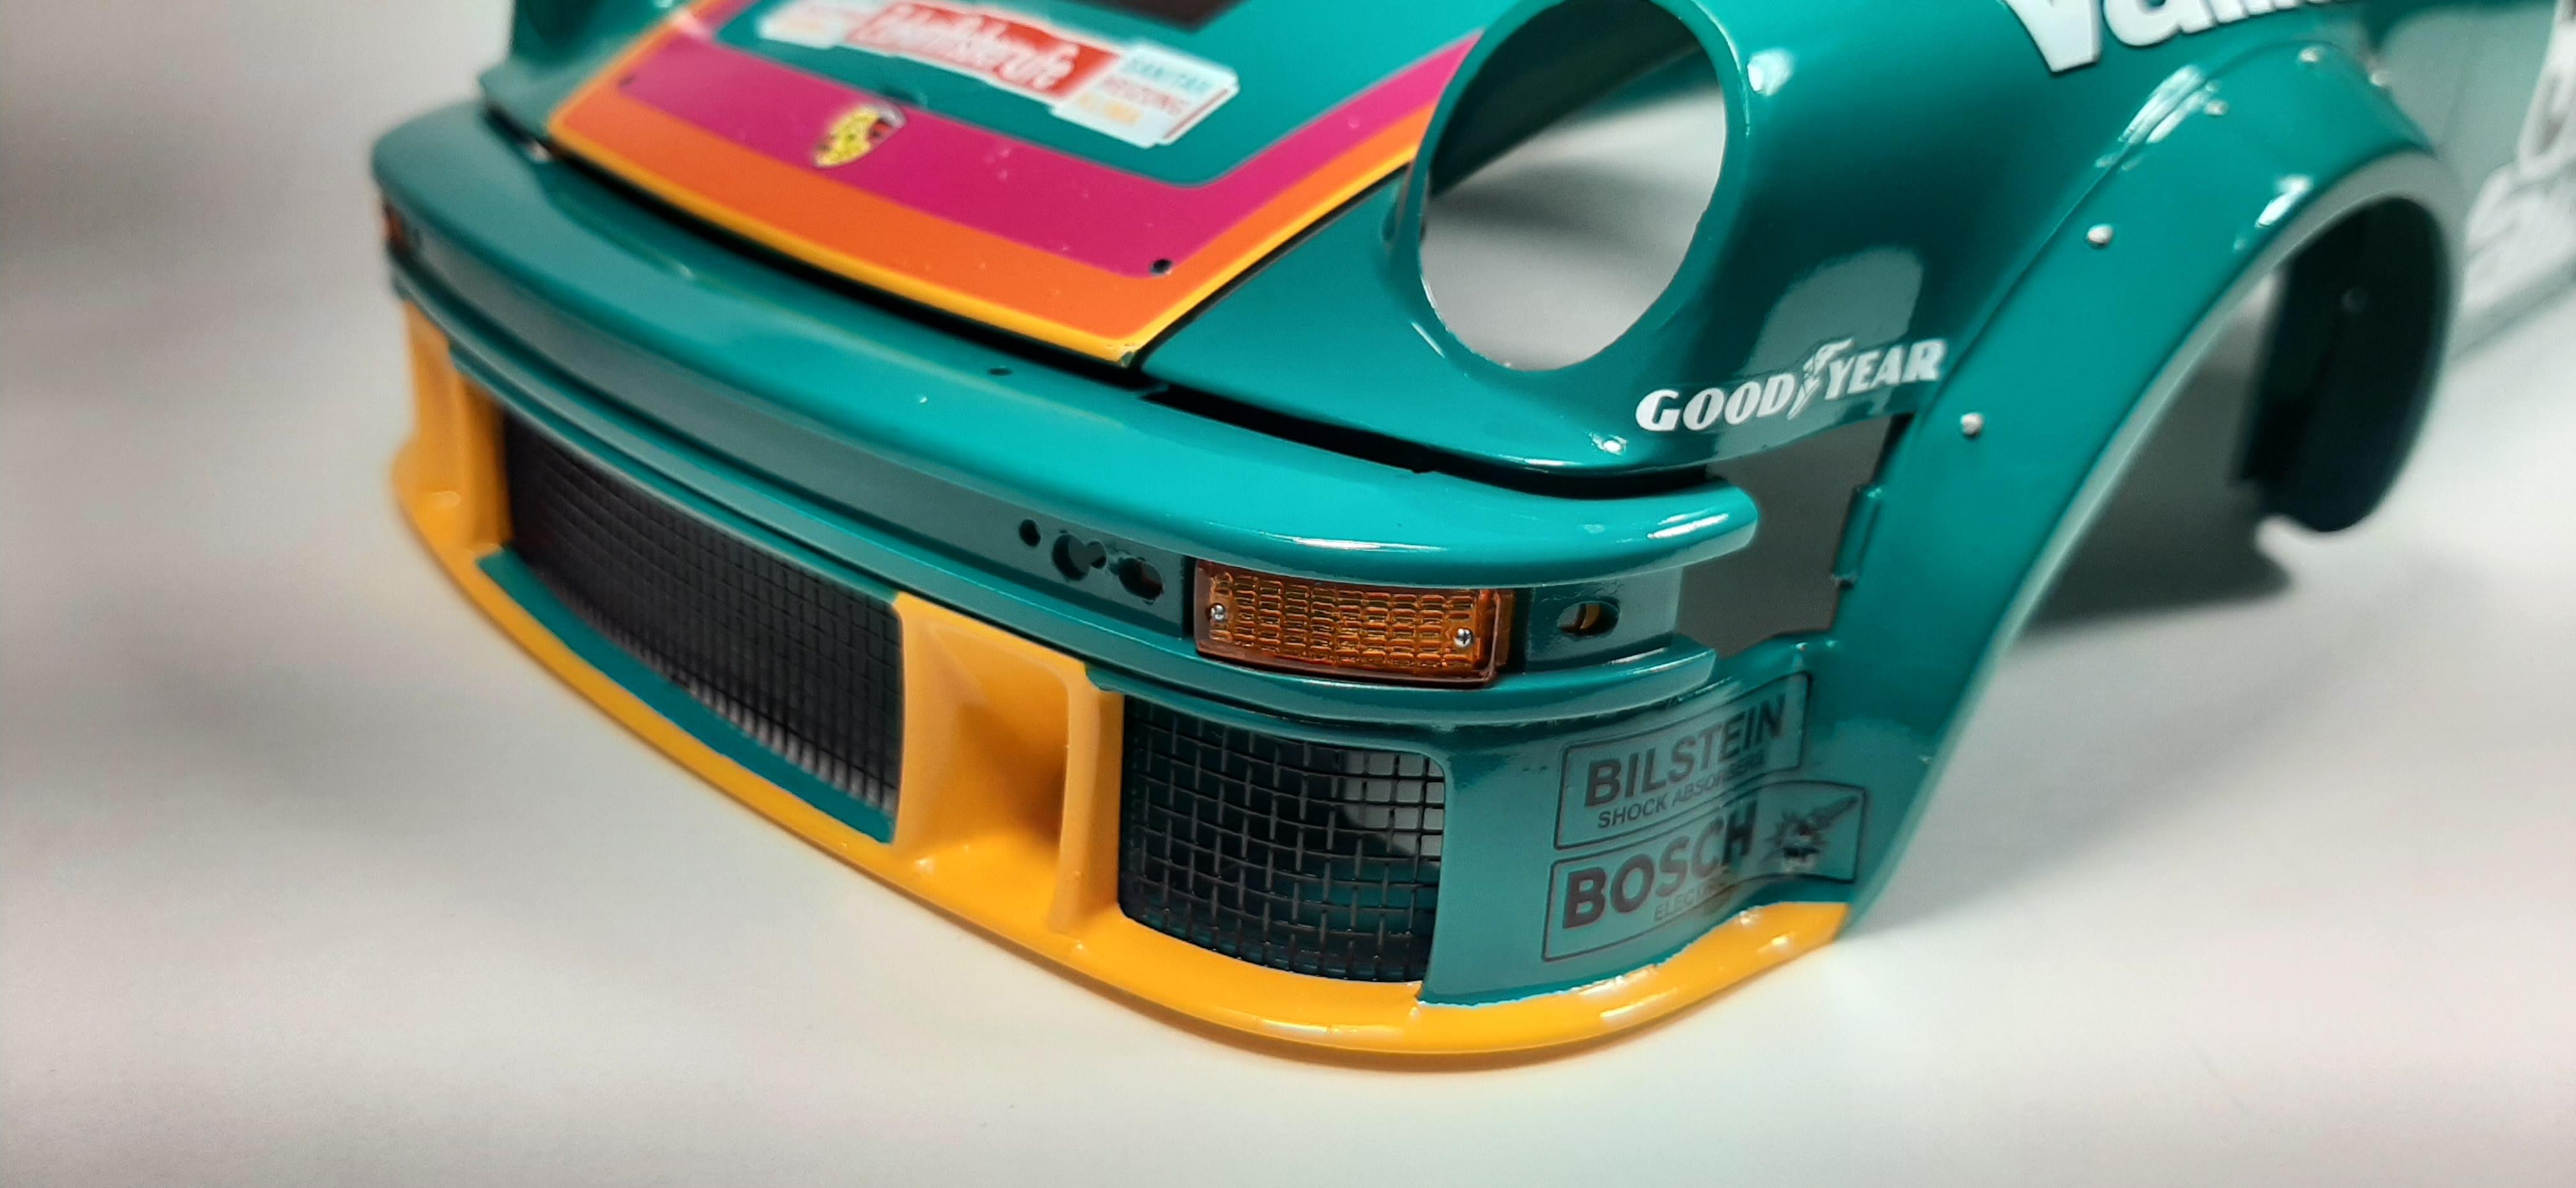
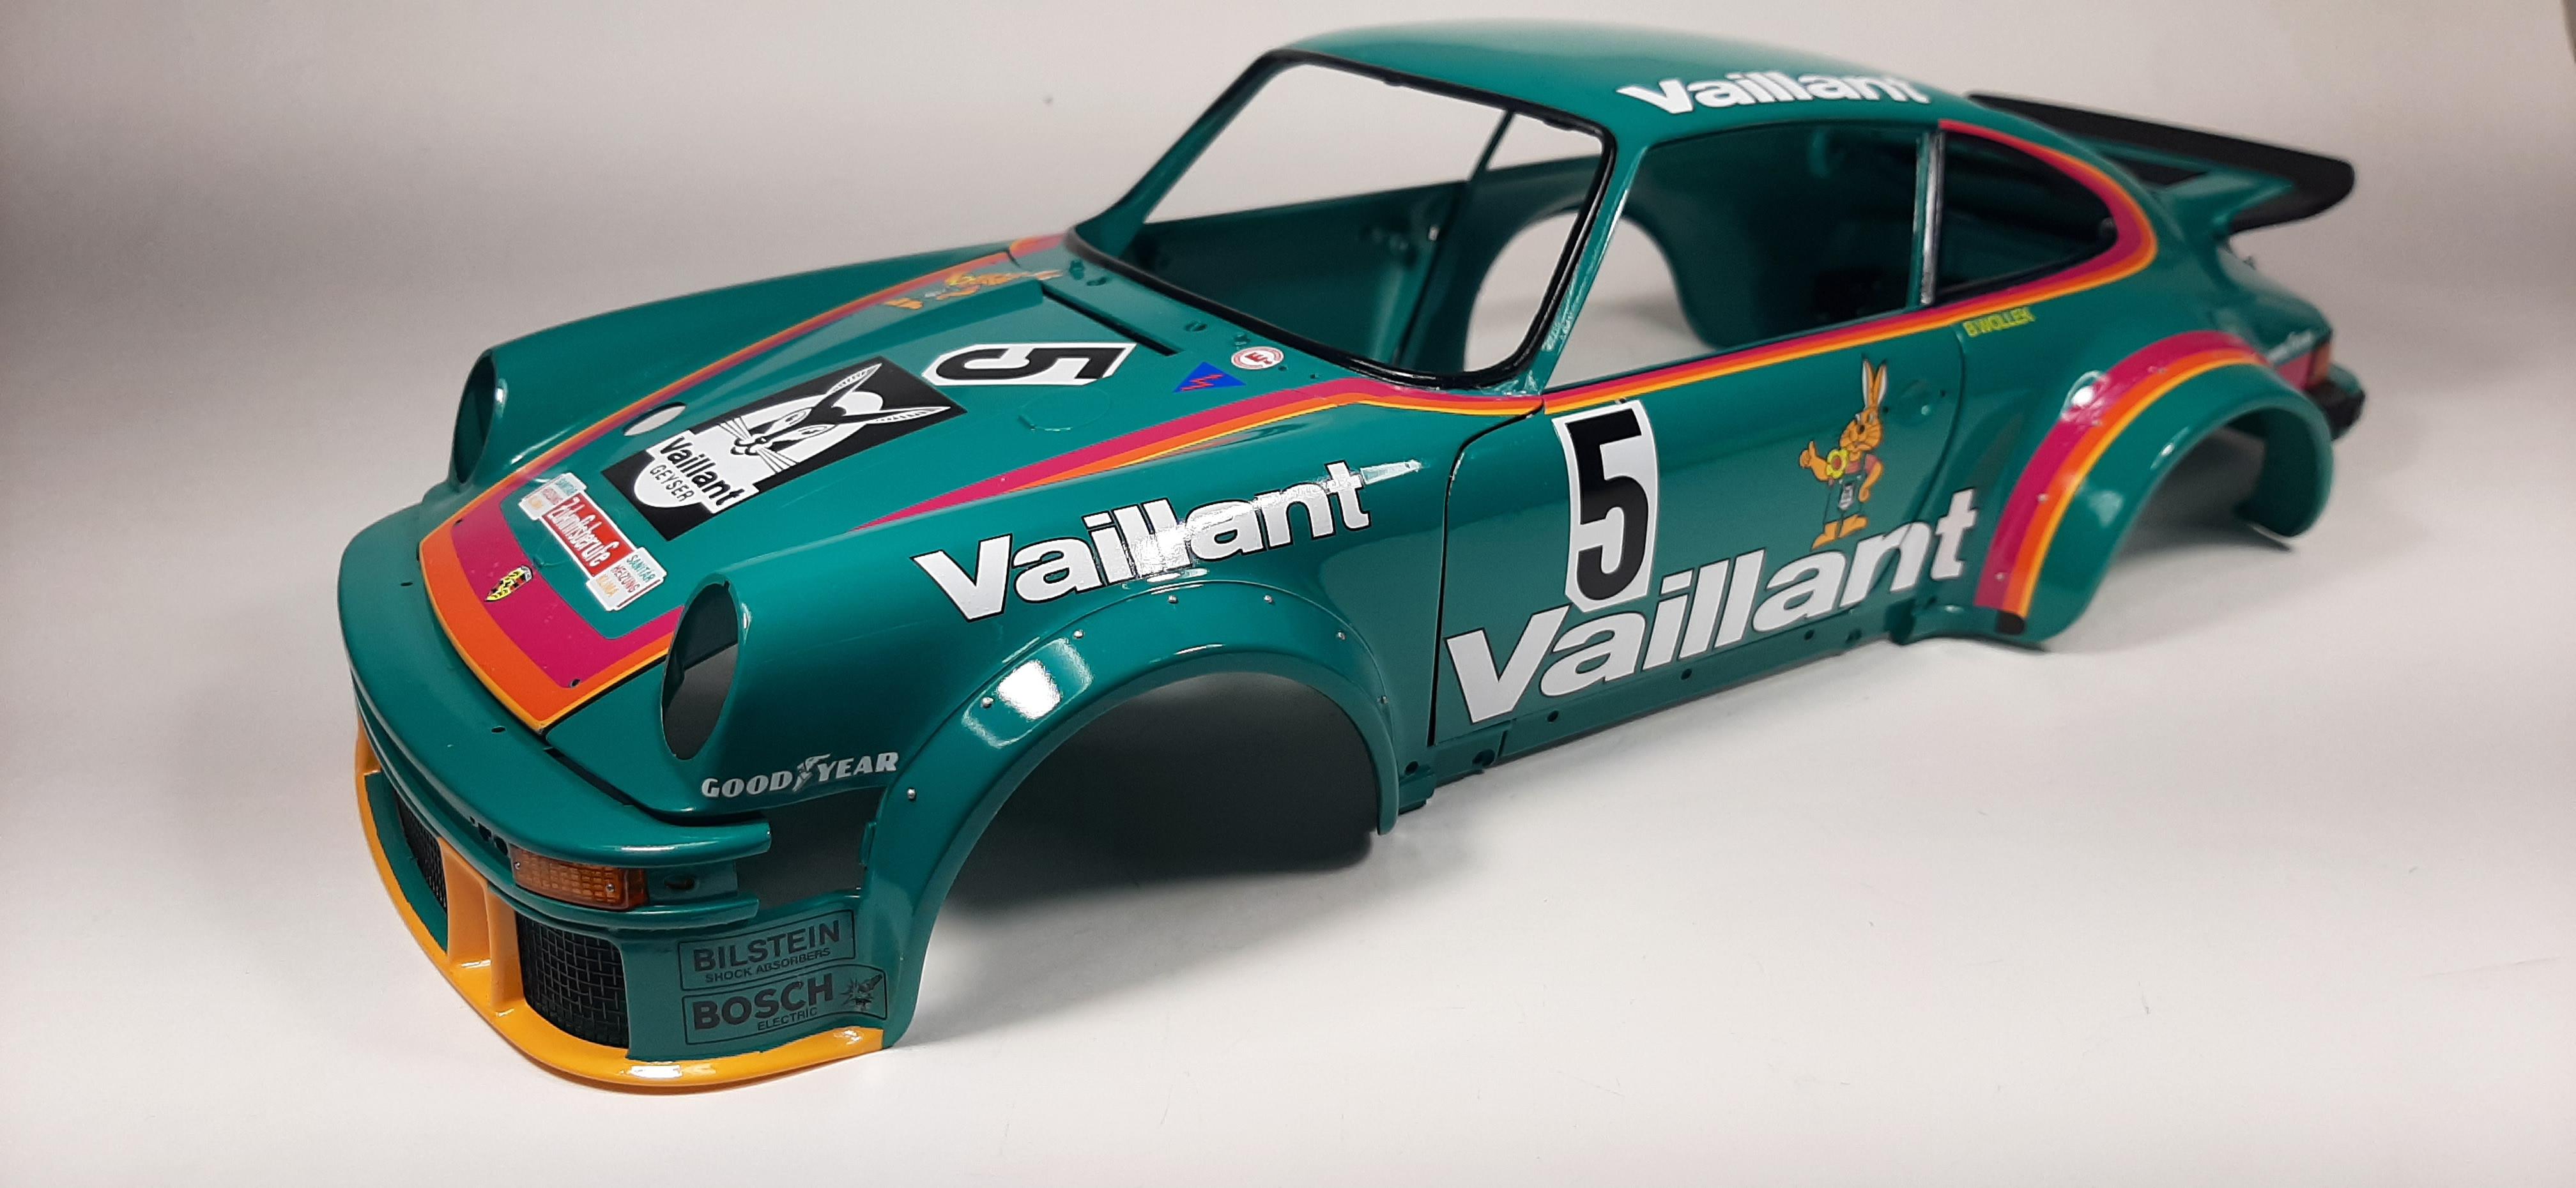
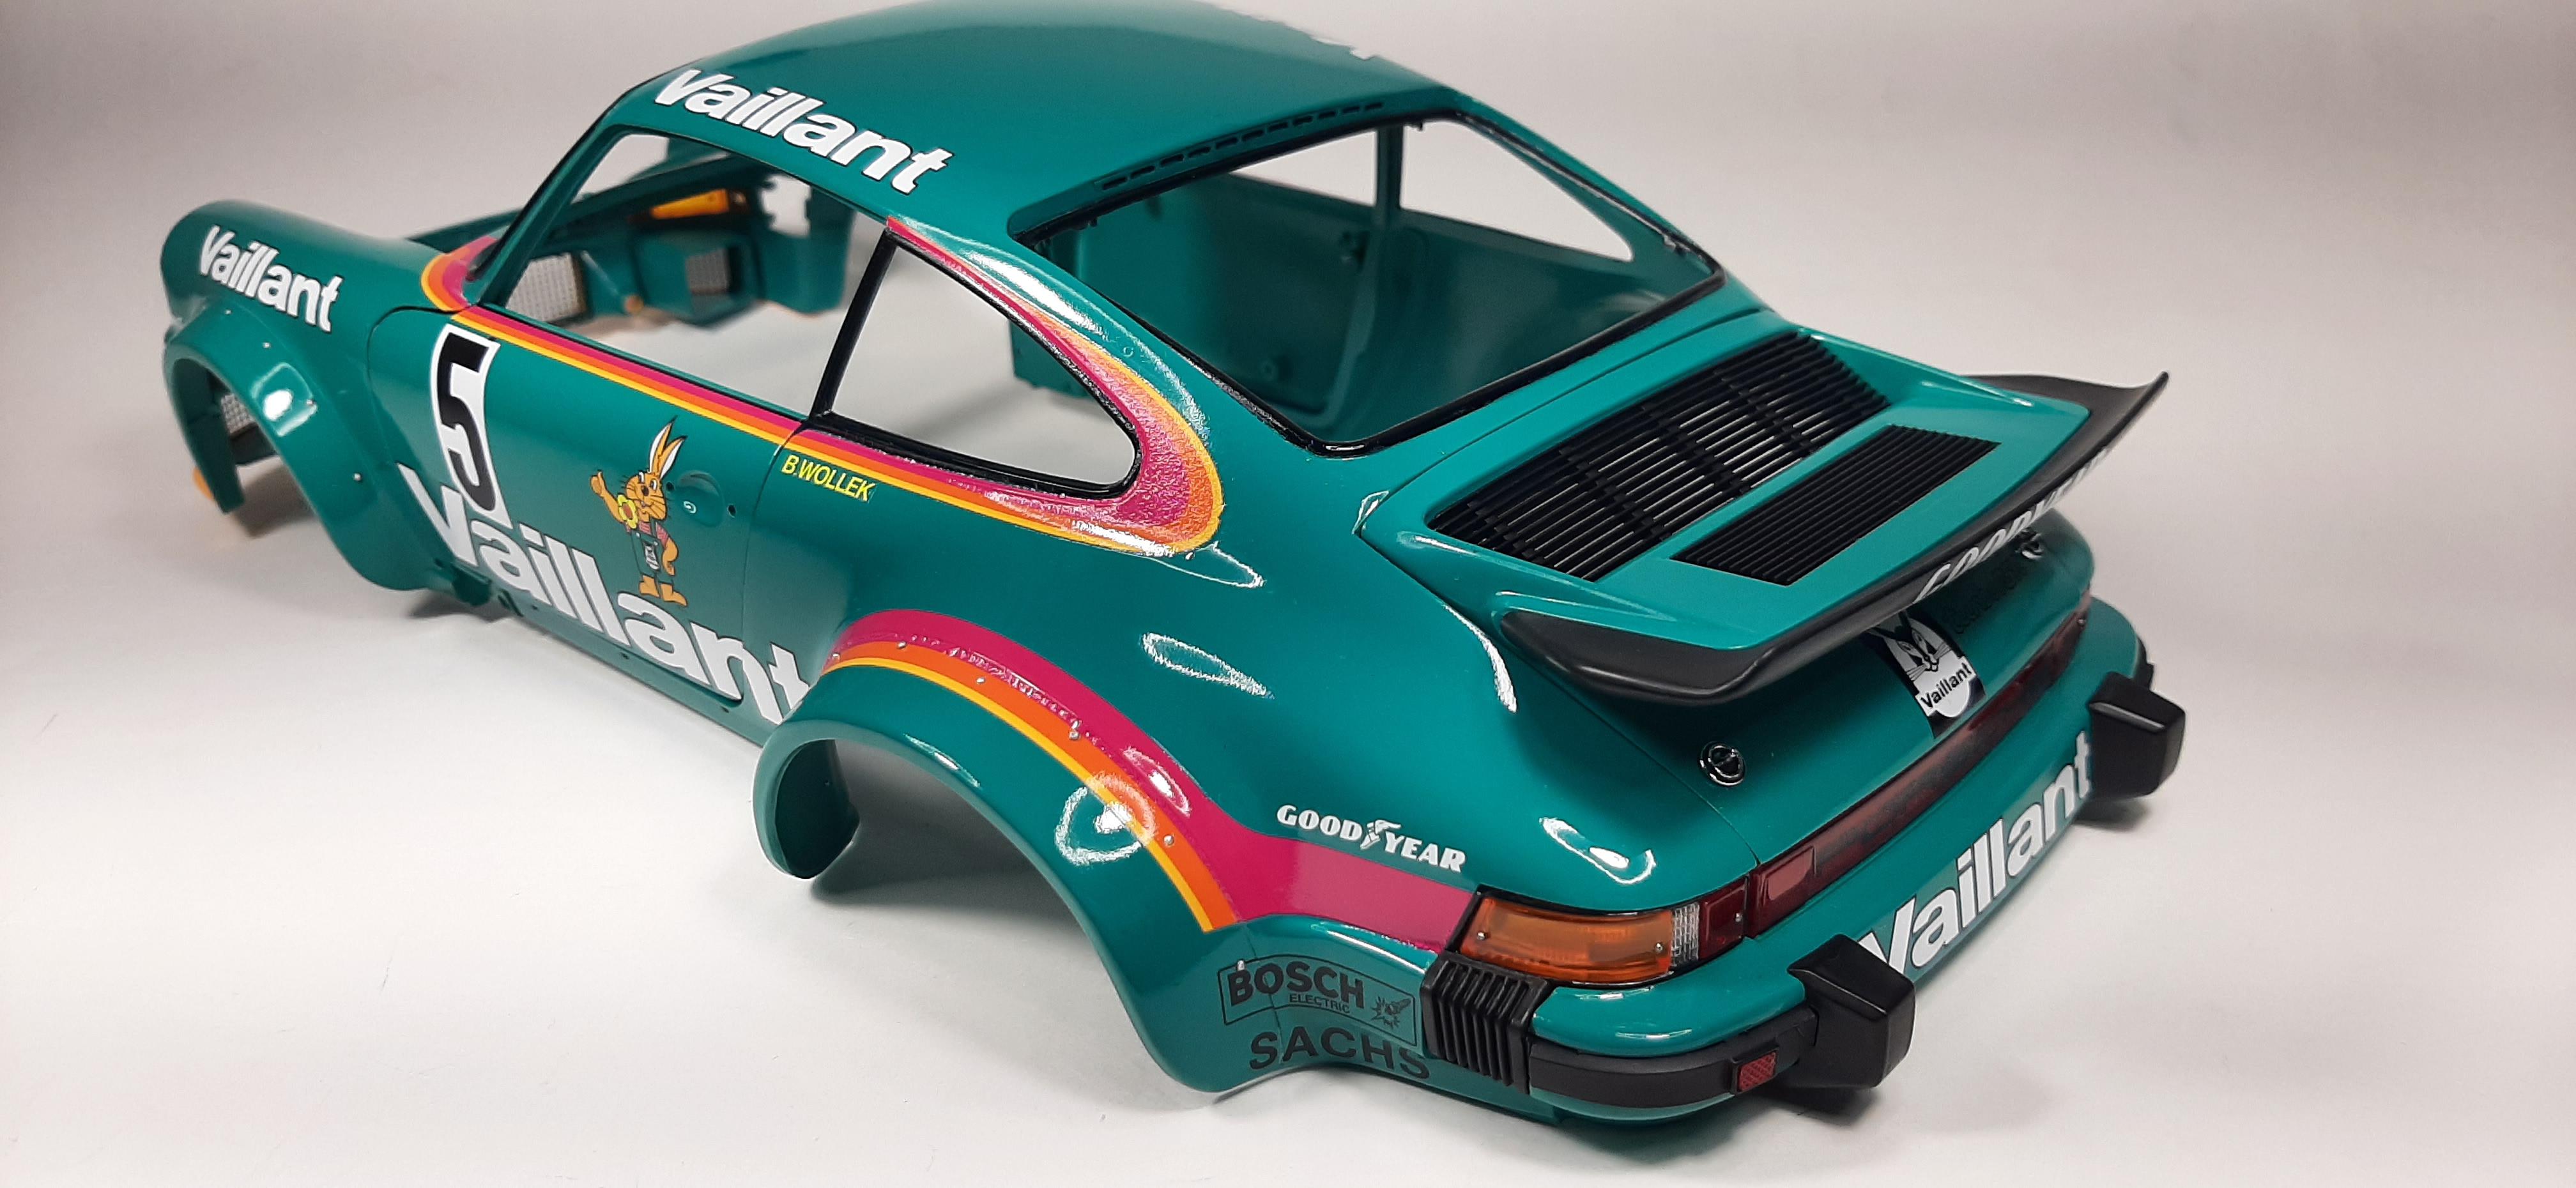
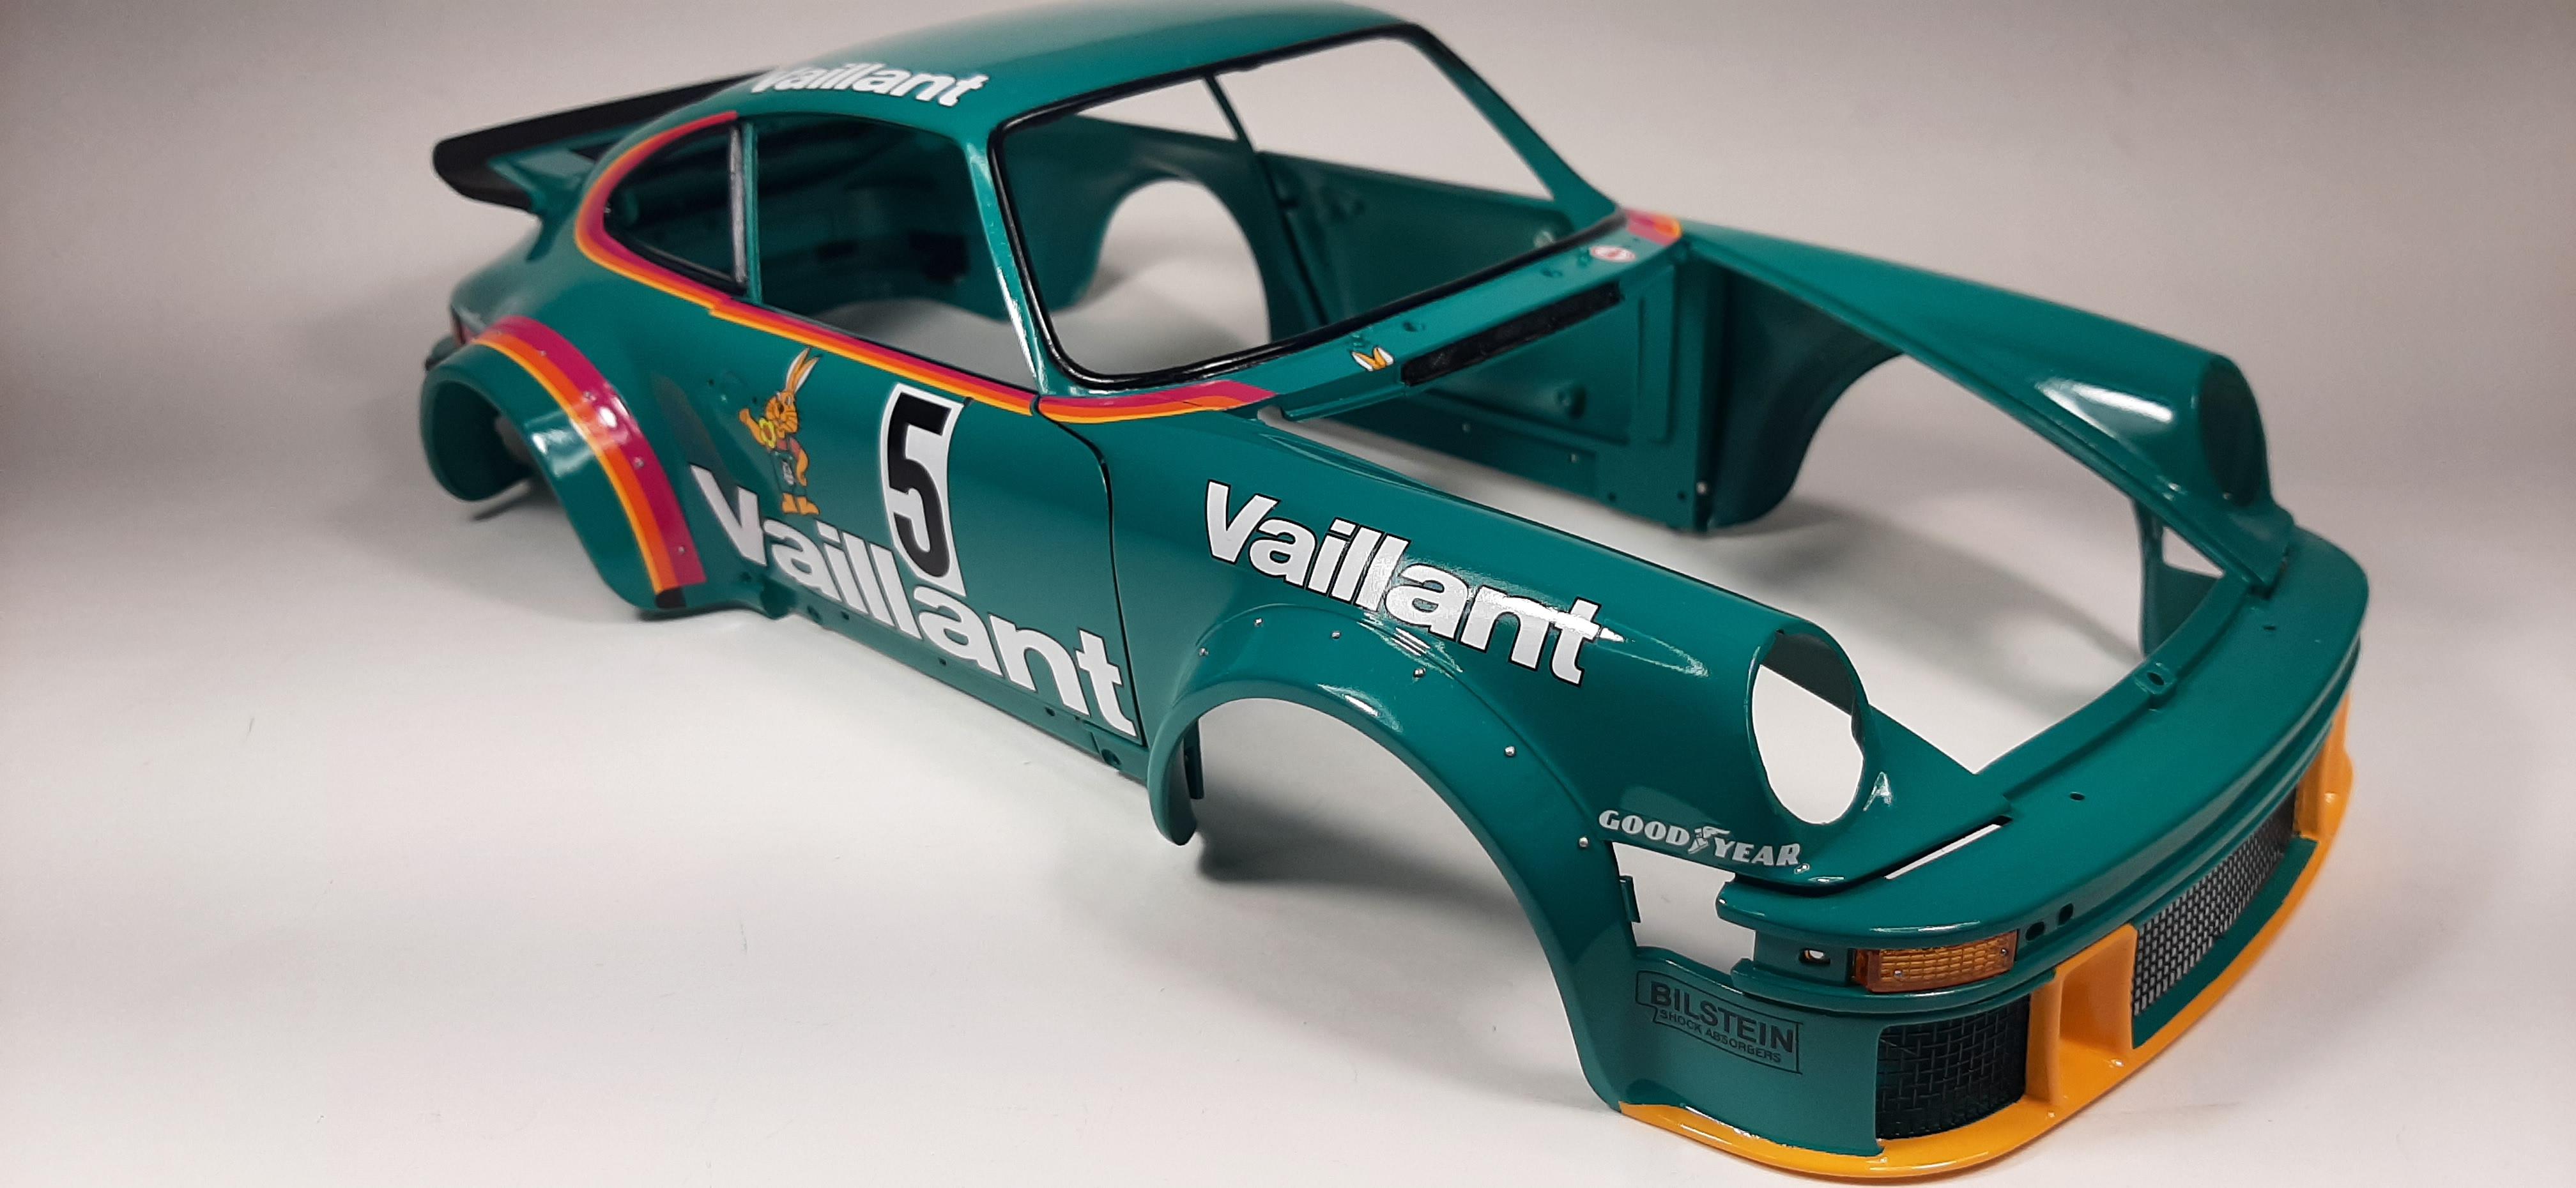
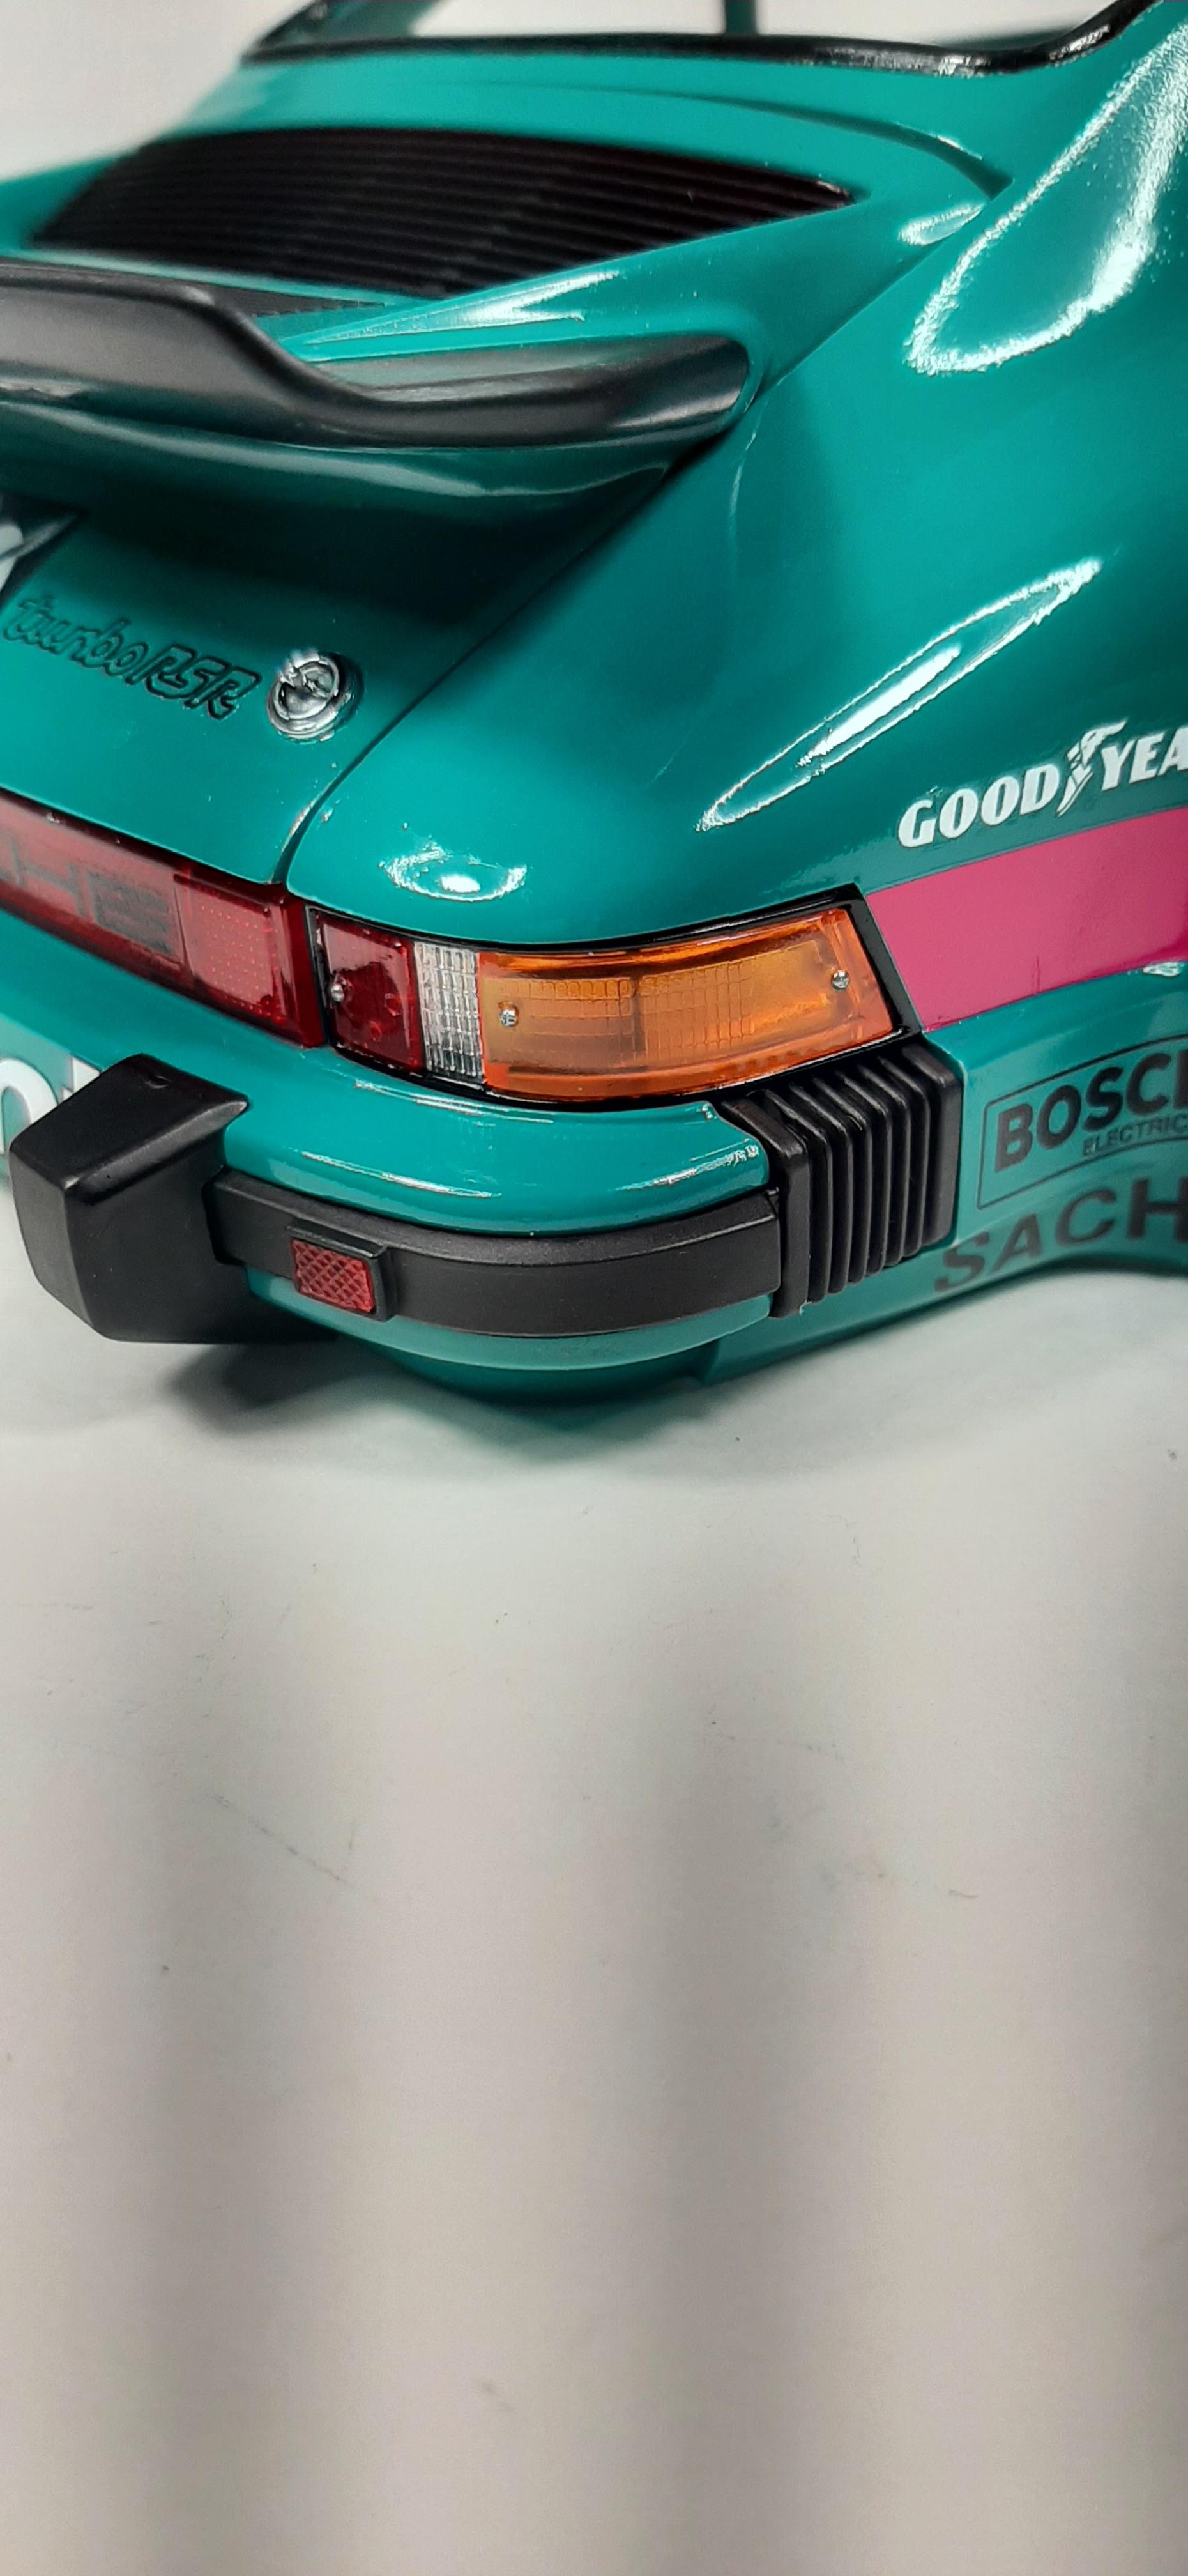
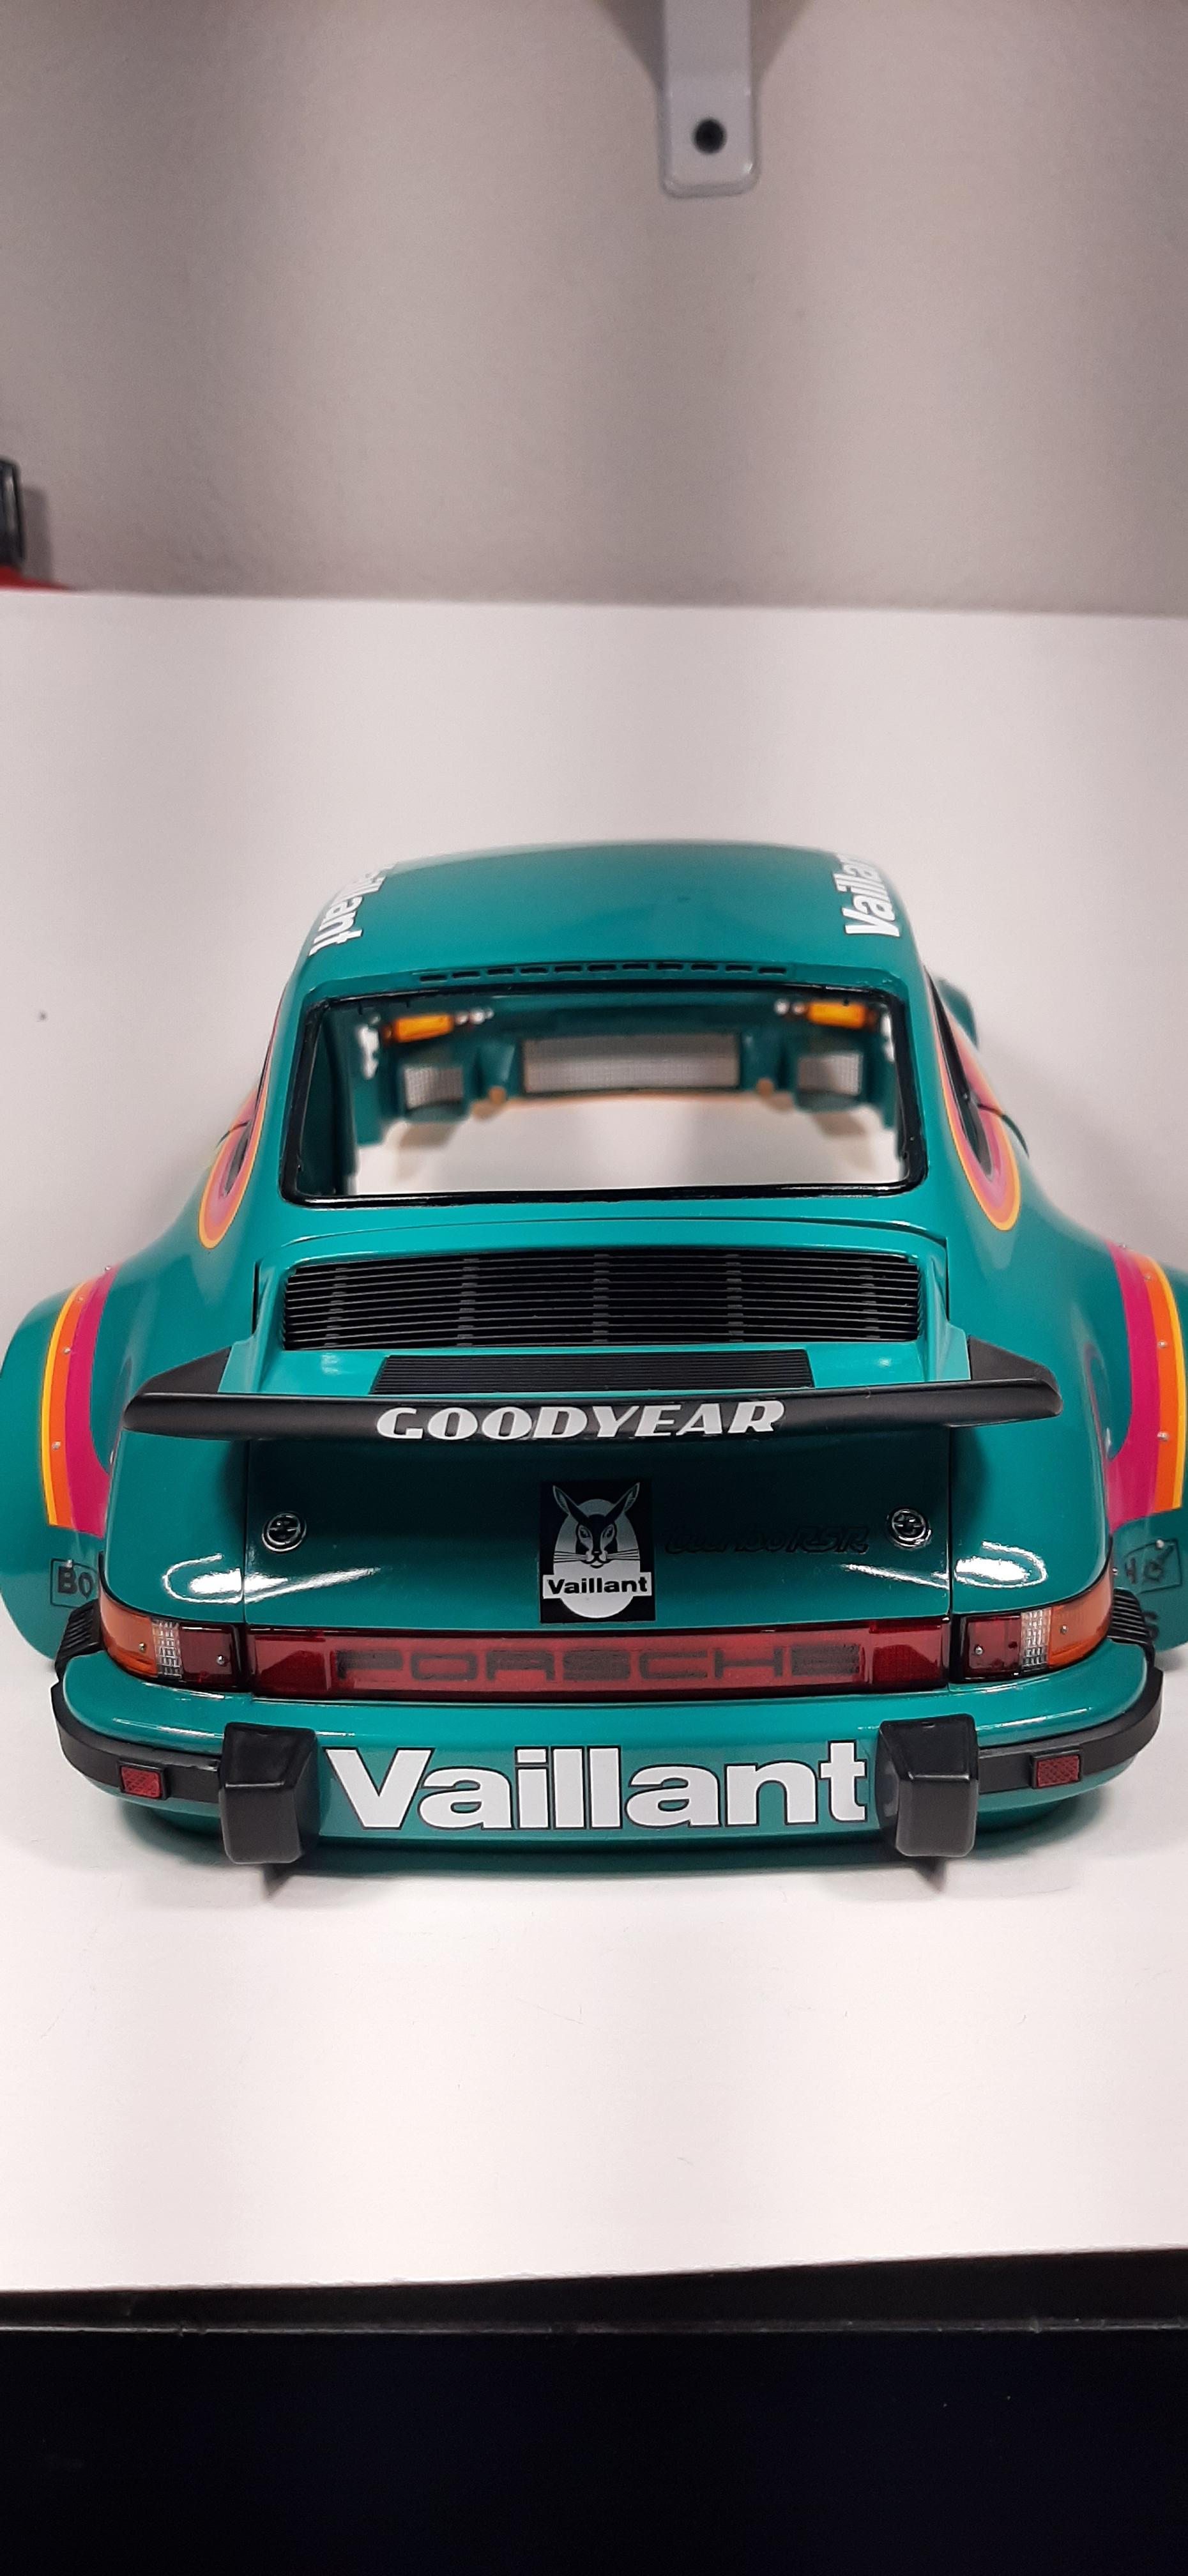
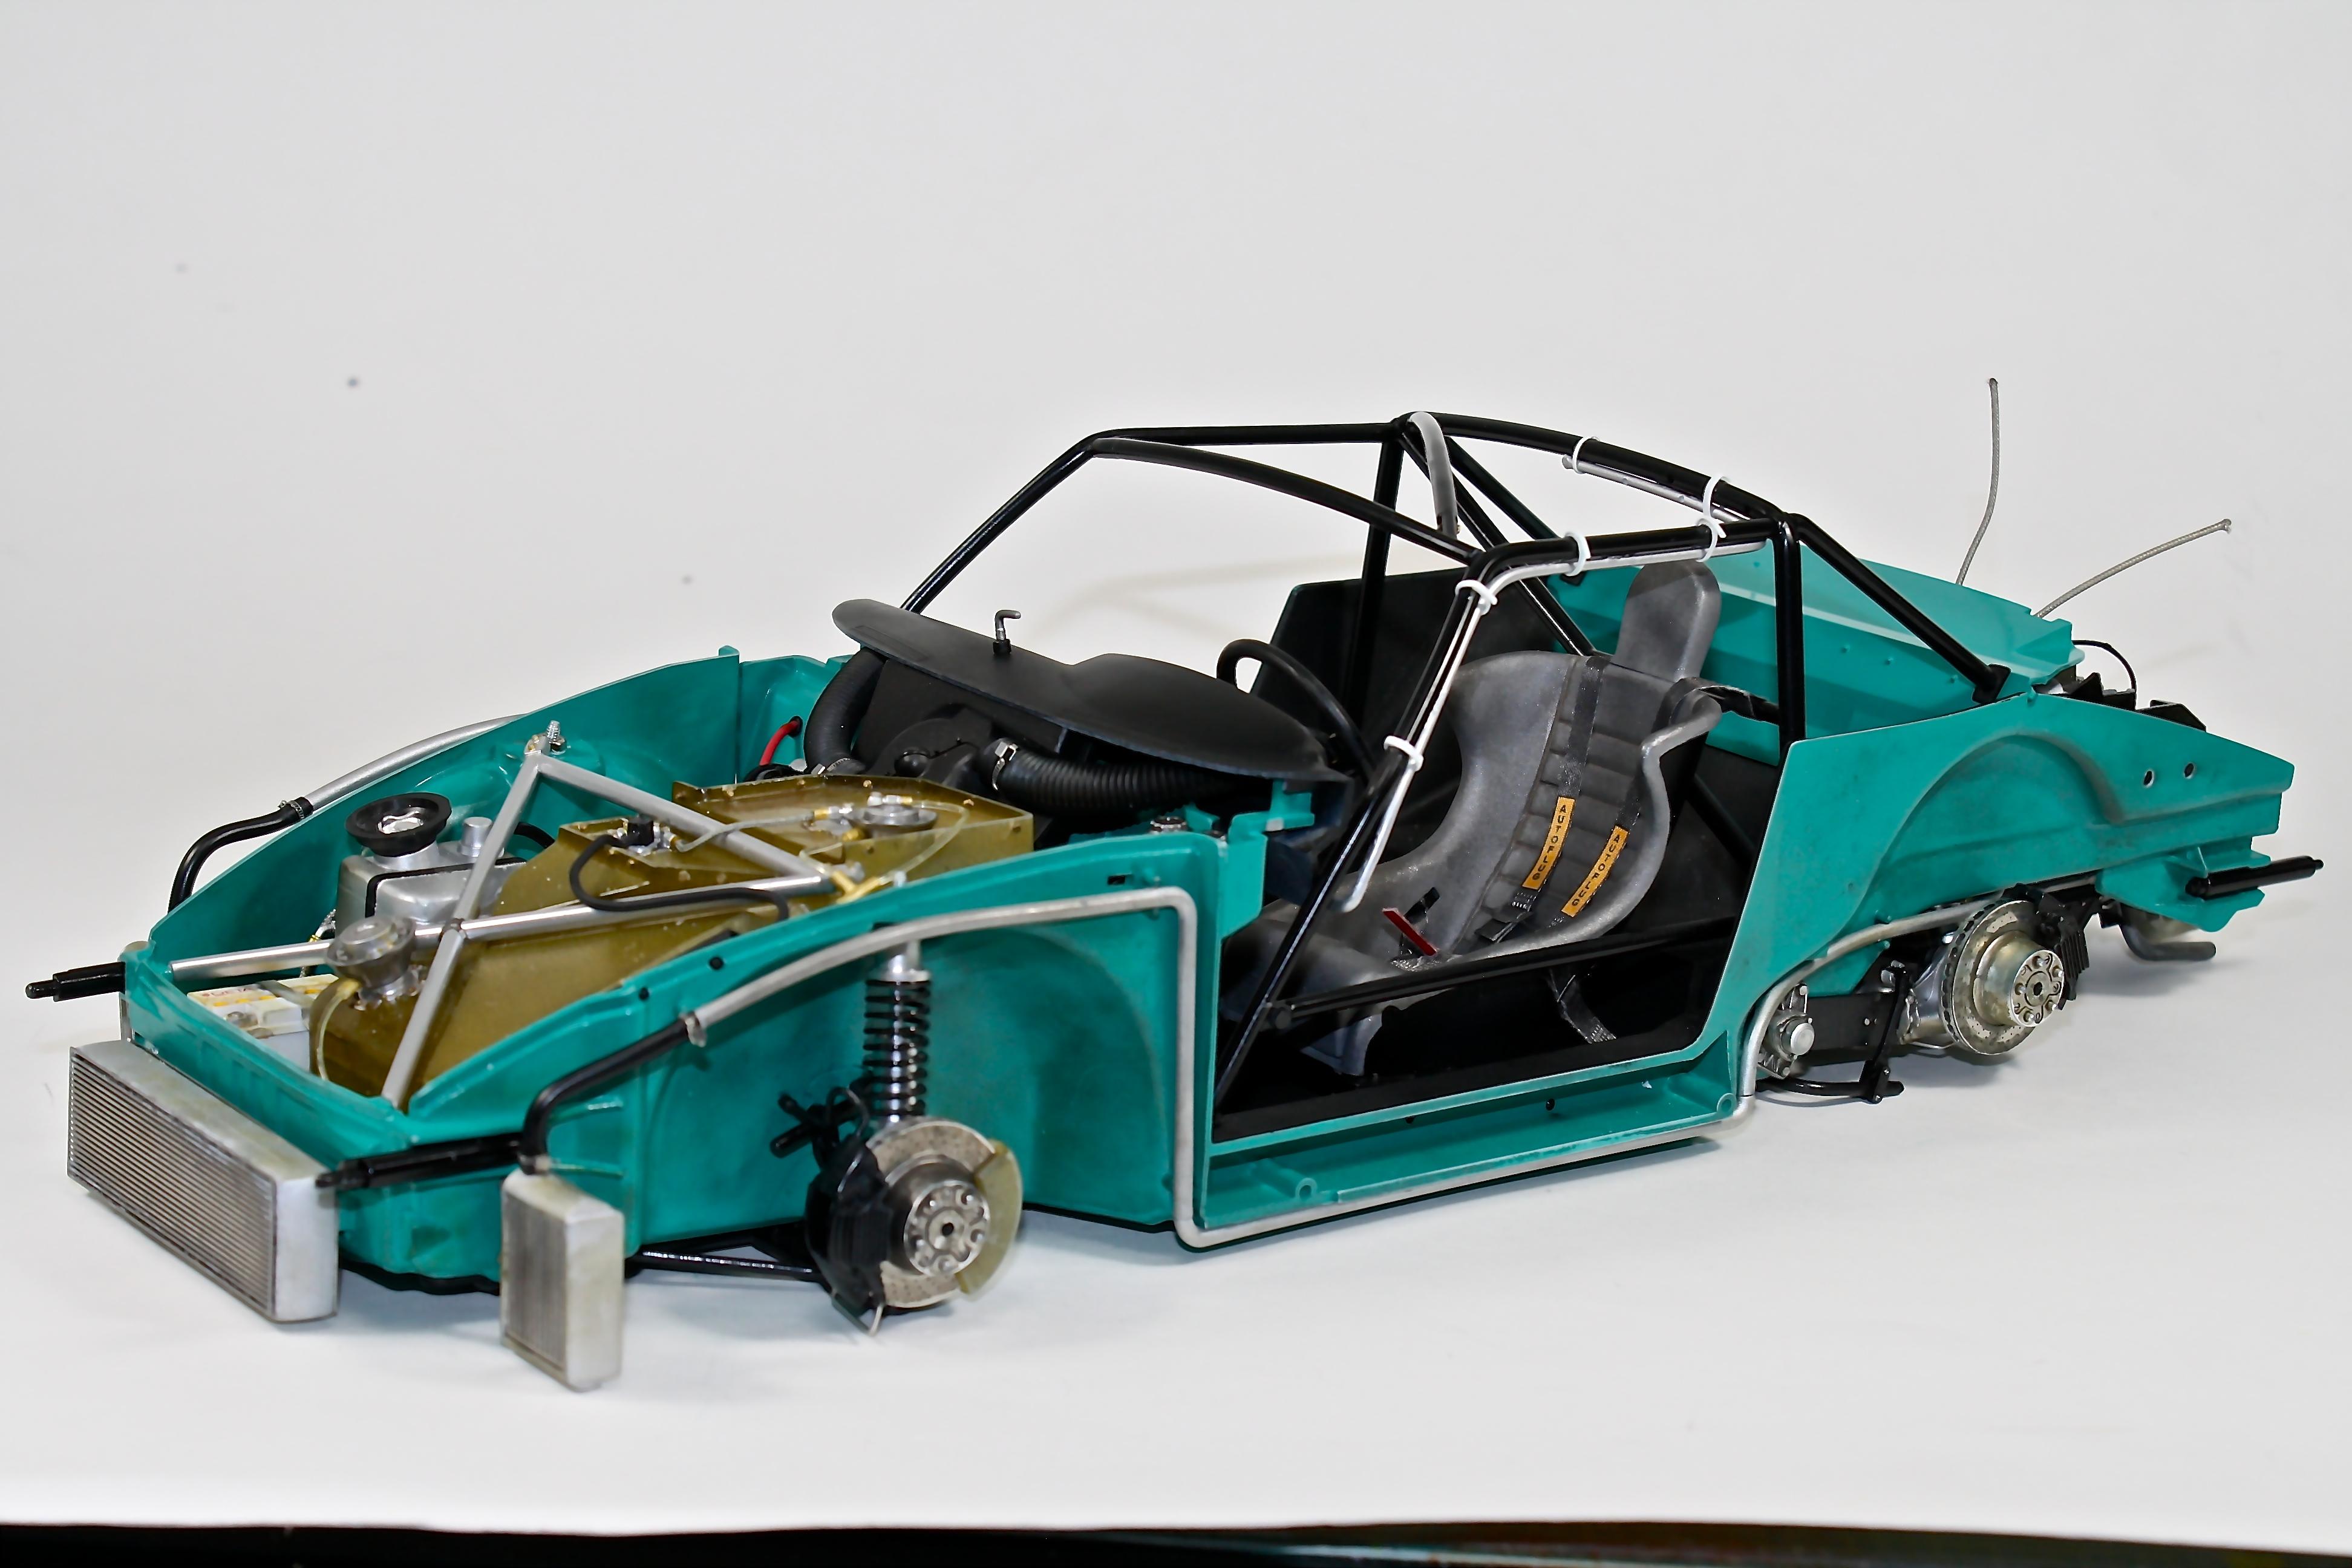
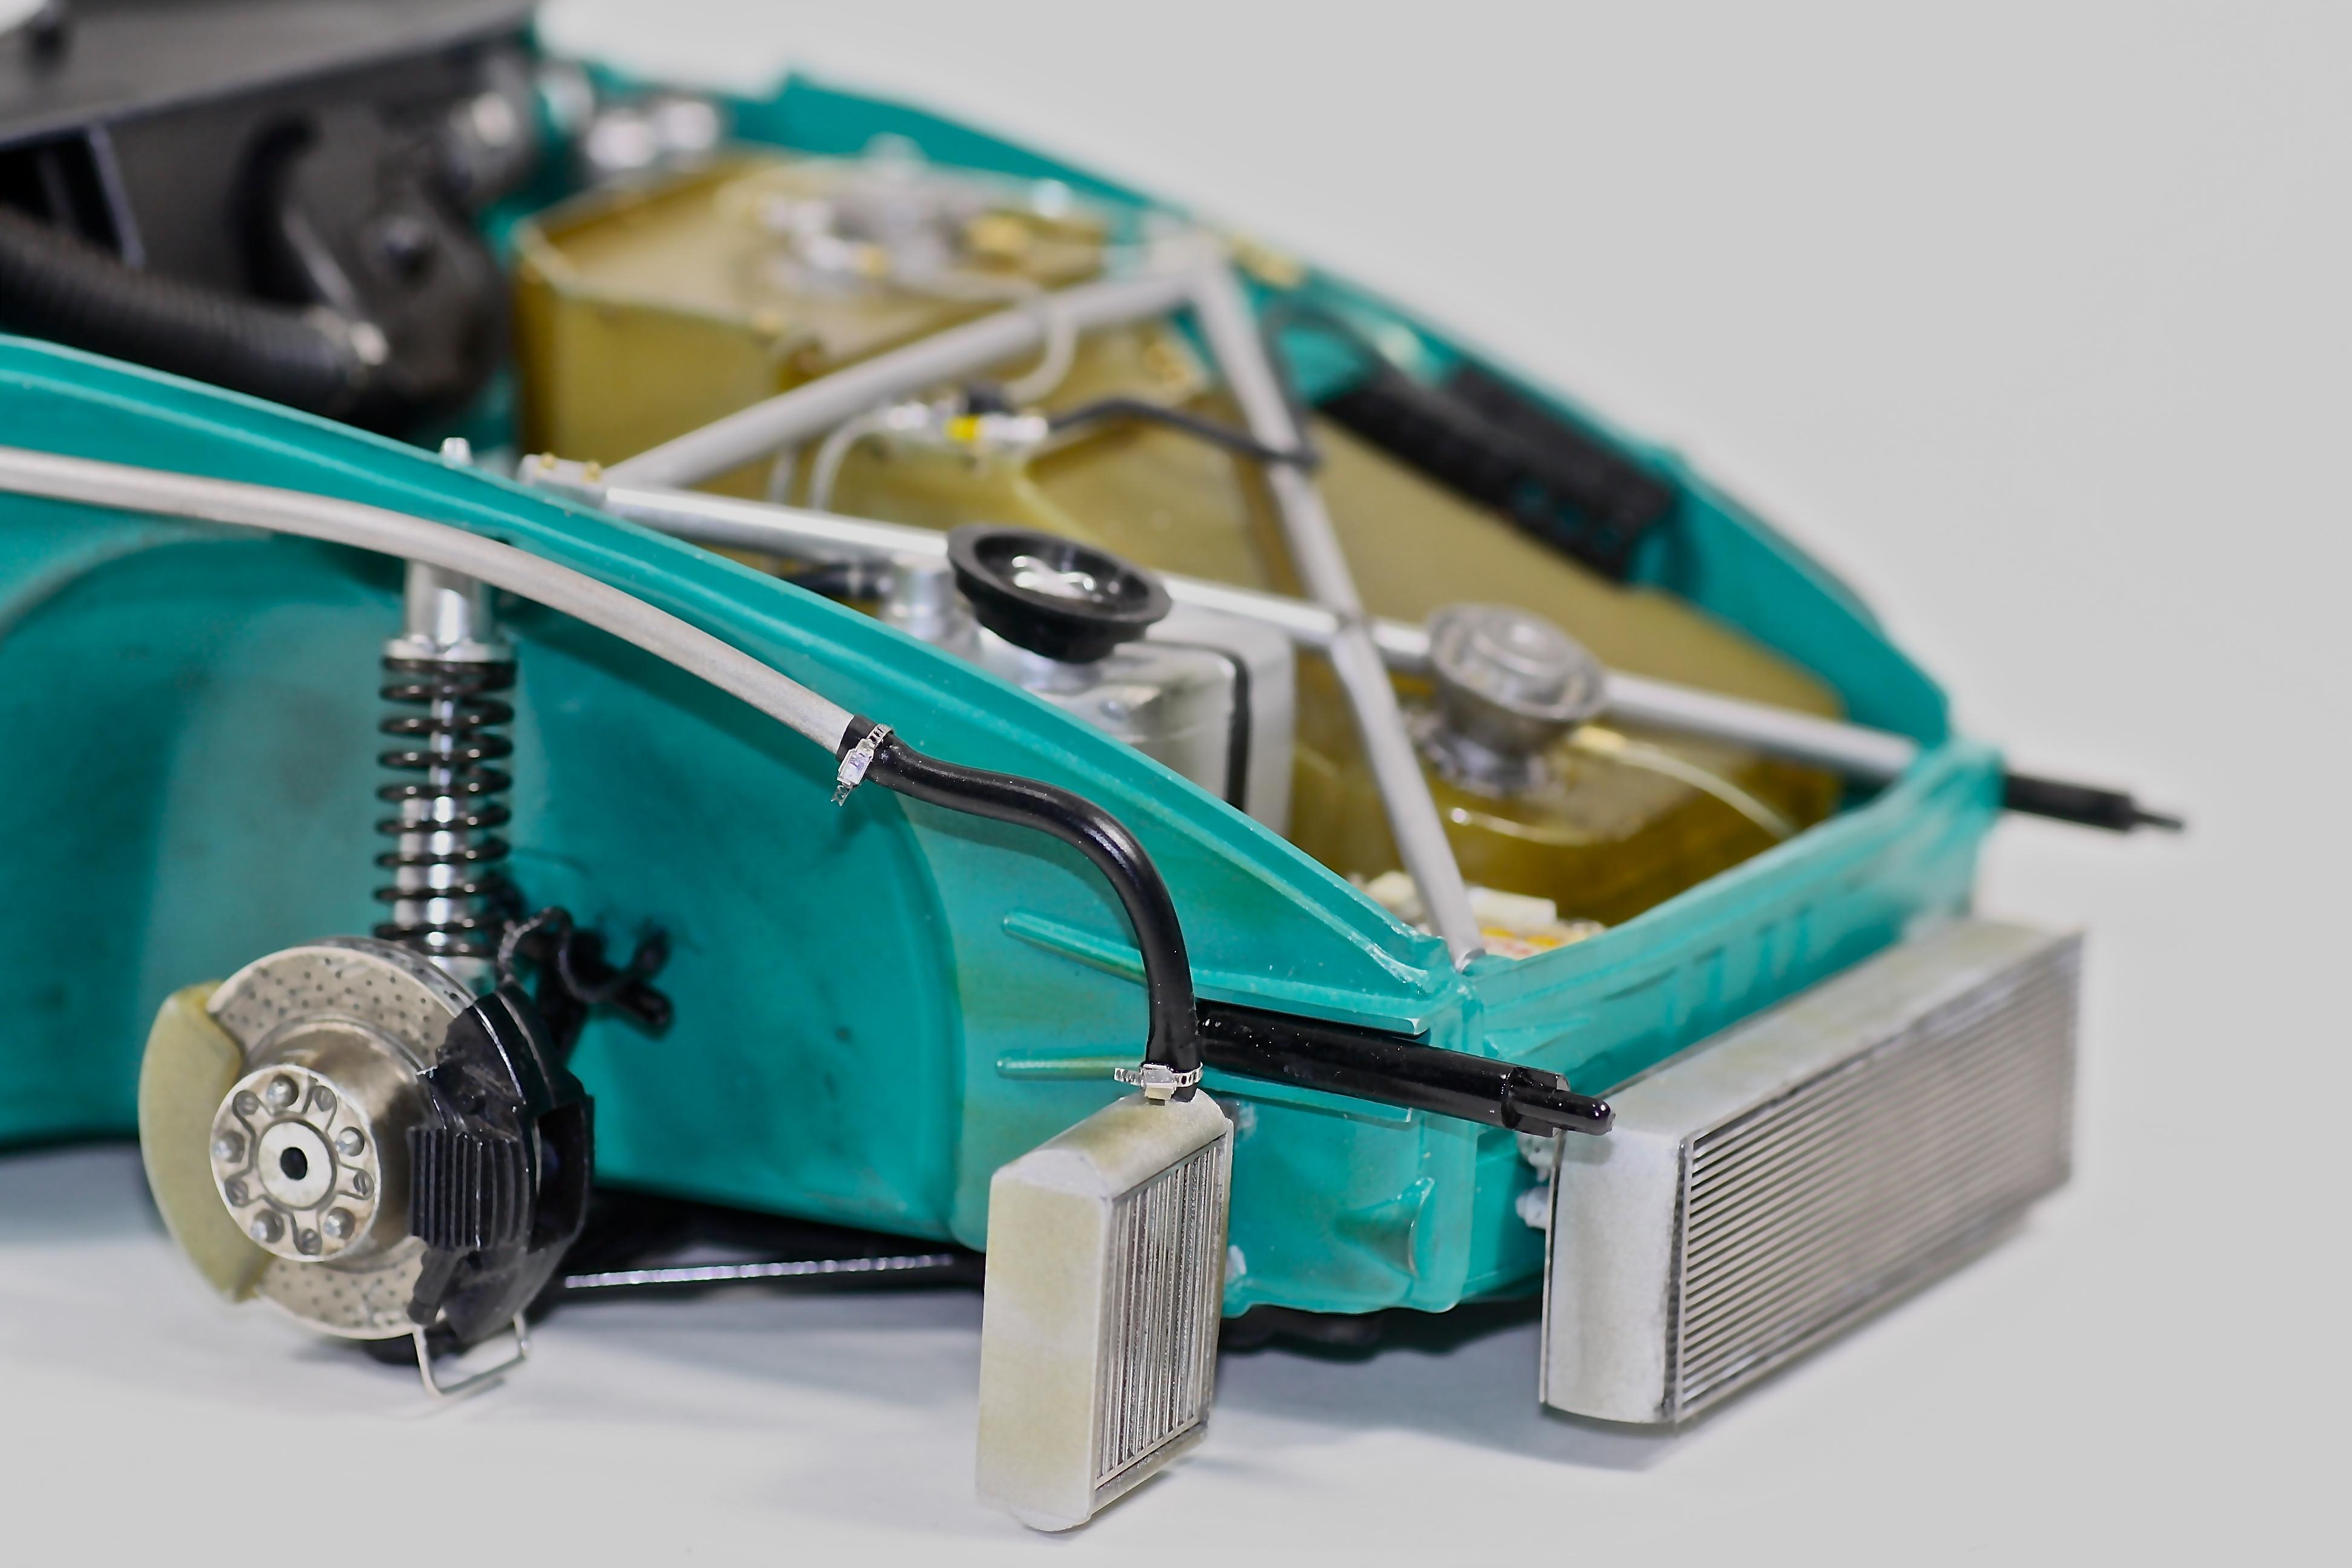
After almost a year this car is finally finished! Not going to do a huge picture dump because I posted a lot of in progress pictures under WIP. This is the Tamiya 1/12th scale Vaillant Porsche 934 painted with Tamiya Cobalt Green and cleared with Tamiya TS-13. This is the first 1/12 scale I have attempted, it is a great model kit and a great scale. I found that you can do an awful lot of detailing, but every mistake that you make is magnified and much easier to see. If you would like to see more detail check out the WIP section, and thank you to everyone who has followed along and commented.

-
That is a very impressive restoration of a glue bomb, great detail and paint.
-
1/12th Porsche 934 Vaillant
majel replied to majel's topic in WIP: Other Racing: Road Racing, Land Speed Racers
I've got the body installed on the chassis and did a little weathering on the body. Used some 1/16 scale Goodyear decals on the tires and weathered them a little to reduce the decal shine a bit. I'm pretty much finished and hoping to get some outside pictures this weekend. -
Super Gas '77 Vega--Completed! (11/12)
majel replied to Straightliner59's topic in WIP: Drag Racing Models
Love the color and the name! The body color and the decal colors scream 1977 leisure suit!! Reminds me of senior year of high school and the Saturday drags at Beeline Dragway in Arizona. Great job. -
Project 1/16th AA/FA AND HERE IT IS!
majel replied to Ian McLaren's topic in WIP: Drag Racing Models
Amazing work Ian! What did you use for the injector fuel lines? I have used stainless steel welding wire in the past, but i think it's too stiff and hard to bend. -
Beautiful color and that dash came out really nice, good work.
-
1/12th Porsche 934 Vaillant
majel replied to majel's topic in WIP: Other Racing: Road Racing, Land Speed Racers
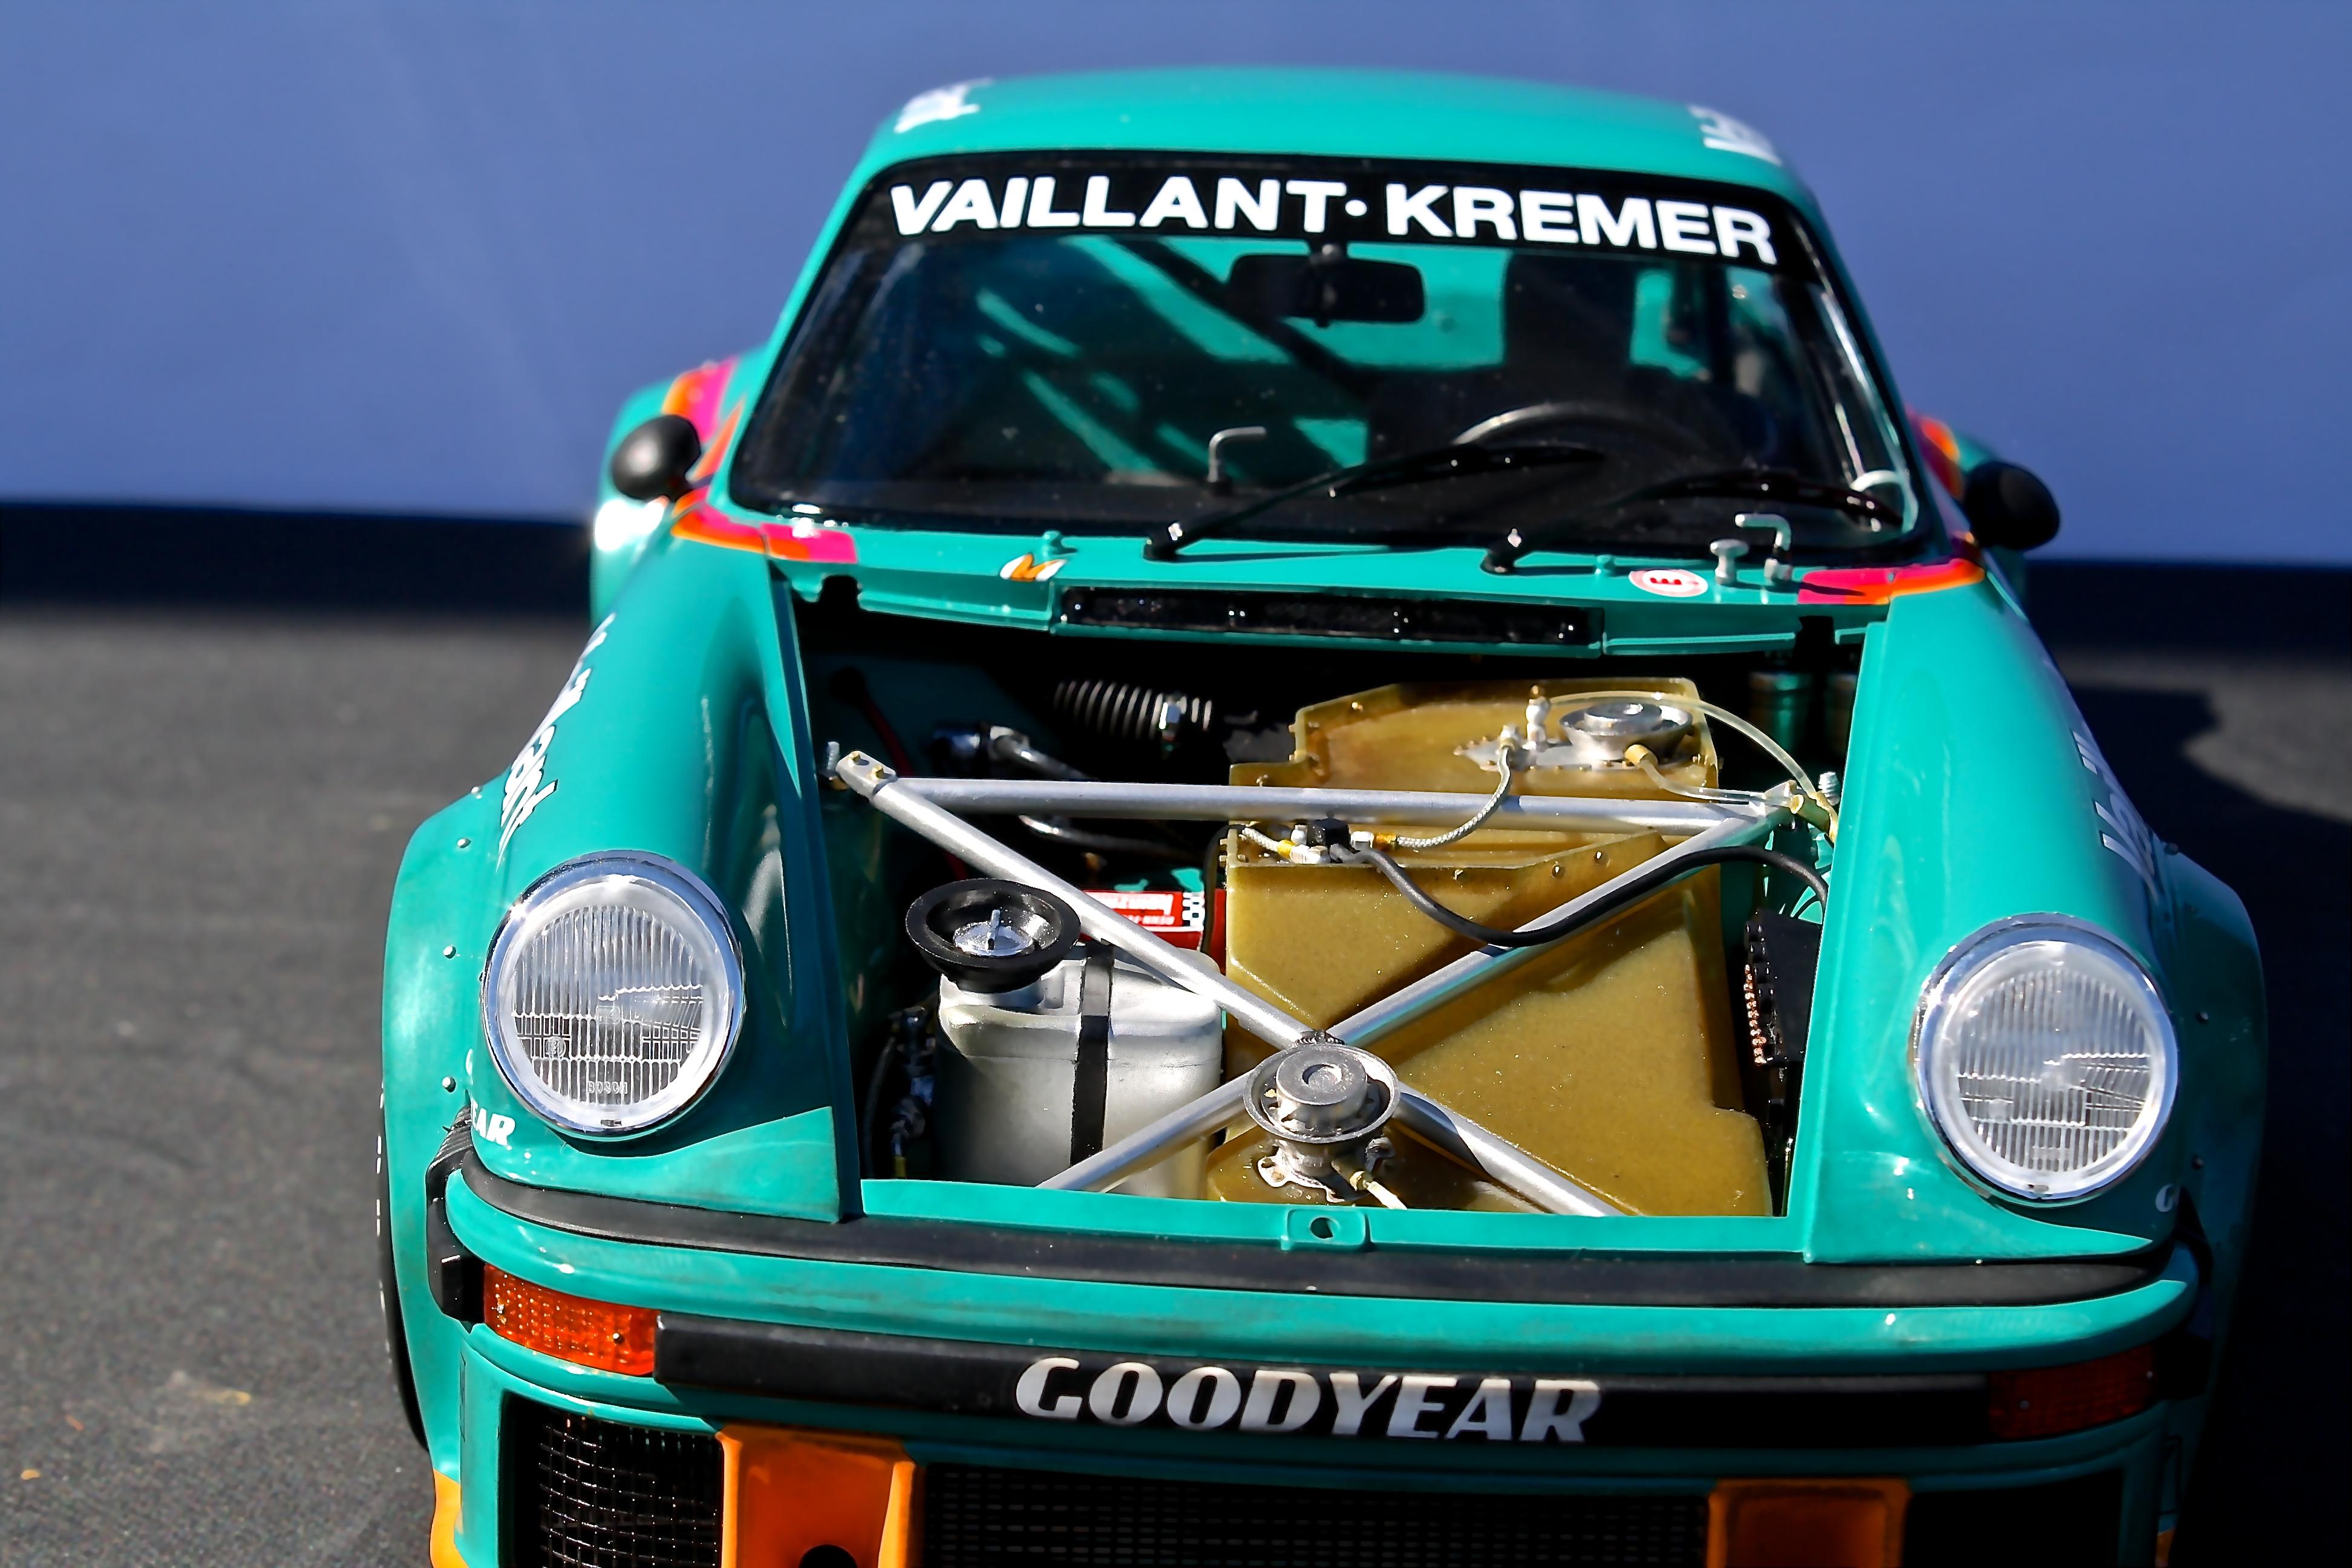
Gilles, all the rubber pieces like the bumpers or spoilers snap or slide in place and can be removed for polishing. -
1/12th Porsche 934 Vaillant
majel replied to majel's topic in WIP: Other Racing: Road Racing, Land Speed Racers
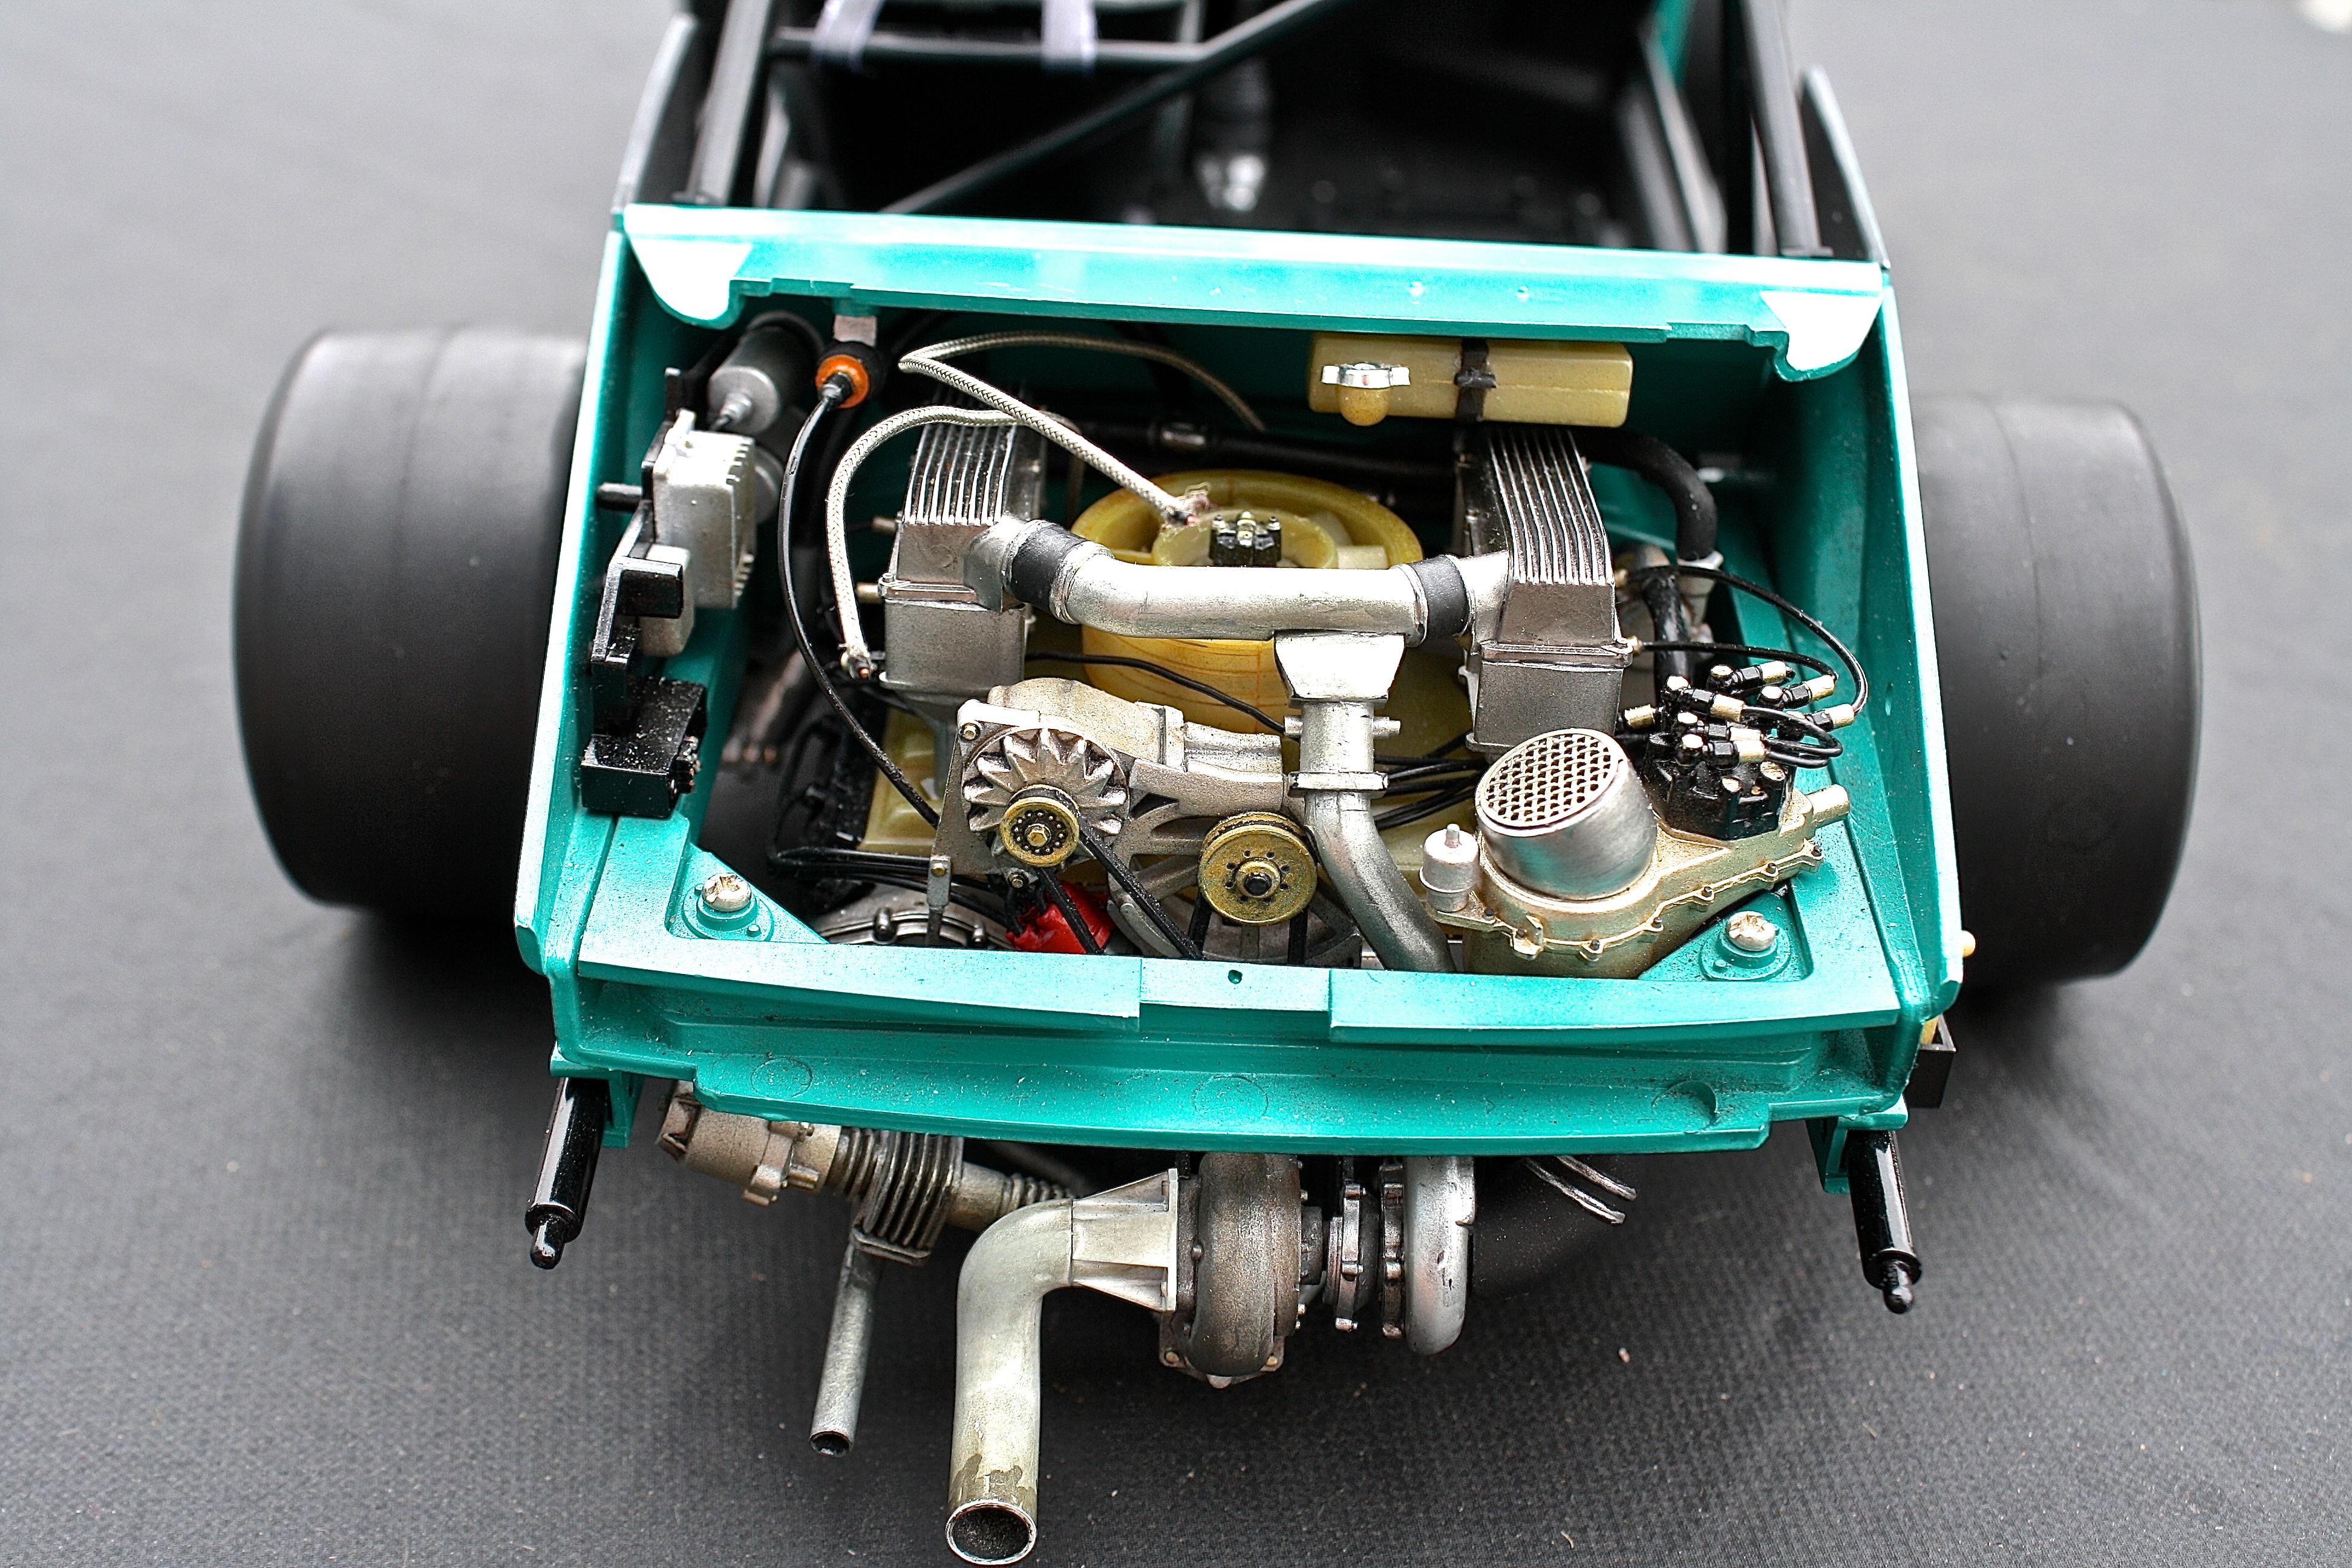
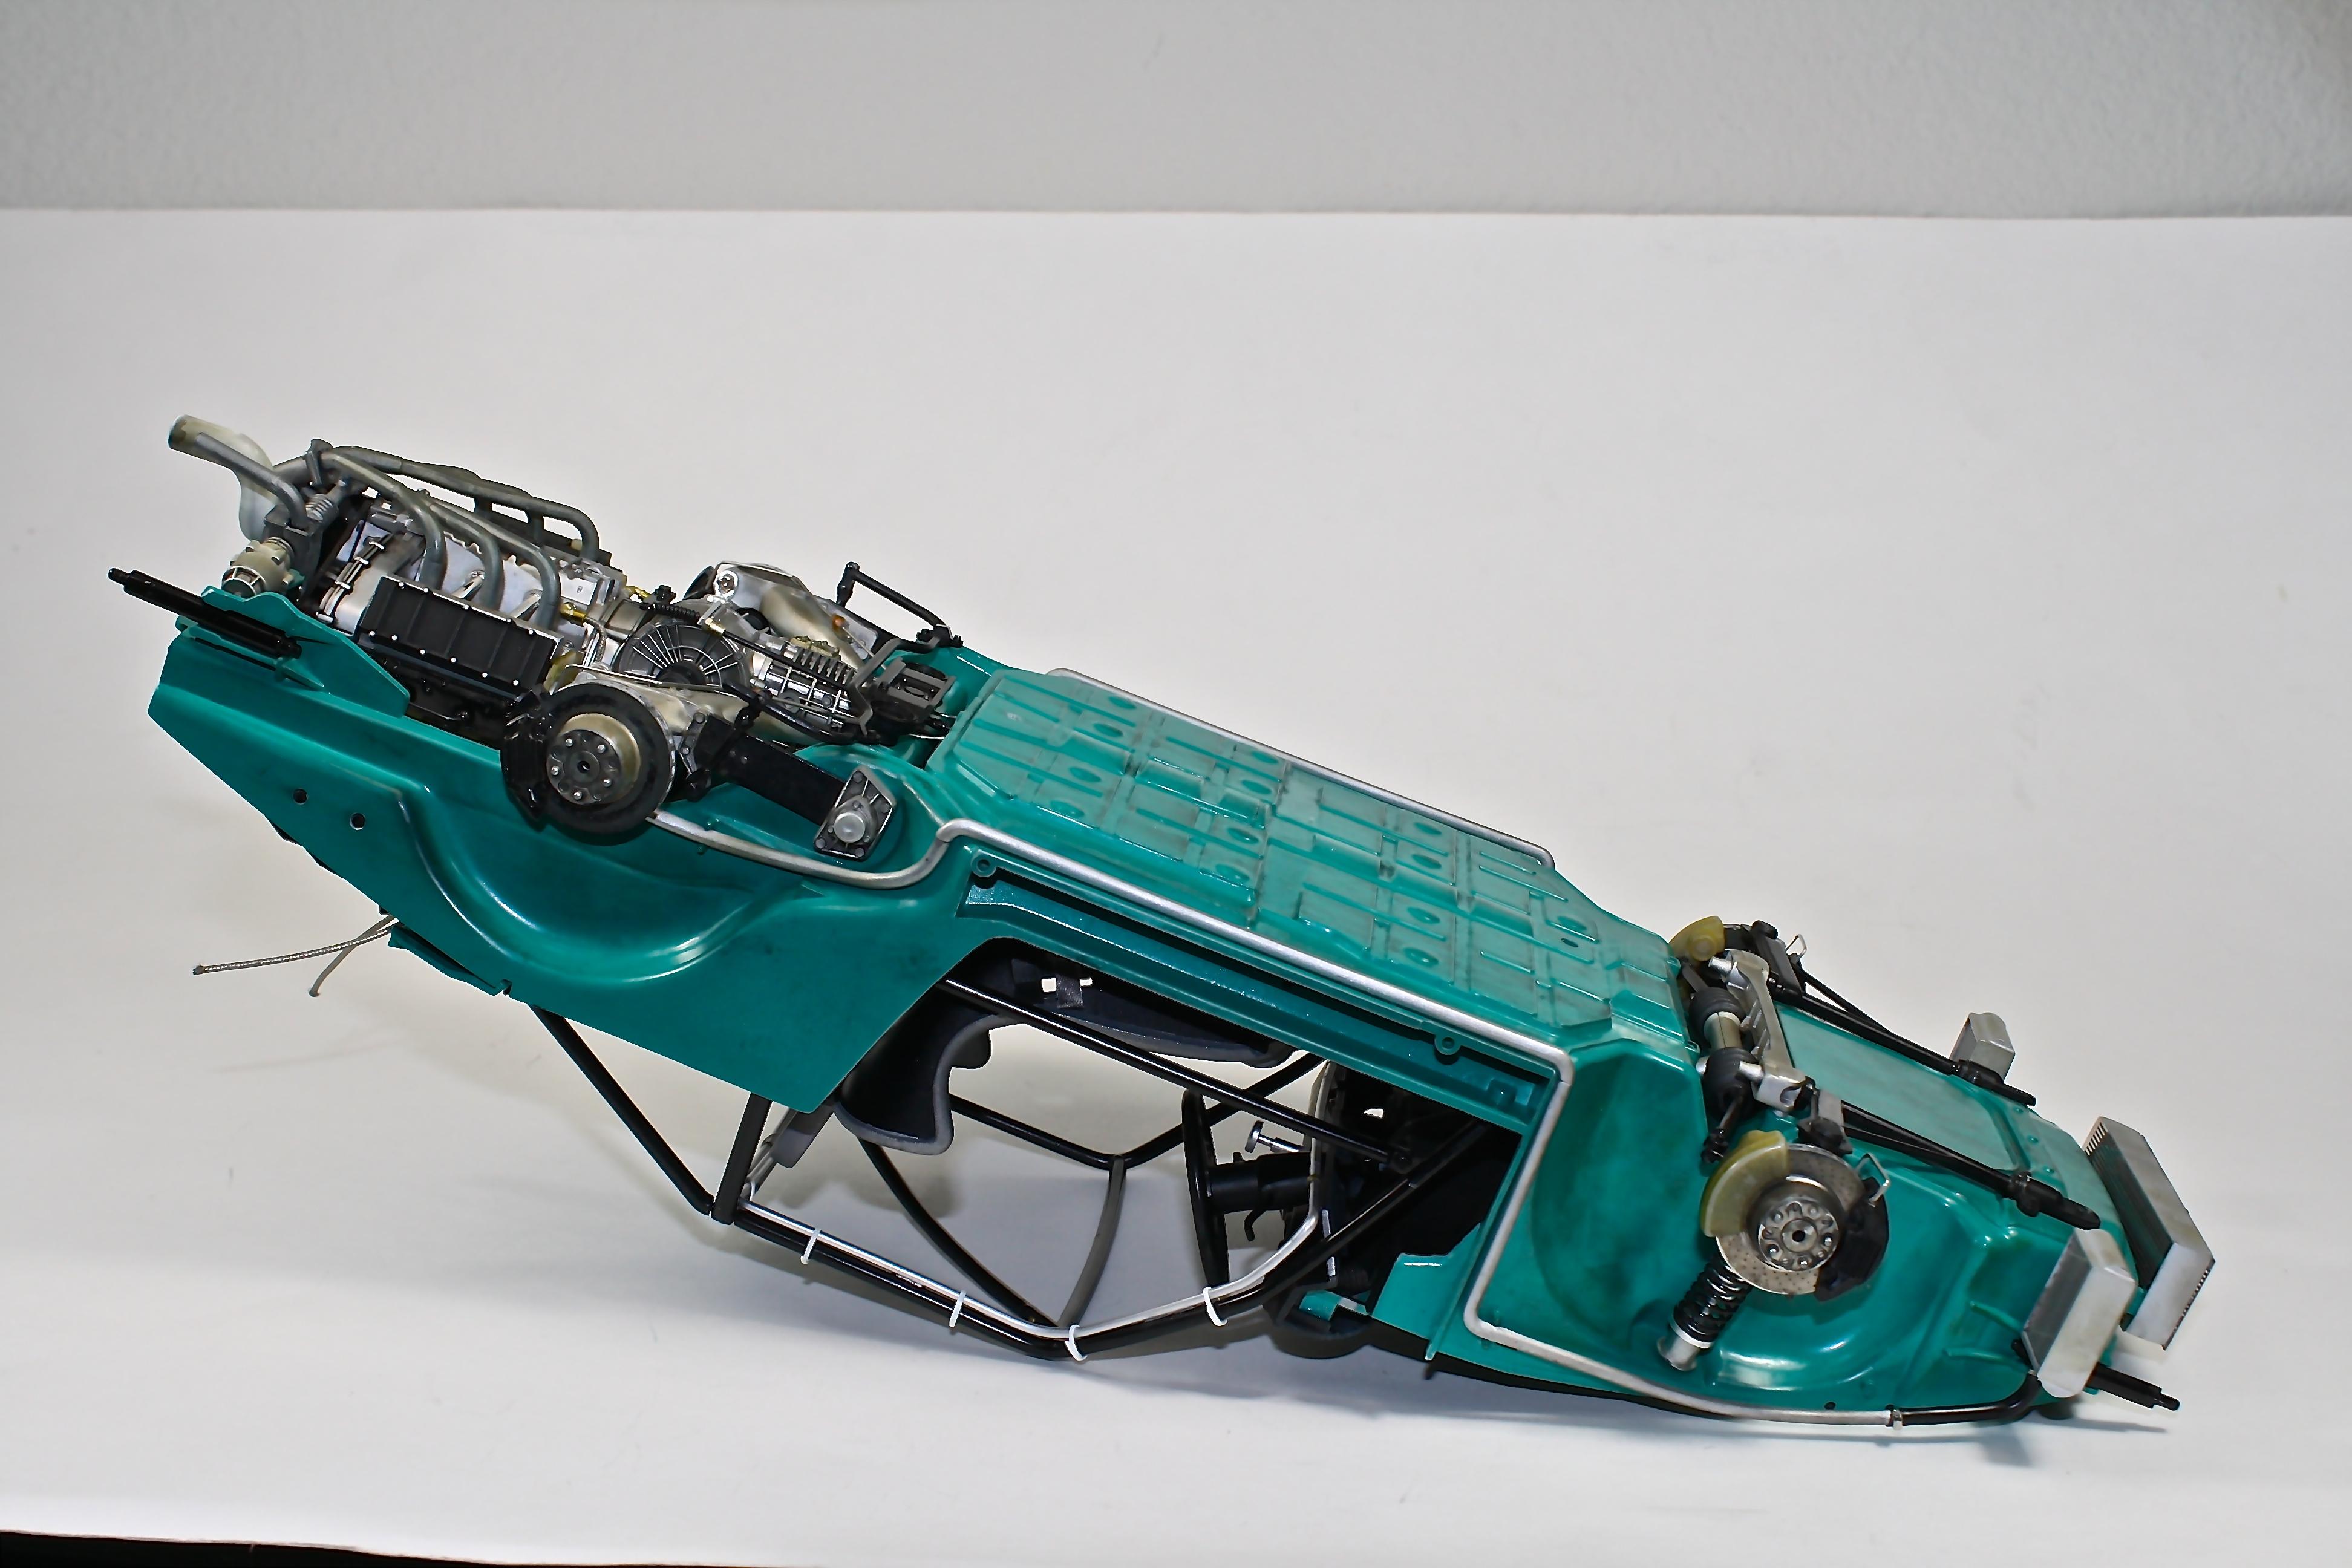
Got the body clear coated, it still needs to be polished and then slightly weathered to match the chassis. Finished up the back end of the body by installing tail lights, bumpers, and rear deck grilles. Both the rear tail lights and the front turn signal lights have Tuner Model Manufactory 1.0 mm cross type rivets installed in them. Getting closer to finishing it up, pretty happy how the body is turning out so far. Both the hood and driver's side rear quarter panel decals have small bubbles in them that appeared after the clear coat. Not sure if my first mist coat or the following coats of clear caused them but they aren't horribly visible.
-
This is truly a model building masterpiece Francis! Your skills in design, fabricating, and construction are incredible. This truck is like a fine piece of jewelry, amazing job.
-
Gorgeous build, very clean work, love the stance!
-
1/12 Tamiya Porsche 935
majel replied to Timonator's topic in Other Racing: Road Racing, Salt Flat Racers
Beautiful model, you did a fantastic job! I'm working on the 934 Vaillant, into month 11, hoping to finish soon. These are great models. -
2016 Le Mans Winner - Ford GT40 #68
majel replied to Lobo2me's topic in Other Racing: Road Racing, Salt Flat Racers
This is a great looking build, good job! -
Magnifier 1/12 Ford GT 40 Done !
majel replied to cobraman's topic in Other Racing: Road Racing, Salt Flat Racers
From the pictures it looks like it came out nice. It's always disappointing when we finish a model and aren't happy with the results. I guess that's how we learn and it's what keeps us building. There's always the next one..... -
That is a beautiful model.
-
Project 1/16th AA/FA AND HERE IT IS!
majel replied to Ian McLaren's topic in WIP: Drag Racing Models
This is coming along great Ian, your fabricating skills see very impressive. -
Super Gas '77 Vega--Completed! (11/12)
majel replied to Straightliner59's topic in WIP: Drag Racing Models
Your level of detail on this model is fantastic Daniel. Love the linkage and the belts, very impressive! -
AMT 2017 Camaro "Fiftieth" Anniversary Edition
majel replied to mustang1989's topic in WIP: Model Cars
Great work on the engine, the colors look spot on. -
This is looking great! I really like your choice of color for the interior.
-
1/12th Porsche 934 Vaillant
majel replied to majel's topic in WIP: Other Racing: Road Racing, Land Speed Racers
Thanks guys for looking and for the comments! I plan on clear coating the body and then adding a little weathering to match the chassis. -
1/12th Porsche 934 Vaillant
majel replied to majel's topic in WIP: Other Racing: Road Racing, Land Speed Racers
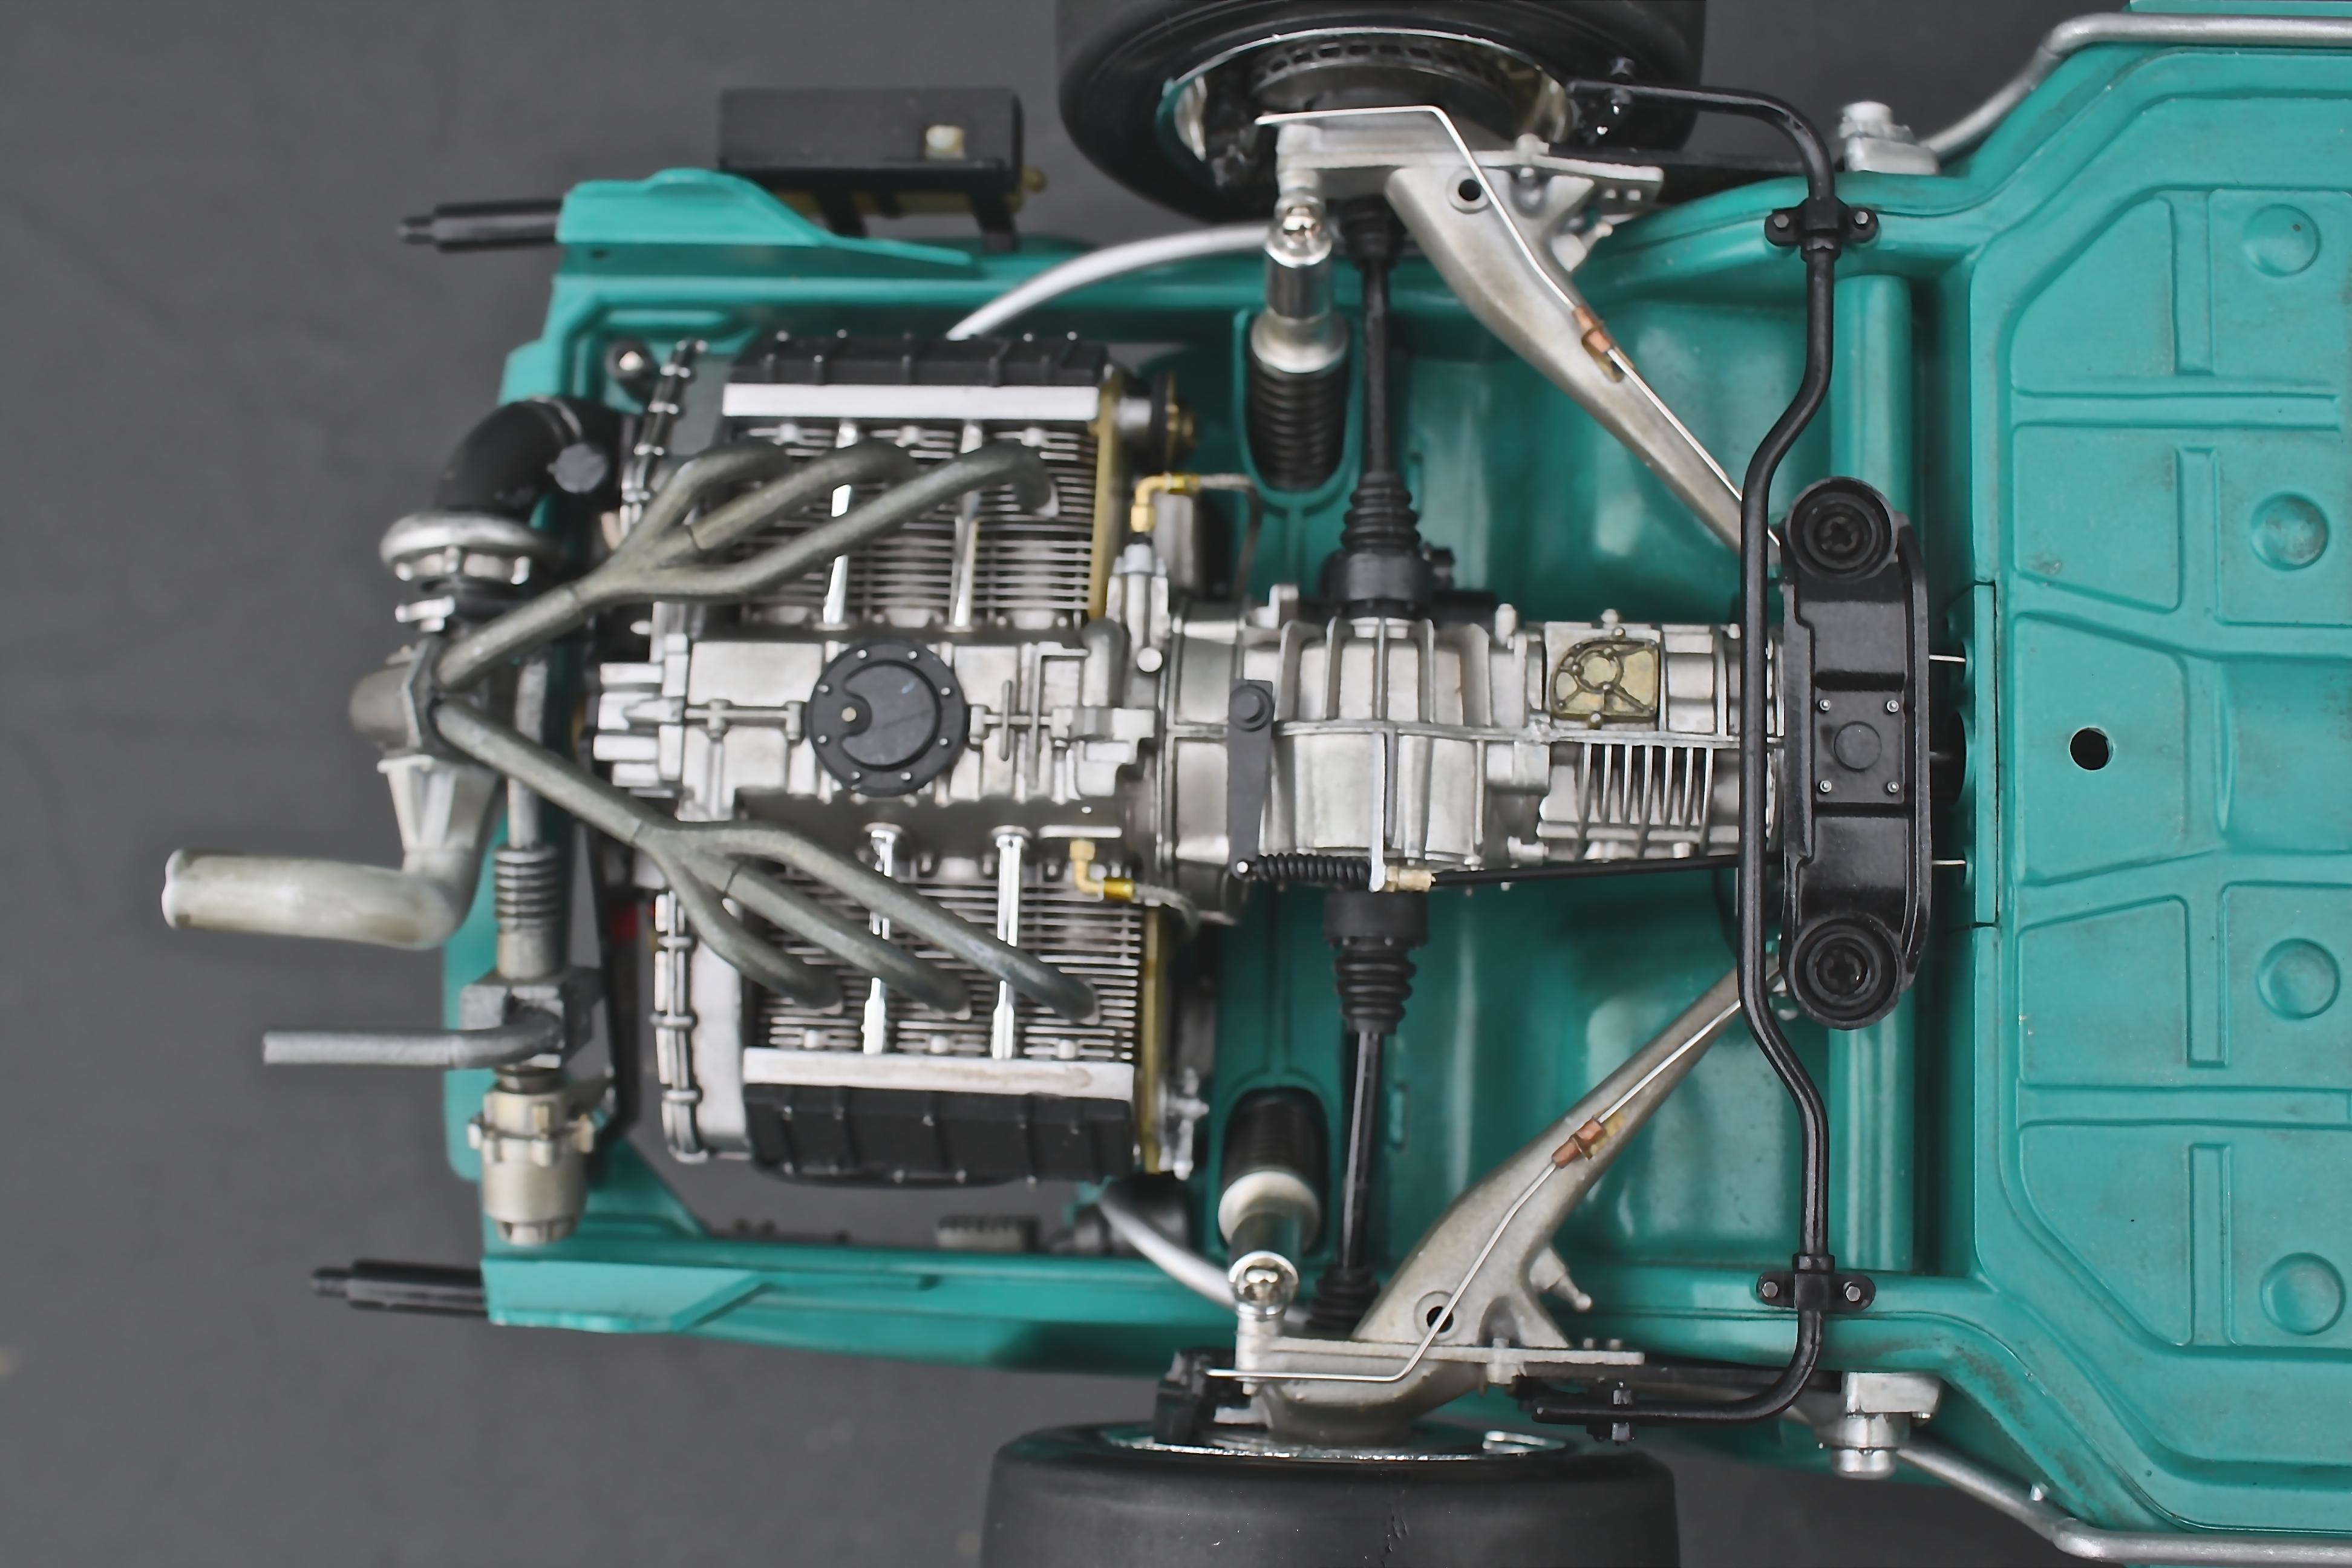
I am done with the undercarriage and now working on the wheels. Ran the two transmission cooler lines and the shifter cable which finished up everything underneath. Next is to install the valve stems, paint the wheels, make a cover-plate for the transmission tunnel cover and install the wheels. Then it's on to finishing up the body. I might actually finish this someday!
-
Datsun 240K 1974 Bathurst 1000
majel replied to ShawnS's topic in Other Racing: Road Racing, Salt Flat Racers
Fantastic job! Very cool model of a subject not normally seen.