peteski
-
Posts
9,225 -
Joined
-
Last visited
Content Type
Profiles
Forums
Events
Gallery
Everything posted by peteski
-
 It's scratchbuilt.
 -
With all the work you did, you should have used them as masters, make a mold and cast more in resin.
-
While of course it is true that different lenses have different working distance, it is all about the magnification factor. The lenses with higher magnification have shorter working distance. I use #7 plate because I need fairly high magnification to work on my projects. That also results in a short working distance, but I fully expect that and have no problem with that. If one does not desire higher magnification factor then a pair of cheap dollar-store reading glasses (rated at +2.75 or higher - at least that is what I use) will work just as well as a headband magnifier with one of the lower number lens plated. I wear the Optivisor when I need the magnification. Then for even stronger magnification I use a stereo microscope. But I realize that this is an overkill for most modelers, but some of my models are quite small, so I find the microscope indispensable.

-
CA glue and Jo-Han promo plastic
peteski replied to ChrisBcritter's topic in Model Building Questions and Answers
Ah yes, some brands of accelerators can easily attack plastic. They use things liek acetone as their solvent. Zap-a-Gap I believe is one such accelerator. That is why my go-to CA accelerator is the BSI brand. Very mild and will not attack styrene (even clear styrene). It might slightly mar fresh paint, but not like the acetone-based accelerators. -
CA glue and Jo-Han promo plastic
peteski replied to ChrisBcritter's topic in Model Building Questions and Answers
I don't ever recall any CA glue melting styrene, but liquid CA will readily start dissolving paint. -
Since you chose to go with the Optivisor (wise choice), I recommend that you spend the few extra dollars and go with the DA model. It is well worth it. I own the DA model. They have cheapened the Optivisor's design a bit from the 30-year-old model I have. The adjustment knob is now plastic (mine was metal) and there are few other shortcuts they took. But it is still worth its price. The leather band on the forehead side makes it very comfortable to wear. I have multiple lens plates (LP-4, 7 and 10). I used to use 4 but now I pretty much use 7 exclusively. #10 is a bit too strong. I don't use any add-ons on it (like loupe or LED lights). MY workbench lighting is very bright. Like others said, it might take a while to get used to, but once you do, you won't wan to take it off your head. I also often wear a pair of cheal reading glasses under it so I can lift the hood and work without magnification. You just need glasses narrow enough to fit inside the hood.
-
Mixing Gloss and Flat enamel paints
peteski replied to Chevy II's topic in Model Building Questions and Answers
Mixing liquid semigloss paint with gloss will never yield a fully glossy finish. But if you apply the semigloss paint first, then after it is dry, apply clear, you should be able to achieve nice glossy finish. Just make sure that the paints are compatible, so the bottom layer doesn't not wrinkle. -
Superglue and Baking soda
peteski replied to Pat Minarick's topic in Model Building Questions and Answers
The glue is not the problem or cause of this - it is the baking soda. I've seen examples where the CA glue did not fully get soaked into the baking soda. When moisture (if you live in a humid climate) gets to that baking soda (through some pinholes in the glue), it will be absorbed by the baking soda (because it is water-soluble), and the whole mess will start oozing out. Bottom line is: using home-brewed solutions is not always good idea. -
The surfaces are machined flat, and there are tons and tons of pressure holing the mold halves together. The liquid plastic is also injected under very high pressure, so it fills all the cavities in the mold. As the molds wear out, the flat surfaces are not so flat, and that is where flash on parts comes from - the plastic starts to ooze in between the mold halves.
-
Superglue and Baking soda
peteski replied to Pat Minarick's topic in Model Building Questions and Answers
Thanks for this post and the photos! I never thought that CA/baking-soda thing was a good idea, and I always recommend not doing it. Especially, since the CA accelerators are readily available, and so are many different filler materials (if needed). -
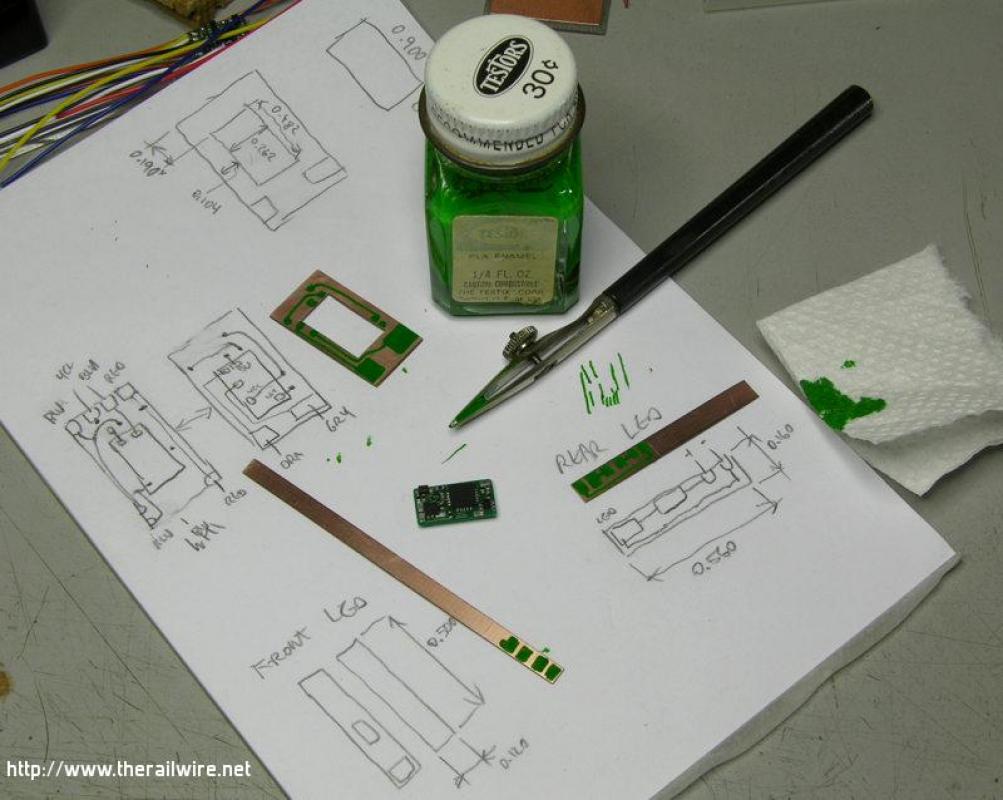
Thanks for the info Mark. My next question is: what exactly did you use for the ignition wires? The color and surface finish looks very realistic (like silicone-insulated wires). But you couldn't really apply waterslide decals to that type of material and have them stick. Also, did you seal those decals with some clear lacquer, or just applied and left it as it was?
-
who dislikes Revell's 2 part door mirror's?
peteski replied to ranma's topic in Car Kit News & Reviews
Hey, whatever works for you. I have some adhesives and paints which are over 30 years old and they are still fully usable. But your right, some paints and adhesives (and especially urethane casting resins) have limited life. -
who dislikes Revell's 2 part door mirror's?
peteski replied to ranma's topic in Car Kit News & Reviews
Yes, there is not such thing as too many adhesives (for models). Testors tube cement can only do so much. I have bought the non-fogging CA in the past, but it is more expensive and with using the accelerator I really don't really have a need for it (the glue sets before it can fog anything). http://www.bsi-inc.com/hobby/super_gold.html -
who dislikes Revell's 2 part door mirror's?
peteski replied to ranma's topic in Car Kit News & Reviews
Nope - the accelerator sets it so fast that it doesn't have time to fog up. And you don't have to prop the parts up until the glue sets. Just apply a tiny bit of accelerator (BSI Brand) to the hole in the mirror, dip the tip of the stem in CA, and plop the tip in the hole. Hold it steady for couple seconds and now you have fully assembled mirror. I like to strip the plating from the parts first. I use a drill to clean the hole in the mirror side and fresh hobby knife blade to scrape the tip on the stem. It doesn't have to be stripped all around - just expose the bare plastic in few areas - just enough to get a plastic-to-plastic joint. -
who dislikes Revell's 2 part door mirror's?
peteski replied to ranma's topic in Car Kit News & Reviews
Epoxy? Ain't nobody got time for that! This is a perfect application for CA glue and accelerator. -
Wow! How exactly did you accomplish that?
-
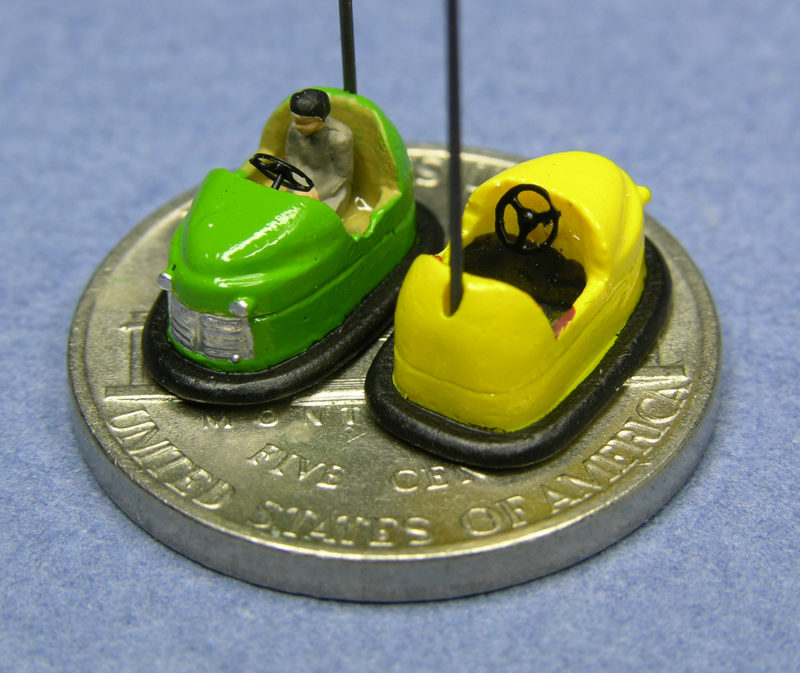
Which of these parts are kit chrome
peteski replied to SfanGoch's topic in General Automotive Talk (Trucks and Cars)
I see that 1 and 3 have that "slightly warm" golden tone that the original chrome BMF foil has. You did an excellent job on these parts. Something that you would never be able to achieve using the BMF's ultra bright chrome foil. -
Board Spam Attack
peteski replied to Dave Ambrose's topic in General Automotive Talk (Trucks and Cars)
That is too bad that Anthony is a trouble maker. He is an excellent truck modeler. I have seen (and photographed) some of his models the Classic Plastic model contests. -
If you are worried about free-handing the lettering on a model, get some clear-film decal paper designed for laser printers (not ink jet) and then draw the lettering on that. Once you are happy with the results, cut out the lettering and apply it to the model, just as any other lettering.
-
Yeah, typical 30AWG Kynar wire wrapping wire has a total OD of around 0.020" with is a bit thick for 1:24/25 factory stock wires. What's wrong with Detail Master and Pro-Tech ignition wires?
-
Actual size of AMT slicks?
peteski replied to andy12646's topic in Model Building Questions and Answers
I think that the question was asked not for precision engineering reasons, but probably just to see what wheels will be compatible with those tires. -
Actual size of AMT slicks?
peteski replied to andy12646's topic in Model Building Questions and Answers
He specifically asked for AMT slicks dimensions. I assume it is for a 1:25 scale model of some Funny Car. Does AMT make more than one slick? The dimensions he mentioned were given as an example of what he is looking for. At least that is how I understand the question, but it is not very well composed. -
Actual size of AMT slicks?
peteski replied to andy12646's topic in Model Building Questions and Answers
Ace, while in a perfect world the models woudl be perfectly scaled down and tires would have the dimensions you described, this is often not the case. Plus, then the person asking this question would have to search for the dimensions of 1:1 tires. Especially problematic is the wheel dimension (since model wheels aren't quite made the same way as the real wheels). For example the outside diameter of a 14" wheel is actually around 15.5". That would likely be closer to the dimension of the OD of the model wheel, and the inside diameter of a 14" model tire. Then some model manufacturers fudge some dimensions too, so the model tires aren't always scaled correctly. The simple question that was asked here was for the actual dimensions of the model tire. While I don't have those tires to provide the desired answer, I hope that someone else will chime in. Sometimes you are being too logical Ace. -
I have an old Soviet drafting set (brought with me when I immigrated to U.S. decades ago) and I use those ruling pens to draw traces on copper-clad when I make one-of circuit boards. The Testors paint acts as etching resist. I can see that ruling pen should do a good job for marking tires (if one can keep the pen steady enough).
-
Looks great to me! I love those big '70s cars. The color combo is also attractive, and white interiors look very elegant. My 1:1 '85 Eldorado Biarritz has a white interior too.