geetee66
-
Posts
1,540 -
Joined
-
Last visited
Content Type
Profiles
Forums
Events
Gallery
Everything posted by geetee66
-
Wow, Leslie! You've got real vision. So many cuts! so much filler! I'm not sure if I could handle it! Really looking forward to seeing the progress on this.
-
That looks brilliant! Makes me want to try more weathering techniques. Very inspirational stuff. Can't wait to see more ?
-

Austin Mini V-Tec rear engine (update 10 Oct)
geetee66 replied to geetee66's topic in WIP: Model Cars
And finally, the exhaust. I cut up a silencer from a parts box set of pipes and bent solder to tuck it up neatly under the engine. The reverse side needed filler. I'll have to install it last and add a bit of metal tube to the end, to make it look hollow. I used aluminium tape around the silencer and chrome pens on the ends. I've given it a bit of heat treatment, too.
-
Austin Mini V-Tec rear engine (update 10 Oct)
geetee66 replied to geetee66's topic in WIP: Model Cars
I've also failed to mention the front hubs. The kit parts are designed to use the driveshafts from the engine, to articulate and support the hubs. As the engine is missing from the front, I had to drill and pin from the upper shock mount, through the hub and out through the A-arm. A little bit of thin wire holds it all together and allows the steering to function. I had forgotten how fiddly PE 5-point harnesses are, to make. Especially as I spent a while pawing over the carpet, looking for parts which pinged out of my tweezers! This took about 90 minutes and it's still not done. Then I've got to make another one! ?
-
Austin Mini V-Tec rear engine (update 10 Oct)
geetee66 replied to geetee66's topic in WIP: Model Cars
Got a bit more done this weekend. I made a bigger radiator from the extra one in a Skyline kit. Chopped off the intercoolers and added a brace made from a bit of L shaped rod. I put some PE bolt heads on the support. I also made a fan, but totally forgot to photograph it. I took a disc of styrene and cut triangles out, then gave the blades a twist. Two sizes of rod made the motor and was mounted with a horizontal support. I had a turned aluminium expansion tank in my parts box, which found space next to the radiator. I made the battery from 4 square styrene rods, glued together and sanded. A PE bracket holds it in place. And I made a screen wash reservoir with a clear rubber hose.
-
Another great build from you. Gotta love these Skylines. To me, they're modern day muscle cars.
-
1949 Ford Phantom 3W Coupe. Billy F. Gibbons´ Kopperhed
geetee66 replied to Koellefornia Kid's topic in Model Cars
Bang-on! you did a great job on it. very nice indeed -
Looks great! seems like you gave your little finger a bash, recently. my only suggestion would be that you sand the tyre treads to make 'em level, remove the seam and make them look a bit used. apart from that, it's a cool model ?
-
AMT Trophy Series Deuce 5 window Box Art Replica
geetee66 replied to Dave Darby's topic in WIP: Model Cars
Looks great! are you going to decal it? -
1960 Chrysler Imperial. 12/4, Finished!!
geetee66 replied to StevenGuthmiller's topic in WIP: Model Cars
Fantastic! I wish I had this on my shelf! The scripts are very clean. That body has good definition, by the looks of it. oh no. I'm going to search eBay for one, now! -
And the transparent green steering wheel is a nice touch.
-
Man, that is CRISP! The interior panel work is excellent. love the colour combo, too. I might have to get one of these, now I've seen how good yours is ?
-
Austin Mini V-Tec rear engine (update 10 Oct)
geetee66 replied to geetee66's topic in WIP: Model Cars
Things are starting to come together, now. made a fuel cell, today. I need to SB a radiator, as the kit's part is too small for this engine
-
Ferrari 512BB rememberance build....99% done
geetee66 replied to Dann Tier's topic in WIP: Model Cars
Nice one, Dan. A fitting tribute to an absent friend. 8 on the go??!! I can barely manage 1! lol ? -
Ka-pow! This is gonna be knockout!
-
Superb! looks 1:1 can't think of higher praise than that. welcome to the forum. Are you from the UK?
-
I was also going to suggest the Tamiya D set. Very easy to use and gives good results. Thanks for detailing the problem you had with the paint. I'm fairly new to airbrushing and tips like these are immensely useful. I especially like the idea of using gloss black, to locate flaws. Top marks for persistence! The finished product will be even more appreciated, thanks to adversity. And yes, those coil springs look fab!
-
This is excellent! Super reworking of an already unique car. The Piranha is a strange choice of car for a spy. Not exactly discreet, is it? ?
-
57 T-Bird "BattleBird" "update 12-25-injectors"
geetee66 replied to Ralph Henderson's topic in WIP: Model Cars
Your attention to the little details is what will set this apart. Great concept and execution. looking forward to seeing the progress ? -
Hasegawas Lamborghini Miura SV....new update!
geetee66 replied to Dann Tier's topic in WIP: Model Cars
Blimey Dan, you set yourself high standards, don't you? Your previous build looks bang-on! And that paint....! Fantastic finish. Looks 1:1 so, if this next build is going to be an improvement on that, I'm really looking forward to seeing it. I don't usually build anything that I can't alter in some way. Box stock leaves me cold. BUT, having seen what a beautiful model this kit builds into, I'm very tempted to see what I could do with it. I got to sit in one of these, at a posh event last summer. Stunning car. You can see where modern Lamborghinis get the hexagon theme from. And to think this car was originally sketched out by a teenager!! Amazing! -
Austin Mini V-Tec rear engine (update 10 Oct)
geetee66 replied to geetee66's topic in WIP: Model Cars
Thanks everyone yes, I used very thin aluminium sheet for the firewall. I used the tip of a needle file, to simulate rivets and photoetch boltheads, for where it fixes to the cage. I agree, Skip. A Hyabusa engine takes up less room and can be set forward, but I couldn't find a 1:24 resin version. Nor a Vauxhall or BMW lump. My YouTube research showed a few with V-Tech engines and my 1:1 inspiration had a Volvo 2L turbo wedged in the back in this position.
-
Austin Mini V-Tec rear engine (update 10 Oct)
geetee66 replied to geetee66's topic in WIP: Model Cars
Also fitted aluminium behind the seats, and a perspex window to the cage.
-
Austin Mini V-Tec rear engine (update 10 Oct)
geetee66 replied to geetee66's topic in WIP: Model Cars
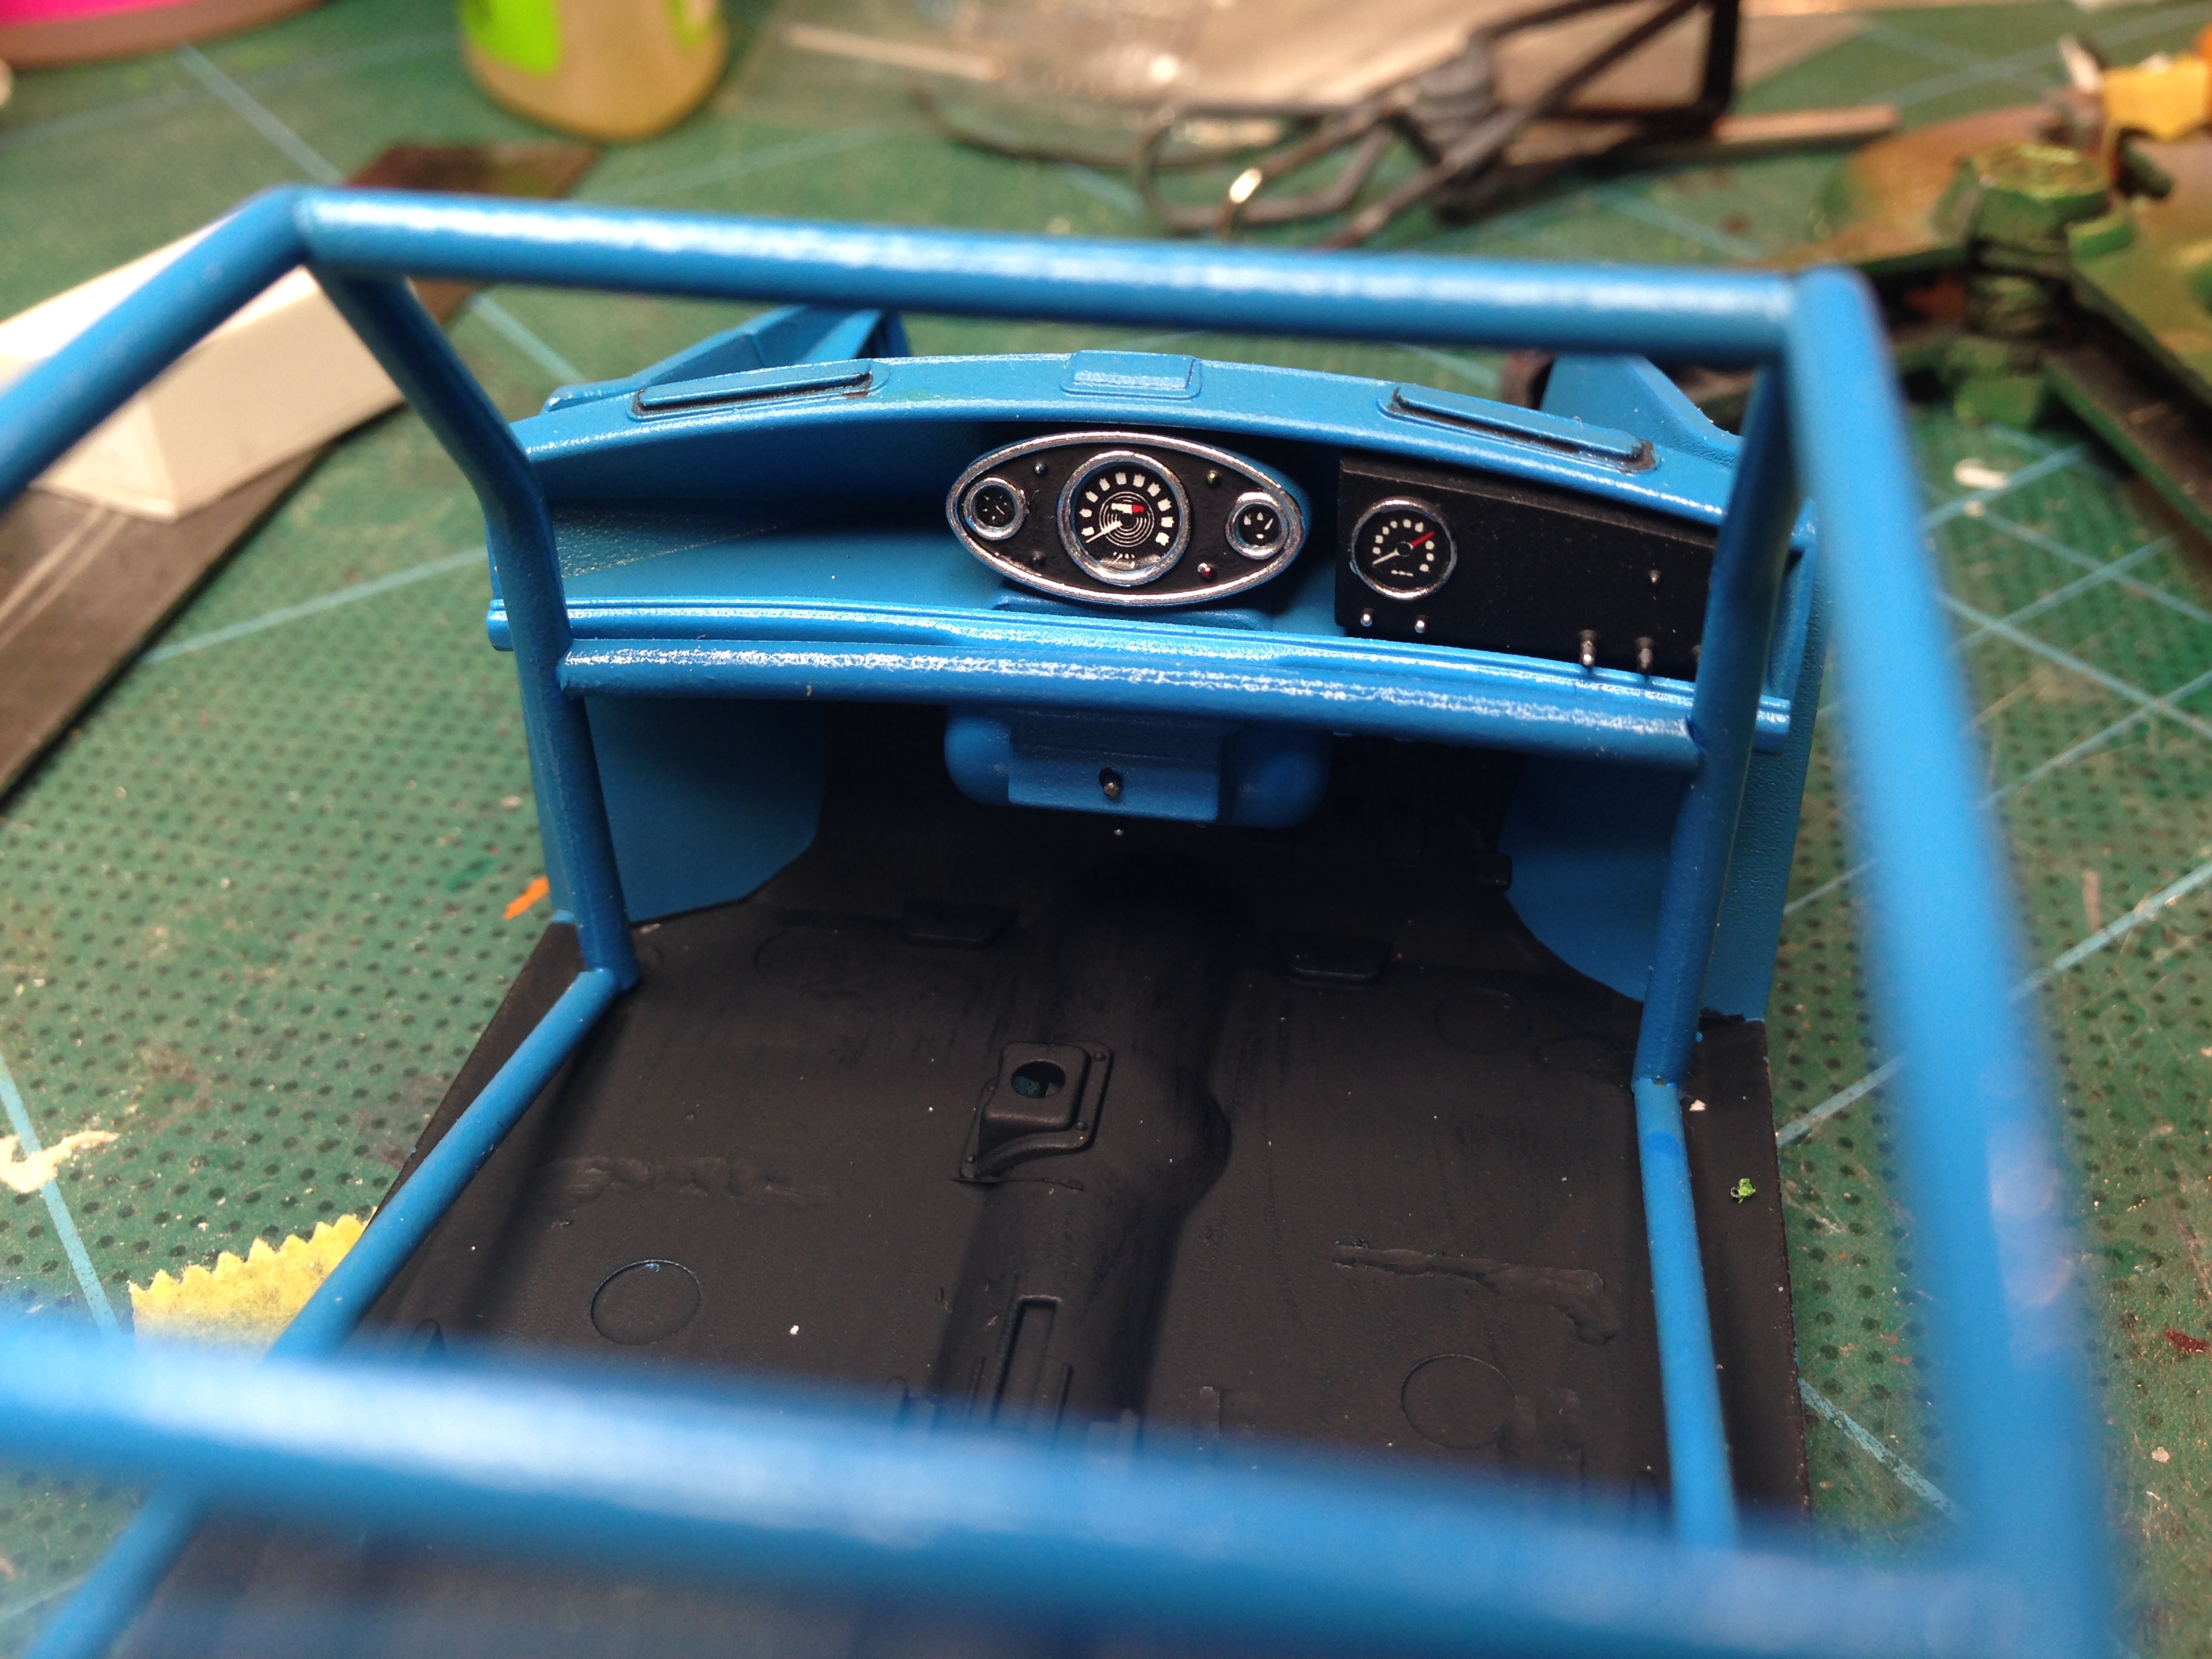
You gotta love these Molotow chrome pens. The clock rings are so easy to do, now.
-
Austin Mini V-Tec rear engine (update 10 Oct)
geetee66 replied to geetee66's topic in WIP: Model Cars
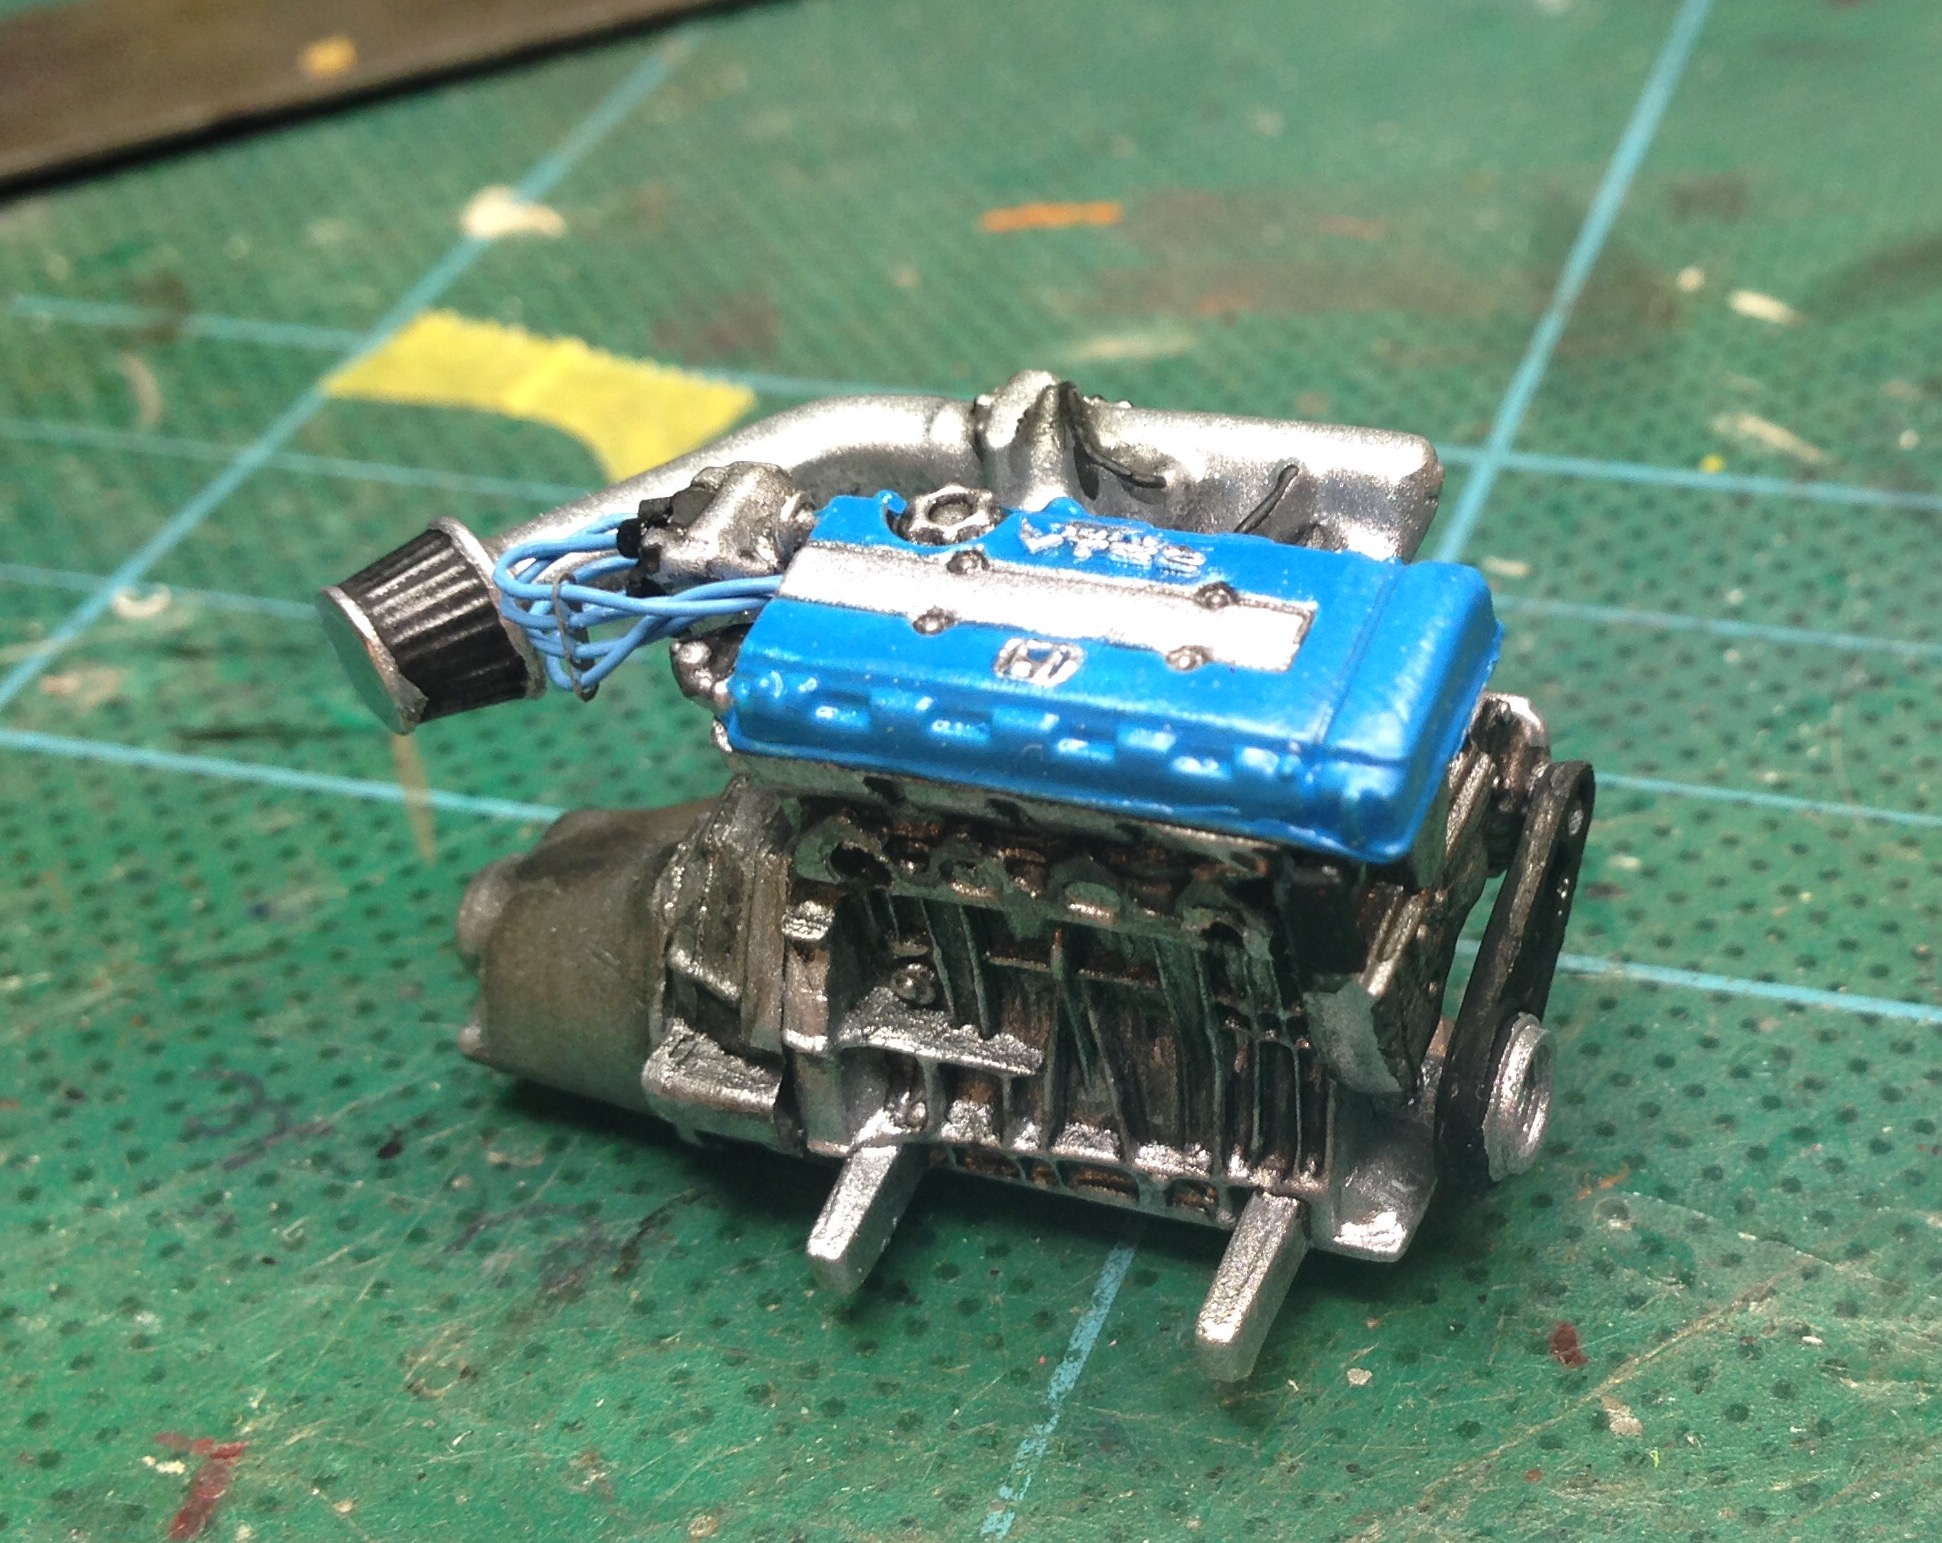
And I also built the resin B18 Honda V-Tech engine. I chucked in some plug leads and gave it a black wash. It went together nicely. The parts were cleanly cast and only needed a quick tidy up.
-
Austin Mini V-Tec rear engine (update 10 Oct)
geetee66 replied to geetee66's topic in WIP: Model Cars
Ok, so things got hung up a bit, with a career change, but this weekend I got a few bits done. The metal wheels came up nice, with a bit of paint.